Quick Pickled Green Beans Crunchy and Flavorful Treat

WANT TO SAVE THIS RECIPE?

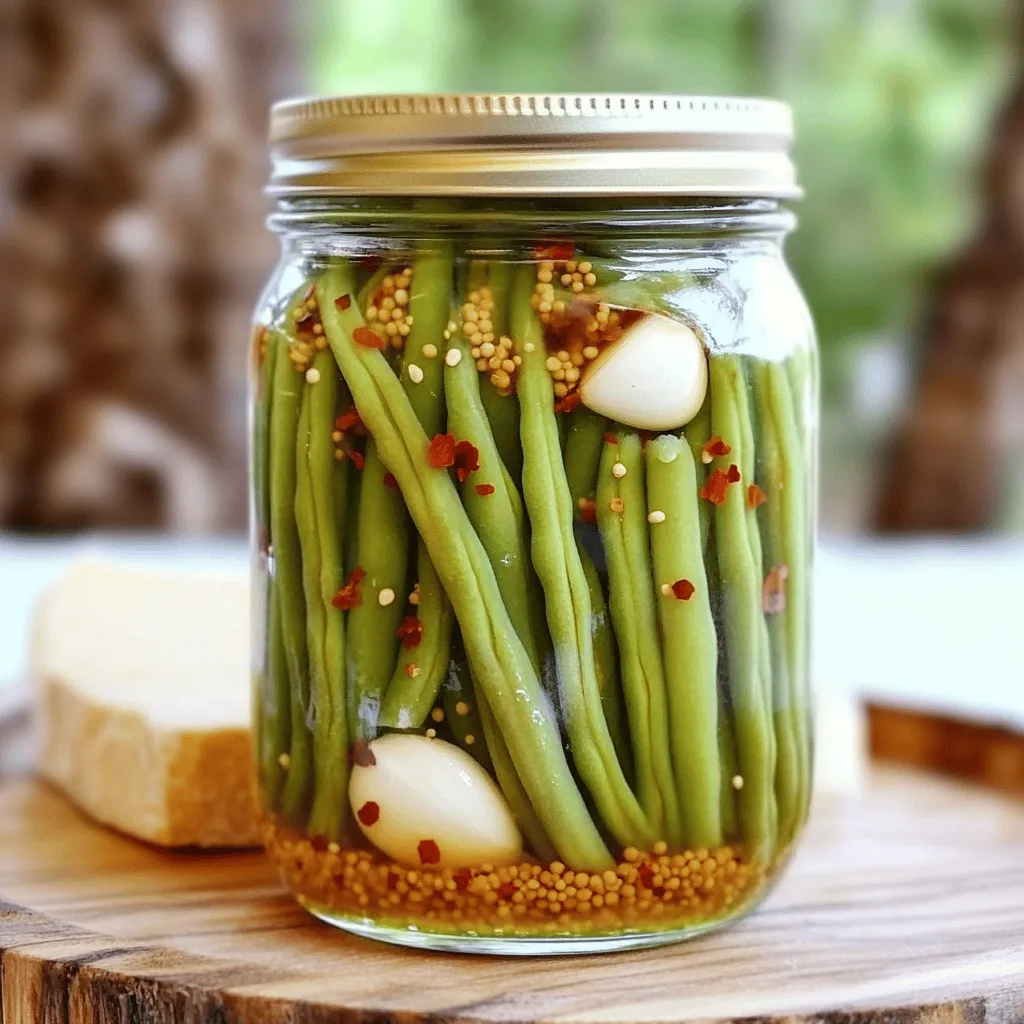
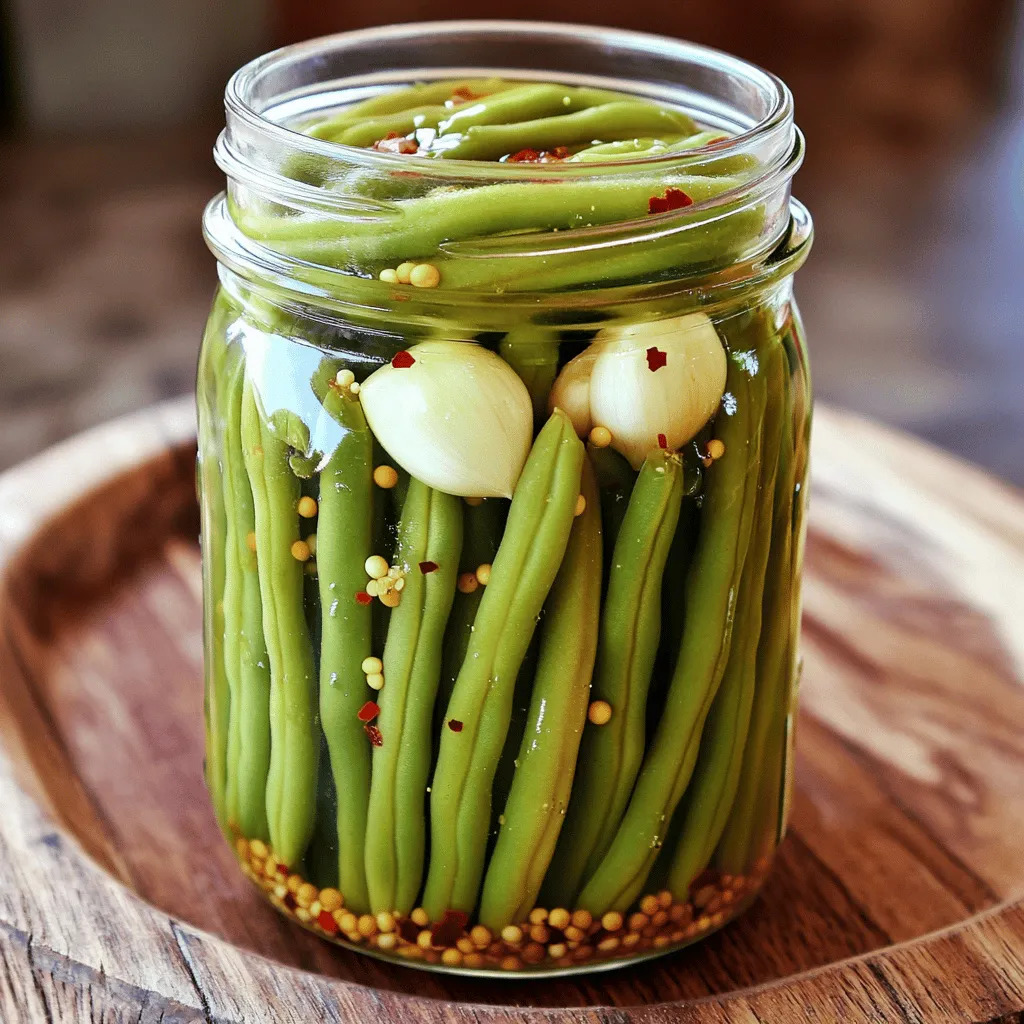
Looking for a crunchy snack that’s packed with flavor? Quick pickled green beans are your answer! In just a few steps, you can turn fresh green beans into a tasty treat that will brighten any meal. With simple ingredients and quick prep, this recipe is all about enhancing that vibrant crunch. Let’s dive into the world of pickling and make your next snack both fresh and flavorful!

Ingredients

Fresh Ingredients for Quick Pickling

– 1 pound fresh green beans, trimmed

– 3 cloves garlic, peeled and smashed

Essential Pickling Liquid

– 1 cup distilled white vinegar

– 1 cup water

– 2 tablespoons granulated sugar

– 1 tablespoon salt

Flavor Enhancements

– 1 teaspoon mustard seeds

– 1 teaspoon red pepper flakes

– 1 teaspoon black peppercorns

– 1 bay leaf

To make quick pickled green beans, you need fresh, vibrant ingredients. Start with one pound of green beans. Look for beans that are firm and bright green. Trim the ends off to ensure they fit nicely in your jars. Next, grab three cloves of garlic. Smash them gently with the flat side of a knife. This lets the garlic flavor seep into the beans as they pickle.

Now, let’s talk about the pickling liquid. You will need one cup of distilled white vinegar. This gives the pickles a nice tangy taste. Add one cup of water to balance the acidity. To sweeten the brine, include two tablespoons of granulated sugar. Finally, mix in one tablespoon of salt for flavor.

Next, we add some excitement with flavor enhancements. Use one teaspoon of mustard seeds for a hint of spice. If you like heat, toss in one teaspoon of red pepper flakes. Add one teaspoon of black peppercorns for depth. Lastly, drop in one bay leaf to round out the taste.

These ingredients come together to create a crunchy and flavorful treat. Follow the [Full Recipe] to see how these elements transform into a delightful snack!

Step-by-Step Instructions

Preparing the Brine

To start, I combine vinegar, water, sugar, and salt in a medium saucepan. I pour in 1 cup of distilled white vinegar and 1 cup of water. Then, I add 2 tablespoons of granulated sugar and 1 tablespoon of salt. I place the saucepan over medium heat. I stir the mixture until the sugar and salt dissolve. Once everything is mixed well, I let it come to a rolling boil. This step is key for building flavor.

Packing the Green Beans

While the brine heats up, I prepare the green beans. I take 1 pound of fresh green beans and trim the ends. Then, I pack the beans tightly into clean jars. I like to arrange them straight for a nice look. I add 3 smashed garlic cloves, 1 teaspoon of mustard seeds, 1 teaspoon of red pepper flakes, 1 teaspoon of black peppercorns, and 1 bay leaf to each jar. These ingredients add a tasty kick!

Pouring the Brine

Once the brine cools slightly, I carefully pour it over the green beans in the jars. I make sure the beans are fully covered. If they float, I gently press down with the back of a spoon. This keeps them submerged. After filling the jars, I seal the lids tightly. I let them cool to room temperature before placing them in the fridge. For the best flavor, I let them pickle for at least 4 hours. However, I find they taste even better after a night in the fridge. For the full recipe, check the details above!

Tips & Tricks

Ensuring Crispiness

To keep green beans crunchy, start with fresh beans. Select firm, bright green ones. Trim the ends before pickling. This helps the beans absorb the brine while staying firm. For cooling times, wait about 5 minutes after boiling the brine. This short pause prevents cooking the beans when added.

Flavor Profiles

To adjust spice levels, add more or less red pepper flakes based on your taste. If you want a milder flavor, reduce the amount. You can also add herbs for variation. Fresh dill or thyme can enhance the taste. Experiment with flavors to find your perfect balance.

Presentation Ideas

For serving suggestions, place the pickled green beans in a mason jar. It makes a lovely centerpiece. You can also serve them on a rustic cheese platter. Their vibrant colors create a feast for the eyes. Enhance visual appeal by adding cherry tomatoes or olives. This adds more color and texture to the table.

Variations

Spicy Garlic Version

To make your quick pickled green beans spicier, add extra red pepper flakes. A teaspoon gives a mild heat. If you crave more spice, try two teaspoons. This kick enhances the flavor and adds depth. The garlic also gives a bold taste, complementing the pepper. I love to enjoy these with sandwiches or as a snack.

Herbed Pickled Beans

Incorporating herbs like dill or thyme can change the flavor profile. Dill adds a fresh taste, while thyme provides warmth. You can add a few sprigs directly to the jars with the green beans. This variation pairs well with roasted meats or as a side dish. Experiment with the amount until you find your perfect mix.

Sweet and Tangy Blend

If you prefer a sweeter taste, modify the sugar in the brine. You can increase the sugar to three tablespoons for a richer sweetness. This blend pairs well with spicy foods, balancing the heat. It also makes a great addition to salads, giving them a unique twist. Enjoy the process of finding the right sweetness for your taste!

For the complete recipe, check out the Full Recipe.

Storage Info

Best Practices for Refrigeration

Store your quick pickled green beans in the fridge. They last about two weeks. For the best taste, keep them in an airtight container. A glass jar works well. Always place the jar in the coldest part of your fridge. Avoid opening it often, as this can let warm air in.

Long-term Storage

If you want to store them for longer, consider canning. Follow these steps for safe canning:

– Use clean, sterilized jars.

– Pack beans into jars with spices.

– Pour hot brine over the beans, leaving space at the top.

– Seal jars with lids and process them in a boiling water bath for 5–10 minutes.

– Let them cool completely before storing.

Signs of Spoilage

Check your pickled green beans for signs of spoilage. If you see mold or an off smell, discard them. If the brine is cloudy, it’s also a warning sign. Always trust your senses. If in doubt, throw them out!

FAQs

How long do quick pickled green beans last?

Quick pickled green beans last about two weeks in the fridge. After that, they may lose their crunch. Always check for any off smell or discoloration before eating.

Can I use other vegetables to pickle?

Yes, you can pickle many veggies! Try carrots, cucumbers, or radishes. Just adjust the pickling time based on the vegetable’s size and texture. Each will give you a unique flavor.

What is the best way to serve pickled green beans?

Serve pickled green beans chilled as a snack. They also add a nice crunch to salads or sandwiches. For a fun touch, place them in a cocktail or on a charcuterie board.

Do I need to sterilize jars for this recipe?

No, you don’t need to sterilize jars for quick pickles. Just make sure they are clean. This keeps your beans safe and tasty.

Can I make this recipe larger or smaller?

Yes, you can easily scale the recipe. Just keep the same ratio of ingredients. Whether you want more or less, adjust as needed for your gatherings. For the full recipe, check out Zesty Quick Pickled Green Beans.

Quick pickling green beans is simple and fun. We covered the best fresh ingredients, the perfect brine mix, and ways to enhance flavor. Keeping your beans crunchy and choosing the right storage are key. You can even create unique variations to match your taste.

Enjoy your pickling journey! Experiment with flavors and share your results with others. Your homemade pickles can add zest to meals and impress friends. Happy pickling!

- 1 pound fresh green beans, trimmed - 3 cloves garlic, peeled and smashed - 1 cup distilled white vinegar - 1 cup water - 2 tablespoons granulated sugar - 1 tablespoon salt - 1 teaspoon mustard seeds - 1 teaspoon red pepper flakes - 1 teaspoon black peppercorns - 1 bay leaf To make quick pickled green beans, you need fresh, vibrant ingredients. Start with one pound of green beans. Look for beans that are firm and bright green. Trim the ends off to ensure they fit nicely in your jars. Next, grab three cloves of garlic. Smash them gently with the flat side of a knife. This lets the garlic flavor seep into the beans as they pickle. Now, let's talk about the pickling liquid. You will need one cup of distilled white vinegar. This gives the pickles a nice tangy taste. Add one cup of water to balance the acidity. To sweeten the brine, include two tablespoons of granulated sugar. Finally, mix in one tablespoon of salt for flavor. Next, we add some excitement with flavor enhancements. Use one teaspoon of mustard seeds for a hint of spice. If you like heat, toss in one teaspoon of red pepper flakes. Add one teaspoon of black peppercorns for depth. Lastly, drop in one bay leaf to round out the taste. These ingredients come together to create a crunchy and flavorful treat. Follow the [Full Recipe] to see how these elements transform into a delightful snack! To start, I combine vinegar, water, sugar, and salt in a medium saucepan. I pour in 1 cup of distilled white vinegar and 1 cup of water. Then, I add 2 tablespoons of granulated sugar and 1 tablespoon of salt. I place the saucepan over medium heat. I stir the mixture until the sugar and salt dissolve. Once everything is mixed well, I let it come to a rolling boil. This step is key for building flavor. While the brine heats up, I prepare the green beans. I take 1 pound of fresh green beans and trim the ends. Then, I pack the beans tightly into clean jars. I like to arrange them straight for a nice look. I add 3 smashed garlic cloves, 1 teaspoon of mustard seeds, 1 teaspoon of red pepper flakes, 1 teaspoon of black peppercorns, and 1 bay leaf to each jar. These ingredients add a tasty kick! Once the brine cools slightly, I carefully pour it over the green beans in the jars. I make sure the beans are fully covered. If they float, I gently press down with the back of a spoon. This keeps them submerged. After filling the jars, I seal the lids tightly. I let them cool to room temperature before placing them in the fridge. For the best flavor, I let them pickle for at least 4 hours. However, I find they taste even better after a night in the fridge. For the full recipe, check the details above! To keep green beans crunchy, start with fresh beans. Select firm, bright green ones. Trim the ends before pickling. This helps the beans absorb the brine while staying firm. For cooling times, wait about 5 minutes after boiling the brine. This short pause prevents cooking the beans when added. To adjust spice levels, add more or less red pepper flakes based on your taste. If you want a milder flavor, reduce the amount. You can also add herbs for variation. Fresh dill or thyme can enhance the taste. Experiment with flavors to find your perfect balance. For serving suggestions, place the pickled green beans in a mason jar. It makes a lovely centerpiece. You can also serve them on a rustic cheese platter. Their vibrant colors create a feast for the eyes. Enhance visual appeal by adding cherry tomatoes or olives. This adds more color and texture to the table. {{image_4}} To make your quick pickled green beans spicier, add extra red pepper flakes. A teaspoon gives a mild heat. If you crave more spice, try two teaspoons. This kick enhances the flavor and adds depth. The garlic also gives a bold taste, complementing the pepper. I love to enjoy these with sandwiches or as a snack. Incorporating herbs like dill or thyme can change the flavor profile. Dill adds a fresh taste, while thyme provides warmth. You can add a few sprigs directly to the jars with the green beans. This variation pairs well with roasted meats or as a side dish. Experiment with the amount until you find your perfect mix. If you prefer a sweeter taste, modify the sugar in the brine. You can increase the sugar to three tablespoons for a richer sweetness. This blend pairs well with spicy foods, balancing the heat. It also makes a great addition to salads, giving them a unique twist. Enjoy the process of finding the right sweetness for your taste! For the complete recipe, check out the Full Recipe. Store your quick pickled green beans in the fridge. They last about two weeks. For the best taste, keep them in an airtight container. A glass jar works well. Always place the jar in the coldest part of your fridge. Avoid opening it often, as this can let warm air in. If you want to store them for longer, consider canning. Follow these steps for safe canning: - Use clean, sterilized jars. - Pack beans into jars with spices. - Pour hot brine over the beans, leaving space at the top. - Seal jars with lids and process them in a boiling water bath for 5–10 minutes. - Let them cool completely before storing. Check your pickled green beans for signs of spoilage. If you see mold or an off smell, discard them. If the brine is cloudy, it’s also a warning sign. Always trust your senses. If in doubt, throw them out! Quick pickled green beans last about two weeks in the fridge. After that, they may lose their crunch. Always check for any off smell or discoloration before eating. Yes, you can pickle many veggies! Try carrots, cucumbers, or radishes. Just adjust the pickling time based on the vegetable's size and texture. Each will give you a unique flavor. Serve pickled green beans chilled as a snack. They also add a nice crunch to salads or sandwiches. For a fun touch, place them in a cocktail or on a charcuterie board. No, you don’t need to sterilize jars for quick pickles. Just make sure they are clean. This keeps your beans safe and tasty. Yes, you can easily scale the recipe. Just keep the same ratio of ingredients. Whether you want more or less, adjust as needed for your gatherings. For the full recipe, check out Zesty Quick Pickled Green Beans. Quick pickling green beans is simple and fun. We covered the best fresh ingredients, the perfect brine mix, and ways to enhance flavor. Keeping your beans crunchy and choosing the right storage are key. You can even create unique variations to match your taste. Enjoy your pickling journey! Experiment with flavors and share your results with others. Your homemade pickles can add zest to meals and impress friends. Happy pickling!

Quick Pickled Green Beans

Discover the vibrant flavors of zesty quick pickled green beans! This easy recipe transforms fresh green beans into a tangy delight with a perfect crunch, combining garlic, mustard seeds, and a hint of spice. Spend just 15 minutes prepping and let them pickle for a few hours to elevate your meals. Perfect for snacks, charcuterie boards, or as a side dish. Click through for the full recipe and add a zing to your kitchen today!

Ingredients
  

1 pound fresh green beans, trimmed

1 cup distilled white vinegar

1 cup water

2 tablespoons granulated sugar

1 tablespoon salt

3 cloves garlic, peeled and smashed

1 teaspoon mustard seeds

1 teaspoon red pepper flakes

1 teaspoon black peppercorns

1 bay leaf

Instructions
 

In a medium saucepan, pour in the distilled white vinegar and water. Add the granulated sugar and salt to the mixture. Place the saucepan over medium heat and stir continuously until the sugar and salt are completely dissolved. Allow the mixture to come to a rolling boil.

    Once the mixture reaches a boil, carefully remove the saucepan from the heat and let it sit for about 5 minutes to cool slightly. This helps to avoid cooking the green beans when added.

      While the brine cools, take your trimmed green beans and pack them tightly into clean jars or a large container. Ensure they are straightened out for a nice presentation. Distribute the smashed garlic, mustard seeds, red pepper flakes, black peppercorns, and bay leaf evenly among the jars.

        After the brine has cooled slightly, slowly pour it over the green beans in each jar, making sure they are completely submerged. If necessary, use the back of a spoon to gently press the beans down or place a small weight on top to keep them immersed.

          Once the jars are filled, secure the lids tightly. Allow them to cool to room temperature before refrigeration.

            Transfer the jars to the refrigerator and allow the green beans to pickle for at least 4 hours before enjoying. For optimal flavor, let them sit overnight for an even deeper zest!

              Prep Time: 15 min | Total Time: 4 hrs + cooling | Servings: 4-6

                - Presentation Tips: Elevate your serving experience by presenting the vibrant pickled green beans in a mason jar on a rustic cheese platter or as a colorful addition to a charcuterie board. Their crunchy texture and vivid colors make them a delightful visual and culinary treat!

                  WANT TO SAVE THIS RECIPE?