

Craving a sweet and simple treat? Dive into my No-Bake S’mores Cheesecake Cups! This easy recipe combines creamy cheesecake, crunchy graham crackers, and rich chocolate for a perfect dessert. With no baking required, you’ll have a delightful dish ready in no time. Join me as I guide you through each step, share helpful tips, and explore tasty variations. Your next sweet snack is just a few ingredients away!
Ingredients
List of Ingredients
– 1 cup graham cracker crumbs
– 1/4 cup unsweetened cocoa powder
– 1/3 cup granulated sugar
– 1/2 cup unsalted butter, melted
– 16 oz cream cheese, softened
– 1 cup powdered sugar
– 1 teaspoon vanilla extract
– 1 cup heavy whipping cream
– 1 cup mini marshmallows
– 1/2 cup semi-sweet or milk chocolate chips
– Additional mini marshmallows and chocolate shavings for garnish
Ingredient Tips
Using fresh ingredients makes a big difference. Make sure your cream cheese is soft enough for smooth mixing. This helps avoid lumps in your cheesecake. For the best flavor, use high-quality chocolate chips. They add richness to the dessert. Keep your heavy cream cold. It whips up better when cold, giving you those fluffy peaks.
Substitutions and Allergens
If you need a dairy-free option, try vegan cream cheese and coconut cream. For gluten-free, use gluten-free graham crackers. You can swap mini marshmallows for dairy-free ones if needed. If you’re allergic to nuts, check your chocolate chips. Some brands may contain traces of nuts. Always read labels to stay safe!
Step-by-Step Instructions
Preparing the Graham Cracker Crust
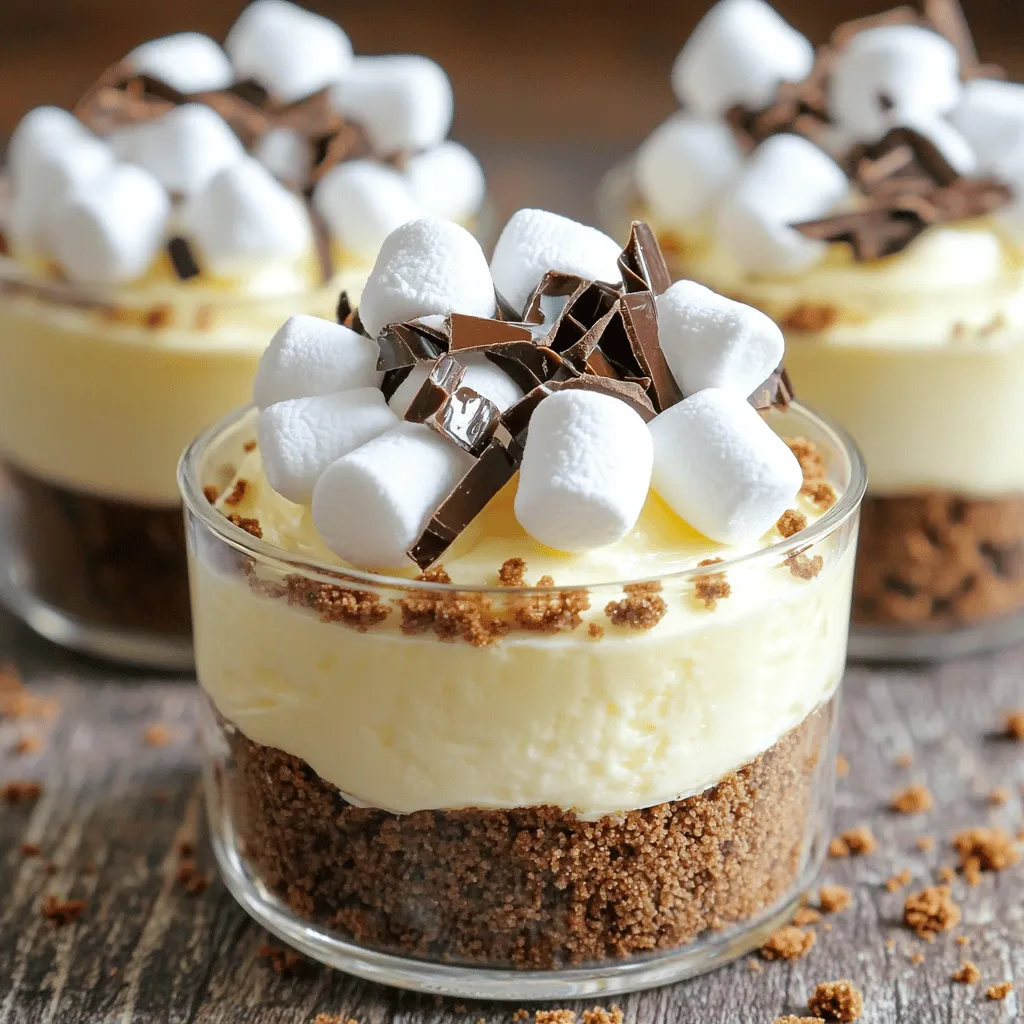
Start by mixing the graham cracker crumbs, cocoa powder, granulated sugar, and melted butter. Use a medium mixing bowl for this. Stir until the mix looks like wet sand. This means it’s ready. Next, take small dessert cups. Divide the crust evenly, about one tablespoon for each cup. Press the mixture down firmly with a spoon or your fingers. Make sure the layer is compact and even. This crust will hold your cheesecake filling.
Making the Cheesecake Filling
In a large bowl, beat the softened cream cheese with an electric mixer. Mix until it is smooth and creamy. Next, add the powdered sugar and vanilla extract. Keep mixing until everything combines well. The mixture should be lump-free and creamy. Now, take another bowl and whip the heavy cream. Whip until you see stiff peaks. This means the cream is ready. Gently fold the whipped cream into the cream cheese mix using a spatula. Be careful to keep it light and fluffy. Lastly, stir in the mini marshmallows and chocolate chips. Mix until they are evenly spread throughout the filling.
Assembling the S’mores Cheesecake Cups
Spoon the cheesecake mixture over the crust in each cup. Fill them all the way to the top. Use a spatula or spoon to smooth the tops. Now, place the cheesecake cups in the refrigerator. Let them chill for at least 2-3 hours. This helps the cheesecake set firmly. Once set, remove them from the fridge. Decorate each cup with more mini marshmallows and chocolate shavings. For a fun twist, try toasting a few mini marshmallows with a kitchen torch before placing them on top. This adds a nice touch of s’mores flavor.
Tips & Tricks
How to Achieve the Perfect Texture
To get the best texture for your No-Bake S’mores Cheesecake Cups, follow these steps:
– Use softened cream cheese: This helps avoid lumps. Let it sit at room temp.
– Whip the cream well: Beat the heavy cream until stiff peaks form. This makes the cheesecake light and fluffy.
– Fold gently: When mixing the whipped cream into the cream cheese, fold carefully. This keeps the air in.
Common Mistakes to Avoid
Here are some common mistakes to watch for:
– Skipping the chilling time: Let the cups chill for at least 2-3 hours. This helps them set properly.
– Not pressing the crust firmly: Press the crust mixture down well. This prevents it from crumbling when you eat it.
– Adding too many chocolate chips or marshmallows: Balance is key. Too many can make the cheesecake too heavy.
Presentation and Serving Suggestions
Make your cheesecake cups look as good as they taste:
– Use clear cups: This lets everyone see the layers.
– Garnish with toasted marshmallows: A kitchen torch can add a warm touch.
– Add chocolate shavings: Sprinkle these on top for an elegant finish.
– Serve on a platter: Arrange the cups together for a beautiful display.
Variations
Flavor Swaps and Additions
You can change the flavors to make this dessert your own. Try using different chocolate types, like white or dark chocolate, to add a unique twist. If you love peanut butter, mix in some creamy peanut butter into the cheesecake layer. For a fruity touch, add fresh berries or a fruit puree. You can also swap the mini marshmallows for flavored marshmallows, like strawberry or banana, for fun flavors.
Different Serving Options
These cheesecake cups are great for all kinds of occasions. Serve them in clear cups to show off the layers. You can also use jars for a rustic feel. Want to impress guests? Create a dessert bar with toppings. Offer items like extra chocolate chips, crushed graham crackers, and toasted coconut. This way, guests can build their own s’mores cups.
Mini Version for Parties
If you want to make a mini version, just reduce the portion size. Use small shot glasses or mini dessert cups. This way, guests can try multiple desserts without feeling too full. It’s perfect for parties or gatherings. You can also make a fun game by having a s’mores cheesecake tasting contest, where everyone votes for their favorite flavor.
Storage Info
How to Store Leftovers
To store your no-bake s’mores cheesecake cups, cover them tightly with plastic wrap or place them in an airtight container. This will keep them fresh and tasty. You can store them in the fridge for up to five days. Just remember to keep them away from strong-smelling foods to avoid any unwanted flavors.
Freezing Instructions
If you want to freeze the cheesecake cups, make sure they are completely chilled first. Cover each cup with plastic wrap, then foil. This will protect them from freezer burn. You can freeze them for up to two months. When ready to eat, thaw them in the fridge overnight. This helps keep their creamy texture intact.
Shelf Life of Cheesecake Cups
The shelf life of these cheesecake cups depends on how you store them. In the fridge, they last for about five days. If frozen, they can last for two months. Always check for any changes in smell or texture before enjoying. Keeping track of these details ensures you savor every delicious bite!
FAQs
Can I use other types of chocolate?
Yes, you can use other types of chocolate. Dark chocolate, white chocolate, or even flavored chocolate work well. Just swap the chocolate chips in the recipe with your choice. This gives you a chance to play with different flavors. You can make each cup unique!
How long do these cheesecake cups last?
These cheesecake cups last about 3 to 5 days in the fridge. Keep them covered with plastic wrap or in an airtight container. This keeps them fresh and tasty. After a few days, the texture may change, so enjoy them sooner rather than later.
Can I make these in advance?
You can make these cheesecake cups in advance! They are perfect for parties or gatherings. Just prepare them, chill them, and store them in the fridge. They taste even better after sitting for a while, as the flavors meld nicely.
Are there any vegan alternatives?
Yes, there are vegan alternatives! You can use vegan cream cheese and coconut cream instead of heavy cream. Replace the butter with coconut oil or vegan butter. For the graham cracker crust, check if your crackers are vegan. With these swaps, you can enjoy a delicious vegan version of this treat!
You now have all the tools to make S’mores Cheesecake Cups. We covered ingredients, steps, and helpful tips. You learned about substitutions, storage, and fun variations. Use these ideas to create tasty treats. Remember to avoid common mistakes for the best results. Enjoy getting creative with flavors and presentations. Now, gather your ingredients and get started! You’ll impress everyone with your delicious cheesecake cups.


