
If you love pumpkin treats but dread baking, you’re in for a real treat! These no-bake pumpkin cheesecake truffles are simple to make and bursting with flavor. In just a few steps, you can whip up these delightful bites perfect for any occasion. I’ll guide you through the ingredients, easy process, and clever tips to make your truffles shine. Let’s dive into this fun and tasty journey together!
Ingredients
Full Ingredients List
To make no-bake pumpkin cheesecake truffles, gather these ingredients:
– 1 cup cream cheese, softened to room temperature
– 1 cup canned pumpkin puree (not pumpkin pie filling)
– 1/2 cup powdered sugar
– 1 teaspoon vanilla extract
– 1 teaspoon pumpkin pie spice (or more to taste)
– 1 cup graham cracker crumbs (plus extra for coating)
– 1/2 cup white chocolate chips, melted
– 1/4 cup chopped pecans (optional for added crunch)
– Pinch of salt
These ingredients blend together to create a creamy, pumpkin-flavored treat that will impress everyone. The cream cheese and pumpkin give it a rich taste, while the graham cracker crumbs add crunch.
Notes on Ingredient Substitutions
You can swap some of the ingredients if needed:
– Use low-fat cream cheese for a lighter option.
– Maple syrup can replace powdered sugar for a different sweetness.
– Try a different nut, like walnuts, if you don’t have pecans.
– If you want a spiced flavor, add cinnamon or nutmeg to the mix.
These swaps keep the truffles tasty while letting you use what you have on hand.
Suggested Brand Recommendations
For the best results, I recommend these brands:
– Cream Cheese: Philadelphia is a classic choice for smooth texture.
– Pumpkin Puree: Libby’s is a trusted brand for pure pumpkin flavor.
– Graham Crackers: Honey Maid offers a sweet crunch that works well.
– White Chocolate Chips: Guittard or Ghirardelli melt nicely and taste great.
– Pecans: Fisher brand pecans are fresh and ready to use.
Using quality brands makes a big difference in taste. Each ingredient contributes to the overall flavor, so choose wisely for the best no-bake pumpkin cheesecake truffles.
Step-by-Step Instructions
Detailed Cooking Process
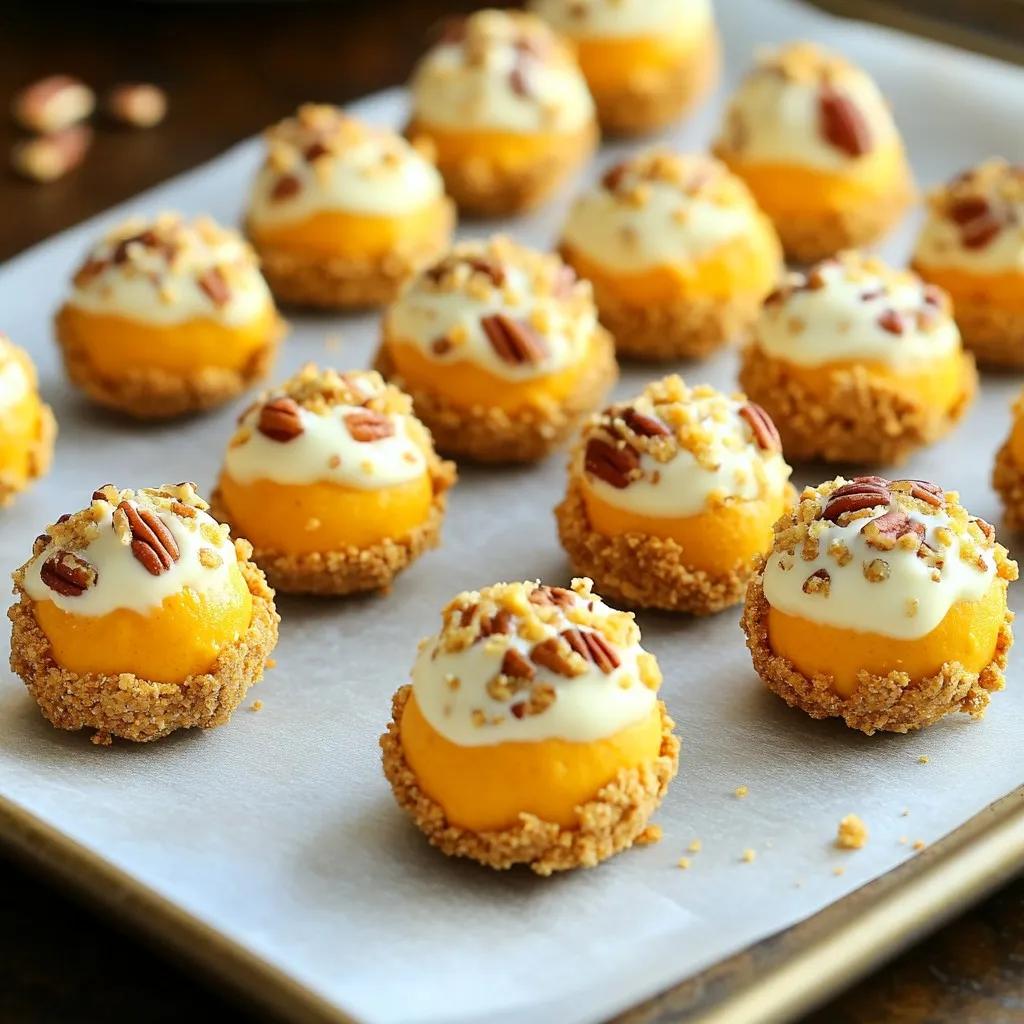
Start with a large bowl. Beat the softened cream cheese until smooth. This takes about 2-3 minutes. Next, add the canned pumpkin puree. Mix in the powdered sugar, vanilla extract, pumpkin pie spice, and a pinch of salt. Stir until the mixture is smooth and creamy.
Gradually add 3/4 cup of graham cracker crumbs. Fold them in gently. This helps keep the truffles light and fluffy. Now, scoop about one tablespoon of the mixture. Roll it into a ball with your hands. Place the balls on a parchment-lined baking sheet. Continue this until you form all the truffles.
Chilling and Setting the Truffles
Once you have all the truffles on the sheet, place it in the fridge. Chill them for at least 30 minutes. This step is key. Chilling helps the truffles firm up. They will hold their shape when you coat them later.
Coating Techniques for Perfect Texture
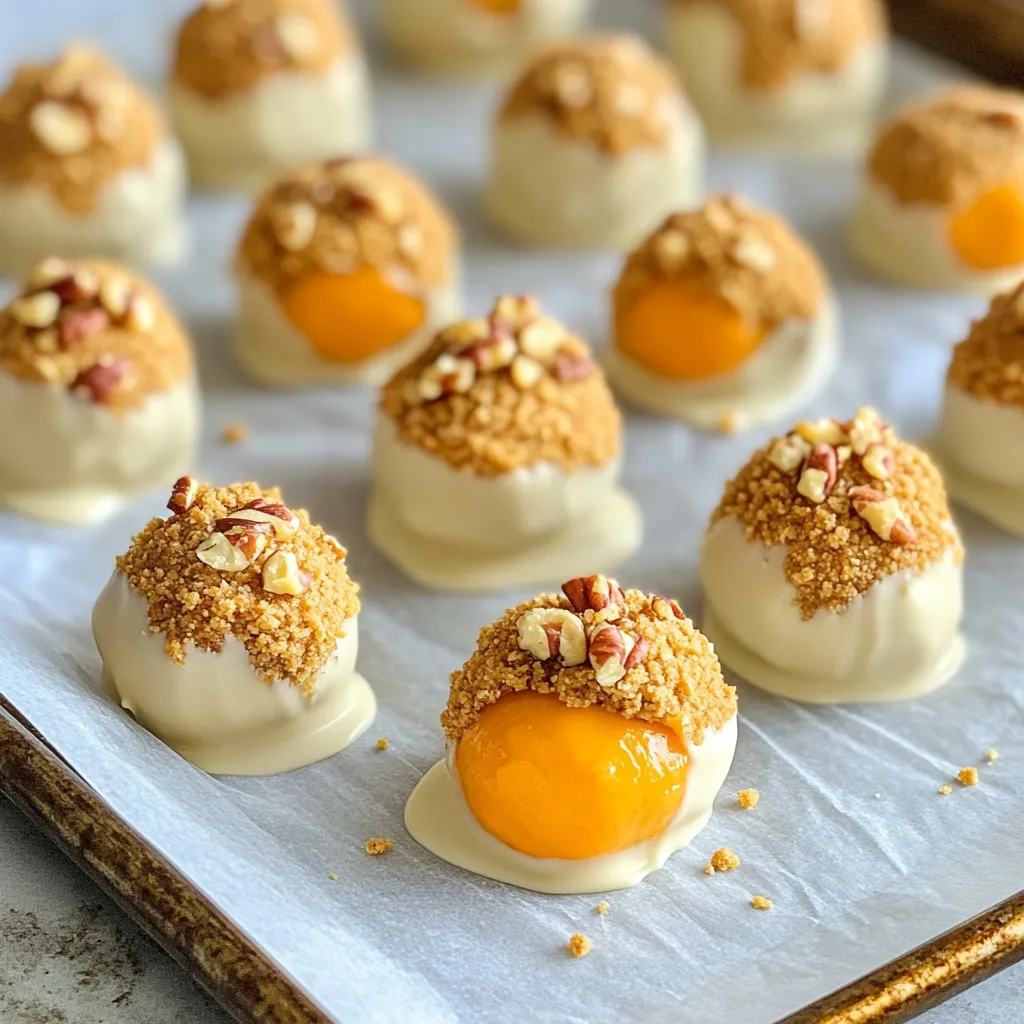
While the truffles chill, prepare the coating. In a small bowl, mix the remaining graham cracker crumbs with the chopped pecans, if using. This adds a nice crunch to the truffles. After the truffles have chilled, dip each one into melted white chocolate. Allow any excess chocolate to drip off.
Next, roll each truffle in the graham cracker and pecan mixture. This creates a delightful outer layer. Once coated, place them back on the baking sheet. Return the truffles to the fridge for another 15 minutes. This sets the chocolate coating perfectly.
Tips & Tricks
How to Achieve the Creamiest Texture
For a creamy texture, start with room-temperature cream cheese. Cold cream cheese will not mix well. Beat the cream cheese until smooth, about 2-3 minutes. This step is key. When you add the pumpkin puree and other ingredients, mix gently. Over-mixing can make the truffles tough. Aim for a smooth, even mixture. If you want it creamier, add a little more pumpkin puree, but not too much!
Best Practices for Melting White Chocolate
Melting white chocolate can be tricky. Use a double boiler or a microwave. If using the microwave, heat in short bursts of 15 seconds. Stir after each burst until it melts. This method helps prevent burning. If it seems too thick, add a small amount of coconut oil. This will keep it smooth for dipping. Always let the chocolate cool slightly before using it on the truffles.
Serving Suggestions for Gifting and Presentation
These truffles make great gifts. Arrange them on a nice plate or in a festive box. Sprinkle extra graham cracker crumbs on top for flair. If you use pecans, add a few on the plate too. This adds a nice touch. For extra fun, label the box with a cute note. Everyone loves a personal touch!
Variations
Flavor Additions and Mix-Ins
You can add fun flavors to your truffles. Try mixing in some chocolate chips for extra sweetness. A bit of maple syrup can also enhance the fall flavor. For a nutty twist, add chopped almonds or walnuts. You can even fold in some dried cranberries for a fruity touch.
Using Dark Chocolate vs. White Chocolate
When it comes to coating, both dark and white chocolate work well. Dark chocolate gives a rich taste. It contrasts nicely with the sweet pumpkin filling. White chocolate adds a creamy sweetness. Choose what you like best. You can even mix both types for a fun look.
Vegan or Dairy-Free Adaptations
Want to make these truffles vegan? Swap the cream cheese for a dairy-free alternative. Use coconut cream or cashew cream for a rich texture. Instead of white chocolate, look for vegan chocolate chips. Make sure to check labels to ensure they are dairy-free. Enjoy these truffles without any animal products!
Storage Info
How to Store No-Bake Pumpkin Cheesecake Truffles
You should store your No-Bake Pumpkin Cheesecake Truffles in an airtight container. This helps keep them fresh and tasty. Place parchment paper between layers if you stack them. Keep the container in the fridge. This will keep the truffles cool and firm.
Freezing Instructions for Longer Shelf Life
If you want to save your truffles for later, freezing them is a great choice. First, chill the truffles in the fridge for about 30 minutes. Once they are firm, place them in a single layer on a baking sheet. Freeze for about 1-2 hours until solid. Then, transfer them to a freezer-safe bag or container. Label the bag with the date. They can last up to three months in the freezer.
Shelf Life and Freshness Tips
When stored properly in the fridge, these truffles will stay fresh for about one week. Watch for any signs of spoilage, like changes in smell or texture. If you freeze them, thaw the truffles in the fridge before eating. This keeps their texture nice. Enjoy these treats whenever you crave something sweet!
FAQs
Can I use fresh pumpkin instead of canned?
Yes, you can use fresh pumpkin. First, cook the pumpkin until it’s soft. Then, blend it until smooth. This makes a great substitute for canned pumpkin puree. Just remember to remove excess water. This helps keep your truffles from being too wet.
How long do these truffles last in the fridge?
These truffles stay fresh in the fridge for about a week. Store them in an airtight container. This keeps them from drying out and helps maintain their great taste. If you want them to last longer, you can freeze them.
Is it possible to make these truffles ahead of time?
You can make these truffles ahead of time. They are perfect for prepping in advance. Make them a day or two before your event. Just store them in the fridge until you are ready to serve. This saves you time and stress on the big day!
You learned how to make no-bake pumpkin cheesecake truffles. We covered ingredients, step-by-step instructions, and useful tips. You can create variations and store them safely, ensuring freshness.
Remember, the right techniques make a big difference in taste and texture. Trust your creativity with flavor add-ins. Enjoy your truffles any time and share them with others. Happy cooking!


