
Looking for a quick, tasty snack that packs a protein punch? No Bake Chocolate Peanut Butter Protein Balls are just what you need! These bite-sized treats are not only easy to make but also customizable to fit your taste. With simple ingredients like peanut butter, honey, and chocolate protein powder, you’ll have a satisfying snack in no time. Let’s dive into the recipe and make your snacking deliciously guilt-free!
Why I Love This Recipe
- Healthy Snack Option: These protein balls are packed with natural ingredients, offering a nutritious snack that satisfies cravings without the guilt.
- No-Bake Convenience: No need to turn on the oven! These protein balls are quick and easy to prepare, making them perfect for busy days.
- Customizable Flavor: You can easily swap ingredients, like using different nut butters or adding your favorite mix-ins, to suit your taste preferences.
- Great for Meal Prep: These protein balls store well in the fridge, making them an ideal option for meal prep and on-the-go snacking.
Ingredients
Main Ingredients List
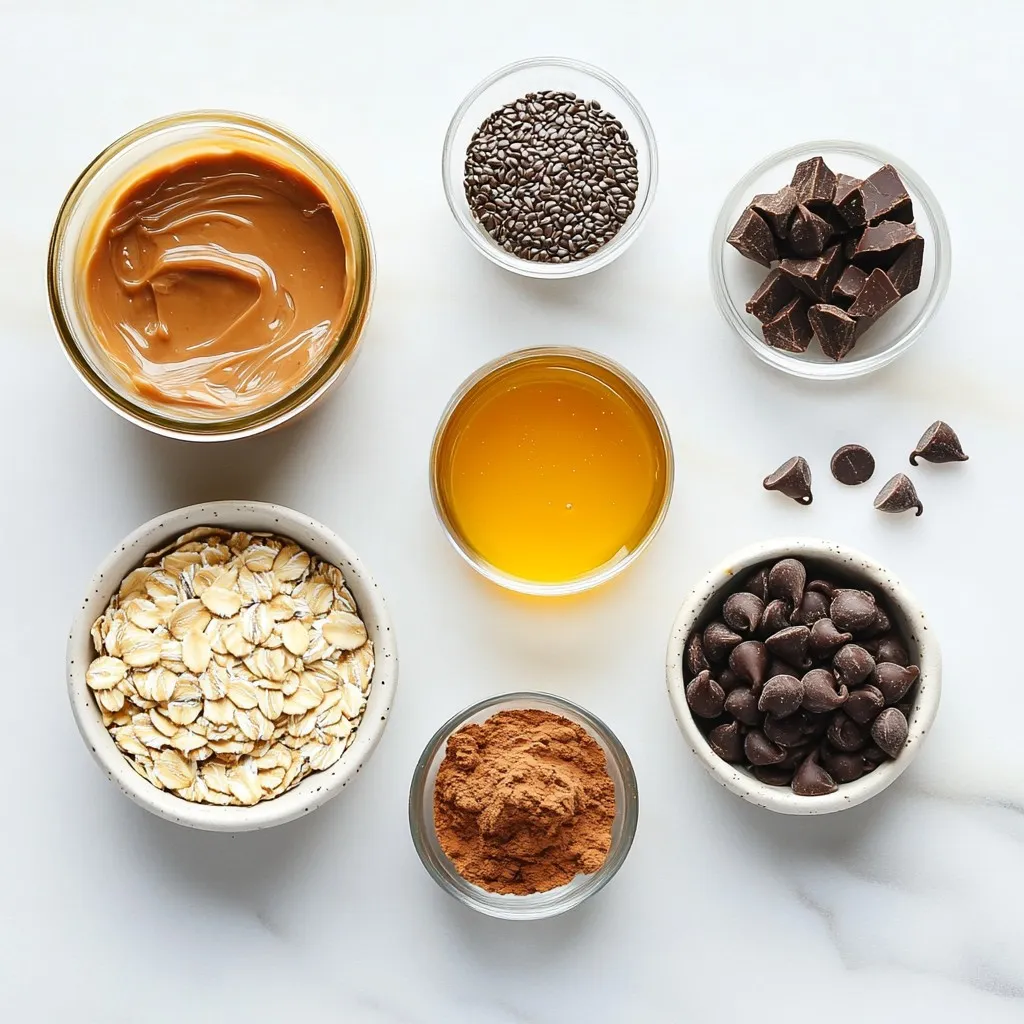
– 1 cup natural peanut butter
– 1/2 cup honey or maple syrup
– 1 cup rolled oats
– 1/2 cup chocolate protein powder
– 1/4 cup dark chocolate chips
– 1/4 cup ground flaxseed
– 1 teaspoon vanilla extract
– A pinch of sea salt
The main ingredients for these protein balls are simple yet delicious. Natural peanut butter gives a creamy base. Honey or maple syrup adds sweetness. Rolled oats provide a hearty texture. Chocolate protein powder boosts the protein content. Dark chocolate chips add fun and flavor. Ground flaxseed brings omega-3s. Vanilla extract adds aroma, while sea salt enhances the taste.
Optional Ingredients for Customization
– Different nut butters (e.g., almond, cashew)
– Add-ins like shredded coconut or dried fruit
– Sweeteners like agave syrup or stevia
You can customize these protein balls easily. Use almond or cashew butter for a twist. Shredded coconut or dried fruit can add texture. If you want less sugar, consider agave syrup or stevia as sweeteners. This way, you can make these snacks your own!
Step-by-Step Instructions
Mixing the Base
First, grab a large mixing bowl. Add 1 cup of natural peanut butter and 1/2 cup of honey or maple syrup. Use a rubber spatula to mix. Blend until the mixture is smooth and creamy. Make sure there are no lumps. This creates a rich base for our protein balls.
Incorporating Dry Ingredients
Next, it’s time to add the dry ingredients. Gradually mix in 1/2 cup of chocolate protein powder, 1 cup of rolled oats, 1/4 cup of ground flaxseed, and a pinch of sea salt. Stir everything together well. Ensure the dry ingredients are fully combined with the peanut butter mixture. This step is key to getting the right taste and texture.
Forming the Protein Balls
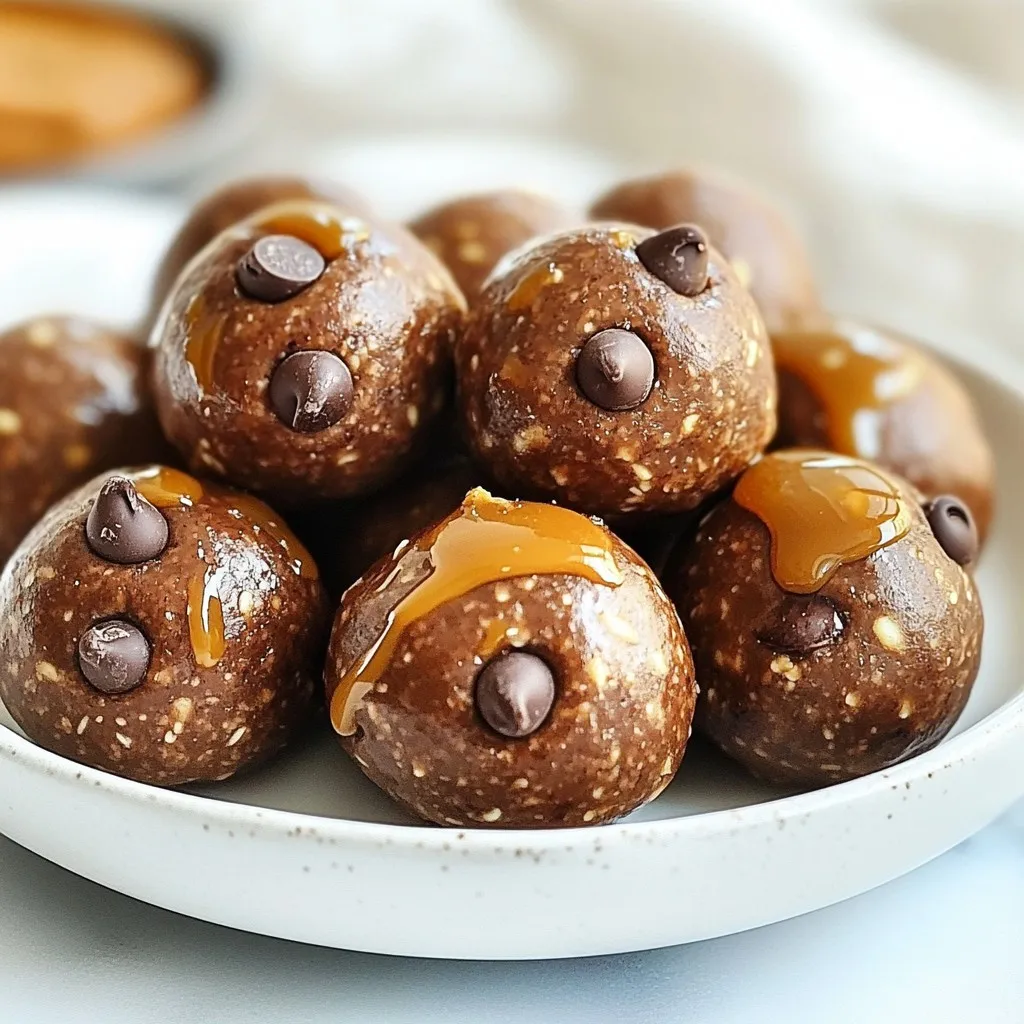
Now, gently fold in 1/4 cup of dark chocolate chips and 1 teaspoon of vanilla extract. Make sure they are evenly mixed in. This adds a delicious chocolatey bite to each ball. To form the balls, pinch off small portions of the mixture. Roll them into 1-inch balls using your hands. If the mixture is sticky, dampen your hands with a bit of water to help. Place each ball on a baking sheet lined with parchment paper. Once you shape all the balls, cover them with plastic wrap or foil. Refrigerate for at least 30 minutes. This helps them firm up nicely.
Tips & Tricks
Perfecting the Texture
To get the right texture, you might need to adjust the mix. If the mixture feels too dry and hard to roll, add a bit of water. Just a teaspoon at a time will help. If it’s too sticky, dampen your hands with water. This keeps the mix from sticking to your fingers.
Presentation Ideas
Presentation matters! To show off your protein balls, use a nice plate. Place the balls in a circle, leaving space in between. For a fun touch, drizzle melted peanut butter over the top. This makes them look tasty and even more inviting. You can also sprinkle some extra dark chocolate chips around the plate.
Serving Suggestions
These protein balls are great anytime. Enjoy them as a quick snack between meals. They’re also perfect before or after workouts. Pair them with a smoothie or shake for a nutritious boost. They make a filling snack that gives you energy. Try them with your favorite drink for extra yum!
Pro Tips
- Use Natural Peanut Butter: Opt for natural peanut butter without added sugars or oils for a healthier option that enhances flavor and texture.
- Chill for Better Texture: Chilling the protein balls not only firms them up but also helps the flavors meld together, resulting in a more enjoyable bite.
- Customize Add-ins: Feel free to experiment with different mix-ins like chopped nuts, dried fruit, or coconut flakes to personalize your protein balls.
- Perfect Portioning: Use a small cookie scoop for uniformity in size, ensuring each protein ball is the same and making them easy to grab on the go.
Variations
Flavor Variations
You can easily change the taste of your protein balls. Try adding spices like cinnamon or cocoa powder. A sprinkle of cinnamon will give a warm, cozy flavor. If you love chocolate, cocoa powder boosts the chocolate taste. Using flavored protein powders also works well. Vanilla or chocolate protein adds more depth. Experiment with different flavors to find your favorite mix!
Dietary Modifications
If you want a vegan option, swap honey for maple syrup. It adds sweetness and keeps it plant-based. For gluten-free snacks, use certified gluten-free oats. This way, everyone can enjoy these tasty protein balls without worry. Always check labels to ensure your ingredients are truly gluten-free.
Different Add-Ins
You can make your protein balls even better with add-ins. Try adding seeds like chia or sunflower seeds for extra crunch. They boost nutrition and add fun textures. Another option is to use different types of chocolate. Milk chocolate or white chocolate can replace dark chocolate chips. These choices will change the flavor and sweetness of the balls. Get creative and mix things up!
Storage Info
Storing Protein Balls
To keep your No Bake Chocolate Peanut Butter Protein Balls fresh, store them in the fridge. Use an airtight container to block moisture and odors. Place parchment paper between layers if you stack them. This will help them stay intact.
Freezing Instructions
If you want to save some for later, freezing is a great option. Just place the protein balls in a single layer on a baking sheet. Freeze them for about an hour until hard. Then, transfer them to a freezer-safe bag or container. When you want to enjoy a ball, take it out and let it thaw for about 15 minutes. This makes for a quick, tasty snack anytime!
Shelf Life
In the fridge, these protein balls last for up to two weeks. If you freeze them, they can stay fresh for up to three months. Check for any signs of spoilage, like a strange smell or change in color. If they look or smell off, it’s best to toss them. Enjoy your healthy treat while it’s fresh!
FAQs
How many calories are in No Bake Chocolate Peanut Butter Protein Balls?
Each protein ball has about 100 calories. This is a great snack that keeps you energized. Here’s a quick breakdown of the nutrients per ball:
– Protein: 4g
– Fat: 5g
– Carbohydrates: 10g
– Fiber: 1.5g
This tasty snack packs a good amount of healthy fats and protein.
Can I make these protein balls without protein powder?
Yes, you can skip the protein powder! Try these tasty options instead:
– Use more oats to add bulk.
– Substitute with ground nuts for richness.
– Add extra flaxseed for fiber and omega-3s.
These swaps keep your protein balls delicious and nutritious!
How long do I need to chill the protein balls?
Chilling is key to perfect texture. I recommend chilling for at least 30 minutes. This helps the balls firm up. A good chill lets the flavors blend well, making each bite more enjoyable. If you want them firmer, chill longer. Enjoy your tasty treats!
Making no-bake chocolate peanut butter protein balls is simple and fun. We covered key ingredients, mixing methods, and tips for great texture. You can customize flavors and make them fit your diet, too. Storing them properly helps keep them fresh.
These snacks work well at any time of day. Enjoy them as a post-workout treat or a quick energy bite. I’m excited for you to try this easy recipe and make it your ow


