
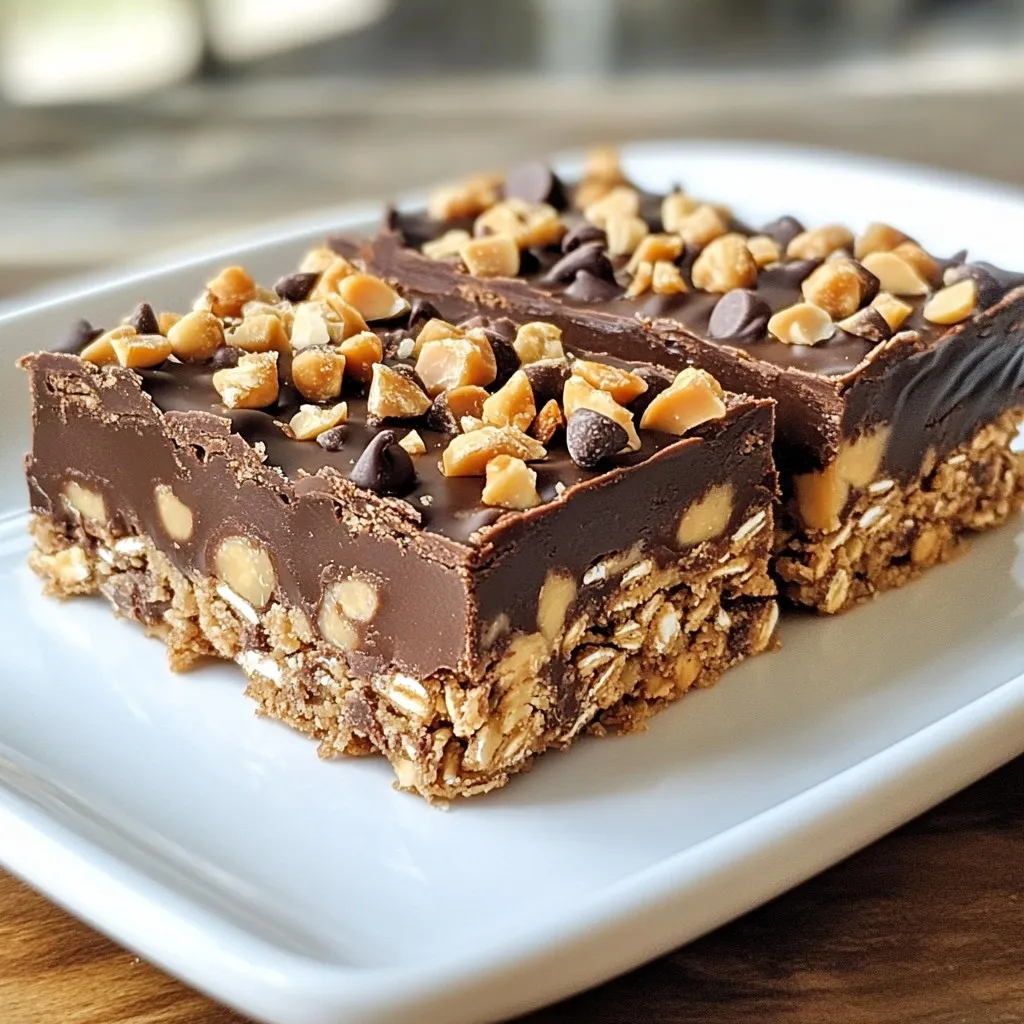
Are you craving a sweet treat that’s easy to make and guilt-free? Look no further! My No Bake Chocolate Peanut Butter Oat Bars are the perfect mix of rich chocolate and creamy peanut butter. Plus, they require no baking! In this post, I’ll guide you through simple steps, share handy tips, and offer tasty variations. Get ready for a delicious snack you can enjoy anytime!
Why I Love This Recipe
- Quick and Easy: This recipe requires no baking, making it a perfect quick treat you can whip up in just 15 minutes!
- Healthy Ingredients: Made with rolled oats, peanut butter, and honey, these bars are packed with nutrients and energy.
- Customizable: You can easily add your favorite toppings like nuts or coconut to make these bars uniquely yours.
- Deliciously Satisfying: The combination of chocolate and peanut butter creates a rich and satisfying snack that everyone will love.
Ingredients
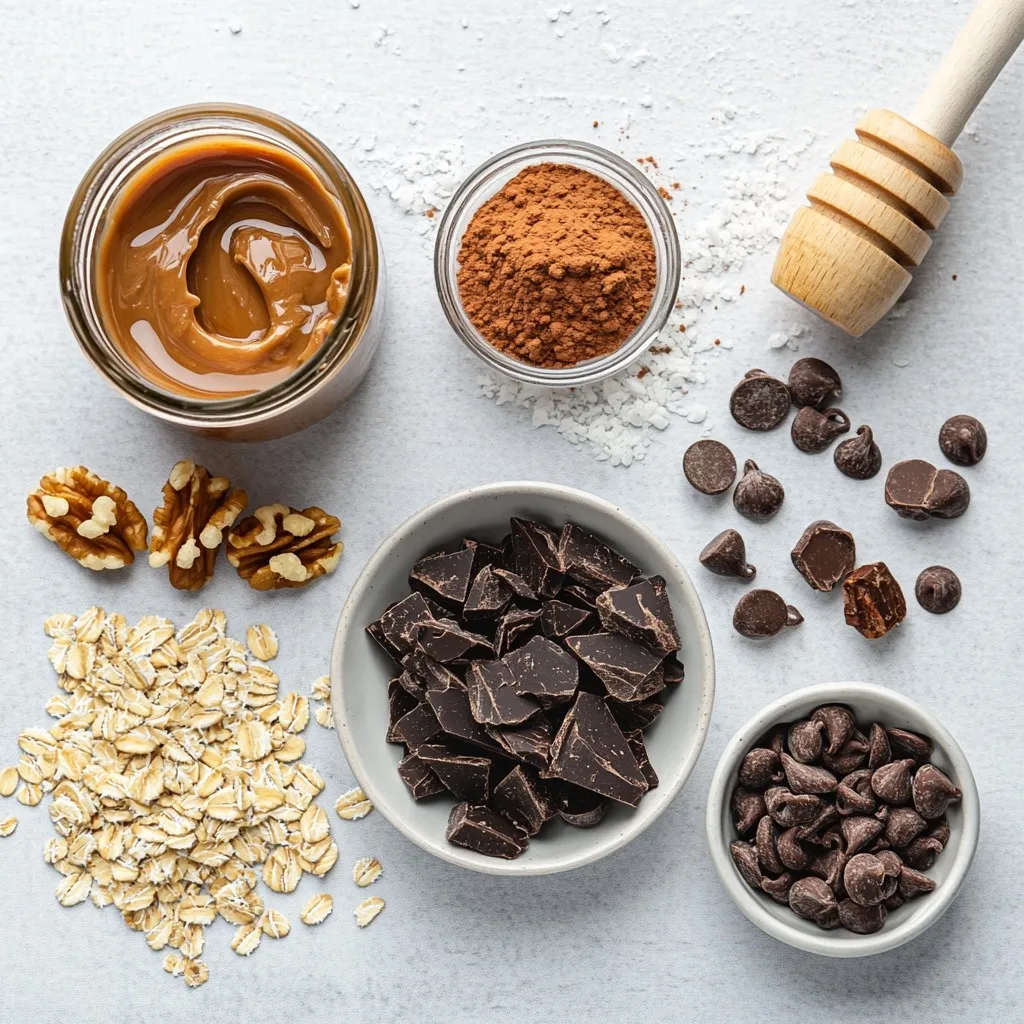
Main ingredients for No Bake Chocolate Peanut Butter Oat Bars
To make these tasty bars, you need a few simple items:
– 2 cups rolled oats
– 1 cup creamy peanut butter
– 1 cup honey or maple syrup
– 1/2 cup chocolate chips (dark or semi-sweet)
– 1/4 cup unsweetened cocoa powder
– 1/2 teaspoon vanilla extract
– A pinch of salt
These ingredients come together to create a rich, sweet, and chewy treat. The oats give the bars a hearty texture. The peanut butter adds creaminess, while honey or maple syrup provides sweetness. Cocoa powder brings that deep chocolate flavor.
Optional toppings and substitutions
You can add fun toppings to make your bars even better. Here are some tasty options:
– Crushed nuts
– Coconut flakes
– Additional chocolate chips
If you want to swap ingredients, feel free! Try almond butter instead of peanut butter. You can use agave syrup in place of honey. These swaps keep the bars delicious and interesting.
Nutritional information per serving
Each bar is packed with nutrients. Here is a rough estimate of what you’ll get per serving:
– Calories: 180
– Protein: 5g
– Carbohydrates: 25g
– Fat: 8g
– Fiber: 3g
These numbers make your snack both filling and fun. You get energy from the oats and protein from the peanut butter. Enjoy these bars as a quick pick-me-up or a sweet dessert!
Step-by-Step Instructions
Preparing the peanut butter and honey mixture
Start with a microwave-safe bowl. Add 1 cup of creamy peanut butter and 1 cup of honey (or maple syrup) to the bowl. Heat this mix in the microwave for 30 seconds to 1 minute. You want it soft and easy to stir. Once heated, stir it until smooth. This blend is the heart of your bars.
Combining the dry and wet ingredients
Next, take a large mixing bowl and add 2 cups of rolled oats. Pour the warm peanut butter mix over the oats. Use a spatula or wooden spoon to mix. Stir until every oat gets coated well. This step is key to making sure your bars hold together. Now, gently fold in 1/2 cup of chocolate chips. Make sure they are spread evenly.
Pressing the mixture into the pan and setting
Prepare an 8×8 inch pan by lining it with parchment paper. Let the paper hang over the edges a bit. This will help you remove the bars later. Transfer the oat mixture into the lined pan. Press it down firmly and evenly. Make sure it is tightly packed for the best texture. If you want, sprinkle on optional toppings like crushed nuts or coconut flakes. Press these down gently too. Finally, refrigerate the pan for at least 2 hours. This allows the bars to set properly. After that, lift the bars out using the parchment paper. Slice them into squares or rectangles for serving.
Tips & Tricks
How to achieve the best texture for bars
To get the best texture, pack the mixture tightly. Use a spatula or your hands to press it down firmly in the pan. This helps the bars hold their shape once set. If the mixture feels too dry, add a bit more peanut butter or honey. If it feels too wet, add a few more oats. Keep these tips in mind for a perfect bite every time.
Storing your No Bake Chocolate Peanut Butter Oat Bars
Store your bars in the fridge for freshness. Place them in an airtight container. They will stay fresh for about one week. You can also freeze them for longer storage. Wrap each bar in plastic wrap and place them in a freezer bag. They can last up to three months in the freezer. Just thaw them in the fridge before enjoying.
Customization ideas for added flavors or textures
Get creative with your bars! Try adding crushed nuts for crunch. You can also mix in coconut flakes for a tropical twist. If you love chocolate, sprinkle more chocolate chips on top. For a fun flavor boost, add cinnamon or nutmeg to the mix. You can even use maple syrup instead of honey for a different taste.
Pro Tips
- Use Natural Sweeteners: Maple syrup adds a unique flavor profile, but honey can provide a richer sweetness. Choose based on your preference!
- Adjust the Texture: For a chewier bar, use whole oats instead of instant oats. This will add a heartier texture to your bars.
- Customize Your Mix-Ins: Feel free to experiment with various toppings such as dried fruits or seeds for added nutrition and flavor.
- Storage Tips: Keep the bars in an airtight container in the refrigerator for up to a week for the best freshness.
Variations
Vegan adaptations using natural sweeteners
You can easily make these bars vegan. Instead of honey, use maple syrup or agave nectar. Both work well and keep the sweetness. Look for natural sweeteners that are organic. This keeps your bars healthy while still being tasty.
Gluten-free options for oats
To make these bars gluten-free, just choose certified gluten-free oats. Many brands offer oats that do not contain gluten. This way, you can enjoy these bars without worry. They will taste just as good while fitting your diet.
Flavor enhancements like protein powder or spices
Want to boost nutrition? Try adding protein powder to the mix. A scoop or two of your favorite protein powder works great. You can also add spices like cinnamon or nutmeg for extra flavor. These small changes can make your bars even better!
Storage Info
Best practices for refrigerating or freezing bars
To keep your No Bake Chocolate Peanut Butter Oat Bars fresh, refrigerate them in an airtight container. If you want to store them longer, you can freeze them. Wrap each bar tightly in plastic wrap. Then, place them in a resealable freezer bag. This helps avoid freezer burn. When you want to eat one, just take it out and let it thaw in the fridge.
How long do they last?
These bars last about one week in the fridge. If you freeze them, they can last up to three months. Just make sure to label your containers. This way, you won’t forget when you made them. Enjoying them fresh is best, but they still taste great even after some time.
Resealable container recommendations
I recommend using glass or BPA-free plastic containers. These keep the bars fresh and prevent any odors from other foods. Choose a container that fits your bars snugly. This limits air exposure. If you cut the bars into smaller pieces, use parchment paper between layers. This way, they won’t stick together.
FAQs
Can I use different nut butters?
Yes, you can swap peanut butter for other nut butters. Almond butter or cashew butter work well. Just ensure the nut butter is creamy. This keeps the bars smooth and easy to mix. Each nut butter adds a unique flavor. Almond butter gives a nuttier taste, while cashew butter is milder.
How can I make these bars less sweet?
To reduce sweetness, cut back on the honey or maple syrup. You can also use unsweetened cocoa powder. Adding more oats helps balance the sweetness. Another option is to mix in a bit of nut butter without added sugar. Taste as you go to find the right balance for you.
What are the best ways to cut and serve the bars?
After chilling, lift the bars out using the parchment paper. Place the block on a cutting board. Use a sharp knife for clean cuts. Cut into squares or rectangles for serving. If the bars are too firm, let them sit at room temperature for a few minutes. This makes slicing easier. Serve these bars chilled with milk or yogurt for a tasty treat.
This article detailed how to make No Bake Chocolate Peanut Butter Oat Bars. We explored ingredients, instructions, tips, and variations. These bars are easy to make and packed with flavor. Customization lets you match your dietary needs. Proper storage keeps them fresh for longer.
Enjoy the fun of making these sweet snacks. They are great for sharing or quick energy boosts. By following the steps, you can create a tasty treat anytim


