
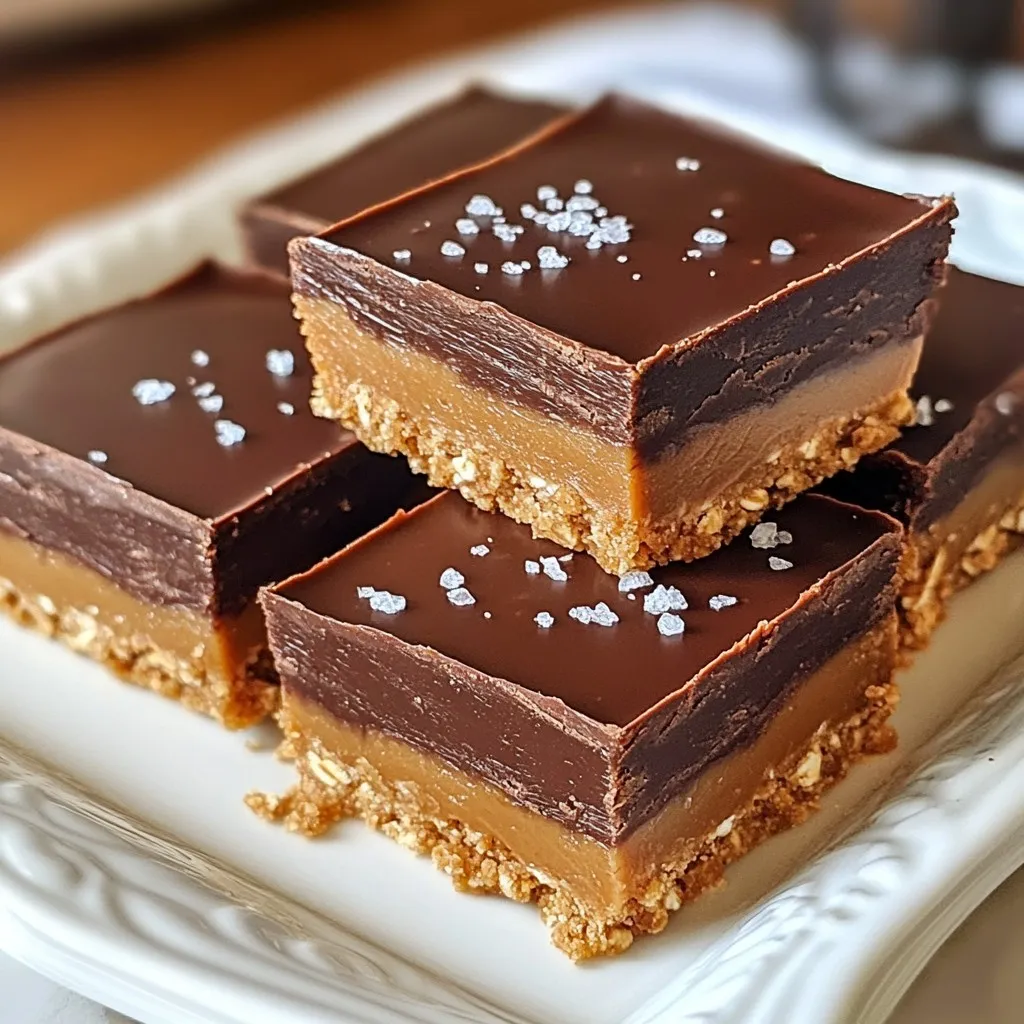
Craving a sweet treat that’s quick and easy? You’ll love my No-Bake Chocolate Peanut Butter Bars! This delightful recipe comes together with simple ingredients like creamy peanut butter and dark chocolate. Best of all, you don’t need an oven. I’ll guide you through each step, sharing tips and tricks. In no time, you’ll be enjoying a rich, satisfying dessert. Let’s dive in and make these delicious bars together!
Why I Love This Recipe
- Easy to Make: This no-bake recipe is simple and requires minimal effort, perfect for beginner bakers or anyone looking to whip up a quick treat.
- Irresistible Flavor: The combination of rich chocolate and creamy peanut butter creates an indulgent flavor that satisfies any sweet tooth.
- Healthy Ingredients: Made with wholesome ingredients like oats and natural sweeteners, these bars are a guilt-free indulgence.
- Perfect for Sharing: With 16 squares in one batch, these bars are ideal for parties, gatherings, or simply sharing with friends and family.
Ingredients
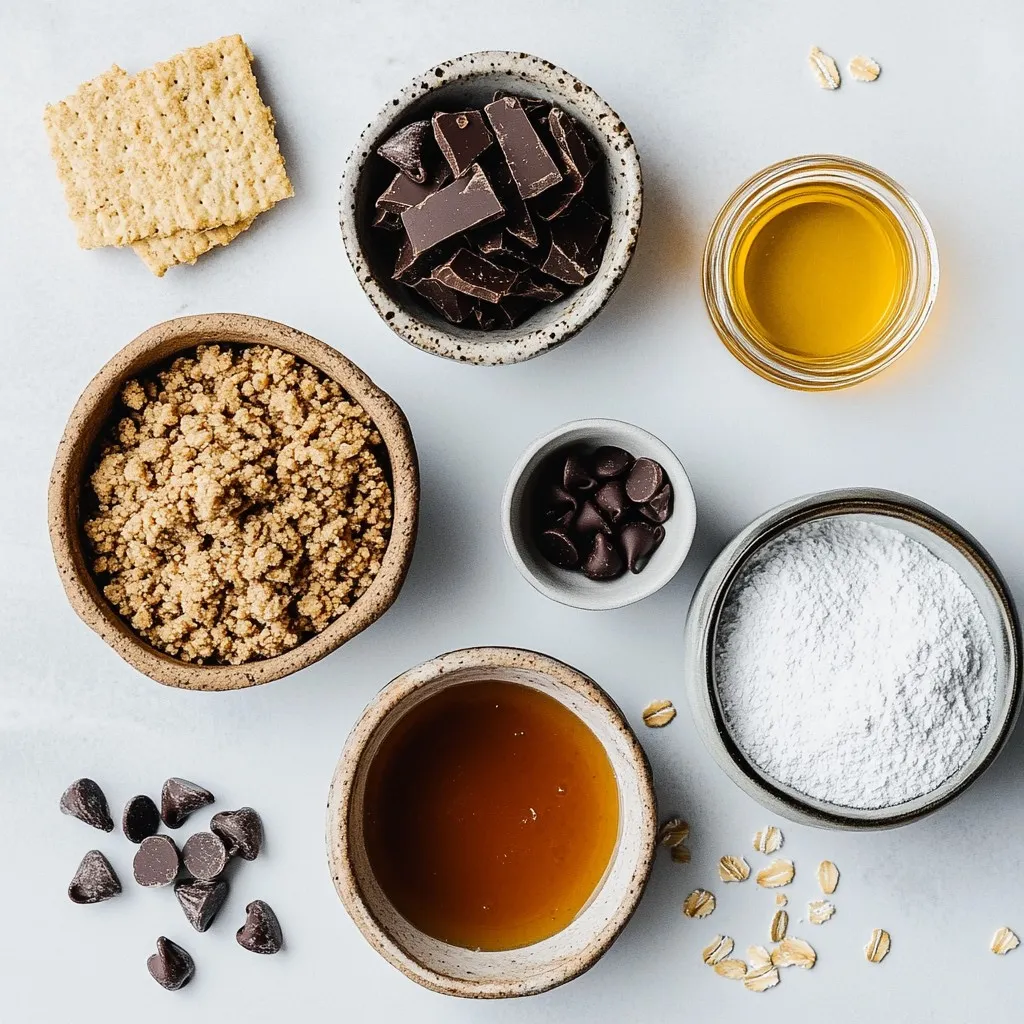
List of Ingredients
– 1 cup graham cracker crumbs
– 1 cup rolled oats
– 1/2 cup creamy peanut butter
– 1/3 cup honey or maple syrup
– 1/2 cup powdered sugar
– 1 cup dark chocolate chips
– 1 tablespoon coconut oil
– Pinch of fine sea salt
Measurements and Suggested Brands
When I make these bars, I love using Honey Maid graham crackers. They add a nice flavor and crunch. For oats, I prefer Quaker rolled oats. They are easy to find and work well. For peanut butter, Jif or Skippy creamy peanut butter gives the best texture. If you want to use syrup, Maple Grove Farms is a great option. I also use Ghirardelli dark chocolate chips for melting. They melt smoothly and taste rich.
Alternative Ingredient Options
You can switch things up if you want. Use crunchy peanut butter for a bit more texture. If you want a vegan option, swap honey for agave syrup. For the graham crackers, try almond flour or oat flour for a gluten-free version. You can also use coconut oil instead of butter to keep it dairy-free. These swaps keep the bars just as tasty while fitting your needs.
Step-by-Step Instructions
Preparation of the Peanut Butter Mixture
Start by gathering your ingredients. In a large mixing bowl, combine the graham cracker crumbs, rolled oats, creamy peanut butter, honey or maple syrup, powdered sugar, and a pinch of sea salt. Mix these ingredients well. Use a sturdy spatula or wooden spoon to bring everything together. You want a sticky and cohesive mixture that holds well.
Setting the Base in the Pan
Next, prepare an 8×8 inch square pan. Line the pan with parchment paper. Leave some paper hanging over the edges for easy removal. Firmly press the peanut butter mixture into the pan. Use your hands or the back of a measuring cup to create a solid layer. Make sure it is even and tightly packed.
Melting the Chocolate
Now it’s time to melt the chocolate. In a microwave-safe bowl, add the dark chocolate chips and coconut oil. Microwave in 30-second intervals. Stir well between each interval. Keep heating until the chocolate is fully melted and smooth.
Assembling the Bars
Carefully pour the melted chocolate over the pressed peanut butter base. Use a spatula to spread the chocolate evenly across the top. Make sure to cover every corner well. This step is key for a nice finish.
Chilling the Bars
Place the assembled bars in the refrigerator. Chill for at least 2 hours. This helps the chocolate set and makes cutting easier. Once chilled, lift the bars out using the parchment paper. Place them on a cutting board and slice them into squares. Enjoy your homemade no-bake chocolate peanut butter bars!
Tips & Tricks
How to Achieve the Perfect Texture
To get the right texture in your bars, mix the base well. You want a sticky and cohesive blend. Use a sturdy spatula to combine the graham cracker crumbs, oats, and peanut butter. Press the mixture firmly into the pan. This step helps the bars hold together. The final texture should be firm yet chewy.
Avoiding Common Mistakes
One common mistake is not pressing the mixture down enough. If it’s loose, the bars will crumble. Make sure you use your hands or the back of a measuring cup to pack it tightly. Another mistake is melting the chocolate too quickly. Use short intervals in the microwave. Stir often to prevent burning.
Best Practices for Melting Chocolate
When melting chocolate, use a microwave-safe bowl. Add chocolate chips and coconut oil together. Heat in 30-second bursts. Stir in between until smooth. This way, you avoid overheating the chocolate. If it gets too hot, it can seize up. A smooth chocolate layer makes your bars shine.
Pro Tips
- Use Natural Sweeteners: Substitute honey with maple syrup for a vegan-friendly option that adds a unique flavor to the bars.
- Chill for Better Texture: Allow the bars to chill longer than 2 hours if you prefer a firmer texture that holds up better when sliced.
- Customize Your Toppings: Experiment with different toppings like chopped nuts, sea salt, or even shredded coconut to enhance the flavor and texture.
- Measure Ingredients Accurately: Use a kitchen scale for precise measurements, especially for the graham cracker crumbs and powdered sugar, to ensure consistent results.
Variations
Adding Nuts or Seeds
You can make these bars even better by adding nuts or seeds. Chopped almonds, walnuts, or pecans add crunch and flavor. Try adding sunflower seeds or chia seeds for a healthy twist. Just mix these extras into the peanut butter base. You can use about 1/2 cup of nuts or seeds for great taste. They also boost the nutrition of your bars.
Using Different Chocolate Types
The type of chocolate you use can change the flavor. Dark chocolate adds a rich, bold taste. Milk chocolate gives a sweeter, creamier bar. For a more unique twist, try white chocolate. Just melt it the same way as dark chocolate. You can mix different chocolates for a fun flavor blend. This small change can make your no-bake bars special.
Flavored Versions with Extracts
Flavors can enhance your bars too. Adding a splash of vanilla or almond extract makes each bite more exciting. I suggest using about 1 teaspoon of extract. You can also try mint or coffee extracts for a unique taste. Just mix the extract into the peanut butter base. This way, you get a fun twist on classic flavors.
Storage Info
Best Practices for Storing Leftovers
To keep your no-bake chocolate peanut butter bars fresh, store them in an airtight container. You can place parchment paper between layers to avoid sticking. These bars stay fresh for up to one week in the fridge. If you notice any moisture, dry them gently with a paper towel. This will help maintain their texture and flavor.
Freezing Tips for Extended Shelf Life
If you want to keep these bars longer, freezing works great. Cut them into squares before freezing. Wrap each piece in plastic wrap, then place them in a freezer-safe bag. They can last up to three months in the freezer. When you’re ready to eat, let them thaw in the fridge overnight.
How to Reheat Bars
You don’t need to reheat these bars, as they taste best cold. However, if you prefer a warm treat, you can microwave them for about 10 seconds. This makes the chocolate slightly melty and enhances the flavor. Just be careful not to heat them too long, or they might lose their shape.
FAQs
Can I use crunchy peanut butter instead of creamy?
Yes, you can use crunchy peanut butter. It adds a fun texture. The bars will still taste great. Just keep in mind that the bars may be less smooth. If you enjoy the crunch, go for it!
How do I make these bars vegan?
To make these bars vegan, swap honey for maple syrup. Use dairy-free chocolate chips instead of regular ones. The other ingredients, like oats and peanut butter, are already vegan. It’s simple to create a vegan version!
What can I substitute for graham cracker crumbs?
You can use crushed cookies or whole wheat crackers. Almond flour or oats work too. Just make sure the texture is similar to graham crumbs. This way, the bars will hold together well.
How long do no-bake bars last in the fridge?
These no-bake bars last about one week in the fridge. Keep them in a sealed container. For longer storage, you can freeze them for up to three months. Just thaw them before serving.
Can I make these bars without honey or syrup?
Yes, you can use mashed bananas or applesauce instead. They add sweetness and moisture. The bars may have a different flavor, but they will still be tasty. Experiment with what you have on hand!
This blog post shared a fun way to make no-bake peanut butter bars. We covered the key ingredients needed, such as graham cracker crumbs and dark chocolate chips. You learned step-by-step instructions, tips, and tricks for perfecting texture. We also explored variations and storage options to extend freshness.
In conclusion, these bars are easy to make and perfect for any occasion. Experiment with different ingredients to find your favorite version. Enjoy your tasty treat


