
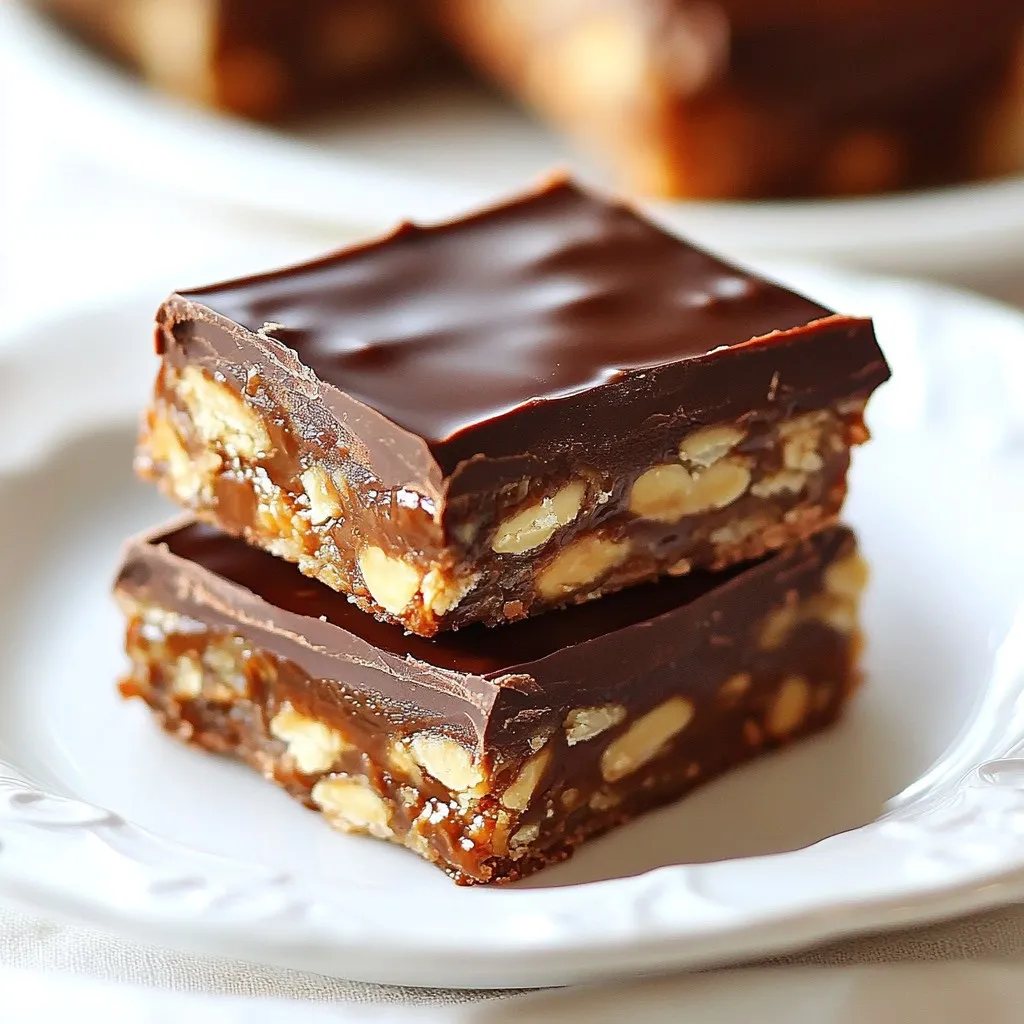
Craving a sweet treat that’s both delicious and simple? Let me introduce you to Ingredient Date Snickers Bars! These bars are a healthier twist on the classic candy you love. Rich in flavor and easy to make, I’ll guide you through every step. From mixing the date filling to melting the chocolate coating, you won’t want to miss these delightful snacks. Get ready to satisfy your sweet tooth guilt-free!
Why I Love This Recipe
- Healthier Indulgence: These bars satisfy your sweet tooth while being packed with nutritious ingredients like dates and peanuts.
- Easy Preparation: With simple steps and no baking required, you can whip these up in no time.
- Customizable: You can easily modify the recipe by adding nuts, seeds, or different types of chocolate to suit your taste.
- Perfect for Sharing: These bars are great for parties, potlucks, or as a healthy snack to share with friends and family.
Ingredients for Cocoa-Dipped Date Snickers Bars
List of Ingredients
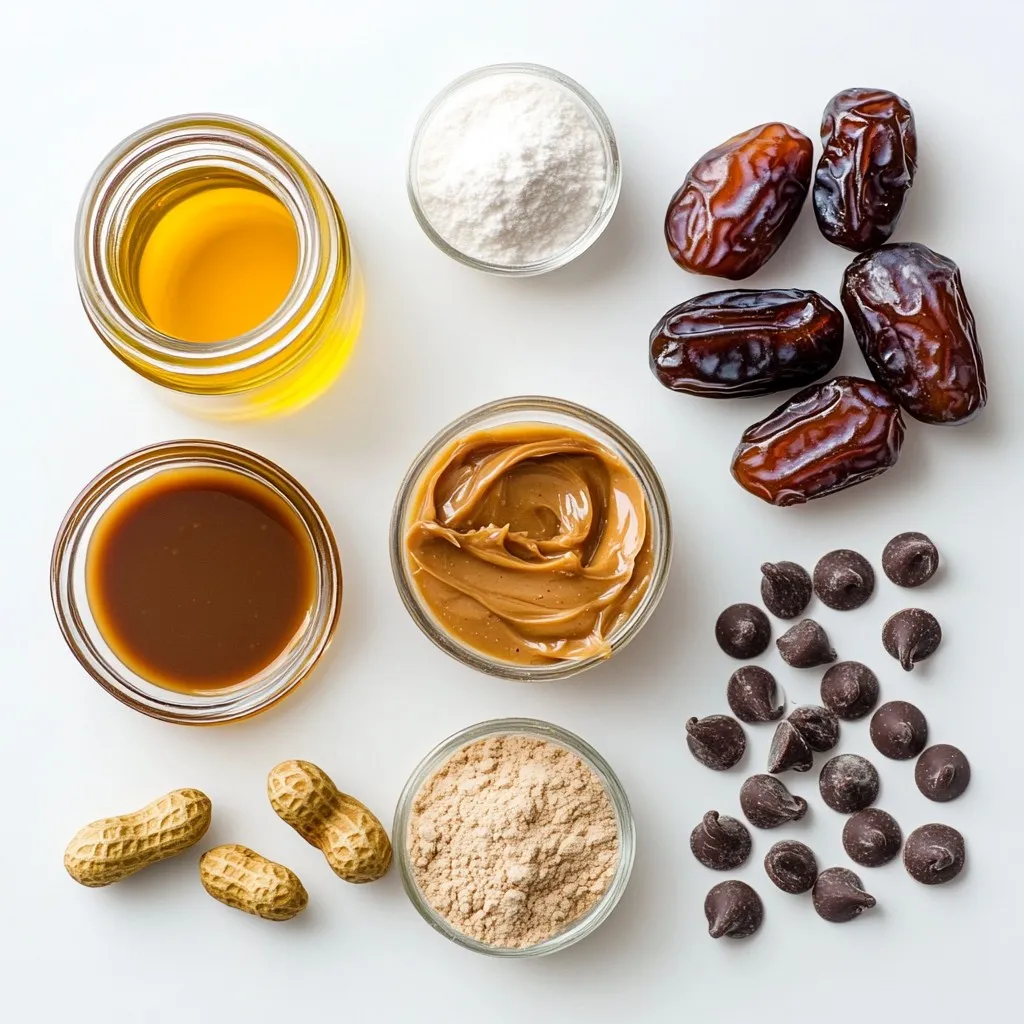
To make these tasty bars, you need:
– 1 cup Medjool dates, pitted
– 1 cup roasted peanuts
– 1/2 cup creamy peanut butter
– 1/2 cup almond flour
– 1 tablespoon maple syrup
– 1 teaspoon vanilla extract
– 1/4 teaspoon sea salt
– 1/2 cup dark chocolate chips (dairy-free if preferred)
– 1 tablespoon coconut oil
Nutritional Information
Each bar is a sweet treat that is also good for you. The Medjool dates give natural sweetness and fiber. Peanuts add protein and healthy fats. Almond flour keeps these bars gluten-free while adding a nutty flavor. The dark chocolate brings antioxidants, making these bars a delightful choice.
Freshness of Ingredients
Using fresh ingredients makes a big difference. Medjool dates should be soft and moist. Roasted peanuts offer crunch and flavor. Make sure your peanut butter is creamy and smooth for the best texture. Check the chocolate chips for freshness to ensure a great melt. Fresh ingredients help the bars taste their best and stay together.
Step-by-Step Instructions
Preparation of the Date Mixture
First, gather your ingredients. You need 1 cup of Medjool dates, 1 cup of roasted peanuts, and 1/2 cup of creamy peanut butter. Also, grab 1/2 cup of almond flour, 1 tablespoon of maple syrup, 1 teaspoon of vanilla extract, and 1/4 teaspoon of sea salt.
Next, place all these ingredients into a food processor. Blend them until you have a thick and sticky dough. This mixture should stick together well, so stop to scrape the bowl’s sides as needed.
Once mixed, line an 8×8 inch baking dish with parchment paper. This step helps with removing the bars later. Spoon the date mixture into the dish. Use your hands or a spatula to press it down evenly. Make sure to pack it tightly for the best bars.
Freezing and Slicing the Bars
Now, it’s time to chill! Place the dish in the freezer for about 30 minutes. This will help the mixture firm up, making it easier to cut. After freezing, take the dish out and use a sharp knife to slice the mixture. You can cut them into bars or squares, whatever you prefer.
Melting the Chocolate Coating
For the chocolate coating, you will need 1/2 cup of dark chocolate chips and 1 tablespoon of coconut oil. In a microwave-safe bowl, combine the chocolate chips and coconut oil. Melt the mixture in the microwave, using 20-second bursts. Stir well after each burst until smooth.
Using a fork, dip each bar into the melted chocolate. Make sure to coat them fully. Let any excess chocolate drip off before placing them on a wire rack or a parchment-lined baking sheet.
After dipping all the bars, return them to the fridge for about 15 minutes. This allows the chocolate to harden completely. Enjoy your Cocoa-Dipped Date Snickers Bars cool or at room temperature!
Tips & Tricks
Best Practices for Mixing
When you mix the ingredients, use a food processor. It saves time and effort. Start with the dates, then add the peanuts, peanut butter, and other ingredients. Blend until it looks like dough. If it sticks to the sides, pause and scrape it down. This ensures a smooth mix.
How to Properly Cut the Bars
After freezing the mixture, it’s time to cut the bars. Use a sharp knife for clean edges. To get even pieces, first, score the top lightly. Then, slice down through the scored lines. This method helps keep the bars from crumbling.
Tips for Melting Chocolate Smoothly
To melt chocolate well, use a microwave-safe bowl. Add the chocolate chips and coconut oil. Microwave in 20-second bursts, stirring each time. This keeps the chocolate from burning. When it’s smooth, dip each bar carefully. Let the excess chocolate drip off for a neat finish.
Pro Tips
- Use Fresh Dates: Ensure your Medjool dates are fresh and soft for the best texture and sweetness in your bars.
- Chill Before Cutting: Always chill the mixture in the freezer for a bit before cutting to help maintain the shape of the bars.
- Experiment with Toppings: Don’t hesitate to sprinkle chopped nuts, coconut flakes, or a pinch of sea salt on top of the chocolate for added flavor and crunch.
- Store Properly: Keep the bars stored in an airtight container in the fridge to maintain their freshness and prevent them from getting too soft.
Variations of Cocoa-Dipped Date Snickers Bars
Alternative Nut Butters
You can switch up the nut butter in this recipe. Use almond butter for a sweet twist. Cashew butter also works well, giving a creamy texture. Each choice brings a new flavor. Try sunflower seed butter for a nut-free option. This keeps the bars safe for school lunches.
Different Chocolate Types
While dark chocolate is the star, feel free to experiment. Milk chocolate adds a creamy richness. White chocolate gives a sweet, vanilla-like flavor. For a fun twist, try flavored chocolate. Mint or orange chocolate can make these bars unique and exciting.
Add-Ins for Enhanced Flavor
Adding extras can take your bars to the next level. Consider mixing in shredded coconut for chewiness. Chopped dried fruit like apricots or cranberries adds a burst of sweetness. You can also sprinkle in some cinnamon or sea salt for depth. Each add-in creates a new taste adventure!
Storage Information
How to Store the Bars
To keep your Cocoa-Dipped Date Snickers Bars fresh, store them in an airtight container. You can stack the bars with parchment paper between layers to prevent sticking. This method keeps the bars moist and tasty.
Shelf Life of Date Snickers Bars
These bars last about one week at room temperature. If you want to store them longer, place them in the fridge. In the fridge, they stay good for up to two weeks. You can also freeze them for up to three months. Just make sure to wrap them well before freezing.
Signs of Spoilage
Check your bars for any changes. If they feel sticky or have a strange smell, it’s time to toss them. Mold is another clear sign of spoilage. Always trust your senses when deciding if food is safe to eat.
FAQs about Ingredient Date Snickers Bars
What is the “best by” date for Snickers bars?
The best by date for Snickers bars is usually about 6 to 12 months. The bars remain safe to eat after this date, but they may lose flavor. To enjoy them fully, eat your bars before this date. Always store them in a cool, dry place. This keeps them fresh and tasty.
Can I use other types of dates?
Yes, you can use other types of dates. Medjool dates are soft and sweet, making them perfect for this recipe. If you use dried dates, soak them in warm water for 10 minutes. This softens them and helps blend better. Other date types may change the flavor slightly, but they can still work.
How do I know if my bars are set properly?
To check if your bars are set, press gently on them after freezing. They should feel firm and slightly springy. If they feel too soft, return them to the freezer for a bit longer. Once cut, the bars should hold their shape. If they crumble, pack them tighter next time.
Cocoa-dipped date Snickers bars are delicious and easy to make. We covered the key ingredients, nutritional info, and freshness tips. The step-by-step guide helps you prepare, freeze, and coat the bars perfectly. Useful tips ensure smooth mixing and cutting. We explored fun variations with nut butters and different chocolates to enhance flavor. Finally, proper storage and spoilage signs keep your bars fresh longer. Enjoy making these tasty treats, and share them with other


