Grandma’s Peanut Butter Bars Easy and Tasty Snack

WANT TO SAVE THIS RECIPE?

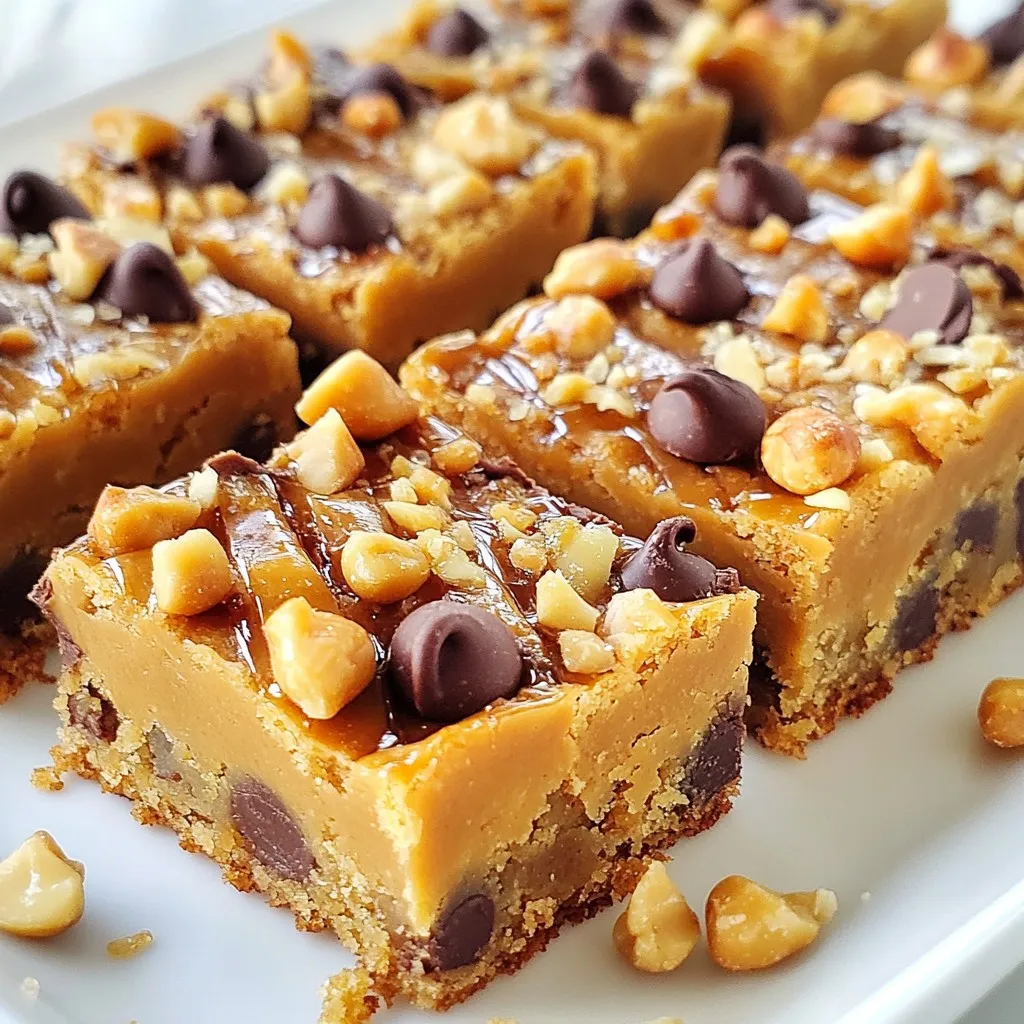
Are you looking for a quick and tasty snack? Grandma’s Peanut Butter Bars are a simple treat you can make in no time. Packed with creamy peanut butter and a hint of sweetness, these bars are perfect for any occasion. Follow my easy recipe and create a delicious snack that will have everyone asking for seconds. Let’s dive into the ingredients and get started on this mouthwatering delight!

Why I Love This Recipe

  1. Simple Ingredients: This recipe uses everyday ingredients that are easy to find, making it accessible for anyone to whip up a delicious treat.
  2. Healthy Twist: With the addition of applesauce, these bars are not only tasty but also provide a healthier alternative to traditional desserts.
  3. Customizable: You can easily modify the recipe by adding nuts, seeds, or different types of chocolate chips to suit your taste preferences.
  4. Family Favorite: This recipe has been passed down through generations, making it a beloved treat that brings back warm memories of family gatherings.

Ingredients

Required Ingredients for Grandma’s Peanut Butter Bars

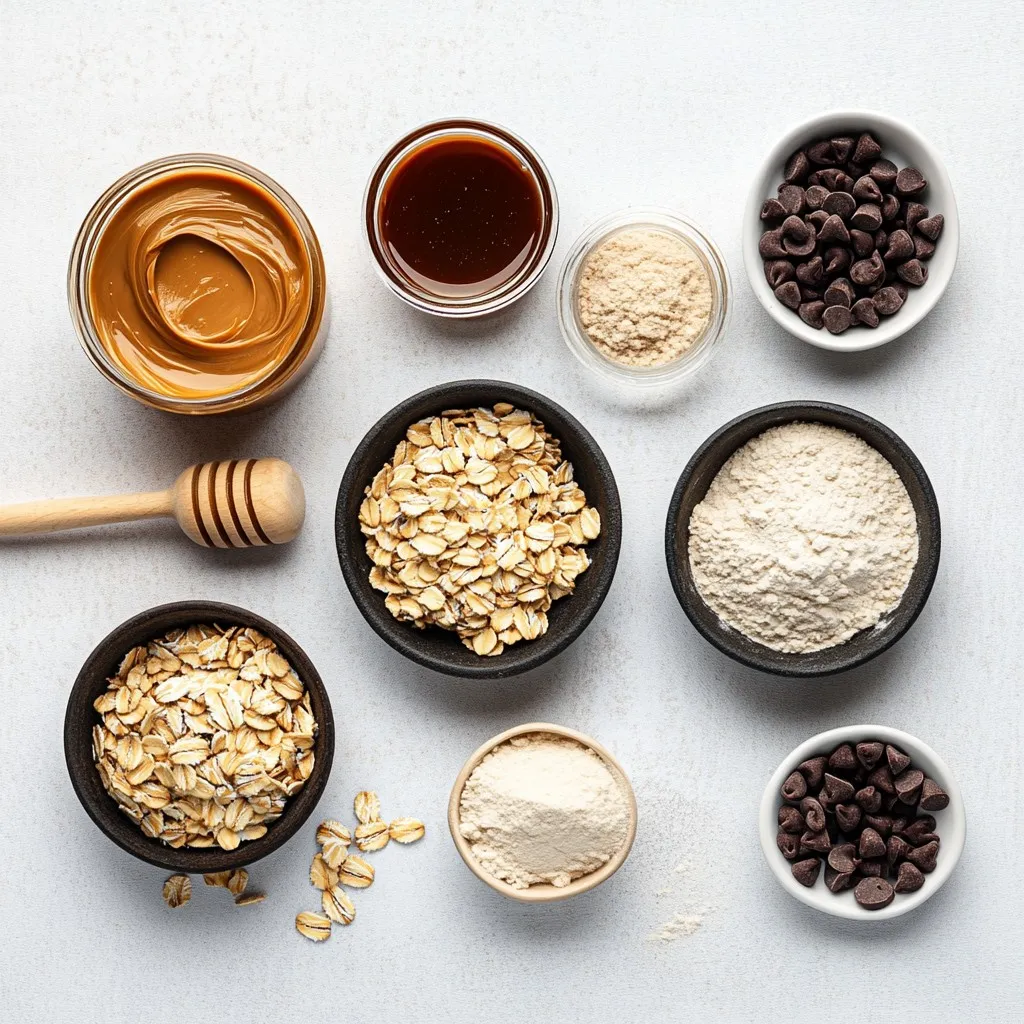
– 1 cup creamy peanut butter

– 1/2 cup unsweetened applesauce

– 1/2 cup packed brown sugar

– 1/4 cup honey

– 1 teaspoon pure vanilla extract

– 1 cup rolled oats

– 1/2 cup all-purpose flour

– 1/2 teaspoon baking powder

– 1/4 teaspoon salt

– 1/4 cup mini chocolate chips (plus extra for topping)

Gather these ingredients before you start. Each one plays a key role in making these bars a hit. The creamy peanut butter gives a rich taste. Unsweetened applesauce adds moisture without too much sugar. Brown sugar brings a deep, sweet flavor. Honey adds a nice lift of sweetness, while vanilla extract enhances the overall taste.

Rolled oats add texture and heartiness. The all-purpose flour helps bind everything together. Baking powder gives the bars a bit of lift, making them soft. A pinch of salt balances the sweetness. Lastly, mini chocolate chips add a fun burst of chocolate in every bite.

These ingredients come together to create a simple yet tasty snack. Don’t forget to grab extra chocolate chips for the top!

Step-by-Step Instructions

Preparation Steps

Preheat Your Oven: Start by preheating your oven to 350°F (175°C). Grease a 9×9 inch baking pan or line it with parchment paper. This helps with easy removal later.

Mix Wet Ingredients: In a large bowl, mix 1 cup of creamy peanut butter, 1/2 cup of unsweetened applesauce, 1/2 cup of packed brown sugar, 1/4 cup of honey, and 1 teaspoon of pure vanilla extract. Blend until smooth.

Combine Dry Ingredients: In another bowl, whisk together 1 cup of rolled oats, 1/2 cup of all-purpose flour, 1/2 teaspoon of baking powder, and 1/4 teaspoon of salt until well mixed.

Incorporate Dry Into Wet: Slowly add the dry mix into the wet ingredients. Stir gently until just combined. A few lumps are okay, so don’t overmix.

Add Chocolate Chips: Fold in 1/4 cup of mini chocolate chips. Make sure they spread evenly in the batter.

Prepare for Baking: Pour the mixture into the prepared pan. Use a spatula to spread it evenly. For a fun touch, add a few extra chocolate chips on top.

Bake: Place the pan in the oven and bake for 20-25 minutes. The edges should turn lightly golden. A toothpick inserted in the center should come out clean.

Cool the Bars: Once baked, take the pan out of the oven. Let it cool in the pan for 10 minutes. Then, move the bars to a wire rack to cool completely.

Slice and Serve: After cooling, slice the bars into squares or rectangles. Enjoy your tasty homemade treat!

Tips & Tricks

Perfecting Grandma’s Peanut Butter Bars

Avoid Overmixing: Mix the wet and dry ingredients just until combined. Overmixing can make the bars tough. A few lumps are okay!

Baking Pan Options: Use a 9×9 inch pan for thick bars. You can also try an 8×8 inch pan for a more chewy texture. Just watch the baking time!

Cooling Techniques: Let the bars cool in the pan for 10 minutes. Then, transfer them to a wire rack. This helps them cool evenly and prevents sogginess.

Presentation Tips

Serving Suggestions: Serve these bars on a rustic wooden platter. They look great and are easy to grab. Perfect for parties or after-school snacks!

Garnishing Ideas: Sprinkle crushed nuts or drizzle honey on top. This adds a nice touch and makes the bars even tastier.

Pro Tips

  1. Storage Tips: Keep your peanut butter bars fresh by storing them in an airtight container at room temperature for up to a week, or in the refrigerator for longer shelf life.
  2. Variations: Try adding different mix-ins like chopped nuts, dried fruits, or coconut flakes to customize the flavor and texture of your bars.
  3. Gluten-Free Option: Substitute the all-purpose flour with a gluten-free flour blend to make these bars suitable for a gluten-free diet.
  4. Serving Suggestions: These bars pair wonderfully with a glass of milk or a scoop of vanilla ice cream for a delicious dessert experience.

Variations

Flavor Variations

Nut Substitutes

You can change the nuts in this recipe. If you want a twist, try almond butter or cashew butter. Each nut brings its own taste. You can even mix two kinds for a unique flavor. Just keep the amount the same for a smooth mix.

Using Different Sweeteners

You can swap out the sweeteners too. Instead of brown sugar, use maple syrup or agave syrup. Each sweetener gives a different taste. Honey is great, but you can try coconut sugar for a richer flavor. Adjust the amount based on your taste.

Dietary Adjustments

Gluten-Free Options

You can make these bars gluten-free easily. Swap out regular flour for almond flour or oat flour. Both options work well and keep the bars soft. Always check that your oats are gluten-free if you choose to use them.

Vegan Alternatives

To make vegan bars, replace honey with maple syrup. Use a plant-based butter instead of peanut butter. You can also use flaxseed meal mixed with water as an egg substitute. This keeps the bars tasty and plant-based.

Storage Info

How to Store

To keep Grandma’s Peanut Butter Bars fresh, follow these simple tips:

Cool Completely: Always let the bars cool fully before storing.

Wrap Well: Use plastic wrap or aluminum foil for wrapping. This keeps them moist.

Room Temperature: Store them at room temperature for up to one week.

Refrigerate: For longer freshness, place them in the fridge. They can last up to two weeks there.

Freezing Instructions

If you want to save some for later, freezing is a great option. Here’s how:

Steps to Freeze: Cut the bars into squares. Place them in a single layer on a baking sheet. Freeze for about an hour. Then, transfer them to a freezer bag or container.

Thawing Tips: To enjoy, take one out and let it sit at room temperature. It will thaw in about 15-20 minutes. You can also microwave it for a few seconds for a warm treat!

FAQs

Common Questions About Grandma’s Peanut Butter Bars

Can I use natural peanut butter instead?

Yes, you can use natural peanut butter. It may change the texture slightly. Natural peanut butter has less sugar and more oil. This can make the bars a bit drier or crumbly. You may want to add a little extra applesauce to help with moisture.

How long do the bars last?

The bars last about five days when stored properly. Keep them in an airtight container at room temperature. If you want them to last longer, consider freezing them. They can stay fresh in the freezer for up to three months.

Can I substitute another type of flour?

Yes, you can substitute other flours. For a gluten-free option, try almond or coconut flour. These flours may change the taste and texture, so adjust the amount. Start with less than the recipe calls for and add more as needed.

What’s the best way to cut these bars?

The best way to cut the bars is to let them cool fully. Use a sharp knife for clean cuts. If you want neat squares, mark the cuts lightly with the knife first. This helps guide your cuts and keeps edges clean.

Grandma’s Peanut Butter Bars are easy and fun to make. We covered the key ingredients and steps, plus helpful tips for the best results. You can also try different flavors and dietary options to fit your needs. Proper storage keeps them fresh longer. Whether you’re sharing these bars or enjoying them yourself, they offer sweet satisfaction. I hope you feel inspired to bake and create your own delicious trea

- 1 cup creamy peanut butter - 1/2 cup unsweetened applesauce - 1/2 cup packed brown sugar - 1/4 cup honey - 1 teaspoon pure vanilla extract - 1 cup rolled oats - 1/2 cup all-purpose flour - 1/2 teaspoon baking powder - 1/4 teaspoon salt - 1/4 cup mini chocolate chips (plus extra for topping) Gather these ingredients before you start. Each one plays a key role in making these bars a hit. The creamy peanut butter gives a rich taste. Unsweetened applesauce adds moisture without too much sugar. Brown sugar brings a deep, sweet flavor. Honey adds a nice lift of sweetness, while vanilla extract enhances the overall taste. Rolled oats add texture and heartiness. The all-purpose flour helps bind everything together. Baking powder gives the bars a bit of lift, making them soft. A pinch of salt balances the sweetness. Lastly, mini chocolate chips add a fun burst of chocolate in every bite. These ingredients come together to create a simple yet tasty snack. Don’t forget to grab extra chocolate chips for the top! {{ingredient_image_2}} - Preheat Your Oven: Start by preheating your oven to 350°F (175°C). Grease a 9x9 inch baking pan or line it with parchment paper. This helps with easy removal later. - Mix Wet Ingredients: In a large bowl, mix 1 cup of creamy peanut butter, 1/2 cup of unsweetened applesauce, 1/2 cup of packed brown sugar, 1/4 cup of honey, and 1 teaspoon of pure vanilla extract. Blend until smooth. - Combine Dry Ingredients: In another bowl, whisk together 1 cup of rolled oats, 1/2 cup of all-purpose flour, 1/2 teaspoon of baking powder, and 1/4 teaspoon of salt until well mixed. - Incorporate Dry Into Wet: Slowly add the dry mix into the wet ingredients. Stir gently until just combined. A few lumps are okay, so don’t overmix. - Add Chocolate Chips: Fold in 1/4 cup of mini chocolate chips. Make sure they spread evenly in the batter. - Prepare for Baking: Pour the mixture into the prepared pan. Use a spatula to spread it evenly. For a fun touch, add a few extra chocolate chips on top. - Bake: Place the pan in the oven and bake for 20-25 minutes. The edges should turn lightly golden. A toothpick inserted in the center should come out clean. - Cool the Bars: Once baked, take the pan out of the oven. Let it cool in the pan for 10 minutes. Then, move the bars to a wire rack to cool completely. - Slice and Serve: After cooling, slice the bars into squares or rectangles. Enjoy your tasty homemade treat! - Avoid Overmixing: Mix the wet and dry ingredients just until combined. Overmixing can make the bars tough. A few lumps are okay! - Baking Pan Options: Use a 9x9 inch pan for thick bars. You can also try an 8x8 inch pan for a more chewy texture. Just watch the baking time! - Cooling Techniques: Let the bars cool in the pan for 10 minutes. Then, transfer them to a wire rack. This helps them cool evenly and prevents sogginess. - Serving Suggestions: Serve these bars on a rustic wooden platter. They look great and are easy to grab. Perfect for parties or after-school snacks! - Garnishing Ideas: Sprinkle crushed nuts or drizzle honey on top. This adds a nice touch and makes the bars even tastier. Pro Tips Storage Tips: Keep your peanut butter bars fresh by storing them in an airtight container at room temperature for up to a week, or in the refrigerator for longer shelf life. Variations: Try adding different mix-ins like chopped nuts, dried fruits, or coconut flakes to customize the flavor and texture of your bars. Gluten-Free Option: Substitute the all-purpose flour with a gluten-free flour blend to make these bars suitable for a gluten-free diet. Serving Suggestions: These bars pair wonderfully with a glass of milk or a scoop of vanilla ice cream for a delicious dessert experience. {{image_4}} You can change the nuts in this recipe. If you want a twist, try almond butter or cashew butter. Each nut brings its own taste. You can even mix two kinds for a unique flavor. Just keep the amount the same for a smooth mix. You can swap out the sweeteners too. Instead of brown sugar, use maple syrup or agave syrup. Each sweetener gives a different taste. Honey is great, but you can try coconut sugar for a richer flavor. Adjust the amount based on your taste. You can make these bars gluten-free easily. Swap out regular flour for almond flour or oat flour. Both options work well and keep the bars soft. Always check that your oats are gluten-free if you choose to use them. To make vegan bars, replace honey with maple syrup. Use a plant-based butter instead of peanut butter. You can also use flaxseed meal mixed with water as an egg substitute. This keeps the bars tasty and plant-based. To keep Grandma's Peanut Butter Bars fresh, follow these simple tips: - Cool Completely: Always let the bars cool fully before storing. - Wrap Well: Use plastic wrap or aluminum foil for wrapping. This keeps them moist. - Room Temperature: Store them at room temperature for up to one week. - Refrigerate: For longer freshness, place them in the fridge. They can last up to two weeks there. If you want to save some for later, freezing is a great option. Here’s how: - Steps to Freeze: Cut the bars into squares. Place them in a single layer on a baking sheet. Freeze for about an hour. Then, transfer them to a freezer bag or container. - Thawing Tips: To enjoy, take one out and let it sit at room temperature. It will thaw in about 15-20 minutes. You can also microwave it for a few seconds for a warm treat! Can I use natural peanut butter instead? Yes, you can use natural peanut butter. It may change the texture slightly. Natural peanut butter has less sugar and more oil. This can make the bars a bit drier or crumbly. You may want to add a little extra applesauce to help with moisture. How long do the bars last? The bars last about five days when stored properly. Keep them in an airtight container at room temperature. If you want them to last longer, consider freezing them. They can stay fresh in the freezer for up to three months. Can I substitute another type of flour? Yes, you can substitute other flours. For a gluten-free option, try almond or coconut flour. These flours may change the taste and texture, so adjust the amount. Start with less than the recipe calls for and add more as needed. What’s the best way to cut these bars? The best way to cut the bars is to let them cool fully. Use a sharp knife for clean cuts. If you want neat squares, mark the cuts lightly with the knife first. This helps guide your cuts and keeps edges clean. Grandma's Peanut Butter Bars are easy and fun to make. We covered the key ingredients and steps, plus helpful tips for the best results. You can also try different flavors and dietary options to fit your needs. Proper storage keeps them fresh longer. Whether you're sharing these bars or enjoying them yourself, they offer sweet satisfaction. I hope you feel inspired to bake and create your own delicious treat!

Grandma's Delightful Peanut Butter Bars

Delicious and easy-to-make peanut butter bars with a hint of chocolate.
Course Dessert
Cuisine American
Servings 16
Calories 150 kcal

Ingredients
  

  • 1 cup creamy peanut butter
  • 1 2 unsweetened applesauce
  • 1 2 packed brown sugar
  • 1 4 honey
  • 1 teaspoon pure vanilla extract
  • 1 cup rolled oats
  • 1 2 all-purpose flour
  • 1 2 baking powder
  • 1 4 salt
  • 1 4 mini chocolate chips (plus extra for topping)

Instructions
 

  • Preheat your oven to 350°F (175°C). Lightly grease a 9x9 inch baking pan or line it with parchment paper.
  • In a large mixing bowl, combine the creamy peanut butter, unsweetened applesauce, packed brown sugar, honey, and pure vanilla extract. Blend until smooth.
  • In a separate bowl, whisk together the rolled oats, all-purpose flour, baking powder, and salt.
  • Slowly add the dry mixture into the wet ingredients, stirring gently until just combined.
  • Gently fold in the mini chocolate chips.
  • Transfer the mixture into the prepared baking pan and spread the batter evenly. Sprinkle extra mini chocolate chips on top.
  • Bake for 20-25 minutes until the edges are lightly golden and a toothpick inserted in the center comes out clean.
  • Allow the bars to cool in the pan for about 10 minutes, then transfer to a wire rack to cool completely.
  • Slice into squares or rectangles and enjoy your delightful homemade treat!

Notes

For a beautiful presentation, serve the bars on a rustic wooden platter. Consider garnishing with a sprinkle of crushed nuts or a light drizzle of honey over the top for an enticing finish.
Keyword bars, chocolate, dessert, peanut butter

WANT TO SAVE THIS RECIPE?