Easy Baked Apples Delightful and Simple Dessert Recipe

WANT TO SAVE THIS RECIPE?

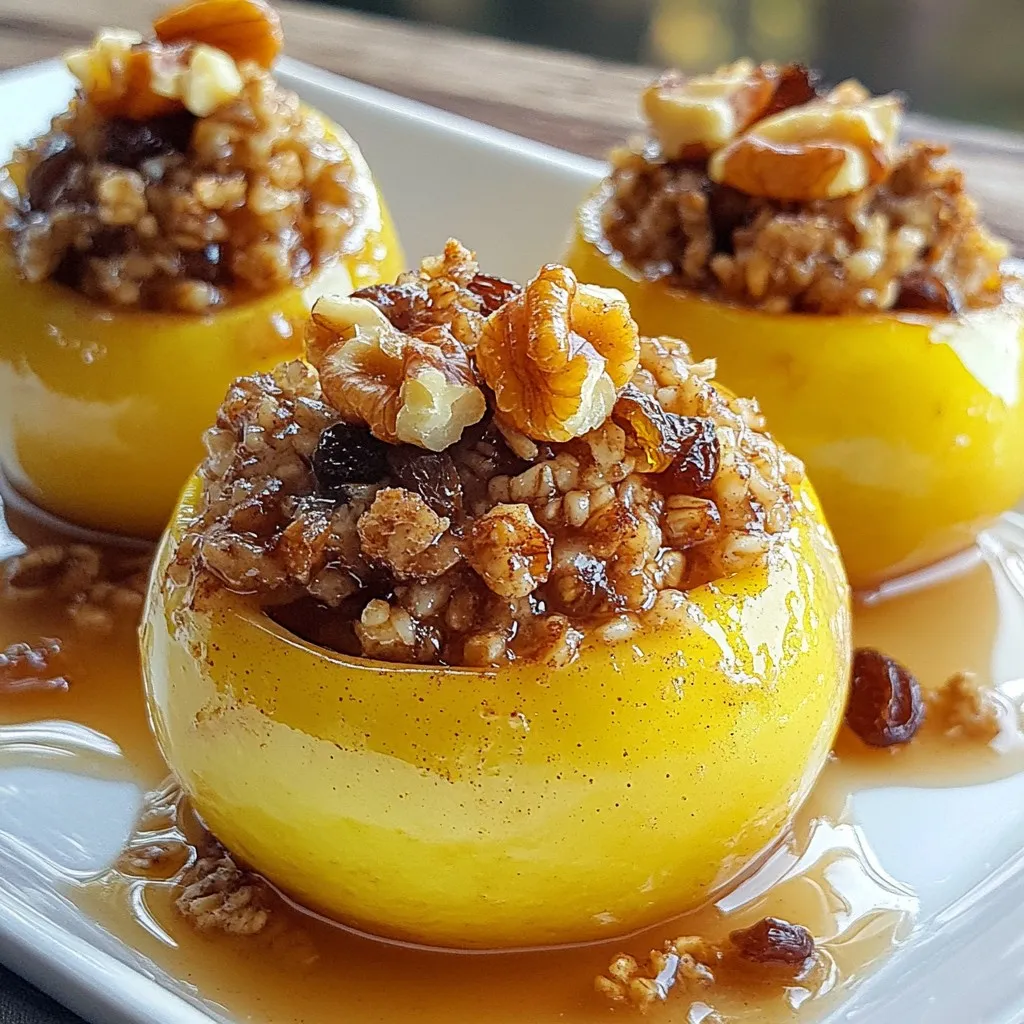
Are you looking for a quick and sweet treat that warms your heart? Easy Baked Apples is the perfect dessert for you! With simple ingredients and a few easy steps, you can whip up a delightful dish that fills your kitchen with sweet aromas. Perfect for any occasion, this recipe will make your taste buds dance. Let’s dive into how to create this delicious treat that everyone will love!

Why I Love This Recipe

  1. Healthy Indulgence: This recipe combines the natural sweetness of apples with wholesome oats, making it a guilt-free dessert option.
  2. Easy Preparation: With simple ingredients and straightforward steps, this dessert is quick to prepare, perfect for busy weeknights.
  3. Customizable Filling: The filling can be easily adjusted to include your favorite nuts and dried fruits, allowing for endless variations.
  4. Warm and Comforting: There’s nothing quite like the aroma of baked apples wafting through your home, creating a warm and inviting atmosphere.
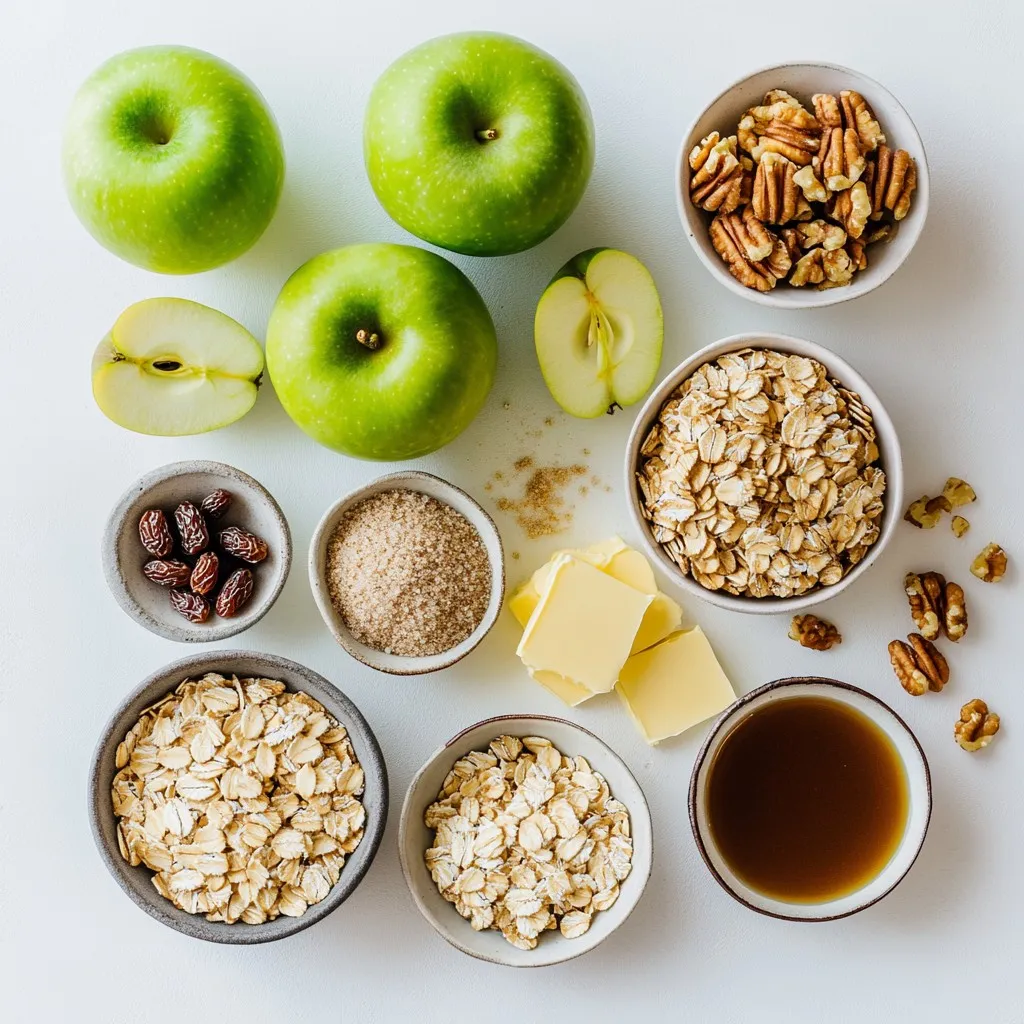
Ingredients

To make Easy Baked Apples, gather these simple ingredients. They create a warm and sweet treat.

– 4 medium-sized Granny Smith apples

– 1/2 cup rolled oats

– 1/4 cup packed brown sugar

– 1 teaspoon ground cinnamon

– 1/4 cup chopped walnuts (or pecans)

– 1/4 cup raisins (or dried cranberries)

– 1/4 cup unsalted butter, melted

– 1/2 cup apple juice or water (for baking)

– A pinch of salt

Each item plays a key role in the taste and texture. The Granny Smith apples bring a nice tartness. The oats and brown sugar create a sweet and chewy filling. Cinnamon adds warmth and spice. Nuts give crunch, while raisins or cranberries add a fruity touch. Butter binds it all together, adding richness. Finally, the apple juice or water ensures the apples stay moist while baking. With these ingredients, you can make a delightful dessert.

Step-by-Step Instructions

Preheat the Oven

First, you need to preheat your oven to 350°F (175°C). This prepares it for our tasty baked apples.

Prepare the Apples

Next, take four medium-sized Granny Smith apples. Use an apple corer or a sharp knife. Carefully remove the core, but keep the bottom intact. This creates a pocket for our sweet filling.

Make the Filling

In a medium bowl, combine the filling ingredients. Add 1/2 cup of rolled oats, 1/4 cup of packed brown sugar, and 1 teaspoon of ground cinnamon. Toss in 1/4 cup of chopped walnuts or pecans, and 1/4 cup of raisins or dried cranberries. Pour in 1/4 cup of melted butter and a pinch of salt. Mix everything well until it forms a cohesive blend.

Stuff the Apples

Now, take spoonfuls of your oat mixture. Gently pack the filling into each cored apple. Make sure to fill them generously. This step is key for great flavor in every bite.

Prepare for Baking

Arrange the stuffed apples upright in a baking dish. Pour 1/2 cup of apple juice or water into the bottom of the dish. This liquid helps create steam during baking, keeping the apples moist and tender.

Bake

Cover your baking dish with aluminum foil. This keeps moisture in. Bake the apples for 25 minutes. After this, remove the foil. Bake for another 15 to 20 minutes. The apples should be tender and the filling golden brown.

Let Cool

Once your apples are done baking, let them cool for a few minutes. This step helps avoid burning your mouth on the hot filling. Enjoy your delightful dessert!

Tips & Tricks

Choosing the Right Apples

For this recipe, I recommend using Granny Smith apples. They are tart and firm, making them perfect for baking. Their shape holds well in the oven, and they balance the sweetness of the filling. Other good options include Honeycrisp or Fuji apples, which add a nice, sweet flavor.

Making Ahead of Time

You can prepare these baked apples a day before serving. Stuff the apples and store them in the fridge. When ready to bake, just add the liquid and pop them in the oven. This saves time and allows the flavors to meld together.

Serving Suggestions

For a special touch, serve the baked apples warm. I love to drizzle the sweet juices from the baking dish over the apples. Add a scoop of vanilla ice cream or a dollop of whipped cream for a creamy contrast. You can also sprinkle some extra nuts or cinnamon on top for added flavor. Enjoy this delightful dessert!

Pro Tips

  1. Choose the Right Apples: For the best flavor and texture, opt for tart apples like Granny Smith, which hold up well during baking and complement the sweetness of the filling.
  2. Experiment with Nuts: Feel free to swap walnuts for pecans or even almonds for a different taste and texture. Each nut brings its unique flavor that enhances the dish.
  3. Enhance the Filling: Add a splash of vanilla extract or a pinch of nutmeg to the filling mixture for an extra layer of flavor that elevates your baked apples.
  4. Serve with a Twist: Instead of traditional ice cream, try serving with a scoop of cinnamon or caramel ice cream for a delightful twist on this classic dessert.

Variations

Flavor Variations

You can change the nuts for more flavor. Instead of walnuts, try pecans or almonds. Each nut gives a new taste. You can also add seeds for crunch, like sunflower or pumpkin seeds.

For dried fruits, you have many options. Raisins work well, but dried cranberries add tartness. Apricots or figs can give a sweet touch. Mix and match to find your favorite flavor combo!

Dietary Modifications

If you need gluten-free options, use gluten-free oats instead of regular rolled oats. They work just as well. Check the labels to ensure they are safe for your diet.

For a vegan treat, swap the butter for coconut oil or a plant-based butter. You can replace apple juice with almond milk or water. The dessert stays tasty and friendly for all diets!

Storage Info

How to Store Leftover Baked Apples

To store leftover baked apples, let them cool down completely. Place them in an airtight container. You can keep them in the fridge for up to three days. If you want to keep them longer, you can freeze them. Just make sure to wrap them tightly in plastic wrap or foil before putting them in a freezer bag. This way, they will stay fresh and tasty.

Reheating Suggestions

When you are ready to enjoy your baked apples again, you have a few easy options. If you want to reheat them in the oven, preheat it to 350°F (175°C). Place the apples in a baking dish and cover them with foil to keep them moist. Heat for about 10-15 minutes. You can also use the microwave. Put one apple on a microwave-safe plate and heat for about 30 seconds to 1 minute. Check if it is warm enough before enjoying it.

FAQs

Can I use a different type of apple?

Yes, you can use other types of apples. I like Fuji or Honeycrisp apples. They are sweet and hold up well when baked. Just make sure the apples are firm. Soft apples may turn mushy.

How long can baked apples last in the fridge?

Baked apples last about 3 to 5 days in the fridge. Store them in an airtight container. You can enjoy them warm or cold. Reheat them in the microwave for a quick treat.

Can I freeze baked apples?

Yes, you can freeze baked apples. Let them cool completely first. Wrap each apple in plastic wrap. Place them in a freezer-safe bag. They can last up to three months in the freezer.

What can I serve with baked apples?

Baked apples taste great with vanilla ice cream. You can also add whipped cream for extra flavor. Drizzle some caramel sauce on top for a sweet touch. Try serving with granola for a crunchy bite!

This blog post covered how to make baked apples. We explored key ingredients, step-by-step instructions, and helpful tips. You can choose different apples, nuts, and fruits for your recipe. The storage tips allow you to enjoy leftovers easily.

In conclusion, baked apples are simple, fun, and tasty. They offer room for creativity while using healthy ingredients. Enjoy your baking, and share this treat with friends and famil

To make Easy Baked Apples, gather these simple ingredients. They create a warm and sweet treat. - 4 medium-sized Granny Smith apples - 1/2 cup rolled oats - 1/4 cup packed brown sugar - 1 teaspoon ground cinnamon - 1/4 cup chopped walnuts (or pecans) - 1/4 cup raisins (or dried cranberries) - 1/4 cup unsalted butter, melted - 1/2 cup apple juice or water (for baking) - A pinch of salt Each item plays a key role in the taste and texture. The Granny Smith apples bring a nice tartness. The oats and brown sugar create a sweet and chewy filling. Cinnamon adds warmth and spice. Nuts give crunch, while raisins or cranberries add a fruity touch. Butter binds it all together, adding richness. Finally, the apple juice or water ensures the apples stay moist while baking. With these ingredients, you can make a delightful dessert. {{ingredient_image_2}} First, you need to preheat your oven to 350°F (175°C). This prepares it for our tasty baked apples. Next, take four medium-sized Granny Smith apples. Use an apple corer or a sharp knife. Carefully remove the core, but keep the bottom intact. This creates a pocket for our sweet filling. In a medium bowl, combine the filling ingredients. Add 1/2 cup of rolled oats, 1/4 cup of packed brown sugar, and 1 teaspoon of ground cinnamon. Toss in 1/4 cup of chopped walnuts or pecans, and 1/4 cup of raisins or dried cranberries. Pour in 1/4 cup of melted butter and a pinch of salt. Mix everything well until it forms a cohesive blend. Now, take spoonfuls of your oat mixture. Gently pack the filling into each cored apple. Make sure to fill them generously. This step is key for great flavor in every bite. Arrange the stuffed apples upright in a baking dish. Pour 1/2 cup of apple juice or water into the bottom of the dish. This liquid helps create steam during baking, keeping the apples moist and tender. Cover your baking dish with aluminum foil. This keeps moisture in. Bake the apples for 25 minutes. After this, remove the foil. Bake for another 15 to 20 minutes. The apples should be tender and the filling golden brown. Once your apples are done baking, let them cool for a few minutes. This step helps avoid burning your mouth on the hot filling. Enjoy your delightful dessert! For this recipe, I recommend using Granny Smith apples. They are tart and firm, making them perfect for baking. Their shape holds well in the oven, and they balance the sweetness of the filling. Other good options include Honeycrisp or Fuji apples, which add a nice, sweet flavor. You can prepare these baked apples a day before serving. Stuff the apples and store them in the fridge. When ready to bake, just add the liquid and pop them in the oven. This saves time and allows the flavors to meld together. For a special touch, serve the baked apples warm. I love to drizzle the sweet juices from the baking dish over the apples. Add a scoop of vanilla ice cream or a dollop of whipped cream for a creamy contrast. You can also sprinkle some extra nuts or cinnamon on top for added flavor. Enjoy this delightful dessert! Pro Tips Choose the Right Apples: For the best flavor and texture, opt for tart apples like Granny Smith, which hold up well during baking and complement the sweetness of the filling. Experiment with Nuts: Feel free to swap walnuts for pecans or even almonds for a different taste and texture. Each nut brings its unique flavor that enhances the dish. Enhance the Filling: Add a splash of vanilla extract or a pinch of nutmeg to the filling mixture for an extra layer of flavor that elevates your baked apples. Serve with a Twist: Instead of traditional ice cream, try serving with a scoop of cinnamon or caramel ice cream for a delightful twist on this classic dessert. {{image_4}} You can change the nuts for more flavor. Instead of walnuts, try pecans or almonds. Each nut gives a new taste. You can also add seeds for crunch, like sunflower or pumpkin seeds. For dried fruits, you have many options. Raisins work well, but dried cranberries add tartness. Apricots or figs can give a sweet touch. Mix and match to find your favorite flavor combo! If you need gluten-free options, use gluten-free oats instead of regular rolled oats. They work just as well. Check the labels to ensure they are safe for your diet. For a vegan treat, swap the butter for coconut oil or a plant-based butter. You can replace apple juice with almond milk or water. The dessert stays tasty and friendly for all diets! To store leftover baked apples, let them cool down completely. Place them in an airtight container. You can keep them in the fridge for up to three days. If you want to keep them longer, you can freeze them. Just make sure to wrap them tightly in plastic wrap or foil before putting them in a freezer bag. This way, they will stay fresh and tasty. When you are ready to enjoy your baked apples again, you have a few easy options. If you want to reheat them in the oven, preheat it to 350°F (175°C). Place the apples in a baking dish and cover them with foil to keep them moist. Heat for about 10-15 minutes. You can also use the microwave. Put one apple on a microwave-safe plate and heat for about 30 seconds to 1 minute. Check if it is warm enough before enjoying it. Yes, you can use other types of apples. I like Fuji or Honeycrisp apples. They are sweet and hold up well when baked. Just make sure the apples are firm. Soft apples may turn mushy. Baked apples last about 3 to 5 days in the fridge. Store them in an airtight container. You can enjoy them warm or cold. Reheat them in the microwave for a quick treat. Yes, you can freeze baked apples. Let them cool completely first. Wrap each apple in plastic wrap. Place them in a freezer-safe bag. They can last up to three months in the freezer. Baked apples taste great with vanilla ice cream. You can also add whipped cream for extra flavor. Drizzle some caramel sauce on top for a sweet touch. Try serving with granola for a crunchy bite! This blog post covered how to make baked apples. We explored key ingredients, step-by-step instructions, and helpful tips. You can choose different apples, nuts, and fruits for your recipe. The storage tips allow you to enjoy leftovers easily. In conclusion, baked apples are simple, fun, and tasty. They offer room for creativity while using healthy ingredients. Enjoy your baking, and share this treat with friends and family!

Sweet Cinnamon Delight Baked Apples

Delicious baked Granny Smith apples stuffed with a sweet oat filling, perfect for dessert.
Course Dessert
Cuisine American
Servings 4
Calories 200 kcal

Ingredients
  

  • 4 medium-sized Granny Smith apples
  • 1/2 cup rolled oats
  • 1/4 cup packed brown sugar
  • 1 teaspoon ground cinnamon
  • 1/4 cup chopped walnuts or pecans
  • 1/4 cup raisins or dried cranberries
  • 1/4 cup unsalted butter, melted
  • 1/2 cup apple juice or water
  • a pinch salt

Instructions
 

  • Preheat your oven to 350°F (175°C) to prepare for the baking process.
  • Using an apple corer or a sharp knife, carefully core each Granny Smith apple, ensuring that you leave the bottom intact to create a pocket for the filling.
  • In a medium mixing bowl, combine the rolled oats, brown sugar, ground cinnamon, chopped walnuts or pecans, raisins or dried cranberries, melted butter, and a pinch of salt. Stir the ingredients together until they are well blended and form a cohesive filling.
  • Take spoonfuls of the oat mixture and gently fill each cored apple, packing the filling firmly inside to ensure they are generously stuffed.
  • Arrange the stuffed apples upright in a baking dish. Pour apple juice or water into the bottom of the dish, which will help create steam during the baking process, ensuring the apples remain moist.
  • Cover the baking dish with aluminum foil to keep in moisture and bake in the preheated oven for 25 minutes. After this initial baking time, remove the foil and continue baking for an additional 15-20 minutes, or until the apples are tender and the filling has turned a beautiful golden brown.
  • Once finished baking, allow the apples to cool for a few minutes before serving to avoid burning your mouth on the hot filling.

Notes

Serve warm with ice cream or whipped cream for an indulgent treat.
Keyword baked apples, cinnamon, dessert, oats

WANT TO SAVE THIS RECIPE?