Crispy Oven-Baked Chicken Tenders Easy and Delicious

WANT TO SAVE THIS RECIPE?

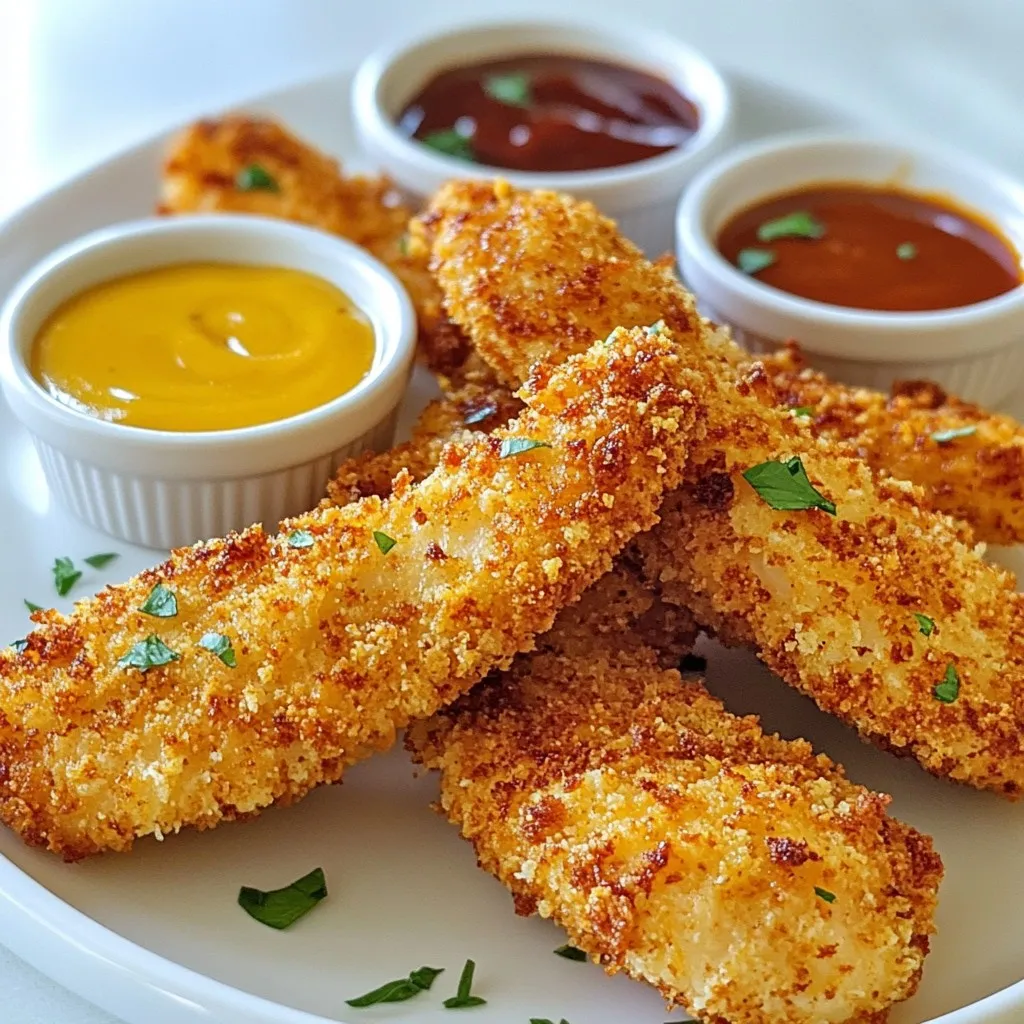
Are you ready for a simple and tasty dinner idea? Crispy oven-baked chicken tenders are perfect for any meal. With a crunchy outside and juicy inside, they are a hit with both kids and adults. This recipe is easy and quick, using just a few ingredients you probably already have at home. So grab your apron, and let’s get started on making these delicious tenders that you’ll love to share!

Why I Love This Recipe

  1. Kid-Friendly: These chicken tenders are a hit with kids, making them a perfect choice for family dinners or gatherings.
  2. Healthy Alternative: Baking instead of frying reduces calories and fat, giving you a lighter option without sacrificing flavor.
  3. Versatile: These tenders can be paired with various dipping sauces, allowing for customization based on your taste preferences.
  4. Easy to Make: With simple ingredients and straightforward steps, this recipe is perfect for cooks of all skill levels.

Ingredients

Main Ingredients

– 1 pound chicken breast tenders

– 1 cup buttermilk

– 1 cup breadcrumbs (panko recommended)

Seasoning Ingredients

– ½ cup all-purpose flour

– 1 teaspoon garlic powder

– 1 teaspoon onion powder

– 1 teaspoon smoked paprika

– ½ teaspoon salt

– ½ teaspoon freshly ground black pepper

– ¼ teaspoon cayenne pepper (optional)

Additional Ingredients

– Cooking spray or olive oil

You need fresh chicken breast tenders for this recipe. I use 1 pound, which serves four. Buttermilk is key for flavor and moisture. One cup will do. For that perfect crunch, I recommend one cup of panko breadcrumbs. They create a great texture.

Next, you have your seasoning ingredients. You need ½ cup of all-purpose flour. This helps the breading stick. Garlic powder, onion powder, and smoked paprika add great taste. You’ll use 1 teaspoon of each.

Don’t forget salt and pepper. They enhance the chicken’s flavors. I suggest ½ teaspoon of each. If you like a little heat, add ¼ teaspoon of cayenne pepper.

Lastly, you’ll need cooking spray or a drizzle of olive oil. This adds crispiness and helps the tenders brown nicely in the oven. All these ingredients combine to create a delicious meal that everyone will love!

Step-by-Step Instructions

Marinate the Chicken

First, take the chicken tenders and put them in a bowl. Add the buttermilk to the bowl. Mix well to coat each piece. Cover the bowl with plastic wrap. Place it in the fridge for at least 30 minutes. For the best flavor, marinate up to 2 hours. This step makes the chicken tender and juicy.

Prepare the Breading Station

While the chicken marinates, preheat your oven to 400°F (200°C). Line a baking sheet with parchment paper. In a shallow dish, mix the flour, garlic powder, onion powder, smoked paprika, salt, black pepper, and cayenne pepper. In another dish, pour in the breadcrumbs. This setup helps keep the process smooth.

Coat the Chicken

Now, take the marinated chicken out of the fridge. Let the excess buttermilk drip off. Dip each tender into the flour mixture first. Make sure it gets good coverage. Shake off any extra flour. Then, move the tender to the breadcrumbs. Press it gently to coat it evenly. This step ensures every bite is crunchy.

Bake the Tenders

Arrange the coated chicken tenders on the baking sheet. Lay them in a single layer. For extra crispiness, lightly spray the tenders with cooking spray. You can also drizzle a little olive oil on top. This helps them brown nicely.

Cooking Time

Place the baking sheet in your preheated oven. Bake the chicken tenders for 15-20 minutes. They should be golden brown and reach an internal temperature of 165°F (74°C). Halfway through, flip the tenders. This helps them cook evenly and get that perfect crunch.

Final Touch

After baking, take the tenders out of the oven. Let them rest for about 3-5 minutes. This resting time keeps them juicy. Serve them warm with your favorite dipping sauces, like honey mustard or barbecue. Enjoy your crispy oven-baked chicken tenders!

Tips & Tricks

Achieving the Perfect Crunch

To get that nice crunch, use panko breadcrumbs. They are lighter and crispier than regular breadcrumbs. A light spray of cooking oil helps the tenders brown evenly. This small step makes a big difference in texture.

Marination Tips

Marination is key for flavor. I recommend marinating the chicken for at least 30 minutes. For the best taste, let it sit for up to 2 hours. You can also spice up the buttermilk. A pinch of garlic powder or a dash of hot sauce can add exciting layers of flavor.

Cooking Tips

When you place the chicken on the baking sheet, space them out well. This helps them cook evenly and stay crispy. Always check the internal temperature. The chicken should reach 165°F to ensure it is fully cooked.

Pro Tips

  1. Marinate for Maximum Flavor: Allowing the chicken to marinate in buttermilk for at least 30 minutes helps to tenderize the meat and infuse it with flavor.
  2. Panko for Extra Crunch: Opt for panko breadcrumbs instead of regular breadcrumbs to achieve an even crispier texture on your chicken tenders.
  3. Don’t Overcrowd the Pan: Arrange the chicken tenders in a single layer on the baking sheet to ensure even cooking and crispy edges.
  4. Check for Doneness: Use a meat thermometer to ensure the chicken has reached an internal temperature of 165°F (74°C) for safe and juicy results.

Variations

Flavor Variations

You can easily change the taste of your chicken tenders. If you like spice, try making spicy chicken tenders. Just add more cayenne pepper to the flour mix. This will give your tenders a nice kick. If you prefer a fresh taste, make herb chicken tenders. Add dried herbs like oregano to the breading. This adds a lovely flavor that makes them stand out.

Gluten-Free Option

If you need a gluten-free option, it’s simple! Just swap regular breadcrumbs and flour for gluten-free ones. This way, you can still enjoy crispy chicken tenders without the gluten. Make sure to check the labels to ensure they fit your needs.

Baked vs. Fried

Baking and frying give different textures. Baked chicken tenders are crisp outside but tender inside. They have less oil, making them a bit healthier. Fried tenders are crunchier and richer in flavor. However, they soak up more oil. Choose baking for a lighter meal, or frying for that classic crunch. Both methods can be delicious!

Storage Info

Storing Leftovers

– Store in an airtight container.

– Keep in the refrigerator for up to 3 days.

After enjoying your crispy oven-baked chicken tenders, you might have some left. To keep them fresh, place the leftovers in an airtight container. This helps to lock in flavor and moisture. You can enjoy them within three days. If you wait too long, they may lose their taste and texture.

Freezing Instructions

– Freeze cooked tenders for longer storage.

– Reheat in oven for crispiness.

If you want to save your chicken tenders for later, freezing is a great option. To do this, place the cooked tenders in a freezer-safe bag or container. Make sure to remove as much air as possible. You can freeze them for up to three months. When you’re ready to eat, just reheat them in the oven. This keeps them crispy and tasty.

Reheating Tips

– Reheat in the oven to maintain crispiness.

– Avoid microwave to prevent sogginess.

When it’s time to enjoy your chicken tenders again, use the oven for reheating. Preheat it to 375°F (190°C) and place the tenders on a baking sheet. Heat for about 10-15 minutes. This method keeps them nice and crispy. Avoid using the microwave, as it can make the tenders soggy. By following these tips, you can savor those delicious tenders just like when they were fresh.

FAQs

How do I make chicken tenders crispy?

To make chicken tenders crispy, focus on the breading and cooking. Use panko breadcrumbs for extra crunch. They are lighter and crispier than regular breadcrumbs.

– Coat the chicken well in flour first.

– Let the excess flour shake off.

– Then dip it in breadcrumbs, pressing gently to stick.

For cooking, spray the tenders lightly with cooking spray or drizzle olive oil on top. This helps brown them nicely in the oven. Bake at 400°F (200°C) for 15 to 20 minutes. Flip them halfway for even crispiness.

Can I prepare these chicken tenders ahead of time?

Yes, you can prepare chicken tenders ahead of time. Marinate them in buttermilk for at least 30 minutes, or up to 2 hours. This adds flavor and makes them tender.

You can bread the chicken and place it on the baking sheet. Cover the sheet with plastic wrap and refrigerate. When ready to cook, just bake them straight from the fridge. This makes dinner quick and easy!

What sauces pair well with chicken tenders?

Chicken tenders taste great with many sauces. Here are a few tasty options:

– Honey mustard: Sweet and tangy.

– Barbecue sauce: Smoky flavor hits just right.

– Ranch dressing: Creamy and cool.

– Ketchup: A classic dip that kids love.

– Buffalo sauce: For a spicy kick.

Feel free to mix and match!

In this blog, we covered making crispy chicken tenders. We discussed ingredients like chicken, buttermilk, and spices. We also went through step-by-step instructions for marinating, breading, and baking. Plus, we shared tips for crunch and storage options. Remember, using panko and marinating is key. These tenders are easy to freeze and reheat. Enjoy them with your favorite sauces. With these tips, you can make a great meal for everyone. Happy cookin

- 1 pound chicken breast tenders - 1 cup buttermilk - 1 cup breadcrumbs (panko recommended) - ½ cup all-purpose flour - 1 teaspoon garlic powder - 1 teaspoon onion powder - 1 teaspoon smoked paprika - ½ teaspoon salt - ½ teaspoon freshly ground black pepper - ¼ teaspoon cayenne pepper (optional) - Cooking spray or olive oil You need fresh chicken breast tenders for this recipe. I use 1 pound, which serves four. Buttermilk is key for flavor and moisture. One cup will do. For that perfect crunch, I recommend one cup of panko breadcrumbs. They create a great texture. Next, you have your seasoning ingredients. You need ½ cup of all-purpose flour. This helps the breading stick. Garlic powder, onion powder, and smoked paprika add great taste. You’ll use 1 teaspoon of each. Don’t forget salt and pepper. They enhance the chicken's flavors. I suggest ½ teaspoon of each. If you like a little heat, add ¼ teaspoon of cayenne pepper. Lastly, you’ll need cooking spray or a drizzle of olive oil. This adds crispiness and helps the tenders brown nicely in the oven. All these ingredients combine to create a delicious meal that everyone will love! {{ingredient_image_2}} First, take the chicken tenders and put them in a bowl. Add the buttermilk to the bowl. Mix well to coat each piece. Cover the bowl with plastic wrap. Place it in the fridge for at least 30 minutes. For the best flavor, marinate up to 2 hours. This step makes the chicken tender and juicy. While the chicken marinates, preheat your oven to 400°F (200°C). Line a baking sheet with parchment paper. In a shallow dish, mix the flour, garlic powder, onion powder, smoked paprika, salt, black pepper, and cayenne pepper. In another dish, pour in the breadcrumbs. This setup helps keep the process smooth. Now, take the marinated chicken out of the fridge. Let the excess buttermilk drip off. Dip each tender into the flour mixture first. Make sure it gets good coverage. Shake off any extra flour. Then, move the tender to the breadcrumbs. Press it gently to coat it evenly. This step ensures every bite is crunchy. Arrange the coated chicken tenders on the baking sheet. Lay them in a single layer. For extra crispiness, lightly spray the tenders with cooking spray. You can also drizzle a little olive oil on top. This helps them brown nicely. Place the baking sheet in your preheated oven. Bake the chicken tenders for 15-20 minutes. They should be golden brown and reach an internal temperature of 165°F (74°C). Halfway through, flip the tenders. This helps them cook evenly and get that perfect crunch. After baking, take the tenders out of the oven. Let them rest for about 3-5 minutes. This resting time keeps them juicy. Serve them warm with your favorite dipping sauces, like honey mustard or barbecue. Enjoy your crispy oven-baked chicken tenders! To get that nice crunch, use panko breadcrumbs. They are lighter and crispier than regular breadcrumbs. A light spray of cooking oil helps the tenders brown evenly. This small step makes a big difference in texture. Marination is key for flavor. I recommend marinating the chicken for at least 30 minutes. For the best taste, let it sit for up to 2 hours. You can also spice up the buttermilk. A pinch of garlic powder or a dash of hot sauce can add exciting layers of flavor. When you place the chicken on the baking sheet, space them out well. This helps them cook evenly and stay crispy. Always check the internal temperature. The chicken should reach 165°F to ensure it is fully cooked. Pro Tips Marinate for Maximum Flavor: Allowing the chicken to marinate in buttermilk for at least 30 minutes helps to tenderize the meat and infuse it with flavor. Panko for Extra Crunch: Opt for panko breadcrumbs instead of regular breadcrumbs to achieve an even crispier texture on your chicken tenders. Don’t Overcrowd the Pan: Arrange the chicken tenders in a single layer on the baking sheet to ensure even cooking and crispy edges. Check for Doneness: Use a meat thermometer to ensure the chicken has reached an internal temperature of 165°F (74°C) for safe and juicy results. {{image_4}} You can easily change the taste of your chicken tenders. If you like spice, try making spicy chicken tenders. Just add more cayenne pepper to the flour mix. This will give your tenders a nice kick. If you prefer a fresh taste, make herb chicken tenders. Add dried herbs like oregano to the breading. This adds a lovely flavor that makes them stand out. If you need a gluten-free option, it's simple! Just swap regular breadcrumbs and flour for gluten-free ones. This way, you can still enjoy crispy chicken tenders without the gluten. Make sure to check the labels to ensure they fit your needs. Baking and frying give different textures. Baked chicken tenders are crisp outside but tender inside. They have less oil, making them a bit healthier. Fried tenders are crunchier and richer in flavor. However, they soak up more oil. Choose baking for a lighter meal, or frying for that classic crunch. Both methods can be delicious! - Store in an airtight container. - Keep in the refrigerator for up to 3 days. After enjoying your crispy oven-baked chicken tenders, you might have some left. To keep them fresh, place the leftovers in an airtight container. This helps to lock in flavor and moisture. You can enjoy them within three days. If you wait too long, they may lose their taste and texture. - Freeze cooked tenders for longer storage. - Reheat in oven for crispiness. If you want to save your chicken tenders for later, freezing is a great option. To do this, place the cooked tenders in a freezer-safe bag or container. Make sure to remove as much air as possible. You can freeze them for up to three months. When you're ready to eat, just reheat them in the oven. This keeps them crispy and tasty. - Reheat in the oven to maintain crispiness. - Avoid microwave to prevent sogginess. When it's time to enjoy your chicken tenders again, use the oven for reheating. Preheat it to 375°F (190°C) and place the tenders on a baking sheet. Heat for about 10-15 minutes. This method keeps them nice and crispy. Avoid using the microwave, as it can make the tenders soggy. By following these tips, you can savor those delicious tenders just like when they were fresh. To make chicken tenders crispy, focus on the breading and cooking. Use panko breadcrumbs for extra crunch. They are lighter and crispier than regular breadcrumbs. - Coat the chicken well in flour first. - Let the excess flour shake off. - Then dip it in breadcrumbs, pressing gently to stick. For cooking, spray the tenders lightly with cooking spray or drizzle olive oil on top. This helps brown them nicely in the oven. Bake at 400°F (200°C) for 15 to 20 minutes. Flip them halfway for even crispiness. Yes, you can prepare chicken tenders ahead of time. Marinate them in buttermilk for at least 30 minutes, or up to 2 hours. This adds flavor and makes them tender. You can bread the chicken and place it on the baking sheet. Cover the sheet with plastic wrap and refrigerate. When ready to cook, just bake them straight from the fridge. This makes dinner quick and easy! Chicken tenders taste great with many sauces. Here are a few tasty options: - Honey mustard: Sweet and tangy. - Barbecue sauce: Smoky flavor hits just right. - Ranch dressing: Creamy and cool. - Ketchup: A classic dip that kids love. - Buffalo sauce: For a spicy kick. Feel free to mix and match! In this blog, we covered making crispy chicken tenders. We discussed ingredients like chicken, buttermilk, and spices. We also went through step-by-step instructions for marinating, breading, and baking. Plus, we shared tips for crunch and storage options. Remember, using panko and marinating is key. These tenders are easy to freeze and reheat. Enjoy them with your favorite sauces. With these tips, you can make a great meal for everyone. Happy cooking!

Crispy Oven-Baked Chicken Tenders

Deliciously crispy chicken tenders baked in the oven for a healthier twist on a classic favorite.
Course Main Course
Cuisine American
Servings 4
Calories 350 kcal

Ingredients
  

  • 1 pound chicken breast tenders
  • 1 cup buttermilk
  • 1 cup breadcrumbs
  • 0.5 cup all-purpose flour
  • 1 teaspoon garlic powder
  • 1 teaspoon onion powder
  • 1 teaspoon smoked paprika
  • 0.5 teaspoon salt
  • 0.5 teaspoon freshly ground black pepper
  • 0.25 teaspoon cayenne pepper
  • 1 spray cooking spray or olive oil

Instructions
 

  • In a medium mixing bowl, combine the chicken tenders and buttermilk. Cover and refrigerate for at least 30 minutes, preferably up to 2 hours.
  • Preheat your oven to 400°F (200°C) and line a baking sheet with parchment paper. In a shallow dish, whisk together the flour, garlic powder, onion powder, smoked paprika, salt, black pepper, and cayenne pepper. In another dish, pour in the breadcrumbs.
  • Remove the marinated chicken tenders from the refrigerator. Allow excess buttermilk to drip off, then dip each tender into the flour mixture, coating thoroughly. Shake off excess flour and transfer to the breadcrumb mixture, pressing gently to adhere.
  • Arrange the coated chicken tenders on the prepared baking sheet in a single layer. Lightly spray with cooking spray or drizzle with olive oil.
  • Bake for 15-20 minutes or until golden brown and internal temperature reaches 165°F (74°C), flipping halfway through for even cooking.
  • Remove from the oven and let rest for 3-5 minutes before serving. Enjoy with dipping sauces like honey mustard, barbecue, or creamy ranch.

Notes

For extra crunch, use panko breadcrumbs. Adjust cayenne pepper to taste for heat.
Keyword chicken tenders, crispy, healthy, oven-baked

WANT TO SAVE THIS RECIPE?