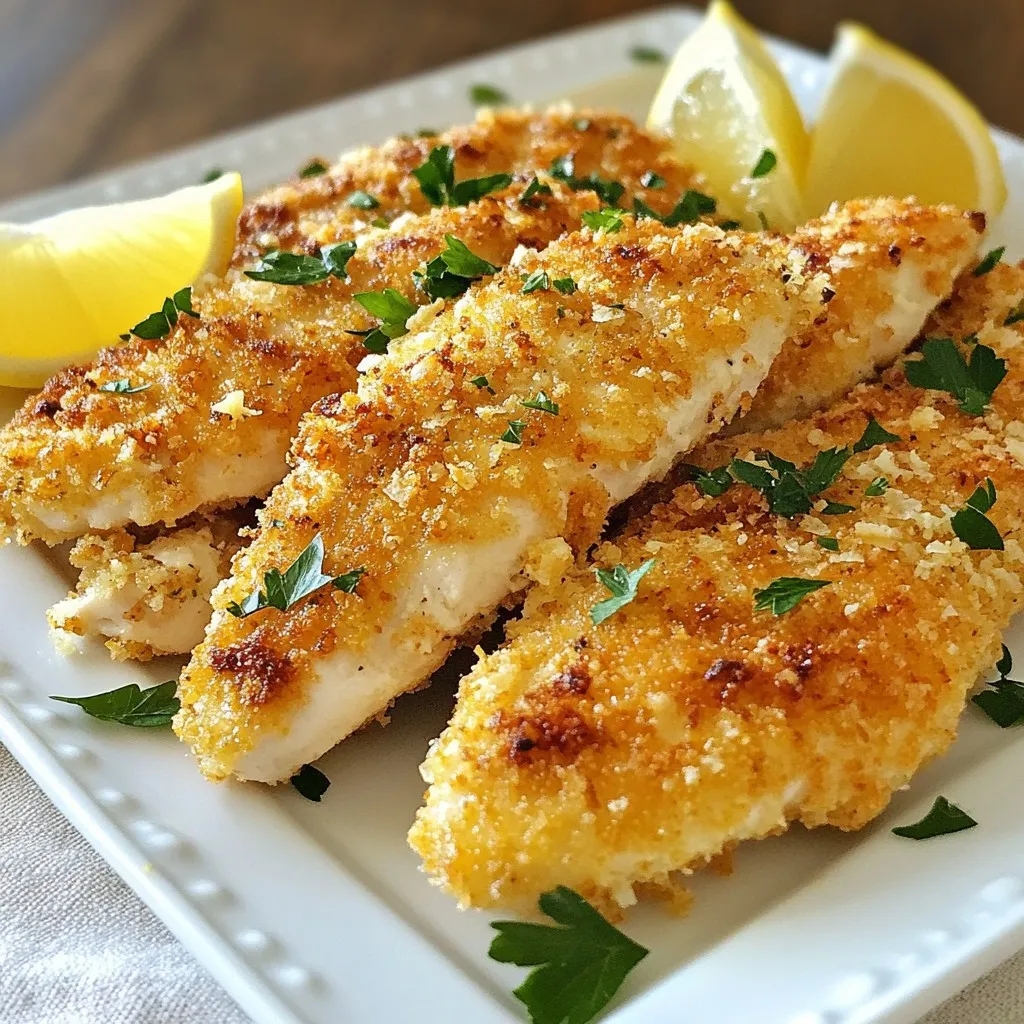
Craving a tasty meal that’s quick and simple? Let’s make crispy oven-baked chicken cutlets! With just a few ingredients, you can whip up this crispy delight that will satisfy your hunger. I’ll guide you through each step, from seasoning to baking. This dish is perfect for busy nights or when you want a delicious meal without the fuss. Ready to impress your family? Let’s get started!
Why I Love This Recipe
- Deliciously Crispy: The panko breadcrumbs combined with Parmesan create a crunchy exterior that perfectly contrasts the tender chicken inside.
- Easy Preparation: This recipe is straightforward and quick, making it perfect for busy weeknights or entertaining guests.
- Customizable: You can easily modify the seasonings or add your favorite herbs to cater to your taste preferences.
- Versatile Serving Options: These cutlets can be enjoyed on their own, in a sandwich, or as part of a salad, making them great for any meal.
Ingredients
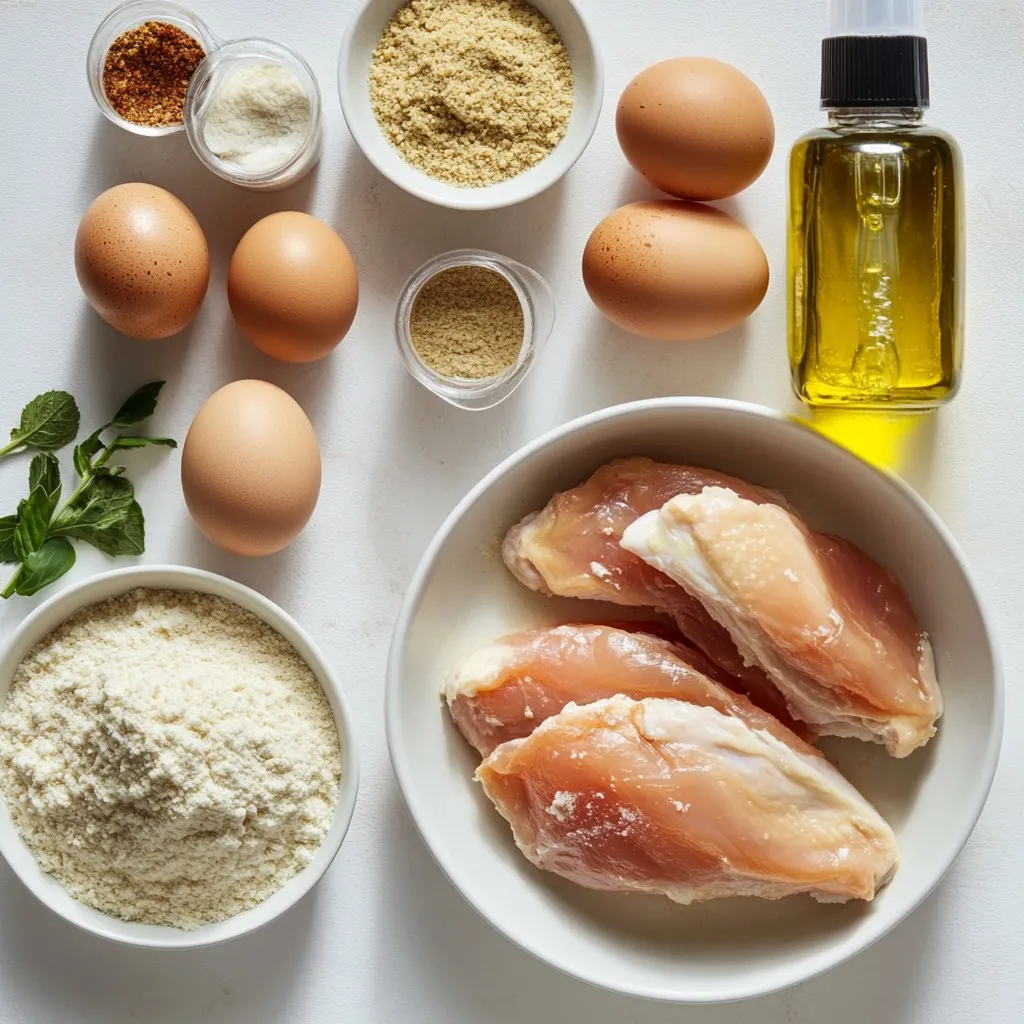
List of Main Ingredients
To make crispy oven baked chicken cutlets, you will need:
– 2 boneless, skinless chicken breasts
– 1 cup all-purpose flour
– 2 large eggs
– 1 cup panko breadcrumbs
– ½ cup grated Parmesan cheese
Seasoning Details
The right spices and herbs make your chicken cutlets delicious. Here’s what to add:
– 1 teaspoon garlic powder
– 1 teaspoon onion powder
– 1 teaspoon smoked paprika
– Salt and pepper to taste
– ½ teaspoon dried Italian herbs (oregano, basil, and thyme blend)
Recommended Tools for Preparation
You’ll want some handy tools to prepare these cutlets:
– Meat mallet or rolling pin
– Three shallow dishes for breading
– Baking sheet
– Parchment paper
– Olive oil spray
Step-by-Step Instructions
Preheating the Oven and Preparing the Baking Sheet
Start by preheating your oven to 400°F (200°C). This makes sure the chicken cooks evenly. While it warms up, line a baking sheet with parchment paper. This prevents sticking and makes cleanup easy.
Preparing the Chicken
To prepare the chicken, take two boneless, skinless chicken breasts. Place them between two sheets of plastic wrap. Use a meat mallet or rolling pin to pound the chicken. Aim for an even thickness of about ½ inch. This ensures even cooking and keeps the chicken tender.
Breading the Chicken Cutlets
Set up your breading station with three shallow dishes. In the first dish, add 1 cup of all-purpose flour. Season it with salt and pepper. In the second dish, whisk 2 large eggs until smooth. In the third dish, mix 1 cup of panko breadcrumbs, ½ cup of grated Parmesan cheese, 1 teaspoon of garlic powder, 1 teaspoon of onion powder, 1 teaspoon of smoked paprika, and ½ teaspoon of dried Italian herbs.
Take one chicken breast and dip it into the flour. Make sure it’s fully coated, then shake off any excess. Next, dip the floured chicken into the whisked eggs. Let any extra egg drip back into the dish. Finally, coat the chicken in the breadcrumb mixture. Press gently to help the breadcrumbs stick. Repeat for each chicken piece.
Baking the Cutlets
Arrange the breaded cutlets on the lined baking sheet. Leave some space between them for even cooking. Lightly spray the tops with olive oil. This helps achieve crispiness while baking. Place the baking sheet in your preheated oven. Bake for 20-25 minutes, checking for doneness. The chicken should be cooked through, and the breading should be golden brown. Flip the cutlets halfway through for even browning.
Resting Before Serving
After baking, remove the cutlets from the oven. Let them rest for a few minutes. This resting period helps keep the chicken juicy. Enjoy your crispy oven-baked chicken cutlets!
Tips & Tricks
Achieving Maximum Crispiness
To get the best crunch, use panko breadcrumbs. They are lighter and crispier than regular breadcrumbs. Spraying the cutlets with olive oil before baking helps too. This extra fat creates a golden brown crust. Flip the cutlets halfway through baking for even crispiness.
Using Alternative Coatings
Try using crushed cornflakes or almond flour for a different texture. Both options can add unique flavors. For a fun twist, mix in some spices or herbs with your coating. This will give your cutlets a flavor boost that everyone will love.
Ensuring Even Cooking
Pound the chicken to a uniform thickness. This step helps the chicken cook evenly. Use a meat mallet or rolling pin between plastic wrap for best results. Space the cutlets well on the baking sheet so hot air flows around them. This keeps them from steaming and losing their crunch.
Pro Tips
- Even Thickness is Key: Ensure that the chicken breasts are pounded to an even thickness of ½ inch. This promotes even cooking and prevents the edges from drying out.
- Double Breading Option: For an even crunchier texture, consider double breading your chicken. Dip the coated cutlets back into the egg and breadcrumbs for an extra crispy finish.
- Rest Before Serving: Allow the chicken cutlets to rest for a few minutes after baking. This helps the juices redistribute, resulting in a moist and tender bite.
- Flavor Variations: Experiment with different spices in the breadcrumb mixture, such as cayenne pepper for heat or Italian seasoning for a herby flavor twist.
Variations
Flavor Enhancements
You can boost the flavor of your chicken cutlets in many ways. Try adding spices like cayenne pepper for heat or lemon zest for brightness. You can also swap out the Parmesan cheese for cheddar or feta for a unique twist. Consider mixing fresh herbs like parsley or cilantro into the breadcrumb mixture for a fresh taste.
Gluten-Free Options
If you need a gluten-free version, it’s simple! Use gluten-free flour and replace the panko breadcrumbs with crushed gluten-free crackers or cornflakes. This substitution still gives you that desired crunch. Make sure to check that your seasonings do not contain gluten, as some may have hidden ingredients.
Serving Suggestions and Pairings
You can serve these crispy cutlets with many sides. Consider classic mashed potatoes or a fresh garden salad. For a fun twist, pair them with sweet potato fries or coleslaw. You can also top them with a tangy sauce, like a homemade aioli or marinara, to enhance the meal. Adding lemon wedges can bring a refreshing touch too!
Storage Info
How to Store Leftovers
To store leftover chicken cutlets, let them cool first. Place them in an airtight container. Make sure to put a piece of parchment paper between layers if stacking. This keeps the cutlets from sticking together. Store them in the fridge for up to three days.
Reheating Tips
When you are ready to enjoy the leftovers, preheat your oven to 375°F (190°C). Place the cutlets on a baking sheet. Reheat them for about 10-15 minutes. This method keeps them crispy. You can also use an air fryer. Set it to 350°F (175°C) and cook for about 5-7 minutes.
Freezing for Future Meals
If you want to save cutlets for later, freezing works well. Wrap each cutlet tightly in plastic wrap. Then, place them in a freezer-safe bag. Remove as much air as possible. They will last for up to three months in the freezer. When ready to eat, thaw in the fridge overnight before reheating.
FAQs
How can I make chicken cutlets extra crispy?
To make chicken cutlets extra crispy, use panko breadcrumbs. They give a crunchier texture than regular breadcrumbs. Also, spray the cutlets lightly with olive oil before baking. This helps them brown nicely in the oven. Flipping the cutlets halfway through cooking ensures even crispiness on both sides.
Can I use chicken thighs instead of breasts?
Yes, you can use chicken thighs instead of breasts. Thighs are juicier and have more flavor. Just make sure to cut them into similar sizes for even cooking. The breading process stays the same, and you will still get that crispy texture.
What dipping sauces pair well with chicken cutlets?
Some great dipping sauces for chicken cutlets include creamy garlic aioli, zesty spicy ketchup, or honey mustard. Each sauce adds a fun twist to the flavor. You can also try a barbecue sauce or a tangy ranch dressing for more options.
How long do leftover cutlets last in the fridge?
Leftover chicken cutlets last about 3 to 4 days in the fridge. Store them in an airtight container to keep them fresh. Reheat them in the oven for the best texture. This way, they stay crispy and tasty!
We covered how to make crispy chicken cutlets from start to finish. You learned about the key ingredients and tools you need. I provided easy steps for preparing, breading, and baking the cutlets. You also found tips for crispiness and variations to try. Don’t forget how to store leftovers for later. Enjoy making this tasty dish. Your meals will be better with these skill