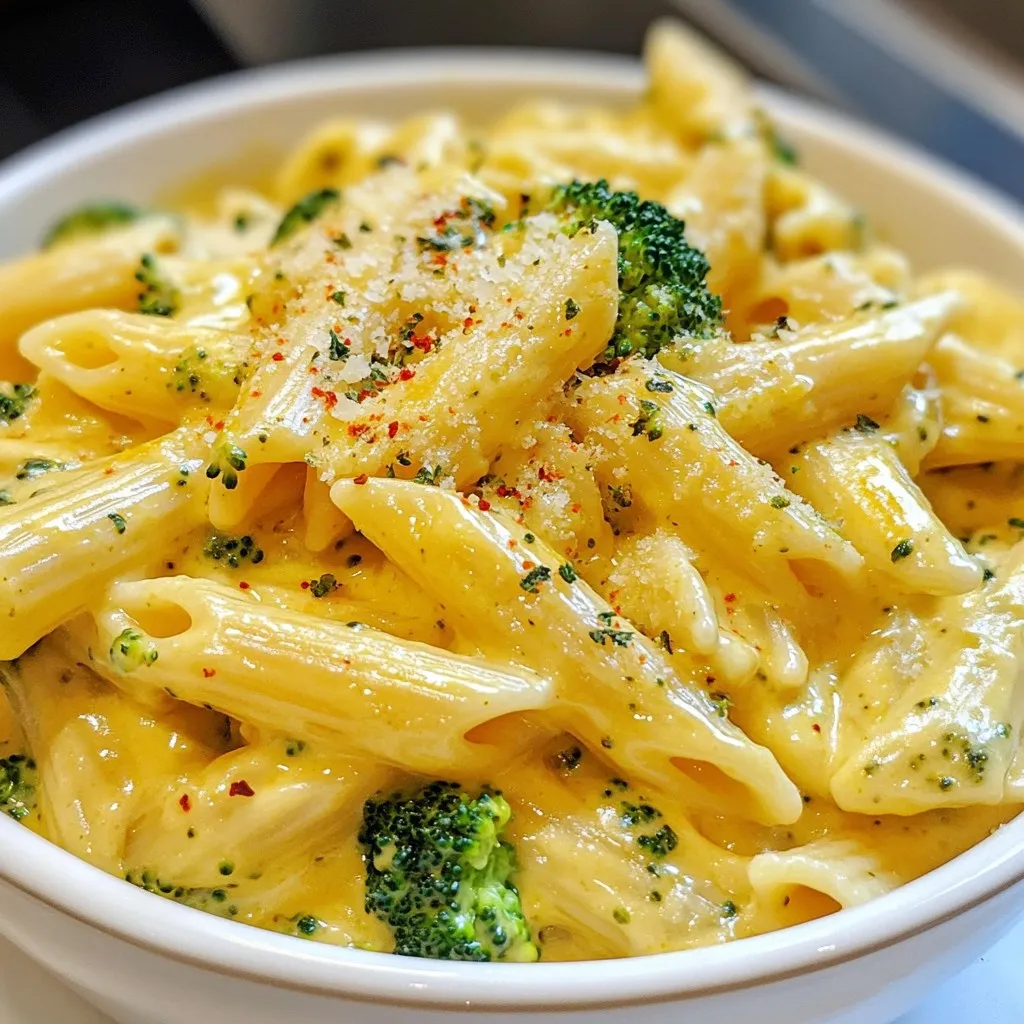
Craving a quick and tasty meal? Let’s dive into Creamy Broccoli Cheese Pasta! This dish combines tender broccoli with creamy cheese in a way that’s both delightful and simple. You’ll find all the ingredients you need right here and learn how easy it is to whip up this tasty meal. Whether you’re a busy parent or a pasta lover, this recipe is sure to please. Let’s get started!
Why I Love This Recipe
- Quick and Easy: This pasta dish comes together in just 25 minutes, making it perfect for busy weeknights.
- Comfort Food at Its Best: The creamy cheese sauce combined with tender broccoli provides a warm and satisfying meal.
- Customizable: You can easily add proteins like chicken or shrimp or switch up the cheese for different flavor profiles.
- Kid-Friendly: With its cheesy goodness and fun pasta shapes, this dish is sure to please even the pickiest eaters!
Ingredients
List of Ingredients
– 8 oz pasta (penne or fusilli are excellent choices)
– 2 cups broccoli florets, fresh or frozen
– 1 cup heavy cream
– 1 cup shredded cheddar cheese (sharp for bold flavor)
– 1/2 cup grated Parmesan cheese
– 2 cloves garlic, minced
– 1 tablespoon olive oil
– Salt and freshly cracked black pepper to taste
– 1/4 teaspoon red pepper flakes (optional, for a spicy kick)
– Fresh parsley, finely chopped (for garnish)
Tips on Choosing Ingredients
When you choose pasta, look for quality brands. I prefer penne or fusilli. These shapes hold sauce well. For broccoli, fresh is best, but frozen works too. Just make sure it’s bright green. When picking cheese, go for sharp cheddar for a bold taste. Parmesan should be real, not just a sprinkle. Fresh garlic gives the best flavor. Always get heavy cream, as it makes the sauce rich.
Substitutions for Dietary Restrictions
If you need a gluten-free option, choose gluten-free pasta. For a lighter dish, swap heavy cream for half-and-half or a plant-based cream. If you’re vegan, use a non-dairy cheese and cream. You can also skip cheese altogether and add nutritional yeast for a cheesy flavor. If you avoid garlic, try shallots or skip it entirely.
Step-by-Step Instructions
Cooking the Pasta and Broccoli
Start by boiling water in a large pot. Add salt to the water. Once it boils, add 8 ounces of pasta. I like penne or fusilli for this dish. Cook the pasta for about 8 to 10 minutes. Two to three minutes before the pasta is done, add 2 cups of broccoli florets. This keeps the broccoli bright and tender. When both are cooked, drain them and set them aside.
Preparing the Creamy Cheese Sauce
In the same pot, reduce the heat to medium. Pour in 1 tablespoon of olive oil. Let it warm up, then add 2 cloves of minced garlic. Sauté the garlic for about 1 minute. You want it fragrant but not brown. Next, lower the heat even more. Pour in 1 cup of heavy cream. Stir it well. Gradually add 1 cup of shredded cheddar cheese and 1/2 cup of grated Parmesan cheese. Keep stirring until the cheese melts and the sauce is smooth and creamy.
Combining Pasta with Sauce
Now it’s time to mix everything. Add the drained pasta and broccoli to the pot. Gently fold them into the creamy cheese sauce. Toss everything carefully so the pasta and broccoli are evenly coated. Season the mixture with salt, freshly cracked black pepper, and red pepper flakes for some heat if you like. Let the pasta warm through on low heat for a minute or two. This step ensures everything is heated perfectly.
Tips & Tricks
How to Achieve the Best Creamy Texture
To get that perfect creamy texture, focus on your cheese. Use fresh, high-quality cheese. I love sharp cheddar for its bold flavor. Grate it yourself to help it melt better. Always stir the cheese in slowly after adding the cream. This keeps the sauce smooth and lump-free.
Timing Tips for Cooking Pasta and Broccoli
Timing is key for great pasta and broccoli. Start boiling water first. Once the water boils, add the pasta. Cook it for about 8-10 minutes. Add the broccoli florets to the pot 2-3 minutes before the pasta is ready. This way, both will cook perfectly. Drain them together, so they stay warm and ready for the sauce.
Enhancing Flavor with Seasonings
Seasoning can make a big difference. I like to use garlic for a rich taste. Sauté it gently to avoid burning. Adding salt and fresh black pepper is a must. For a little heat, try red pepper flakes. They add a nice kick without being too spicy. Finish with fresh parsley. It adds a burst of color and flavor.
Pro Tips
- Cook Pasta Al Dente: Ensure your pasta is cooked al dente to maintain a firm texture that holds up well in the creamy sauce.
- Use Fresh Garlic: Freshly minced garlic adds a more intense flavor compared to pre-minced or powdered options, enhancing the overall taste of the sauce.
- Gradual Cheese Addition: Add the cheese slowly and stir continuously to prevent clumping and achieve a smooth, creamy sauce.
- Garnish Thoughtfully: Garnish with freshly chopped parsley and extra cheese just before serving to elevate the dish visually and add a fresh flavor contrast.
Variations
Adding Protein Options (e.g., chicken or shrimp)
You can easily make this dish more filling. Adding protein boosts flavor and nutrition. Try cooked chicken or shrimp. If you use chicken, grill or sauté it first. Cut it into bite-sized pieces. For shrimp, cook until pink and tender. Mix them in when you combine the pasta and sauce. This adds a nice texture and taste, making your meal heartier.
Incorporating Additional Vegetables
Feel free to get creative with veggies! You can add bell peppers, spinach, or peas. Just chop them into small pieces for easy cooking. If you want a colorful dish, use a mix of these veggies. Add them to the pot when cooking the pasta. This way, they cook perfectly and keep their bright colors. More veggies mean more flavors, and they make the dish healthier.
Making it Vegan or Dairy-Free
Want a vegan version? Swap the heavy cream for coconut milk or cashew cream. Use nutritional yeast instead of cheese for a cheesy flavor. Choose pasta made from lentils or chickpeas to keep it plant-based. You can also add vegan cheese if you like. Follow the same steps, and you’ll have a creamy pasta that everyone can enjoy!
Storage Info
How to Store Leftovers
Storing leftovers properly keeps your creamy broccoli cheese pasta fresh. First, let the pasta cool to room temperature. Then, transfer it to an airtight container. Make sure to seal it well. You can keep it in the fridge for up to three days. If you want to save it longer, freezing is a great option.
Reheating Tips for Optimal Taste
When you are ready to enjoy your leftovers, reheating is key. Use a skillet for the best taste. Add a splash of milk or cream to the pasta. This helps bring back the creamy texture. Heat over medium-low until hot, stirring often. If you prefer the microwave, cover the dish with a lid. Heat in short bursts, stirring in between, until warm.
Freezing Instructions
To freeze your creamy broccoli cheese pasta, portion it out first. Use freezer-safe containers or bags. Squeeze out as much air as possible to prevent freezer burn. You can freeze it for up to three months. When ready to eat, thaw it in the fridge overnight. Then, reheat as mentioned above for the best flavor and texture.
FAQs
Can I use a different type of cheese?
Yes, you can use many types of cheese. If you want a milder taste, try mozzarella. For a bolder flavor, use gouda or fontina. You can mix cheeses for a unique taste. Just make sure to use cheese that melts well for that creamy sauce.
How can I make this recipe gluten-free?
To make this dish gluten-free, choose gluten-free pasta. Many brands offer great options like rice or quinoa pasta. Always check the label to ensure it’s gluten-free. The rest of the ingredients are naturally gluten-free, so you can enjoy this dish without worry.
What type of pasta works best for this dish?
Penne or fusilli work best for this recipe. They hold the sauce well and make each bite tasty. Other types like rotini or bowtie also work nicely. Just pick a pasta shape that you like!
This blog post guides you through creating a creamy pasta dish. You learned about choosing fresh ingredients and smart substitutions for dietary needs. I shared step-by-step cooking instructions and tips to achieve the best texture. You can also explore fun variations or how to store leftovers. Remember, cooking is flexible. Feel free to adjust ingredients and flavors to suit your taste. Enjoy making this dish your own. Happy cookin