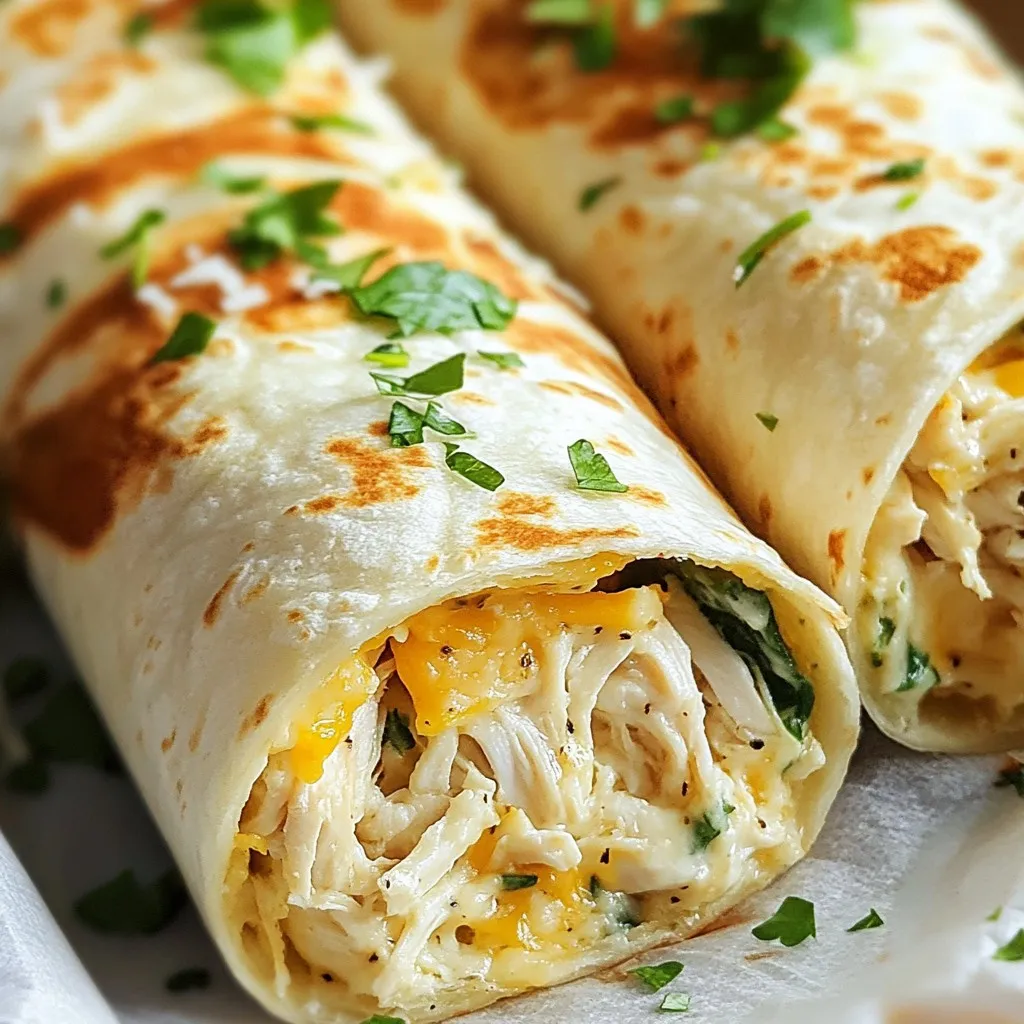
Looking for a quick and tasty meal? You’ll love these Cheesy Garlic Chicken Wraps! They’re simple to make and packed with flavor. You can whip them up in no time, perfect for busy evenings. Whether you’re cooking for yourself or a crowd, this recipe hits the spot. Let’s dive into the ingredients and steps to create your new favorite wrap!
Why I Love This Recipe
- Delicious Flavor Combination: The blend of garlic, cream cheese, and cheeses creates a rich and savory filling that’s hard to resist.
- Easy to Make: With just a few simple steps, you can whip up these wraps in no time, making them perfect for a quick meal.
- Customizable: You can easily adjust the spiciness or add extra veggies to suit your taste preferences.
- Great for Any Occasion: These wraps are versatile enough for a casual lunch, a picnic, or even a party appetizer.
Ingredients
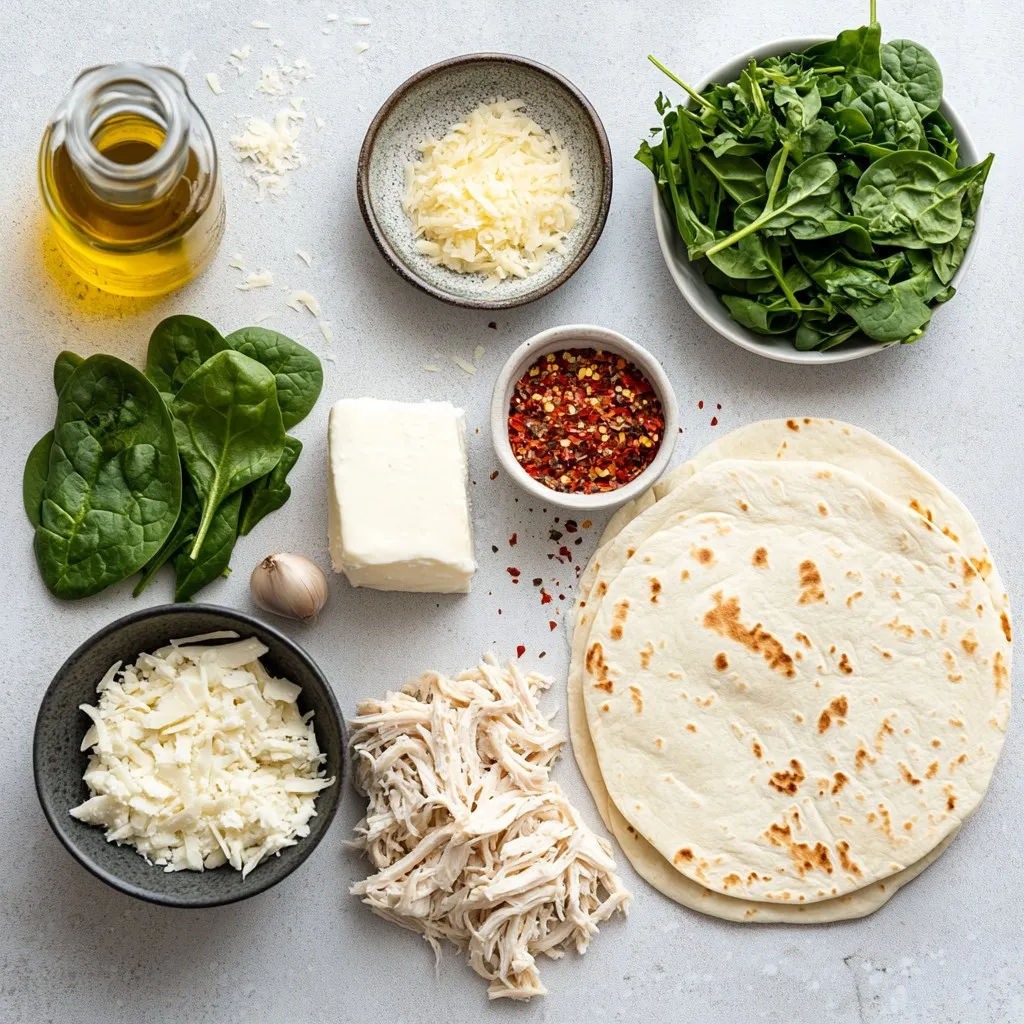
List of Ingredients
– 2 cups cooked chicken, shredded
– 1 cup cream cheese, softened at room temperature
– 1 cup shredded mozzarella cheese
– 1/2 cup grated Parmesan cheese
– 4 cloves of garlic, minced
– 1 teaspoon Italian seasoning blend
– 1/2 teaspoon red pepper flakes (optional)
– 4 large tortillas (flour or spinach)
– 1 cup fresh spinach leaves, washed and dried
– 1/4 cup fresh parsley, finely chopped
– Olive oil, for brushing
Optional Ingredients for Variation
You can add your own twist with these options:
– Diced bell peppers for crunch
– Sliced mushrooms for earthiness
– Chopped sun-dried tomatoes for sweetness
– Avocado slices for creaminess
Kitchen Tools Required
To make these wraps, you will need:
– A large mixing bowl
– A skillet for cooking
– A spatula for flipping
– A sharp knife for slicing
– A clean flat surface for assembling
Gather these tools and ingredients to make cooking easy and fun!
Step-by-Step Instructions
Preparing the Cheesy Mixture
Start with a large mixing bowl. Add the 2 cups of shredded chicken. Next, mix in 1 cup of cream cheese that is soft. Then, add 1 cup of shredded mozzarella and 1/2 cup of grated Parmesan. Don’t forget the 4 cloves of minced garlic! You can add more if you love garlic. Sprinkle in 1 teaspoon of Italian seasoning. If you want some heat, toss in 1/2 teaspoon of red pepper flakes. Stir until everything is creamy and combined well.
Assembling the Wraps
Grab your clean workspace and lay out the tortillas. You can use flour or spinach ones for color. In the center of each tortilla, place a handful of fresh spinach leaves. This will add freshness and crunch. Now, take a generous spoonful of the cheesy chicken mixture and place it on the spinach. Spread it evenly so each bite is packed with flavor.
Cooking the Wraps
Preheat a large skillet over medium heat. Brush the skillet lightly with olive oil. This helps prevent sticking and adds flavor. Place the wraps seam-side down in the skillet. Cook for 2-3 minutes on each side. You want them golden brown and crispy. Once done, remove the wraps and let them cool for a minute. Slice each wrap in half. Finally, garnish with fresh parsley for a pop of color. Enjoy your tasty cheesy garlic chicken wraps!
Tips & Tricks
How to Achieve the Perfect Crispy Texture
To get a nice crispy wrap, use medium heat. A hot skillet helps the tortillas crisp up well. Brush the outside of each wrap with olive oil. This adds flavor and helps with browning. Cook each side for 2-3 minutes. Look for a golden brown color. This shows they are ready to flip. If they are not crispy, cook them a little longer.
Adjusting Spiciness and Flavor
You can change the spice level to fit your taste. If you like heat, add more red pepper flakes. For a milder flavor, skip the flakes altogether. Fresh garlic gives a strong taste. You can use less garlic if you want it less bold. The Italian seasoning also adds flavor. Feel free to mix in your favorite herbs for a twist. Basil or oregano can work well here.
Serving Suggestions
Serve your cheesy garlic chicken wraps on a bright plate. Pair them with marinara sauce for dipping. A yogurt dip also adds a nice touch. Consider adding a simple salad on the side for freshness. For a fun twist, cut the wraps into smaller pieces. This makes them great for sharing at parties. Enjoy experimenting with different sides and dips!
Pro Tips
- Choose the Right Tortilla: Opt for flour tortillas for a soft, chewy texture or spinach tortillas for a vibrant color and added nutrition.
- Customize Your Cheese: Feel free to mix in other cheeses like cheddar or pepper jack for a unique flavor profile.
- Perfectly Shredded Chicken: Use rotisserie chicken for convenience, or poach chicken breasts for a homemade touch and better flavor.
- Serve with Dips: Enhance the eating experience by offering marinara sauce or a light yogurt dip on the side for extra flavor.
Variations
Vegetarian Option
To make a vegetarian version of cheesy garlic chicken wraps, swap the chicken for cooked mushrooms or roasted vegetables. Mushrooms add a meaty flavor and texture. You can use bell peppers, zucchini, or even eggplant. Ensure you season the veggies well to keep the taste bright and fresh. This option is just as creamy and satisfying!
Different Cheese Combinations
You can mix and match different cheeses to create your favorite flavor. Try using gouda or cheddar for a sharp taste. Feta cheese adds a nice tang. For a fun twist, add some blue cheese for a bold flavor. Just remember to keep the cream cheese as a base for creaminess.
Gluten-Free Wraps
For a gluten-free option, choose gluten-free tortillas. Many brands offer great flavors and textures. You can also use lettuce leaves for a low-carb wrap. This gives a fresh and crunchy bite. Just be careful when wrapping, as they can be more delicate. Enjoy the same cheesy goodness without the gluten!
Storage Info
How to Store Leftover Wraps
Store any leftover wraps in an airtight container. Make sure they cool down first. This helps keep the wraps fresh and tasty. Place them in the fridge for up to three days. You can also wrap them in plastic wrap for extra protection. Just remember, the sooner you eat them, the better they will taste.
Reheating Instructions
To reheat the wraps, you can use a skillet. Heat it over medium heat without oil. Place the wrap seam-side down and cook for about 2 minutes. Flip it over and cook for another 2 minutes. This keeps the wrap crispy. You can also use a microwave, but it might make the wrap soft. Heat for 30 seconds at a time until warm.
Freezing for Future Meals
If you want to save wraps for later, freezing is a great option. Wrap each cooled wrap in foil or plastic wrap. Place them in a freezer-safe bag. They can stay in the freezer for up to three months. When you’re ready to eat, thaw them in the fridge overnight. Then, reheat them as mentioned above. Enjoy them whenever you want!
FAQs
Can I use raw chicken instead of cooked?
No, you cannot use raw chicken. The recipe needs cooked chicken for safety. Raw chicken must cook fully to be safe to eat. It takes longer to cook raw chicken. Also, cooked chicken makes the wrap creamy and flavorful. Shredded cooked chicken blends well with cheese and garlic.
What can I substitute for cream cheese?
You can use Greek yogurt instead of cream cheese. It gives a similar texture and adds protein. Another option is cottage cheese, but blend it until smooth. Mascarpone cheese also works well for a rich taste. Each substitute will change the flavor a bit, so choose what you like best.
How can I make these wraps healthier?
To make these wraps healthier, use whole wheat tortillas. They add fiber and nutrients. You can also add more veggies like bell peppers or cucumbers. Swap out some cheese for extra spinach or other greens. Use low-fat cream cheese or yogurt to cut calories. Each of these changes keeps the wraps tasty and healthy.
This post covered all you need to make delicious wraps. You learned about the key ingredients, tools, and step-by-step cooking guide. We shared tips for perfect texture and ways to adjust flavors. You can also explore fun variations, like vegetarian options or gluten-free wraps. Plus, we discussed storage and reheating suggestions.
Enjoy your tasty creations and experiment with different flavors. The wraps can be a fun meal for anyon