Go Back
- 1 cup graham cracker crumbs - 4 tablespoons unsalted butter, melted - 2 cups cream cheese, softened - 1/2 cup powdered sugar - 1 teaspoon pure vanilla extract - 1 cup heavy whipping cream - 1 cup fresh strawberries, hulled and sliced - 2 tablespoons granulated sugar (for macerating strawberries) - Fresh mint leaves for garnish (optional) The graham cracker crumbs form the crust. They add a sweet and crunchy base. The melted butter helps bind the crumbs together. Cream cheese provides a rich and creamy texture. It is the star of our cheesecake. Powdered sugar sweetens the mix without grittiness. Heavy whipping cream adds a light and fluffy feel. The strawberries bring freshness and a burst of flavor. They also add a lovely color to the cups. Finally, mint leaves offer a pop of green for garnish. If you lack graham crackers, try digestive biscuits or cookies. For gluten-free options, use gluten-free graham crackers. You can swap cream cheese for a dairy-free cream cheese. If you want a different flavor, use flavored yogurt instead. Greek yogurt works well but may change the texture. For less sweetness, cut back on powdered sugar. Adjust the sugar in strawberries to taste. If you want a fruity twist, try adding blueberries or raspberries. {{ingredient_image_2}} To start, grab a medium bowl. Add 1 cup of graham cracker crumbs. Then, pour in 4 tablespoons of melted unsalted butter. Mix well until the crumbs feel like wet sand. This makes a great base for our cheesecake. Next, take serving cups and fill them with the crumb mixture. Press down firmly to form a solid crust. Make sure it’s compact. Set these cups aside; we will fill them soon. Now, let’s make the creamy filling. In a large bowl, beat 2 cups of softened cream cheese. Use an electric mixer until it turns smooth and creamy. There should be no lumps. Gradually, add in 1/2 cup of powdered sugar and 1 teaspoon of pure vanilla extract. Keep mixing until everything is well blended. In a separate bowl, pour in 1 cup of heavy whipping cream. Whip it until you see stiff peaks. This makes the cheesecake light and fluffy. Carefully fold the whipped cream into the cream cheese mixture. Use a spatula to combine gently. Be careful not to deflate the whipped cream; it should remain airy. Next, we will prepare the strawberries. Take 1 cup of fresh strawberries and hull them. Slice them and toss them in a bowl with 2 tablespoons of granulated sugar. Let them sit for about 10 minutes. This process is called macerating and brings out their sweet juice. Now, it’s time to layer the cups. Spoon the cream cheese mixture into each cup over the graham cracker crust. Next, top each cup with a generous amount of macerated strawberries. Let some of the juice drizzle onto the cheesecake for extra flavor. Cover the cups and place them in the refrigerator. Chill them for at least 2 hours or overnight. This helps the flavors meld beautifully. Before serving, you can add fresh mint leaves for a pop of color. Enjoy your delicious no-bake strawberry cheesecake cups! To make the best whipped cream, start with cold heavy cream. Use a clean bowl and beaters. I prefer using an electric mixer for speed. Whip the cream until it forms stiff peaks. This means it holds its shape well. Be careful not to over-whip, or it will turn grainy. Fold the whipped cream gently into the cream cheese mixture. This keeps it light and fluffy. Layering is key to a beautiful cheesecake cup. Begin with the graham cracker crust at the bottom. Press it down firmly to avoid crumbling. Then, add a smooth layer of cream cheese mixture. Use a spoon or spatula to spread it evenly. Next, spoon the macerated strawberries on top. Try to let some juice flow onto the cream layer. This creates a lovely look and adds flavor. Presentation matters when serving these cheesecake cups. Use clear cups to show off the layers. A decorative platter makes a great display. For extra flair, add fresh mint leaves on top. You can also sprinkle some crushed graham crackers for texture. Keep the cups chilled until serving. This ensures they stay fresh and tasty! Pro Tips Use Room Temperature Cream Cheese: Allow your cream cheese to come to room temperature before mixing. This ensures a smoother and creamier texture without lumps in your cheesecake mixture. Chill the Cups: For an extra refreshing dessert, chill your serving cups in the refrigerator before assembling the cheesecake. This keeps the dessert cool and enhances the overall experience. Experiment with Flavors: Feel free to add flavorings such as lemon zest or almond extract to the cream cheese mixture for a unique twist on the classic cheesecake flavor. Make Ahead: These cheesecake cups can be prepared a day in advance. Allowing them to chill overnight helps the flavors to meld beautifully, making for an even tastier dessert. {{image_4}} You can switch up the fruit on top. While strawberries are great, try using blueberries, raspberries, or sliced peaches. Each fruit adds its own flavor. You can even mix fruits for a fun twist. Just remember to macerate them, like we did with the strawberries, to bring out their sweetness. If you want a dairy-free option, you can use vegan cream cheese. Look for brands that are rich and creamy. For the whipped cream, coconut cream works well. Just chill a can of coconut milk, scoop out the cream, and whip it. This keeps the dessert light and tasty while being dairy-free. Add some extra flavor to your cream cheese mix. A tablespoon of lemon juice or zest brightens the taste. For a chocolate twist, mix in cocoa powder. You can also try adding a splash of almond extract for a nutty flavor. These simple changes make your cheesecake unique and fun! To keep your leftover cheesecake cups fresh, cover them tightly with plastic wrap. You can also use an airtight container. This keeps moisture in and prevents the cheesecake from drying out. Store the cups in the refrigerator. They will stay tasty for up to three days. If you want to save some for later, you can freeze them. First, let the cheesecake cups chill in the fridge for at least two hours. After that, cover each cup with plastic wrap, then aluminum foil. This extra layer protects against freezer burn. You can freeze them for up to a month. When you are ready to eat, thaw them in the fridge overnight. The cheesecake cups taste best within three days if stored in the fridge. After three days, the flavors may fade. If frozen, enjoy them within a month for the best taste and texture. Remember, the fresher, the better! Yes, you can make these cheesecake cups ahead of time. Prepare them a day before your event. This lets the flavors blend well. Just cover them tightly and store in the fridge. They taste even better after chilling overnight. If you need a substitute for graham crackers, try digestive biscuits or vanilla wafers. You can also use crushed cookies like Oreos for a chocolate twist. All these options will give you a tasty crust. Chill the cheesecake cups for at least 2 hours. This helps the filling set nicely. For best results, let them chill overnight. The longer they sit, the better the flavors meld together. In this article, I covered the essential ingredients and step-by-step instructions for making cheesecake cups. You learned about ingredient substitutions and tips for perfecting your whipped cream. We explored fun variations, including fruit toppings and dairy-free options. Lastly, I shared how to store leftovers and answered common questions. Enjoy creating your cheesecake cups. They are easy, tasty, and perfect for sharing.

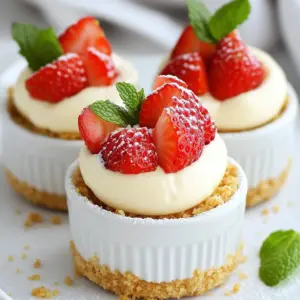
No-Bake Strawberry Cheesecake Cups

Delicious and easy-to-make no-bake cheesecake cups layered with fresh strawberries.
Course Dessert
Cuisine American
Servings 6
Calories 350 kcal

Ingredients
  

  • 1 cup graham cracker crumbs
  • 4 tablespoons unsalted butter, melted
  • 2 cups cream cheese, softened to room temperature
  • 1/2 cup powdered sugar
  • 1 teaspoon pure vanilla extract
  • 1 cup heavy whipping cream
  • 1 cup fresh strawberries, hulled and sliced
  • 2 tablespoons granulated sugar (for macerating strawberries)
  • to taste fresh mint leaves for garnish (optional)

Instructions
 

  • In a medium mixing bowl, combine the graham cracker crumbs and melted butter. Stir well until the crumbs are evenly coated and have a texture similar to wet sand.
  • Evenly distribute the graham cracker mixture among serving cups, pressing down firmly to form a compact crust layer at the bottom. Set the cups aside.
  • In a larger mixing bowl, use an electric mixer to beat the softened cream cheese until it is smooth and creamy, ensuring there are no lumps.
  • Gradually add the powdered sugar and vanilla extract to the cream cheese mixture, continuing to mix until all ingredients are thoroughly combined and smooth.
  • In a separate bowl, whip the heavy cream using a whisk or electric mixer until stiff peaks form. This is crucial for adding lightness to the cheesecake mixture.
  • Carefully fold the whipped cream into the cream cheese mixture, using a spatula to combine them gently. Be cautious not to deflate the whipped cream; mix until the two mixtures are fully incorporated and smooth.
  • In another bowl, toss the sliced strawberries with 2 tablespoons of granulated sugar. Allow them to sit for about 10 minutes to macerate, which will enhance their natural sweetness and release some juice.
  • Spoon the luscious cream cheese mixture into the prepared cups, layering it over the graham cracker crust.
  • Top each cheesecake layer with a generous amount of the macerated strawberries, allowing some of the juice to drizzle onto the cheesecake.
  • Cover the cups and place them in the refrigerator to chill for at least 2 hours, or ideally overnight, to let the flavors meld.
  • Just before serving, garnish the cheesecake cups with fresh mint leaves, if desired, and any remaining strawberries for added decoration.

Notes

For a layered effect, consider using clear cups to showcase the beautiful hues of the strawberries against the cream cheese mixture. Serve them on a decorative platter for an appealing display!
Keyword cheesecake, dessert, easy, no-bake, strawberry