Go Back
To make these tasty treats, you need a few key ingredients: - 1 cup canned pure pumpkin (not pumpkin pie filling) - 1/2 cup rolled oats - 1/3 cup unsweetened peanut butter (ensure it's xylitol-free) - 1/2 teaspoon ground cinnamon (optional) - 1/4 cup ground flaxseed (optional) - 1 cup whole wheat flour (or oat flour for gluten-free) These ingredients work together to create a healthy and fun snack for your dog. The pumpkin gives a nice flavor and is good for digestion. The oats and peanut butter add texture and taste that dogs love. You can add a few ingredients to make these treats even better: - A dash of honey for sweetness - A tablespoon of mashed banana for extra flavor - A bit of coconut oil for healthy fats These additions are not necessary but can make the treats more appealing to your pup. Just remember to keep the amounts small. If you don’t have some ingredients on hand, here are some easy swaps: - Use almond butter if you run out of peanut butter. - Try pumpkin puree with sweet potato for a different taste. - Swap the whole wheat flour with oat flour if your dog has gluten issues. These substitutes keep the treats tasty and safe for your furry friend. You can find many options in your kitchen or store! For the full recipe, check out Easy Pumpkin No-Bake Treats for Dogs. First, gather your ingredients. You will need: - 1 cup canned pure pumpkin (not pumpkin pie filling) - 1/2 cup rolled oats - 1/3 cup unsweetened peanut butter (make sure it’s xylitol-free) - 1/2 teaspoon ground cinnamon (optional) - 1/4 cup ground flaxseed (optional) - 1 cup whole wheat flour (or oat flour for gluten-free) In a large bowl, mix the canned pumpkin, rolled oats, and peanut butter. Stir well until everything blends smoothly. If you want a little extra flavor, add the ground cinnamon and flaxseed. Mix again until it is evenly mixed. Next, add the whole wheat flour bit by bit. Keep stirring until you have a dough that is firm but not sticky. Now it’s time to form the treats. Turn the dough out onto a lightly floured surface. Knead it gently with your hands until it holds together well. Roll the dough out to about 1/4 inch thick. You can use cookie cutters to make fun shapes or roll small balls for easy treats. Once shaped, place the treats on a baking sheet lined with parchment paper. Allow the treats to sit at room temperature for 30 minutes. This helps them firm up nicely. After they have set, transfer them to an airtight container. You can store them in the fridge for up to one week. This way, your dog will always have a fresh snack ready to enjoy. You can find the full recipe above to guide you through this fun process! To make great treats, the dough must be just right. If it feels too sticky, add a bit more flour. If it’s too dry, mix in a touch of pumpkin or peanut butter. The dough should hold together without crumbling. It should not be too wet, or it won’t shape well. When serving these treats, think about your dog's size. Cut them into smaller pieces for tiny dogs. Larger dogs can enjoy bigger shapes. Always serve treats in a clean bowl. You can also mix them with your dog’s regular food for a fun surprise. To entice your dog even more, use fun shapes. Cookie cutters make the treats look exciting. You can add a sprinkle of oats on top. A small dollop of dog-friendly frosting can also make them special. These small touches will make your dog wag their tail with joy! {{image_4}} You can change up the flavor of these treats easily. Try using sweet potato instead of pumpkin. This adds a different taste while keeping it healthy. You can also mix in mashed bananas. Dogs love the sweetness of bananas! For a savory twist, consider adding plain yogurt. It makes the treats creamy and tasty. Some dogs have food allergies. If your dog is sensitive to wheat, use oat flour instead of whole wheat flour. This keeps the treats gluten-free. For peanut butter lovers, make sure to avoid brands with xylitol. You can swap peanut butter with almond butter or sunflower seed butter. Both options are safe and tasty for dogs. Think about seasonal flavors to keep things fun. In the fall, add some apple puree or a dash of nutmeg. These flavors match the autumn vibe perfectly. In the summer, try adding coconut flakes for a tropical twist. During the holidays, a hint of ginger can make your treats festive. Your dog will love these seasonal snacks! To keep your easy pumpkin no-bake treats fresh, store them in an airtight container. This helps to lock in moisture and flavor. Place the container in the refrigerator to maintain the treats' firmness. Avoid leaving them out at room temperature for too long, as they can dry out. When stored properly in the fridge, these treats last about one week. Make sure to check for any signs of spoilage, like a strange smell or mold. If they look good, your dog can enjoy them throughout the week! If you want to save some treats for later, freezing is a great option. Simply place the treats in a freezer-safe bag or container. They can last for up to three months in the freezer. When you're ready to serve, let them thaw in the fridge for a few hours or at room temperature for quicker serving. Enjoy your time making these delicious treats with your furry friend! Yes, you can use regular flour. Whole wheat flour adds more fiber. It is often better for your dog’s digestion. If you want a gluten-free option, oat flour works great too. Just make sure your dog has no allergies to oats. Yes, these treats are fine for puppies. They contain safe, natural ingredients. Just ensure your puppy is not allergic to any of them. Start with small amounts to see how they react. Always consult your vet if you have concerns. You can give these treats a few times a week. Moderation is key to keep your dog healthy. These treats should not replace a balanced diet. Treats are fun but should be a small part of your dog's meals. Follow your vet's advice for the best guidelines. For more details on making these treats, check out the Full Recipe. You now have all the details to create easy pumpkin no-bake treats for your pup. We covered key ingredients, step-by-step instructions, helpful tips, yummy variations, and storage methods. Remember, you can adjust flavors based on your dog's needs. Keep these treats fresh and fun for every season. With these simple recipes, your dog will enjoy tasty snacks that are good for them. Happy treating!

Easy Pumpkin No-Bake Treats for Dogs

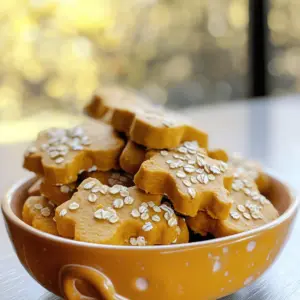
Treat your furry friend to delicious Easy Pumpkin No-Bake Treats for Dogs! Made with wholesome ingredients like canned pumpkin, rolled oats, and peanut butter, these tasty goodies are simple to prepare and perfect for any pup. In just 15 minutes, you can create about 24 treats that will keep tails wagging. Click through to explore the full recipe and learn fun presentation tips that will make treat time extra special!

Ingredients
  

1 cup canned pure pumpkin (ensure it's not pumpkin pie filling)

1/2 cup rolled oats

1/3 cup unsweetened peanut butter (be sure it's xylitol-free for your furry friend)

1/2 teaspoon ground cinnamon (optional, for added flavor)

1/4 cup ground flaxseed (optional, boosts nutrition)

1 cup whole wheat flour (or substitute with oat flour for a gluten-free option)

Instructions
 

In a large mixing bowl, combine the canned pumpkin, rolled oats, and peanut butter. Stir thoroughly until well blended into a uniform mixture.

    If using, sprinkle in the ground cinnamon and ground flaxseed. Mix until everything is evenly incorporated for enhanced flavor and nutrition.

      Gradually introduce the whole wheat flour to the mixture, adding it bit by bit while stirring until a cohesive dough forms. The consistency should be firm yet non-sticky.

        Once the dough has reached the right consistency, transfer it to a lightly floured clean surface. Knead gently with your hands just until it holds together well without crumbling.

          Roll the dough out to approximately 1/4 inch thick. Use fun cookie cutters to create shapes, or simply roll the dough into small balls for simpler treats.

            Position the cut-out shapes or rolled balls onto a baking sheet lined with parchment paper. Allow them to sit at room temperature for at least 30 minutes to firm up.

              Once the treats have set, place them in an airtight container. They can be stored in the refrigerator for up to one week to maintain freshness.

                Prep Time, Total Time, Servings: 15 minutes | 1 hour (including the setting time) | About 24 adorable dog treats

                  - Presentation Tips: Serve these delightful treats in a charming dog bowl. For an extra touch, sprinkle some oats on top or add a small dollop of dog-friendly frosting for an adorable finishing touch!