
Get ready to impress your family and friends with Bloomin’ Grilled Apples! This fun and flavorful treat takes simple ingredients and turns them into a delicious dessert. From juicy apples to creamy caramel, each bite explodes with flavor. Whether you’re a grilling expert or just starting out, I’ll guide you step by step. Grab your apron, and let’s create an unforgettable dessert that everyone will love!
Ingredients
To make Bloomin’ Grilled Apples, gather these fresh and tasty ingredients:
– 4 large firm apples (Honeycrisp or Granny Smith)
– 1/4 cup packed brown sugar
– 1 teaspoon ground cinnamon
– 1/2 teaspoon ground nutmeg
– 1/4 cup chopped walnuts or pecans
– 1/4 cup caramel sauce
– 1/4 cup mini marshmallows (optional)
– 2 tablespoons unsalted butter, melted
– Vanilla ice cream (for serving)
These ingredients work together to create a sweet and warm treat. The combination of spices and nuts gives the apples a special touch. Honeycrisp apples bring a crisp bite, while Granny Smith apples add a tart zing. The brown sugar and cinnamon mix creates a warm flavor that fills your kitchen with a sweet aroma.
Once you’ve gathered all the ingredients, you’re ready to move on to the fun part: cooking! If you want the full recipe, check it out for step-by-step instructions.
Step-by-Step Instructions
Preparation of Apples
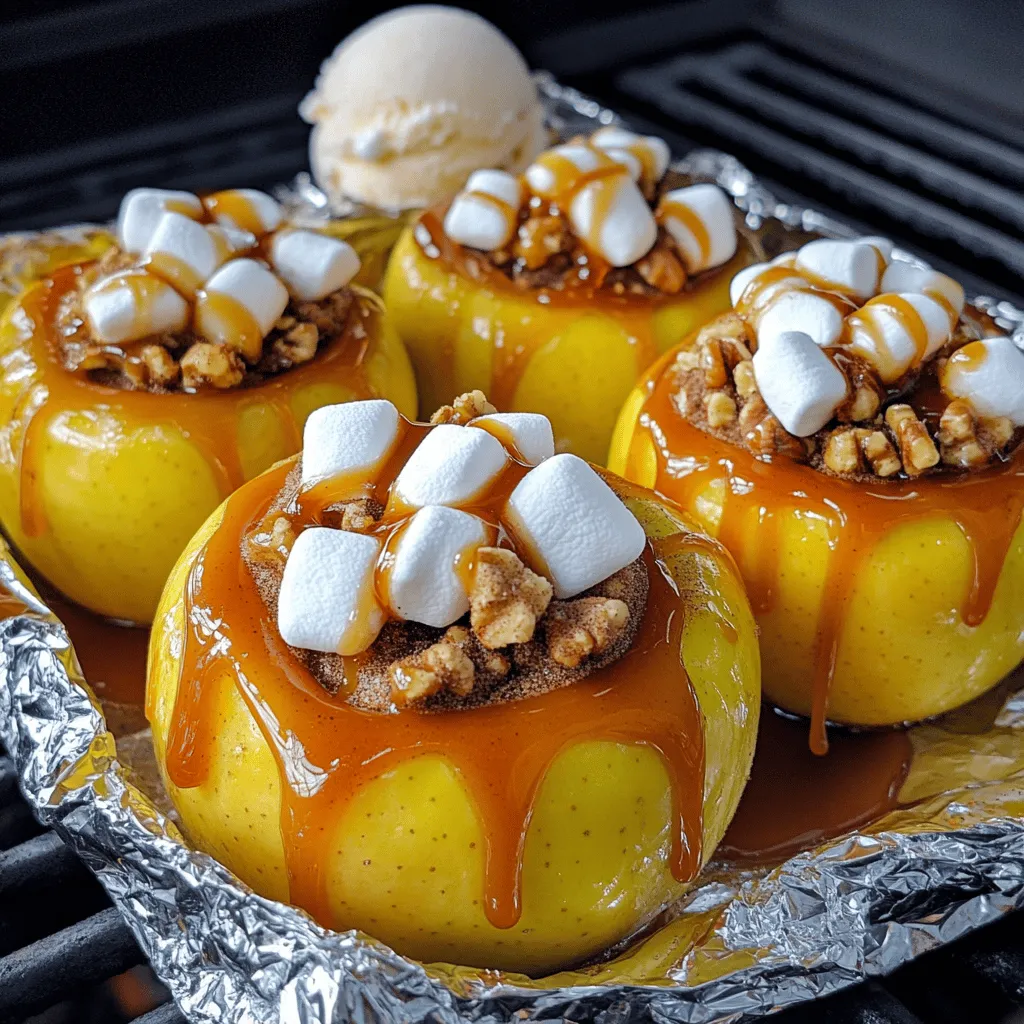
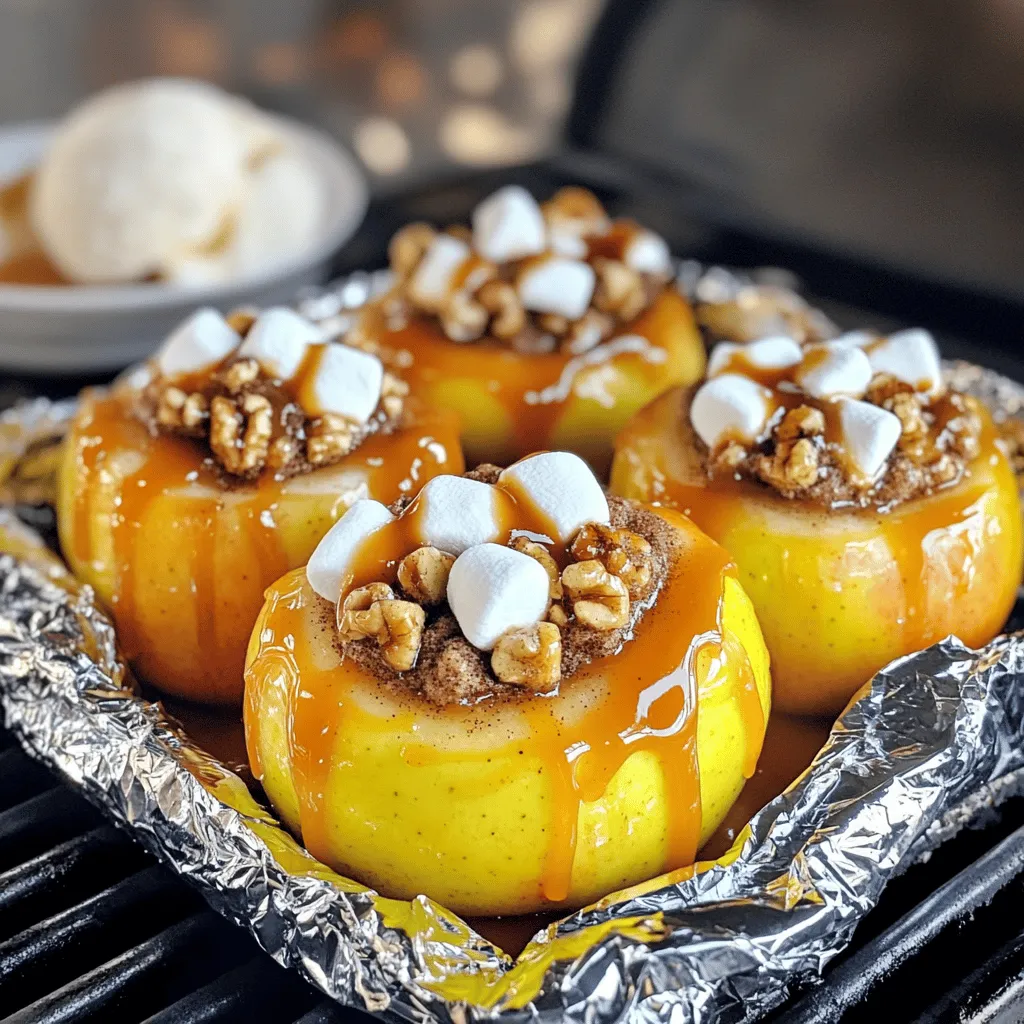
To start, you need to core the apples. Keep the bottom intact. This helps create the bloom effect when grilling. Next, take a bowl and mix the brown sugar, cinnamon, nutmeg, and chopped nuts. This sugar-nut mixture adds flavor and crunch. Stuff each apple generously with this mixture. Make sure to pack it tightly. A little overflow looks great!
Grilling Process
Now, let’s get the grill ready. Preheat it to medium heat. This ensures even cooking. Wrap each stuffed apple in aluminum foil. Seal the foil tightly to keep in the steam. Place the apples directly on the grill grate. Grill for 20 to 25 minutes. Turn them occasionally for even tenderness. The apples should feel soft but still hold their shape.
Finishing Touches
In the last few minutes, carefully open the foil. Avoid steam burns as you do this. If you like, sprinkle mini marshmallows over the apples. Rewrap the foil and grill for a couple more minutes. You want the marshmallows to just start melting. Once done, remove the apples from the grill. Drizzle caramel sauce over each apple. Let it seep into the warm filling. Serve warm and enjoy this sweet treat! For the Full Recipe, refer to the earlier section.
Tips & Tricks
Selecting the Right Apples
To make the best bloomin’ grilled apples, choose firm apples. Honeycrisp and Granny Smith are my top picks. These apples hold their shape well while grilling. Firm apples also allow for easy stuffing. Look for apples that feel heavy for their size and have smooth skin. Avoid soft or bruised apples; they may turn mushy when cooked.
Grilling Tips
Keep your grill at medium heat for even cooking. This helps the apples soften perfectly without burning. If the heat is too high, the outside may char before the inside cooks. Wrap your apples tightly in aluminum foil. This keeps them from steaming too much, which can make them soggy. Turn the apples gently while grilling to ensure all sides cook evenly.
Serving Suggestions
Serve your bloomin’ grilled apples warm. A scoop of vanilla ice cream pairs nicely with the warm, sweet apples. You can also add toppings like caramel sauce or chopped nuts for extra flavor. For a fun touch, consider serving them on a wooden board, garnished with fresh mint leaves. This makes a beautiful presentation and adds a pop of color. For the full recipe, check out the details above!
Variations
Flavor Enhancements
You can spice things up with different flavors. Adding ginger or cloves can give the apples a warm kick. These spices blend well with the sweetness of the fruit. Just a pinch can change the whole vibe of the dish.
You can also substitute the nuts. Try using almonds or hazelnuts instead of walnuts or pecans. Each nut brings its own taste and crunch. This small change adds new textures and flavors.
Alternative Serving Options
While apples are the star, don’t be shy to explore other fruits. Pears or peaches can work beautifully on the grill. They will also bloom and create that fun presentation.
You can pair grilled apples with savory dishes too. Serve them with grilled chicken or pork. The sweet and savory mix creates a delicious contrast. You might even try them on a cheese board for a fun twist.
Dietary Considerations
If you want to make this treat gluten-free, it’s simple. Just check the labels on your sugar and toppings. Most are safe, but it’s always good to be sure.
For a vegan option, swap butter for coconut oil. You can use maple syrup instead of caramel for sweetness. These changes keep the flavor rich without animal products.
Lastly, for a healthier version, consider using less sugar. You can use natural sweeteners like honey or agave. This way, you enjoy the treat with less guilt and more health benefits.
For the full recipe, visit the section above.
Storage Info
Leftover Storage
To store grilled apples, let them cool down first. Place them in an airtight container. This keeps them fresh longer. If you have extra caramel sauce, store it separately.
In the refrigerator, these apples last for about 3 to 5 days. Make sure the container is sealed well to avoid drying out.
Reheating Instructions
You want to reheat grilled apples gently. The best way is to use a microwave. Heat them in short bursts of 30 seconds. Check their warmth after each burst.
You can also reheat them on a grill. Place them in foil again. Heat for about 5 to 10 minutes. This keeps their soft texture.
Leftovers can be kept for up to 5 days in the fridge. After that, they may lose their taste and texture.
Freezing Options
If you want to freeze prepped apples, do it before grilling. Core and stuff the apples as usual. Then wrap each one tightly in plastic wrap. Place them in a freezer-safe bag.
They can stay in the freezer for about 3 months. When you’re ready to grill, thaw them overnight in the fridge.
To reheat frozen grilled apples, grill them for about 20 to 25 minutes. Check for softness before serving.
FAQs
How long do I grill the apples?
I grill the apples for about 20 to 25 minutes. This time ensures they get soft but still hold their shape. Turn them occasionally for even cooking. You will know they are ready when a fork goes in easily.
Can I use other types of nuts?
Yes, you can use many types of nuts. Almonds, pecans, or even hazelnuts work great. Choose what you like best! Just chop them up and mix them with the sugar.
How can I make this recipe gluten-free?
To make this recipe gluten-free, use simple ingredients. Most nuts and apples are gluten-free. Just ensure your caramel sauce has no gluten. Check labels to be sure.
Can I make this recipe in the oven instead?
Yes! Preheat your oven to 350°F. Wrap the apples in foil and place them on a baking sheet. Bake for about 25 to 30 minutes. This method works well too!
What should I serve with Bloomin’ Grilled Apples?
Bloomin’ grilled apples pair nicely with vanilla ice cream or whipped cream. You can also add extra caramel sauce on top. They make a sweet treat or a fun dessert for any meal. Enjoy!
Grilling apples is simple and fun. We covered the best ingredients, preparation steps, and grilling techniques. You can use different spices and fruits to customize your dish. Don’t forget about great storage tips for leftovers.
Remember, the right apples can make a big difference. Enjoy the sweet flavors with ice cream or other toppings. Grilled apples are a tasty treat that everyone will love. Now, get grilling and share your creations with family and friends!


