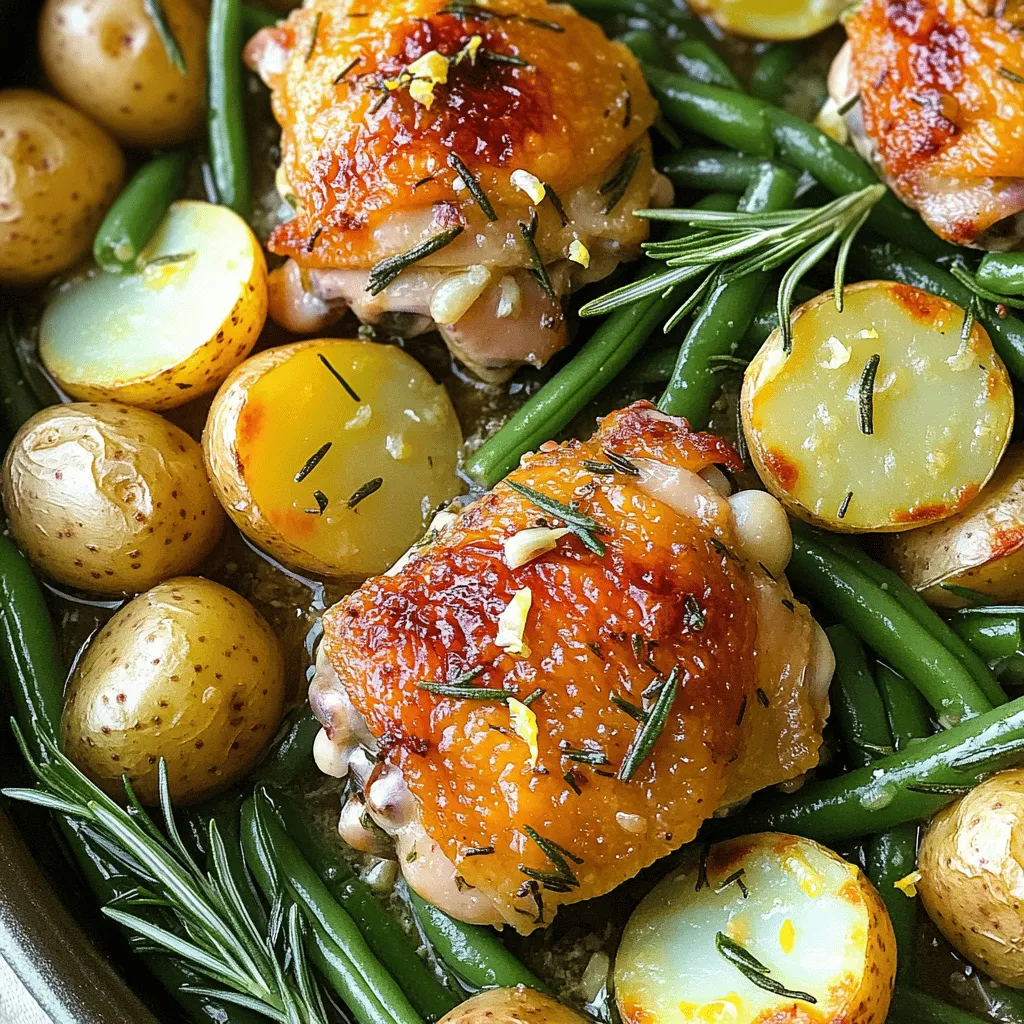
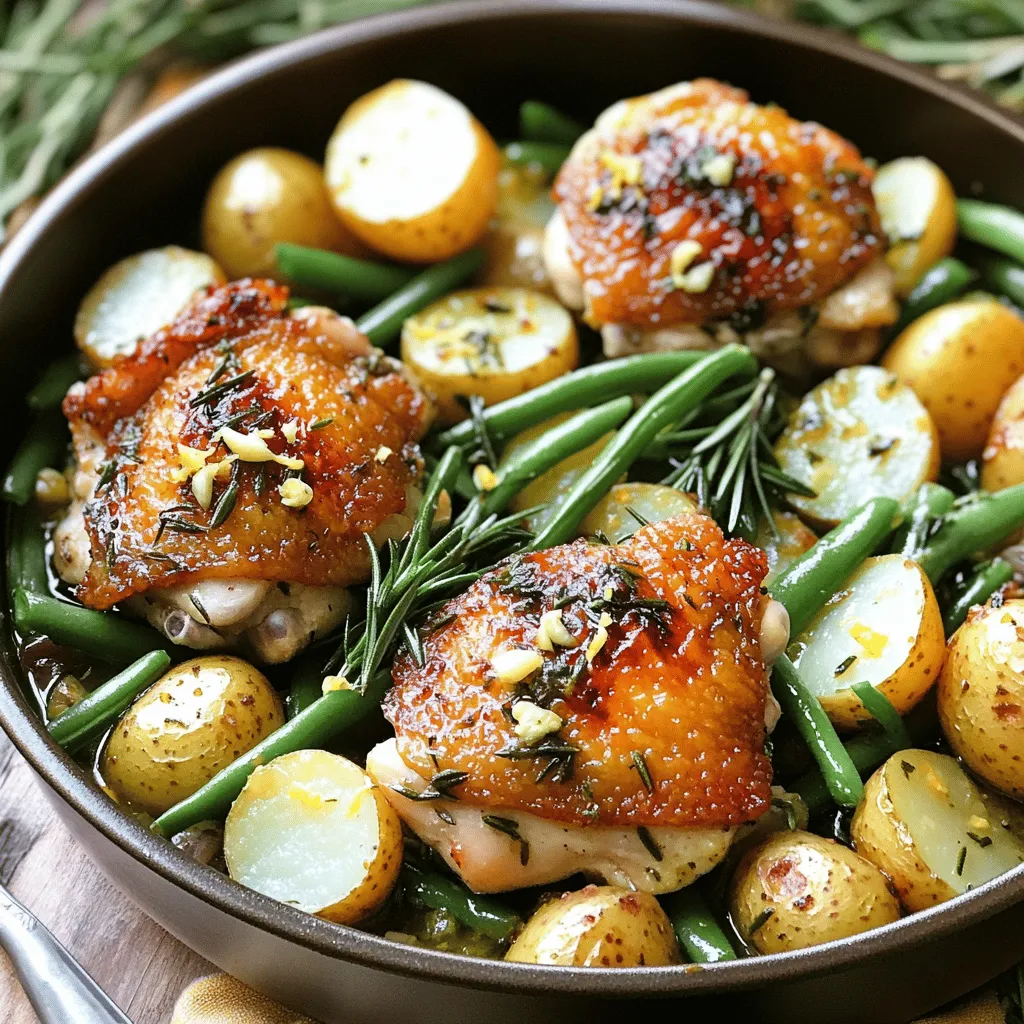
Looking for a simple, delicious meal for your family? You’ve found it! One-Pot Rosemary Garlic Chicken combines juicy chicken thighs, fresh garlic, and fragrant rosemary with colorful veggies. This easy recipe saves you time and cleanup while packing in incredible flavors. Get ready to impress your loved ones with a dish that’s satisfying and quick to prepare. Let’s dive into this delightful cooking adventure!
Ingredients
To create this delightful One-Pot Rosemary Garlic Chicken, you will need the following ingredients:
– 4 chicken thighs, bone-in and skin-on
– 2 tablespoons extra virgin olive oil
– 4 cloves of garlic, minced
– 1 tablespoon fresh rosemary, finely chopped
– 1 teaspoon smoked paprika
– Salt and freshly cracked black pepper to taste
– 1 cup low-sodium chicken broth
– 1 lemon, zested and juiced
– 1 cup baby potatoes, halved
– 1 cup fresh green beans, trimmed
– Fresh rosemary sprigs for garnish
These ingredients work together to create a flavorful and hearty meal. The chicken thighs are rich and juicy. The garlic and rosemary add a fragrant touch. Potatoes and green beans bring in texture and color. With the right seasonings and broth, you’ll have a dish that warms your heart and pleases your taste buds. You can find the Full Recipe to guide you through the cooking process.
Step-by-Step Instructions
Preparation Steps
1. Preheating the oven: Start by preheating your oven to 400°F (200°C). This step ensures even cooking as the chicken roasts.
2. Searing the chicken: In a large oven-safe pot, heat 2 tablespoons of olive oil over medium-high heat. Season the chicken thighs with salt, pepper, and smoked paprika. Place the thighs skin-side down in the hot oil. Sear them for 5-7 minutes until the skin turns golden brown and crispy. Flip the thighs and cook for an additional 3-4 minutes. After searing, remove the chicken and set it aside.
3. Sautéing garlic and rosemary: In the same pot, lower the heat to medium. Add 4 cloves of minced garlic and 1 tablespoon of finely chopped rosemary. Sauté for about 30 seconds. Stir often to avoid burning the garlic. You want it fragrant but not brown.
Combining Ingredients
1. Adding broth and lemon: Pour in 1 cup of low-sodium chicken broth, followed by the zest and juice of 1 lemon. Use a wooden spoon to scrape up any browned bits from the pot. This adds flavor to your sauce.
2. Nestling chicken and potatoes: Gently return the seared chicken thighs to the pot. Nestle them among 1 cup of halved baby potatoes. Increase the heat slightly to bring the liquid to a gentle simmer.
3. Baking process and timing: Cover the pot with a lid and place it in the preheated oven. Bake for 20 minutes. After that, remove the pot and add 1 cup of trimmed green beans. Stir gently, then cover and return to the oven for another 15-20 minutes. The chicken should be fully cooked, and the veggies vibrant and tender.
By following these steps, you create a delicious One-Pot Rosemary Garlic Chicken that the whole family will love. For the full recipe, check the details above.
Tips & Tricks
Cooking Tips
– Searing chicken for optimal flavor: Always start by searing the chicken thighs. This step creates a golden crust. It locks in juices and adds deep flavor. Sear the chicken skin-side down for 5-7 minutes. Flip and cook for another 3-4 minutes.
– Avoiding burnt garlic: Garlic adds amazing taste but can burn quickly. After searing the chicken, lower the heat before adding garlic. Sauté it for 30 seconds, just until fragrant. Keep stirring to avoid burning.
– Perfect timing for vegetables: Timing is key for cooking veggies. Add the green beans after the first 20 minutes of baking. This way, they stay crisp and bright. They will cook perfectly in the last 15-20 minutes.
Presentation Tips
– Serving suggestions: Serve the chicken and veggies in shallow bowls. Spoon some of the tasty broth over the top. This gives a rustic look that is both inviting and warm.
– Garnishing ideas: Fresh rosemary sprigs make a lovely garnish. They add color and aroma. You can also add lemon slices for a zesty touch.
– Using broth creatively: Don’t waste the broth! Use it as a base for a soup or sauce. You can also drizzle it over rice or quinoa for extra flavor.
For the full recipe, check out the One-Pot Rosemary Garlic Chicken!
Variations
Ingredient Substitutions
You can switch up the veggies in this dish. Try carrots, zucchini, or bell peppers. They add color and flavor. You can also use different cuts of chicken. Breasts or drumsticks work well too. Just adjust the cooking time as needed.
Using herbs and spices is another fun way to change the taste. If you love thyme or oregano, feel free to add them. The dish will still shine with great flavor.
Flavor Enhancements
To kick up the flavor, consider adding a splash of white wine. It adds depth and brightness to the sauce. Just pour it in after you sauté the garlic and rosemary.
Citrus can also change the game. Try using orange or lime juice instead of lemon. This gives a fresh twist to the dish that you may love.
Lastly, mix in different seasonings like Italian seasoning or a pinch of red pepper flakes. These small changes can lead to big taste differences. For more ideas, check out the Full Recipe for One-Pot Rosemary Garlic Chicken.
Storage Info
Storing Leftovers
– Refrigeration guidelines: Store leftover One-Pot Rosemary Garlic Chicken in an airtight container. Make sure it cools down before sealing. Place it in the fridge within two hours after cooking.
– Freezing options: You can freeze the leftovers for up to three months. Use a freezer-safe container or bag. Label it with the date.
– Reheating instructions: To reheat, you can use the oven or microwave. Heat in the oven at 350°F (175°C) until warmed through. If using a microwave, cover it to keep moisture.
Shelf Life
– How long it lasts in the fridge: This dish stays fresh in the fridge for about three to four days.
– Signs of spoilage: Look for off smells, changes in color, or mold. If you see any of these, discard it.
– Recommended storage containers: Use glass or BPA-free plastic containers. They keep food fresh and are easy to clean.
For the full recipe, check out the One-Pot Rosemary Garlic Chicken.
FAQs
Common Questions
How to make One-Pot Rosemary Garlic Chicken?
To make this dish, start by preheating your oven to 400°F (200°C). In a large pot, heat olive oil. Season chicken thighs with salt, pepper, and smoked paprika. Sear them skin-side down until golden brown. Remove and set aside. Sauté minced garlic and chopped rosemary in the same pot. Then, add chicken broth, lemon zest, and lemon juice. Return the chicken to the pot, add halved baby potatoes, and let it simmer. Cover and bake for 20 minutes, then add green beans and bake for another 15-20 minutes. For the full recipe, check the detailed instructions above.
What to serve with this dish?
I love serving One-Pot Rosemary Garlic Chicken with a fresh salad or crusty bread. You can also pair it with rice or quinoa for a heartier meal. Roasted vegetables make a great side too!
Can I make this dish ahead of time?
Yes! You can prepare the chicken and vegetables ahead of time. Just store them in the fridge. When you’re ready to eat, reheat them in the oven until hot. This makes dinner easy and quick.
Cooking Times and Tips
What is the best cooking time for chicken thighs?
The best cooking time for bone-in chicken thighs is about 35-40 minutes total. This includes the initial bake and the time with green beans added. Always check for doneness.
How do I know when chicken is fully cooked?
To check if the chicken is done, use a meat thermometer. The internal temperature should reach 165°F (74°C). You can also check if the juices run clear when you cut into it.
Can I use boneless chicken instead?
Yes, you can use boneless chicken thighs. They will cook faster, so check them after 25-30 minutes in the oven. Adjust the cooking time to prevent dry chicken.
This blog post covered everything you need for One-Pot Rosemary Garlic Chicken. We discussed the ingredients, like chicken, garlic, and potatoes, and how to prepare and cook them. You learned tips for better flavor and ideas for presentation. I also shared variations and storage guidelines to help you enjoy your dish later.
Cooking can be simple and fun with the right steps. Enjoy trying this recipe and making it your own!