Mini Pumpkin Pie Cups Tasty and Simple Dessert Recipe

WANT TO SAVE THIS RECIPE?

Looking for a sweet treat that’s easy to make? These Mini Pumpkin Pie Cups are perfect! You’ll enjoy a creamy pumpkin filling in a flaky crust—simple and delicious. Whether you’re hosting a party or treating yourself, these bite-sized pies will impress everyone. Follow my easy steps and tips to create a dessert that’s sure to be a hit. Let’s get baking!

Ingredients

To make Mini Pumpkin Pie Cups, you need a few simple ingredients. Here’s the list to get you started:

– 1 cup pumpkin puree

– 1/2 cup sweetened condensed milk

– 1/4 cup brown sugar

– 1 teaspoon ground cinnamon

– 1/2 teaspoon ground nutmeg

– 1/4 teaspoon ground ginger

– 1/4 teaspoon salt

– 1 large egg

– 1 package (1 sheet) of pre-made pie crusts or homemade

– Whipped cream for topping

– Cinnamon sticks for garnish

This combination creates a smooth and creamy filling that is both sweet and spiced. Each ingredient plays a role in building flavor. Pumpkin puree gives rich texture. Sweetened condensed milk adds creaminess and sweetness. The spices, like cinnamon and nutmeg, bring warmth to each bite.

Using pre-made pie crusts saves time, but homemade can add a personal touch. Don’t forget the whipped cream! It makes every cup feel festive. Finally, the cinnamon sticks are not just for looks; they add a nice aroma and extra flavor.

For the full recipe, check out the detailed instructions. Enjoy making these bite-sized treats!

Step-by-Step Instructions

Preparation Steps

– Preheat the oven to 375°F (190°C). This step is key for even baking.

– Prepare the pie crusts in a mini muffin tin. Roll out a pre-made pie crust on a floured surface.

– Using a round cookie cutter, cut out circles. Press each circle into the mini muffin cups. Make sure they fit snugly.

Filling and Baking

– Mix the filling ingredients thoroughly in a large bowl. Combine pumpkin puree, sweetened condensed milk, brown sugar, ground cinnamon, ground nutmeg, ground ginger, salt, and one large egg. Whisk until smooth.

– Fill the cups with the pumpkin mixture. Pour the filling into each pie shell, filling them about three-quarters full.

– Bake for 15-20 minutes. Check for doneness by inserting a toothpick into the center of one pie. It should come out clean when they are set.

Cooling and Serving

– Cool the mini pumpkin pie cups properly. Let them sit in the pan for about 5 minutes. Then, move them to a wire rack to cool completely.

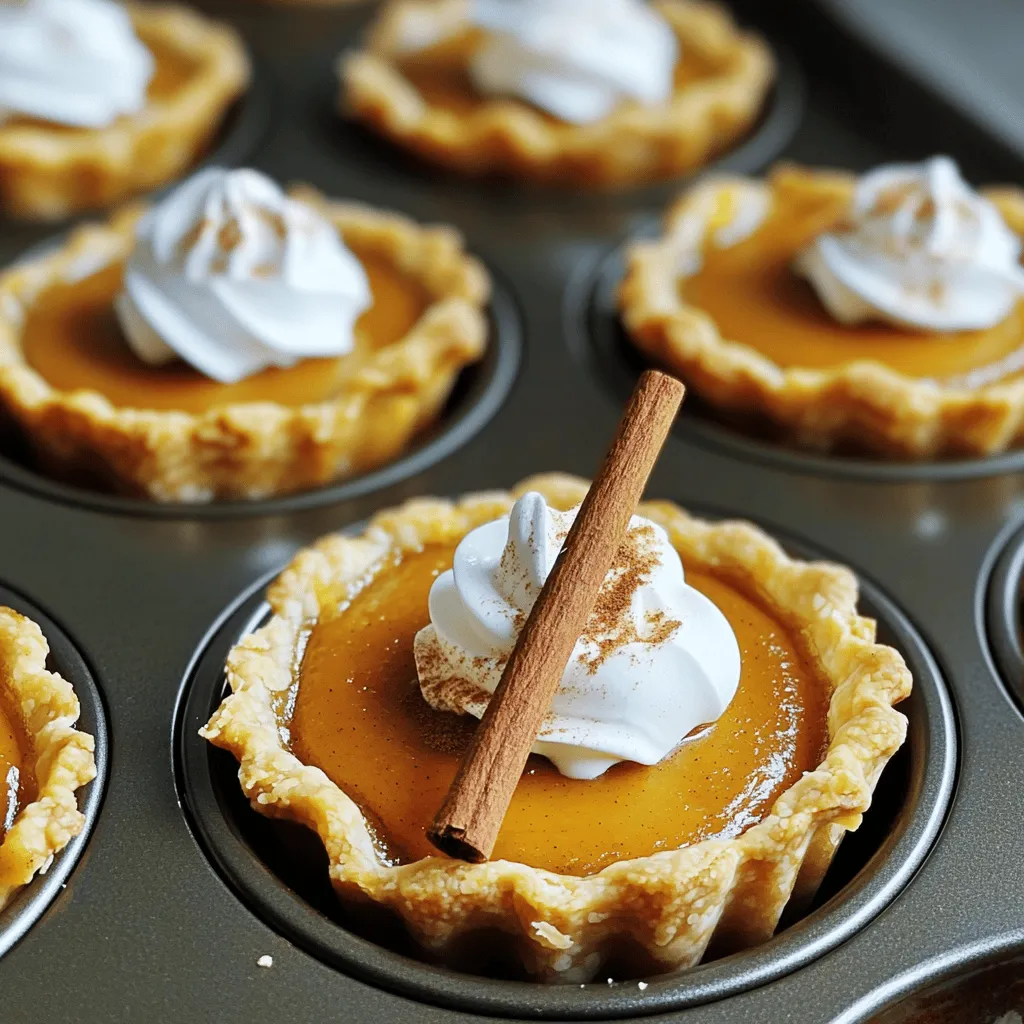
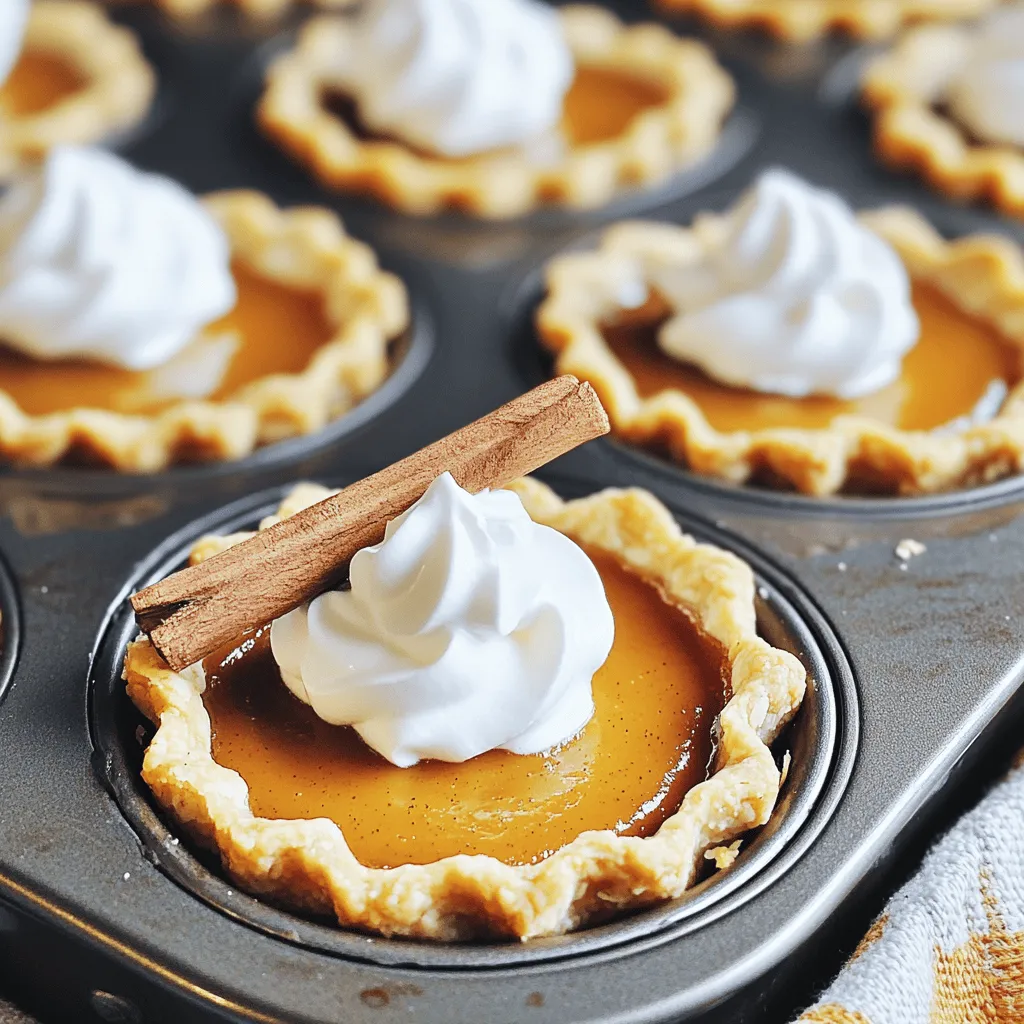
– Top with whipped cream and garnish with cinnamon sticks. This adds a nice touch and makes them look great. Enjoy your mini pumpkin pie cups as a tasty fall dessert! For the full recipe, check the section above.

Tips & Tricks

Perfecting Your Mini Pumpkin Pie Cups

To achieve the perfect crust texture, use chilled pie dough. This helps it keep its shape. When rolling out the dough, keep it about 1/8 inch thick. This thickness helps create a crispy crust. Press the dough firmly into the muffin tin. Make sure there are no air pockets. This ensures even baking.

For a smoother filling, mix the ingredients well. Start with the pumpkin puree and sweetened condensed milk. Then, add the sugars and spices. Whisk until no lumps remain. I like to use a hand mixer for a super smooth texture. Adding the egg last helps blend everything nicely.

Serving Suggestions

When serving mini pumpkin pie cups, presentation matters. Arrange them on a beautiful platter. You can drizzle caramel sauce over them for a sweet touch. This makes them look extra special.

For larger gatherings, pair them with hot drinks. Coffee, tea, or even spiced cider work well. They add warmth and comfort to your dessert table. These cups also make great party favors. Just place them in small boxes for guests to take home.

For the full recipe, check the section above. Enjoy making these mini treats!

Variations

Ingredient Substitutions

You can make these mini pumpkin pie cups even better with some easy swaps. If you want a healthier option, try using alternative sweeteners. Some great choices include honey or maple syrup. They add lovely flavor while cutting down on refined sugar.

For those who are dairy-free, there are options for the filling. You can use coconut milk instead of sweetened condensed milk. This gives a rich taste and creamy texture without dairy.

Flavor Enhancements

To make your mini pumpkin pie cups stand out, think about adding chocolate or other spices. A sprinkle of cocoa powder will bring a nice twist to the classic flavor. You could also try adding a pinch of allspice or cardamom for an extra kick.

Topping your mini pies with flavored whipped cream can also add fun. Try adding vanilla or maple syrup to the whipped cream before you dollop it on top. This simple change gives a burst of flavor that pairs well with the pumpkin filling.

For the full recipe of these delightful treats, check out the details above!

Storage Info

Storing Leftovers

After enjoying your mini pumpkin pie cups, store any leftovers in the fridge. Place them in an airtight container. This helps keep them fresh. Ideally, eat them within three to four days for the best taste. If you want to keep them fresh longer, cover them with plastic wrap before sealing.

Freezing Options

You can also freeze mini pumpkin pie cups for later. To do this, let them cool completely first. Then, place them in a single layer on a baking sheet. Freeze them for about two hours. Once frozen, transfer them to a freezer bag. This way, they won’t stick together. To reheat, take them out and let them thaw in the fridge overnight. Then, warm them in the oven at 350°F (175°C) for about 10 minutes. Enjoy your tasty treat anytime! For the full recipe, check the section above.

FAQs

How long do mini pumpkin pie cups last?

Mini pumpkin pie cups last about 3 to 4 days in the fridge. Store them in an airtight container. If you want them to last longer, you can freeze them. They can stay fresh in the freezer for up to 2 months.

Can I use fresh pumpkin instead of canned puree?

Yes, you can use fresh pumpkin! Just cook the pumpkin until soft, then mash it. Be sure to drain any excess water. This will help you get the right texture for your mini pumpkin pie cups.

What are the best alternatives to condensed milk?

For a lighter option, you can use coconut milk or almond milk. You can also blend silken tofu with some sweetener. This will give you a creamy texture without the added sugar.

How do I make mini pumpkin pie cups gluten-free?

To make mini pumpkin pie cups gluten-free, use a gluten-free pie crust. You can find pre-made options in stores. Alternatively, you can make your own crust using gluten-free flour.

In this blog post, we covered how to make mini pumpkin pie cups. We discussed the key ingredients like pumpkin puree and sweetened condensed milk. Then, I shared step-by-step instructions for preparing, baking, and cooling. We also explored tips for perfecting your pies and offered fun serving suggestions. Finally, I covered variations, storage, and answered common questions.

These mini treats are easy to make and delicious to share. Enjoy your baking!

To make Mini Pumpkin Pie Cups, you need a few simple ingredients. Here’s the list to get you started: - 1 cup pumpkin puree - 1/2 cup sweetened condensed milk - 1/4 cup brown sugar - 1 teaspoon ground cinnamon - 1/2 teaspoon ground nutmeg - 1/4 teaspoon ground ginger - 1/4 teaspoon salt - 1 large egg - 1 package (1 sheet) of pre-made pie crusts or homemade - Whipped cream for topping - Cinnamon sticks for garnish This combination creates a smooth and creamy filling that is both sweet and spiced. Each ingredient plays a role in building flavor. Pumpkin puree gives rich texture. Sweetened condensed milk adds creaminess and sweetness. The spices, like cinnamon and nutmeg, bring warmth to each bite. Using pre-made pie crusts saves time, but homemade can add a personal touch. Don't forget the whipped cream! It makes every cup feel festive. Finally, the cinnamon sticks are not just for looks; they add a nice aroma and extra flavor. For the full recipe, check out the detailed instructions. Enjoy making these bite-sized treats! - Preheat the oven to 375°F (190°C). This step is key for even baking. - Prepare the pie crusts in a mini muffin tin. Roll out a pre-made pie crust on a floured surface. - Using a round cookie cutter, cut out circles. Press each circle into the mini muffin cups. Make sure they fit snugly. - Mix the filling ingredients thoroughly in a large bowl. Combine pumpkin puree, sweetened condensed milk, brown sugar, ground cinnamon, ground nutmeg, ground ginger, salt, and one large egg. Whisk until smooth. - Fill the cups with the pumpkin mixture. Pour the filling into each pie shell, filling them about three-quarters full. - Bake for 15-20 minutes. Check for doneness by inserting a toothpick into the center of one pie. It should come out clean when they are set. - Cool the mini pumpkin pie cups properly. Let them sit in the pan for about 5 minutes. Then, move them to a wire rack to cool completely. - Top with whipped cream and garnish with cinnamon sticks. This adds a nice touch and makes them look great. Enjoy your mini pumpkin pie cups as a tasty fall dessert! For the full recipe, check the section above. To achieve the perfect crust texture, use chilled pie dough. This helps it keep its shape. When rolling out the dough, keep it about 1/8 inch thick. This thickness helps create a crispy crust. Press the dough firmly into the muffin tin. Make sure there are no air pockets. This ensures even baking. For a smoother filling, mix the ingredients well. Start with the pumpkin puree and sweetened condensed milk. Then, add the sugars and spices. Whisk until no lumps remain. I like to use a hand mixer for a super smooth texture. Adding the egg last helps blend everything nicely. When serving mini pumpkin pie cups, presentation matters. Arrange them on a beautiful platter. You can drizzle caramel sauce over them for a sweet touch. This makes them look extra special. For larger gatherings, pair them with hot drinks. Coffee, tea, or even spiced cider work well. They add warmth and comfort to your dessert table. These cups also make great party favors. Just place them in small boxes for guests to take home. For the full recipe, check the section above. Enjoy making these mini treats! {{image_4}} You can make these mini pumpkin pie cups even better with some easy swaps. If you want a healthier option, try using alternative sweeteners. Some great choices include honey or maple syrup. They add lovely flavor while cutting down on refined sugar. For those who are dairy-free, there are options for the filling. You can use coconut milk instead of sweetened condensed milk. This gives a rich taste and creamy texture without dairy. To make your mini pumpkin pie cups stand out, think about adding chocolate or other spices. A sprinkle of cocoa powder will bring a nice twist to the classic flavor. You could also try adding a pinch of allspice or cardamom for an extra kick. Topping your mini pies with flavored whipped cream can also add fun. Try adding vanilla or maple syrup to the whipped cream before you dollop it on top. This simple change gives a burst of flavor that pairs well with the pumpkin filling. For the full recipe of these delightful treats, check out the details above! After enjoying your mini pumpkin pie cups, store any leftovers in the fridge. Place them in an airtight container. This helps keep them fresh. Ideally, eat them within three to four days for the best taste. If you want to keep them fresh longer, cover them with plastic wrap before sealing. You can also freeze mini pumpkin pie cups for later. To do this, let them cool completely first. Then, place them in a single layer on a baking sheet. Freeze them for about two hours. Once frozen, transfer them to a freezer bag. This way, they won’t stick together. To reheat, take them out and let them thaw in the fridge overnight. Then, warm them in the oven at 350°F (175°C) for about 10 minutes. Enjoy your tasty treat anytime! For the full recipe, check the section above. Mini pumpkin pie cups last about 3 to 4 days in the fridge. Store them in an airtight container. If you want them to last longer, you can freeze them. They can stay fresh in the freezer for up to 2 months. Yes, you can use fresh pumpkin! Just cook the pumpkin until soft, then mash it. Be sure to drain any excess water. This will help you get the right texture for your mini pumpkin pie cups. For a lighter option, you can use coconut milk or almond milk. You can also blend silken tofu with some sweetener. This will give you a creamy texture without the added sugar. To make mini pumpkin pie cups gluten-free, use a gluten-free pie crust. You can find pre-made options in stores. Alternatively, you can make your own crust using gluten-free flour. In this blog post, we covered how to make mini pumpkin pie cups. We discussed the key ingredients like pumpkin puree and sweetened condensed milk. Then, I shared step-by-step instructions for preparing, baking, and cooling. We also explored tips for perfecting your pies and offered fun serving suggestions. Finally, I covered variations, storage, and answered common questions. These mini treats are easy to make and delicious to share. Enjoy your baking!

Mini Pumpkin Pie Cups

Get ready to indulge in delightful Mini Pumpkin Pie Cups, the perfect fall treat! These easy-to-make desserts use simple ingredients like pumpkin puree, sweetened condensed milk, and warm spices to create a silky filling in buttery mini pie shells. Ideal for parties or cozy gatherings, they're topped with whipped cream and garnished with cinnamon sticks. Click through to discover this delicious recipe and impress your guests with these adorable bites!

Ingredients
  

1 cup pumpkin puree

1/2 cup sweetened condensed milk

1/4 cup brown sugar

1 teaspoon ground cinnamon

1/2 teaspoon ground nutmeg

1/4 teaspoon ground ginger

1/4 teaspoon salt

1 large egg

1 package (1 sheet) of pre-made pie crusts (or homemade crust)

Whipped cream (for topping)

Cinnamon sticks (for garnish)

Instructions
 

Preheat the Oven: Begin by preheating your oven to 375°F (190°C) to prepare for baking the mini pumpkin pie cups.

    Prepare the Pie Crusts: On a lightly floured surface, gently roll out the pie crusts. Using a round cookie cutter or a cup, cut circles that are just larger than the openings of a mini muffin tin. Carefully press each dough circle into the muffin cups, forming cute little pie shells.

      Mix the Filling: In a large mixing bowl, combine the pumpkin puree, sweetened condensed milk, brown sugar, ground cinnamon, nutmeg, ground ginger, salt, and the egg. Using a whisk, mix everything together until you achieve a smooth, uniform filling without lumps.

        Fill the Cups: With care, pour the silky pumpkin filling into each prepared mini pie shell, filling them about three-quarters full to allow for some puffing during baking.

          Bake: Transfer the muffin tin to the preheated oven and bake for about 15-20 minutes. Keep an eye on them, and check for doneness by inserting a toothpick into the center of one pie; it should come out clean when they are fully set.

            Cool: After baking, remove the muffin tin from the oven and allow the mini pumpkin pie cups to cool in the pan for roughly 5 minutes. Then, gently transfer them to a wire rack to cool completely.

              Serve: Once cooled, generously top each mini pie with a dollop of freshly whipped cream. For a charming touch, garnish each cup with a cinnamon stick.

                Prep Time: 15 minutes | Total Time: 40 minutes | Servings: 12 mini cups

                  - Presentation Tips: Serve the mini pumpkin pie cups on a decorative platter, and consider drizzling a little caramel sauce over them before adding the whipped cream for an extra touch of indulgence. Enjoy your delightful fall treat!

                    WANT TO SAVE THIS RECIPE?