Grandma’s Crispy Garlic Dilly Beans Delightful Recipe

WANT TO SAVE THIS RECIPE?

Are you ready to add some zing to your snack game? Today, I’m sharing my grandma’s recipe for crispy garlic dilly beans—tangy, crunchy, and bursting with flavor! These delightful pickled green beans are not just a treat; they’re also a fun way to enjoy fresh produce. Follow along for easy, step-by-step instructions and tips to make your own batch. Your taste buds will thank you!

Ingredients

Fresh Ingredients

– 1 pound fresh green beans, trimmed

– 4 cloves garlic, peeled and smashed

Brine Ingredients

– 1 cup distilled white vinegar

– 1 cup water

– 2 tablespoons sugar

– 1 tablespoon salt

– 1 tablespoon dill seeds

– 1/2 teaspoon red pepper flakes (optional)

– 1/2 teaspoon black peppercorns

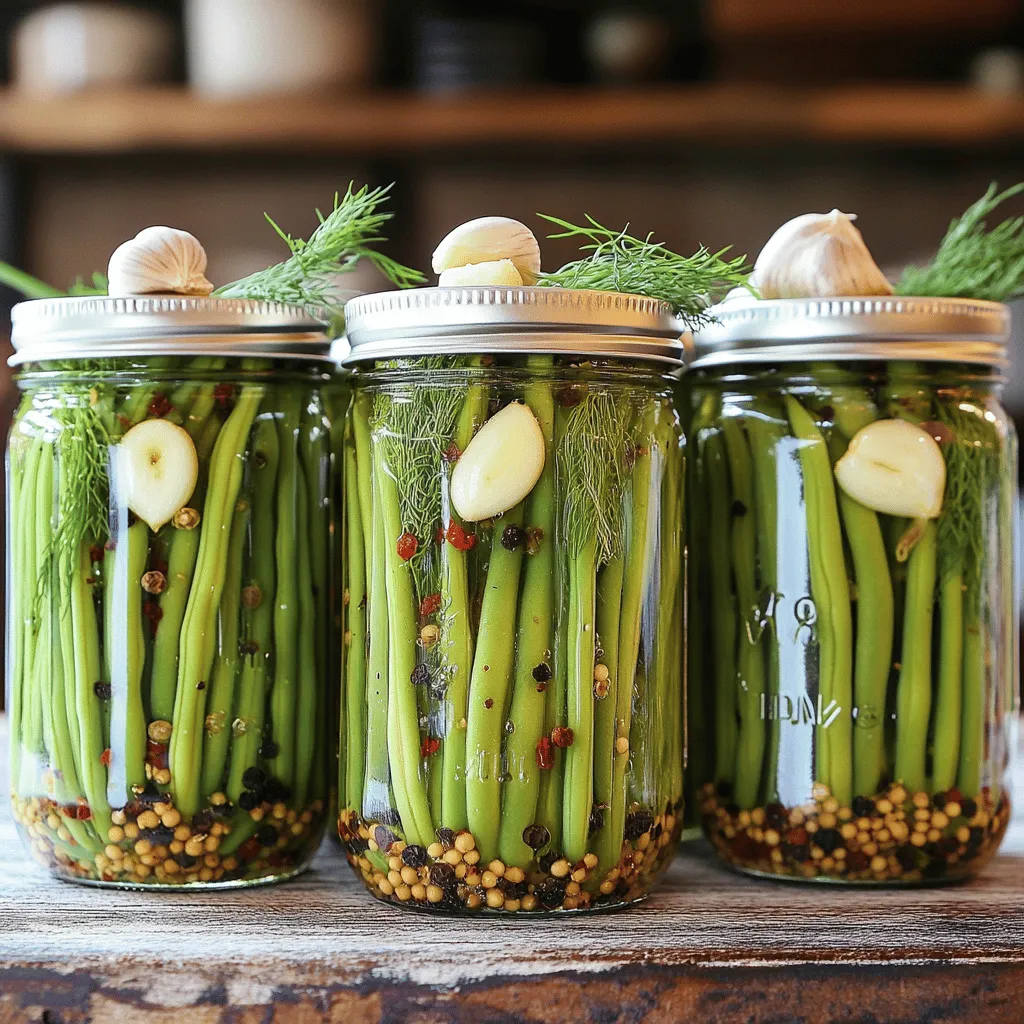
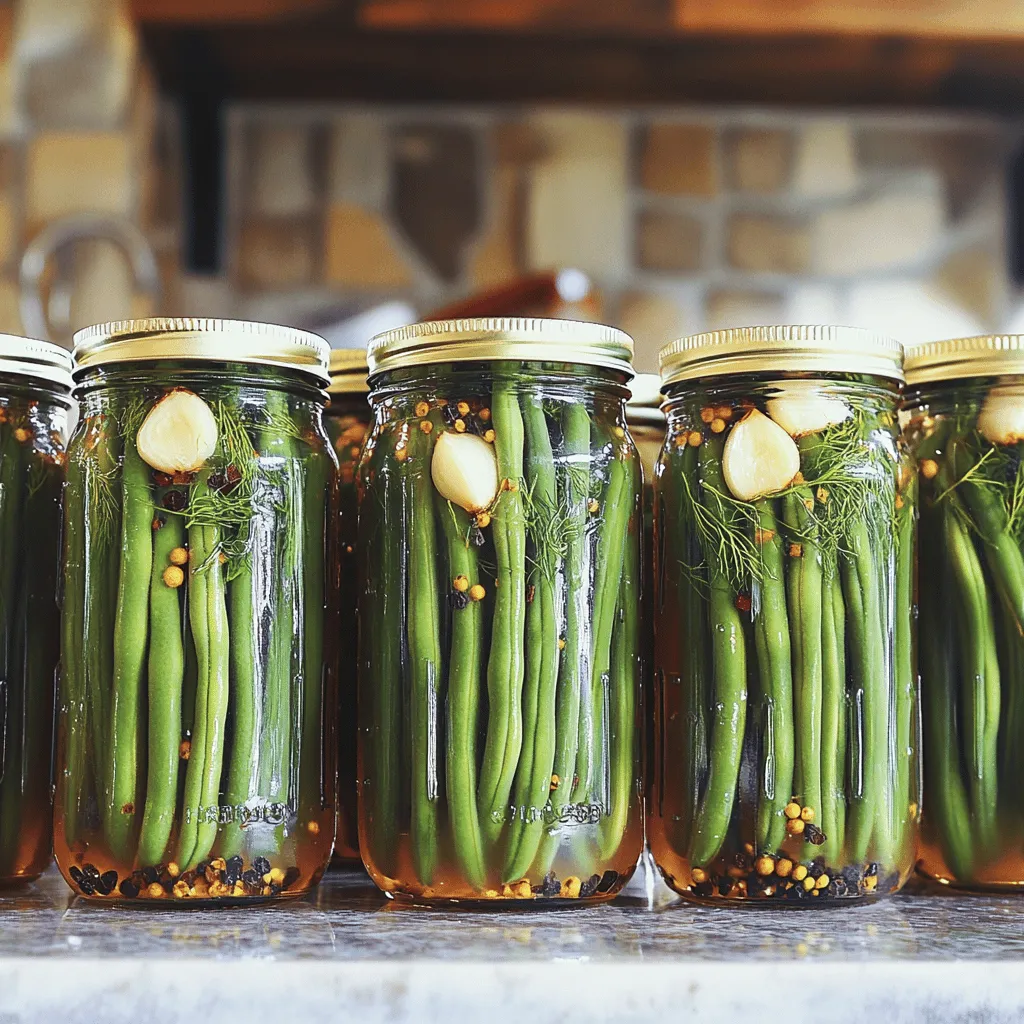
– 4 sterilized pint jars with lids

Gathering the right ingredients is key to making Grandma’s crispy garlic dilly beans. Fresh green beans are the star of the show. Their crispness adds a delightful crunch. Choose bright green beans without blemishes for the best quality. The garlic brings a strong, savory flavor. Smash the cloves to release their oils and aromas.

Next, you need to make the brine. The vinegar is essential for tanginess. I prefer distilled white vinegar for its clean taste. The water balances the acidity. Sugar and salt create a perfect harmony, enhancing the flavor. Dill seeds give that classic dilly taste. If you like a little heat, add red pepper flakes. The black peppercorns add a nice depth, too.

Finally, you need sterilized jars. These keep your beans safe and fresh. Four pint jars will hold this recipe well. Follow the full recipe for a clear guide to making these delightful beans. Happy cooking!

Step-by-Step Instructions

Preparing the Green Beans

Start by rinsing 1 pound of fresh green beans under cold water. This removes dirt and grit. Next, trim both ends of the beans. You can use a sharp knife or kitchen scissors for this task. Set the trimmed beans aside for later use.

Making the Brine

In a medium saucepan, combine 1 cup of distilled white vinegar and 1 cup of water. Add 2 tablespoons of sugar and 1 tablespoon of salt to the mix. Heat this mixture over medium heat. Stir it gently until the sugar and salt dissolve. Once the mixture reaches a rolling boil, remove it from the heat. Allow it to cool for 5 to 10 minutes.

Packing the Jars

Take 4 sterilized pint jars. In each jar, place 1 smashed garlic clove and 1 tablespoon of dill seeds. If you like spicy, add 1/2 teaspoon of red pepper flakes. Next, place 1/2 teaspoon of black peppercorns in each jar. Now, stand the green beans upright and pack them tightly into the jars. Leave about 1 inch of headspace at the top for the brine.

Pouring the Brine

Carefully pour the cooled brine over the packed green beans in each jar. Make sure all the beans are fully submerged. Distribute the garlic and spices evenly as you pour. This ensures that every bean is full of flavor.

Sealing and Storing

Take a clean cloth and wipe the rims of the jars. This helps create a good seal. Secure the lids onto the jars, screwing them on firmly but not too tight. Let the jars cool on the counter until they reach room temperature. Once cooled, transfer them to the refrigerator. For the best flavor, let the beans pickle for at least 24 hours. If you can wait a week, the flavor will be even better.

You can find the full recipe details in the preceding sections. Enjoy crafting these crunchy, flavorful dilly beans!

Tips & Tricks

Ensuring Crispiness

To keep your Dilly Beans crispy, always start with fresh green beans. Look for bright green beans that snap easily. Older beans can be tough and mushy. Trim both ends to help them soak up the brine.

Choosing the right vinegar is key too. I use distilled white vinegar for a clean taste. It helps the beans stay crunchy and adds a nice tang. You can try apple cider vinegar for a fruity twist, but it may change the flavor.

Flavor Adjustments

Feel free to experiment with spices in your Dilly Beans. You can add crushed red pepper for extra heat. Try mustard seeds or coriander for a unique taste. Remember, a little goes a long way!

Adjusting sugar and salt levels is also important. If you like it sweeter, add more sugar. For a saltier kick, increase the salt slightly. Taste your brine before pouring to find the right balance.

Serving Suggestions

There are many creative ways to enjoy Dilly Beans. Serve them cold as a crunchy snack or side dish. They also make a great garnish for salads and sandwiches.

Pair Dilly Beans with other dishes too. They complement grilled meats and fish perfectly. You can even chop them up and mix them into pasta salads for added texture.

For full details, check the Full Recipe.

Variations

Spicy Garlic Dilly Beans

To give your dilly beans some heat, try adding more red pepper flakes. This simple change will give each bite a spicy kick. You can also include sliced jalapeños. Just add them to the jars before you pour in the brine. This adds a fresh, zesty flavor that pairs well with garlic.

Herbs and Spices

You can also play with different herbs and spices in your recipe. Incorporating herbs like thyme or oregano adds a new twist. Just sprinkle a teaspoon in each jar. You can also experiment with mustard seeds. Try yellow or brown seeds for varied flavors. This small change can make a big difference.

Quick Pickle Version

If you want to enjoy these dilly beans fast, go for a quick pickle version. Shorten the pickling time to just a few hours. This way, you can enjoy them the same day! Another option is to use hot water bath methods. This will help develop flavors quickly, giving you tasty beans in no time.

Storage Info

Refrigeration Guidelines

Dilly beans taste best when stored in the fridge. They can last about 2 to 3 weeks when sealed properly. Check for signs of spoilage. If you see mold, an off smell, or soft beans, throw them away. Freshness is key for that crisp bite!

Freezing Dilly Beans

You can freeze dilly beans, but they may lose some crunch. To freeze them, blanch the beans first. Boil them for 2 minutes, then plunge them into ice water. Drain and pack them in airtight bags. This method helps keep their bright color and flavor.

Preserving Techniques

Water bath canning is a great way to preserve dilly beans for long-term storage. Fill jars with beans, spices, and brine, then process in boiling water for 10 minutes. This seals the jars and keeps out air. Store the jars in a cool, dark place. Check seals before using.

FAQs

What are Dilly Beans?

Dilly beans are pickled green beans. They mix fresh green beans with garlic and dill. This dish comes from the American South, where pickling is popular. The crunch of the green beans pairs well with the tangy brine. You can enjoy them as a snack or a side. They add a zesty touch to meals and are easy to make at home.

How long should I let Dilly Beans pickle?

For the best flavor, let the dilly beans pickle for at least 24 hours. This time helps the flavors meld. If you want a stronger taste, wait a week. The longer they sit, the more intense the taste. Keep them in the fridge while they pickle. This ensures they stay fresh and crisp.

Can I adjust the recipe for more or fewer jars?

Yes, you can adjust the recipe easily. If you want more jars, simply double the ingredients. For fewer jars, cut the amounts in half. Just make sure to keep the same ratios. This way, the flavor stays balanced. You can always experiment with the spices too. This makes your dilly beans even more unique.

Are Dilly Beans good for canning?

Dilly beans are great for canning. Use sterilized jars to store them safely. Make sure to follow proper canning steps to avoid spoilage. The vinegar helps preserve the beans for a long time. If done right, they can last for months. Always check for signs of spoilage before eating them.

What is the nutritional value of Dilly Beans?

Dilly beans are low in calories. A serving has about 30 calories. They are high in fiber, which helps digestion. Plus, they offer vitamins like A and C. The garlic adds health benefits too. It may help boost your immune system. Enjoying these beans can be a tasty way to add healthy options to your diet.

Making Dilly Beans is easy and fun. You learned about the key ingredients and steps. Fresh green beans and the right spices create a tasty dish. Follow the tips to ensure your beans stay crisp and flavorful. Feel free to try variations for added spice or different herbs. Store them correctly for long-lasting enjoyment. Dilly Beans can be a great addition to your meals. I hope you feel inspired to make your own batch today!

- 1 pound fresh green beans, trimmed - 4 cloves garlic, peeled and smashed - 1 cup distilled white vinegar - 1 cup water - 2 tablespoons sugar - 1 tablespoon salt - 1 tablespoon dill seeds - 1/2 teaspoon red pepper flakes (optional) - 1/2 teaspoon black peppercorns - 4 sterilized pint jars with lids Gathering the right ingredients is key to making Grandma's crispy garlic dilly beans. Fresh green beans are the star of the show. Their crispness adds a delightful crunch. Choose bright green beans without blemishes for the best quality. The garlic brings a strong, savory flavor. Smash the cloves to release their oils and aromas. Next, you need to make the brine. The vinegar is essential for tanginess. I prefer distilled white vinegar for its clean taste. The water balances the acidity. Sugar and salt create a perfect harmony, enhancing the flavor. Dill seeds give that classic dilly taste. If you like a little heat, add red pepper flakes. The black peppercorns add a nice depth, too. Finally, you need sterilized jars. These keep your beans safe and fresh. Four pint jars will hold this recipe well. Follow the full recipe for a clear guide to making these delightful beans. Happy cooking! Start by rinsing 1 pound of fresh green beans under cold water. This removes dirt and grit. Next, trim both ends of the beans. You can use a sharp knife or kitchen scissors for this task. Set the trimmed beans aside for later use. In a medium saucepan, combine 1 cup of distilled white vinegar and 1 cup of water. Add 2 tablespoons of sugar and 1 tablespoon of salt to the mix. Heat this mixture over medium heat. Stir it gently until the sugar and salt dissolve. Once the mixture reaches a rolling boil, remove it from the heat. Allow it to cool for 5 to 10 minutes. Take 4 sterilized pint jars. In each jar, place 1 smashed garlic clove and 1 tablespoon of dill seeds. If you like spicy, add 1/2 teaspoon of red pepper flakes. Next, place 1/2 teaspoon of black peppercorns in each jar. Now, stand the green beans upright and pack them tightly into the jars. Leave about 1 inch of headspace at the top for the brine. Carefully pour the cooled brine over the packed green beans in each jar. Make sure all the beans are fully submerged. Distribute the garlic and spices evenly as you pour. This ensures that every bean is full of flavor. Take a clean cloth and wipe the rims of the jars. This helps create a good seal. Secure the lids onto the jars, screwing them on firmly but not too tight. Let the jars cool on the counter until they reach room temperature. Once cooled, transfer them to the refrigerator. For the best flavor, let the beans pickle for at least 24 hours. If you can wait a week, the flavor will be even better. You can find the full recipe details in the preceding sections. Enjoy crafting these crunchy, flavorful dilly beans! To keep your Dilly Beans crispy, always start with fresh green beans. Look for bright green beans that snap easily. Older beans can be tough and mushy. Trim both ends to help them soak up the brine. Choosing the right vinegar is key too. I use distilled white vinegar for a clean taste. It helps the beans stay crunchy and adds a nice tang. You can try apple cider vinegar for a fruity twist, but it may change the flavor. Feel free to experiment with spices in your Dilly Beans. You can add crushed red pepper for extra heat. Try mustard seeds or coriander for a unique taste. Remember, a little goes a long way! Adjusting sugar and salt levels is also important. If you like it sweeter, add more sugar. For a saltier kick, increase the salt slightly. Taste your brine before pouring to find the right balance. There are many creative ways to enjoy Dilly Beans. Serve them cold as a crunchy snack or side dish. They also make a great garnish for salads and sandwiches. Pair Dilly Beans with other dishes too. They complement grilled meats and fish perfectly. You can even chop them up and mix them into pasta salads for added texture. For full details, check the Full Recipe. {{image_4}} To give your dilly beans some heat, try adding more red pepper flakes. This simple change will give each bite a spicy kick. You can also include sliced jalapeños. Just add them to the jars before you pour in the brine. This adds a fresh, zesty flavor that pairs well with garlic. You can also play with different herbs and spices in your recipe. Incorporating herbs like thyme or oregano adds a new twist. Just sprinkle a teaspoon in each jar. You can also experiment with mustard seeds. Try yellow or brown seeds for varied flavors. This small change can make a big difference. If you want to enjoy these dilly beans fast, go for a quick pickle version. Shorten the pickling time to just a few hours. This way, you can enjoy them the same day! Another option is to use hot water bath methods. This will help develop flavors quickly, giving you tasty beans in no time. Dilly beans taste best when stored in the fridge. They can last about 2 to 3 weeks when sealed properly. Check for signs of spoilage. If you see mold, an off smell, or soft beans, throw them away. Freshness is key for that crisp bite! You can freeze dilly beans, but they may lose some crunch. To freeze them, blanch the beans first. Boil them for 2 minutes, then plunge them into ice water. Drain and pack them in airtight bags. This method helps keep their bright color and flavor. Water bath canning is a great way to preserve dilly beans for long-term storage. Fill jars with beans, spices, and brine, then process in boiling water for 10 minutes. This seals the jars and keeps out air. Store the jars in a cool, dark place. Check seals before using. Dilly beans are pickled green beans. They mix fresh green beans with garlic and dill. This dish comes from the American South, where pickling is popular. The crunch of the green beans pairs well with the tangy brine. You can enjoy them as a snack or a side. They add a zesty touch to meals and are easy to make at home. For the best flavor, let the dilly beans pickle for at least 24 hours. This time helps the flavors meld. If you want a stronger taste, wait a week. The longer they sit, the more intense the taste. Keep them in the fridge while they pickle. This ensures they stay fresh and crisp. Yes, you can adjust the recipe easily. If you want more jars, simply double the ingredients. For fewer jars, cut the amounts in half. Just make sure to keep the same ratios. This way, the flavor stays balanced. You can always experiment with the spices too. This makes your dilly beans even more unique. Dilly beans are great for canning. Use sterilized jars to store them safely. Make sure to follow proper canning steps to avoid spoilage. The vinegar helps preserve the beans for a long time. If done right, they can last for months. Always check for signs of spoilage before eating them. Dilly beans are low in calories. A serving has about 30 calories. They are high in fiber, which helps digestion. Plus, they offer vitamins like A and C. The garlic adds health benefits too. It may help boost your immune system. Enjoying these beans can be a tasty way to add healthy options to your diet. Making Dilly Beans is easy and fun. You learned about the key ingredients and steps. Fresh green beans and the right spices create a tasty dish. Follow the tips to ensure your beans stay crisp and flavorful. Feel free to try variations for added spice or different herbs. Store them correctly for long-lasting enjoyment. Dilly Beans can be a great addition to your meals. I hope you feel inspired to make your own batch today!

Grandma’s Crispy Garlic Dilly Beans

Discover the delightful world of pickling with Grandma’s Crispy Garlic Dilly Beans! This easy recipe combines fresh green beans, zesty garlic, and aromatic dill for a crunchy snack that's bursting with flavor. Perfect for sides, salads, or cocktails, these pickled beans are a must-try. Ready to elevate your culinary skills? Click to explore the full recipe and bring some delicious homemade pickles to your table!

Ingredients
  

1 pound fresh green beans, trimmed

4 cloves garlic, peeled and smashed

1 cup distilled white vinegar

1 cup water

2 tablespoons sugar

1 tablespoon salt

1 tablespoon dill seeds

1/2 teaspoon red pepper flakes (optional for a spicy kick)

1/2 teaspoon black peppercorns

4 sterilized pint jars with lids

Instructions
 

Prepare the Green Beans: Rinse the fresh green beans under cold water to remove any dirt. Trim both ends of the beans using a sharp knife or kitchen scissors, and set them aside for later use.

    Make the Brine: In a medium-sized saucepan, pour in the distilled white vinegar and water. Add the sugar and salt to the mixture. Heat the saucepan over medium heat, stirring occasionally until the sugar and salt fully dissolve. Once the liquid reaches a rolling boil, remove it from the heat and allow it to cool for about 5-10 minutes.

      Pack the Jars: Take the sterilized pint jars and begin packing them. In each jar, place 1 smashed garlic clove, followed by 1 tablespoon of dill seeds. If you prefer a bit of heat, add 1/8 teaspoon of red pepper flakes, along with 1/8 teaspoon of black peppercorns. Next, standing the green beans upright, pack them tightly into the jars, making sure to leave about 1 inch of headspace at the top for the brine.

        Pour the Brine: With care, pour the slightly cooled brine over the packed green beans in each jar, ensuring that all the beans are completely submerged. Distribute the garlic and spices evenly throughout the jars.

          Seal the Jars: Take a clean cloth and gently wipe the rims of the jars to eliminate any spillage that could prevent a proper seal. Secure the lids onto the jars and screw them on firmly but not overly tight.

            Refrigerate: Allow the jars to cool to room temperature on the counter. Once cooled, transfer them to the refrigerator. For optimal flavor, let the beans pickle for at least 24 hours. For a more intense flavor profile, wait a week before indulging in them.

              Enjoy: These crispy garlic dilly beans can be served cold and make a delightful side dish, a crunchy snack, or a flavorful garnish for your favorite salads and non-alcoholic cocktails.

                Prep Time: 20 mins | Total Time: 25 mins + pickling | Servings: 4 pint jars

                  Presentation Tips: For serving, consider placing the beans in a decorative dish, and garnish with a sprig of fresh dill for a beautiful and appetizing presentation!

                    WANT TO SAVE THIS RECIPE?