Salads

- 1 cup strawberries, hulled and sliced - 1 cup blueberries, rinsed - 1 cup raspberries, rinsed - 1 cup blackberries, rinsed - 2 kiwis, peeled and cut into bite-sized pieces - 1 ripe banana, sliced into rounds - 3 tablespoons honey, preferably raw - 2 tablespoons fresh lime juice - Zest of 1 lime - Fresh mint for garnish To create a Berry Fruit Salad, you need fresh and vibrant fruits. Strawberries bring sweetness. Blueberries add a pop of color and flavor. Raspberries offer a tangy bite. Blackberries add juicy goodness. Kiwis bring a tropical touch. Bananas add creaminess. For the honey lime dressing, I use raw honey for its rich taste. Fresh lime juice brightens the flavors. Lime zest adds aromatic notes. Together, these ingredients create a delicious dressing that enhances the fruits. Feel free to add fresh mint as a garnish. It not only looks great but adds a refreshing twist. You can find the full recipe for this delightful dish in the Berry Bliss Fruit Salad section. To start, gather your fresh fruits. You need to hull, slice, and rinse all the berries. - 1 cup strawberries, hulled and sliced - 1 cup blueberries, rinsed - 1 cup raspberries, rinsed - 1 cup blackberries, rinsed Next, peel and chop the kiwis and bananas. The kiwis should be cut into bite-sized pieces, while the banana should be sliced into rounds. - 2 kiwis, peeled and cut into bite-sized pieces - 1 ripe banana, sliced into rounds Now, let’s make the honey lime dressing. In a small bowl, combine honey, lime juice, and lime zest. - 3 tablespoons honey, preferably raw - 2 tablespoons fresh lime juice - Zest of 1 lime Whisk these ingredients together until the mixture is smooth and well-blended. It's time to mix everything together. In a large bowl, add all the prepared fruits. Pour the honey lime dressing over them. Gently toss the fruit salad with a spatula. Be careful not to mash the delicate berries. Now, let the salad rest for about 5 minutes. This wait allows the flavors to come together nicely. When you're ready to serve, arrange the salad in individual bowls or on a large platter. For the final touch, sprinkle with finely chopped fresh mint. This adds a pop of color and freshness. You can find the full recipe for this delightful dish. To make a great berry fruit salad, start by picking ripe fruits. Look for fruits that are firm and fresh. Choose strawberries that are bright red and smell sweet. Blueberries should be plump and deep blue. Raspberries must be vibrant and not mushy. Blackberries should be shiny and dark. For kiwis, pick ones that feel slightly soft when you press them. Bananas should be yellow with a few brown spots for sweetness. Once you mix the fruits with the dressing, let the salad rest for 5 minutes. This short wait allows the honey lime dressing to soak into the fruits. The flavors blend beautifully. You will notice a sweeter, more vibrant taste. This step makes a big difference in the final dish. Serving matters as much as taste. For a fun touch, use individual bowls for each guest. It makes the salad feel special. You can also arrange the salad on a large platter for gatherings. Add a sprinkle of fresh mint on top for color. It adds a nice aroma and looks beautiful. Check out the Full Recipe for more ideas on how to serve! {{image_4}} You can make your berry fruit salad even better. Consider adding pineapple or mango for tropical flair. These fruits bring a sweet and juicy touch. Pineapple adds a tangy punch, while mango offers creaminess. Mixing these fruits with berries creates a fun flavor burst. You can even try peaches or nectarines for a summer vibe. If you like creamy textures, try a yogurt-based dressing. This will add a smooth and tangy flavor. Mix plain yogurt with a bit of honey and lime juice. You can adjust the sweetness to fit your taste. This dressing pairs well with all the fruits. It adds a nice twist to the classic honey lime dressing. For a vegan option, substitute honey with agave syrup. Agave is sweeter and works well in dressings. This change keeps the salad light and bright. You can also use maple syrup for a different flavor. Both options keep your berry fruit salad delicious while meeting dietary needs. You should eat this berry fruit salad fresh for the best taste. If you need to store it, keep it in the fridge. It will stay good for 1-2 days. Make sure to use an airtight container. This helps keep the fruits from getting mushy and losing flavor. Place the container in the refrigerator right away. I do not recommend freezing this salad. Freezing can change the texture of the fruit. It may become soft and watery when thawed. Enjoy it fresh for the best experience. Typically, the salad lasts 1-2 days in an airtight container. The fruits stay fresh for a short time. After that, they may become mushy. Always check for changes in color or smell. It’s best to prepare the salad shortly before serving for optimal freshness. If you make it too early, the fruits may release juice. This can make the salad watery and less appealing. Agave syrup or maple syrup can be used as alternatives. Both provide sweetness without changing the flavor too much. This is great if you want a vegan option. You can still enjoy a tasty dressing! For the full recipe, check out the Berry Bliss Fruit Salad. This berry fruit salad combines fresh fruits and a zesty honey lime dressing. You’ve learned how to prepare the fruits and create the dressing. This salad is easy to make and perfect for any meal. Remember, using ripe fruits enhances the flavor. Feel free to add more fruits or try different dressings. Enjoy the taste and color of this dish. Fresh is key, so serve it right away for the best experience. Don’t forget to store leftovers properly for later use. Enjoy your healthy, delicious creation!
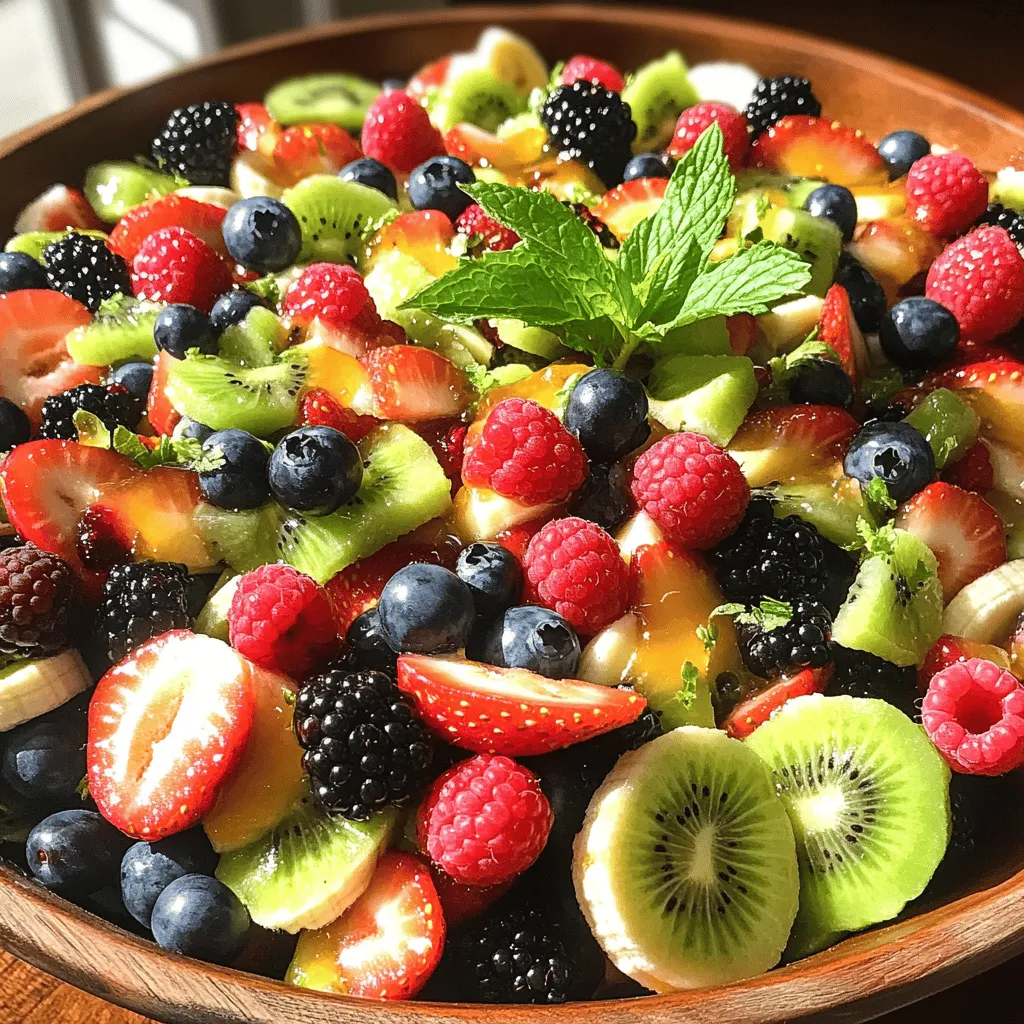
Berry Fruit Salad with Easy Honey Lime Dressing Delight
Get ready to delight your tastebuds with a fresh Berry Fruit Salad topped with an easy Honey Lime Dressing! This vibrant dish is packed with
- 1 can (15 oz) chickpeas, thoroughly drained and rinsed - 1 cup feta cheese, crumbled - 1/2 cup dried cranberries - 1/4 cup red onion, finely diced - 1/4 cup fresh parsley, chopped - 1/4 cup extra virgin olive oil - 2 tablespoons lemon juice - 1 teaspoon Dijon mustard - 1/2 teaspoon garlic powder - Salt and pepper to taste The ingredients for Feta & Cranberry Chickpeas with Zesty Lemon Vinaigrette are simple yet flavorful. Each one plays a role in creating a fresh taste. Chickpeas are the base. They give protein and fiber. Feta cheese adds creaminess and tang. Dried cranberries bring a sweet bite. The red onion provides crunch and sharpness. Fresh parsley gives a pop of color and freshness. Extra virgin olive oil is vital for a smooth vinaigrette. It enhances flavor and richness. Lemon juice adds zest and brightness. Dijon mustard helps emulsify the dressing. Garlic powder gives a hint of warm flavor. Finally, salt and pepper balance all the tastes. This dish is not only tasty but also nutritious. Each serving has about 200 calories. Here’s a breakdown of the macronutrients: - Protein: 8g - Carbohydrates: 24g - Fat: 10g Chickpeas are high in protein and fiber. They help keep you full. Feta cheese gives calcium and flavor. Dried cranberries offer antioxidants. Fresh parsley is rich in vitamins. Olive oil provides healthy fats. This recipe is a balanced choice for a meal or snack. For the full recipe, check out the details above. To start, you will mix the base ingredients. In a large bowl, add the chickpeas, crumbled feta, dried cranberries, red onion, and parsley. Use your hands or a large spoon to gently toss everything together. This helps to combine all the flavors and textures. Next, let’s create the lemon vinaigrette. In a small bowl, whisk together the olive oil, lemon juice, Dijon mustard, and garlic powder. Add a pinch of salt and black pepper. Keep whisking until the vinaigrette is smooth and well-mixed. This dressing adds a zesty kick to your salad. Now, it’s time to drizzle the vinaigrette over the chickpea mixture. Pour it slowly over the salad. This allows for even distribution of the dressing. Then, gently toss everything together again. Make sure each chickpea and mix-in gets coated well with the dressing. This step is crucial for the best flavor. You can serve this salad chilled or at room temperature. Letting it rest for 10 to 15 minutes at room temperature helps the flavors blend. For an attractive finish, garnish with extra parsley on top before serving. This simple touch makes the dish pop visually and adds freshness. For the full recipe, check out the detailed instructions above. Enjoy your Feta & Cranberry Chickpeas with Zesty Lemon Vinaigrette! To enhance the taste of your feta and cranberry chickpeas, start by adjusting the salt and pepper. I recommend tasting as you go. A little salt can make the flavors pop. If it’s too salty, add a splash of lemon juice. For the dressing, a well-balanced mix is key. Use fresh lemon juice for brightness. The Dijon mustard adds a nice tang. Whisk until smooth. If it feels too thick, add a bit more olive oil or lemon juice. One common mistake is over-mixing the salad. Gently toss the ingredients to keep the feta intact. If you mix too hard, you risk breaking the cheese and losing texture. Another error is using too much or too little dressing. Start with half of what you think you need. Toss the salad, then taste it. You can always add more dressing, but you can't take it away. For sides, consider serving this salad with pita chips or crusty bread. They add a nice crunch. If you want to make it a main dish, add grilled chicken or chickpea patties. This adds protein and makes it heartier. For the full recipe, check back to the main section. Enjoy your cooking! {{image_4}} You can easily make this dish your own. Swap feta cheese for vegan cheese to suit a plant-based diet. Try different nuts, like walnuts or almonds, for added crunch. If you want more protein, consider adding grilled chicken or cubed tofu. Both options blend well and keep the meal filling. Change your salad based on the season. In summer, add fresh tomatoes and crunchy cucumbers for a bright touch. These ingredients enhance flavor and color, making your dish pop. For winter, think warm and hearty. Roasted veggies like squash or carrots can bring comfort and warmth to this salad. While the zesty lemon vinaigrette shines, you can explore other dressings too. A balsamic vinaigrette offers a sweet and tangy twist. You might also enjoy a tahini dressing for a creamy option. Each variation can change the whole vibe of the dish, so feel free to experiment. For the complete experience, check out the Full Recipe. To keep your feta and cranberry chickpeas fresh, store them in a sealed container. I recommend glass or BPA-free plastic containers. Make sure to refrigerate them right after serving. This helps prevent spoilage. Always cool the salad to room temperature before sealing it. This keeps moisture out and maintains flavor. In the fridge, this salad lasts about three to five days. Look for signs that the salad has gone bad. If it smells off or looks slimy, it's time to toss it. Also, if the feta changes color, do not eat it. Freshness matters for taste and safety. You can serve this salad cold or at room temperature. If you prefer it warm, gently heat the chickpeas in a pan on low heat. Do not overcook, as this can make the feta melt and change the texture. Enjoy it as a light lunch or a side dish for dinner. For best results, serve it cold on hot days. Yes, you can prepare this salad in advance. I recommend making it up to 24 hours ahead. Store the salad in the fridge, covered. This allows the flavors to blend well. Just remember to add any fresh herbs right before serving for the best taste. Yes, this salad is gluten-free. The main ingredients, chickpeas and feta cheese, do not contain gluten. Always check labels on packaged items to ensure they are certified gluten-free. This way, you can enjoy the salad safely. To make this salad vegan, replace feta cheese with a plant-based cheese. You can also try using tofu or avocado for creaminess. Use maple syrup instead of honey for sweetness in the vinaigrette. These swaps keep the dish tasty and plant-based. Chickpeas are packed with nutrition. They are high in protein and fiber. This helps keep you full longer. They also contain essential vitamins and minerals, like iron and magnesium. Eating chickpeas can support heart health and aid digestion. You get great flavor and health benefits in this salad. Enjoy the Full Recipe to make it yourself! This blog post covered a tasty chickpea salad, from ingredients to serving tips. We discussed how to mix flavors and create a delightful lemon vinaigrette. Also, I shared variations, storage tips, and answers to common questions. Overall, this salad is healthy and easy to make. You can customize it and prepare it ahead of time. Enjoy this dish as a side or a main course. Explore your options, and make it your own.
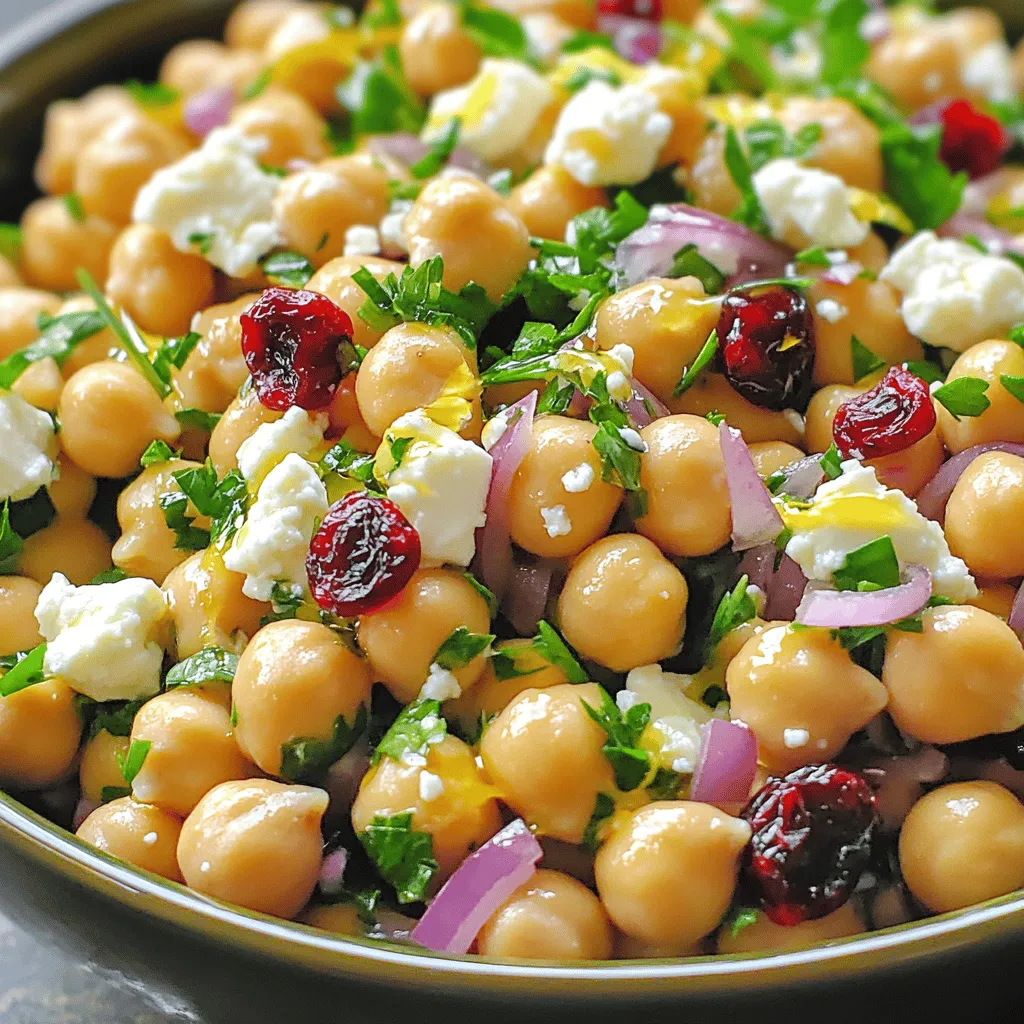
Feta & Cranberry Chickpeas with Zesty Lemon Boost
If you crave a fresh, tasty dish that’s easy to make, look no further! My Feta & Cranberry Chickpeas with Zesty Lemon Vinaigrette packs flavor
For a delicious high protein salad, gather these ingredients: - 1 cup quinoa, thoroughly rinsed - 1 can (15 oz) chickpeas, well-drained and rinsed - 1 cup cherry tomatoes, halved - 1 medium cucumber, diced - 1 bell pepper (choose your favorite color), diced - 1/4 cup red onion, finely chopped - 1/2 cup feta cheese, crumbled (optional but recommended) - 1/4 cup fresh parsley, finely chopped - 3 tablespoons extra virgin olive oil - 1 tablespoon freshly squeezed lemon juice - 1 teaspoon garlic powder - Salt and freshly ground black pepper to taste This salad packs a punch in protein and nutrients: - Quinoa: A complete protein with all nine essential amino acids. It has about 8 grams of protein per cup. - Chickpeas: These legumes add roughly 15 grams of protein per cup. They also provide fiber, which helps keep you full. - Feta cheese: While optional, it adds about 4 grams of protein per ounce. It also adds a tangy flavor that brightens the dish. - Vegetables: Cherry tomatoes, cucumbers, and bell peppers add vitamins, minerals, and antioxidants. They help balance your meal with fresh flavors. When choosing ingredients, freshness matters: - Fresh Ingredients: Look for vibrant colors and firm textures. Fresh veggies enhance flavor and nutrition. Visit local farmers' markets for the best selection. - Canned Ingredients: Canned chickpeas are a great option for quick meals. Choose low-sodium varieties to keep your dish healthy. Rinse them well to remove excess salt. - Feta Cheese: If you can, buy fresh feta from local cheese shops. It often tastes better than pre-packaged options. Using quality ingredients makes your high protein salad even more enjoyable. Check out the Full Recipe for all the steps to create this nutritious dish. 1. Boil Water: Start by bringing 2 cups of water to a rolling boil in a medium pot. 2. Add Quinoa: Once boiling, stir in 1 cup of rinsed quinoa. 3. Simmer Quinoa: Lower the heat to simmer. Cover the pot and cook for 15-20 minutes. 4. Check Quinoa: The quinoa should look fluffy, and all the water should be absorbed. 5. Cool Quinoa: Remove the pot from heat and let the quinoa cool completely. 6. Mix Salad: In a large bowl, combine the cooled quinoa, 1 can of rinsed chickpeas, 1 cup of halved cherry tomatoes, 1 diced cucumber, 1 diced bell pepper, 1/4 cup of finely chopped red onion, and 1/4 cup of chopped parsley. 7. Add Feta: If you want, fold in 1/2 cup of crumbled feta cheese gently. 8. Make Dressing: In a small bowl, whisk together 3 tablespoons of olive oil, 1 tablespoon of lemon juice, 1 teaspoon of garlic powder, and salt and pepper. 9. Combine: Drizzle the dressing over the salad mixture and toss everything well. 10. Taste and Adjust: Taste the salad. Add more salt or pepper as you like. 11. Portion Out: Divide the salad into meal prep containers. Store them in the fridge for easy lunches. - Water Ratio: Use 2 cups of water for every cup of quinoa. - Fluffing: After it cooks, fluff with a fork for a better texture. - Cooling: Let it cool in a wide bowl. This helps it cool faster. - Medium Pot: For cooking your quinoa. - Large Mixing Bowl: To combine all the salad ingredients. - Small Bowl: For whisking the dressing. - Measuring Cups and Spoons: For accurate ingredient amounts. - Meal Prep Containers: To store your salad for the week. This method makes meal prep simple and fun. Enjoy your healthy, tasty salads all week long! For the full recipe, check out the Nutritious Quinoa & Chickpea Salad. When you prep salads, keep them fresh and tasty. Start with dry ingredients. Wet ingredients can make your salad soggy. Store dressings separately and add them when you eat. Use sturdy greens like kale or spinach. They hold up well in the fridge. Cut veggies just before you pack them if possible. This keeps them crisp. Try to mix colors for a fun look and better nutrition. Adding herbs and spices boosts flavor. Fresh herbs like parsley and cilantro add a lot without extra calories. Use lemon juice for brightness. It helps keep your salad fresh too. For a kick, add a sprinkle of chili flakes or pepper. Choose dressings made with healthy fats like olive oil. This adds flavor and keeps your heart healthy. Remember, a little goes a long way, especially with strong flavors. Use small containers for your salads. This helps you control portions. Aim for about two cups of salad per container. This amount is filling and provides enough protein. Use clear containers to see what you have. This keeps you from skipping meals. Label your containers with dates. This way, you know when to eat them. Keep your meals fun by changing up the salads each week. For a delicious recipe, check out the Full Recipe for Nutritious Quinoa & Chickpea Salad. You’ll love how easy it is! {{image_4}} You can change up your salad to keep it exciting. Try using grilled chicken, shrimp, or tofu. Each adds a unique taste and texture. For a meatless option, consider tempeh or edamame. These proteins are packed with nutrients. Mix and match to find your favorite combo. If you follow a vegan diet, skip the feta cheese. Use avocado instead for creaminess. You can also add nuts or seeds for extra crunch. For gluten-free options, quinoa is a great choice. Always check labels to ensure any other ingredients are gluten-free. Using seasonal produce makes your salad fresh and bright. In spring, add asparagus and peas. In summer, ripe tomatoes and corn shine. Fall brings sweet potatoes and kale, while winter offers root veggies. Visit local markets to find the best ingredients. They not only taste better but also support local farmers. To keep your high protein salad fresh, use airtight containers. Glass containers work best, but sturdy plastic ones are fine too. Always let the salad cool before sealing it. This prevents moisture buildup, which can make the salad soggy. Your Nutritious Quinoa & Chickpea Salad will stay fresh for about 3 to 5 days in the fridge. To maximize freshness, keep the dressing separate until you are ready to eat. This keeps the salad crisp and tasty. If you notice any off smells or colors, it's best to discard it. You can eat this salad cold, but if you prefer warm, heat it gently. Place it in a microwave-safe bowl. Heat in short bursts, about 30 seconds at a time. Stir between each burst to ensure even heating. Avoid overheating, as it can change the salad's texture. You can store the quinoa salad in the fridge for up to five days. Make sure to keep it in an airtight container. This helps keep it fresh and tasty. After a few days, check for any off smells or changes in texture. If everything seems fine, enjoy it! Yes, you can freeze this salad. It will keep well in the freezer for about three months. To freeze, portion the salad into containers. Leave some space at the top for expansion. When you’re ready to eat, thaw it in the fridge overnight. Enjoy it cold or let it come to room temperature before serving. Here are some great high protein options: - Grilled chicken - Tofu - Hard-boiled eggs - Edamame - Sunflower seeds - Hemp seeds - Black beans Adding any of these will boost the protein content of your salad. Experiment with different combinations to find your favorite taste! In this blog post, I covered how to make a healthy, high protein salad. We discussed the essential ingredients, cooking steps, and handy tips. Customizations for dietary needs and storage best practices were also highlighted. By following these steps, you can enjoy a nutritious salad packed with flavor. Always choose fresh ingredients when possible, and don’t be afraid to experiment. This will help you create meals that excite your taste buds while being good for you.
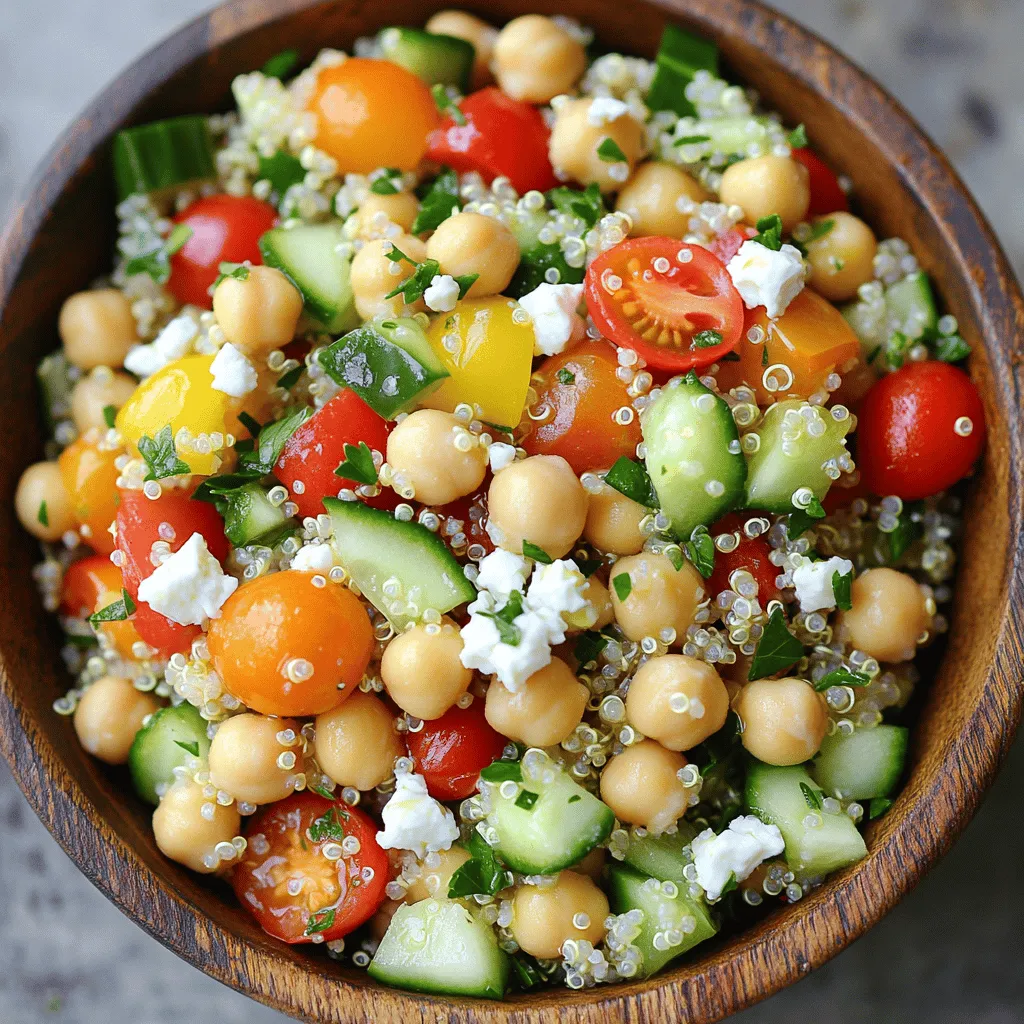
High Protein Salad Recipes for Meal Prep Success
Are you ready to transform your meal prep with delicious high protein salads? I’m here to share some easy recipes that fuel your body and
- Fresh corn kernels - Cherry tomatoes - Red onion - Bell pepper - Optional add-ins: avocado - Optional add-ins: black beans The heart of any great corn salad is fresh corn kernels. They bring sweet and juicy flavor. You can use corn on the cob or frozen corn if fresh isn’t available. I love adding cherry tomatoes for a burst of color and taste. They add a slight tang that balances the sweetness of the corn. Red onion gives a sharp bite, while bell pepper adds crunch. You can choose any color of bell pepper, but I prefer red for its sweetness. If you're feeling adventurous, toss in some diced avocado for creaminess. Black beans are also a great option. They add protein and make the salad more filling. - Lime juice - Olive oil - Ground cumin - Salt - Pepper A good dressing can elevate your corn salad. I use fresh lime juice and olive oil for a bright flavor. Lime juice adds acidity, which makes the salad lively. Olive oil brings richness without overpowering the other tastes. Ground cumin gives a warm, earthy note. Don't forget salt and pepper to enhance all the flavors! - Fresh cilantro - Lime wedges For a fresh finish, I like to add cilantro. It gives a burst of herbal flavor that complements the corn. Lime wedges serve as a pretty garnish and add a splash of zing when squeezed over the salad just before eating. For the full recipe, check out the Sunny Zesty Corn Salad section! Blanching the Corn Start by filling a large pot with water. Bring the water to a rolling boil. Add the ears of corn carefully. Let them blanch for about five minutes. This step keeps the corn tender and bright. After five minutes, get a bowl of ice water ready. Remove the corn from the pot and place it in the ice water. This stops the cooking. After a few minutes, drain the corn. Cutting Kernels Off the Cob Once the corn is cool, it is time to cut the kernels off the cob. Hold the cob upright in a bowl. Use a sharp knife to slice down the sides. The kernels should fall right into the bowl. Make sure you get all of them! Combining Key Ingredients In the bowl with the corn, add the halved cherry tomatoes. Next, add the finely diced red onion. Then, toss in the diced bell pepper. Stir gently so the corn does not break. Adding Black Beans if Desired If you want extra protein, now is the time to add black beans. Rinse them well and drain. Gently fold the beans into the vegetable mix. Be careful not to mash them. Whisking Ingredients Together In a separate small bowl, combine lime juice, olive oil, and ground cumin. Add a pinch of salt and black pepper. Use a whisk to mix until it is smooth. This dressing brings all the flavors together. Combining with the Salad Drizzle the dressing over your corn salad mix. Toss everything gently to coat all the ingredients. You want every bite to be flavorful. Adding Avocado and Cilantro Just before you serve, add the diced avocado. Also, toss in the chopped cilantro. Gently fold the ingredients together. Take care to keep the avocado pieces whole. Adjusting Seasoning Taste your salad. If it needs more flavor, adjust the seasoning. You can add more lime juice or salt. Make it just how you like it! For the full recipe, check out the Sunny Zesty Corn Salad recipe. - Cooking Time for Corn: Start by blanching fresh corn. Boil it for about 5 minutes. This keeps the corn crisp. After boiling, cool it quickly in ice water. This step locks in the sweet taste. - Handling Avocado: Choose a ripe avocado. Cut it just before serving. This keeps the avocado from browning. Gently fold the avocado into the salad. This ensures it stays intact. - Experimenting with Seasonings: Don't be afraid to try new spices. Add some chili powder for heat. You can also use smoked paprika for a deeper flavor. - Using Fresh Herbs: Fresh herbs add a burst of flavor. Try adding basil or parsley for a twist. Don't forget to use cilantro, which brightens the dish. - Serving Suggestions: Serve the salad in a big, colorful bowl. This makes it look inviting. You can also use individual cups for a fun touch. - Creative Serving Options: For a picnic vibe, put the salad in mason jars. Layer the ingredients for a beautiful display. This makes it easy to grab and enjoy. For more details, check the Full Recipe. {{image_4}} You can give your corn salad a fun twist with a Mexican street corn style. Start by adding Cotija cheese. This cheese brings a salty flavor that pairs perfectly with the sweet corn. Crumble it on top just before serving for a nice crunch. Next, use chili powder. A sprinkle adds heat and depth. Mix it into the dressing or dust it over the salad. This will give your dish a vibrant kick. Grilling corn makes it smoky and sweet. To grill corn, soak the ears in water for 30 minutes. This helps them steam and keeps them juicy. Then, grill them for about 10 minutes, turning often for even cooking. You can also add other grilled vegetables for extra flavor. Bell peppers, zucchini, or red onions are great options. Chop them into bite-sized pieces and mix them into your salad for a colorful touch. Want to make your corn salad creamier? Incorporate more avocado. Add a second ripe avocado for a rich texture. It adds healthy fats and tastes amazing. You can also play with dressing variations. Try adding Greek yogurt for creaminess. Mix it with lime juice for a tangy flavor. This twist keeps your salad fresh and exciting. For a full recipe, check out the Sunny Zesty Corn Salad. Enjoy! To keep your corn salad fresh, store it in the fridge. Use an airtight container. This helps prevent any odors from mixing. Make sure the lid fits snugly. Corn salad stays fresh for about 3 days in the fridge. After this time, the veggies can become soggy. Always check for any signs of spoilage before eating. You can freeze corn salad, but it may change texture. To do this, pack it in a freezer-safe bag. Remove as much air as possible. This helps avoid freezer burn. When you are ready to eat, thaw the salad in the fridge. This usually takes about 6–8 hours overnight. Avoid using a microwave; it can make the veggies mushy. For the best taste, enjoy your corn salad fresh. If you want to make it ahead, try to store it in the fridge instead. You can find the full recipe in the article if you want more details. Yes, you can use frozen corn. Frozen corn is easy to find. It saves time since you don't need to cook it. However, fresh corn often has a better taste and crunch. Frozen corn may lack some sweetness. If you use frozen corn, make sure to thaw and drain it before adding it to the salad. If you need a lime juice substitute, use lemon juice. It has a similar tartness and flavor. Another option is apple cider vinegar. It adds a nice tang. You can also try orange juice for a sweeter twist. Each option can change the taste slightly, so choose what you like best. Corn salad will last about 3 to 5 days in the fridge. To keep it fresh, store it in an airtight container. Make sure to keep it cool. If the salad starts to look or smell off, it’s best to throw it away. Yes, you can make corn salad ahead of time. It tastes even better after sitting for a bit. Just mix all the ingredients, except for the avocado and cilantro. Add those just before serving. This helps keep them fresh and bright. You can add several proteins to corn salad. Grilled chicken or shrimp are great choices. Tofu or chickpeas work well for a plant-based option. Adding black beans gives extra flavor and protein too. Choose the protein that fits your meal or diet. This corn salad is simple and fresh. You learned about key ingredients, like corn and vegetables, to mix together. The dressing adds zing with lime juice and spices. I shared tips to enhance flavor and best storage methods to keep it fresh. Try different variations to suit your taste. Enjoy making this dish and sharing it with others. It's a tasty addition to any meal!
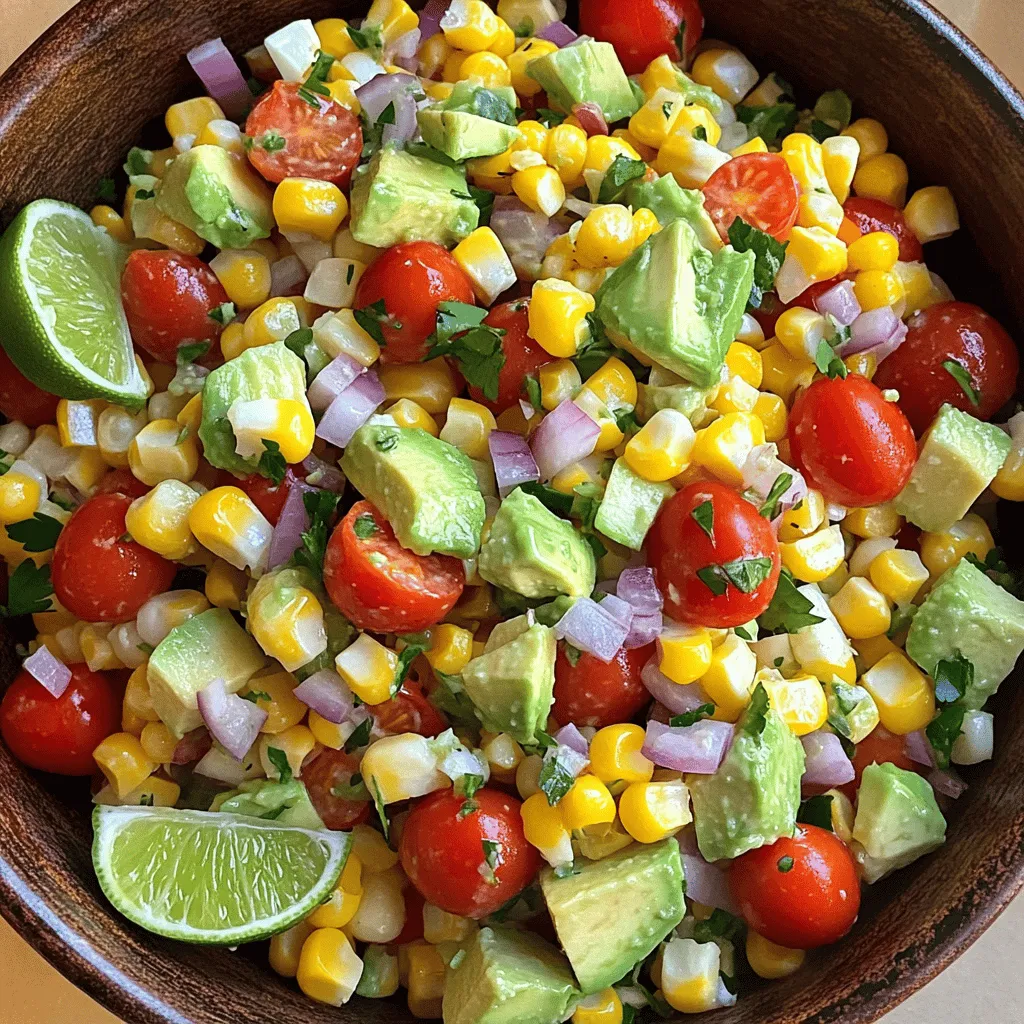
Corn Salad Delight Fresh and Flavorful Recipe
Are you ready to experience a burst of flavor? In this “Corn Salad Delight” recipe, fresh corn kernels dance with colorful veggies like cherry tomatoes
- Fresh baby spinach - Ripe strawberries - Creamy goat cheese - Sliced almonds - Red onion - Aged balsamic vinegar - Extra virgin olive oil - Pure honey - Sea salt and freshly ground black pepper - Calories per serving: The salad has about 200 calories. - Macronutrients breakdown: It contains healthy fats, fiber, and protein. - Health benefits of ingredients: Spinach provides iron, strawberries are high in vitamin C, and goat cheese adds calcium. This salad is not just a delight to eat; it is also a powerhouse of nutrition. You get fresh veggies, sweet fruit, and creamy cheese in every bite. Each ingredient brings unique flavors and benefits to your table. If you want to dive deeper into making this salad, check out the Full Recipe for more details. 1. Rinse the spinach well under cold water. This step removes dirt and grit. 2. Spin the spinach in a salad spinner to dry it. Dry spinach helps the dressing stick. 3. Slice the strawberries into thin rounds. This makes them easy to eat and adds color. 4. Crumble the goat cheese into bite-sized pieces. Small pieces mix well with the other flavors. 1. Start by placing the spinach in a large bowl. This is your salad base. 2. Layer the sliced strawberries evenly on top of the spinach. This adds sweetness to each bite. 3. Sprinkle crumbled goat cheese over the strawberries. The cheese adds creaminess and tang. 4. Next, add the sliced almonds. They give a nice crunch and extra flavor. 5. Finally, add the thin rings of red onion. They add a mild, zesty kick. 6. For freshness, toss the salad gently just before serving. This keeps the ingredients crisp. 1. In a small bowl, combine balsamic vinegar, olive oil, honey, salt, and pepper. 2. Whisk the ingredients together until they blend well. This is called emulsification. 3. The dressing should look smooth and creamy. This step ensures all flavors combine. 4. Drizzle the dressing over the salad just before serving. This keeps the spinach fresh. 5. Toss the salad gently to coat everything in the dressing. Be careful not to mash the ingredients. For the full recipe, you can refer to the complete instructions above. Enjoy your Spinach Strawberry Salad! To make a great spinach strawberry salad, start with fresh ingredients. - Choose fresh baby spinach. Look for bright, crisp leaves with no spots. - Select ripe strawberries. They should be bright red and firm. Avoid soft or mushy ones. - For goat cheese, find a creamy variety. This will add a nice texture and flavor. Presentation matters. Serve your salad in a way that looks appealing. - Use individual bowls or chilled plates for an elegant touch. - Garnish with extra strawberry slices and toasted almonds. This adds color and crunch. Pair this salad with grilled chicken or fish. It also goes well with a light pasta dish. Avoid common pitfalls to keep your salad fresh and tasty. - Do not overdress the salad. Too much dressing can make it soggy. - Be careful when tossing the salad. Gently mix to avoid bruising spinach and strawberries. If you damage them, the salad loses its lovely texture and flavor. For the full recipe, check out the Spinach Strawberry Delight Salad. {{image_4}} You can make your salad heartier by adding proteins. Grilled chicken adds great flavor. Shrimp gives a nice touch too. If you prefer plant-based options, tofu works well. Just cube the tofu and toss it in. These proteins make the salad a complete meal. Change up the cheese for a new taste. Feta adds a salty kick. Blue cheese brings bold flavor. If you want something milder, try mozzarella. Each cheese adds its own flair to the salad. Feel free to mix and match according to your taste. Seasonal fruits can change your salad game. Use ripe peaches in summer. Apples add crunch in fall. You can also swap in other berries, like blueberries or raspberries. Each fruit choice brings a unique twist. Explore different flavors to keep it fresh and exciting. To keep your spinach fresh, store it in a sealed container. Use a paper towel to absorb extra moisture. Place the towel inside the container with the spinach. This helps prevent sogginess and keeps it crisp. For the salad, do not dress it until you're ready to eat. The dressing can make the leaves wilt quickly. You can keep this spinach strawberry salad in the fridge for about 1 to 2 days. After that, the strawberries may get mushy, and the spinach will lose its crunch. If you plan to eat it later, store each part separately. If you have leftover salad, try adding it to a wrap or sandwich. You can mix it into a grain bowl with rice or quinoa. Another option is to blend it into a smoothie for added nutrition. The flavors from the salad can make a tasty twist in these dishes. Check out the Full Recipe for more ideas! You can easily make this salad vegetarian by swapping a few ingredients. Here are some ideas: - Use feta cheese instead of goat cheese for a similar creamy texture. - Replace sliced almonds with sunflower seeds for a nut-free option. - Add chickpeas or black beans for extra protein without meat. These swaps keep the salad tasty and full of flavor. Yes, you can prepare this salad ahead of time. Here are some tips for meal prep: - Wash and dry the spinach, but wait to mix it with other ingredients. - Store sliced strawberries in a separate container to keep them fresh. - Make the dressing a day ahead and store it in the fridge. Combine everything just before serving for the best taste and texture. You have great options for dressing this salad. Consider these choices: - A homemade balsamic vinaigrette is fresh and simple to make. - Store-bought dressings can save time, but check for quality. - You can mix yogurt with herbs for a creamy option. Homemade dressings often taste better and let you control the flavors. Yes, this salad is suitable for a gluten-free diet. Here are some gluten-free ingredient options: - All the main ingredients like spinach, strawberries, and cheese are naturally gluten-free. - Ensure that any dressing you use is labeled gluten-free. - Be careful with croutons or any added toppings; choose gluten-free ones. This way, everyone can enjoy this fresh and vibrant salad. This blog post shared a simple spinach strawberry salad recipe. We covered key ingredients, like fresh spinach and ripe strawberries. You learned how to prepare the salad and make a tasty dressing. I shared tips for choosing the best ingredients and avoiding common mistakes. We explored fun variations to customize your salad and proper storage methods for leftovers. Enjoy making this salad! It’s fresh, healthy, and easy to love.
Spinach Strawberry Salad Fresh and Flavorful Delight
Looking for a quick, flavorful dish? My Spinach Strawberry Salad is fresh and easy to make. Imagine tender spinach mixed with juicy strawberries, creamy goat
Here’s what you need for the BLT Chicken Salad: - 2 cups cooked chicken breast, shredded - 4 slices of crispy turkey bacon, chopped - 1 cup cherry tomatoes, halved - 1 ripe avocado, diced - 1/2 cup romaine lettuce, chopped - 1/4 cup red onion, finely diced - 1/2 cup Greek yogurt - 2 tablespoons mayonnaise - 1 tablespoon Dijon mustard - 1 tablespoon fresh lemon juice - Salt and freshly ground black pepper These fresh ingredients make the salad tasty and colorful. You can use leftover chicken or store-bought rotisserie chicken. For the bacon, turkey bacon is a lighter choice, but regular bacon works great too. Fresh produce is key for this salad. The ripe avocado adds creaminess, while the cherry tomatoes bring a burst of flavor. Using Greek yogurt instead of regular mayo makes it healthier. You can mix the yogurt with mayo to get the best of both worlds. Fresh lemon juice brightens the dish and balances the flavors. If you want a little more kick, add some hot sauce or spices. This salad is flexible, so feel free to adjust based on what you have on hand. You can find the full recipe [here]. Enjoy creating your own version! To make your BLT chicken salad quick and easy, follow these steps. 1. Combine chicken, bacon, tomatoes, avocado, lettuce, and onion: In a large bowl, add the shredded chicken, chopped turkey bacon, halved cherry tomatoes, diced avocado, chopped romaine lettuce, and finely diced red onion. Gently toss these ingredients together. 2. Prepare the dressing with Greek yogurt, mayonnaise, mustard, and lemon juice: In a small bowl, whisk together the Greek yogurt, mayonnaise, Dijon mustard, fresh lemon juice, and a pinch of salt and pepper. Mix until smooth. 3. Combine the dressing with the salad mixture: Drizzle the dressing over the chicken salad. Use a spatula or wooden spoon to fold everything gently. Make sure the chicken and veggies are well-coated. 4. Adjust seasoning to taste: Taste your salad and add more salt and pepper if needed. This helps enhance the flavors. 5. Refrigerate for 15 minutes before serving: Cover the bowl with plastic wrap or a lid. Chill the salad in the fridge for 15 minutes. This allows the flavors to meld. 6. Serve on individual plates, garnished with basil: After chilling, give the salad a gentle toss. Use a spoon to transfer the salad onto individual plates. Garnish with fresh basil leaves for a nice touch. This recipe keeps it simple while giving you all the tasty flavors you crave. Enjoy your savory BLT chicken salad! Want more details? Check the Full Recipe above for everything you need! - How to make crispy turkey bacon Start with cold turkey bacon. Place it in a hot pan without oil. Cook over medium heat. Flip the slices until they are golden and crispy. Remove and drain on paper towels to absorb excess fat. This method keeps the bacon crispy and full of flavor. - Best substitutes for Greek yogurt and mayonnaise If you need a change, use sour cream instead of Greek yogurt. For mayonnaise, try avocado or hummus. Both options add creaminess without the calorie load. You can also mix cottage cheese and lemon juice for a healthier dressing. - Recommended seasoning hacks To enhance the flavor, add a pinch of smoked paprika or garlic powder. A little cayenne pepper gives a nice kick. Fresh herbs like dill or parsley can brighten the dish. Always taste and adjust the spices to match your taste. {{image_4}} You can make your BLT chicken salad more fun by adding different proteins or veggies. Try mixing in shrimp, tuna, or even chickpeas for a tasty change. You can also swap the turkey bacon for crispy prosciutto or a plant-based bacon. Each option gives the salad a new flavor. If you want a portable meal, think about making it a wrap or sandwich. Use a whole wheat wrap or your favorite bread. Spread a thin layer of the dressing on the wrap. Then, pile on the salad. Roll it up or cut it into halves. This makes a great lunch! For those watching carbs or gluten, there are easy options. Skip the bread or wrap and serve the salad in lettuce cups. You can use romaine or butter lettuce. This keeps the salad light and fresh. You can also skip the yogurt and mayonnaise for a lighter dressing, using just lemon juice and herbs instead. These variations keep the dish exciting and suit many diets. You can enjoy the classic flavors while mixing things up! For more details, check out the Full Recipe to create your perfect BLT chicken salad. To keep your BLT chicken salad fresh, follow these simple steps: - Best refrigeration practices: Store your salad in an airtight container. This helps prevent air from spoiling the ingredients. Make sure to keep it in the main part of the fridge, not the door. - How long it lasts in the fridge: Your salad will stay good for about 3 days when stored properly. After that, the flavors may fade, and the veggies could get soggy. - Freezing options and advice: While it’s best to eat the salad fresh, you can freeze it. Just remember that freezing may change the texture of some ingredients, like tomatoes and avocado. If you want to freeze it, leave out the dressing. Store the salad without dressing in a freezer-safe bag for up to 2 months. When you're ready to eat, thaw it in the fridge overnight and add the dressing fresh. For the full recipe, check back to create this delicious dish. BLT chicken salad pairs well with many sides. You can serve it with: - Crunchy tortilla chips - Fresh fruit slices - A warm roll or baguette - Crispy sweet potato fries These sides add extra flavor and texture to the meal. Yes, you can make this recipe ahead of time. Prepare the salad and dressing separately. Store them in the fridge. This keeps the salad fresh. Mix them just before serving. It tastes even better after flavors meld. To check if the chicken is cooked, use a meat thermometer. The internal temperature should reach 165°F. If you don’t have a thermometer, cut into the chicken. It should be white and juices should run clear. This ensures it is safe to eat. This blog post covered a tasty BLT chicken salad, from ingredients to storage. You learned how to combine simple items like chicken, bacon, and avocado. We also shared tips to make it truly awesome and how to store it safely. Remember, you can add your favorite proteins or veggies for a fun twist. This salad is not just tasty; it’s also easy to make and keep. Enjoy creating your own version!
Savory BLT Chicken Salad Quick and Easy Recipe
Looking for a quick and tasty meal? This Savory BLT Chicken Salad recipe is packed with flavors you’ll love. With tender chicken, crispy turkey bacon,
- 2 cups cooked and cooled quinoa - 1 cup pomegranate seeds - 1 cup diced Granny Smith apples - 1/2 cup chopped walnuts or pecans - 1/2 cup dried cranberries - 1/4 cup freshly chopped parsley - 1/4 cup freshly squeezed orange juice - 2 tablespoons extra-virgin olive oil - 1 tablespoon honey or maple syrup When you make Ensalada Navideña, the main ingredients shine. The quinoa acts as a hearty base. It brings a nutty flavor and a fluffy texture. Pomegranate seeds add a burst of sweetness and crunch. Diced Granny Smith apples bring a tart twist. Together, they create a delightful mix. You can personalize this salad with optional ingredients. Chopped walnuts or pecans give a nice crunch. Dried cranberries add a chewy sweetness. Fresh parsley enhances the dish with a pop of color. Now, let's talk about the dressing. Fresh orange juice gives it a bright, zesty flavor. Extra-virgin olive oil adds richness and smoothness. Honey or maple syrup sweetens the dressing. This combination elevates the salad. For the full recipe, check out the detailed instructions. This salad is not just a side dish. It's a colorful celebration on your holiday table. Each bite is a mix of flavors and textures that makes it special. Start with a big bowl. Add 2 cups cooked and cooled quinoa. This gives the salad its base. Next, mix in 1 cup pomegranate seeds and 1 cup diced Granny Smith apples. These fruits make the salad sweet and crunchy. Then, add 1/2 cup diced celery for a nice crunch and 1/2 cup chopped walnuts. If you want a twist, try pecans instead. Finally, toss in 1/2 cup dried cranberries and 1/4 cup freshly chopped parsley. Gently mix all these colorful ingredients. In a small bowl, whisk together 1/4 cup freshly squeezed orange juice and 2 tablespoons extra-virgin olive oil. Then add 1 tablespoon honey or maple syrup if you prefer a vegan option. Don't forget a pinch of salt and some freshly ground black pepper. Whisk until everything blends well. This dressing should be smooth and creamy, adding flavor to your salad. Now, drizzle the dressing over the salad mixture. Carefully toss everything together. Make sure all pieces are coated nicely. After that, taste your salad. Adjust the seasonings by adding more salt or pepper if needed. Once mixed well, cover the bowl with plastic wrap. Place it in the fridge for at least 30 minutes. This waiting time lets the flavors blend, making the salad even more tasty. Enjoy this delightful holiday side dish from the Full Recipe! To make Ensalada Navideña shine, adjust the salt and pepper to your taste. I often start with a pinch of salt and a few cracks of black pepper. After mixing, taste the salad. If it feels flat, add more salt or pepper. The right balance lifts all the flavors. Marinating the salad is key. I let it sit in the fridge for at least 30 minutes. This waiting time helps the flavors blend together. The salad gets better as it rests. Presentation matters, especially during the holidays. Serve your salad in a large, festive bowl. This makes it pop on the table. For extra flair, sprinkle more pomegranate seeds on top. Fresh parsley adds a splash of green and looks beautiful. You can also arrange the salad in layers. Start with quinoa, then add fruits and nuts on top. This creates a colorful, inviting dish. Ensalada Navideña pairs well with roasted meats. Try it alongside turkey or glazed ham. The fresh flavors of the salad balance the richness of these dishes. For side dishes, consider serving it with warm bread or a creamy potato dish. These pairings make a complete holiday meal. For the full recipe, check out the detailed instructions and enjoy making this festive delight! {{image_4}} You can easily change the nuts in Ensalada Navideña. If you have allergies or just prefer something new, try using chopped pecans or sunflower seeds. Each nut adds a unique crunch and flavor to the dish. Fruits are another area for swaps. Instead of Granny Smith apples, you might enjoy sweet pears or tart citrus fruits like oranges. You can even try dried fruits like apricots or figs for a different taste. If you want a vegan version of the dressing, simply replace honey with maple syrup. This change keeps the dressing sweet and tasty without using animal products. For gluten-free options, all the ingredients in this salad are naturally gluten-free. Just double-check any packaged products, like nuts or dried fruits, to ensure they are certified gluten-free. Ensalada Navideña has many versions across different cultures. In some areas, people add jicama for a crunchy texture or even avocado for creaminess. You can also find recipes that include regional fruits like mango or guava. Each twist reflects the local flavors and traditions, making the salad even more special. For the full recipe, check out Ensalada Navideña! To keep your Ensalada Navideña fresh, store any leftovers in the fridge. Place the salad in a sealed container. Glass or plastic containers work great for this. Make sure the lid is on tight to keep moisture out. This way, it stays crisp and tasty for a few days. If you want to save the salad for later, freezing is an option. However, the texture may change a bit after freezing. To freeze, place the salad in an airtight container. When you’re ready to eat it, take it out and thaw it in the fridge overnight. Serve it cold, and if needed, add a splash of orange juice to refresh the flavors. You can keep this salad in the fridge for about three days. If it stays longer, check for signs it’s not good. Look for wilting, off smells, or discoloration. If you see any of these, it’s best to throw it away. Enjoy your Ensalada Navideña while it’s fresh for the best taste! For the complete recipe, check the Full Recipe section. Ensalada Navideña is a festive holiday salad. It is popular in many Latin cultures. This dish symbolizes joy and togetherness during holiday celebrations. The main ingredients include: - Cooked quinoa - Pomegranate seeds - Diced Granny Smith apples - Diced celery - Chopped walnuts (or pecans) - Dried cranberries - Fresh parsley These ingredients create a bright and colorful mix. Each bite brings a burst of flavor. The crunchy nuts and sweet fruits balance well with the quinoa. Yes, you can prepare this salad ahead of time. I suggest making it at least 30 minutes before serving. This allows all the flavors to blend. For safety, store it in the fridge. Use a covered bowl to keep it fresh. When serving leftovers, check for any changes in smell or texture to ensure safety. Ensalada Navideña pairs well with many main dishes. Some great options include roasted turkey or glazed ham. For drinks, try serving it with sparkling water or a fruity punch. These beverages enhance the bright flavors of the salad. For the complete recipe, check [Full Recipe]. This post covered how to create a delicious Ensalada Navideña. We explored main ingredients like quinoa, pomegranate seeds, and apples. I shared ways to enhance flavors and tips for a beautiful presentation. You learned about variations to fit dietary needs and how to store leftovers properly. In the end, this salad is versatile and perfect for any gathering. You can enjoy it fresh or customize it to your liking. Go ahead, make this dish, and impress everyone with your cooking skills!
Ensalada Navideña Delightful Holiday Side Dish
Ready to impress your guests this holiday season? The Ensalada Navideña is a colorful, flavorful side dish perfect for any festive table. With fresh quinoa,
- 2 cups seedless watermelon, cut into bite-sized cubes - 2 cups fresh pineapple, peeled and cubed - 1 cup cucumber, diced into small pieces - 1/4 cup fresh mint leaves, finely chopped - 1/4 cup feta cheese, crumbled (optional) - 2 tablespoons freshly squeezed lime juice - 1 tablespoon honey, or to taste - Pinch of salt and freshly ground black pepper, to taste When I make this Watermelon Pineapple Salad, I start with fresh, juicy fruits. The watermelon gives a sweet taste and a fun crunch. The pineapple brings a bright, tropical flavor. Cucumber adds a cool, crisp texture. For added flavor, I love using fresh mint. It gives a nice herbal kick. If you want a creamy touch, sprinkle some feta cheese on top. The tang from the cheese perfectly balances the sweetness of the fruits. Next, I squeeze fresh lime juice over everything. This adds a zesty flavor and keeps the salad fresh. I sweeten it with a bit of honey. Just a spoonful makes it even more delightful. A pinch of salt and black pepper ties all the flavors together. This simple mix of ingredients creates a refreshing and colorful salad that is perfect for summer. You can find the full recipe above for more details on how to prepare this delicious dish! - Peel and cube the fresh pineapple. - Cut the seedless watermelon into bite-sized cubes. Start by peeling the pineapple. Use a sharp knife to slice off the skin. Cut the fruit into cubes. Aim for even pieces for better mixing. Next, take your watermelon. Cut it into similar-sized cubes. Make sure you discard any seeds you find. - Dice the cucumber into small pieces. - Finely chop the fresh mint leaves. Now, grab your cucumber. Cut it into small, bite-sized pieces. This adds a nice crunch. Then, take your fresh mint. Chop it finely to release its strong scent. This will give your salad a bright flavor. - Combine all fruit ingredients in a large mixing bowl. - Whisk together the lime juice, honey, salt, and pepper for dressing. In a large mixing bowl, toss in the cubed pineapple, watermelon, and cucumber. Mix gently so the juices blend well. For the dressing, whisk lime juice, honey, salt, and pepper in a small bowl. This adds a sweet and tangy kick. - Drizzle the dressing over the salad mix. - Toss gently and add mint and feta cheese just before serving. Drizzle your dressing over the fruit mix. Use a large spoon to toss everything together. Be gentle, so the fruit stays whole. Right before serving, sprinkle the mint and optional feta cheese on top. This adds a burst of flavor and makes the salad look lovely. For the full recipe, check out the details earlier in this article. Enjoy your refreshing watermelon pineapple salad! To find the best watermelon, look for these signs: - Shape: Choose a round or oval shape. - Field Spot: Check for a creamy yellow spot on the skin. - Weight: It should feel heavy for its size. For pineapple, look for: - Color: A golden-yellow color indicates ripeness. - Fragrance: A sweet smell at the base means it’s ready to eat. - Leaves: The leaves should be green and easy to pull. For seedless watermelon, pick one with: - Smooth Skin: It should have a smooth, shiny skin. - No Large Bumps: Avoid melons with large bumps or bruises. You can elevate the taste of your salad by adding: - Fresh Herbs: Try basil or cilantro for a twist. - Spices: A sprinkle of chili powder can add heat. To adjust sweetness, use honey. Here’s how: - Start with one tablespoon and mix it into your dressing. - Taste and add more if you want it sweeter. For a fun serving idea, use a watermelon bowl: - Cut a watermelon in half and scoop out the insides. - Fill the hollowed-out half with your salad for a colorful display. For garnishing, consider: - Mint Leaves: Scatter extra mint on top for color. - Lime Wedges: Place lime wedges around the salad for a pop. These simple tips can make your watermelon pineapple salad a showstopper at any summer gathering. For the full recipe, check out the delicious details above. {{image_4}} You can make this salad even more exciting. Adding mango or kiwi offers a bright, sweet flavor. These fruits blend well with watermelon and pineapple. You can also mix in other tropical fruits like papaya and passion fruit. This adds a fun twist and extra color to your dish. If you're looking to cut fat, try using low-fat feta cheese. If you prefer, you can leave out the cheese entirely. Using agave syrup instead of honey is another option. It gives the same sweetness with fewer calories. Fruits change with the seasons, so try using what's fresh. In summer, you can add berries like strawberries or blueberries. In fall, switch to apples or pears for a crunchy texture. Adjust your salad based on what you find at the market. This keeps your salad new and exciting every time you make it. For the full recipe, check out the details above! To keep your watermelon pineapple salad fresh, store it in an airtight container. Glass or plastic containers work well. Make sure to seal the lid tightly. This helps keep moisture in while preventing the salad from absorbing other smells in the fridge. In the refrigerator, your salad stays fresh for about 2-3 days. After that, it may lose its crunch and taste. Look for signs like a mushy texture or off smell. If the salad turns brown or slimy, it’s best to toss it. You can prep ingredients ahead of time for easy assembly. Cut the watermelon and pineapple a day before. Store them separately to avoid sogginess. Keep cucumbers in their own container. This way, they stay crisp. Mix all the ingredients right before serving for the best taste. For a delicious watermelon pineapple salad, refer to the Full Recipe for guidance on making this refreshing dish. Yes, you can prepare the salad ahead of time. To keep it fresh, store the fruits separately. Mix them just before serving. This helps prevent the salad from getting soggy. If you want to dress it early, use less lime juice. You can add it later for a brighter taste. This salad is very healthy! Watermelon is high in water and low in calories. It helps keep you hydrated. Pineapple adds vitamin C, which boosts your immune system. Cucumber also has a lot of water and fiber. Mint helps with digestion and adds flavor without extra calories. Feta cheese, if used, adds protein and calcium. You can add many things to this salad! Consider strawberries or blueberries for extra color and flavor. Avocado gives a creamy texture. Some people enjoy a sprinkle of chili powder for heat. For a crunch, try nuts like almonds or walnuts. You can also swap honey for agave or maple syrup based on your taste. Customize the salad to match your preferences! In summary, we covered the key ingredients for a delicious Watermelon Pineapple Salad, including tips for preparation and presentation. I shared ways to enhance flavors, explore variations, and ensure freshness during storage. This salad not only tastes great but also packs nutritional benefits. I encourage you to try different fruits and adjust the recipe to your liking. Enjoy creating your own tasty blend!
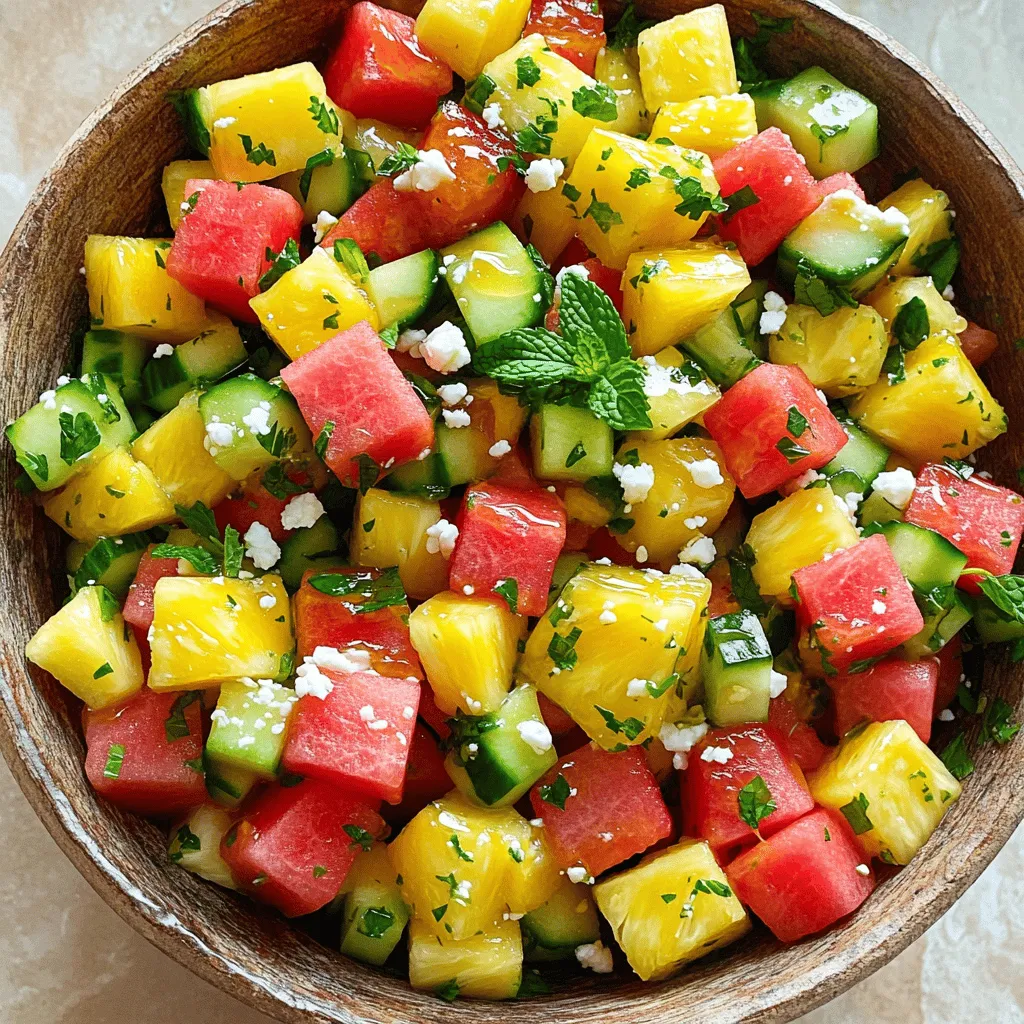
Watermelon Pineapple Salad Delicious Summer Delight
Looking for a refreshing treat that screams summer? I’ve got just the thing: Watermelon Pineapple Salad! This vibrant dish is easy to make and bursts
- 2 large cucumbers, sliced into 1/2-inch rounds - 1 cup cherry tomatoes, halved - 1 small red onion, thinly sliced - 1/2 cup feta cheese, crumbled - 1/4 cup black olives, pitted and sliced - 1/4 cup tahini - 2 tablespoons fresh lemon juice - 1 tablespoon honey - Salt and freshly cracked black pepper to taste - Fresh dill or parsley, chopped for garnish This cucumber snack bowl recipe is fresh and easy to make. The ingredients come together to create a vibrant mix. Each ingredient plays a crucial role in adding taste and texture. Each serving of this dish is about 150 calories. The breakdown includes: - Protein: 5g - Fat: 10g - Carbohydrates: 12g Cucumbers are low in calories but high in water content. They help keep you hydrated. Plus, they are rich in vitamins K and C. Eating cucumbers can promote healthy skin and digestion. Start by cleaning the cucumbers. Rinse them under cold water. Use a vegetable peeler if you prefer them peeled. Slice the cucumbers into 1/2-inch rounds. Place the slices in a large mixing bowl. Next, add the cherry tomatoes. Cut them in half and toss them in with the cucumbers. Then, take the red onion and slice it thinly. Add these onion slices to the bowl. You now have a colorful base for your snack bowl. For the dressing, grab a small bowl. Combine the tahini, lemon juice, and honey in it. Add a pinch of salt and pepper for flavor. Whisk everything together until smooth. If it seems too thick, add a little water. Keep adding water until you reach a creamy consistency. Now it's time to bring it all together. Drizzle the tahini dressing over the cucumber mixture. Toss gently to coat. Be careful not to break the cucumber slices. Next, fold in the feta cheese and black olives. Mix everything lightly to keep the cheese intact. Taste your snack bowl and adjust the seasoning. Add more salt or pepper if needed. Finally, transfer it to a serving dish. Garnish with chopped dill or parsley for a fresh look. Enjoy your crispy cucumber snack bowl! For more details, check out the Full Recipe. To get the best taste for your cucumber snack bowl, season it well. Start with a pinch of salt. This helps bring out the natural flavors of the cucumbers and tomatoes. You can always add more salt later if needed. Freshly cracked black pepper adds a nice kick. Just sprinkle some on top and mix well. If you want a creamier dressing, add more tahini. A little extra lemon juice brightens the flavors too. If the dressing feels too thick, add a splash of water. This keeps it smooth and easy to drizzle. This dish works great for parties! Serve it in a big bowl for sharing. You can also put small portions in cups for easy grabbing. Pair it with refreshing drinks like iced tea or lemonade. It goes well with pita chips or veggie sticks too. For a fancy touch, offer some crusty bread on the side. The bread complements the flavors and makes it more filling. Make your snack bowl eye-catching! Use a colorful dish to hold your salad. Bright colors excite the eyes and make food more appealing. You can also add fresh herbs on top for a pop of color. Chopped dill or parsley works wonders. Lemon wedges on the side add color and a zesty aroma. Serve with toothpicks or small forks for easy eating. This makes your snack bowl fun and inviting! {{image_4}} You can switch up the veggies for a fresh twist. Instead of cucumbers, try: - Bell peppers for crunch - Zucchini for a mild taste - Carrots for sweetness For the dressing, if you want a dairy-free option, replace feta cheese with: - Avocado for creaminess - Nutritional yeast for a cheesy flavor To make your cucumber snack bowl pop, add spices or herbs. Here are some ideas: - A sprinkle of smoked paprika for warmth - Fresh mint for a cooling effect - Crushed red pepper for a spicy kick You can also add toppings like: - Toasted nuts for crunch - Seeds for extra nutrition - A drizzle of balsamic glaze for sweetness Give your cucumber snack bowl an international flair. For a Mediterranean twist, consider adding: - Sun-dried tomatoes for a burst of flavor - Marinated artichokes for a tangy bite If you prefer Asian flavors, use: - A splash of sesame oil for nuttiness - Chopped scallions for a fresh, sharp taste These variations make your snack bowl fun and exciting. Enjoy experimenting with different flavors! To store leftovers of your cucumber snack bowl, place them in the fridge. Use an airtight container to keep the flavors fresh. Glass containers work well to prevent any odors from mixing. You can also use plastic containers with tight lids. If you want to save your cucumber snack bowl for later, freezing is an option, but it's not ideal. Freezing can change the texture of the cucumbers. If you choose to freeze, do so without the dressing. When you’re ready to eat, thaw in the fridge overnight. For the best taste, eat it fresh. Reheat only if necessary, and do it gently in the microwave. The cucumber snack bowl lasts for about 2 to 3 days in the fridge. Look for signs of spoilage like a slimy texture or off smells. If the cucumbers lose their crunch, it's time to toss them. Always check before you eat! To make a vegan cucumber snack bowl, skip the feta cheese. You can add avocado or use vegan cheese instead. These options add creaminess without dairy. Make sure to check the tahini; it is usually vegan-friendly. You can also add extra veggies for more texture and flavor. If you don't have tahini, you can use almond butter or sunflower seed butter. They provide a similar creamy texture. You can also mix peanut butter with a bit of lemon juice for a tasty twist. Just adjust the other flavors to keep the balance right. Yes, you can prepare the cucumber snack bowl ahead of time. Just keep the dressing separate until serving. This way, the cucumbers stay crisp. Mix everything together just before serving for the best flavor and texture. The best way to slice cucumbers is into 1/2-inch rounds. This size allows for easy snacking. Use a sharp knife to get clean cuts. You can also slice them into spears if you prefer a different shape. Yes, the cucumber snack bowl is healthy! Cucumbers are low in calories and high in water, keeping you hydrated. The tomatoes and olives add vitamins and healthy fats. Feta cheese offers protein, making this snack both filling and nutritious. To make the cucumber snack bowl gluten-free, ensure all ingredients are gluten-free. Most veggies and tahini are naturally gluten-free. Just double-check any packaged items, such as feta cheese or dressings, to avoid hidden gluten. This blog post gave you a clear guide to making a tasty cucumber snack bowl. You learned about the fresh ingredients and how to prepare them. I shared helpful tips to enhance flavor and presentation, along with storage advice. Enjoy trying this recipe at home. It’s healthy, simple, and fun to share. With a few easy changes, you can make it your own. Dive in, explore, and enjoy the fresh flavors!
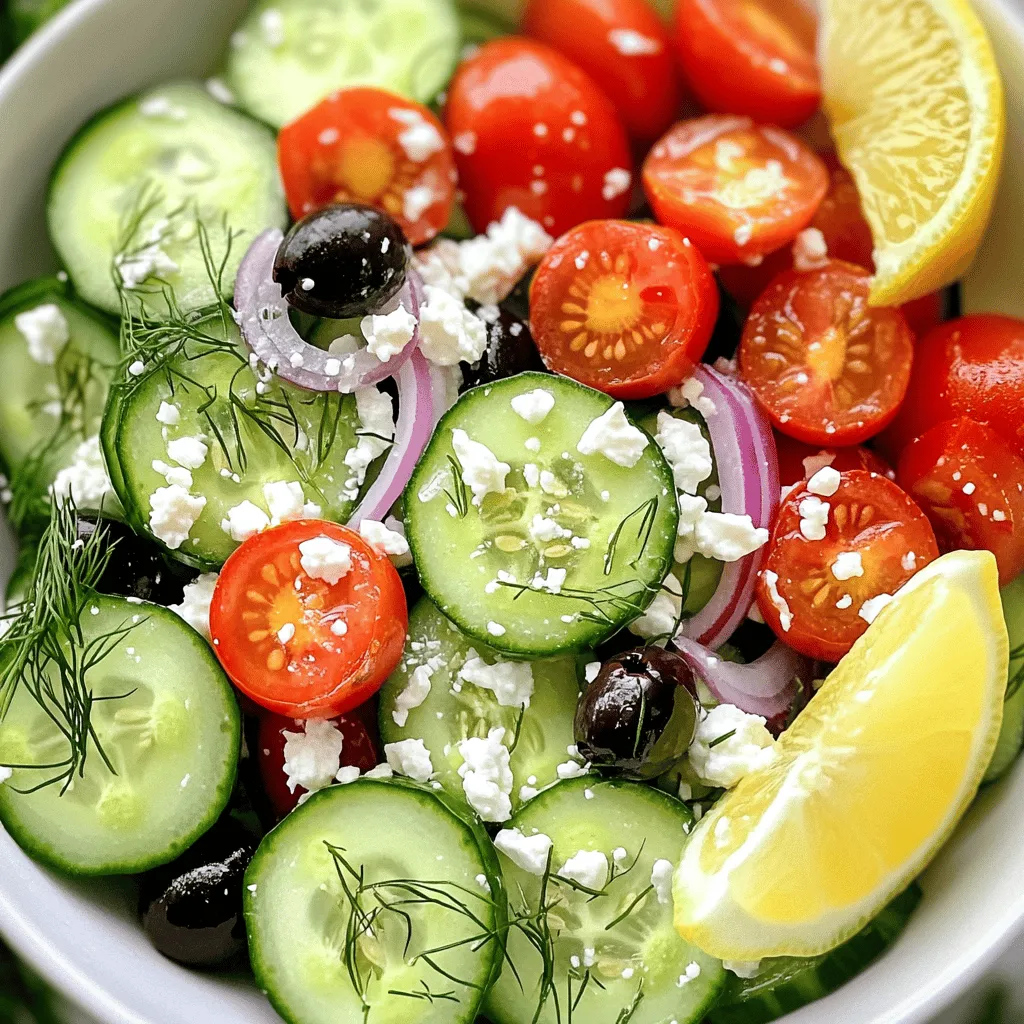
Cucumber Snack Bowl Fresh and Flavorful Delight
Looking for a fresh and tasty snack? You’re in the right place! The Cucumber Snack Bowl is a delightful mix of crunchy cucumbers, juicy tomatoes,
- 2 cups cooked chicken breast, shredded - 1 cup corn (canned or fresh, drained if canned) - 1 cup black beans, rinsed and drained thoroughly - 1 red bell pepper, diced into bite-sized pieces - 1 ripe avocado, diced - 1/2 cup cherry tomatoes, halved - 1/4 cup red onion, finely chopped - 1/2 cup fresh cilantro, chopped roughly - Juice of 1 lime - 3 tablespoons extra virgin olive oil - 1 teaspoon ground cumin - 1 teaspoon chili powder - Salt and freshly ground black pepper, to taste - Tortilla strips or crushed tortilla chips When I make this Zesty Southwest Chicken Salad, I love how fresh and vibrant the ingredients are. Each bite bursts with flavor. The shredded chicken provides a filling base. The corn and black beans add a sweet and earthy crunch. The red bell pepper brings a nice crunch and sweetness. Dicing a ripe avocado adds creaminess that balances the flavors. Cherry tomatoes bring a juicy pop. The red onion adds a sharp bite, while cilantro gives a bright finish. For the dressing, I squeeze fresh lime juice. It brings a tangy punch that ties it all together. I mix in olive oil for richness, cumin and chili powder for warmth, and a touch of salt and pepper. This dressing makes everything sing! When serving, I love adding crunchy tortilla strips on top. They add an extra texture that makes the salad fun to eat. You can find the full recipe to make this delightful dish. Enjoy! - Combine the chicken, corn, black beans, red bell pepper, avocado, cherry tomatoes, red onion, and cilantro in a mixing bowl. - Toss ingredients gently to ensure even mixing. First, I take my large mixing bowl and add the shredded chicken. Then, I add the corn and black beans. Next, I chop the red bell pepper and toss that in too. The creamy avocado comes next, followed by halved cherry tomatoes. I finely chop the red onion and add that for a bit of bite. Finally, I throw in roughly chopped cilantro for that fresh flavor. Toss everything gently so that each ingredient gets mixed well. - Whisk together lime juice, olive oil, cumin, chili powder, salt, and pepper. For the dressing, I use a small bowl. I squeeze the juice of one lime into the bowl. Then, I add three tablespoons of olive oil. This adds richness. Next, I sprinkle in ground cumin and chili powder for warmth. Finally, I season with salt and pepper. I whisk the mixture until it all blends smoothly. This dressing will bring zest to the salad. - Drizzle the dressing over the salad and toss until all ingredients are coated. - Let the salad rest for about 10 minutes to allow flavors to meld. - Serve with tortilla strips or chips for garnish. Once the dressing is ready, I drizzle it over the salad. I use a spatula to toss everything until it is coated in the dressing. This helps each bite burst with flavor! Next, I let the salad rest for about 10 minutes. This pause allows the flavors to come together. When it’s time to serve, I add crunchy tortilla strips or chips. This adds a fun texture and makes the salad even more enjoyable. For the full recipe, check the details listed above. To make your Zesty Southwest Chicken Salad even better, you can tweak the lime juice and spices. Start with the juice of one lime, but if you love zest, add more! Adjust the salt and pepper to suit your taste. Want a stronger kick? Add a pinch of cayenne or smoked paprika. These spices can change the whole dish! The way you serve the salad matters. Layer the ingredients in a bowl to create a beautiful look. Start with a base of chicken, then add corn, beans, and colorful peppers on top. Finish with avocado and tomatoes for pops of color. For a nice touch, add lime wedges and sprinkle fresh cilantro on top. It makes the dish look fresh and inviting! You can serve this salad in individual bowls for each guest. Or, put it on a big platter for everyone to share. This makes it fun and interactive! Pair it with crusty bread or tortilla chips on the side. The crunch of chips adds a nice texture and makes it a complete meal. Enjoy your creation! {{image_4}} You can switch the chicken for other proteins. Grilled shrimp adds a nice, smoky flavor. If you want a vegetarian option, tofu works great too. Just season it well before adding to the salad. Want more flavor? Add sliced jalapeños for a spicy kick. If you prefer a fresh crunch, diced cucumber is a perfect choice. Both options enhance the salad's appeal. Try changing the dressing for new tastes. A yogurt-based dressing can add creaminess without extra fat. You can also use a creamy avocado dressing for a rich, smooth texture. Both options make the salad even more exciting. For the complete recipe, check the [Full Recipe]. Store leftovers in an airtight container in the fridge for up to 3 days. This keeps the salad fresh and safe to eat. When you are ready to enjoy it again, just take it out and give it a quick stir. If freezing, consider keeping dressing separate to maintain texture. Freezing the salad with the dressing can make it soggy. Instead, freeze the chicken and veggies together. Just add the dressing later when you thaw it. Mix well before serving leftovers; a splash of lime juice can refresh flavors. This simple tip brings back the zesty taste and makes the salad feel fresh again. Enjoy the vibrant flavors every time! Yes, you can prep ingredients a day prior. Just keep the avocado and dressing separate. Add them just before serving for the best flavor and texture. Kidney beans or pinto beans can be good substitutes. Both will add protein and flavor. Feel free to use what you have on hand. Yes, this salad is gluten-free. Just check that your dressing ingredients are also gluten-free. Enjoy this healthy option without worry! This Zesty Southwest Chicken Salad is easy to make and packed with flavor. You learned how to combine fresh ingredients and a simple dressing for a tasty meal. You can switch up the protein or add favorite spices to make it your own. Plus, the salad keeps well in the fridge and tastes even better after some rest. Whether it's a quick lunch or a side dish, this salad fits any occasion perfectly. Enjoy making it your new go-to recipe.
Zesty Southwest Chicken Salad Flavorful and Fresh Option
If you crave a burst of flavor in your meals, this Zesty Southwest Chicken Salad is your answer. Packed with fresh ingredients like shredded chicken,