Salads

- 2 cups mixed salad greens (arugula, spinach, romaine) - 1 cup cherry tomatoes, halved - 1 cup diced cucumber - 1 yellow bell pepper, thinly sliced - 1 ripe avocado, diced - 1/3 cup candied pecans - 1/4 cup crumbled feta cheese - 1/4 cup fresh basil leaves, roughly chopped - 3 tablespoons extra virgin olive oil - 2 tablespoons fresh lemon juice - 1 tablespoon honey - Salt and pepper to taste Using fresh ingredients makes your salad lively and tasty. Mixed greens provide a crisp base. Cherry tomatoes add sweetness and color. Cucumbers bring crunch and freshness. Yellow bell pepper offers a sweet, crunchy bite, while avocado gives a creamy texture. Candied pecans add a sweet crunch, and feta cheese gives a tangy flavor. Fresh basil adds a fragrant touch, making every bite delightful. - Mixed greens: High in vitamins A and C. Great for skin health. - Cherry tomatoes: Packed with antioxidants. They support heart health. - Cucumber: Hydrating and low in calories. Good for digestion. - Yellow bell pepper: Rich in vitamin C. Boosts your immune system. - Avocado: Contains healthy fats. Supports heart health and brain function. - Candied pecans: Provide healthy fats and protein. Good for energy. - Feta cheese: A source of calcium. Supports bone health. - Basil: Contains anti-inflammatory properties. Good for digestion. - Olive oil: Rich in monounsaturated fats. Supports heart health. - Lemon juice: High in vitamin C. Good for skin health. - Honey: Natural sweetener with antioxidants. May soothe your throat. Using these fresh ingredients not only makes your salad tasty but also boosts your health! To start, gather all your ingredients. You need: - 2 cups mixed salad greens - 1 cup cherry tomatoes, halved - 1 cup diced cucumber - 1 yellow bell pepper, sliced - 1 ripe avocado, diced - 1/3 cup candied pecans - 1/4 cup crumbled feta cheese - 1/4 cup fresh basil leaves - 3 tablespoons extra virgin olive oil - 2 tablespoons fresh lemon juice - 1 tablespoon honey - Salt and pepper to taste Wash your greens and chop your veggies. Cut the cherry tomatoes and cucumber into small pieces. Slice the yellow bell pepper into thin rings. Dice the avocado right before you add it to keep it fresh. In a large bowl, place the mixed salad greens as your base. Next, layer the halved cherry tomatoes, diced cucumber, and sliced yellow bell pepper on top. This makes the salad look bright and fun! Now, gently fold in the diced avocado. Sprinkle the candied pecans and crumbled feta cheese over the salad. This adds a nice mix of textures and flavors. In a small bowl, whisk together the olive oil, lemon juice, honey, salt, and pepper. Mix until it’s smooth and well combined. This dressing is bright and full of flavor! Drizzle the dressing over the salad. Toss everything together gently so all the ingredients blend well. Finally, add the chopped basil on top for a fresh touch. You can find the full recipe in the previous section. Enjoy your vibrant and refreshing Sunshine Salad! To dice an avocado, first cut it in half. Remove the pit with a knife. Carefully scoop the flesh out with a spoon. Place the avocado half flat on the cutting board. Slice it lengthwise into strips, then crosswise to make small cubes. This method gives you nice, even pieces for your salad. If you have leftover Sunshine Salad, store it in an airtight container. Keep it in the fridge for up to two days. However, be aware that the avocado might brown. To slow this down, you can squeeze a bit of lemon juice over the avocado before storing. This keeps your salad fresh and tasty for later. Serve your Sunshine Salad in a large bowl or on individual plates. Add extra feta cheese and fresh basil on top for a lovely look. Pair the salad with grilled chicken or shrimp for a full meal. This way, you can enjoy the vibrant flavors and colors while also filling your belly! {{image_4}} You can easily boost the protein in your Sunshine Salad. Grilled chicken adds a savory touch. Just slice it thin and layer it on top. If you want a plant-based option, chickpeas work great too. Just rinse and drain them before adding. Both choices make the salad filling and satisfying. Fruits can add a sweet twist to the salad. In summer, try adding fresh berries like strawberries or blueberries. They bring a nice pop of color and flavor. In the fall, diced apples are perfect. They add a crisp texture and a touch of sweetness. Experiment with different fruits for fun new flavors! The dressing can change your salad game. A classic balsamic vinaigrette is always a hit. Just mix balsamic vinegar with olive oil, salt, and pepper. You can also try a honey mustard dressing for a sweet zing. Or, make a creamy avocado dressing for a smooth touch. Each dressing gives the salad a unique taste that you’ll love! For the full recipe, check out the Sunshine Salad Delight. To keep your Sunshine Salad fresh, store each ingredient separately. This method helps maintain their crunch and flavor. Place greens in a dry container with a paper towel. This absorbs moisture and keeps them crisp. Store chopped veggies in airtight containers. This will prevent them from wilting. For avocado, sprinkle lime juice on the cut side. This slows browning. If stored correctly, your salad lasts about three days. The greens will stay fresh for up to two days. Other ingredients like cucumber and bell pepper hold up well for those days too. Once you dress the salad, eat it within a day. The dressing makes the greens soggy over time. You can freeze some ingredients, but not the whole salad. Freezing cucumbers and tomatoes will change their texture. Avoid freezing the avocado, as it turns mushy. Instead, freeze the pecans and cheese separately. They maintain their flavor and texture better that way. Always label your containers with the date. Yes, you can swap cheese types. Try goat cheese for a tangy flavor. You can also use mozzarella for a milder taste. Just remember, each cheese adds a unique touch. Experiment to find what you love best! Sunshine Salad shines with many dishes. Pair it with grilled chicken for protein. You can also serve it alongside fish for a light meal. For a vegetarian option, add chickpeas or quinoa. These pairings balance the salad's fresh flavors. To make Sunshine Salad vegan, skip the feta cheese. Use a nut-based cheese or avocado for creaminess. Replace honey with maple syrup for sweetness. This keeps the salad tasty while making it plant-based. Enjoy the vibrant flavors without dairy! This blog post covered the fresh ingredients for the Sunshine Salad Delight. You learned how to prepare, assemble, and dress the salad. I shared tips on dicing avocado and storing leftovers for later use. We also explored fun variations to keep it interesting. In short, this salad is bright, healthy, and easy to make. Enjoy every bite and feel great about your choice!
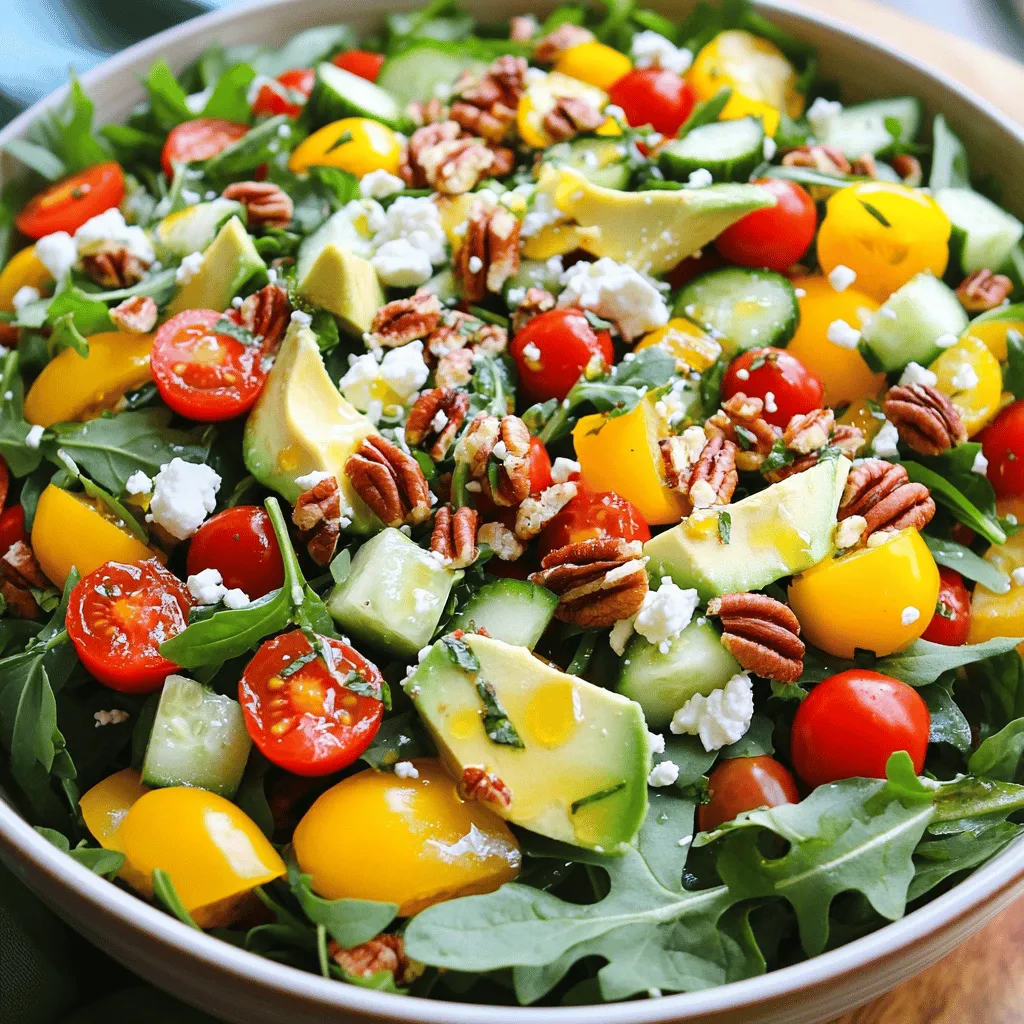
Sunshine Salad Vibrant and Fresh Flavors Await
Get ready for a burst of color and flavor with my Sunshine Salad! This dish is packed with fresh ingredients that bring joy to your
Here are the ingredients you need for the Peach Cobbler Cheesecake Fruit Salad: - 4 ripe peaches, diced into bite-sized pieces - 1 cup strawberries, hulled and sliced - 1 cup fresh blueberries - 1 cup fresh pineapple, diced - 8 oz cream cheese, softened to room temperature - 1/2 cup plain Greek yogurt - 1/3 cup powdered sugar - 1 tsp vanilla extract - 1 tsp ground cinnamon - 1/2 cup granola (for topping) - Fresh mint leaves (for garnish) Each ingredient plays a key role in making this salad tasty and fun. Fresh peaches add sweetness and juiciness. Strawberries bring brightness, while blueberries and pineapple add color and zest. The cream cheese and Greek yogurt create a creamy base. The powdered sugar sweetens the mix, while vanilla and cinnamon enhance the flavor. Granola gives a crunchy texture, and mint leaves add a lovely finish. When you gather your ingredients, choose ripe and fresh fruit for the best taste. You can find the full recipe to guide you through this delightful dish. - Combine diced peaches, strawberries, blueberries, and pineapple. - Toss gently to avoid mashing the fruit. First, I take ripe peaches and chop them into bite-sized pieces. I also slice the strawberries and dice the fresh pineapple. The blueberries can go in whole. I love the bright colors of these fruits. It makes the salad look so inviting! Gently toss everything in a large bowl. This keeps the fruits intact and fresh. - Blend cream cheese, Greek yogurt, powdered sugar, vanilla extract, and cinnamon. - Ensure the mixture is smooth and creamy. Next, I grab a bowl and add softened cream cheese. I mix in plain Greek yogurt, powdered sugar, vanilla extract, and ground cinnamon. I use an electric mixer for this step. It needs to be smooth and creamy. This mixture adds a rich flavor and pairs well with the fruits. - Fold the creamy mixture into the fruit mixture. - Use a spatula gently for even coating. Now comes the fun part! I carefully fold the creamy mixture into the bowl of fruits. I use a spatula to ensure everything gets coated. It's important to be gentle here. I want to keep the fruit pieces whole and beautiful. - Transfer to serving bowl or dessert cups. - Add granola and mint leaves just before serving. For serving, I like to use a big bowl or cute dessert cups. It looks nice for guests! Just before serving, I sprinkle granola on top for a nice crunch. I also add mint leaves for a pop of green. The fresh mint smells amazing and adds a nice touch. Enjoy! For the full recipe, check the earlier section. - Chill ingredients beforehand for optimal taste. Cold fruit tastes fresher and better. - Use ripe fruit for maximum flavor. Ripe peaches and strawberries bring sweetness and joy. - Serve immediately for freshness. The flavors are best when enjoyed right away. - Drizzle honey for additional sweetness before serving. Honey adds a pleasant touch to the dish. - Choose clear bowls to showcase the vibrant colors. Your guests will love the pretty look. - Garnish with mint leaves for an elegant look. Mint adds a pop of green and a fresh aroma. For the full recipe, check the [Full Recipe]. {{image_4}} You can swap out peaches for other fruits. Berries like strawberries or blueberries work great. Apples add a crisp bite too. If you want a zesty twist, try adding citrus fruits like oranges or grapefruits. These fruits bring a bright flavor that balances the sweetness of the salad. If you want a lighter version, use low-fat cream cheese. This keeps the creaminess while cutting calories. For crunch, replace granola with nuts or seeds. Almonds, walnuts, or sunflower seeds add great texture and flavor. This way, you can enjoy the salad without the extra sugar from granola. Add a splash of lemon juice to brighten the dish. It enhances the fruit's natural sweetness. You can also experiment with flavored Greek yogurt. Options like vanilla or honey yogurt can add a new taste. These small changes can transform your salad into something unique and delicious. For the full recipe, check out the Peach Cobbler Cheesecake Fruit Salad recipe. - Refrigerate in an airtight container - Best consumed within 2 days for optimal freshness When I make Peach Cobbler Cheesecake Fruit Salad, I always want it fresh. If you have leftovers, place them in an airtight container. This keeps the fruit crisp and the cream creamy. Enjoy it within two days. After that, the flavors may fade. - Not recommended for freezing due to texture changes - Prepare fresh as needed for best flavor Freezing this salad is not a good idea. The texture of the fruit will change when thawed. I recommend making it fresh each time. This way, you will keep the bright flavors and great taste. Enjoy the salad as it is meant to be! Yes, you can prepare the fruit and creamy mixture separately and combine just before serving. This keeps everything fresh. Make sure to store them in the fridge to maintain their taste. Use lemon juice on cut fruits like apples or bananas if you're including them. The juice slows down browning and keeps the fruit looking fresh. A little lemon goes a long way. Serve chilled and consider individual servings for a nice presentation. Small cups or bowls look great and make it easy for guests to enjoy. Fresh peaches are recommended for texture and flavor, but canned can be a quick substitute if necessary. Just drain them well to avoid extra liquid in your salad. Pair with shortcakes or serve with whipped cream for a more indulgent dessert experience. You can also sprinkle some nuts for extra crunch. Enjoy your sweet treat! This blog post outlines a simple and tasty Peach Cobbler Cheesecake Fruit Salad recipe. You learned about the fresh ingredients, easy preparation steps, and helpful tips. I also shared variations to fit your taste and dietary needs. Remember to serve it fresh for the best flavor and presentation. Enjoy experimenting with this dish, and let your creativity shine in the kitchen!
Peach Cobbler Cheesecake Fruit Salad Delight Recipe
Looking for a refreshing and indulgent treat? The Peach Cobbler Cheesecake Fruit Salad combines juicy fruits with a creamy, delightful mixture that will wow your
- 2 cups cooked chicken breast, shredded - 1 cup mixed salad greens (arugula, spinach, and romaine) - 1 grapefruit, segmented - 1 orange, segmented - 1 small cucumber, diced - 1/4 cup red onion, thinly sliced - 1 ripe avocado, diced - 1/4 cup toasted almonds, chopped - 1/4 cup feta cheese, crumbled - 3 tablespoons olive oil - 1 tablespoon apple cider vinegar - 1 teaspoon honey - Salt and freshly cracked pepper to taste Each ingredient plays a key role in creating a fresh and colorful chicken salad. The chicken adds protein and heartiness. The mixed greens bring a nice crunch and vibrant color. Citrus like grapefruit and orange boost flavor and add a sweet and tart twist. Cucumber gives a refreshing bite while red onion adds a bit of sharpness. The avocado contributes creaminess, making each bite delightful. Toasted almonds lend a nice crunch and a nutty flavor. Feta cheese adds a tangy kick that balances the dish perfectly. The dressing, made from olive oil, apple cider vinegar, and honey, ties everything together. It’s simple yet bright, enhancing all the fresh ingredients. This chicken salad is not only tasty but also visually stunning. For the complete method to bring this dish to life, check out the Full Recipe. - In a large bowl, combine: - 2 cups cooked chicken breast, shredded - 1 cup mixed salad greens (arugula, spinach, and romaine) - 1 grapefruit, segmented - 1 orange, segmented - 1 small cucumber, diced - 1/4 cup red onion, thinly sliced Start by tossing these ingredients gently. This step ensures each bite bursts with flavor. - In a separate bowl, whisk together: - 3 tablespoons olive oil - 1 tablespoon apple cider vinegar - 1 teaspoon honey - Salt and freshly cracked pepper to taste Mix until the dressing is smooth and well combined. This dressing adds a bright touch to the salad. - Drizzle the dressing over your salad mixture. Use tongs to toss everything together. Make sure all the ingredients get a nice coating of the dressing. - Carefully fold in: - 1 ripe avocado, diced - 1/4 cup toasted almonds, chopped Be gentle when you mix them in. You want the avocado to stay chunky. - Add 1/4 cup feta cheese, crumbled, on top. It brings a creamy and tangy flavor that pairs well with the salad. - Serve the salad right away for the best taste. If you want, chill it in the fridge for 15-20 minutes. This allows the flavors to blend. - For an eye-catching presentation, use a colorful bowl. You can also serve it on individual plates. Garnish with extra citrus segments or a sprinkle of whole toasted almonds for a lovely finish. This zesty citrus chicken salad is not just a meal; it’s a vibrant experience. For the full recipe, check the earlier section! Toasting almonds adds great flavor. Start with raw almonds. Here’s how to do it: - Preheat your oven to 350°F (175°C). - Spread almonds on a baking sheet. - Bake for 8-10 minutes. - Keep an eye on them to avoid burning. - Let them cool before adding to your salad. Toasting brings out a nutty taste. It also adds a nice crunch to your chicken salad. Sourness adds brightness to your salad. If you want to adjust it, consider these tips: - Add more citrus segments, like grapefruit or orange. - Squeeze fresh lemon juice for extra zing. - Mix in a bit of Greek yogurt for creaminess and tang. Taste as you go. This way, you can find the balance that you enjoy best. Mixing is key to a great chicken salad. Here are my best tips: - Use a large bowl to give room for tossing. - Add the dressing slowly to avoid sogginess. - Use tongs or a large spoon to mix gently. - Fold in soft ingredients like avocado last. These practices keep your salad fresh and make it beautiful. Follow them to create a dish that looks as good as it tastes! {{image_4}} You can switch things up with different proteins in your chicken salad. Grilled shrimp adds a nice touch. Tuna can give it a bold flavor. Chickpeas are a great choice for a plant-based option. Each protein brings its own taste and texture. Mix and match to keep your meals exciting! If you have dietary needs, chicken salad can easily adapt. For gluten-free options, use gluten-free ingredients. You can swap dairy for non-dairy items. For example, use avocado or a dairy-free cheese. These changes make the dish friendly for everyone's needs. Seasonal fruits and veggies can enhance your chicken salad. In spring, add fresh peas or radishes. Summer is perfect for juicy tomatoes or corn. In fall, try apples or pears for sweetness. Winter calls for citrus fruits like oranges or grapefruits. Using seasonal produce boosts flavor and nutrition. For a full recipe, check out the Zesty Citrus Chicken Salad. It’s a tasty way to enjoy these variations! To keep chicken salad fresh, store it in an airtight container. Glass or plastic containers work well. Make sure the lid seals tightly to avoid air exposure. Place it in the fridge right after making it. Always use clean utensils when serving to prevent contamination. This way, you can enjoy your salad for longer. Chicken salad typically lasts about three to four days in the fridge. If you notice any off smells or changes in texture, it’s best to throw it away. Always check for freshness before eating. Enjoy your zesty citrus chicken salad while it's still at its best! Freezing chicken salad is not recommended. The texture can change when thawed, making it watery. Ingredients like avocado and lettuce do not freeze well. If you want to save time, prepare the chicken and dressing separately. Mix them together when you’re ready to serve. This keeps everything fresh and crunchy. Yes, you can make chicken salad ahead of time. It tastes great fresh, but you can chill it for one to two hours. This allows the flavors to blend well. Store it in an airtight container in the fridge. I recommend eating it within two days for the best taste. The best way to shred chicken is to use two forks. Hold one fork steady and pull the chicken apart with the other fork. You can also use your hands if the chicken is cool enough to touch. For a quick method, try a stand mixer with a paddle attachment. Just mix on low speed until shredded. To make chicken salad lower in calories, use less olive oil and skip the feta cheese. You can swap Greek yogurt for the dressing instead of oil. Add more veggies, like celery or bell peppers, to keep it filling without added calories. This makes the salad lighter but still tasty. You can serve chicken salad in many ways. Try it in a sandwich, on a bed of greens, or in a wrap. Add some crunchy veggies on the side, like carrots or cucumber sticks. You could also pair it with a light soup or fresh fruit. This makes for a balanced meal. For a full recipe, check out the Zesty Citrus Chicken Salad. This chicken salad is simple and healthy. You mix fresh ingredients like chicken, greens, and fruits. The recipe includes easy steps and tips to customize it. You can add different proteins or adjust the sourness to fit your taste. Proper storage tips help keep it fresh. Enjoying a tasty meal can be easy. Experiment with your own mix, and share it with friends!
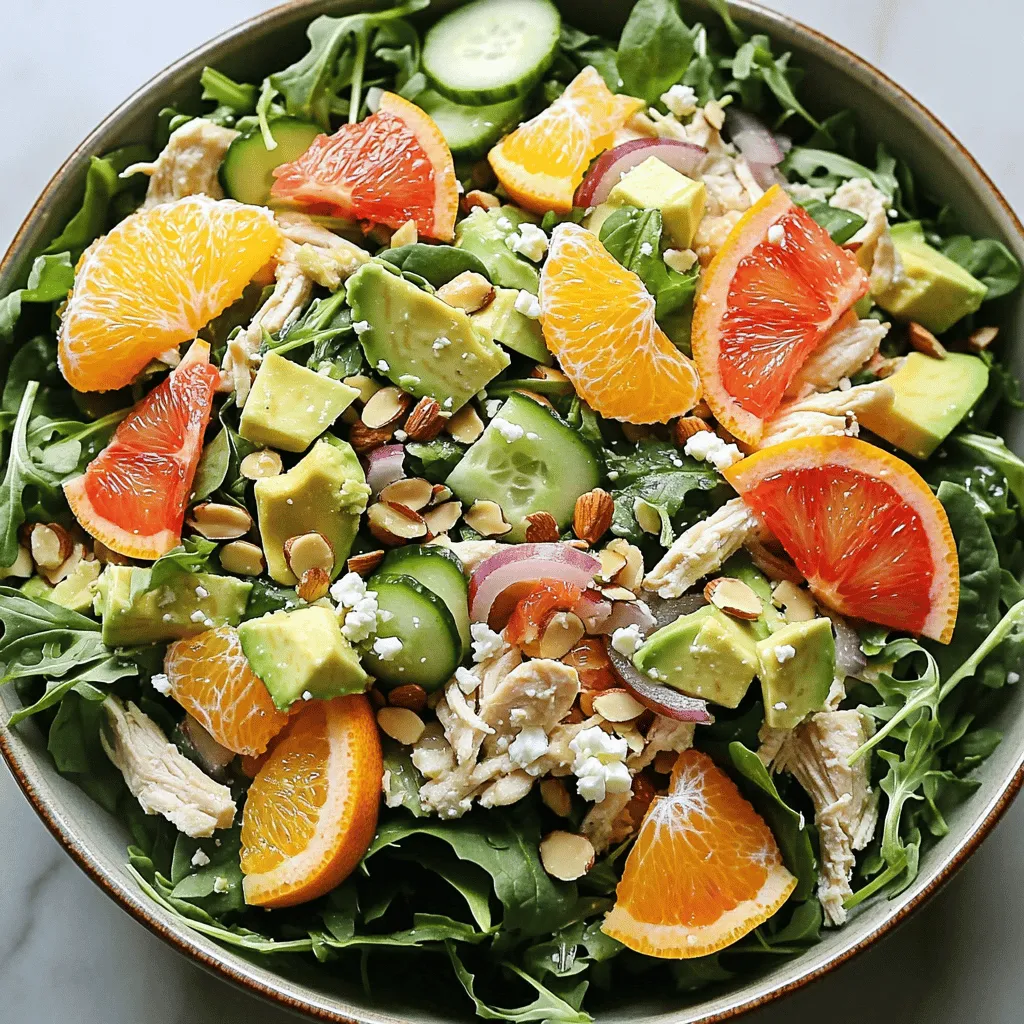
Chicken Salad Fresh and Flavorful Meal Option
Looking for a fresh and tasty meal? My Chicken Salad is the perfect choice! It combines juicy chicken, crisp greens, and vibrant fruits, all drizzled
To make this tasty salad, gather these main ingredients: - 2 cups cooked chicken, shredded - 1 cup dill pickles, finely chopped - 1/2 cup Greek yogurt or mayonnaise - 1/4 cup red onion, finely diced - 1/4 cup celery, finely diced - 2 tablespoons fresh dill, finely chopped - 1 tablespoon Dijon mustard - Salt and pepper to taste These ingredients create a perfect balance of flavors and textures. The shredded chicken gives protein, while the dill pickles add a nice crunch. The Greek yogurt or mayonnaise binds it all together. You can add some optional ingredients to make your salad even better: - 1 tablespoon fresh lemon juice - 1/2 teaspoon garlic powder - 1/4 cup chopped walnuts or pecans Lemon juice brings a tangy flavor. Garlic powder adds depth. Chopped nuts give a satisfying crunch. Don’t worry if you can’t find an ingredient. Here are some great substitutions: - Use canned chicken instead of cooked chicken for a quick option. - Swap Greek yogurt for plain sour cream for a different taste. - Replace dill pickles with sweet pickles for a sweeter flavor. These substitutions keep your salad delicious while adapting to your pantry. The Full Recipe ensures you have all the details you need to create this delightful dish. Start by shredding your cooked chicken. You can use rotisserie chicken or poached chicken for great taste. In a large mixing bowl, add the shredded chicken. Now, chop your dill pickles finely. Choose crunchy pickles for a nice bite. Add the chopped pickles to the chicken. Next, dice the red onion and celery. Stir these veggies gently into the chicken and pickles. In a small bowl, combine Greek yogurt or mayonnaise. Add the fresh dill, Dijon mustard, and lemon juice if you want a tangy twist. Whisk these ingredients together until they blend well. This dressing makes the salad creamy and flavorful. Pour the dressing over the chicken and vegetable mixture. Use a spatula to fold everything together. Make sure all the ingredients get coated with the dressing. Season the salad with salt and pepper. Taste it and adjust the flavors as needed. For the best taste, cover the bowl and chill your salad for at least 30 minutes. This allows all the flavors to mix. For more details, you can check the Full Recipe. To get the best texture in your Dill Pickle Chicken Salad, focus on your ingredients. Use shredded rotisserie chicken. It adds great flavor and moisture. Choose crunchy dill pickles for a satisfying crunch. The red onion and celery also help create that desired crispness. Make sure to chop everything finely. This ensures an even mix and delightful bites. You can serve this salad in many fun ways. A simple way is on a bed of fresh greens. This adds color and freshness. You can also scoop it into halved avocados. It makes a great presentation! Pair it with whole grain crackers or pita chips. This adds a nice crunch and makes eating easier. For drinks, a chilled lemonade or iced tea works well. Avoid overmixing your salad. If you mix too much, the chicken can become mushy. Also, don't skip the seasoning. Salt and pepper bring out the flavors. Taste your salad before serving. If it feels bland, add more seasoning or lemon juice. Lastly, don’t rush the chilling time. Letting the salad rest helps flavors blend better. Following these tips will make your salad a hit! {{image_4}} You can make a lighter version of this salad by using Greek yogurt instead of mayonnaise. Greek yogurt gives a creamy texture and adds protein. It also has fewer calories. You can adjust the yogurt amount to fit your taste. If you want a thicker salad, use more yogurt. This change keeps the salad tasty without adding extra fat. Feel free to mix in other ingredients to boost the flavor. You can add: - Chopped bell peppers for sweetness. - Sliced almonds for crunch. - Hard-boiled eggs for extra protein. These additions make your salad more exciting and colorful. Try different combinations to find your favorite mix. Each ingredient adds its own unique taste and texture. For a vegan or vegetarian option, replace chicken with chickpeas or tofu. Both options add protein and fiber. Use vegan mayo or more Greek yogurt as a dressing base. Mix in some nutritional yeast for a cheesy flavor. This way, you can enjoy Dill Pickle Chicken Salad while keeping it plant-based. You can still have a hearty, delicious meal that everyone will love. To store leftover Dill Pickle Chicken Salad, place it in an airtight container. Make sure to seal the container tightly to keep out air. This step helps maintain freshness and flavor. You can also layer plastic wrap over the salad before sealing if you like. Store the chicken salad in the fridge for up to three days. After that, the taste and texture may change. If you notice any off smells or changes in appearance, it's best to throw it away. Always prioritize your health. Freezing this salad is possible, but it is not ideal. The texture of vegetables may become mushy when thawed. If you still want to freeze it, separate the dressing from the chicken and pickles. Freeze the chicken mix in a freezer-safe bag for up to two months. When ready to eat, thaw it in the fridge overnight, then mix in the dressing fresh. This keeps the salad tasty and enjoyable. Yes, you can use canned chicken. It makes the recipe quick and easy. Just drain and shred the chicken before mixing it with the other ingredients. Canned chicken works well, but fresh chicken adds more flavor. Dill Pickle Chicken Salad lasts about three to four days in the fridge. Make sure to store it in an airtight container. This helps keep it fresh and tasty. If you notice any change in smell or color, it’s best to discard it. You can serve Dill Pickle Chicken Salad in many ways. It tastes great on a sandwich, in a wrap, or on crackers. You can also enjoy it on a bed of greens or in halved avocados. Pair it with chips or a side of fresh fruit for a fun meal. Check out the Full Recipe for more ideas! In this post, we explored how to make Dill Pickle Chicken Salad. We looked at main and optional ingredients, along with some great substitutions. I provided step-by-step instructions for preparation, dressing, and mixing. You learned tips for texture, serving ideas, and common mistakes to avoid. I also shared variations, storage tips, and answered common questions. Now, you have all you need to make a tasty salad. Enjoy creating your own version!
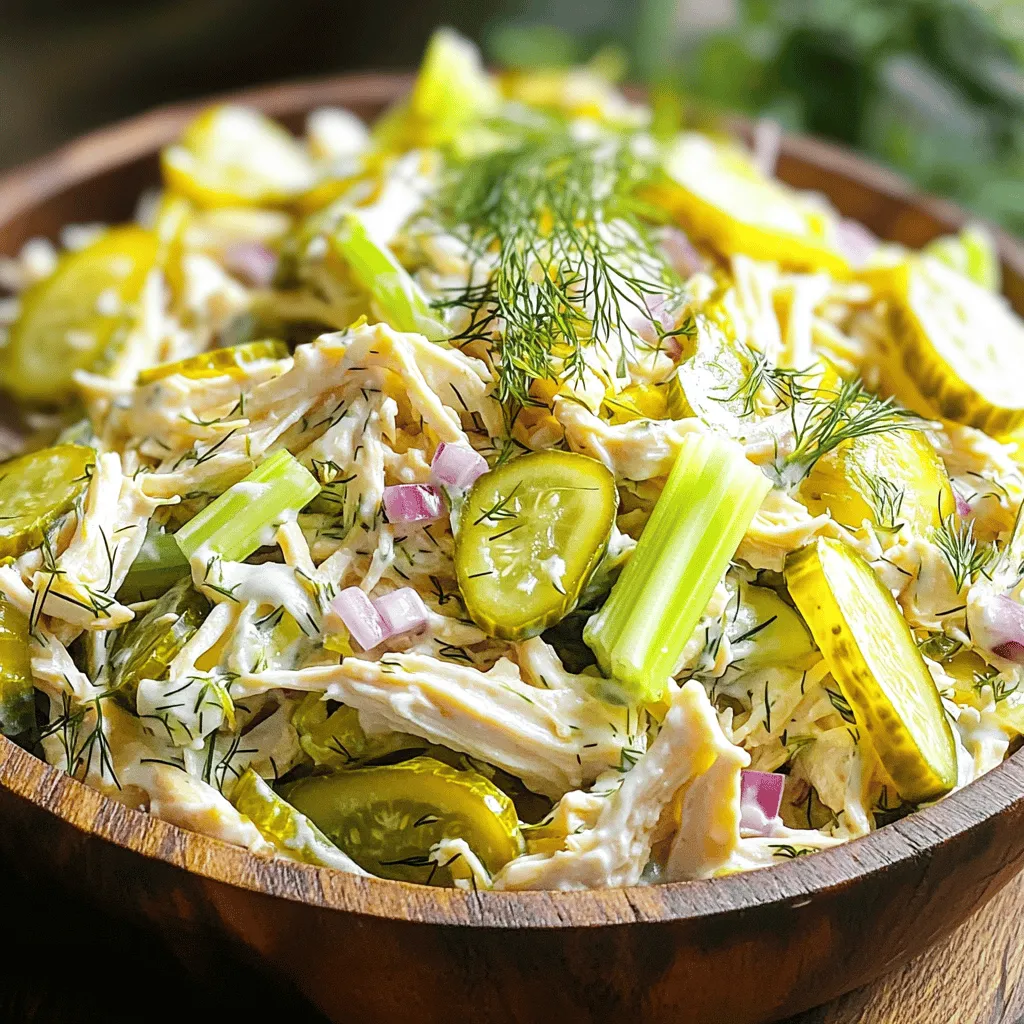
Dill Pickle Chicken Salad Quick and Tasty Recipe
Looking for a quick and tasty meal? I’ve got just the thing: Dill Pickle Chicken Salad! This simple recipe is packed with flavor and uses
Here’s what you need for your Zesty Southwest Chicken Salad. Each ingredient adds flavor and texture. - 2 cups cooked chicken breast, shredded - 1 can (15 oz) black beans, rinsed and drained - 1 cup corn kernels (fresh or frozen, thawed if frozen) - 1 red bell pepper, diced into bite-sized pieces - 1 ripe avocado, diced - ½ medium red onion, finely chopped - 1 cup cherry tomatoes, halved - 1 cup romaine lettuce, chopped into strips - ½ cup fresh cilantro, chopped - ¼ cup freshly squeezed lime juice - 3 tablespoons extra virgin olive oil - 1 tablespoon ground cumin - 1 teaspoon chili powder - Salt and pepper to taste - Optional: crunchy tortilla strips for garnish These ingredients create a colorful and tasty salad. You can find the full recipe included in this guide. Each item plays a role in making the salad fresh and zesty. The chicken gives protein, while the beans add fiber. Avocado adds creaminess, and lime juice brings a bright flavor. When you gather these ingredients, think about freshness. Choose ripe avocados and firm bell peppers. Quality matters, and it shows in your dish. This salad is perfect for lunch or dinner and is quick to prepare. Enjoy the process of making it! - Combine the base ingredients in a large mixing bowl. - Add 2 cups of shredded chicken, 1 can of black beans, 1 cup of corn, 1 diced red bell pepper, 1 diced avocado, ½ finely chopped red onion, 1 cup of halved cherry tomatoes, and 1 cup of chopped romaine lettuce. - Stir gently to ensure even distribution of all ingredients. This helps every bite be full of flavor. - In a small bowl, whisk together ¼ cup of lime juice, 3 tablespoons of olive oil, 1 tablespoon of cumin, 1 teaspoon of chili powder, and a pinch of salt and pepper. - Mix thoroughly until the dressing is well blended. The flavors should meld together and create a zesty taste. - Drizzle the dressing over the salad and mix thoroughly. - Use a spatula or large spoon to gently toss the salad. This ensures all ingredients are coated with the dressing. - Incorporate the fresh cilantro next. Adjust seasoning as needed with more salt and pepper. This step is crucial for enhancing the overall flavor. Enjoy your Zesty Southwest Chicken Salad! For the complete dish, refer to the Full Recipe above. To make your Zesty Southwest Chicken Salad stand out, focus on presentation. Use large, vibrant bowls or a colorful platter. This makes the salad look fresh and inviting. Garnish the top with extra cilantro and a few slices of avocado. This adds color and taste. For a fun touch, serve crunchy tortilla strips in a small bowl on the side. Guests can add them as they like. To boost the flavor, consider adding spices like smoked paprika or garlic powder. These spices can add depth to your dish. If you want it spicier, try adding more chili powder or diced jalapeños. Adjust these spices based on your taste. Start small, then add more until you reach your preferred heat level. For the chicken, grilling or baking works best. Both methods keep the chicken moist and flavorful. Make sure to season it well before cooking. Once cooked, shred it into bite-sized pieces. This will make it easy to mix into the salad. When dicing vegetables, aim for uniform sizes. This helps them mix well and look good in the salad. Use a sharp knife for clean cuts. For the best results, practice your dicing skills with different veggies. For the complete recipe, check out the Full Recipe section. {{image_4}} You can switch up the proteins in your Zesty Southwest Chicken Salad. Try using grilled shrimp, tofu, or chickpeas. Each option brings its own flair to the dish. For veggies, you can replace or add ingredients based on what you have. Consider using: - Diced cucumbers for a refreshing crunch - Sliced radishes for a bit of spice - Chopped spinach for more greens These substitutions keep the salad fresh and exciting. You can customize it to fit your taste or diet. The dressing can change the game's flavor. You can add different herbs or spices for a unique twist. Think about using: - Fresh basil for a sweet note - Oregano for a Mediterranean touch - Garlic powder for extra depth You can also try different vinaigrettes or creamy dressings. A honey mustard dressing or avocado dressing can add creaminess and sweetness. Each option enhances the salad in its own way. Making this salad fit your diet is easy. It can be gluten-free by using gluten-free tortillas. For a vegan version, skip the chicken and use chickpeas or tofu. If you want to cut calories, use less olive oil and add more veggies. To boost protein, consider adding more chicken or beans. These adjustments keep the salad healthy and satisfying. After enjoying your Zesty Southwest Chicken Salad, store any leftovers in the fridge. Use an airtight container to keep it fresh. This salad stays good for about three days. If you notice any wilted greens or soggy ingredients, it's best to toss them out. If you want to save some for later, freeze the ingredients separately. Chicken, beans, and corn freeze well. For the best taste, do not freeze fresh avocados or herbs. They can turn brown and mushy. Instead, add them fresh when you serve the salad. This way, you keep all the flavors and textures just right. You can use grilled shrimp, tofu, or chickpeas. These options add protein and flavor. They also keep the salad fresh. Add extra chili powder or jalapeños for heat. You can also include hot sauce for a kick. Start small and taste as you go. Yes, you can prepare the salad a few hours ahead. Store the dressing separately to keep it fresh. Mix it right before serving for the best taste. Serve it with tortilla chips, guacamole, or corn on the cob. A light soup or fresh fruit also pairs nicely. These sides enhance the meal's flavor and texture. You can create a delicious Southwest Chicken Salad with simple steps. Use fresh ingredients like chicken, beans, and avocado to build great flavor. The dressing adds a zesty kick that makes it perfect. Feel free to adjust spices or switch out ingredients to fit your taste. This meal is not only tasty but also easy to store as leftovers. Enjoy making this healthy salad for yourself or sharing it with friends. This recipe is versatile and great for any occasion. Dive into the flavors and have fun experimenting!
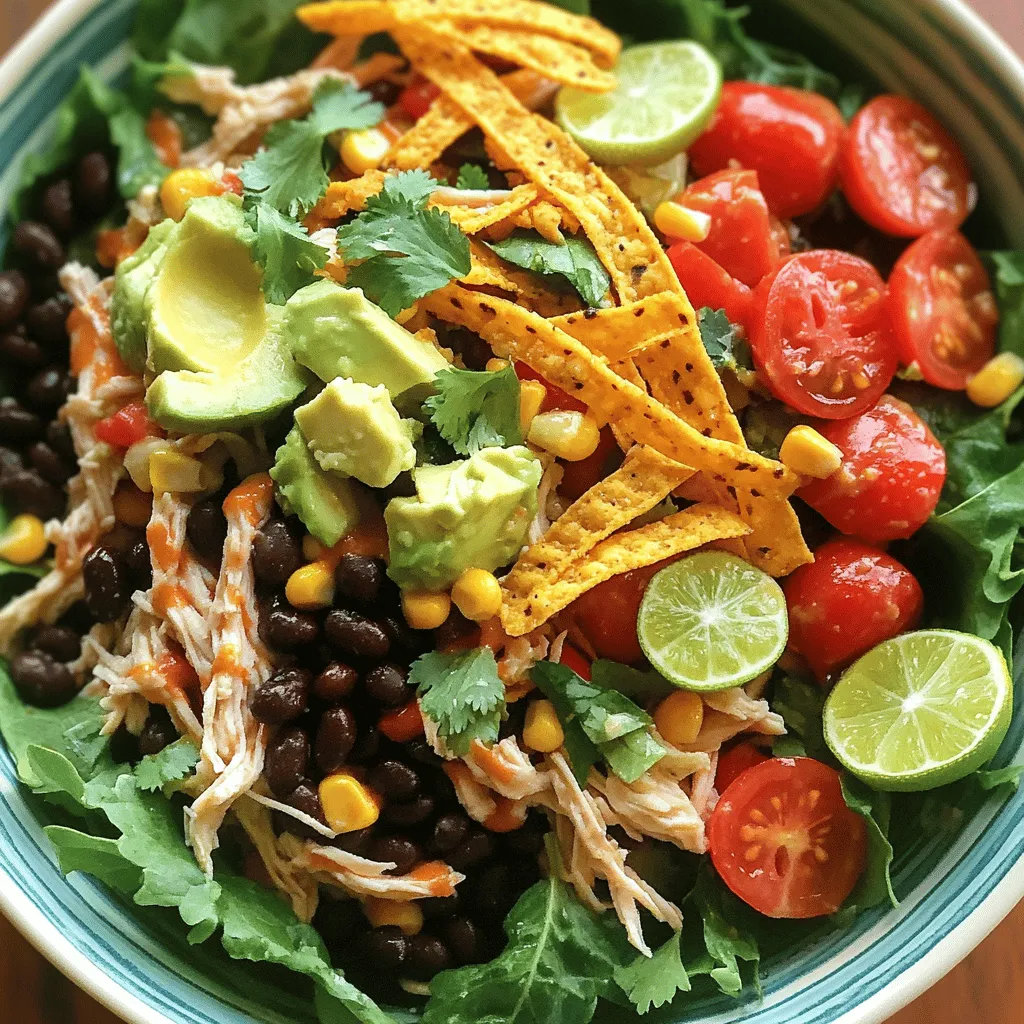
Zesty Southwest Chicken Salad Flavorful and Fresh Dish
Get ready to spice up your meal with my Zesty Southwest Chicken Salad! This colorful dish packs a punch of flavor while being fresh and
Chickpeas are the star of this dish. They are packed with protein and fiber. They help keep you full and satisfied. Fresh romaine lettuce adds a crisp texture and bright flavor. It is key for that classic Caesar crunch. You can also add optional toppings. Consider avocado, croutons, or even olives for extra flavor. Each topping brings its own taste and texture. You can use store-bought Caesar dressing to save time. However, making your own can add a personal touch. If you want to skip the cheese, try nutritional yeast. It gives a cheesy flavor without dairy. For spices, consider adding a pinch of smoked paprika or cayenne. These spices can elevate the taste and add a kick. Start by mixing the chickpeas, lettuce, tomatoes, and cheese in a bowl. Use a fork to crush some chickpeas. This adds creaminess to the salad. Make sure the dressing coats everything evenly. You want each bite to be flavorful. To fold your tortillas, lay one flat on a clean surface. Place the salad mixture in the center, but don't overfill it. Fold in the sides and roll it from the bottom up. This keeps your wrap secure and neat. Cut each wrap in half for a pretty presentation. Serve with lemon wedges for a zesty kick. For the full recipe, check out the sections above. To elevate your Chickpea Caesar Salad Wraps, consider these tips: - Suggested add-ins for more texture: Try adding diced cucumbers or sliced bell peppers. These will add crunch and freshness. You can also toss in some sunflower seeds for a nutty bite. - Using fresh herbs for added freshness: Chopped parsley or basil can brighten up the dish. Fresh herbs add layers of flavor that make each bite exciting. - Balancing flavors with acidity and seasoning: A squeeze of fresh lemon juice can bring out the flavors. Adjust the salt and pepper to taste. A bit of zest can make a big difference. Watch out for these common pitfalls: - Overfilling wraps: It may seem tempting to load them up, but too much filling can lead to messy wraps. Keep it simple for easier handling. - Not mashing chickpeas enough: A few mashed chickpeas create a creamy texture. Don’t skip this step; it helps bind the salad. - Using wilted lettuce or veggies: Always use fresh, crisp produce. Wilted greens can ruin the taste and look of your wraps. If you want to switch things up, consider these options: - Substituting chickpeas with other beans: You can use black beans or kidney beans. They provide a different flavor while still being healthy. - Adding grilled chicken or tofu for non-vegans: For more protein, grilled chicken or tofu works well. Just season them to match the Caesar flavor profile. - Considerations for flavor adjustment: If you change the main protein, adjust the seasoning as needed. Different beans or proteins may need a different touch. You can change the dressing to suit your taste: - Recipes for homemade versions: Making your own Caesar dressing is easy. Blend garlic, anchovies, lemon juice, and oil for a fresh taste. - Vegan dressing options to consider: For a vegan option, try blending cashews with lemon juice and nutritional yeast. This creates a creamy and tasty version. - Using yogurt or avocado as a base: Both yogurt and mashed avocado can create a rich dressing. They add creaminess without the need for mayo. For the full recipe, check out the detailed instructions above. To keep your Chickpea Caesar Salad Wraps fresh, you need to store them well. If you have leftovers, refrigerate them right away. Always aim to eat the wraps fresh for the best taste. Use airtight containers to keep the wraps intact. This helps prevent them from getting soggy. You can also wrap them in foil or plastic wrap for extra protection. Store wraps in the fridge for up to three days. After that, the flavors may fade, and the texture can change. If you want to reheat your wraps, do it carefully. The goal is to warm them without losing their great taste. The oven is the best choice for reheating. Preheat it to 350°F (175°C). Wrap your Chickpea Caesar Salad Wrap in foil and heat for about 10-15 minutes. This keeps them soft and tasty. You can also use a microwave if you’re short on time. Place the wrap on a microwave-safe plate. Heat it for about 30 seconds to 1 minute. Check to see if it’s warm enough. Remember, microwaving can make the wrap a bit soggy, so use it as a last resort. Following these tips ensures your wraps stay delicious and enjoyable! For more details on making these wraps, check the Full Recipe. {{image_4}} Each serving of Chickpea Caesar Salad Wraps has about 300 calories. You get 10 grams of protein, 12 grams of fat, and 40 grams of carbs. Chickpeas are high in fiber, which helps digestion. Romaine lettuce adds vitamins A and K. Parmesan cheese gives calcium for strong bones. This meal is not just tasty; it also fuels your body. For gluten-free options, use corn tortillas or lettuce wraps instead of whole wheat tortillas. If you want a lower-calorie version, skip the cheese or use a lighter dressing. Always check the ingredient labels for allergens. This wrap contains chickpeas, dairy, and wheat. If you or your guests have allergies, choose your ingredients wisely. These wraps are great for many diets. You can adjust the ingredients to fit your needs. Whether you’re vegan, gluten-free, or just health-conscious, you can make this dish work for you. Remember, Chickpea Caesar Salad Wraps are not just good for you; they are also fun to eat! For more details, check the Full Recipe. To make these wraps vegan, you can swap out the Parmesan cheese for a plant-based version. Nutritional yeast is a great choice for a cheesy flavor without dairy. For the dressing, look for a vegan Caesar dressing at the store, or make your own using tahini, lemon juice, and garlic. These options keep all the rich flavors while being plant-based. Yes, you can prepare Chickpea Caesar Salad Wraps in advance. To do this, mix the salad filling the night before. Store it in an airtight container in the fridge. Wrap the tortillas separately to keep them fresh. When you’re ready to eat, simply assemble your wraps. This method keeps the wraps crisp and tasty. You can serve these wraps with a variety of side dishes. A light soup, like tomato basil, pairs well. You might also enjoy a fresh fruit salad for a sweet touch. For drinks, consider iced tea or sparkling water. These options complement the flavors of the wraps nicely. Chickpea Caesar Salad Wraps are tasty and easy to make. We explored the key ingredients, from chickpeas to fresh romaine lettuce. I shared steps for mixing the salad and making secure wraps. Tips on storage and reheating help keep your wraps fresh. In conclusion, this dish is flexible and healthy. It's perfect for lunch or dinner. You can customize it to fit your taste. Getting creative with flavors will make this meal even better. Enjoy your wraps and the health benefits they bring!
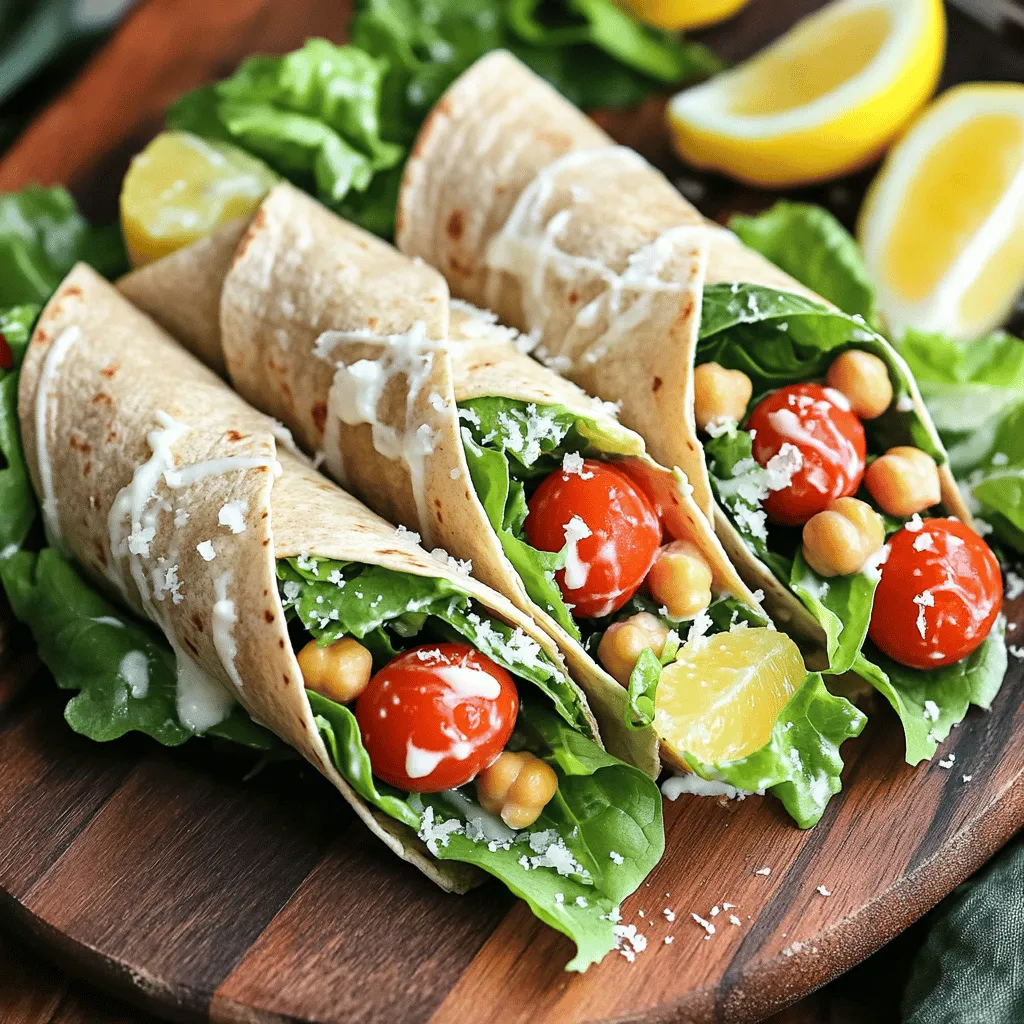
Chickpea Caesar Salad Wraps Nourishing and Tasty Meal
If you’re looking for a meal that’s both nourishing and tasty, look no further than Chickpea Caesar Salad Wraps! Packed with protein-rich chickpeas and fresh
To make the Easy Frito Corn Salad, gather these fresh ingredients: - 2 cups canned corn, thoroughly drained - 1 cup cherry tomatoes, cut in half - 1 cup bell peppers, diced (use a mix of colors for a vibrant look) - 1/2 medium red onion, finely chopped - 1 cup shredded cheddar cheese - 1 cup Fritos corn chips - 1 cup sour cream - 1 tablespoon ranch seasoning mix - Salt and pepper to taste - Fresh cilantro, chopped, for garnish (optional) Measuring your ingredients correctly is key. Use standard measuring cups for dry and wet ingredients. For the corn, make sure it is thoroughly drained to avoid excess liquid. This keeps the salad from being too soggy. When cutting the vegetables, keep them uniform in size. This helps with even mixing and presentation. If you have allergies, you can easily swap some ingredients. For dairy, try using a dairy-free sour cream. For a nut allergy, check that your ranch seasoning is nut-free. If you dislike certain veggies, feel free to add what you love. Zucchini or cucumbers can replace bell peppers. Keep it fun and personal to your taste! Start by gathering all your veggies. You need canned corn, cherry tomatoes, bell peppers, and red onion. Drain the corn well so it doesn’t make the salad soggy. Cut the cherry tomatoes in half and dice the bell peppers. I like to use a mix of colors to make the dish look bright and fun. Finely chop the red onion for the best flavor. In a large mixing bowl, combine all these colorful ingredients. Stir them well to mix everything evenly. For the dressing, grab a small bowl. Add sour cream and the ranch seasoning mix. Stir the two together until they blend smoothly. This step is key to getting a rich flavor. The ranch dressing adds a creamy touch to the salad. Make sure it’s well-mixed so every bite is tasty. Now, it’s time to bring everything together. Pour the ranch dressing over the veggie mix in your large bowl. Use a gentle folding motion to coat the veggies without mashing them. Next, add the shredded cheddar cheese. Carefully fold it in to spread the cheese throughout. Just before serving, toss in the Fritos corn chips. This keeps them crunchy! Lightly mix them in to avoid crushing. Finally, season with salt and pepper to taste. If you want, sprinkle some chopped cilantro on top for a fresh look. For the complete recipe, check out Full Recipe. To keep your Fritos crunchy, add them just before serving. Fritos can lose their crispiness if they sit in the salad for too long. Toss them in gently, and enjoy that satisfying crunch. You can also try serving the salad in separate cups. This way, guests can add their own Fritos right before they eat. This salad is great for parties or potlucks. Serve it in a big glass bowl to show off its colors. You can also offer small cups for a fun, individual touch. Pair it with grilled meats or serve it as a side with tacos. It goes well with a chilled drink on a warm day. Use fresh, colorful vegetables to add flavor and crunch. Cherry tomatoes add sweetness and a pop of color. Bell peppers bring a nice crunch and a variety of flavors. Red onion gives a sharp taste that balances the salad. Feel free to mix in other veggies you like, such as cucumbers or corn. Fresh herbs like cilantro can brighten the dish even more. For the full recipe, check out the link. {{image_4}} You can add many proteins to your Frito Corn Salad. Grilled chicken works great. You can also toss in some cooked bacon bits for a smoky touch. If you want seafood, shrimp can add a nice twist. Just make sure to chop everything into small pieces. This way, every bite is packed with flavor. To make this salad vegetarian, skip the meat and add more veggies. Diced avocado brings creaminess and flavor. For a vegan option, swap sour cream for a plant-based yogurt. You can also use dairy-free cheese if you like. This keeps the taste while meeting dietary needs. Want to spice things up? Add diced jalapeños for heat. You can also mix in some chili powder for a smoky flavor. If you prefer sweet, drizzle honey or add diced mangoes. These options make your salad fun and exciting. Each twist creates a new flavor profile, keeping every bite fresh and interesting. To store leftover Frito corn salad, first, let it cool. Place it in a clean container. Cover it tightly with a lid or plastic wrap. This keeps the salad fresh and prevents odors from mixing. I recommend using glass or plastic containers with airtight lids. These are great for keeping your salad fresh. If you want to save space, use smaller containers. They are easy to stack in the fridge. Frito corn salad stays fresh for about three days in the fridge. After that, it may lose its crunch. Check for any signs of spoilage before eating. The corn and veggies should still look bright and fresh. For the best taste, enjoy it sooner rather than later! Yes, you can make Frito Corn Salad ahead of time. The flavors blend well when the salad sits. Prepare the salad and store it in the fridge for up to a day. Just wait to add the Fritos until you are ready to serve. This keeps them crunchy and fresh. You have a few options if you need a sour cream substitute. Greek yogurt works well and adds a nice tang. You can also use a dairy-free yogurt if you want a vegan option. Another choice is mayonnaise, which gives a creamy texture but less tang. Freezing Frito Corn Salad is not recommended. The texture of the Fritos will change and become soggy. Vegetables also lose crunch when frozen and thawed. Instead, make just what you need and enjoy it fresh. For a larger gathering, prepare the salad in parts, adding Fritos last. This blog post covers all you need for Frito Corn Salad. You learned about key ingredients, and how to measure them. I shared easy steps to prepare the salad and tips to keep your Fritos crunchy. You can add your favorite proteins, or even make it vegan. Plus, I highlighted how to store leftovers for freshness. Explore these ideas to create your perfect salad. Enjoy experimenting with flavors and ingredients! Your taste buds will thank you.
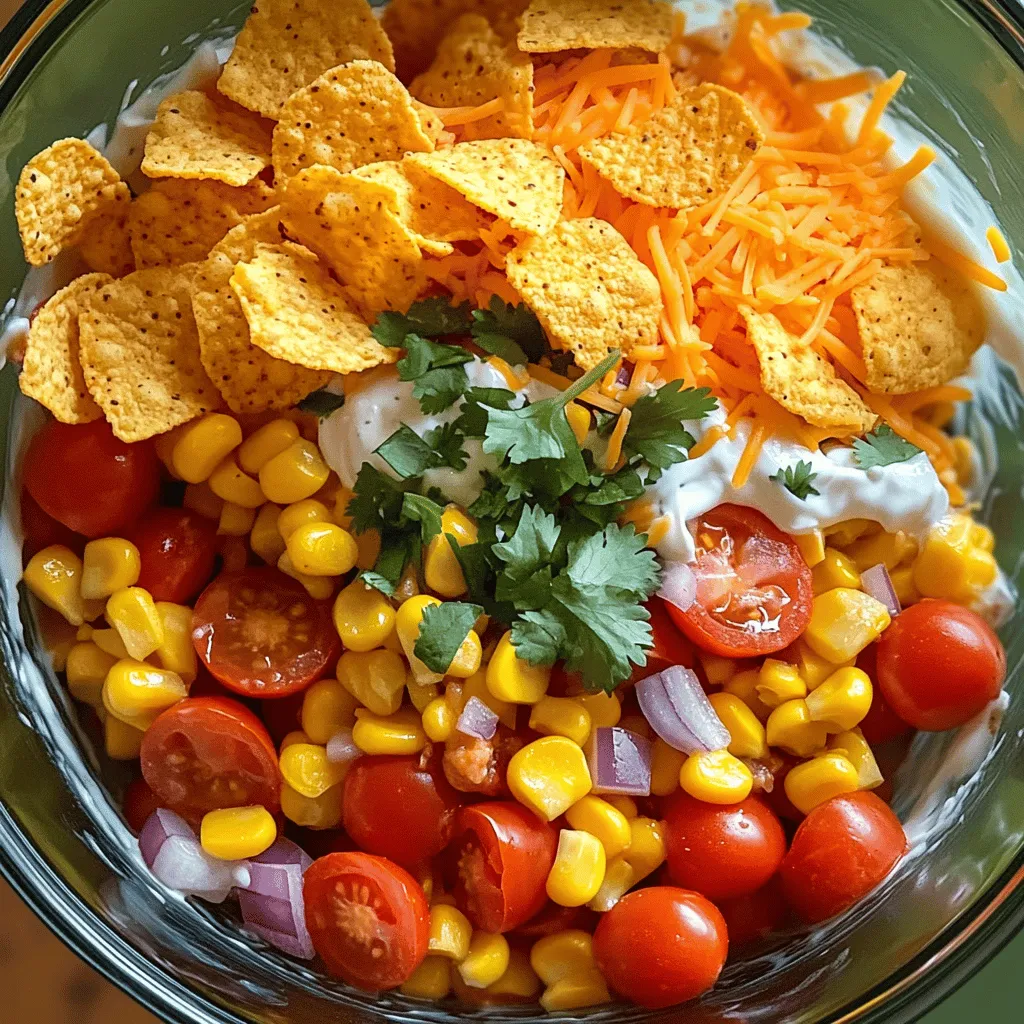
Easy Frito Corn Salad Quick and Tasty Dish
Looking for a quick and tasty dish that everyone will love? You’re in the right place! My Easy Frito Corn Salad combines crunch, sweetness, and
To make Mediterranean Chicken Pasta Salad, gather these ingredients: - 2 cups rotini or penne pasta - 1 cup cooked chicken breast, diced into bite-sized pieces - 1 cup cherry tomatoes, halved - 1 medium cucumber, diced - 1/2 medium red onion, finely chopped - 1/2 cup Kalamata olives, pitted and sliced - 1/2 cup feta cheese, crumbled - 1/4 cup fresh parsley, finely chopped - 1/4 cup high-quality olive oil - 2 tablespoons red wine vinegar (or substitute with fresh lemon juice) - 1 teaspoon dried oregano - Salt and freshly ground black pepper, to taste You can swap some ingredients to suit your taste or diet: - Pasta: Use whole wheat or gluten-free pasta. - Chicken: Try cooked shrimp or chickpeas for a different protein. - Feta Cheese: Use goat cheese or leave it out for a dairy-free option. - Olives: Substitute with green olives if you prefer. - Vegetables: Add bell peppers or artichokes for extra flavor. Quality matters in this salad. Here’s what to focus on: - Pasta: Choose a brand with simple ingredients for better taste. - Olive Oil: Use extra virgin olive oil for rich flavor. - Chicken: Fresh, organic chicken breast enhances the dish. - Veggies: Pick ripe, fresh tomatoes and crisp cucumbers for the best crunch. - Feta: Look for sheep's milk feta for a creamier texture. For the full recipe and detailed instructions, check out the [Full Recipe]. First, grab a large pot and fill it with water. Add a pinch of salt and bring it to a boil. Once the water bubbles, add 2 cups of rotini or penne pasta. Cook it until it is al dente, which should take about 8 to 10 minutes. After cooking, drain the pasta in a colander. Then, rinse it under cold water. This stops the cooking and cools the pasta quickly. While the pasta cools, chop your veggies. Halve 1 cup of cherry tomatoes. Dice 1 medium cucumber into small pieces. Finely chop half of a medium red onion and a quarter cup of fresh parsley. Place each veggie in separate bowls. This makes it easy to mix later. Now it’s time to mix! In a large bowl, add the cooled pasta. Then, toss in 1 cup of diced chicken, the halved cherry tomatoes, diced cucumber, chopped onion, 1/2 cup of sliced Kalamata olives, and 1/2 cup of crumbled feta cheese. Finally, add the chopped parsley. Gently mix everything together to blend the flavors. For the dressing, take a medium bowl. Combine 1/4 cup of high-quality olive oil, 2 tablespoons of red wine vinegar, and 1 teaspoon of dried oregano. Add a pinch of salt and pepper, then whisk until it’s mixed well. Drizzle this dressing over the pasta salad. Toss everything again with a spatula. Make sure every ingredient gets coated nicely. For the full recipe, check the details above. To make the best Mediterranean Chicken Pasta Salad, cook your pasta just right. I recommend using rotini or penne. For al dente pasta, boil it for about 8-10 minutes. Follow the package guide to avoid overcooking. After draining, rinse it under cold water. This stops the cooking and cools the pasta fast. To boost the taste, use fresh herbs and spices. Fresh parsley adds brightness. Dried oregano brings warmth. Kalamata olives give a briny kick. For a zestier twist, try adding fresh lemon juice instead of vinegar. The balance of flavors is key. Each ingredient should shine without overpowering the others. This salad is best served chilled. After mixing, let it sit in the fridge for at least 30 minutes. This time allows the flavors to meld beautifully. You can serve it cold or at room temperature. Just keep in mind that chilling enhances the taste and texture. Enjoy your fresh and vibrant Mediterranean Chicken Pasta Salad! {{image_4}} You can easily make this salad vegetarian. Simply swap out the chicken for chickpeas. One cup of canned chickpeas works well. You can also add grilled zucchini or bell peppers for added flavor. These veggies add a nice crunch and vibrant color. If you want to change the protein, consider using shrimp or salmon. Cooked shrimp adds a light taste, while salmon offers rich flavor. You can also use tofu for a plant-based option. Just make sure to season it well to enhance the taste. You can switch ingredients based on what’s in season. In spring, try adding asparagus or peas for freshness. In summer, corn and fresh herbs like basil work great. Fall brings in roasted butternut squash, which adds sweetness. Winter is perfect for hearty greens like kale or spinach. These swaps keep the salad exciting and fresh. For the complete recipe, check out the Full Recipe. After making Mediterranean chicken pasta salad, it's best to store it in the fridge. Use an airtight container to keep it fresh. This salad will stay good for about 3 to 5 days. The flavors will blend more the longer it sits. So, if you can wait, enjoy it after a day! You can freeze this salad, but some ingredients may not freeze well. The pasta and chicken freeze fine, but fresh veggies and feta may lose their crunch and creaminess. If you plan to freeze it, mix only the pasta and chicken with the dressing. Store the veggies and feta separately in the fridge. When you are ready to eat, thaw everything overnight in the fridge. Then mix in the veggies and feta before serving. If you choose to reheat your pasta salad, do so gently. Place it in a pan on low heat. Stir it often to ensure even warming. You may want to add a little more olive oil or vinegar to freshen it up. Don't microwave it if you can help it, as that can make the pasta mushy. Enjoy your delicious Mediterranean chicken pasta salad, even as leftovers! Yes, you can make this salad ahead of time. It tastes even better after a few hours. Prepare the salad, cover it, and store it in the fridge. The flavors mix well as it chills. Just wait to add the dressing until you are ready to serve. This keeps the pasta firm and fresh. I recommend using rotini or penne pasta. These shapes hold the dressing well and mix easily with the other ingredients. You can also try farfalle or fusilli for fun shapes. Just make sure to cook it al dente for the best texture. To make this salad gluten-free, choose gluten-free pasta. Many brands offer great options made from rice, quinoa, or chickpeas. Follow the same cooking steps as with regular pasta. Just watch the cooking time, as it may vary with gluten-free pasta. This blog post covers the key steps to create a Mediterranean Chicken Pasta Salad. We explored important ingredients and smart substitutions for the best quality. Then, I shared step-by-step instructions to prepare and combine your salad. Tips for cooking and enhancing flavors ensure great taste. Consider variations for your preferences, like vegetarian or seasonal swaps. Lastly, we went over storage tips to keep your salad fresh. With this knowledge, you can now build a dish that's tasty and adaptable. Enjoy making and sharing your Mediterranean Chicken Pasta Salad!
Mediterranean Chicken Pasta Salad Easy and Fresh Meal
Looking for a fresh and easy meal? You’ll love my Mediterranean Chicken Pasta Salad! This dish is packed with flavor, color, and healthy ingredients. I’ll
- 1 cup orzo pasta - 1 cup cherry tomatoes, halved - 1 cup cucumber, diced - 1 bell pepper (any color), diced - 1 cup corn kernels (fresh or frozen) - 1/2 cup red onion, finely chopped - 1/4 cup Kalamata olives, sliced (optional) - 1/4 cup feta cheese, crumbled - 1/4 cup fresh parsley, chopped For this rainbow orzo salad, I love using fresh, bright ingredients. Each one adds color and flavor. Orzo pasta is the base. It cooks quickly and has a nice bite. I often use cherry tomatoes for sweetness. They burst with flavor in every bite. Cucumbers add a crisp texture, while bell peppers bring crunch and color. Sweet corn adds a lovely pop, whether fresh or frozen. Red onion gives a hint of sharpness. If you like, add Kalamata olives for a briny touch. Feta cheese adds creaminess and a salty bite, while parsley finishes with freshness. - 1/4 cup extra virgin olive oil - 2 tablespoons fresh lemon juice - 1 teaspoon honey - Salt and freshly cracked black pepper to taste The dressing is key to this salad. I use extra virgin olive oil for its rich flavor. Fresh lemon juice brightens every bite. Honey adds a hint of sweetness, balancing the acidity. A sprinkle of salt and fresh black pepper enhances all the flavors. This dressing brings the salad together and makes it shine. For the full recipe, check out the complete guide above. First, fill a pot with water and add a pinch of salt. Bring the water to a boil over medium-high heat. Stir in the orzo pasta and cook it until it's al dente. Check the package for timing, as it can vary. Once done, drain the orzo and rinse it under cold water. This stops the cooking process and cools it down quickly. In a large bowl, mix the cooled orzo with the chopped vegetables. Add the halved cherry tomatoes, diced cucumber, diced bell pepper, corn kernels, and finely chopped red onion. If you like olives, toss in the sliced Kalamata olives too. Use a spatula to gently combine everything, ensuring the veggies and orzo are well mixed. Grab a smaller bowl and whisk together the dressing ingredients. Combine the extra virgin olive oil, fresh lemon juice, honey, salt, and pepper. Keep whisking until the mixture is smooth and well mixed. This dressing will bring all the flavors together. Now, drizzle the dressing over the orzo mixture. Use your spatula to toss everything gently. Ensure all the ingredients are coated well without breaking the orzo. This step adds a burst of flavor to every bite. Carefully fold in the crumbled feta cheese and chopped parsley. This adds a creamy texture and a fresh taste. Then, taste the salad. Adjust the seasoning by adding more salt or pepper if needed. For the best flavor, let the salad rest at room temperature for at least 15 minutes. This time allows the flavors to mingle beautifully. For the full recipe, check the recipe section above. To make the orzo just right, rinse it after cooking. Rinsing stops the cooking. It also keeps the orzo from sticking together. This step is key for a fluffy salad. Serve your Rainbow Orzo Salad fresh for the best taste. Let it rest for at least 15 minutes. This time lets the flavors blend well. For a beautiful presentation, use a large, colorful bowl. You can also layer the salad in mason jars. This makes it fun and easy for picnics or lunch. Taste your salad before serving. If it needs more flavor, adjust the seasonings. Add salt or pepper to suit your palate. Remember, you can always add more, but you can’t take it out! {{image_4}} You can easily change up the veggies in your Rainbow Orzo Salad. Try adding fresh spinach for a peppery bite. Zucchini also works great and adds a nice crunch. If you want it dairy-free or vegan, skip the feta cheese. You can replace it with avocado for creaminess or use tofu for protein. These swaps keep the salad light and fun. While the original dressing is yummy, you can experiment with different flavors. Balsamic vinaigrette adds a sweet tang, perfect for summer days. If you love herbs, a fresh pesto dressing can brighten the salad. These options let you tailor the taste to match your mood or meal. Want to make your salad heartier? Add grilled chicken for a protein kick. Chickpeas are a great plant-based choice, adding fiber and texture. For seafood lovers, shrimp makes a tasty addition. These proteins not only boost nutrition but also make the salad more filling and satisfying. To keep your Rainbow Orzo Salad fresh, store it in an airtight container. Place it in the fridge right after serving. This salad tastes best within three days. If you notice any wilting or off smells, it's time to toss it. You can freeze this salad, but it may change texture. To maintain freshness, freeze only the orzo and veggies separately. Store them in freezer-safe bags. When ready to eat, thaw them in the fridge overnight. Reheat as needed before serving. To refresh the salad after refrigeration, add a splash of olive oil and lemon juice. Stir gently to combine. This will help revive the flavors and make the salad taste fresh again. If it looks dry, you can also add a bit of water or additional dressing to enhance moisture. For the full recipe, check the earlier sections! Rainbow Orzo Salad stays fresh for about 3 to 5 days in the fridge. To keep it fresh, store it in an airtight container. Look for signs like wilted veggies or a sour smell. If you spot these, it’s time to toss it. Yes, you can use whole grain orzo. Whole grain orzo adds more fiber and nutrients. It has a nuttier taste than white orzo. This makes your Rainbow Orzo Salad even healthier. Absolutely! Rainbow Orzo Salad is great for meal prep. You can make it ahead and store it in portions. Keep the dressing separate until you are ready to eat. This will help keep the salad crisp and fresh. You can serve this salad with grilled chicken, shrimp, or chickpeas. It also pairs well with roasted veggies or a piece of fish. For a complete meal, add a slice of crusty bread or a light soup. You can find the full recipe to get started on this delicious side dish! This Rainbow Orzo Salad is colorful, fresh, and easy to make. We explored the main ingredients and how to mix them just right. We showed how to make a tasty dressing that adds punch to the salad. Remember to let it sit for a while to enhance flavors. Try adding different veggies or proteins for a fun twist. Use these tips to enjoy a vibrant meal any time. Enjoy this salad fresh and share it with friends!
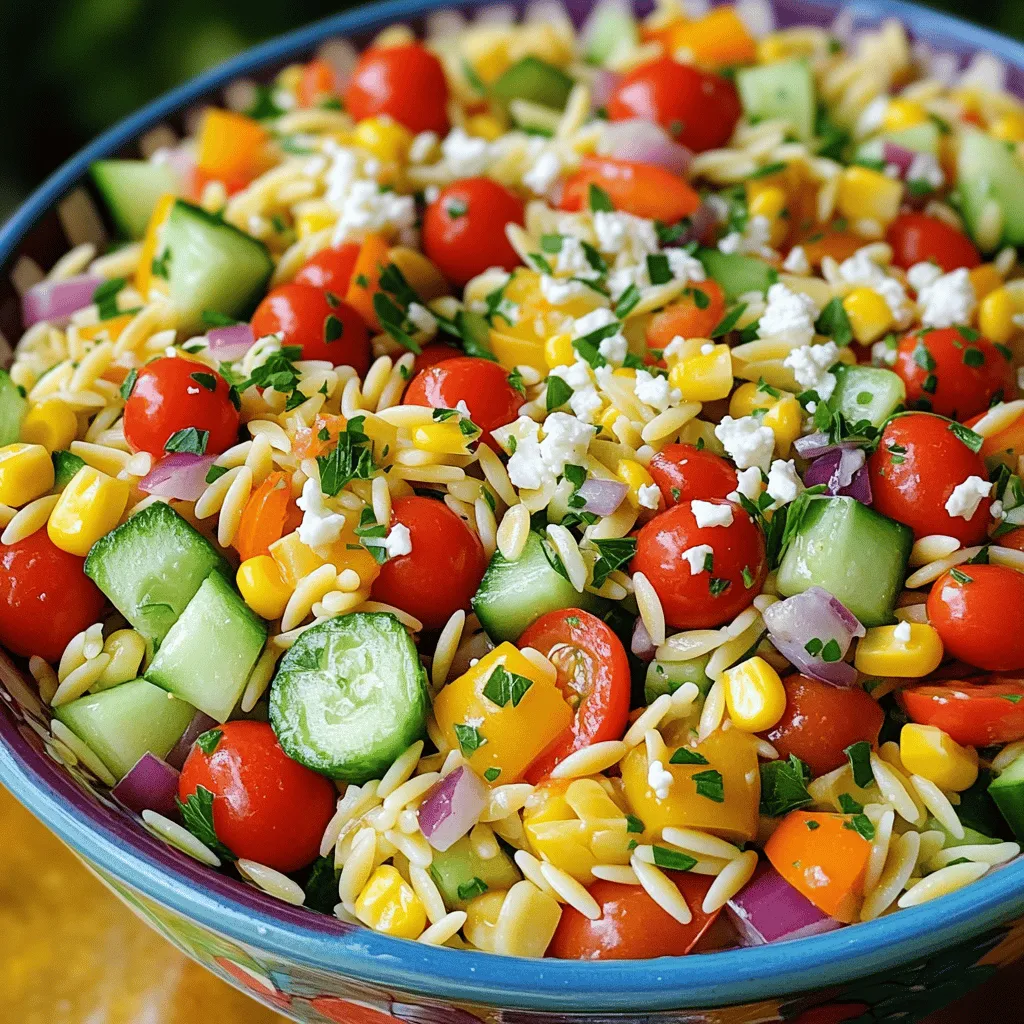
Rainbow Orzo Salad Vibrant and Fresh Side Dish
Dive into the colorful world of Rainbow Orzo Salad! This fresh and vibrant side dish not only pleases the eye but also packs a punch
- 5 cups fresh baby spinach, thoroughly washed and dried - 1 cup mixed berries (combination of strawberries, blueberries, and raspberries) - 1/2 cup pecans, gently toasted - 1/4 cup feta cheese, crumbled - 1/4 red onion, finely sliced - 1/4 cup balsamic vinaigrette dressing I love using fresh baby spinach for its crisp texture and vibrant color. Mixed berries add sweetness and a burst of flavor. Toasted pecans bring a nice crunch and rich taste. Feta cheese gives a creamy touch, while red onion adds a bit of bite. The balsamic vinaigrette ties everything together perfectly. - Honey for sweetness - Salt and pepper If you want to add a hint of sweetness, honey works great. A dash of salt and pepper can enhance the salad's flavor even more. - Number of servings: 4 servings - Portion recommendations: Serve about 1 1/2 cups per person. This salad is perfect for sharing or as a light meal for four. Each serving is filling and packed with nutrients. If you want to make it a main dish, consider adding grilled chicken or quinoa for extra protein. For the full recipe, check out the reference above. Toasting pecans brings out a deep, rich flavor. Use a dry skillet and set it on medium heat. Add the pecans and stir often for about 5-7 minutes. You want them golden brown and fragrant. Watch them closely to prevent burning. If they start to smoke, remove them right away. Start by washing the spinach. Place it in a large bowl and fill it with cold water. Swirl the leaves to remove dirt. Lift the spinach out and let it drain in a colander. Pat it dry with a clean towel or use a salad spinner. For the berries, rinse them under cold water. Gently pat them dry too. If you use strawberries, slice them into small pieces. This makes them easier to eat and mix well. Layer your salad for the best look and taste. First, add the spinach to a large bowl. Next, sprinkle the berries over the spinach. Follow this with the toasted pecans. Add the sliced red onion and crumbled feta cheese on top. Drizzle the balsamic vinaigrette dressing over everything. If you like sweetness, you can add honey here. Finally, toss the salad gently. Use tongs or your hands to mix well, coating all the ingredients. Taste it and add salt and black pepper as needed. Enjoy this fresh and tasty dish! You can find the Full Recipe for more details. To make your Berry Spinach Salad even better, try different dressings. You can use lemon vinaigrette or honey mustard for a sweet twist. Adding protein can make it heartier. Grilled chicken or chickpeas makes a great choice. Feel free to switch out the nuts or cheese. Almonds or walnuts can work well too. Try goat cheese instead of feta for a different taste. You can also mix in seasonal fruits. Apples in fall or peaches in summer add freshness. When serving, consider a large bowl or individual plates. A big bowl is great for family meals. For a fancy touch, use small plates. Garnish each serving with whole berries or extra pecans. This adds color and looks nice. For the full recipe, check out the details in the main article. {{image_4}} You can change this salad based on the season. In summer, use fresh berries like strawberries, blueberries, and raspberries. They add sweetness and a burst of color. For winter, try adding citrus fruits like oranges or pomegranate seeds. They give a nice zing. You can also mix in roasted root vegetables, like sweet potatoes, for warmth. If you follow a vegan diet, skip the feta cheese. You can use avocado or chickpeas instead for creaminess and protein. For gluten-free options, ensure your vinaigrette is gluten-free. You can make your dressing with olive oil, vinegar, and herbs. Check labels on any toppings to avoid gluten. Feel free to add more fruits or veggies. Sliced apples or pears work great. They add a nice crunch. You can also include nuts like walnuts or almonds for extra texture. Experiment with different dressings too. Try a honey mustard or a citrus vinaigrette. Each will give a new taste to your salad. Enjoy exploring these variations to keep your meals interesting! For the full recipe, see [Full Recipe]. To store leftover salad, place it in an airtight container. This keeps it fresh and prevents wilting. Use a container that fits the salad snugly. I recommend glass or BPA-free plastic containers. These materials help preserve the taste and texture. The salad stays fresh in the refrigerator for about 2-3 days. After that, the spinach can become soggy. Watch for signs of spoilage, like brown leaves or a slimy texture. If it smells off, it’s best to toss it. You don’t need to reheat this salad. Instead, freshen up leftovers by adding a splash of balsamic vinaigrette. This revives the flavors. Always store dressings separately to prevent sogginess. This way, you can enjoy a crisp salad later. You can find the full recipe for the Berry Spinach Salad with Pecans online. To make this salad, follow these key steps: 1. Toast the pecans: Use a dry skillet over medium heat for 5-7 minutes. 2. Prepare the greens: Add washed baby spinach to a large bowl. 3. Prepare the berries: Rinse mixed berries and slice strawberries if needed. 4. Add ingredients: Sprinkle toasted pecans, red onion, and feta cheese over the spinach. 5. Dress the salad: Drizzle balsamic vinaigrette and optional honey. 6. Toss and season: Mix gently and add salt and pepper to taste. 7. Serve immediately: Enjoy fresh for the best flavor. Yes, you can use frozen berries. Thaw them first to avoid excess moisture. Pat them dry with a paper towel. This helps keep the salad from getting soggy. Frozen berries might be softer, so handle them gently. They work well, especially in winter. Balsamic vinaigrette is ideal, but you can try other options. Lemon vinaigrette adds a fresh zing. Honey mustard dressing gives a sweet and tangy flavor. A creamy dressing, like ranch, can also work if you prefer a richer taste. Yes, this salad is healthy. Spinach is rich in vitamins A and C. Berries provide antioxidants and fiber. Pecans add healthy fats and protein. Feta cheese offers calcium and flavor. Overall, this dish is balanced and nutritious. You can prep some parts in advance. Wash and dry the spinach a day earlier. Store it in the fridge in a sealed container. You can also toast the pecans ahead of time. Keep them in an airtight container. Combine everything just before serving to maintain freshness. To wrap up, the Berry Spinach Salad with Pecans is easy and tasty. You learned the main ingredients, like spinach, berries, and pecans. I shared how to toast nuts and combine everything well. With tips for flavor and storage, you can enjoy this salad at any time. Don't be afraid to make it your own with different fruits and nuts. This dish is not only healthy, but it's also a fun way to enjoy fresh ingredients. Try it, and you may find your new favorite salad!
Berry Spinach Salad with Pecans Fresh and Tasty Dish
Are you ready to whip up a fresh and tasty dish? This Berry Spinach Salad with Pecans is the perfect blend of flavors and textures.