Salads
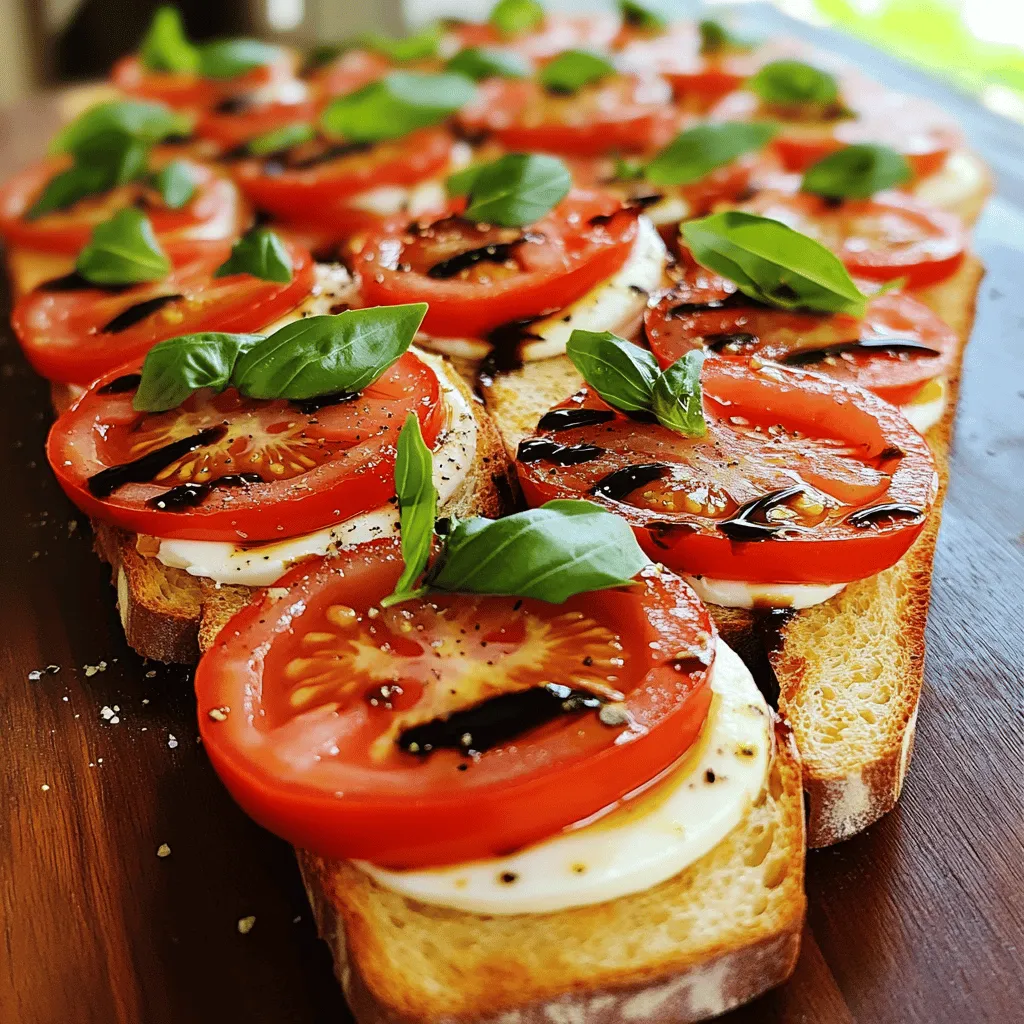
Baguette Caprese Salad Fresh and Flavorful Delight
If you crave a fresh and tasty dish, you’ll love Baguette Caprese Salad. This recipe combines crispy baguette slices, creamy mozzarella, and ripe tomatoes for
![To make this kale salad with roasted beets, gather these fresh ingredients: - 4 cups kale, stems removed and chopped into bite-sized pieces - 2 medium-sized beets, peeled and cut into small cubes - 1 medium carrot, finely grated - 1/2 cup feta cheese, crumbled into small pieces - 1/4 cup walnuts, lightly toasted and roughly chopped - 1/4 cup dried cranberries for a touch of sweetness These ingredients create a mix of flavors and textures. The kale provides a sturdy base, while the beets add a sweet earthiness. The crunch from walnuts and the creaminess of feta enhance the salad's appeal. For the dressing, you will need: - 1/4 cup extra virgin olive oil - 2 tablespoons balsamic vinegar - 1 teaspoon honey - Salt and pepper to taste This dressing brings everything together. The olive oil adds richness, while the balsamic vinegar gives a nice tang. Honey balances the flavors, making each bite delightful. This salad is not just tasty; it's also good for you. - Kale is rich in vitamins A, C, and K. It supports eye health and boosts the immune system. - Beets contain antioxidants and help improve blood flow. They are great for heart health and can lower blood pressure. Eating this salad often can improve your health while keeping meals exciting. Feel free to explore the [Full Recipe] for more details! To roast the beets, first, preheat your oven to 400°F (200°C). This temperature helps the beets cook evenly. Next, take two medium-sized beets. Peel them and cut them into small cubes. Spread these cubes on a baking sheet. Drizzle one tablespoon of extra virgin olive oil over them. Sprinkle a pinch of salt and pepper on top. Roast the beets in the oven for 25-30 minutes. They should be tender when you pierce them with a fork. Remember to stir the beets halfway through cooking. Once they are done, take them out and let them cool. Now, let’s mix up the salad. In a large mixing bowl, add four cups of chopped kale. Make sure to remove the tough stems first. Next, grate one medium carrot and add it to the bowl. Then, toss in the roasted beet pieces you just made. Crumble half a cup of feta cheese into the bowl. Add a quarter cup of roughly chopped walnuts and a quarter cup of dried cranberries for sweetness. These ingredients give the salad great color and texture. To make the salad dressing, take a small bowl. Whisk together three tablespoons of olive oil, two tablespoons of balsamic vinegar, and one teaspoon of honey. Add a sprinkle of salt and pepper to taste. Make sure everything is well mixed and emulsified. This dressing enhances all the fresh flavors in your salad. Drizzle it over your kale and beet mixture. Gently toss the salad to coat all the ingredients. Let it sit for about ten minutes. This waiting time allows the kale to soften and the flavors to blend perfectly. Roasting beets brings out their natural sweetness. Start by preheating your oven to 400°F (200°C). Cut your beets into small cubes for even cooking. Spread them on a baking sheet. Drizzle with olive oil, and sprinkle salt and pepper. Roast for 25 to 30 minutes. Stir them halfway through for a nice, even roast. Check if they are tender with a fork. Let them cool before adding to your salad. This method makes beets bright and tasty. Balancing flavors is key in any salad. The sweetness of roasted beets pairs well with the saltiness of feta. Add a splash of balsamic vinegar for tang. Honey can help balance these flavors. If the salad tastes flat, add more salt or pepper. You can also toss in some lemon juice for extra brightness. Taste as you go. Adjust until you find your perfect mix. This way, each bite will be full of flavor. A beautiful salad can make a meal special. Use a large wooden bowl for a rustic look. Top the salad with extra feta and walnuts for texture. For individual servings, use clear glasses or small bowls. Garnish with a lemon slice on the side. This adds color and a zesty touch. You can also layer the ingredients for a stunning display. Eye-catching salads invite everyone to dig in. Make your salad not just tasty but also a feast for the eyes. For the complete recipe, check out the Full Recipe section. {{image_4}} If you want to change the cheese in your salad, you have options. You can try goat cheese for a tangy twist. Creamy burrata adds a rich texture. For a dairy-free choice, use crumbled tofu. Each cheese gives a unique flavor to your salad. Want to make your salad more filling? Try adding proteins! Grilled chicken works great for a hearty dish. If you prefer plant-based options, chickpeas or black beans are fantastic. Simply toss them in with the other ingredients for a tasty boost. To make a vegan version of this salad, skip the feta cheese. Instead, add avocado for creaminess. You can also include a sprinkle of nutritional yeast for a cheesy flavor. Replace honey with maple syrup or agave nectar. This way, you keep the taste vibrant and fresh. For the complete recipe, check [Full Recipe]. To keep leftover kale salad fresh, store it in a sealed container. You can use glass or plastic containers, but make sure they are airtight. Place the salad in the fridge as soon as possible. This helps keep the ingredients crisp. If you can, keep the dressing separate. This way, the kale will not get soggy. The salad can last in the refrigerator for about 2-3 days. However, the texture will change over time. The kale may wilt, and the beets can release moisture. For the best taste, enjoy it within the first two days. Always check for any signs of spoilage before eating. Freezing the salad is not recommended. The kale and other veggies will lose their crispness. While the beets may hold up, the overall texture will not be good after freezing. If you want to save beets, you can freeze them alone. Just roast and cool them first before freezing. Use them later in other dishes or salads. For the full recipe, check the linked instructions. Yes, you can use other leafy greens. Spinach, arugula, or Swiss chard work well. Each green has a different taste. Spinach is mild, while arugula adds spice. Feel free to mix and match to find your favorite flavor. If fresh beets are hard to find, use canned or pre-cooked beets. These options save time and still taste great. Just drain and rinse them before adding to your salad. This keeps the flavors fresh and vibrant. To make this salad gluten-free, ensure all ingredients are safe. Check the labels on your feta cheese and dressing. Most olive oils and vinegars are gluten-free, but it's good to double-check. This way, everyone can enjoy this tasty dish. For the full recipe, visit the cooking section. This blog post shared how to make a great salad with fresh, healthy ingredients. You learned about vibrant kale, beets, and the right dressing to tie it all together. I provided steps to roast beets, assemble your salad, and even tips for storing leftovers. Lastly, you can customize the salad to suit your taste or dietary needs. This dish is not just delicious but also packed with nutrients. Enjoy your tasty salad, and don’t be afraid to get creative!](https://meltedrecipes.com/wp-content/uploads/2025/07/3d718c5d-395a-41f5-8678-ecdb362b0e85.webp)
Kale Salad with Roasted Beets Fresh and Flavorful Meal
Looking for a fresh, flavorful meal that’s as healthy as it is tasty? My Kale Salad with Roasted Beets is the perfect choice! Packed with
![- 2 boneless, skinless chicken breasts - 1 cup cherry tomatoes, halved - 1 cup fresh mozzarella balls (bocconcini or ciliegine) - 2 cups fresh basil leaves, loosely packed - 3 tablespoons balsamic vinegar - 2 tablespoons extra virgin olive oil, divided - Salt and freshly ground black pepper, to taste - 1 teaspoon garlic powder - 1 teaspoon dried oregano - Additional fresh basil leaves for garnish To make this flavorful balsamic chicken caprese salad, you need fresh and vibrant ingredients. First, choose two boneless, skinless chicken breasts. They will be the star of your dish. Next, gather one cup of cherry tomatoes, sliced in half. They add sweetness and color. You will also need one cup of fresh mozzarella balls, which give a creamy texture. Don't forget the basil! You will need two cups of fresh basil leaves. They bring a fresh flavor to the salad. For the dressing, grab three tablespoons of balsamic vinegar. This will add a tangy kick. You'll use two tablespoons of extra virgin olive oil for richness. Also, have salt and freshly ground black pepper on hand for seasoning. You should add one teaspoon of garlic powder and dried oregano to boost the flavor. Lastly, set aside a few extra basil leaves for a lovely garnish. This recipe brings together bright flavors and textures, making it a perfect choice for any meal. For the full recipe, check out the details above. Seasoning the Chicken First, take two boneless, skinless chicken breasts. I like to season them well. Sprinkle garlic powder, dried oregano, salt, and black pepper on both sides. This gives the chicken great flavor. Cooking Technique Next, heat one tablespoon of olive oil in a large skillet over medium heat. Once the oil is hot, add the chicken. Cook each side for about 6 to 7 minutes. You want the chicken to reach 165°F (75°C). After cooking, let the chicken rest for 5 minutes. Then, slice it into strips. Preparing the Salad Base In a large salad bowl, combine one cup of halved cherry tomatoes, one cup of fresh mozzarella balls, and two cups of fresh basil leaves. Gently toss these ingredients together. Making the Dressing For the dressing, whisk together three tablespoons of balsamic vinegar and one tablespoon of olive oil in a small bowl. Taste it. If needed, add salt and black pepper for flavor. Adding Chicken to Salad Now, take the sliced chicken and add it to the bowl with the tomatoes and mozzarella. Drizzling Dressing and Tossing Drizzle the balsamic dressing over the salad. Carefully toss everything together, so each piece gets coated in the dressing. For the full recipe, check the earlier section. Enjoy this fresh, vibrant salad! Ensuring Juicy Chicken To make juicy chicken, start with fresh breasts. You can also brine them before cooking. A simple brine uses salt and water. Let the chicken sit in the brine for 30 minutes. This helps keep the moisture in. Cook the chicken over medium heat, so it doesn’t dry out. Always use a meat thermometer to check the internal temperature. Aim for 165°F (75°C) for safe eating. Adjusting Flavor Profiles Taste as you go! If you want more flavor, add extra garlic powder or oregano. You can also try a splash of lemon juice for brightness. Adjust salt and pepper to your liking. Don’t forget the balsamic vinegar! It adds a delicious tang. If you like it sweeter, use a balsamic glaze instead. Presentation Ideas Make your salad pop! Serve it in a clear glass bowl to show off the colors. Arrange the chicken strips on top for a nice look. A drizzle of balsamic around the bowl adds elegance. Use fresh basil leaves as a garnish for a lovely finish. Ideal Pairings This salad pairs well with crusty bread or garlic bread. A light white wine, like Sauvignon Blanc, enhances the flavors. For a heartier meal, serve with grilled vegetables or a side of quinoa. You can also add a light soup to round out your dinner. For the full recipe, check out the complete instructions and tips! {{image_4}} You can switch the chicken for other meats. Try grilled shrimp or steak. If you want to keep it light, use turkey breast. These options still work well with the salad's fresh flavors. For a vegan version, skip the chicken and cheese. Instead, use chickpeas or grilled tofu for protein. You can also add some avocado for creaminess. This keeps the salad tasty and filling. If you want a twist, try different dressings. A lemon vinaigrette can brighten the dish. A creamy ranch can add richness. Just drizzle it over the salad before serving. Add nuts or seeds for crunch. Toasted pine nuts or sunflower seeds work great. You can also sprinkle some red pepper flakes for heat. These toppings add texture and make your salad even more exciting. For the complete recipe, check out the [Full Recipe]. - How to Store Leftovers: First, let the salad cool to room temperature. Then, place any leftover salad in the fridge. Use a clean spoon to avoid germs. - Ideal Containers: Use airtight containers. Glass or plastic containers work well. Make sure the lid is on tight to keep the salad fresh. - Freezing and Thawing: I don't recommend freezing this salad. The fresh ingredients, like tomatoes and basil, can become mushy. If you must freeze, store only the chicken. Thaw in the fridge before using. - Best Practices for Flavor Retention: Always wrap the chicken tightly in plastic wrap or foil. This helps lock in flavor. Avoid freezer burn by not leaving it too long. Use within a month for best taste. For more details on making this dish, check out the Full Recipe. To make Balsamic Chicken Caprese Salad, follow these steps: 1. Season the Chicken: Sprinkle garlic powder, oregano, salt, and pepper on both sides of the chicken breasts. 2. Cook the Chicken: Heat olive oil in a skillet. Cook the chicken for 6-7 minutes on each side until it reaches 165°F (75°C). Let it rest and slice it. 3. Prepare the Salad Base: In a bowl, mix halved cherry tomatoes, mozzarella balls, and basil leaves. Toss them gently. 4. Make the Dressing: Whisk balsamic vinegar and olive oil in a small bowl. Add salt and pepper to taste. 5. Combine the Salad: Add chicken strips to the salad base. Drizzle the dressing and toss everything well. 6. Serve: Place the salad on a platter and garnish with more basil leaves. This recipe is quick and full of fresh flavors. You can find the [Full Recipe] for more details. Yes, you can! Feel free to swap or add veggies. Bell peppers, cucumbers, or arugula work well. Each vegetable adds its own flavor and crunch. Think about what you enjoy or have on hand. Just remember to cut them into small pieces for easy eating. This salad pairs well with many sides. You might serve it with crusty bread or garlic bread. A light soup, like tomato basil, also complements it nicely. For a heartier meal, try it with quinoa or a grain salad. Enjoy the mix of flavors and textures! This post shared how to make a tasty Balsamic Chicken Caprese Salad. We covered key ingredients like chicken, veggies, and herbs. You learned how to prepare the chicken and assemble the salad in simple steps. Plus, you got tips on cooking and serving. Now, you can make this dish your own with variations and smart storage tips. Enjoy this flavorful salad that everyone will love!](https://meltedrecipes.com/wp-content/uploads/2025/07/7b5560e7-176e-4518-8dfe-8aa07bd72463.webp)
Flavorful Balsamic Chicken Caprese Salad Recipe
Are you ready to elevate your salad game? I’m excited to share my Flavorful Balsamic Chicken Caprese Salad Recipe! This dish combines tender chicken, fresh
![- 3 medium zucchinis - 1 teaspoon sea salt - 1/4 cup extra virgin olive oil - 1/4 cup red wine vinegar - 1 tablespoon honey The main ingredients create a fresh and zesty flavor. Zucchinis are the star of this salad. They have a mild taste, making them perfect for marinating. The sea salt helps draw out moisture. This step ensures the zucchinis stay crunchy. Extra virgin olive oil adds richness and depth. Red wine vinegar gives the salad a pleasant tang. Honey balances the acidity, adding a hint of sweetness. - 1/4 cup feta cheese - 1/4 cup cherry tomatoes - Fresh parsley Optional ingredients can elevate your salad even more. Feta cheese adds creaminess and a salty touch. Cherry tomatoes bring a pop of color and sweetness. Fresh parsley adds a nice herbal note, enhancing the overall taste. - Using apple cider vinegar - Adding Dijon mustard - Including different herbs You can switch up the marinade for fun. Apple cider vinegar gives a sweeter flavor. Dijon mustard adds a nice kick to the mix. You can also use different herbs, like basil or dill, for more variety. These small changes can make your salad unique and exciting. For the full recipe, check out the details provided. To start, you need to prepare the zucchini. First, slice 3 medium zucchinis thinly. Lay them in a colander and sprinkle 1 teaspoon of sea salt over them. This step helps draw out moisture. Let the zucchinis sit for about 30 minutes. The salt will make them crispier and more flavorful. After 30 minutes, rinse the zucchinis well under cold water. This helps remove excess salt. Once rinsed, gently pat them dry with a paper towel. This keeps your salad fresh and prevents sogginess. Now, let’s make the marinade. In a large mixing bowl, combine these ingredients: - 1/4 cup extra virgin olive oil - 1/4 cup red wine vinegar - 1 tablespoon honey - 1 teaspoon garlic powder - 1 teaspoon dried oregano - 1/2 teaspoon freshly ground black pepper Whisk these ingredients together until they blend well. Taste the marinade and adjust the flavors as needed. You can add more vinegar for tang or honey for sweetness. Next, it’s time to marinate the zucchini. Add the dried zucchini slices to the bowl with the marinade. Toss gently to coat each slice well. For the best flavor, let the zucchini sit at room temperature for at least 15 minutes. If you have more time, you can refrigerate it for up to 2 hours. After marinating, add 1/4 cup of finely chopped fresh parsley and 1/4 cup of halved cherry tomatoes to the bowl. Toss everything together to mix. Just before serving, you can sprinkle 1/4 cup of crumbled feta cheese on top for a creamy touch. Enjoy your refreshing Marinated Zucchini Salad! For a complete guide, check the Full Recipe. To get the best flavor in your marinated zucchini salad, timing is key. I suggest marinating the zucchini for at least 15 minutes. This allows the flavors to soak in. For even better taste, try marinating for two hours in the fridge. The zucchini will absorb the marinade fully. Always use fresh ingredients. Fresh zucchinis and herbs make a big difference in taste. When serving, choose a large bowl or individual plates. This makes the salad look inviting. A nice bowl can enhance the meal's appeal. Drizzle any leftover marinade over the salad for added flavor. For a pop of color, add fresh parsley or cherry tomatoes on top. They brighten the dish and make it look delicious. One mistake to avoid is over-salting the zucchini. Too much salt can make it soggy. Use just a teaspoon of sea salt to draw out moisture. Another mistake is skipping the drying step. After salting, rinse and pat the zucchini dry. This keeps the salad fresh and crisp. Following these tips will help you create a perfect marinated zucchini salad. Check the [Full Recipe] for complete instructions. {{image_4}} You can make this salad even better with fun add-ins. Adding avocado gives the salad a creamy touch. The rich flavor of avocado pairs well with the tangy dressing. You can also try adding nuts or seeds for crunch. Almonds, walnuts, or sunflower seeds elevate the texture. These add-ins keep the salad interesting and tasty. Switching up the dressing can change the entire vibe. You can use different oils and vinegars for variety. For example, try using lemon oil for a bright twist. Or swap red wine vinegar with balsamic for sweetness. You can also infuse flavors with herbs and spices. Adding fresh basil or dill will enhance the taste. Experimenting with these options makes the salad fun to create. This salad pairs well with many main dishes. Grilled chicken or fish works nicely alongside it. The fresh flavors balance the richness of these proteins. You can also serve it with a hearty pasta dish. For bread, crusty baguette or whole grain crackers are great choices. They add a nice crunch and make the meal complete. For the full recipe, check out our detailed instructions above. To keep your marinated zucchini salad fresh, refrigerate it right away. Place it in a clean, airtight container. This will help retain its flavor and texture. Glass containers work best, as they do not absorb odors. If you use plastic, ensure it is BPA-free for safe storage. You can freeze marinated zucchini salad, but expect some texture changes when thawed. To prepare for freezing, first, drain any excess marinade. Place the salad in a freezer-safe bag, removing air before sealing. Label the bag with the date to track freshness. In the fridge, your salad lasts about 3 to 5 days. Always check for signs of spoilage. If you see any off smells, discoloration, or slimy textures, it’s best to toss it. Keeping an eye on these signs ensures you enjoy your salad at its best! You should marinate zucchini for at least 15 minutes. This allows the flavors to soak in well. For even better taste, marinate up to 2 hours in the fridge. The longer you marinate, the more intense the flavors become. Just don’t go overboard, as too long can make the zucchini too soft. Yes, you can make this salad ahead of time. It tastes great when chilled. Prepare it a day before your meal. Store it in an airtight container in the fridge. The flavors will blend nicely, making it even tastier. Just be sure to add the feta just before serving for freshness. If you want to skip feta, try using avocado for creaminess. You can also use tofu for a dairy-free option. Nutritional yeast can add a cheesy flavor too. Choose what fits your taste and diet. In this post, we explored marinated zucchini salad, from main ingredients to storage tips. We covered how to prepare, marinate, and present your salad for great flavor. Remember to use fresh ingredients and avoid common mistakes, like over-salting. With various add-ins and dressings, you can make this dish your own. Enjoy making a colorful salad that’s perfect for any meal. This tasty side is quick, easy, and sure to impress!](https://meltedrecipes.com/wp-content/uploads/2025/07/19e90fda-99ea-4fcd-9f2f-1221b2f7e944.webp)
Marinated Zucchini Salad Refreshing Summer Delight
Summer calls for fresh, crisp dishes that delight your taste buds. That’s where my Marinated Zucchini Salad comes in! It’s simple to make and bursting
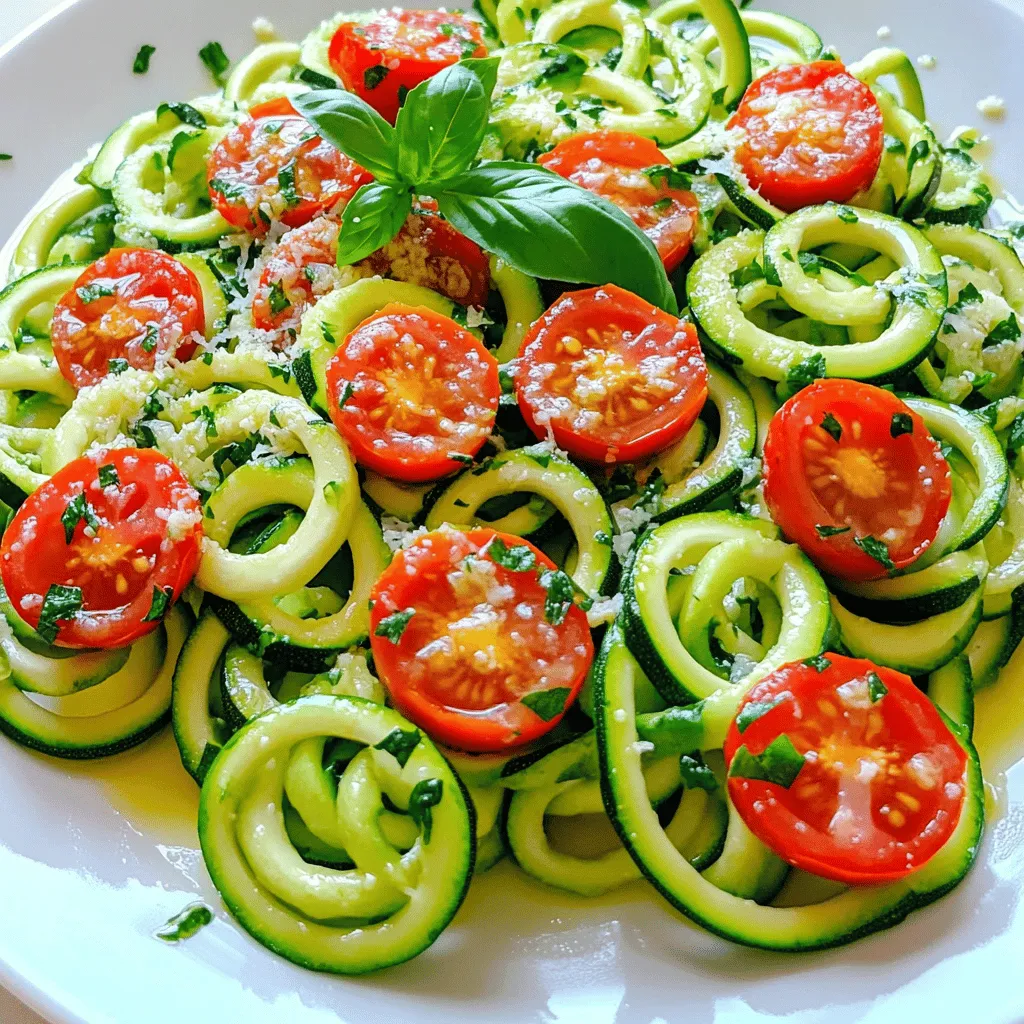
Zucchini Noodles with Tomato and Basil Fresh Delight
Looking for a fresh and healthy meal? Try my Zucchini Noodles with Tomato and Basil! This dish combines vibrant veggies and rich flavors, making it
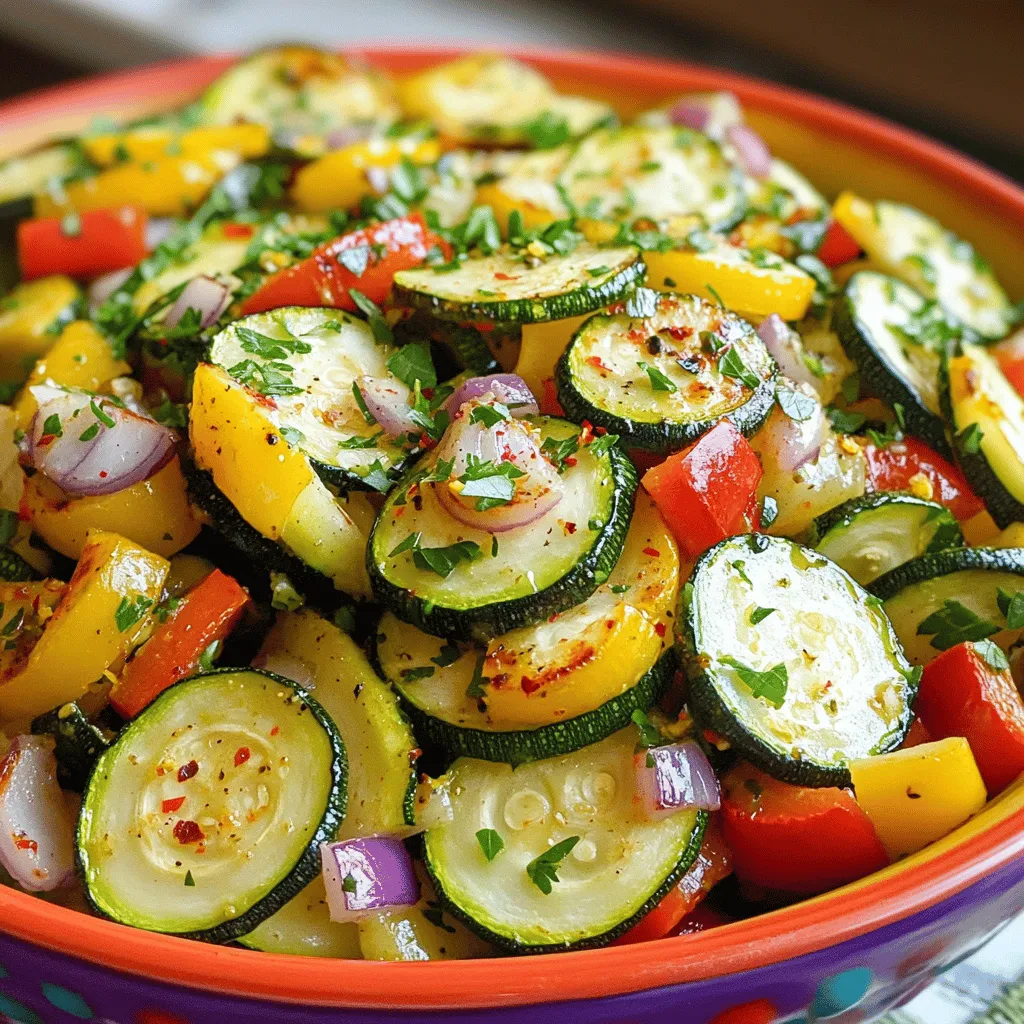
Flavorful Make-Ahead Zucchini Side for Easy Meals
Looking for an easy, tasty side dish? This flavorful make-ahead zucchini side is your answer! Packed with fresh veggies and bold flavors, it’s perfect for

Japanese Steakhouse Hibachi Zucchini Flavor Boost
Looking to elevate your home cooking with a taste of the Japanese steakhouse? Dive into my easy guide to making hibachi zucchini that bursts with
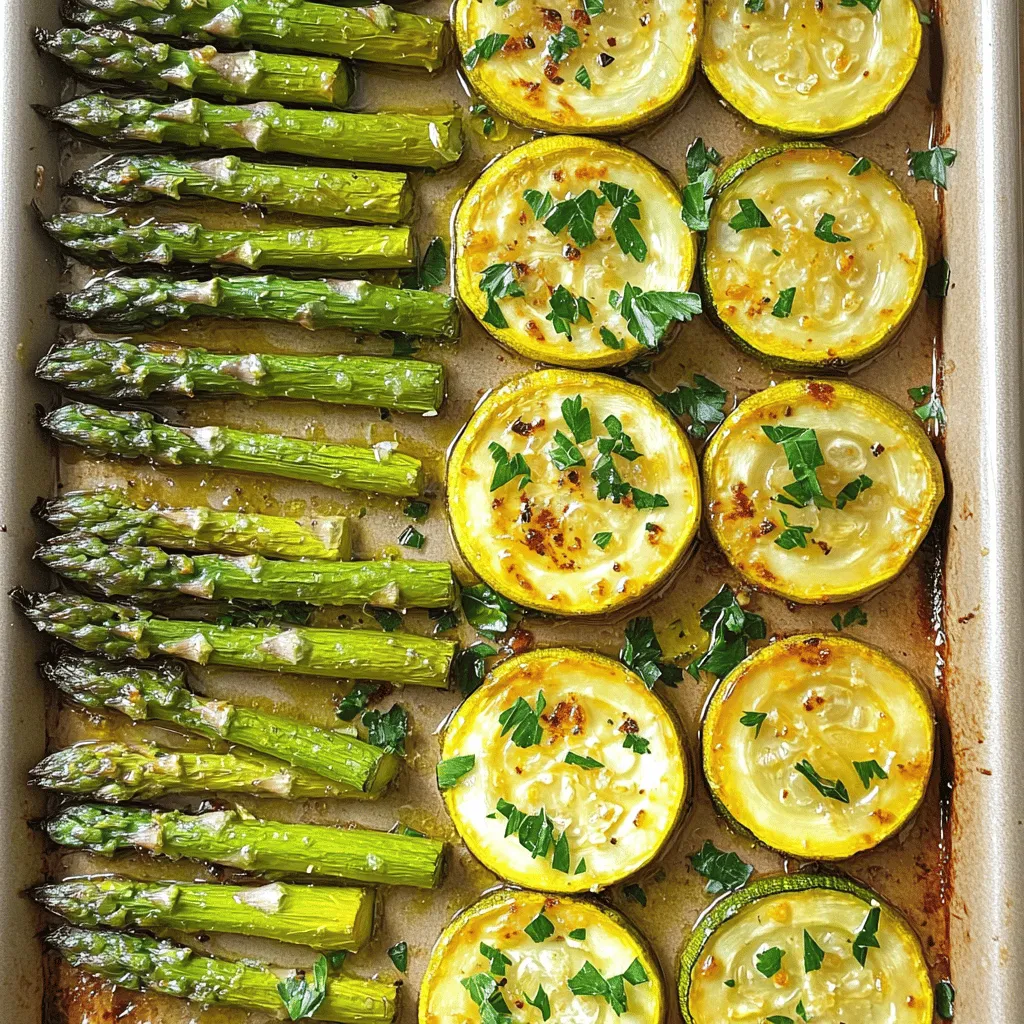
Flavorful Asparagus with Zucchini Simple Roasted Dish
Looking for a simple, tasty dish? I’ve got just the thing for you! This Flavorful Asparagus with Zucchini recipe brings the fresh crunch of veggies
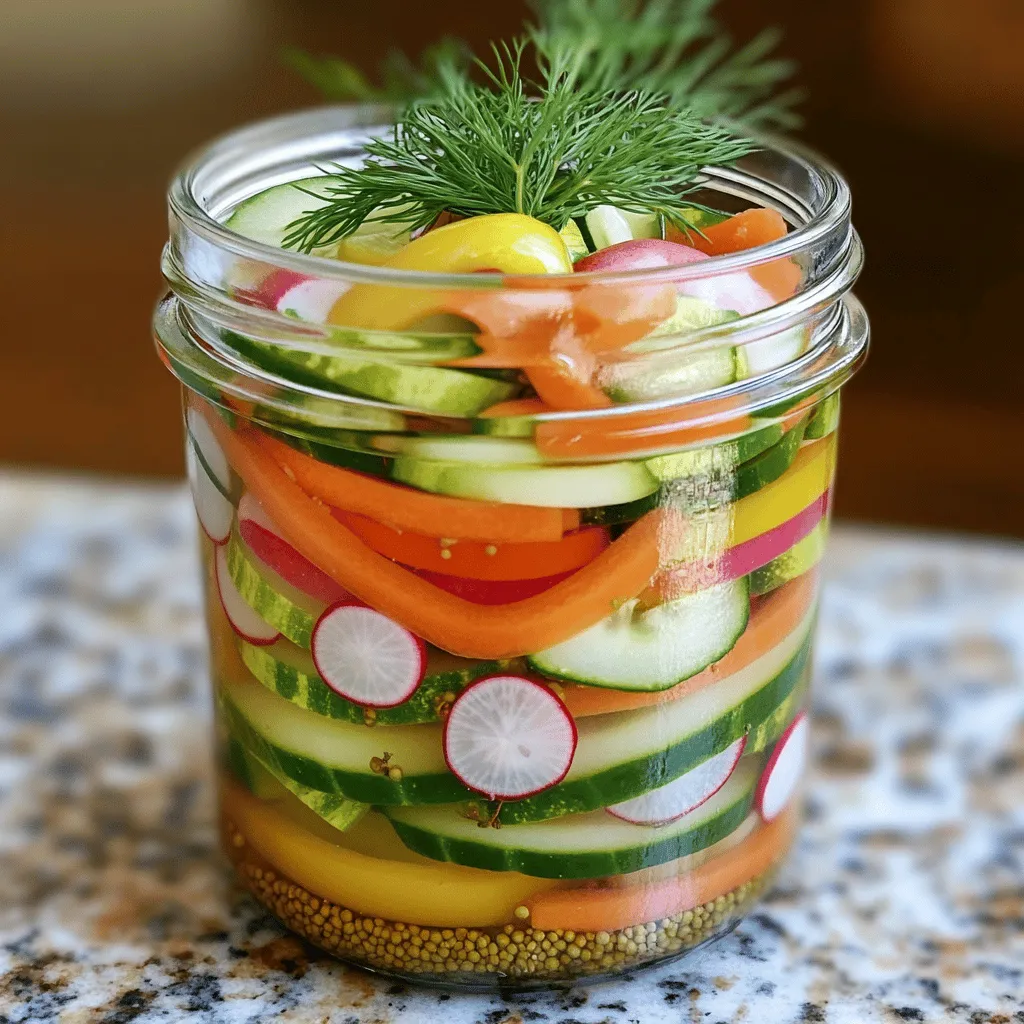
Quick Pickled Vegetables Flavorful and Easy Recipe
Are you ready to add a burst of flavor to your meals? Quick pickled vegetables are easy to make and incredibly tasty! In this guide,
![- 2 cups rotini pasta - 1 cup cherry tomatoes, halved - 1 cup cucumber, diced - 1/2 cup red bell pepper, chopped - 1/4 cup red onion, finely chopped - 1 cup cooked and cooled chickpeas - 1/2 cup Greek yogurt - 1/4 cup mayonnaise - 2 tablespoons fresh lemon juice - 1 tablespoon Dijon mustard - 1 teaspoon garlic powder - Salt and freshly ground black pepper to taste - Fresh parsley, finely chopped, for garnish I choose these ingredients to create a vibrant and tasty pasta salad. The rotini pasta holds the creamy dressing well. Cherry tomatoes add a sweet burst, while cucumber gives a nice crunch. Red bell pepper and red onion bring color and flavor. Chickpeas add protein and fiber. The dressing, made with Greek yogurt and mayo, provides creaminess and tang. Lemon juice and Dijon mustard enhance the flavor, while garlic powder adds depth. Fresh parsley gives a bright finish. You can add more to your pasta salad for even better taste. Here are some great options: - Suggested vegetables: You can try adding diced carrots, sweet corn, or peas for extra color and crunch. - Protein options: Grilled chicken, shrimp, or tofu are great choices if you want more protein. - Cheese and other mix-ins: Feta cheese, mozzarella balls, or olives can add a nice twist. These add-ins let you make the salad your own and play with different flavors. To cook the rotini, bring a large pot of salted water to a boil. Add the pasta and stir it right away. This helps prevent sticking. Cook according to the package instructions until it is al dente. Al dente means the pasta is firm when bitten. After cooking, drain the pasta in a colander. Rinse it under cold water. This stops the cooking and keeps the pasta perfect. In a big mixing bowl, combine the cooled rotini with the cherry tomatoes, cucumber, bell pepper, red onion, and chickpeas. Use a gentle touch when mixing. Toss the ingredients lightly to avoid breaking the pasta. You want an even mix of flavors in every bite. For the dressing, grab a medium-sized bowl. Add Greek yogurt, mayonnaise, lemon juice, Dijon mustard, garlic powder, and a pinch of salt and pepper. Use a whisk to blend everything until it is smooth. If you want a different taste, adjust the seasoning. Add more lemon juice for tang or extra salt for flavor. Once the dressing is ready, pour it over the salad mixture. Use a spatula to fold the dressing gently into the salad. This ensures all the pasta and vegetables are coated well. You can find the full recipe for this delicious creamy pasta salad at the beginning of the article. Chilling your creamy pasta salad is key. It allows the flavors to mix well. I suggest refrigerating for at least 30 minutes. This wait helps the salad taste even better. To prevent your pasta from sticking, rinse it right after cooking. Use cold water to cool it down. This stops the cooking process and keeps each piece separate. You can add a bit of oil too, which helps keep the pasta loose. If you want a lighter dish, try low-fat yogurt instead of Greek yogurt. You can also swap the mayonnaise for more yogurt. For a vegan version, use plant-based yogurt or tofu. These options keep the creaminess without dairy. To customize the dressing, add herbs or spices. If you prefer it tangy, add more lemon juice. For a milder taste, reduce the garlic powder. This way, you can create a dressing that fits your taste perfectly. For the complete recipe, check out the [Full Recipe]. {{image_4}} If you want to switch up the pasta, many options exist. You can choose penne, fusilli, or even farfalle. Each type brings its own charm. Penne has a smooth surface, perfect for holding dressings. Fusilli twists can catch bits of veggies and dressing, adding great flavor. Farfalle, with its bow tie shape, can make your salad look fun and inviting. Each pasta type changes the texture and feel of your salad. Changing the dressing can make your pasta salad unique. You can use ranch, vinaigrette, or even pesto. Each dressing brings its own taste. For a zesty twist, try adding lime juice instead of lemon. You can also blend in herbs like basil or dill for a fresh kick. Consider seasonal ingredients too. In summer, add fresh corn or peas for sweetness. In fall, roasted squash or sweet potatoes add warmth. These small changes can make your creamy pasta salad a delightful surprise every time. For a complete experience, refer to the Full Recipe for ideas that will inspire your next creation. To keep your creamy pasta salad fresh, refrigerate it right away. Store it in an airtight container. This helps to keep the flavors intact. If you don’t have an airtight container, use a bowl covered tightly with plastic wrap. Make sure to push out any excess air before sealing. You can expect your creamy pasta salad to stay fresh for about 3 to 5 days in the fridge. After that, the quality starts to drop. Look for signs of spoilage. If the salad smells sour or has a slimy texture, it’s time to toss it. Also, if you see any mold, discard it immediately. Keeping an eye on freshness ensures you enjoy this delight at its best. Yes, you can make this pasta salad ahead of time. Prepare the salad and store it in the fridge. Just remember to keep it in an airtight container. This helps keep it fresh. Making it a day before can deepen the flavors. However, if you make it too early, the veggies may get soft. So, try to enjoy it within two days for the best taste. If you don’t have Greek yogurt, you can use sour cream. Cream cheese is another option too. These swaps change the flavor slightly. Sour cream gives a tangy taste, while cream cheese adds a rich creaminess. Both options still keep the salad creamy and delicious. Yes, you can easily make this salad gluten-free. Use gluten-free rotini pasta. Many brands offer tasty options made from rice or corn. For a gluten-free dressing, check the labels on yogurt and mayonnaise. Some brands have gluten-free versions. This way, everyone can enjoy this creamy dish! This pasta salad is both simple and flavorful, with the right mix of ingredients. We explored essential components, optional add-ins, and step-by-step instructions to achieve the perfect dish. Remember to chill your salad for the best taste and consider variations to keep it exciting. Proper storage ensures it stays fresh, so enjoy this dish now and later. By following these tips, you can make a creamy pasta salad that fits your taste and dietary needs. Happy cooking!](https://meltedrecipes.com/wp-content/uploads/2025/06/28046504-b872-437d-b9e6-6276f776dc5b.webp)
Creamy Pasta Salad Wholesome and Refreshing Dish
Are you ready to whip up a dish that is both creamy and refreshing? In this blog post, I’ll guide you through how to create