Dinner

- 2 cups butternut squash, peeled and cut into 1-inch cubes - 1 cup creamy ricotta cheese - 1 pound Italian sausage, casings removed The main stars of this dish are butternut squash, ricotta cheese, and Italian sausage. Butternut squash brings a sweet, nutty flavor. Ricotta adds creaminess, making the gnocchi soft. Italian sausage gives a savory taste that pairs well with the squash. - 2 cups all-purpose flour (plus additional for dusting) - 1 large egg - 1/4 cup fresh sage leaves, roughly chopped - 1/2 cup freshly grated Parmesan cheese All-purpose flour binds the dough, while the egg helps it hold shape. Fresh sage adds a lovely herbal note. Parmesan cheese enhances the flavor with its salty richness. - Sea salt and black pepper - 1 tablespoon extra-virgin olive oil - 1 teaspoon freshly grated nutmeg Seasoning is key. Sea salt and black pepper boost all the flavors. Olive oil coats the squash for roasting. Freshly grated nutmeg adds warmth and depth, lifting the dish from simple to extraordinary. Using these fresh, quality ingredients will make your butternut squash gnocchi with sausage a savory delight. Each component plays a vital role in creating a comforting and delicious meal. Enjoy the process of cooking and the wonderful aromas that fill your kitchen! {{ingredient_image_2}} - Preheat your oven to 400°F (200°C). - Take a baking sheet and line it with parchment paper for easy cleanup. - Place the butternut squash cubes on the sheet. - Drizzle with extra-virgin olive oil, then sprinkle with sea salt and black pepper. - Toss the squash until it is evenly coated. - Roast in the oven for about 25 minutes. - Look for tender squash with a light caramelization on the edges. Roasting brings out the sweetness in the squash. You want it soft and slightly charred for the best flavor. - Grab a large mixing bowl and mash the roasted squash with a fork or potato masher. - Stir in the creamy ricotta cheese until well combined. - Crack in the large egg and add the freshly grated nutmeg. - Mix everything thoroughly to create a smooth mixture. - Gradually add the all-purpose flour, a little at a time. - Keep mixing until the dough forms a soft, workable mass. The dough should not stick too much to your hands. If it feels too sticky, add more flour. - Lightly flour your work surface to prevent sticking. - Take a portion of the dough and roll it into a rope about 1/2 inch thick. - Cut the rope into 1-inch pieces to form gnocchi. - For texture, press the back of a fork against each piece. Shaping the gnocchi is fun and easy. The fork marks help the sauce cling better when you serve them. - How to check dough consistency Your dough should feel soft and smooth. If it sticks to your hands, add a bit more flour. If it feels too dry, you may need a splash of water or an extra egg. - Rolling techniques for even pieces Roll the dough gently into a rope. Aim for about 1/2 inch thick. Use a light touch to keep it even. Cut into 1-inch pieces for uniform cooking. Press a fork on each piece for texture. - Timing for cooking gnocchi and sausage Cook the gnocchi first. It takes about 2-3 minutes in boiling water. Start the sausage while the gnocchi cooks. This way, both will be ready at the same time. - How to avoid water splatter When adding gnocchi to boiling water, drop them in gently. Use a slotted spoon to avoid splashes. This keeps your kitchen clean and safe. - Best garnishes to enhance flavor Top your dish with fresh sage leaves and a sprinkle of Parmesan cheese. A drizzle of olive oil adds richness. Black pepper gives a nice kick. - Recommended side dishes for a complete meal Serve with a light salad or roasted veggies. Garlic bread also pairs well. These sides balance the rich flavors of the gnocchi and sausage. Pro Tips Use Fresh Sage: Opt for fresh sage leaves instead of dried for a more vibrant flavor profile in your dish. Don’t Overwork the Dough: Mix the gnocchi dough just until combined to avoid tough gnocchi. It should be soft and slightly sticky. Test Gnocchi Before Cooking: Boil a small piece of gnocchi first to check the texture. It should float to the top when ready. Customize Your Sausage: Try different types of sausage, such as spicy or sweet, to tailor the dish to your taste preferences. {{image_4}} If you want to switch things up, try using different proteins. Chicken or turkey can replace the Italian sausage. These meats add a lighter taste while keeping the dish hearty. For a vegan option, swap the ricotta cheese with tofu or a vegan cream cheese. Use plant-based sausage to keep the flavor strong without meat. You can change the taste of your gnocchi by adding herbs or spices. Fresh thyme or rosemary works well with butternut squash. Spice it up with crushed red pepper for heat or smoked paprika for depth. Experiment with sauces too. Instead of using a simple drizzle of olive oil, try a creamy Alfredo or a tangy marinara. Each sauce offers a new twist on the dish. Using seasonal vegetables can enhance your gnocchi. In fall, add roasted Brussels sprouts or kale. During spring, fresh peas or asparagus can lighten the meal. You can also adapt this dish for holidays. Serve it with a side of roasted root vegetables for Thanksgiving. Or, top it with toasted walnuts for a festive touch during winter gatherings. To store leftovers, place the gnocchi and sausage in an airtight container. Keep it in the refrigerator. This way, it stays fresh longer. It can last for about three days. Make sure to check for any off smells before eating. Freezing uncooked gnocchi is easy. First, lay the gnocchi in a single layer on a baking sheet. Make sure they don’t touch each other. Freeze them for about one hour. Once frozen, transfer them to a freezer bag. They can last for up to three months in the freezer. To reheat frozen meals, simply place the frozen gnocchi in boiling water. Cook them until they float. This usually takes about 3-5 minutes. For the sausage, heat it in a skillet until hot. Combine them together and enjoy! Leftover gnocchi and sausage can be transformed into new dishes. Try adding them to a hearty soup. They also work great in a baked casserole with cheese and veggies. Another idea is to toss them in a salad with fresh greens. These options help reduce waste while keeping meals interesting. You can mix and match flavors for fun new meals. Don’t hesitate to get creative with your leftovers! You can tell gnocchi is ready when it floats. It usually takes about 2-3 minutes. When the gnocchi rise to the top of the boiling water, they are done. You should check them to ensure they are tender. If they are still hard, give them another minute. Cooking gnocchi is quick, so stay close! Yes, you can prepare gnocchi in advance. After shaping them, place the gnocchi on a floured baking sheet. Make sure they do not touch each other. You can store them in the fridge for a day or two. If you want to keep them longer, freeze the uncooked gnocchi. Just remember to freeze them in a single layer first. Once they are frozen, you can move them to a bag. This way, you can enjoy them anytime! Butternut squash gnocchi pairs well with many sides. You can serve it with a fresh salad to balance the rich flavors. A simple arugula salad with lemon dressing works great. You might also enjoy garlic bread for a comforting touch. Another idea is to add steamed vegetables like broccoli or green beans. These sides will make your meal even more delightful! Butternut squash gnocchi combines rich flavors and simple steps. We explored key ingredients, from squash to sausage, and shared tips for perfect results. Remember, gnocchi cooking is about timing and texture. You can customize with different proteins or herbs too. Store leftovers safely and use fresh ideas for future meals. With these tricks in hand, you can create a delicious dish that impresses everyone at the table. Enjoy the cooking journey, and don't hesitate to experiment with this wonderful recipe!
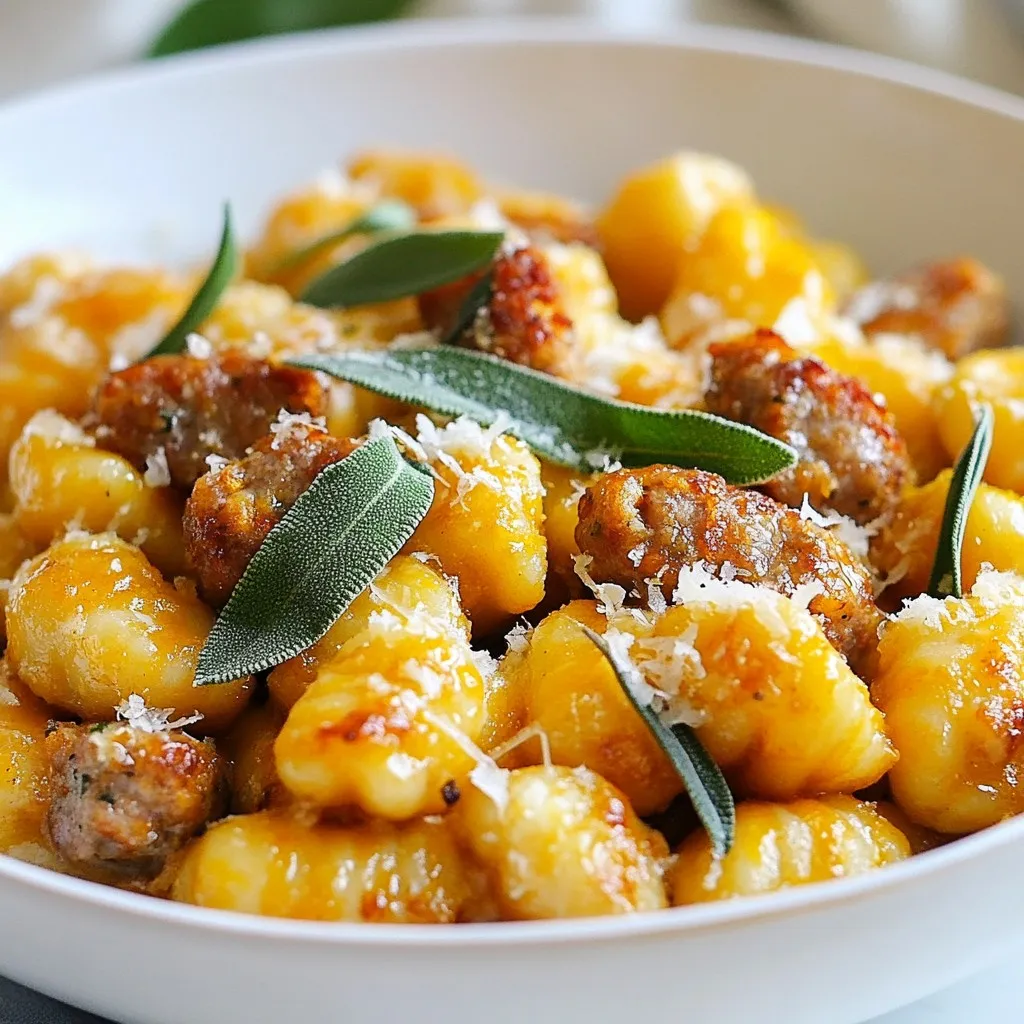
Butternut Squash Gnocchi with Sausage Savory Delight
Are you ready to embark on a flavor journey with Butternut Squash Gnocchi and Sausage? This dish combines the sweetness of squash with savory sausage,
- 2 boneless, skinless chicken breasts, diced into bite-sized pieces - 1 cup orzo pasta - 2 tablespoons balsamic vinegar - 1 cup cherry tomatoes, halved - 1 bell pepper (choose red or yellow), diced - 1 medium zucchini, diced - 2 cups fresh spinach, roughly chopped For this dish, the chicken is the star. It cooks fast and stays juicy. Orzo pasta adds a nice, chewy texture. The balsamic vinegar gives a sweet and tangy kick that brightens the meal. Fresh vegetables like cherry tomatoes, bell peppers, and zucchini add color and crunch. Spinach adds a healthy touch and looks great on the plate. - 1 tablespoon extra virgin olive oil - 1 teaspoon garlic powder - 1 teaspoon dried Italian herbs (like basil and oregano) - Salt and freshly ground black pepper to taste - Grated Parmesan cheese for serving (optional) Olive oil is key for sautéing the chicken. Garlic powder brings a warm flavor that everyone loves. Dried Italian herbs add depth, making each bite flavorful. Don’t forget to season with salt and pepper to enhance all the tastes. If you want to elevate this dish, sprinkle some grated Parmesan cheese on top before serving. It adds creaminess and a savory touch that makes it extra special. {{ingredient_image_2}} First, I heat 1 tablespoon of extra virgin olive oil in a large skillet over medium heat. Once the oil is hot, I add 2 diced boneless, skinless chicken breasts. I season the chicken with a teaspoon of garlic powder, salt, freshly ground black pepper, and dried Italian herbs. I cook the chicken for about 6 to 8 minutes, stirring occasionally. The chicken should become golden brown and fully cooked. After cooking the chicken, I add 1 cup of halved cherry tomatoes, 1 diced bell pepper, and 1 diced medium zucchini to the skillet. I let these cook for about 4 to 5 minutes. This time allows the vegetables to soften and release their tasty juices. Next, I stir in 1 cup of orzo pasta and 2 tablespoons of balsamic vinegar. I make sure to mix everything well to combine the flavors. Then, I carefully pour in 4 cups of water. I increase the heat to bring it to a gentle boil. Once it boils, I reduce the heat to low and cover the skillet. I let it simmer for about 10 to 12 minutes, stirring occasionally, until the orzo is cooked al dente and mostly absorbs the liquid. Once the orzo is cooked, I toss in 2 cups of roughly chopped spinach. I stir until the spinach wilts down. I taste the dish and adjust the seasoning with more salt and black pepper if needed. To serve, I recommend topping it with freshly grated Parmesan cheese for extra flavor. To ensure your chicken cooks evenly, cut it into small, bite-sized pieces. This helps the chicken cook through without drying out. When you sauté it, make sure to move the pieces around in the pan. This keeps them from sticking and helps them brown nicely. For perfect orzo texture, keep an eye on the cooking time. Orzo cooks fast, so check it often. You want it to be tender but still firm to the bite, known as al dente. When you add the orzo to the skillet, stir it well with the other ingredients. This helps it absorb the flavors. You can change up the flavor by trying different seasonings. Instead of garlic powder, try fresh garlic or shallots for a more robust taste. You can also swap dried Italian herbs for fresh herbs like basil or parsley. Both options add a burst of flavor. For extra toppings, consider adding a sprinkle of red pepper flakes for heat. You can also top the dish with freshly chopped herbs, like basil or parsley, for a fresh finish. If you want more texture, add toasted pine nuts or sliced almonds before serving. Pro Tips Marinating Chicken: For enhanced flavor, marinate the diced chicken in balsamic vinegar and herbs for at least 30 minutes before cooking. Vegetable Variations: Feel free to add or substitute vegetables based on seasonality or preference, such as mushrooms or asparagus. Cooking Orzo: Monitor the orzo closely while it cooks; if it absorbs too much liquid, add a splash of water to keep it creamy. Serving Suggestions: Pair this dish with a light salad or crusty bread for a complete meal experience. {{image_4}} You can easily swap the chicken for different proteins. Chicken thighs add more flavor and stay juicy. Rotisserie chicken is an easy choice for a quick meal. If you want a vegetarian option, try using tofu. Cubed tofu soaks up flavors well. Chickpeas are another great choice. They add protein and a nice texture to the dish. Feel free to change up the veggies based on the season. In the summer, use fresh zucchini and bell peppers. In the fall, add butternut squash or Brussels sprouts for a heartier dish. Mixing and matching colors makes your meal pop. Bright vegetables like red, orange, and green look great together. Aim for a rainbow on your plate for both taste and nutrition. If you need gluten-free options, replace the orzo with gluten-free pasta. Look for orzo made from rice or corn. You can also make a low-carb version by using cauliflower rice. This change keeps the dish light but still satisfying. Enjoy the same flavors while staying true to your diet choice. To store leftovers, let the dish cool down first. Place it in an airtight container. This step helps keep out air and moisture, maintaining quality. You can store the Balsamic Chicken Orzo Skillet in the fridge for up to three days. When you're ready to enjoy it again, just reheat it on the stove or in the microwave until hot. If you want to freeze this dish, allow it to cool completely. Then, portion it into freezer-safe bags or containers. Remove as much air as possible before sealing. You can freeze it for up to three months. When you're ready to eat it, take it out of the freezer. Thaw it in the fridge overnight for even heating. To reheat, warm it on the stove or microwave. Add a splash of water if it seems dry during reheating. This helps bring back the creamy texture of the orzo. Can I make this recipe ahead of time? Yes, you can prepare this dish ahead of time. Cook the chicken and veggies, then cool them down. Store in the fridge for up to three days. When ready to eat, reheat it on the stove, adding a splash of water. What can I substitute for orzo pasta? You can use other small pasta types like couscous or ditalini. Quinoa is also a great gluten-free choice. Just adjust the cooking time based on the pasta you choose. How do I know when the chicken is fully cooked? Check the chicken for a golden brown color and no pink inside. The internal temperature should reach 165°F. Use a meat thermometer for best results. Can I use dried herbs instead of fresh? Yes, dried herbs work well. They have a stronger flavor, so use about one-third of the amount of fresh herbs. This keeps the taste bright and balanced. What sides pair well with Balsamic Chicken Orzo Skillet? A fresh garden salad or steamed green beans go great with this dish. You can also serve crusty bread to soak up the sauce. Can I serve this dish cold? Yes, you can serve it cold as a pasta salad. Just chill it in the fridge for a few hours, and enjoy! This blog post covered the essentials of making a flavorful Balsamic Chicken Orzo Skillet. We explored main ingredients, including chicken and fresh veggies. I shared step-by-step instructions, cooking tips, and variations to suit different diets. This dish is versatile and easy to store. In conclusion, experimenting with flavors and ingredients will keep this recipe exciting. Enjoy creating a meal that your family loves!
Balsamic Chicken Orzo Skillet Flavorful Easy Meal
Looking for a quick and delicious meal? This Balsamic Chicken Orzo Skillet is your answer! With juicy chicken, vibrant veggies, and tender orzo, it’s a