Dinner

- 4 fresh salmon fillets (approximately 6 ounces each) I love using fresh salmon fillets for this dish. They have a rich taste and a firm texture. The fillets should be about 6 ounces each. This size helps them cook evenly and stay moist. - 1/4 cup pure honey - 3 tablespoons low-sodium soy sauce - 4 cloves garlic, finely minced - 1 tablespoon fresh ginger, finely grated - 2 teaspoons sesame oil - 1 tablespoon rice vinegar - Salt and freshly ground black pepper, to taste The marinade is where the magic happens. I mix honey with soy sauce for sweetness and depth. Garlic and ginger add a nice kick. Sesame oil brings a nutty taste, while rice vinegar adds a hint of tang. Don’t forget to season with salt and pepper to enhance the flavors. - 2 green onions, thinly sliced (for garnish) - Sesame seeds, for garnish Garnishes make the dish pop! I sprinkle sliced green onions on top for color and crunch. A few sesame seeds add a nice finish and extra texture. These simple touches make the dish look and taste gourmet. {{ingredient_image_2}} To start, grab a medium-sized mixing bowl. In this bowl, whisk together these ingredients: - 1/4 cup pure honey - 3 tablespoons low-sodium soy sauce - 4 cloves garlic, finely minced - 1 tablespoon fresh ginger, finely grated - 2 teaspoons sesame oil - 1 tablespoon rice vinegar - A pinch of salt and freshly ground black pepper Make sure everything blends well into a smooth mixture. This marinade will give your salmon a tasty kick. Now, take your fresh salmon fillets and place them in a shallow dish or a resealable plastic bag. Pour the marinade over the salmon. Make sure each fillet gets a good coat. Seal the bag or cover the dish tightly. Let it sit in the fridge to marinate for at least 30 minutes. For a stronger flavor, let it marinate for up to 2 hours. Next, preheat your air fryer to 400°F (200°C). This should take about 5 minutes. After the salmon has marinated, take it out of the marinade. Let any extra marinade drip off. Do not throw away the leftover marinade; you will use it later! Place the salmon fillets in the air fryer basket. Arrange them in a single layer, with space between each piece. If your air fryer is small, you may need to cook in batches. Air fry the salmon at 400°F for about 8-10 minutes. It’s done when the fish is opaque and flakes easily with a fork. While the salmon cooks, pour the leftover marinade into a small saucepan. Heat it over medium heat until it simmers. Cook for about 2-3 minutes, stirring to avoid sticking. This will thicken the marinade. Once the salmon is cooked, drizzle the thickened marinade over the fillets. This adds flavor and gives a nice glaze. To finish, sprinkle freshly chopped green onions and sesame seeds on top. Serve the salmon on a plate with steamed veggies or rice for a bright meal. Enjoy! To get the best flavor, mix the marinade well. Use a medium bowl. Combine honey, soy sauce, minced garlic, grated ginger, sesame oil, and rice vinegar. Add a pinch of salt and pepper. Whisk until smooth. Marinate the salmon for at least 30 minutes. For more flavor, marinate for up to 2 hours. This helps the salmon soak up all the tasty goodness. Preheat your air fryer to 400°F (200°C). This step is key for even cooking. For crispy edges, don’t overcrowd the basket. Place the fillets in a single layer. If your air fryer is small, cook in batches. Air fry for 8-10 minutes. The salmon should be opaque and flake easily. This technique gives you moist fish without drying it out. To serve, choose a sleek plate. Place the salmon fillets carefully. Add steamed veggies or fluffy rice on the side. This creates a colorful dish. Top the salmon with sliced green onions and sesame seeds. For a final touch, add a sprig of fresh cilantro or parsley. This makes your meal look as good as it tastes! Pro Tips Marination Time: For the best flavor, marinate the salmon for at least 1 hour. If you have the time, letting it marinate for up to 2 hours will deepen the taste even more. Check Doneness: Keep an eye on the salmon as it cooks. It’s done when it flakes easily with a fork and has a slightly opaque appearance. Overcooking can dry it out. Use Fresh Ingredients: Fresh garlic and ginger will elevate the flavor of your marinade. Avoid using pre-minced products for the best results. Serving Suggestions: Pair your honey garlic salmon with a side of steamed broccoli or jasmine rice to balance the sweetness of the glaze. {{image_4}} You can swap honey for other sweeteners. Maple syrup works well and adds a unique flavor. Agave nectar is another option that keeps the dish sweet and light. If you prefer a lower-calorie choice, try using stevia or monk fruit sweetener. Each gives a different taste and can still balance the garlic and soy sauce. If you like some spice, add chili flakes or sriracha to your marinade. This gives the dish a nice kick. You can also mix in some finely chopped jalapeños or serrano peppers for extra heat. Adjust the amount based on your spice level. This addition can turn a sweet dish into a sweet and spicy delight. While salmon is fantastic, you can try other fish. Cod, trout, or tilapia are great choices. Each fish has a different texture, but they all soak up the marinade well. Cooking times may vary, so check the fish for doneness. Flaky fish will tell you when it’s ready. You can refrigerate leftover salmon. Place it in an airtight container. It will stay fresh for up to three days. Make sure to cool it to room temperature before storage. This keeps the texture nice and firm. You can also cover it tightly with plastic wrap if you prefer. Enjoy those tasty bites later! Freezing salmon is easy. Wrap each piece tightly in plastic wrap. Then, place them in a freezer-safe bag. Remove as much air as you can. This helps prevent freezer burn. You can freeze honey garlic salmon for up to three months. When you're ready, simply thaw it in the fridge overnight. Reheating salmon is simple. Use the air fryer for best results. Preheat your air fryer to 350°F (175°C). Place the salmon inside and heat for about 5 to 7 minutes. This keeps it moist and tasty. You can also use the microwave, but it may dry out. Place a damp paper towel over the salmon if you choose this method. This helps keep it juicy. Yes, you can use frozen salmon. Just make sure to thaw it first. You can do this overnight in the fridge or use the microwave on defrost. Once thawed, you can follow the marinating steps just like with fresh salmon. Look for a few signs to know when your salmon is done. The flesh should turn opaque and flake easily with a fork. If you have a food thermometer, aim for an internal temperature of 145°F (63°C). This ensures the salmon is safe to eat and perfectly tender. You have many tasty options! Serve the salmon with steamed vegetables like broccoli or green beans. Fluffy rice or quinoa pairs well too. For a fresh touch, add a simple salad with mixed greens and a light dressing. Yes, you can use tamari or coconut aminos as a soy sauce alternative. Both options bring a similar flavor. If you want a gluten-free option, tamari is great. Coconut aminos is a bit sweeter, so adjust the honey if needed. You can marinate the salmon for at least 30 minutes. For deeper flavor, marinate it for up to 2 hours. Just remember not to go overboard, as too long can affect the texture. You now know how to make delicious Air Fryer Honey Garlic Salmon. We discussed fresh salmon, the marinade, and garnishes. I shared step-by-step instructions to make it perfect. Tips helped improve the taste and look. You learned variations and how to store leftovers safely. In summary, enjoy your tasty salmon dish with ease. Try different flavors and share with friends. Cooking can be fun and rewarding!
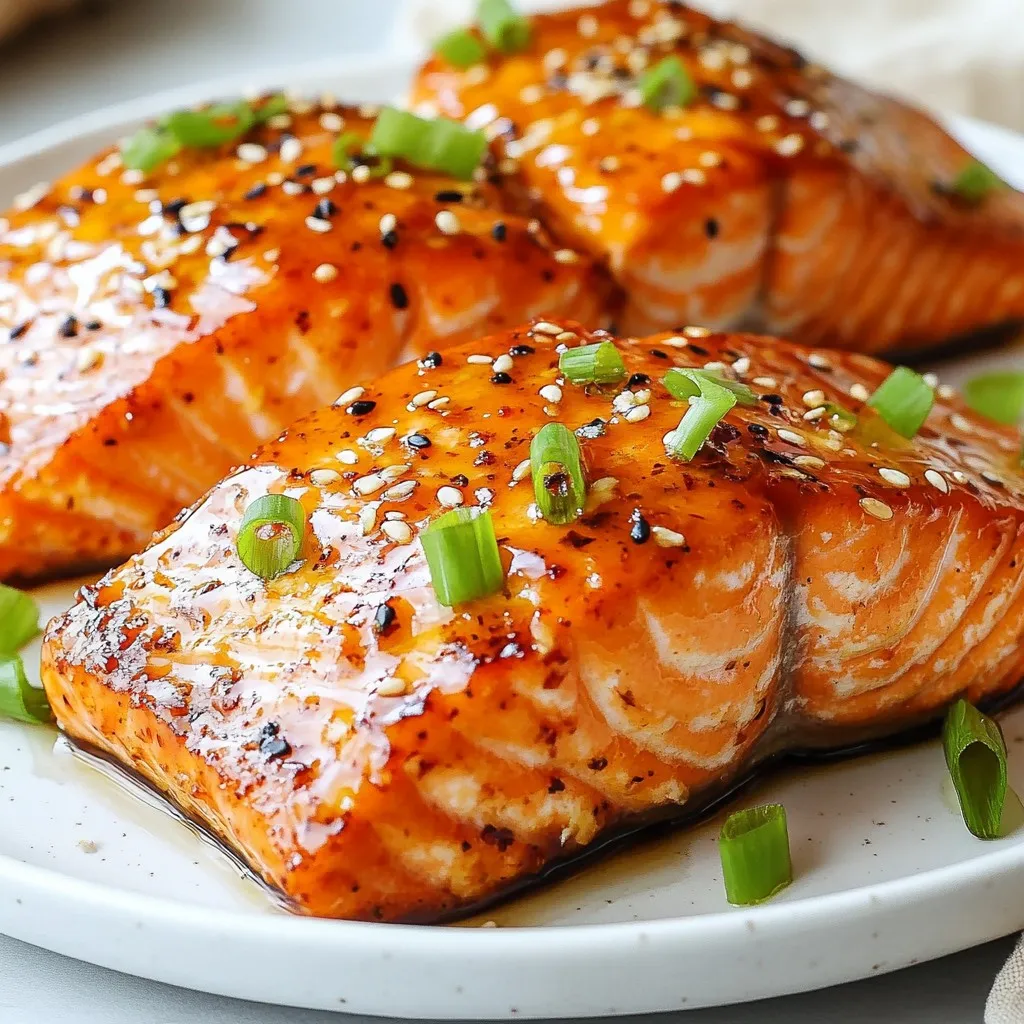
Air Fryer Honey Garlic Salmon Simple and Flavorful Dish
Craving a meal that’s both simple and bursting with flavor? You’ll love making Air Fryer Honey Garlic Salmon. This dish is quick, healthy, and incredibly
To make Minute Taco Rice Bowls, gather these items: - 1 cup instant brown rice - 1 can (15 oz) black beans, rinsed and drained - 1 cup corn (frozen or canned) - 1 cup diced tomatoes (fresh or canned) - 1 ripe avocado, diced - 1 cup shredded cheddar cheese - 1 packet taco seasoning (store-bought or homemade) - 1 tablespoon olive oil - 1 teaspoon freshly squeezed lime juice - Salt and pepper to taste You can swap ingredients to fit your taste or diet. Try: - Quinoa instead of rice for a protein boost. - Chickpeas instead of black beans for a different flavor. - Fresh lime zest for a zesty kick instead of juice. - Use a spicy taco seasoning for extra heat. Garnishes add flair and flavor to your bowls. Consider adding: - Fresh cilantro leaves for a burst of freshness. - Lime wedges to squeeze over the dish. - Sliced jalapeños for some spice. - Sour cream or Greek yogurt for creaminess. {{ingredient_image_2}} To start, grab a medium saucepan. Bring 1.5 cups of water to a boil. Once boiling, stir in 1 cup of instant brown rice. Cover the pot and remove it from the heat. Let it sit for about 5 minutes. This time helps the rice absorb the water and fluff up perfectly. Next, take a skillet and heat 1 tablespoon of olive oil over medium heat. Add the rinsed and drained black beans along with 1 cup of corn. Stir the mixture often, cooking for about 3 to 5 minutes. You want everything to be heated through and nice and warm. Now it's time to add flavor! Toss in 1 cup of diced tomatoes and 1 packet of taco seasoning. Mix everything well. Let it simmer for another 2 to 3 minutes. This step lets the flavors blend nicely. Taste the mixture and adjust it with salt, pepper, and a teaspoon of freshly squeezed lime juice as needed. To save time, use instant brown rice. It cooks fast and is healthy. Rinse the black beans before adding them to the skillet. This step removes excess salt. Warm the corn in the same skillet. It blends well with the beans. Mix the tomatoes and taco seasoning in the last minutes. This method keeps the flavors fresh. Add lime juice right before serving. It brightens all the flavors in the bowl. If you want more heat, stir in some diced jalapeños. You can also use spicy taco seasoning. Consider adding a dash of hot sauce for an extra kick. Fresh herbs like cilantro add freshness and depth. Choose colorful bowls for a fun look. Layer the ingredients neatly for a great display. You could set up a topping bar. Let everyone customize their bowls. Serve with lime wedges on the side. This allows guests to add their own zesty twist. A sprinkle of cilantro on top makes it pop! Pro Tips Use Fresh Ingredients: Opt for fresh tomatoes and avocados to enhance the flavor and nutritional value of your taco rice bowls. Customize Your Protein: For added protein, consider including grilled chicken, ground beef, or tofu to make the dish heartier. Layer Flavors: Experiment with additional spices or hot sauce in your black bean and corn mixture for an extra kick. Meal Prep Friendly: Prepare the rice and black bean mixture in advance for a quick and easy meal during busy weekdays. {{image_4}} You can easily make this dish vegetarian or vegan. Simply skip the cheese or use a plant-based option. You can add more veggies like bell peppers or zucchini. These add color and taste. You can also use quinoa instead of rice for a great protein boost. If you want to add protein, ground turkey or chicken works well. Cook it in the skillet before adding the beans. You can also use shrimp or tofu for a tasty twist. For a quick fix, try canned tuna or shredded rotisserie chicken. These add flavor and make your meal heartier. Salsa can change the whole dish. Try mango salsa for a sweet kick. If you like heat, use a spicy salsa or fresh jalapeños. You can also drizzle on ranch or a creamy dressing. A squeeze of lime juice adds freshness to any salsa. Experiment with your favorites to make each bowl unique. After you enjoy your Minute Taco Rice Bowls, store any leftovers in an airtight container. Keep the rice and toppings separate if possible. This helps maintain the texture and taste of each ingredient. You can keep them in the fridge for up to three days. If you mix everything, it may get soggy quickly. You can freeze the rice mixture and beans for later use. Place them in freezer-safe bags or containers. Make sure to remove as much air as you can. This step helps prevent freezer burn. You can freeze the mixture for up to three months. However, I recommend freezing the rice and toppings separately for the best results. To reheat, just take out what you need. You can microwave the rice mixture in a bowl. Heat it for about 1 to 2 minutes, stirring halfway through. For the rice, you can add a splash of water to keep it moist. If you prefer, you can also reheat it on the stovetop over low heat. Stir regularly until it warms up. Enjoy your meal as if it was fresh! Yes, you can use instant white rice. It cooks faster than brown rice. Just follow the package directions for water and cooking time. The taste will be slightly different, but it will still be delicious. White rice tends to be softer and less nutty than brown rice. If you want a healthier option, stick with brown rice when you can. To add heat, use spicy taco seasoning or add chopped jalapeños. You can also mix in some hot sauce or diced green chilies. Fresh chopped cilantro adds a bold flavor too. If you really love spice, use a dash of cayenne pepper in the mix. Remember, start small, then taste and adjust as needed. You can try sour cream or Greek yogurt for creaminess. Shredded lettuce adds crunch and freshness. Sliced olives bring a nice briny flavor. For a tangy twist, add pico de gallo or salsa. You can also add pickled red onions for a pop of color and taste. Don't forget to mix and match to find your favorite combo! In this blog post, we explored how to create a delicious taco rice bowl. We covered essential ingredients, like rice, beans, and toppings. Next, I detailed step-by-step instructions for cooking and mixing. I also shared tips on quick cooking and ways to enhance flavor. Variations, like vegetarian options, offer more choices. Finally, I provided storage tips to keep leftovers fresh. You now have a solid foundation. Enjoy making your taco rice bowl your own!
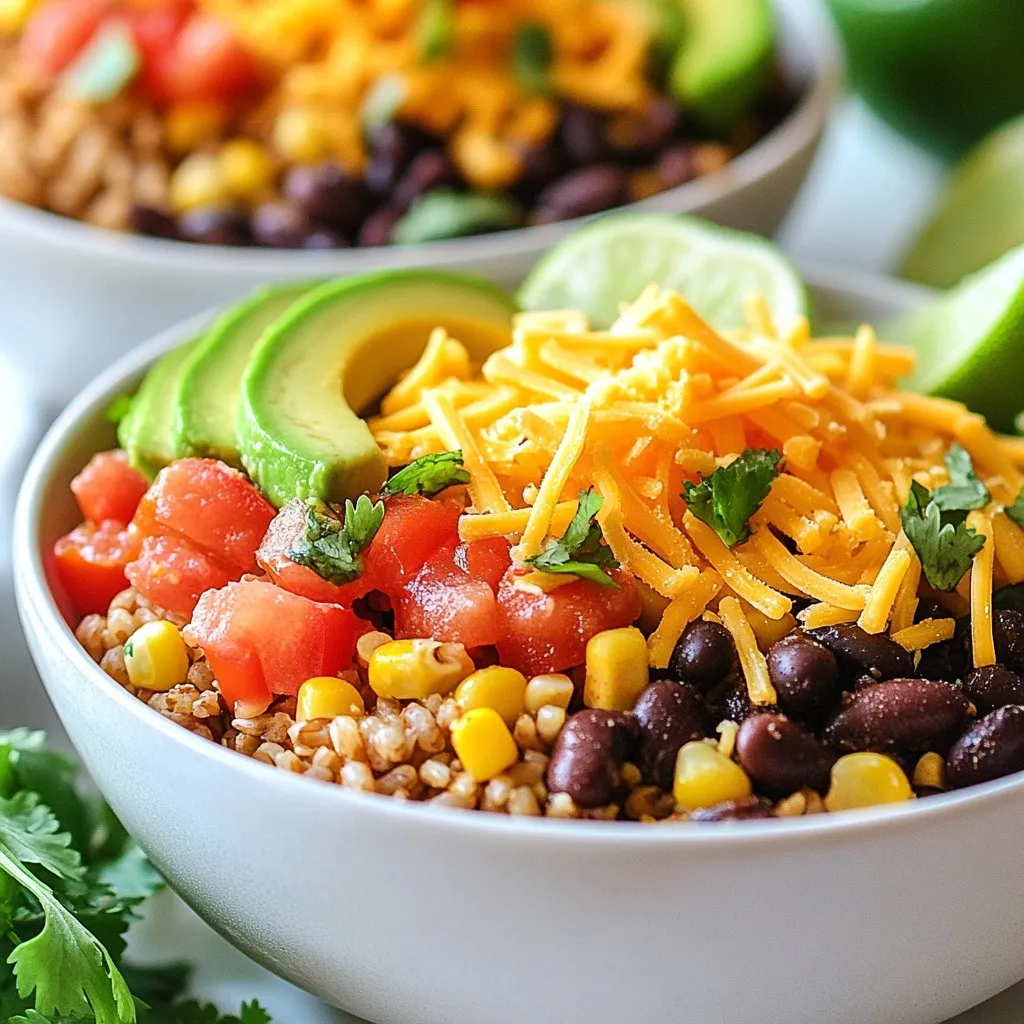
Minute Taco Rice Bowls Quick and Flavorful Meal
Craving a quick, tasty meal? My Minute Taco Rice Bowls fit the bill! You’ll whip these up in no time, using simple ingredients you probably
For these tasty wraps, you will need the following main ingredients: - 2 boneless, skinless chicken breasts - 1/4 cup teriyaki sauce - 1 tablespoon sesame oil - 1 cup bell peppers (a mix of red, yellow, and green), thinly sliced - 1/2 cup carrots, julienned - 1/4 cup red cabbage, finely shredded - 4 large whole wheat tortillas - 1/4 cup fresh cilantro, chopped - 1/4 cup green onions, chopped These ingredients combine to create a flavorful meal that pleases everyone. You can customize your wraps with these optional ingredients: - Sriracha or chili flakes for extra heat - Avocado slices for creaminess - Cucumber ribbons for freshness - Spinach leaves for added crunch If you need substitutes, you can use chicken thighs instead of breasts. Try tamari sauce if you prefer a gluten-free option. Each wrap packs a punch with nutrition. Here's a quick look: - Calories: About 300 per wrap - Protein: 25 grams from chicken - Carbs: 30 grams from tortillas and veggies - Fats: 10 grams mainly from sesame oil Teriyaki chicken wraps are a balanced meal option. Enjoy them for lunch or dinner! {{ingredient_image_2}} First, take two boneless, skinless chicken breasts. Place them in a bowl. Pour in 1/4 cup of teriyaki sauce. Mix well to coat the chicken fully. Cover the bowl and let it sit for at least 30 minutes at room temperature. For a better taste, refrigerate it for up to one hour. This helps the chicken absorb the flavor. Next, heat 1 tablespoon of sesame oil in a non-stick skillet over medium heat. Once hot, add the marinated chicken breasts. Cook each side for about 6 to 7 minutes. Check that the chicken reaches an internal temperature of 165°F (75°C). It should have a nice glaze from the teriyaki sauce. After cooking, remove the chicken from the skillet. Let it rest for a few minutes. This helps keep it juicy. Slice the chicken into thin strips for easy layering. In the same skillet, add 1 cup of thinly sliced bell peppers and 1/2 cup of julienned carrots. Stir-fry for 3 to 4 minutes. You want them soft but still crunchy. Now, grab 4 large whole wheat tortillas. Lay each tortilla flat on a clean surface. Start by layering the sliced chicken strips on each tortilla. Next, add the stir-fried vegetables and 1/4 cup of finely shredded red cabbage. Top with 1/4 cup of chopped cilantro and 1/4 cup of chopped green onions. If you like heat, drizzle some Sriracha or sprinkle chili flakes on top. To wrap, start at one end of the tortilla. Roll it tightly while tucking in the sides toward the center. This keeps the filling inside. Slice each wrap in half diagonally for a nice look and easier eating. Serve the wraps warm, or wrap them in foil for a quick lunch! To cook chicken just right, start with marinating. Use teriyaki sauce for flavor. Let the chicken sit for at least 30 minutes. If possible, refrigerate it for an hour. This helps the meat soak up the taste. When cooking, use medium heat. Sauté each side for 6-7 minutes until the chicken reaches 165°F. Always let the chicken rest before slicing. This keeps it juicy. For the best veggies, heat sesame oil in your pan. Add the bell peppers and carrots. Cook them for about 3-4 minutes. You want them soft yet still crunchy. Stir often to keep them from burning. The colors should be bright. This makes your wraps look tasty and fresh. How you serve your wraps matters. Place them on a wooden platter for a rustic look. Garnish with extra cilantro and lime wedges. This adds color and freshness. Cut the wraps in half diagonally for easy eating. This also shows off the colorful filling inside. These small details make your meal more appealing. Enjoy sharing these wraps with friends and family! Pro Tips Marinating Time: For the best flavor, marinate the chicken for at least 1 hour in the refrigerator; this allows the teriyaki sauce to penetrate deeply. Vegetable Crunch: Stir-fry the vegetables just until they are tender-crisp to maintain their vibrant color and crunchiness in the wraps. Tortilla Warmth: Warm the tortillas in a dry skillet for a few seconds on each side before wrapping; this makes them more pliable and easier to roll. Presentation: Serve the wraps cut diagonally on a wooden platter, garnished with lime wedges and extra cilantro for an appealing presentation. {{image_4}} You can easily make a vegetarian version of teriyaki wraps. Start by replacing chicken with tofu or tempeh. - Ingredients: - 1 block of firm tofu or tempeh - 1/4 cup teriyaki sauce - Use the same vegetables as in the chicken wrap. To prepare, press the tofu to remove extra water. Cut it into strips and marinate it in teriyaki sauce for 30 minutes. After marinating, sauté it until golden brown. Follow the same steps to assemble your wrap. While teriyaki sauce is a favorite, you can mix it up! Here are some tasty options: - Soy Sauce: A classic flavor that works well. - Hoisin Sauce: Adds a sweet and thick touch. - Peanut Sauce: Gives a rich, nutty flavor. Feel free to experiment. Each sauce can change the whole taste of your wrap! You can add fun fillings to make your wraps even better. Here are some ideas: - Avocado: Creamy and rich, it balances the flavors. - Cucumber: Adds crunch and freshness. - Mango: Sweetness pairs nicely with teriyaki. Mix and match these fillings to create your perfect wrap. Enjoy the fun of making a meal just the way you like it! To store your leftover teriyaki chicken wraps, let them cool first. Place each wrap in a single layer in an airtight container. Use parchment paper between layers if stacking. This keeps them fresh and prevents sogginess. Store in the fridge for up to three days. To reheat, unwrap the wrap from any foil or plastic. Place it in a microwave-safe dish. Heat for about one to two minutes, or until warm. If you prefer a crispy wrap, use a skillet. Heat it over medium heat for about three to four minutes on each side. This method keeps the wrap crispy and tasty. If you want to freeze your wraps, make them without any fresh herbs or sauces. Wrap them tightly in plastic wrap, then place them in a freezer bag. They can stay good for up to three months. When ready to eat, thaw in the fridge overnight before reheating. This keeps them fresh and delicious for later enjoyment. You can marinate chicken in teriyaki sauce for 30 minutes at room temperature. For more flavor, refrigerate it for up to 1 hour. This gives the chicken time to soak in the sauce and become tender. The longer it marinates, the more flavor it gains, but do not marinate it for too long. Over-marinating can make the chicken mushy. Yes, you can make teriyaki chicken wraps ahead of time. Prepare the chicken and veggies, then wrap them up. Store them in the fridge for up to a day. When you are ready to eat, just unwrap and enjoy. If you want to keep them fresh, wrap each one in foil. This keeps them tasty and easy to grab for lunch. Teriyaki chicken wraps go well with many sides. You can serve them with a crisp salad or some steamed rice. Here are some great choices: - Edamame pods - Cucumber salad - Sweet potato fries - Miso soup These sides add taste and texture. Feel free to mix and match to find your favorite pairings! Teriyaki chicken wraps are easy and fun to make. You learned about key ingredients, from chicken to sauces. I shared tips for cooking chicken perfectly and sautéing veggies right. We explored yummy variations, including a vegetarian option. Proper storage and reheating keep your wraps fresh for later. Enjoy your delicious teriyaki wraps! Explore new flavors and share with friends. Make them your own!
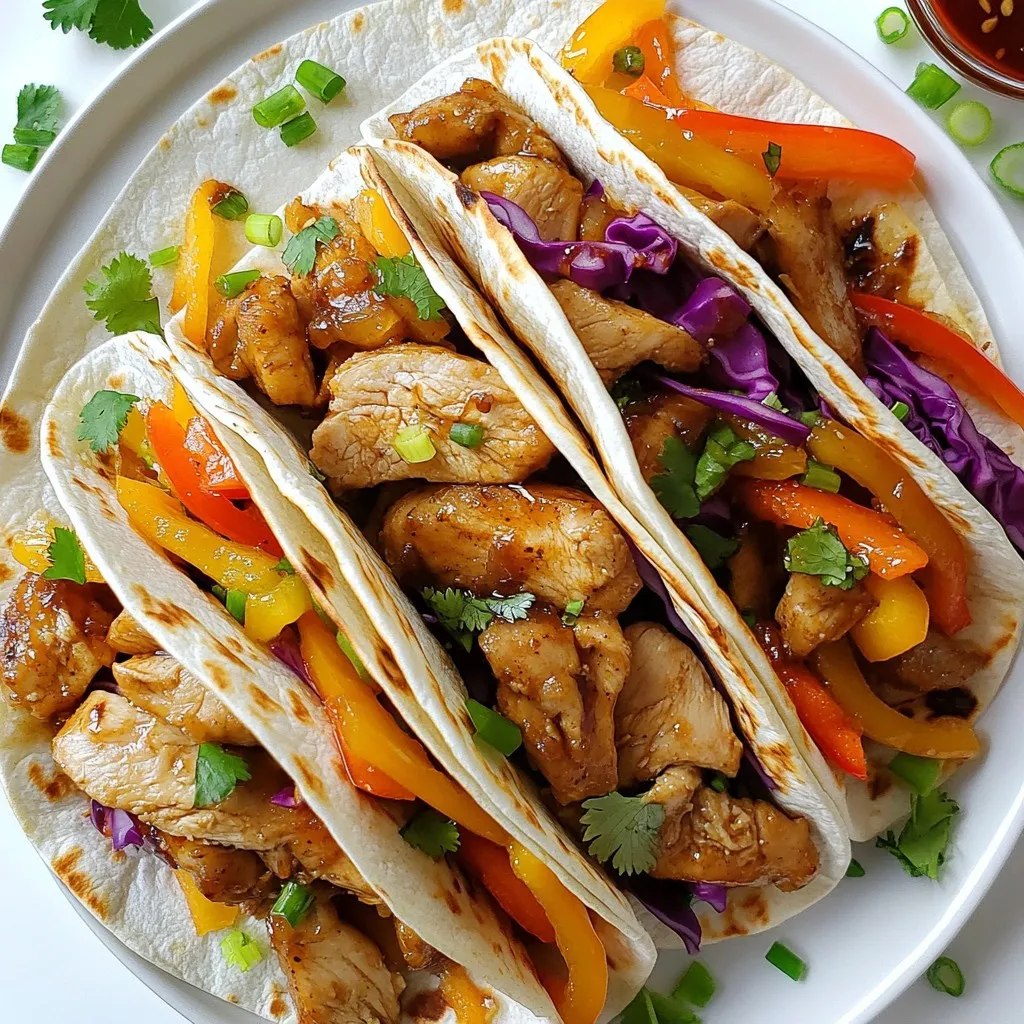
Teriyaki Chicken Wraps Quick and Tasty Meal Idea
Are you looking for a quick and tasty meal idea? Teriyaki Chicken Wraps are perfect for busy days and delicious enough to please the whole
- 2 boneless, skinless chicken breasts, diced - 1 large sweet potato, peeled and cubed - 1 cup brown rice - 2 cups vegetable broth - 1 red bell pepper, diced - 1 cup black beans, rinsed and drained - 2 tablespoons olive oil - 1 teaspoon ground cumin - 1 teaspoon smoked paprika - Salt and freshly cracked pepper to taste - 1 ripe avocado, sliced - Fresh cilantro, chopped - Lime wedges When I make Chicken & Sweet Potato Rice Bowls, I enjoy using fresh ingredients. The chicken breast provides lean protein. Sweet potatoes add natural sweetness and fiber. Brown rice brings a hearty base. Vegetable broth enhances the rice with flavor. I also add red bell pepper for crunch and color. Black beans boost protein and fiber. Olive oil keeps everything moist and adds richness. The spices, cumin and smoked paprika, give a warm depth to the chicken. For toppings, I love creamy avocado slices. Fresh cilantro adds a burst of flavor. Lime wedges bring a zesty kick. This combination not only looks great but tastes amazing too! {{ingredient_image_2}} Bringing to a Boil Start by adding 1 cup of brown rice and 2 cups of vegetable broth to a medium-sized pot. Place it on high heat and bring it to a boil. You will see bubbles forming, which means it's time to lower the heat. Simmering Time Once boiling, reduce the heat to low. Cover the pot with a lid and let it simmer. This will take about 30-35 minutes. Keep an eye on it to ensure the liquid absorbs fully. Fluffing the Rice After the rice is tender, remove the pot from heat. Use a fork to fluff the rice gently. This will make the rice light and airy. Set it aside while you prepare the rest of the dish. Preheating the Oven While the rice cooks, preheat your oven to 425°F (220°C). This high heat will help caramelize the sweet potatoes. Seasoning and Arranging In a large bowl, combine the cubed sweet potatoes with 1 tablespoon of olive oil. Add salt and pepper to taste. Toss them until they are well coated, then spread them out on a baking sheet. Roasting Time Roast the sweet potatoes in the oven for about 25-30 minutes. Halfway through, turn the sweet potatoes to ensure even cooking. They should be tender and lightly caramelized when done. Heating the Skillet In a large skillet, heat the remaining tablespoon of olive oil over medium heat. Make sure the oil is hot before adding the chicken. Cooking Time and Seasoning Now, add 2 diced chicken breasts to the skillet. Sauté for about 6-8 minutes. Stir occasionally until the chicken turns golden brown and is cooked through. Season it with ground cumin, smoked paprika, salt, and pepper. Mix well to coat the chicken. Adding Vegetables After the chicken is cooked, add 1 diced red bell pepper and 1 cup of rinsed black beans to the skillet. Stir everything together and cook for an additional 3-5 minutes. The bell pepper should soften slightly. - Spice Adjustments: You can change the spice level. Add more cumin or paprika for heat. If you want less spice, use less or skip them. Try adding garlic powder or chili flakes for new flavors. - Vegetable Variations: Mix in different veggies. Zucchini, spinach, or corn can add color and taste. Use what you have on hand or what's in season for the best flavor. - Additional Toppings: Toppings make your bowl special. Try crumbled feta or sliced radishes for crunch. A dollop of sour cream can add creaminess too. - Ensuring Tender Chicken: Use medium heat when cooking chicken. This keeps it juicy. Don’t overcrowd the pan; cook in batches if needed. Let the chicken rest after cooking to keep it moist. - Perfectly Roasted Sweet Potatoes: Cut sweet potatoes into even pieces. This helps them cook evenly. Toss them with oil and seasonings before roasting. Flip them halfway for even browning. - Fluffy Rice Every Time: Rinse brown rice before cooking. This removes excess starch. Use the right water-to-rice ratio. Once cooked, fluff with a fork to keep it light and airy. - Layering Ingredients: Create layers in your bowl. Start with rice, then add sweet potatoes, chicken, and veggies. This looks appealing and makes each bite special. - Garnishing Ideas: Fresh cilantro adds color and flavor. Use lime wedges for a zesty touch. Sliced avocado not only looks great but adds creaminess. - Serving Suggestions: Serve in clear bowls to show off the colors. Place lime wedges on the side. It invites everyone to add their own zest. This makes each bowl unique and personal. Pro Tips Marinate the Chicken: For even more flavor, consider marinating the chicken in olive oil, lime juice, and spices for at least 30 minutes before cooking. This will enhance the taste and tenderness of the chicken. Customize Your Veggies: Feel free to swap in your favorite seasonal vegetables. Zucchini, corn, or spinach would be excellent additions for added nutrition and flavor. Batch Cooking: Make a larger batch of this recipe and store individual portions in the freezer. It's a great meal prep option for busy weeks ahead! Perfectly Roasted Sweet Potatoes: To ensure your sweet potatoes roast evenly, make sure they are all cut into uniform 1-inch cubes, and avoid overcrowding the baking sheet. {{image_4}} You can swap chicken for turkey or tofu. Turkey gives a leaner option. Tofu is great for a plant-based meal. Both options work well with the same spices. For turkey, cook it like chicken. For tofu, press it to remove extra water. Then, sauté until golden. Grilling adds a nice smoky flavor. You can grill the chicken or turkey on medium-high heat. It takes about 6-8 minutes per side. Baking is another option. Preheat the oven to 400°F. Bake for 20-25 minutes until cooked through. Try quinoa or cauliflower rice instead of brown rice. Quinoa cooks fast and is packed with protein. Use 1 cup of quinoa and 2 cups of water. Cook for about 15 minutes. Cauliflower rice is a low-carb choice. Sauté it in a pan for about 5-7 minutes. If you prefer white rice, it’s easy to use. Just replace the brown rice with the same amount of white rice. White rice cooks faster, usually in 15-20 minutes. Adjust the water amount to 1.5 cups for every cup of rice. Adding citrus zest can brighten up the dish. A little lime or orange zest goes a long way. Fresh herbs like basil, parsley, or mint can give fresh notes. Consider using spices like chili powder or curry for a kick. Each choice will change the taste and make the meal unique. - Store the chicken and sweet potato rice bowls in airtight containers. - Keep the bowls in the fridge for up to four days. The best way to keep your meal fresh is to cool it down before storing. This helps stop bacteria from growing. - Divide the bowls into single servings. - Use freezer-safe containers or bags for storage. You can freeze these rice bowls for up to three months. Make sure to label them, so you know what’s inside. - Thaw in the fridge overnight for best results. - If you’re in a hurry, use the microwave on the defrost setting. Remember, never refreeze food once it’s been thawed. This keeps your meal safe and tasty. - Use the microwave for quick reheating. Heat for 1-2 minutes, stirring halfway. - For a crispier texture, reheat in the oven at 350°F for about 10-15 minutes. When reheating, add a splash of water or broth. This helps keep the rice moist and flavorful. Yes, you can make this dish ahead of time. Cook the rice, sweet potatoes, and chicken. Store them separately in airtight containers. You can keep them in the fridge for up to four days. When you are ready to eat, just reheat everything. This makes meal prep easy and saves time. You can use several substitutes for brown rice. Quinoa is a great option. It cooks quickly and adds protein. Cauliflower rice is also good if you want fewer carbs. White rice or farro are other choices. Each option brings a unique taste and texture. To make this dish vegetarian, skip the chicken. Use more beans instead. You can add chickpeas or lentils for protein. Also, increase the veggies, like zucchini or spinach. This adds color and flavor. You still get a hearty meal without meat. For toppings, sliced avocado is a must. It adds creaminess and healthy fats. Fresh cilantro brings brightness and flavor. Lime wedges are great for a zesty kick. You can also add sliced jalapeños for spice. These toppings make your bowls fun and tasty. This blog post shows how to make a tasty chicken and sweet potato rice bowl. You learned about the key ingredients, from chicken to spices. I shared step-by-step instructions to help you cook perfectly. You also gained tips on how to customize and store your dish. In the end, creating this meal is easy and fun. Make it your own by trying different proteins or grains. Enjoy your cooking adventure and savor every bite!
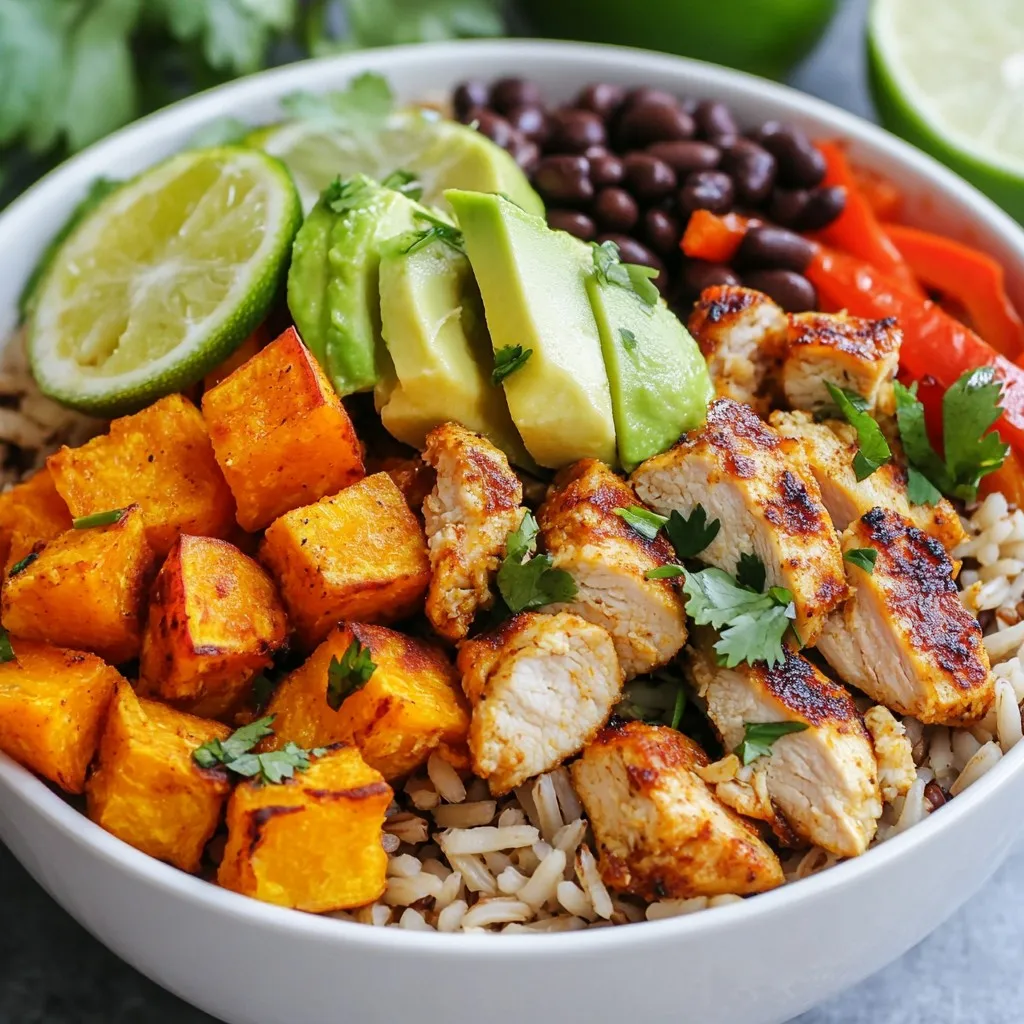
Chicken & Sweet Potato Rice Bowls Healthy Meal Prep
Are you looking for a healthy meal prep idea that’s both tasty and easy to make? Chicken and Sweet Potato Rice Bowls are your answer!
- 2 cups rotisserie chicken, shredded - 8 tostada shells - 1 cup black beans, rinsed and drained - 1 cup corn kernels, fresh or frozen - 1 ripe avocado, diced - 1 cup cherry tomatoes, halved - 1/2 cup red onion, finely chopped - 1 cup shredded lettuce - 1/2 cup crumbled queso fresco - 2 tablespoons fresh cilantro, chopped - Juice of 1 lime - 1 teaspoon chili powder - Salt and pepper to taste - Sour cream or Greek yogurt for serving (optional) These ingredients make the perfect base for your tostadas. The rotisserie chicken adds rich flavor and ease. Using black beans and corn gives you a nice texture. The fresh veggies like avocado and tomatoes bring brightness. Each topping adds a layer of flavor and color, making your dish beautiful and tasty. The lime juice and chili powder add zesty notes that enhance the overall taste. You can also adjust the seasonings to your liking. If you want extra creaminess, a dollop of sour cream or Greek yogurt is a great touch. {{ingredient_image_2}} - Preheat the oven to 350°F (175°C). - Crisp the tostada shells in the oven for 5-7 minutes. Watch them closely. They should turn golden and crunchy. - In a big bowl, mix 2 cups of shredded rotisserie chicken, 1 cup of rinsed black beans, and 1 cup of corn kernels. - Add the juice of 1 lime and 1 teaspoon of chili powder. - Season with a pinch of salt and pepper. Stir well until everything is combined. - Take a tostada shell and spread a generous amount of the chicken mixture on top. - Next, layer on diced avocado, halved cherry tomatoes, chopped red onion, and shredded lettuce. - Finish with crumbled queso fresco for a creamy touch. These steps will help you make tasty and colorful tostadas. Enjoy the bold flavors! - How to ensure tostadas are crispy: To make sure your tostadas stay crispy, bake them at 350°F for about 5-7 minutes. Watch them closely, so they don’t burn. A good tip is to space them out on the baking sheet. This allows hot air to flow around them, making them crispier. - Adjusting spice levels for different tastes: Spice levels can vary by taste. If you like mild flavors, use less chili powder. For a kick, add more chili powder or a few dashes of hot sauce. You can also mix in jalapeños for extra heat. Don’t forget to taste as you mix! - Presentation tips for a colorful platter: For a bright presentation, arrange the tostadas on a big platter. Use a mix of colors: green from avocado, red from tomatoes, and white from queso fresco. Add extra lime wedges and cilantro sprigs around the platter for a festive look. - Pairing ideas with drinks or sides: Tostadas pair well with many drinks. Try serving them with a cold soda, iced tea, or even a light beer. For sides, consider fresh fruit like watermelon or a simple green salad. These keep the meal light and refreshing! Pro Tips Use Fresh Ingredients: Fresh avocado and ripe tomatoes elevate the flavor and texture of your tostadas, making them more vibrant and delicious. Perfectly Crisp Tostadas: Keep a close eye on the tostada shells in the oven; even a minute too long can lead to burning. Aim for a golden brown color for the best crunch. Customize Your Toppings: Feel free to add or substitute toppings based on your preferences; jalapeños, olives, or different cheeses can add unique flavors. Make Ahead: The chicken mixture can be prepared in advance and stored in the fridge. Just assemble the tostadas when you're ready to serve for a quick meal. {{image_4}} You can switch up the protein in your tostadas. Instead of rotisserie chicken, try tofu. Tofu absorbs flavors well and adds protein. For a heartier option, use shredded beef. Beef adds a rich taste and pairs well with toppings. You can make tasty vegetarian tostadas too. Use black beans and corn as a filling. They add fiber and flavor. You can also try grilled vegetables like zucchini, bell peppers, and eggplant. These veggies bring a fresh taste and vibrant color. Changing the cheese or salsa can make a big difference. Try using cheddar or Monterey Jack cheese for a different taste. You can also add your favorite salsa for a kick. To enhance flavors, include spices like cumin or smoked paprika. Fresh herbs like cilantro or parsley add brightness too. These small changes can create a new flavor experience each time you make them. After you enjoy your tostadas, store any leftovers properly. Place leftover chicken mixture in an airtight container. Keep the chicken mixture and toppings separate. This way, the tostada shells stay crispy. Store the tostada shells in a cool, dry place. If you place them in the fridge, they may get soggy. To reheat tostada shells, preheat your oven to 350°F (175°C). Place the shells on a baking sheet. Heat them for about 5 minutes. This will make them crispy again. For the chicken mixture, warm it in a skillet over medium heat. Stir it often to heat evenly. You can also use the microwave. Heat it in 30-second bursts, stirring in between, until hot. You can freeze the chicken mixture for later use. Place it in a freezer-safe bag or container. Remove as much air as possible before sealing. Tostada shells do not freeze well once they are baked. If you want to freeze them, do it before baking. Just thaw and bake when you’re ready to enjoy. To keep tostadas crispy, store them in an airtight container. Avoid stacking them. If you need to reheat, place them in the oven at 350°F for a few minutes. This restores their crunch. Yes, you can prepare the chicken mixture ahead of time. Mix the shredded chicken, beans, corn, lime juice, chili powder, and seasonings. Store it in the fridge for up to two days. Just remember to assemble the tostadas when you're ready to eat. Each serving of Rotisserie Chicken Tostadas has around 400 calories. It provides protein, fiber, and healthy fats. The exact values depend on toppings and portion sizes. Each tostada has a good mix of nutrients, making it a balanced meal. To make gluten-free tostadas, use gluten-free tostada shells. Most corn tortillas are gluten-free. Check their labels to ensure they fit your dietary needs. This way, you can enjoy the dish without worries. Absolutely! Store-bought salsa works great as a topping. Choose one that you enjoy. This saves time and keeps your meal easy. Just remember to add fresh ingredients like avocado and cilantro for extra flavor! This blog post has shown you how to make delicious Rotisserie Chicken Tostadas. We covered essential ingredients, cooking steps, and tasty variations. You can enjoy crispy tostadas topped with chicken, beans, and fresh veggies. Remember to try different proteins or add layers of flavor with herbs and spices. Don't forget to store leftovers correctly and reheat for that perfect crunch. These tasty tostadas can fit any meal, making them a great choice for any day. Enjoy creating your own flavorful tostadas!
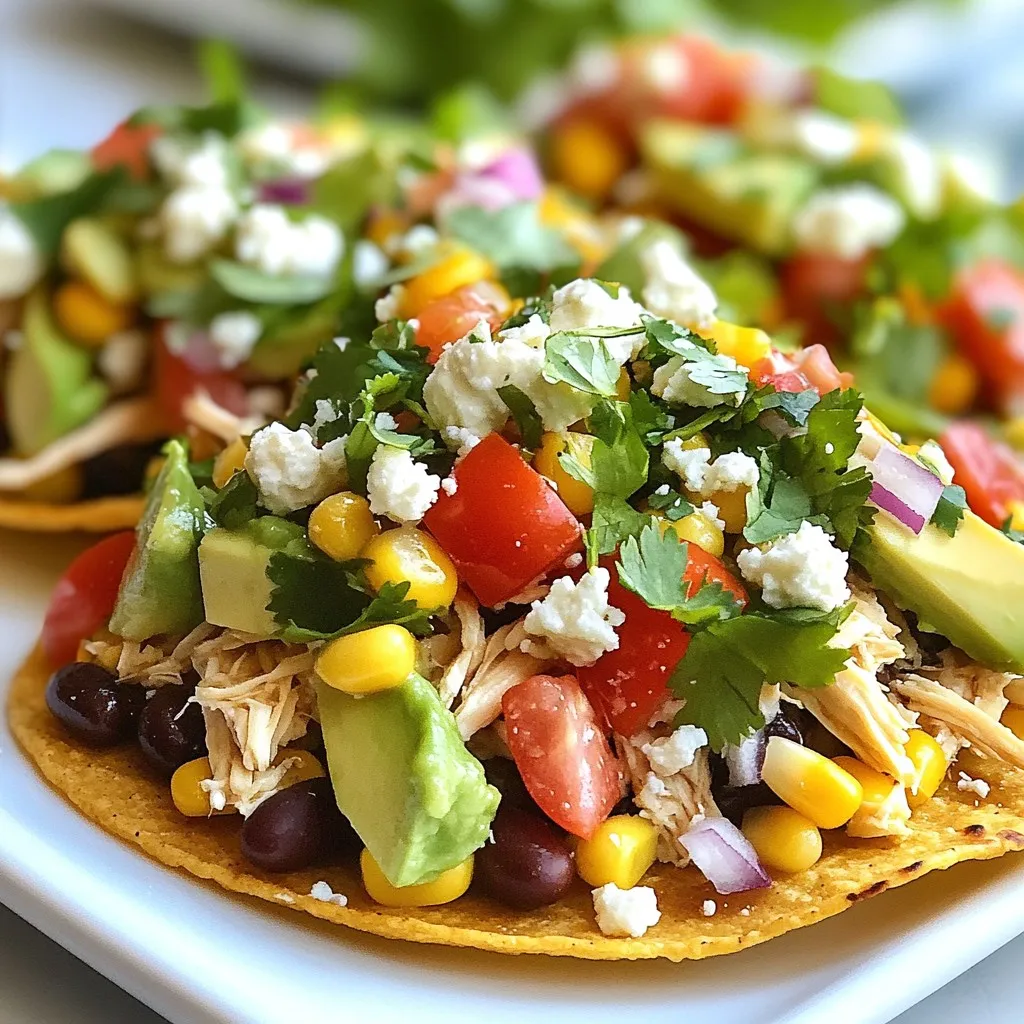
Rotisserie Chicken Tostadas Flavorful and Easy Recipe
Looking for a quick and tasty meal? Try these Rotisserie Chicken Tostadas! This easy recipe packs flavor and crunch in every bite. With simple ingredients
- Chicken breasts - Buttermilk - Panko breadcrumbs - Parmesan cheese - Seasonings (garlic powder, onion powder, salt, pepper) - Sandwich rolls - Romaine lettuce - Caesar dressing - Garnishes (black pepper, lemon wedges) You need the right mix of tasty items to make Crispy Chicken Caesar Sandwiches. Start with chicken breasts. They provide a juicy base. Next, grab buttermilk. Soaking the chicken in buttermilk makes it tender. For crunch, use panko breadcrumbs. They give a nice, crispy texture. Don't forget Parmesan cheese. It adds rich flavor to your breading. You will also need seasonings. Garlic powder and onion powder bring depth. Salt and pepper add warmth. For the sandwich, choose soft sandwich rolls. They hold everything together. Add some romaine lettuce for crunch and freshness. You can use Caesar dressing for that classic taste. Finally, use garnishes like black pepper and lemon wedges. They brighten up each bite. These ingredients come together to make a fantastic lunch. Enjoy mixing and matching flavors! {{ingredient_image_2}} Start by cutting the chicken breasts in half. This makes them thinner and helps them cook faster. Place the chicken fillets in a bowl and add the buttermilk. Make sure the chicken is fully covered. Cover the bowl and refrigerate for at least one hour. You can also marinate it overnight for extra flavor. In a shallow dish, mix the panko breadcrumbs with the grated Parmesan cheese. Add the garlic powder, onion powder, and a pinch of salt and pepper. Stir well to ensure all the seasonings are evenly blended. This mix will give your chicken a nice, crunchy coating. Heat a good amount of oil in a large skillet over medium-high heat. Once the oil is hot, carefully add the breaded chicken fillets. Cook them for about 4-5 minutes on each side until they turn golden brown. Use a meat thermometer to check that the chicken reaches an internal temperature of 165°F. While the chicken cooks, slice the sandwich rolls in half. You can toast them in another skillet or under a broiler if you want. On the bottom half of each roll, spread a tablespoon of Caesar dressing. Place the crispy chicken fillets on top, then add a handful of chopped romaine lettuce. Finish the sandwiches with more Caesar dressing on the lettuce. Sprinkle some freshly cracked black pepper on top. Serve the sandwiches on plates with lemon wedges on the side. The lemon juice adds a nice touch to each bite! Marinating the chicken is key. I suggest soaking the chicken for at least one hour. If you have more time, marinate overnight. This makes the chicken juicy and full of flavor. Pressing the breadcrumbs is very important. When you coat the chicken, press down firmly. This helps the breadcrumbs stick well. A good coat gives you that crispy crunch. Choose a Caesar dressing that you love. A good dressing makes a big difference. You can also try adding spices. A little cayenne pepper or smoked paprika can boost the taste. Consider adding fresh herbs, like parsley or basil. They add a pop of color and flavor. You could also sprinkle some extra Parmesan cheese for richness. Pair your sandwich with crispy fries or a fresh salad. A cold drink, like lemonade, goes great with this meal. For presentation, cut the sandwiches in half. This makes them easier to eat and looks nice on a plate. Add lemon wedges on the side for a zesty touch. Pro Tips Choose the Right Chicken: Opt for organic or free-range chicken breasts for better flavor and texture. Perfectly Crunchy Breading: Double-dip the chicken in buttermilk and breadcrumbs for an extra crispy coating. Let the Chicken Rest: After frying, let the chicken rest for a few minutes to retain its juiciness. Fresh Ingredients Matter: Use fresh romaine and high-quality Caesar dressing for the best flavor in your sandwiches. {{image_4}} You can switch out the chicken for turkey or tofu. Turkey gives a rich taste with fewer calories. It cooks well and stays juicy. Tofu is great if you want a plant-based option. Just press it to remove extra water, then marinate like chicken. Both options keep the sandwich tasty and fun. Adding avocado or bacon can change the game. Avocado makes it creamy and smooth. Try slicing it thin and layering it on top of the chicken. Bacon adds a crispy, salty crunch. Cook it until it’s nice and crispy. You can also experiment with dressings. Instead of Caesar, try ranch or a spicy aioli for a new twist. You can make this sandwich into a wrap or a salad. For a wrap, use a large tortilla. Spread the dressing, add chicken and veggies, then roll it up. It’s easy to grab and eat on the go! For a salad, chop the chicken and mix it with romaine, dressing, and toppings. This way, you enjoy the same great flavors while keeping it light. To keep your Crispy Chicken Caesar Sandwiches fresh, store them properly. Wrap each sandwich in plastic wrap or foil. You can also use an airtight container. Place them in the fridge. They will stay good for about 2 to 3 days. Make sure to separate the chicken from the lettuce and sauce. This prevents soggy bread. When reheating breaded chicken, keep it crispy. Use an oven for the best results. Preheat the oven to 375°F (190°C). Place the chicken on a baking sheet. Heat for about 10 to 15 minutes. This keeps the crust crunchy. You can also use a toaster oven. Avoid the microwave, as it makes the chicken soggy. Freezing is great for meal prep. You can freeze the chicken before cooking. Place the breaded chicken in a freezer bag. Remove as much air as possible. It can last up to 3 months. You can also freeze the cooked chicken. Just let it cool first. For best results, freeze the chicken and rolls separately. Assemble the sandwiches after thawing. You can marinate chicken in buttermilk for 1 hour to overnight. The longer, the better! It makes the chicken juicy and tender. If you're short on time, even an hour will help. Yes, you can prepare many parts ahead. Marinate the chicken the night before. You can also bread the chicken and store it in the fridge. Just cook it fresh when ready to serve. If you need a substitute for Caesar dressing, try ranch or blue cheese. You can also mix yogurt with garlic and lemon juice for a fresh taste. Each option gives a nice twist to the sandwich. Absolutely! Baking is a great option for a healthier choice. Preheat your oven to 425°F (220°C). Place the breaded chicken on a baking sheet and bake for about 20 minutes or until golden brown. Some tasty sides include crispy fries or a fresh green salad. You can also serve coleslaw for a crunchy contrast. Pair with chips for a fun twist. Enjoy your meal! In this blog post, I shared how to make a Crispy Chicken Caesar Sandwich. We covered essential ingredients, marination, and cooking methods. I also provided tips for flavor and presentation. Remember, you can customize your sandwich with different proteins and toppings. Proper storage and reheating will keep your meal tasty. Enjoy trying these recipes and making them your own!
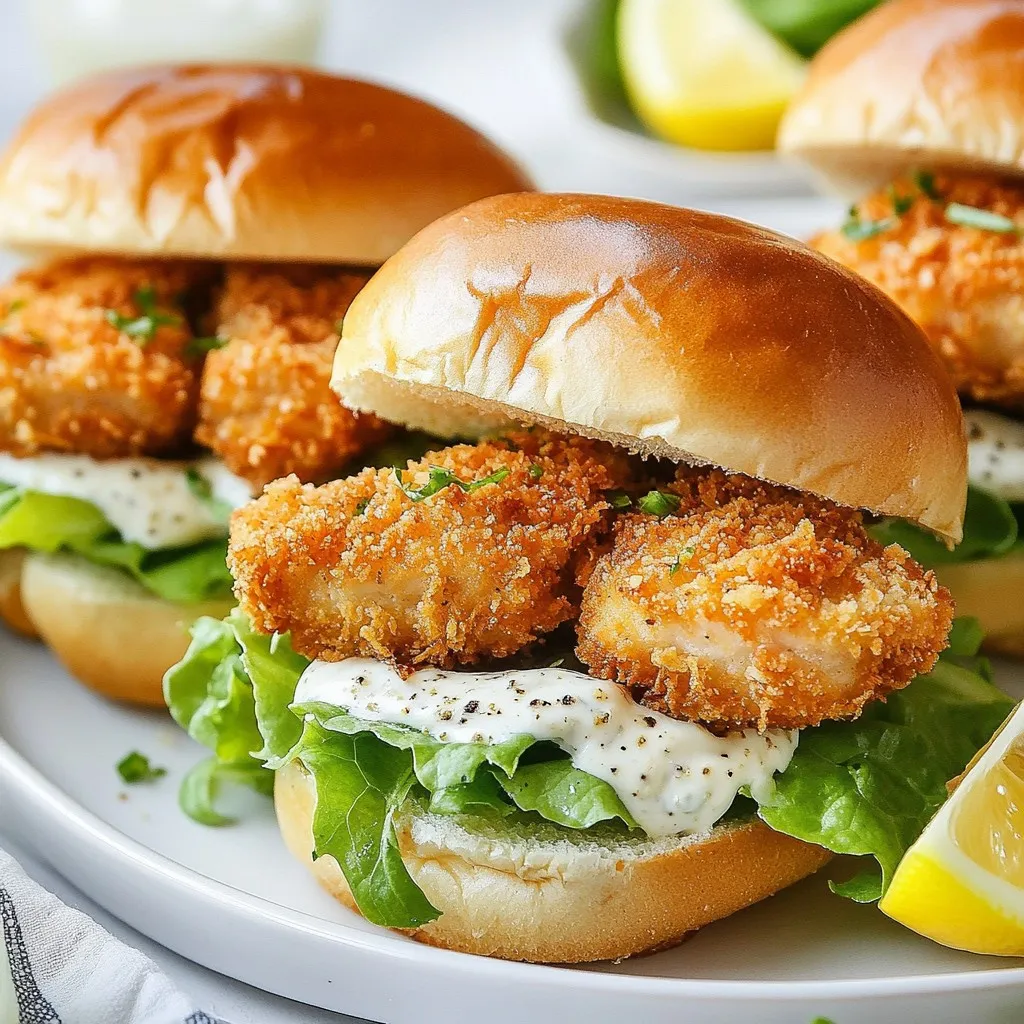
Crispy Chicken Caesar Sandwiches Great for Lunch
Are you craving a tasty and filling lunch? Crispy Chicken Caesar Sandwiches are your answer! This delicious sandwich features juicy chicken, crunchy romaine, and creamy
- 4 large round bread boules (single-serving size) - 2 cups cooked chicken breast, shredded - 2 cups fettuccine pasta (or your favorite pasta) - 1 cup heavy cream - 1 cup grated Parmesan cheese - 2 tablespoons unsalted butter - 2 cloves garlic, minced - Salt and pepper, to taste - Fresh parsley, chopped (for garnish) - 1/2 teaspoon nutmeg (optional, for an extra layer of flavor) When I make Chicken Alfredo Bread Bowls, I like to keep it simple. You can swap the chicken for cooked shrimp or tofu for a vegetarian option. For the pasta, any shape works well, like penne or rigatoni. If you want a lighter dish, use low-fat cream or a plant-based alternative like cashew cream. For seasoning, a pinch of red pepper flakes adds heat. You can also try fresh thyme or basil for a fresh taste. Don’t forget to save the tops of the bread bowls! They make a cute lid and add more bread goodness to your meal. Each ingredient adds its own charm, making this dish a flavorful comfort meal. {{ingredient_image_2}} First, preheat your oven to 375°F (190°C). This step is key for getting that perfect crust on the bread bowls. While your oven warms up, you can start cooking the pasta. Boil a large pot of water and add a pinch of salt. Cook the fettuccine until it is al dente, which means it should be firm but not hard. This usually takes about 8-10 minutes. Once done, drain the pasta and set it aside. Now, let’s make the bread bowls. Take your round bread boules and slice off the tops. This creates a lid for your bowls. Use a small knife or spoon to hollow out the insides. Leave about a 1-inch thick border around the edges. Be careful not to break the bread. Keep those tops; they will look great on your finished bowls. Next, it’s time to craft the Alfredo sauce. In a large skillet, melt two tablespoons of unsalted butter over medium heat. Add two minced garlic cloves and sauté for 1-2 minutes. Watch closely, as you don’t want the garlic to burn. After that, pour in one cup of heavy cream, stirring to combine. Bring this to a gentle simmer. Then, add one cup of grated Parmesan cheese and a pinch of nutmeg if you like. Stir until the cheese melts and the sauce thickens slightly. Season with salt and pepper to taste. In this step, stir in two cups of shredded cooked chicken. Make sure the chicken is well coated in the creamy Alfredo sauce. Add the drained fettuccine and mix everything together. You want an even distribution of chicken and pasta in the sauce. When filling the bread bowls, pack the mixture in gently. This ensures they hold their shape, but don’t overfill them. Place the filled bread bowls on a baking sheet. Bake them in your preheated oven for about 15-20 minutes. Keep an eye on them; you want the bread to be golden and slightly crispy on the outside. Once the bowls are done baking, take them out of the oven carefully. Garnish each bowl with fresh chopped parsley for a pop of color. If you want, place the tops back on the boules for a fun look. For a lovely presentation, serve the bowls on a rustic wooden board with a small salad on the side. Enjoy your meal! To make your Chicken Alfredo Bread Bowls shine, avoid a few common mistakes. - Don’t overcook the pasta. Cook it just until al dente. - Watch the garlic. Sauté it until golden, not burnt. - Be careful with salt. Add it slowly to taste. For more flavor, consider these enhancements: - Add nutmeg. Just half a teaspoon can elevate the sauce. - Try different cheeses. A mix of Parmesan and mozzarella adds creaminess. You can make parts of this meal ahead of time. - Cook the chicken and pasta a day before. - Prepare the Alfredo sauce and store it in the fridge. To reheat, gently warm the sauce on low heat. You can microwave the filled bread bowls. Heat them for about 2-3 minutes, but watch closely. Pair your Chicken Alfredo Bread Bowls with fresh sides. - A mixed green salad brings a nice crunch. - Garlic bread complements the meal perfectly. Consider a light vinaigrette to balance the creamy dish. Enjoy every bite! Pro Tips Use Fresh Ingredients: Always opt for fresh garlic and high-quality Parmesan cheese to enhance the flavor of your Alfredo sauce. Customize Your Pasta: Feel free to experiment with different types of pasta such as penne or rigatoni for a unique twist on this recipe. Don’t Overcook the Bread: Keep an eye on the bread bowls while baking to avoid them becoming too hard; they should be golden and slightly crispy. Make Extra Sauce: Prepare a bit more Alfredo sauce to drizzle on top before serving for an extra creamy finish. {{image_4}} You can swap out chicken for other proteins. Shrimp or turkey work great! For a vegetarian option, try using mushrooms or a mix of your favorite veggies. Pasta choices are also flexible. While fettuccine is classic, penne or even gluten-free pasta can shine. Just make sure to cook them al dente for a great bite! Experimenting with cheese can elevate your dish. Try adding mozzarella for a gooey texture or goat cheese for a tangy twist. You can also mix in different sauces. A dash of pesto or sun-dried tomato sauce can add a burst of flavor. Adding vegetables to your filling can boost nutrition. Spinach, bell peppers, or broccoli can brighten up your bread bowl. Just sauté them lightly before mixing them in. This way, you create a tasty and colorful meal! To store leftover Chicken Alfredo Bread Bowls, place them in an airtight container. This keeps them fresh and moist. You can also wrap each bowl in plastic wrap for extra protection. Make sure to store them in the fridge right after they cool down. Leftovers will last about 3 days. To maintain the bread's texture and flavor, avoid storing them in the fridge for too long. Bread can become soggy or stale. If you can, enjoy your bowls within the first two days for the best taste. For freezing, allow the Chicken Alfredo Bread Bowls to cool completely. Wrap each bowl tightly in plastic wrap, then place them in a freezer bag. This helps prevent freezer burn. You can freeze them for up to 2 months. When you're ready to eat, thaw the bowls in the fridge overnight. This keeps them safe and helps maintain their texture. To reheat, place the bowls on a baking sheet. Heat in a preheated oven at 350°F (175°C) for about 15-20 minutes. This method warms the filling and keeps the bread crispy. Avoid using the microwave, as it can make the bread chewy. Can I use a different type of bread? Yes, you can use other bread types. Try ciabatta or sourdough for a twist. Both add unique flavors and textures. How do I make the dish gluten-free? To make it gluten-free, use gluten-free pasta and bread. Many stores offer great options that taste good too. What can I substitute for heavy cream? You can use half-and-half or coconut cream as a substitute. Both can give a rich texture. How long can leftovers be stored in the fridge? Store leftovers in an airtight container for up to three days. Reheat gently to keep the bread soft. Can I prepare the filling ahead of time? Yes, make the chicken Alfredo filling a day early. Just store it in the fridge until you are ready to fill the bowls. What’s the best pasta to use for this recipe? Fettuccine is the classic choice for Alfredo. However, penne or rotini can work well too. How can I make a healthier version of Chicken Alfredo? Use whole wheat pasta and low-fat cream or milk. Add veggies like spinach or broccoli for extra nutrition. You learned how to make Chicken Alfredo Bread Bowls today. We covered ingredients, cooking steps, and variations. I shared tips for prep and serving to help you enjoy this dish. Remember, experimenting with flavors makes cooking fun. You can personalize it to fit your taste. With the right techniques, you will impress everyone. Now, go and create your own tasty bread bowls!
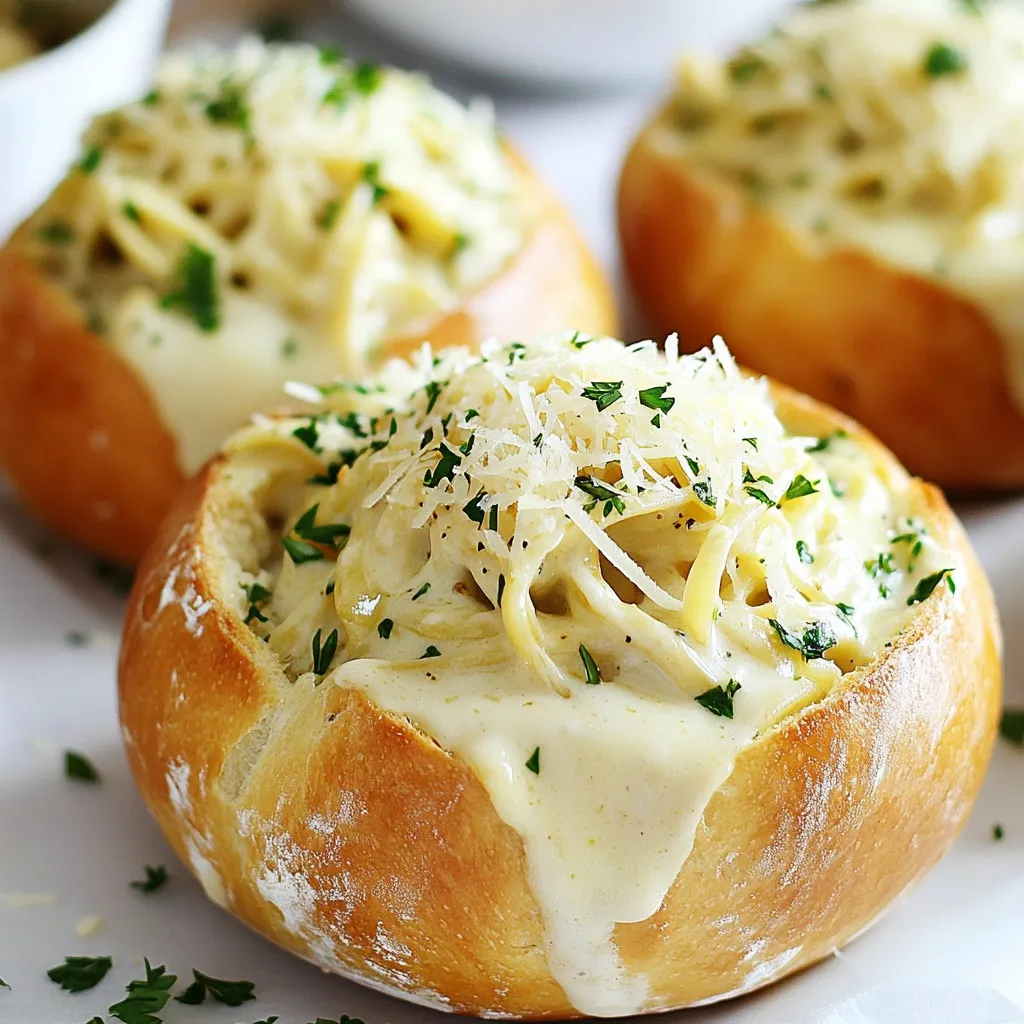
Chicken Alfredo Bread Bowls Flavorful Comfort Meal
If you’re craving a comfort meal, look no further—Chicken Alfredo Bread Bowls are here to save the day! These delicious bowls combine creamy Alfredo sauce,
- 2 cups butternut squash, peeled and cut into 1-inch cubes - 1 cup creamy ricotta cheese - 1 pound Italian sausage, casings removed The main stars of this dish are butternut squash, ricotta cheese, and Italian sausage. Butternut squash brings a sweet, nutty flavor. Ricotta adds creaminess, making the gnocchi soft. Italian sausage gives a savory taste that pairs well with the squash. - 2 cups all-purpose flour (plus additional for dusting) - 1 large egg - 1/4 cup fresh sage leaves, roughly chopped - 1/2 cup freshly grated Parmesan cheese All-purpose flour binds the dough, while the egg helps it hold shape. Fresh sage adds a lovely herbal note. Parmesan cheese enhances the flavor with its salty richness. - Sea salt and black pepper - 1 tablespoon extra-virgin olive oil - 1 teaspoon freshly grated nutmeg Seasoning is key. Sea salt and black pepper boost all the flavors. Olive oil coats the squash for roasting. Freshly grated nutmeg adds warmth and depth, lifting the dish from simple to extraordinary. Using these fresh, quality ingredients will make your butternut squash gnocchi with sausage a savory delight. Each component plays a vital role in creating a comforting and delicious meal. Enjoy the process of cooking and the wonderful aromas that fill your kitchen! {{ingredient_image_2}} - Preheat your oven to 400°F (200°C). - Take a baking sheet and line it with parchment paper for easy cleanup. - Place the butternut squash cubes on the sheet. - Drizzle with extra-virgin olive oil, then sprinkle with sea salt and black pepper. - Toss the squash until it is evenly coated. - Roast in the oven for about 25 minutes. - Look for tender squash with a light caramelization on the edges. Roasting brings out the sweetness in the squash. You want it soft and slightly charred for the best flavor. - Grab a large mixing bowl and mash the roasted squash with a fork or potato masher. - Stir in the creamy ricotta cheese until well combined. - Crack in the large egg and add the freshly grated nutmeg. - Mix everything thoroughly to create a smooth mixture. - Gradually add the all-purpose flour, a little at a time. - Keep mixing until the dough forms a soft, workable mass. The dough should not stick too much to your hands. If it feels too sticky, add more flour. - Lightly flour your work surface to prevent sticking. - Take a portion of the dough and roll it into a rope about 1/2 inch thick. - Cut the rope into 1-inch pieces to form gnocchi. - For texture, press the back of a fork against each piece. Shaping the gnocchi is fun and easy. The fork marks help the sauce cling better when you serve them. - How to check dough consistency Your dough should feel soft and smooth. If it sticks to your hands, add a bit more flour. If it feels too dry, you may need a splash of water or an extra egg. - Rolling techniques for even pieces Roll the dough gently into a rope. Aim for about 1/2 inch thick. Use a light touch to keep it even. Cut into 1-inch pieces for uniform cooking. Press a fork on each piece for texture. - Timing for cooking gnocchi and sausage Cook the gnocchi first. It takes about 2-3 minutes in boiling water. Start the sausage while the gnocchi cooks. This way, both will be ready at the same time. - How to avoid water splatter When adding gnocchi to boiling water, drop them in gently. Use a slotted spoon to avoid splashes. This keeps your kitchen clean and safe. - Best garnishes to enhance flavor Top your dish with fresh sage leaves and a sprinkle of Parmesan cheese. A drizzle of olive oil adds richness. Black pepper gives a nice kick. - Recommended side dishes for a complete meal Serve with a light salad or roasted veggies. Garlic bread also pairs well. These sides balance the rich flavors of the gnocchi and sausage. Pro Tips Use Fresh Sage: Opt for fresh sage leaves instead of dried for a more vibrant flavor profile in your dish. Don’t Overwork the Dough: Mix the gnocchi dough just until combined to avoid tough gnocchi. It should be soft and slightly sticky. Test Gnocchi Before Cooking: Boil a small piece of gnocchi first to check the texture. It should float to the top when ready. Customize Your Sausage: Try different types of sausage, such as spicy or sweet, to tailor the dish to your taste preferences. {{image_4}} If you want to switch things up, try using different proteins. Chicken or turkey can replace the Italian sausage. These meats add a lighter taste while keeping the dish hearty. For a vegan option, swap the ricotta cheese with tofu or a vegan cream cheese. Use plant-based sausage to keep the flavor strong without meat. You can change the taste of your gnocchi by adding herbs or spices. Fresh thyme or rosemary works well with butternut squash. Spice it up with crushed red pepper for heat or smoked paprika for depth. Experiment with sauces too. Instead of using a simple drizzle of olive oil, try a creamy Alfredo or a tangy marinara. Each sauce offers a new twist on the dish. Using seasonal vegetables can enhance your gnocchi. In fall, add roasted Brussels sprouts or kale. During spring, fresh peas or asparagus can lighten the meal. You can also adapt this dish for holidays. Serve it with a side of roasted root vegetables for Thanksgiving. Or, top it with toasted walnuts for a festive touch during winter gatherings. To store leftovers, place the gnocchi and sausage in an airtight container. Keep it in the refrigerator. This way, it stays fresh longer. It can last for about three days. Make sure to check for any off smells before eating. Freezing uncooked gnocchi is easy. First, lay the gnocchi in a single layer on a baking sheet. Make sure they don’t touch each other. Freeze them for about one hour. Once frozen, transfer them to a freezer bag. They can last for up to three months in the freezer. To reheat frozen meals, simply place the frozen gnocchi in boiling water. Cook them until they float. This usually takes about 3-5 minutes. For the sausage, heat it in a skillet until hot. Combine them together and enjoy! Leftover gnocchi and sausage can be transformed into new dishes. Try adding them to a hearty soup. They also work great in a baked casserole with cheese and veggies. Another idea is to toss them in a salad with fresh greens. These options help reduce waste while keeping meals interesting. You can mix and match flavors for fun new meals. Don’t hesitate to get creative with your leftovers! You can tell gnocchi is ready when it floats. It usually takes about 2-3 minutes. When the gnocchi rise to the top of the boiling water, they are done. You should check them to ensure they are tender. If they are still hard, give them another minute. Cooking gnocchi is quick, so stay close! Yes, you can prepare gnocchi in advance. After shaping them, place the gnocchi on a floured baking sheet. Make sure they do not touch each other. You can store them in the fridge for a day or two. If you want to keep them longer, freeze the uncooked gnocchi. Just remember to freeze them in a single layer first. Once they are frozen, you can move them to a bag. This way, you can enjoy them anytime! Butternut squash gnocchi pairs well with many sides. You can serve it with a fresh salad to balance the rich flavors. A simple arugula salad with lemon dressing works great. You might also enjoy garlic bread for a comforting touch. Another idea is to add steamed vegetables like broccoli or green beans. These sides will make your meal even more delightful! Butternut squash gnocchi combines rich flavors and simple steps. We explored key ingredients, from squash to sausage, and shared tips for perfect results. Remember, gnocchi cooking is about timing and texture. You can customize with different proteins or herbs too. Store leftovers safely and use fresh ideas for future meals. With these tricks in hand, you can create a delicious dish that impresses everyone at the table. Enjoy the cooking journey, and don't hesitate to experiment with this wonderful recipe!
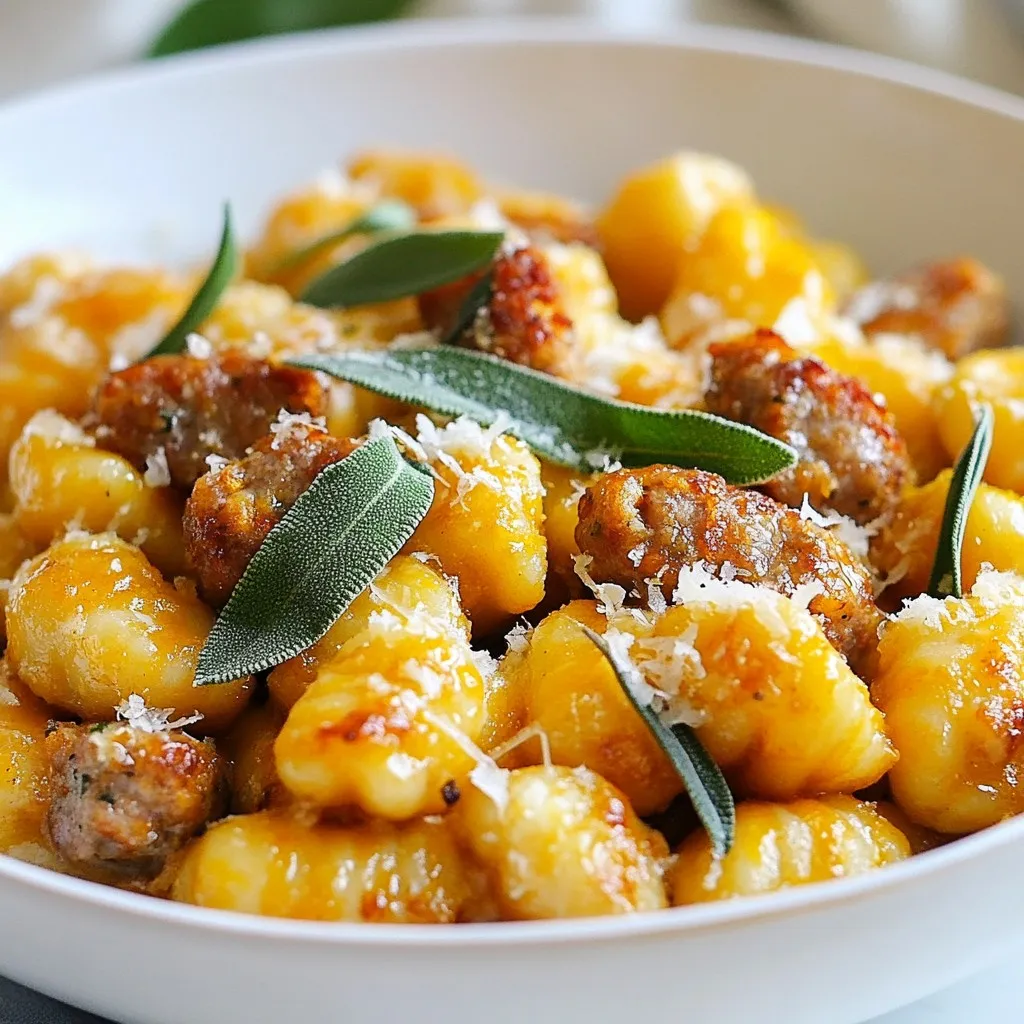
Butternut Squash Gnocchi with Sausage Savory Delight
Are you ready to embark on a flavor journey with Butternut Squash Gnocchi and Sausage? This dish combines the sweetness of squash with savory sausage,
- 2 boneless, skinless chicken breasts, diced into bite-sized pieces - 1 cup orzo pasta - 2 tablespoons balsamic vinegar - 1 cup cherry tomatoes, halved - 1 bell pepper (choose red or yellow), diced - 1 medium zucchini, diced - 2 cups fresh spinach, roughly chopped For this dish, the chicken is the star. It cooks fast and stays juicy. Orzo pasta adds a nice, chewy texture. The balsamic vinegar gives a sweet and tangy kick that brightens the meal. Fresh vegetables like cherry tomatoes, bell peppers, and zucchini add color and crunch. Spinach adds a healthy touch and looks great on the plate. - 1 tablespoon extra virgin olive oil - 1 teaspoon garlic powder - 1 teaspoon dried Italian herbs (like basil and oregano) - Salt and freshly ground black pepper to taste - Grated Parmesan cheese for serving (optional) Olive oil is key for sautéing the chicken. Garlic powder brings a warm flavor that everyone loves. Dried Italian herbs add depth, making each bite flavorful. Don’t forget to season with salt and pepper to enhance all the tastes. If you want to elevate this dish, sprinkle some grated Parmesan cheese on top before serving. It adds creaminess and a savory touch that makes it extra special. {{ingredient_image_2}} First, I heat 1 tablespoon of extra virgin olive oil in a large skillet over medium heat. Once the oil is hot, I add 2 diced boneless, skinless chicken breasts. I season the chicken with a teaspoon of garlic powder, salt, freshly ground black pepper, and dried Italian herbs. I cook the chicken for about 6 to 8 minutes, stirring occasionally. The chicken should become golden brown and fully cooked. After cooking the chicken, I add 1 cup of halved cherry tomatoes, 1 diced bell pepper, and 1 diced medium zucchini to the skillet. I let these cook for about 4 to 5 minutes. This time allows the vegetables to soften and release their tasty juices. Next, I stir in 1 cup of orzo pasta and 2 tablespoons of balsamic vinegar. I make sure to mix everything well to combine the flavors. Then, I carefully pour in 4 cups of water. I increase the heat to bring it to a gentle boil. Once it boils, I reduce the heat to low and cover the skillet. I let it simmer for about 10 to 12 minutes, stirring occasionally, until the orzo is cooked al dente and mostly absorbs the liquid. Once the orzo is cooked, I toss in 2 cups of roughly chopped spinach. I stir until the spinach wilts down. I taste the dish and adjust the seasoning with more salt and black pepper if needed. To serve, I recommend topping it with freshly grated Parmesan cheese for extra flavor. To ensure your chicken cooks evenly, cut it into small, bite-sized pieces. This helps the chicken cook through without drying out. When you sauté it, make sure to move the pieces around in the pan. This keeps them from sticking and helps them brown nicely. For perfect orzo texture, keep an eye on the cooking time. Orzo cooks fast, so check it often. You want it to be tender but still firm to the bite, known as al dente. When you add the orzo to the skillet, stir it well with the other ingredients. This helps it absorb the flavors. You can change up the flavor by trying different seasonings. Instead of garlic powder, try fresh garlic or shallots for a more robust taste. You can also swap dried Italian herbs for fresh herbs like basil or parsley. Both options add a burst of flavor. For extra toppings, consider adding a sprinkle of red pepper flakes for heat. You can also top the dish with freshly chopped herbs, like basil or parsley, for a fresh finish. If you want more texture, add toasted pine nuts or sliced almonds before serving. Pro Tips Marinating Chicken: For enhanced flavor, marinate the diced chicken in balsamic vinegar and herbs for at least 30 minutes before cooking. Vegetable Variations: Feel free to add or substitute vegetables based on seasonality or preference, such as mushrooms or asparagus. Cooking Orzo: Monitor the orzo closely while it cooks; if it absorbs too much liquid, add a splash of water to keep it creamy. Serving Suggestions: Pair this dish with a light salad or crusty bread for a complete meal experience. {{image_4}} You can easily swap the chicken for different proteins. Chicken thighs add more flavor and stay juicy. Rotisserie chicken is an easy choice for a quick meal. If you want a vegetarian option, try using tofu. Cubed tofu soaks up flavors well. Chickpeas are another great choice. They add protein and a nice texture to the dish. Feel free to change up the veggies based on the season. In the summer, use fresh zucchini and bell peppers. In the fall, add butternut squash or Brussels sprouts for a heartier dish. Mixing and matching colors makes your meal pop. Bright vegetables like red, orange, and green look great together. Aim for a rainbow on your plate for both taste and nutrition. If you need gluten-free options, replace the orzo with gluten-free pasta. Look for orzo made from rice or corn. You can also make a low-carb version by using cauliflower rice. This change keeps the dish light but still satisfying. Enjoy the same flavors while staying true to your diet choice. To store leftovers, let the dish cool down first. Place it in an airtight container. This step helps keep out air and moisture, maintaining quality. You can store the Balsamic Chicken Orzo Skillet in the fridge for up to three days. When you're ready to enjoy it again, just reheat it on the stove or in the microwave until hot. If you want to freeze this dish, allow it to cool completely. Then, portion it into freezer-safe bags or containers. Remove as much air as possible before sealing. You can freeze it for up to three months. When you're ready to eat it, take it out of the freezer. Thaw it in the fridge overnight for even heating. To reheat, warm it on the stove or microwave. Add a splash of water if it seems dry during reheating. This helps bring back the creamy texture of the orzo. Can I make this recipe ahead of time? Yes, you can prepare this dish ahead of time. Cook the chicken and veggies, then cool them down. Store in the fridge for up to three days. When ready to eat, reheat it on the stove, adding a splash of water. What can I substitute for orzo pasta? You can use other small pasta types like couscous or ditalini. Quinoa is also a great gluten-free choice. Just adjust the cooking time based on the pasta you choose. How do I know when the chicken is fully cooked? Check the chicken for a golden brown color and no pink inside. The internal temperature should reach 165°F. Use a meat thermometer for best results. Can I use dried herbs instead of fresh? Yes, dried herbs work well. They have a stronger flavor, so use about one-third of the amount of fresh herbs. This keeps the taste bright and balanced. What sides pair well with Balsamic Chicken Orzo Skillet? A fresh garden salad or steamed green beans go great with this dish. You can also serve crusty bread to soak up the sauce. Can I serve this dish cold? Yes, you can serve it cold as a pasta salad. Just chill it in the fridge for a few hours, and enjoy! This blog post covered the essentials of making a flavorful Balsamic Chicken Orzo Skillet. We explored main ingredients, including chicken and fresh veggies. I shared step-by-step instructions, cooking tips, and variations to suit different diets. This dish is versatile and easy to store. In conclusion, experimenting with flavors and ingredients will keep this recipe exciting. Enjoy creating a meal that your family loves!
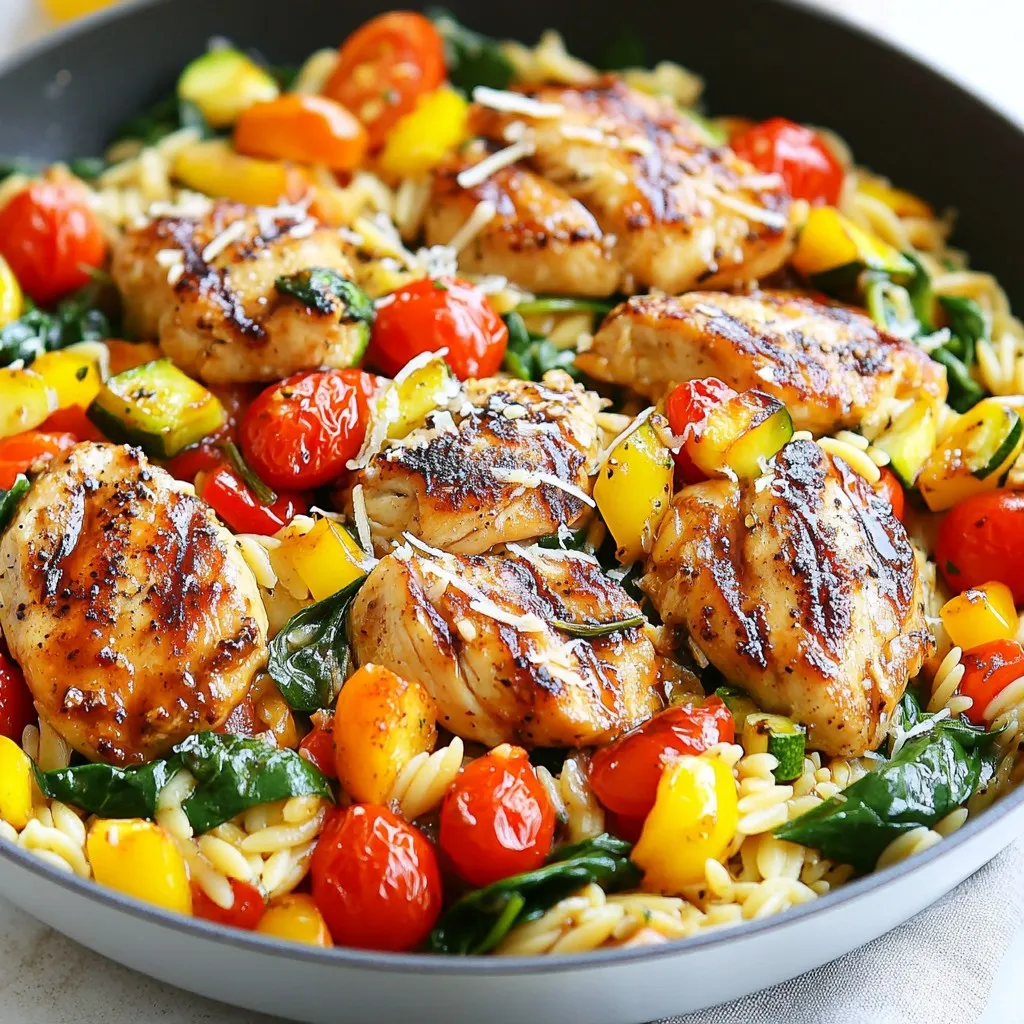
Balsamic Chicken Orzo Skillet Flavorful Easy Meal
Looking for a quick and delicious meal? This Balsamic Chicken Orzo Skillet is your answer! With juicy chicken, vibrant veggies, and tender orzo, it’s a