Dinner

- 2 cups rotini pasta (uncooked) - 2 cups cooked chicken, shredded - 2 cups broccoli florets - 2 cups Alfredo sauce - 1 cup mozzarella cheese, shredded - 1/2 cup Parmesan cheese, grated - 3 cups chicken broth - 1 teaspoon garlic powder - 1/2 teaspoon onion powder - Salt and pepper to taste - Optional: Fresh parsley, chopped You can swap rotini for penne or farfalle. If you like, use turkey instead of chicken. Fresh broccoli can be replaced with frozen. Store-bought Alfredo sauce works great, but you can make your own if you prefer. If you want a lighter dish, try low-fat cheeses. Chopped fresh parsley adds color and flavor. You can also sprinkle red pepper flakes for heat. A squeeze of lemon juice brightens the dish. Try adding extra cheese on top before serving for a cheesy finish. {{ingredient_image_2}} 1. Preheat the Oven: First, set your oven to 375°F. This step is key for even cooking. 2. Mix the Ingredients: In a big bowl, add 2 cups of uncooked rotini pasta. Next, toss in 2 cups of shredded cooked chicken and 2 cups of broccoli florets. Pour in 2 cups of Alfredo sauce and 3 cups of chicken broth. Then, sprinkle 1 teaspoon of garlic powder and 1/2 teaspoon of onion powder. Mix well until everything combines. 3. Season the Mixture: Taste the mix. Add salt and pepper to make it perfect for your palate. 4. Transfer to Baking Dish: Take a 9x13 inch baking dish and lightly grease it. Pour the chicken and pasta mix into the dish. Spread it out evenly to promote even cooking. 5. Add the Cheeses: Top the mix with 1 cup of shredded mozzarella and 1/2 cup of grated Parmesan. Make sure to cover it evenly for a cheesy finish. 6. Bake Covered: Cover the dish tightly with aluminum foil. This keeps the moisture in. Place it in the oven and bake for 25 minutes. 7. Bake Uncovered: After 25 minutes, take off the foil. Look for the bubbling goodness. Return the dish to the oven and bake uncovered for another 15 minutes. You want the cheese on top to turn golden brown. 8. Let It Rest: Once finished, take the casserole out of the oven. Let it sit for about 5 minutes. This helps it set and makes serving easier. - When mixing, ensure all pasta is coated with sauce for the best flavor. - Use a non-stick spray or olive oil to prevent sticking in the dish. - Keep an eye on the cheese; it should be melted and lightly browned. - Letting it rest is crucial. It helps the layers stay together when you slice. - Garnish with fresh parsley for a touch of color and taste. With these steps, your Dump-and-Bake Chicken Alfredo Casserole will be a hit every time! To make this casserole shine, preheat your oven to 375°F (190°C) first. This helps cook everything evenly. Use a large mixing bowl for your ingredients. Mix well to combine flavors before baking. This is key for a tasty casserole. You can boost flavor by using fresh garlic instead of garlic powder. Fresh onions also add a nice touch. Try adding spices like Italian herbs or a pinch of red pepper flakes for some heat. For a richer taste, consider using homemade Alfredo sauce. Use rotisserie chicken to save time. It is already cooked and adds great flavor. You can also use frozen broccoli to skip washing and chopping. Prepare your ingredients ahead of time. This way, you can quickly mix and bake when you need a meal. Pro Tips Use Rotisserie Chicken: For a quicker preparation, opt for rotisserie chicken. It saves time and adds great flavor without the need for cooking your own chicken. Broccoli Options: You can use fresh or frozen broccoli florets. If using frozen, there's no need to thaw them beforehand; they will cook perfectly in the casserole. Customize Your Cheese: Feel free to mix different cheeses like cheddar or gouda for a unique flavor twist. Just ensure they melt well for the best texture. Meal Prep Friendly: This casserole is perfect for meal prep. You can assemble it ahead of time and store it in the fridge for up to 2 days before baking. {{image_4}} You can change the flavor of your Dump-and-Bake Chicken Alfredo Casserole easily. Try using different sauces like pesto or a creamy mushroom sauce. If you want more protein, swap in cooked shrimp or sausage. Even beef or tofu works well. Each choice brings a new taste. Mixing in spices can also help. Add some Italian herbs for a fresh twist. This casserole is easy to adjust for different diets. To make it gluten-free, use gluten-free rotini pasta. Check the sauce label to ensure it is gluten-free too. For a vegetarian option, skip the chicken and add extra veggies. You can use mushrooms, bell peppers, or spinach. Just make sure to keep the Alfredo sauce for creaminess. Feel free to swap ingredients based on what you have. If you don’t have broccoli, try green beans or peas instead. You can also use any cooked chicken you have on hand. If you want a different cheese, cheddar or gouda can work. The key is to keep it simple and fun. Mix and match until you find your favorite combo! To store leftovers, let the casserole cool first. Then, place it in an airtight container. You can keep it in the fridge for up to four days. Make sure to cover the dish if you leave some in the baking pan. Reheating is simple. You can use the microwave or the oven. If you use the microwave, heat in short bursts. Stir the casserole in between to warm it evenly. If using the oven, preheat it to 350°F (175°C). Cover the dish with foil to avoid drying out. Heat for about 20 minutes or until it is hot inside. Freezing works well for this casserole. To freeze, let it cool completely. Cut it into portions for easy serving. Wrap each portion tightly in plastic wrap, then place it in a freezer-safe bag. You can freeze it for up to three months. When ready to eat, thaw it in the fridge overnight before reheating. This way, you keep the flavors fresh! Yes, you can use frozen chicken. Just make sure to cook it fully. If using frozen, add extra time to the baking process. Ensure your chicken reaches 165°F (74°C) for safe eating. To make the casserole healthier, consider these tips: - Use whole wheat rotini for more fiber. - Swap out half the cheese for low-fat options. - Add more veggies like spinach or bell peppers. - Use homemade Alfredo sauce with less cream. This creamy dish pairs well with: - A fresh green salad for crunch. - Garlic bread for a tasty side. - Steamed veggies to add color and nutrients. Yes, you can prepare it ahead of time. Mix all the ingredients and store it in the fridge. Just cover it tightly. When ready, bake it straight from the fridge. You may need to add 10-15 minutes to the cooking time. Absolutely! You can use any pasta you like. Penne, fusilli, or rotini all work well. Just remember to adjust cooking times if you use a different shape or size. This blog post covered all you need for Chicken Alfredo Casserole. We discussed key ingredients, cooking steps, and useful tips. You learned how to mix flavors and even tried some swaps for diets or preferences. I hope these details help you make a tasty dish. Remember, cooking is fun and creative. Don’t be afraid to explore more variations next time you cook. Enjoy your meal and impress your friends!
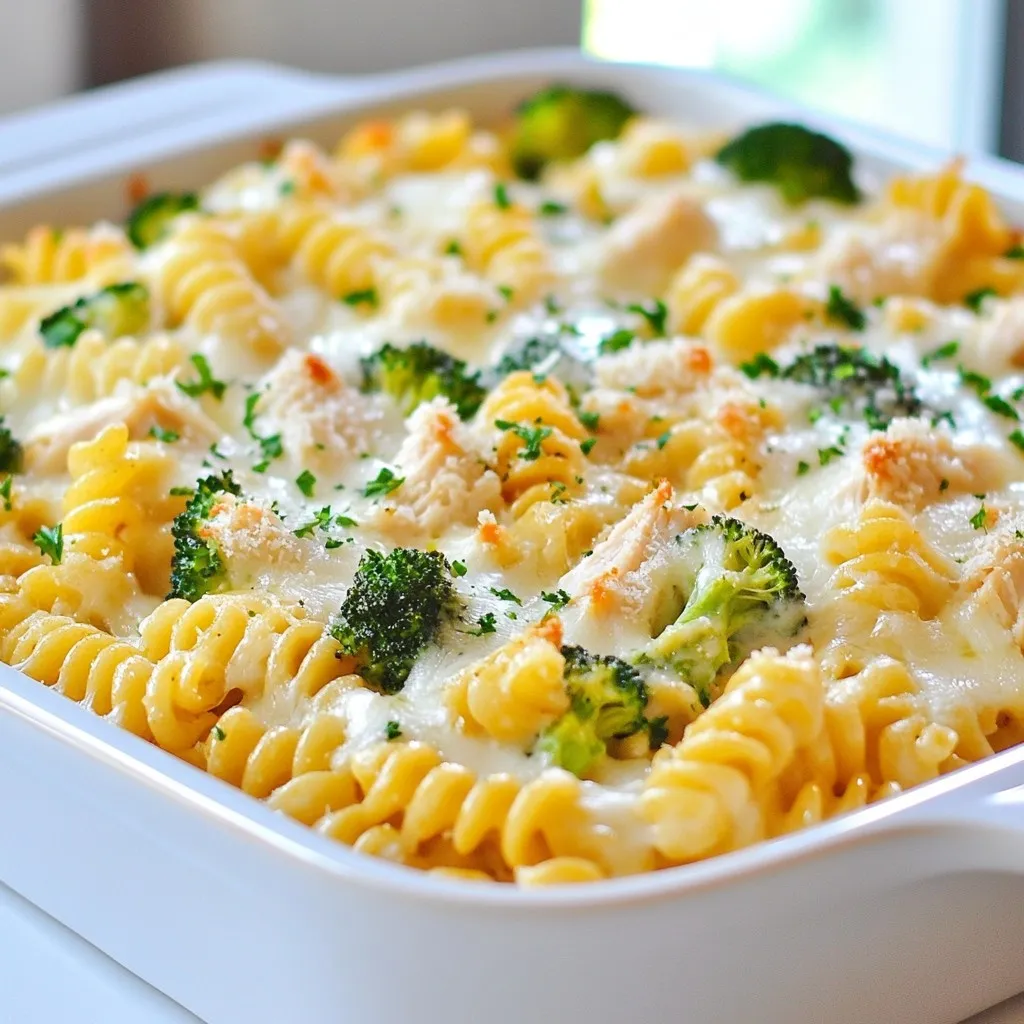
Dump-and-Bake Chicken Alfredo Casserole Simple Meal
Are you ready to whip up a meal that checks all the boxes? My Dump-and-Bake Chicken Alfredo Casserole is your answer. It’s quick, easy, and
To make these gooey cheeseburger sliders, you will need simple ingredients. Here’s what to gather: - 1 lb ground beef - 1 teaspoon garlic powder - 1 teaspoon onion powder - Salt and freshly ground black pepper to taste - 8 small slider buns - 8 slices of sharp cheddar cheese - 1/2 cup mayonnaise - 2 tablespoons ketchup - 2 tablespoons mustard - 1 small pickle, finely chopped (optional) - Fresh crispy lettuce leaves Each ingredient plays a key role. The ground beef gives the sliders their main flavor. Garlic and onion powders add depth. Salt and pepper enhance the taste. The slider buns hold everything together. Sharp cheddar cheese adds that gooey goodness we crave. Mayonnaise, ketchup, mustard, and pickles create a tasty sauce. Lastly, fresh lettuce adds a nice crunch. This mix of flavors makes every bite a delight. When you gather these ingredients, you set yourself up for a fun cooking experience. {{ingredient_image_2}} First, set your oven to 350°F (175°C). This step is key for making sure the sliders bake just right. In a large bowl, mix together 1 lb of ground beef, 1 teaspoon of garlic powder, and 1 teaspoon of onion powder. Add salt and pepper to taste. Use your hands to blend the meat gently. Don’t overwork it, as you want the patties to stay tender. Next, divide the meat into 8 equal pieces. Roll each piece into a small patty, about 1/2 inch thick. Press your thumb into the center of each patty to help them cook flat. Heat a bit of oil in a skillet over medium-high heat. Once hot, add the patties. Cook them for about 3-4 minutes per side. When they are almost done, place a slice of cheddar cheese on each patty. Cover the skillet to melt the cheese. While the patties cook, cut the slider buns in half. In a separate bowl, mix 1/2 cup of mayonnaise, 2 tablespoons of ketchup, and 2 tablespoons of mustard. You can add the chopped pickle for extra flavor. Spread a layer of your sauce on the bottom half of each bun. Place a warm cheeseburger patty on top. Add a fresh lettuce leaf, then cap it with the top half of the bun. Arrange the assembled sliders on a baking sheet. Put them in the oven and bake for about 5-7 minutes. You want the buns to toast and turn golden brown. Take the sliders out of the oven and let them cool for a couple of minutes. Serve them warm and enjoy the gooey cheeseburger goodness. To make juicy patties, choose 80/20 ground beef. This mix has enough fat for flavor. Mix the beef with garlic and onion powder, salt, and pepper. Do not overwork the meat; this keeps it tender. Form small patties, about 1/2 inch thick. Press your thumb in the center of each patty. This helps them cook evenly and stay flat. To get gooey cheese, use sharp cheddar. Add the cheese on the patties during the last minute of cooking. Cover the skillet with a lid. The steam will melt the cheese perfectly. If you want a fun twist, try using a mix of cheeses. Options like pepper jack or gouda can add a unique flavor. For a tasty sauce, mix mayonnaise, ketchup, and mustard. Add finely chopped pickles for a crunch. This simple sauce adds great flavor to the sliders. Spread it generously on the bun. You can also try adding a dash of hot sauce for some heat. To make your sliders look great, use a nice platter. Stack the sliders neatly on it. Serve with crispy fries or sweet potato wedges on the side. Adding a small bowl of extra pickles can also impress your guests. Doing this makes the meal fun and appealing. Pro Tips Rest the Meat: Allow the ground beef to sit at room temperature for about 15 minutes before mixing. This helps the fat distribute evenly, resulting in juicier patties. Cheese Variations: Experiment with different types of cheese such as pepper jack or gouda for a unique flavor twist. Slider Size Matters: Make sure to keep the patties a bit smaller than the buns since they will shrink while cooking. This ensures the perfect bite size. Keep It Warm: Cover the assembled sliders with aluminum foil after baking to keep them warm until serving, preserving that gooey cheesiness. {{image_4}} You can switch up the cheese for fun flavors. Try pepper jack for a spicy kick. Swiss cheese melts well and adds a nutty taste. For a rich touch, go with gouda. Mix cheeses for a unique blend. Your sliders can be a cheese lover's dream! You don’t need a skillet to cook these sliders. You can grill them outdoors for a smoky flavor. A broiler can also work—just watch them closely. Baking is easy and gives even results. Use an air fryer for a quick, crispy finish. Each method brings a new twist to your sliders. The toppings can change the whole slider game. Classic toppings like pickles and lettuce are a must. For heat, add jalapeños or hot sauce. You can also try sautéed onions or mushrooms. For a fresh taste, use tomatoes and avocado. Your sliders can be as simple or fancy as you like! You can keep your gooey cheeseburger sliders in the fridge. Place the sliders in an airtight container. They stay fresh for up to three days. If you want to keep them longer, freezing is best. To freeze your sliders, wrap each one tightly in plastic wrap. Then, place them in a freezer bag. They can last for up to three months in the freezer. When you are ready to eat, just thaw them in the fridge overnight. To reheat the sliders, use an oven for the best taste. Preheat your oven to 350°F (175°C). Place the sliders on a baking sheet. Heat them for about 10-15 minutes until warm and gooey again. You can also use a microwave, but they might lose some crispiness. Enjoy your tasty sliders! You can use an oven to cook sliders. Form your patties and place them on a baking sheet. Bake them at 350°F (175°C) for about 15-20 minutes. This method keeps them juicy and allows you to make many sliders at once. Yes, you can use ground turkey or chicken. These meats are leaner, so add some oil or moisture. Mix in a bit of extra seasoning to keep the flavor rich. The cooking time may change, so check for doneness. Crispy fries are a classic choice. Sweet potato wedges also pair well. You can add a fresh salad or coleslaw for a crunchy side. These sides balance the richness of the sliders nicely. Add chopped jalapeños to the meat mix for heat. You can also use spicy mustard or hot sauce in your sauce. For extra kick, use pepper jack cheese instead of cheddar. Adjust the spice to your taste. Store leftover sliders in an airtight container in the fridge. They stay fresh for about 3 days. For longer storage, wrap them tightly and freeze. To reheat, use the oven or microwave until warm. You now have a simple guide to making delicious cheeseburger sliders. We covered ingredients, steps, and tips. Remember to keep your patties juicy and experiment with toppings! You can also try different cheeses or cooking methods. Lastly, don’t forget to store extras properly. Now, go ahead and enjoy your sliders with friends and family! Cooking should be fun and tasty.
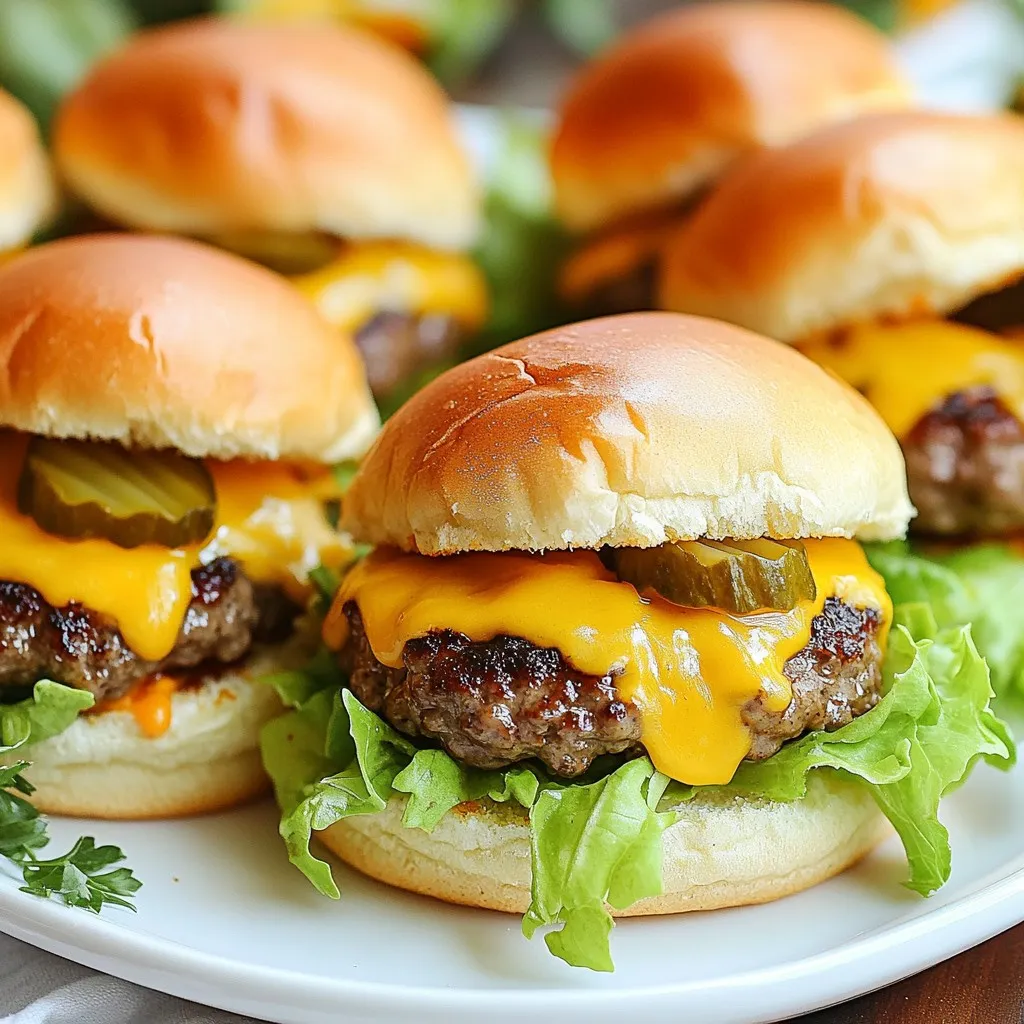
Gooey Cheeseburger Sliders Savory and Simple Treat
Get ready for a tasty treat with my Gooey Cheeseburger Sliders! These sliders are easy to make and perfect for any gathering. With just a
To make crispy chili beef fried rice, gather these main ingredients: - 2 cups of cooked jasmine rice (preferably chilled for at least a few hours or overnight) - 250g beef sirloin, thinly sliced against the grain - 1 bell pepper, diced (any color you prefer) - 1 carrot, peeled and diced - 2 green onions, finely chopped, plus extra for garnish - 3 cloves garlic, minced - 2 tablespoons soy sauce - 1 tablespoon oyster sauce (optional for depth of flavor) - 1 tablespoon chili paste (adjust according to spice level) - 1 teaspoon sesame oil - 2 tablespoons vegetable oil, divided - Salt and black pepper to taste - Fresh cilantro leaves for garnish You can enhance the dish with these optional items: - Additional vegetables like peas or corn for color - A splash of lime juice for a zesty kick - Chopped peanuts for crunch and flavor Choosing fresh ingredients makes a big difference. Here are my tips: - Look for bright bell peppers with smooth skin. - Choose firm carrots without soft spots. - Select fresh green onions that are vibrant and crisp. - For beef, pick sirloin with a bright red color and minimal fat. - Always smell and touch the garlic to ensure it’s fresh and firm. By following these tips, you ensure every bite of your crispy chili beef fried rice is packed with flavor! {{ingredient_image_2}} To marinate the beef, start by slicing 250g of beef sirloin against the grain. This helps keep it tender. In a bowl, mix the beef with a pinch of salt, black pepper, and 1 tablespoon of soy sauce. Stir well and let it sit for about 15 minutes. This step adds flavor and makes the beef juicy. Heat a large skillet or wok over medium-high heat. Add 1 tablespoon of vegetable oil until it shimmers. Carefully place the marinated beef in a single layer. Avoid overcrowding the pan. Sear the beef for 2-3 minutes. You want it crispy and brown. Once done, remove it from the skillet and set it aside. Using the same skillet, add another tablespoon of vegetable oil. When it’s hot, toss in 3 minced garlic cloves. Sauté for about 30 seconds. Be careful not to burn the garlic. Next, add 1 diced bell pepper and 1 diced carrot. Stir-fry for 3-4 minutes. The goal is to keep them tender but slightly crisp. Now, add 2 cups of chilled cooked jasmine rice to the skillet. Use a spatula to break up any clumps. Pour in the remaining soy sauce, 1 tablespoon of oyster sauce (optional), 1 tablespoon of chili paste, and 1 teaspoon of sesame oil. Toss everything together until the rice is coated and heated through. Return the crispy beef to the skillet. Mix it well with the rice and vegetables. Continue stir-frying for 2-3 minutes. This helps blend all the flavors together nicely. Remove the skillet from heat. Gently fold in the chopped green onions. This adds a fresh flavor. Serve the crispy chili beef fried rice in bowls or plates. Garnish with fresh cilantro leaves and more green onions. Enjoy your vibrant and tasty dish while it’s hot! To get that great crispy texture, start with cold rice. Cold rice has less moisture, which helps it fry better. I recommend using jasmine rice and chilling it for a few hours or overnight. When you cook the beef, make sure not to overcrowd the pan. This will help it sear and not steam. Cook the beef in batches if needed. Lastly, let the rice fry for a bit without stirring too much. This will help create those crunchy bits we all love. Using the right tools makes cooking easier and more fun. Here’s what you need: - Large skillet or wok - Spatula for stirring - Bowl for marinating beef - Knife for chopping - Cutting board for prep These tools will help you cook smoothly and achieve great results. If you have leftover crispy chili beef fried rice, it's important to store it well. First, let it cool to room temperature. Then, place it in an airtight container. This keeps it fresh and prevents odors. You can store it in the fridge for up to three days. When reheating, add a splash of water. This keeps the rice moist and helps it heat evenly. Enjoy your tasty leftovers! Pro Tips Use Day-Old Rice: For the best texture, use rice that has been cooked and chilled for at least a few hours or overnight. This helps prevent the rice from becoming mushy when stir-frying. Marinate the Beef: Allow the beef to marinate for at least 15 minutes. This enhances the flavor and tenderness, ensuring each bite is packed with taste. High Heat is Key: Cook the beef and vegetables over medium-high heat. This helps to achieve a crispy texture and vibrant colors in your stir-fry. Customize the Spice Level: Adjust the amount of chili paste according to your preference. You can also add fresh chilies or a dash of hot sauce for an extra kick! {{image_4}} You can easily turn this dish vegetarian. Replace the beef with tofu or tempeh. Use the same marinating steps for the tofu. Cut it into cubes to help it crisp up nicely. Use 2 tablespoons of soy sauce in the marinade for flavor. Keep the vegetables like bell pepper and carrots for texture and color. Add more veggies like peas or broccoli for a healthy twist. Want to try different proteins? Chicken and pork work great in this recipe. For chicken, use thin slices of boneless breast. Marinate it the same way as the beef. For pork, tenderloin or chops sliced thinly are perfect. Cook the proteins until they are crispy and golden. Each protein adds its own flavor, making the dish unique every time. Adjusting the spice level is simple. If you love heat, add more chili paste. You can also include fresh chili peppers for an extra kick. If you prefer less spice, reduce the chili paste or skip it. You can add sweet soy sauce instead, which balances the heat. Customize it to fit your taste, and enjoy your perfect fried rice! To keep your Crispy Chili Beef Fried Rice fresh, place it in an airtight container. Make sure to cool it down to room temperature first. This helps prevent moisture build-up, which can make the rice soggy. Store it in the fridge for up to 3 days. When you store it properly, the flavors stay great, and you can enjoy it later. When you're ready to enjoy your leftovers, there are simple ways to reheat them. I recommend using a skillet for the best results. Heat a little oil over medium heat, then add your rice. Stir it often for even heating. This method keeps the rice crispy and flavorful. You can also add a splash of soy sauce to boost the taste while reheating. If you're in a hurry, the microwave is an option too. Just cover the rice to hold in moisture and heat for about 1-2 minutes. If you want to store your fried rice for a longer time, freezing works well. Cool the rice completely before placing it in freezer-safe bags. Remove as much air as possible to prevent freezer burn. You can freeze it for up to 3 months. When you're ready to eat, thaw it in the fridge overnight and reheat as mentioned before. This way, you can enjoy delicious fried rice anytime! The best rice for fried rice is jasmine rice. It has a light, fluffy texture. Cook it ahead and chill it. Cold rice works best as it won't clump. Day-old rice is often perfect. Yes, you can use fresh beef. However, marinating adds flavor and tenderness. A quick marinade makes a big difference. It only needs about 15 minutes. This allows the beef to soak up the flavors of soy sauce and spices. To prevent rice from sticking, use chilled rice. Freshly cooked rice tends to clump. Ensure the rice is dry and fluffy. When stir-frying, keep the heat high. This helps fry the rice quickly and evenly. Yes, you can use tamari as a gluten-free option. Tamari has a similar taste to soy sauce. You can also use coconut aminos for a lighter flavor. These options give you the same umami taste without gluten. This blog post covered how to make crispy fried rice. We looked at key ingredients, cooking steps, and tips for a perfect dish. You learned how to marinate beef, sauté veggies, and achieve that crispy texture everyone loves. In closing, remember to experiment with flavors and proteins to make it your own. Store leftovers safely and enjoy this dish multiple times. Happy cooking!
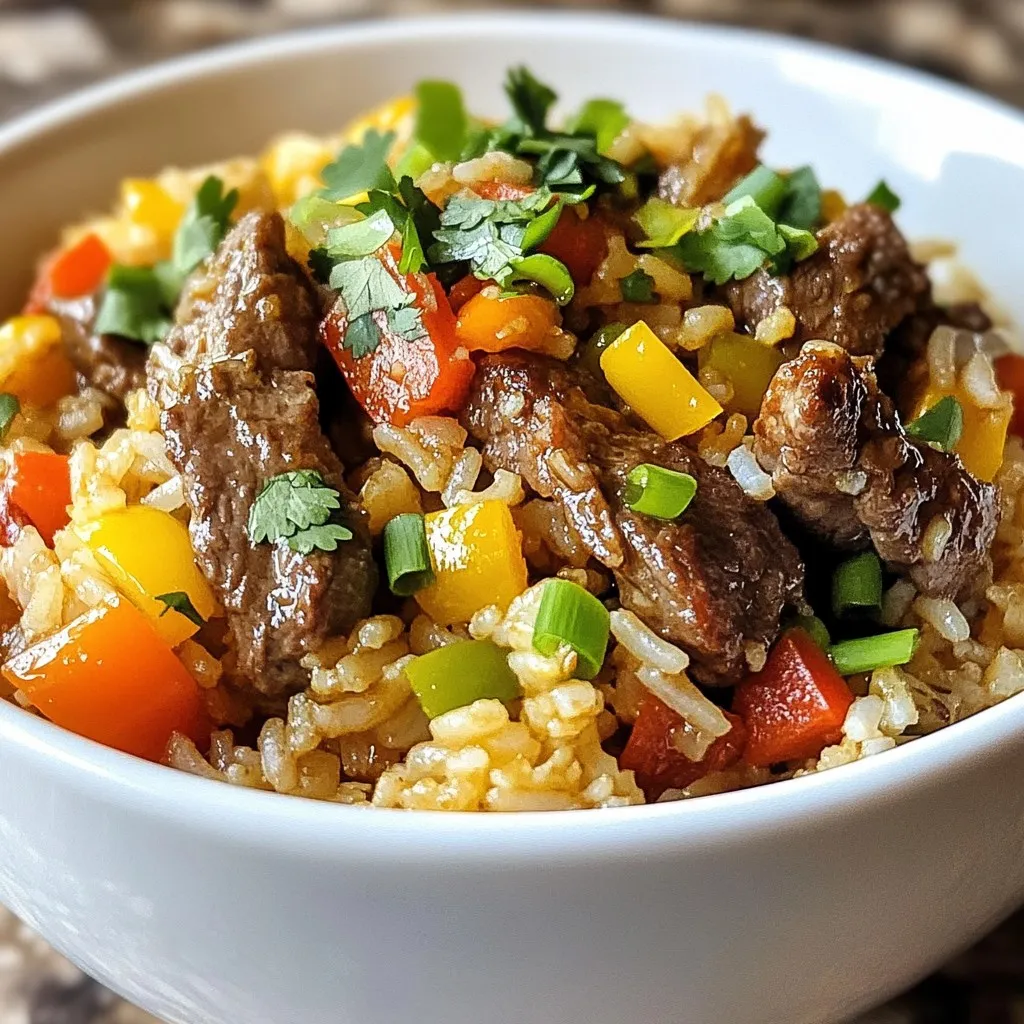
Crispy Chili Beef Fried Rice Flavorful Easy Recipe
Looking for a dinner that packs a punch? This Crispy Chili Beef Fried Rice is your answer! With a perfect blend of beef and veggies,
- 1 lb sirloin steak, cut into 1-inch cubes - 4 medium yellow potatoes, diced into small cubes - 4 tablespoons unsalted butter - 4 cloves garlic, finely minced - 1 teaspoon fresh rosemary, finely chopped - 1 teaspoon fresh thyme, finely chopped - Salt and freshly cracked pepper - 1 tablespoon olive oil - 2 tablespoons fresh parsley, chopped (for garnish) The sirloin steak shines in this dish. It’s tender and juicy, great for bites. The potatoes add a hearty touch. They soak up the garlic butter flavor well. Unsalted butter gives us that rich taste without added salt. Garlic, fresh herbs, salt, and pepper elevate the dish. I like to use fresh herbs like rosemary and thyme. They add depth to the sauce. Fresh parsley at the end brightens the meal. It makes the dish look pretty too. This combination creates a simple, yet flavorful meal. {{ingredient_image_2}} - Start by bringing a large pot of salted water to a boil. - Add the diced potatoes and cook for 10-12 minutes. - Check if they are tender by piercing them with a fork. - Once cooked, drain the potatoes and set them aside. - Season the sirloin steak cubes with salt and pepper. - Heat 1 tablespoon of olive oil in a large skillet over medium-high heat. - When the oil shimmers, add steak cubes in batches. - Sear each side for 2-3 minutes to form a golden crust. - Once done, remove the steak and place it on a plate. - In the same skillet, reduce the heat to medium. - Add 4 tablespoons of unsalted butter to the pan. - Stir in 4 cloves of minced garlic, rosemary, and thyme. - Cook for 1-2 minutes until the garlic smells amazing and the butter melts. - Add the seared steak back into the skillet. - Gently toss in the drained potatoes. - Mix everything well to coat in the garlic butter sauce. - Cook for 2-3 more minutes, stirring gently to heat through. - Remove the skillet from the heat when done. - Sprinkle chopped parsley over the dish for a fresh look. - For serving, use a rustic cast iron skillet or a wooden board. - Add a pinch of coarse sea salt for extra flavor and style. - Achieving the perfect sear: To get a great sear, start with a hot skillet. Use medium-high heat and add olive oil. Let the oil shimmer before adding the steak. Sear in batches to avoid overcrowding. This helps form a nice brown crust on all sides. - Maintaining steak tenderness: Choose sirloin steak for its tenderness. Season well with salt and pepper before cooking. Don’t overcook; aim for medium-rare to keep it juicy. Let it rest for a few minutes after cooking. This helps the juices redistribute, keeping each bite flavorful. - Best practices for leftovers: Store any leftover steak and potatoes in an airtight container. Keep them in the fridge for up to three days. This ensures they stay fresh and safe to eat. - Tips for reheating without drying out: To reheat, use a skillet on low heat. Add a splash of broth or water to keep moisture. Stir gently until warmed through. Avoid using the microwave, as it can dry out the meat. - Recommended side dishes: Garlic butter steak bites pair well with a simple green salad or steamed veggies. Consider serving it with roasted asparagus or garlic bread for extra flavor. - Beverage pairings: A full-bodied red wine, like Cabernet Sauvignon, complements the steak well. You can also enjoy a light beer or sparkling water with lemon for a refreshing option. Pro Tips Rest the Steak: Allow the seared steak to rest for a few minutes before adding it to the garlic butter sauce. This helps retain its juices, making the meat more tender and flavorful. Potato Texture: For extra crispy potatoes, consider parboiling them in salted water first and then allowing them to cool slightly before adding them to the skillet. Garlic Timing: Keep an eye on the minced garlic while cooking; it can burn quickly. Add it to the butter only after it has melted and the pan has cooled slightly. Herb Variations: Feel free to experiment with different herbs like thyme or oregano to customize the flavor. Fresh herbs add a burst of freshness to the dish. {{image_4}} For a twist on this dish, consider using different meats. Chicken breast or pork tenderloin works well. They both cook quickly and absorb flavors beautifully. You can also use shrimp for a seafood version. If you want to change the potatoes, try using sweet potatoes. They add a slight sweetness that balances the savory steak. Other options include red potatoes or even Yukon golds. Each type brings its own unique flavor and texture. To make your garlic butter steak bites even tastier, add herbs and spices. Fresh basil or oregano can add a pop of flavor. You might also enjoy a sprinkle of smoked paprika for a smoky touch. If you like heat, add chili flakes. They bring a nice kick that pairs well with the butter. You could also try jalapeños for a fresh heat. Just remember to adjust the amount to match your spice level. For those needing gluten-free options, this recipe fits well. The ingredients do not contain gluten. Just make sure any added sauces are also gluten-free. If you're looking for low-carb alternatives, swap out the potatoes. You can use cauliflower instead. It cooks quickly and can soak up the garlic butter just as well. Zucchini or broccoli also works for a low-carb side. Each serving of garlic butter steak bites with potatoes contains about 400 calories. This meal gives you a good balance of protein, carbs, and fats. Each serving has: - Protein: 30 grams - Carbohydrates: 25 grams - Fat: 20 grams These ingredients are not just tasty; they are good for you too. Sirloin steak is rich in protein, helping build and repair muscles. Potatoes provide fiber, which aids digestion. Garlic is known for its health perks. It can support heart health and boost the immune system. Fresh herbs like rosemary and thyme add flavor and nutrition. They have antioxidants that fight free radicals. So, enjoying this dish means you get taste and health benefits in every bite! The best way to cook steak bites is to sear them in a hot skillet. Use medium-high heat with a bit of olive oil. Make sure to season the steak well with salt and pepper before cooking. Sear for 2-3 minutes on each side. This gives them a rich, golden crust. Yes, you can use frozen potatoes. They will save time, but you must adjust cooking time. Cook them until they are tender. Be sure to drain them well before adding to the skillet. This keeps the dish from becoming watery. You can check the steak’s doneness by using a meat thermometer. For medium-rare, aim for 130-135°F. For medium, go for 140-145°F. You can also press the steak with your finger. If it feels firm but springs back, it's likely done. You can prepare some parts ahead of time. Cook the potatoes and steak bites, then store them separately. When ready to serve, reheat them in a skillet. Add the garlic butter sauce just before serving for the best flavor. Garlic butter steak bites pair well with many sides. Try a fresh salad for crunch. Garlic bread is also a great choice. For a heartier meal, serve with rice or pasta. You can even add roasted vegetables for extra color and flavor. In this blog post, we covered how to make delicious garlic butter steak bites. We explored ingredients like sirloin steak, potatoes, and fresh herbs. I shared step-by-step instructions, cooking tips, and variations to suit your taste. To sum up, using quality ingredients and following simple steps leads to a tasty meal. Don't hesitate to customize or pair it with your favorite sides. Enjoy your cooking and the great flavors!
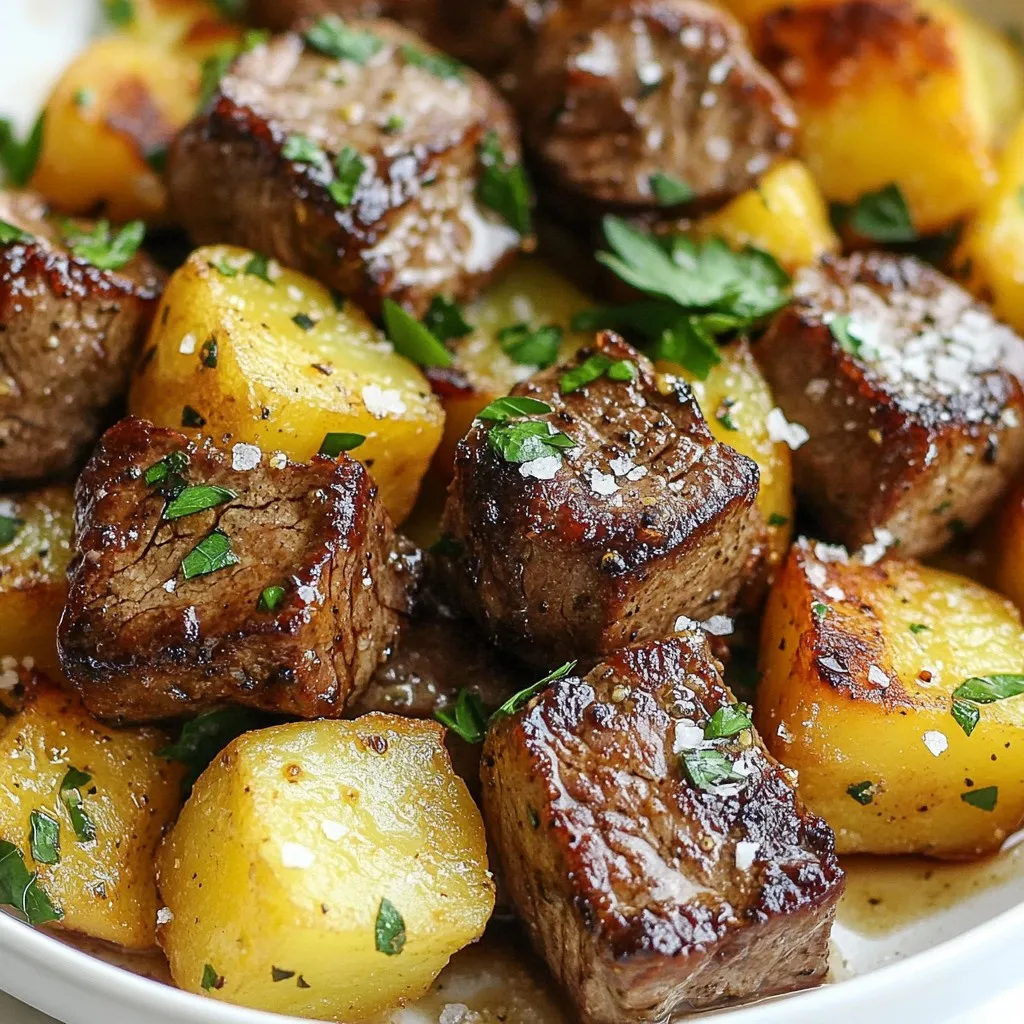
Garlic Butter Steak Bites with Potatoes Recipe Treat
Are you ready to dive into a delicious treat? My Garlic Butter Steak Bites with Potatoes recipe is simple, flavorful, and sure to impress! This
- 8 oz fettuccine or linguine - 1 lb shrimp, peeled and deveined - 2 tablespoons olive oil - 3 cloves garlic, minced - 1 cup cherry tomatoes, halved - 2 cups fresh spinach - 1 cup heavy cream - 1/2 cup grated Parmesan cheese - 1 teaspoon Italian seasoning - Salt and freshly ground pepper, to taste - Fresh basil leaves, for garnish These ingredients create a rich and creamy dish. The pasta acts as a base, while the shrimp adds a protein punch. Olive oil and garlic bring lovely flavor. Cherry tomatoes burst with sweetness, and spinach adds freshness. Heavy cream and Parmesan create that dreamy sauce. Salt, pepper, and Italian seasoning tie it all together. Fresh basil gives a nice touch when serving. - Alternative pasta types: You can use penne or spaghetti if you don’t have fettuccine or linguine. - Dairy-free options for cream and cheese: Try coconut cream and nutritional yeast for a vegan twist. - Other seafood choices: Scallops or crab meat can replace shrimp for a different seafood experience. These swaps can keep your dish exciting. You can mix it up based on what you have at home. - Large pot for boiling pasta - Large skillet for cooking shrimp and sauce - Colander for draining pasta - Measuring cups and spoons - Cooking utensils like spatula and tongs Having the right tools makes cooking easier. It helps you manage time and ensures that everything goes smoothly. {{ingredient_image_2}} To make a great creamy Tuscan shrimp pasta, start with the pasta. Use fettuccine or linguine for the best results. It's vital to cook it al dente. This means it should be firm but not hard. Cooking it this way gives the pasta the right texture. Follow the package directions, usually around 8-10 minutes. While the pasta cooks, keep an eye on the time. You want the pasta to finish close to when the sauce is ready. This way, everything stays fresh and hot. Next, you’ll sauté the shrimp. Use a large skillet for this step. Heat olive oil over medium heat. Season the shrimp with salt, pepper, and Italian seasoning. This adds flavor, so don’t skip it! Cook the shrimp for 2-3 minutes on each side. They should turn pink and opaque to show they are done. Once cooked, take the shrimp out of the skillet and set them aside. This step keeps them tender and juicy. Now, let’s make the creamy sauce. In the same skillet, lower the heat a bit. Add minced garlic first. Sauté for about 30 seconds until it smells great, but don’t let it burn. Next, toss in halved cherry tomatoes. Cook these for 2-3 minutes until they soften. This step helps release their juices, adding depth to the sauce. After the tomatoes, add fresh spinach. Stir and cook until it wilts in about 1-2 minutes. Then, pour in the heavy cream. Raise the heat slightly to bring the mixture to a gentle simmer. Finally, stir in grated Parmesan cheese until it melts. This creates a rich, creamy sauce that makes the dish shine. Combine the sautéed shrimp with the creamy sauce and pasta. Toss everything together to coat well. If the sauce is too thick, add a bit of reserved pasta water to reach your desired consistency. Adjust seasoning if needed. To make your sauce creamy, use heavy cream. It gives a rich texture. Stir in grated Parmesan cheese until it melts. This adds depth and flavor. If you want a lighter sauce, mix in some reserved pasta water. This helps thin it out without losing creaminess. Taste the sauce as you go. Add salt and pepper to fit your taste. For a beautiful presentation, plate the pasta in shallow bowls. Top with extra grated Parmesan and fresh basil leaves. A drizzle of olive oil adds shine and flavor. Pair this dish with a crisp white wine or a light salad. This brings balance to the meal and enhances the flavors. One big mistake is overcooking shrimp. Aim for pink and opaque shrimp in about 2-3 minutes per side. If you cook too long, the shrimp become tough. Watch for the sauce thickness. If it gets too thick, add reserved pasta water. This keeps it creamy and smooth, so your pasta shines. Pro Tips Use Fresh Ingredients: Fresh shrimp and spinach elevate the dish's flavors and texture, making your pasta truly exceptional. Perfect Pasta Texture: Make sure to cook the pasta al dente for a great bite. It will continue to cook slightly when tossed with the sauce. Adjust Creaminess: If the sauce is too thick for your liking, add a splash of the reserved pasta water to achieve your desired consistency. Garnish Wisely: A sprinkle of extra Parmesan and fresh basil not only adds flavor but also enhances the dish's presentation. {{image_4}} You can make this dish even better by adding fresh veggies. Cherry tomatoes and spinach are great, but there are many more options. Try adding seasonal vegetables like zucchini, bell peppers, or even asparagus. They add color and taste. For a fun twist, mix in some peas or broccoli. They not only taste good but also boost the dish's nutrition! If you want a change from shrimp, you can use chicken or tofu. Cook chicken in the same way as the shrimp. Ensure it's cooked through before adding it to the sauce. Tofu can be a great plant-based option. Just press it to remove extra water, then cut it into cubes. Sauté it until golden brown for added flavor. This way, you can enjoy a shrimp-free version that still feels rich and tasty! Spice up your pasta by adding some heat. A pinch of red pepper flakes can add a nice kick. You can also mix in fresh herbs like parsley or thyme for a fresh taste. If you want more flavor, consider using smoked paprika or lemon zest. These small changes can change the flavor profile and keep your dish exciting. To keep your creamy Tuscan shrimp pasta fresh, cool it down first. Let it sit at room temperature for about 30 minutes. Once cooled, place it in a container. Use an airtight container to avoid air exposure. Glass or BPA-free plastic containers work great. Make sure to seal the lid tightly. When reheating, keep the texture and flavor in mind. Use a skillet over low heat for best results. If the pasta seems dry, add a splash of water or cream. Stir gently to mix everything well. This helps restore the creaminess of the sauce. You can also use a microwave, but do it in short bursts. Stir after each burst to avoid hot spots. If you want to save some for later, freezing works well. Cool the pasta completely before freezing. Place it in a freezer-safe container. Label the container with the date. It can last up to three months in the freezer. When you're ready to eat, thaw it in the fridge overnight. Reheat gently on the stove or in the microwave. Making Creamy Tuscan Shrimp Pasta takes about 30 minutes. This includes prep and cooking time. The pasta cooks in about 10 minutes. The shrimp and sauce take around 15 minutes. It’s a quick dish for busy nights. Yes, you can make this dish ahead of time. Cook the pasta and sauce, then store them separately. When ready to serve, reheat each part gently. This helps keep the pasta from getting mushy. You can serve this pasta with a fresh salad or garlic bread. A light side helps balance the creamy sauce. Pair it with a crisp white wine for a nice touch. Yes, you can make it low-carb! Substitute traditional pasta with zucchini noodles or spaghetti squash. This keeps the flavor while lowering carbs. You can still enjoy the creamy sauce and shrimp. Yes, frozen shrimp work well in this recipe. Just thaw them before cooking. You can place them in cold water for a quick thaw. This makes it easy to enjoy the dish anytime. This blog post covered many aspects of making Creamy Tuscan Shrimp Pasta. We discussed key ingredients, storage tips, and various methods to enhance flavor. You learned how to cook pasta, sauté shrimp, and create a rich sauce. By following my tips, you can avoid common mistakes and experiment with substitutions. Cooking can be enjoyable and satisfying. I hope you feel encouraged to try making this dish at home. Enjoy your cooking journey!
Creamy Tuscan Shrimp Pasta Simple and Flavorful Dish
Craving a delicious meal that’s quick and simple? Look no further than Creamy Tuscan Shrimp Pasta! This dish blends tender shrimp with rich, creamy sauce
- Chicken and Veggies - 4 boneless, skinless chicken breasts - 2 cups broccoli florets - 1 cup baby carrots, sliced - 1 cup bell peppers, diced (red or yellow) - Spices and Seasonings - 6 cloves garlic, minced - 1 teaspoon paprika - 1 teaspoon dried thyme - Salt and pepper to taste - Garnishes - 4 tablespoons unsalted butter - Fresh parsley, chopped (for garnish) Gather these items before you start. This will make cooking easier. The chicken and veggies are the stars here. You can switch the veggies based on what you like. Use fresh ones for the best taste. The spices add depth. Paprika gives warmth, while thyme adds a nice earthiness. Salt and pepper make everything pop. Don't skip the garlic; it’s what makes this dish shine. Finally, parsley adds color and freshness. You can use it to top your dish right before serving. Having these ingredients ready helps you create a delightful meal. {{ingredient_image_2}} - Preheating the Oven First, set your oven to 400°F (200°C). This heat cooks the chicken evenly and helps the veggies roast well. - Melting the Butter Next, take a large oven-safe skillet. Melt 2 tablespoons of unsalted butter on medium heat. Wait until it foams and then settles. This shows it's hot and ready for cooking. - Seasoning the Chicken Season both sides of the chicken breasts with salt, pepper, paprika, and dried thyme. This mix gives the chicken a tasty crust. - Searing the Chicken Place the seasoned chicken in the skillet. Sear for about 4-5 minutes on each side. Look for a nice golden color. This adds flavor and makes it look great. - Sautéing the Veggies After browning the chicken, set it aside on a plate. In the same skillet, add the other 2 tablespoons of butter. Toss in minced garlic, broccoli florets, sliced carrots, and diced bell peppers. Sauté for about 3-4 minutes. The veggies should start to soften, and the garlic will smell great. - Combining Chicken and Veggies Now, return the seared chicken to the skillet. Place it on top of the sautéed vegetables. This helps the flavors mix well as everything cooks together. - Oven Cooking Process Spoon some veggies over the chicken for extra flavor. Then, transfer the skillet to the preheated oven. Bake for 20-25 minutes. - Checking for Doneness Check the chicken's internal temperature. It should reach 165°F (75°C) to be fully cooked. - Resting the Chicken Once cooked, carefully take the skillet out of the oven. Let the chicken rest for a few minutes. This helps the juices stay in the meat. - Garnishing Tips Before serving, sprinkle freshly chopped parsley on top. This adds color and a fresh taste. Enjoy your garlic butter chicken with bright, tasty veggies! - Ensuring Flavorful Chicken: Season the chicken well with salt, pepper, paprika, and thyme. This gives it a tasty crust. Sear it until golden brown. This step adds depth to the flavor. - Vegetable Cooking Time: Sauté the veggies for just a few minutes. This keeps them crisp and bright. Aim for 3-4 minutes to soften them without losing their crunch. - Avoiding Overcooked Veggies: Keep an eye on your veggies as they cook. Remove them from heat while they are still slightly firm. This helps them stay vibrant and delicious. - Perfectly Cooked Chicken Tips: Use a meat thermometer to check the chicken. It should reach 165°F (75°C) for safe eating. Let it rest after cooking. This helps the juices flow back into the meat. - Adding Extra Herbs or Spices: Feel free to add fresh herbs like basil or rosemary. They can enhance the flavor and make the dish more fragrant. - Suggested Marinades: Consider marinating the chicken in lemon juice or soy sauce. This adds more flavor and keeps the meat juicy. A simple marinade can make a big difference! Pro Tips Use Room Temperature Chicken: Allow the chicken breasts to sit at room temperature for about 15-20 minutes before cooking. This ensures they cook evenly and stay juicy. Customize Your Veggies: Feel free to swap in your favorite vegetables such as zucchini or asparagus for a personal touch. Just keep cooking times in mind. Check Doneness with a Thermometer: Always use a meat thermometer to check the chicken's internal temperature, aiming for 165°F (75°C) to ensure safety and juiciness. Let It Rest: After removing the skillet from the oven, let the chicken rest for a few minutes before slicing. This helps retain moisture and flavor. {{image_4}} You can switch up the protein in this dish. Turkey offers a leaner option. Simply use turkey breasts instead of chicken. Cook it the same way, adjusting the time if needed. Pork is another great choice. Pork tenderloin works well. Season and cook it like the chicken for a tasty twist. For a vegetarian meal, use firm tofu or tempeh. Marinate it in garlic butter before cooking. This adds depth while keeping the dish light. Feel free to mix in seasonal veggies for variety. In spring, try asparagus or snap peas. In fall, use squash or Brussels sprouts. You can also add creative extras. Think about artichokes, zucchini, or even sweet potatoes. Each addition brings new flavor and color to the meal. For an Asian-inspired twist, add soy sauce and ginger to the garlic butter. This creates a savory glaze perfect for chicken. Serve it with jasmine rice for a complete meal. If you prefer a lemon herb flavor, mix in lemon juice and zest. Fresh herbs like rosemary or dill enhance the dish's brightness. This variation is fresh and vibrant, making it perfect for warm weather. - Refrigeration Tips: Store leftover garlic butter chicken and veggies in an airtight container. It stays fresh for about 3-4 days in the fridge. Make sure it cools down before sealing the container to prevent moisture buildup. - Freezing Instructions: For longer storage, freeze the leftovers in a freezer-safe bag or container. This dish can last up to 3 months in the freezer. Thaw it overnight in the fridge before reheating. - Best Method to Reheat: The best way to reheat garlic butter chicken and veggies is in the oven. Set it to 350°F (175°C) and bake for about 15-20 minutes, or until heated through. You can also use the microwave, but be careful not to overcook it. - Maintaining Flavor and Texture: To keep the chicken moist, add a splash of broth or water before reheating. Cover the dish with a lid or microwave-safe wrap to trap steam, helping the chicken and veggies stay juicy. To check if the chicken is done, use a meat thermometer. Insert it into the thickest part of the chicken. The temperature should reach 165°F (75°C). If you don't have a thermometer, cut into the chicken. The meat should be white, not pink, and juices should run clear. Yes, you can use frozen chicken. However, it is best to thaw it first. Thaw in the fridge overnight or use the defrost setting on your microwave. This helps the chicken cook evenly and stay juicy. This dish goes well with rice, quinoa, or pasta. You can also serve it with crusty bread to soak up the garlic butter sauce. A light salad or garlic bread adds freshness and balance to the meal. Leftover garlic butter chicken can last up to three days in the fridge. Store it in an airtight container to keep it fresh. Reheat it in the microwave or on the stove until it is warm. Enjoy it again! This blog post covers how to make a tasty garlic butter chicken and veggies. We looked at ingredients, cooking steps, tips, and variations. You can easily customize this dish with different proteins or vegetables. Don't forget to check chicken doneness for the best results. With the right storage and reheating tips, leftovers will stay delicious. Try these methods to impress yourself and others. Cooking can be fun and rewarding! Enjoy your meals and happy cooking!
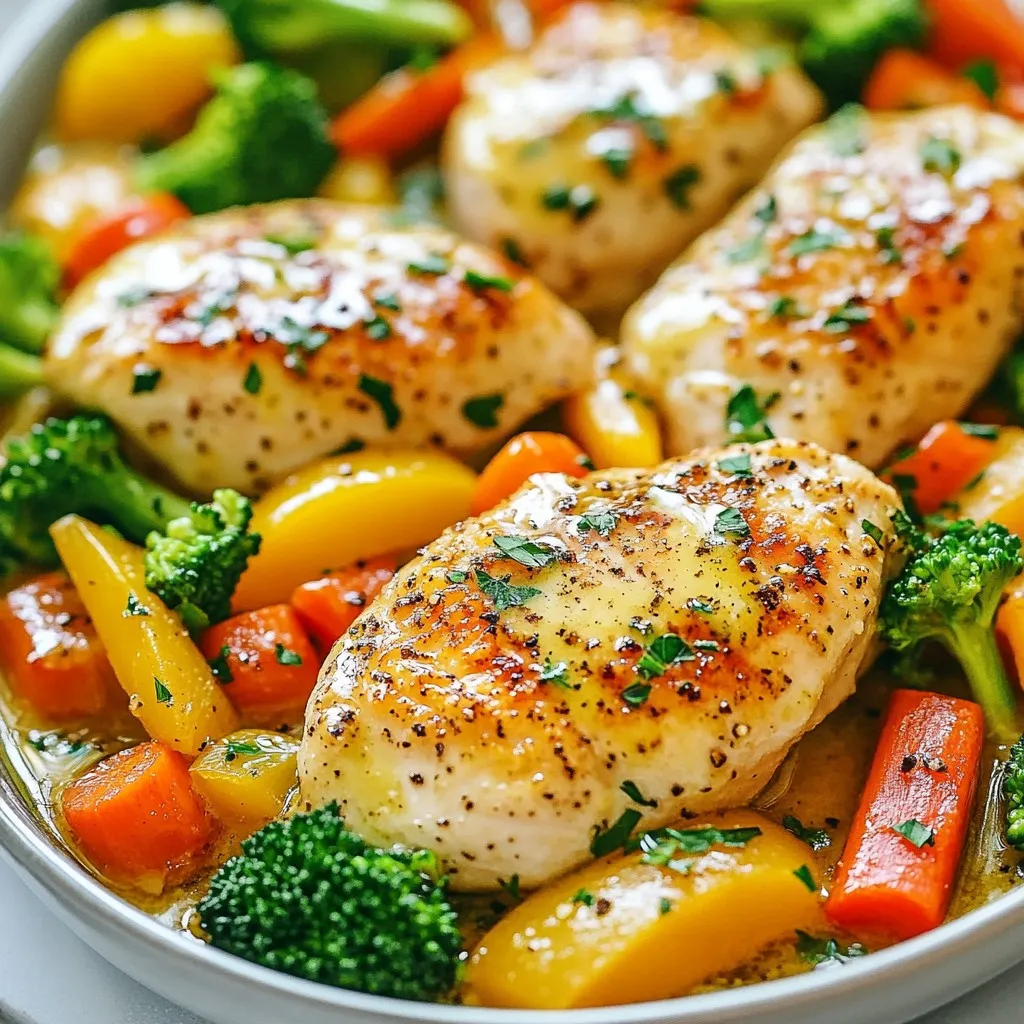
Garlic Butter Chicken & Veggies Simple and Tasty Dish
Looking for a quick, tasty meal? Try my Garlic Butter Chicken & Veggies! This simple dish bursts with flavor and is perfect for busy weeknights
- 200g (7 oz) cherry tomatoes - 200g (7 oz) block of feta cheese - 250g (9 oz) pasta options (penne, fusilli, or rotini) - 4 cloves of garlic, finely minced - 3 tablespoons extra virgin olive oil - 1 teaspoon dried oregano - Salt and freshly ground black pepper to taste - 1 teaspoon red chili flakes for spice - 1 tablespoon lemon juice for brightness - Fresh basil leaves for garnish Gather these ingredients to make TikTok baked feta pasta. The cherry tomatoes burst with flavor as they roast, while the feta cheese melts into a creamy sauce. You can pick any pasta you like, but I love using penne or fusilli. They both hold the sauce well. The garlic adds a nice kick. The olive oil makes everything rich and smooth. Don't forget the dried oregano; it gives a lovely herbal taste. If you like some heat, red chili flakes are a great choice. For a zesty touch, add lemon juice. Finally, top it all off with fresh basil for that perfect finish. These ingredients are simple yet come together to create a dish that feels special. Make sure you have everything on hand before you start cooking! {{ingredient_image_2}} 1. Preheat your oven to 400°F (200°C). This makes sure everything cooks evenly. 2. Grab a large baking dish. Spread the cherry tomatoes evenly in the dish. 3. Create a spot in the middle for the feta cheese block. Place it right there. 4. Drizzle 3 tablespoons of olive oil over the tomatoes and feta. It adds great flavor. 5. Sprinkle 4 minced garlic cloves, 1 teaspoon of dried oregano, and chili flakes if you want spice. Add salt and black pepper for taste. 1. Place the baking dish in the hot oven. Bake for 25-30 minutes. The tomatoes should blister and the feta should melt. 2. While that bakes, cook 250g of pasta according to package instructions. Look for the word "al dente," which means it should be firm but not hard. 3. Once the pasta is done, drain it. Be sure to save a cup of pasta water for later. 1. After baking, take the dish out of the oven. Use a fork to mash the feta into the tomatoes. This creates a creamy sauce. 2. Add the drained pasta to the baking dish. Pour a splash of the reserved pasta water in. It helps make the sauce creamy. 3. Toss everything together gently. Make sure the pasta is covered with the sauce. 4. If you like, squeeze a tablespoon of lemon juice over the pasta for a bright burst of flavor. 5. Serve hot and top with fresh basil leaves for a nice touch. To ensure a creamy sauce, mix in a bit of reserved pasta water. This helps the sauce stick to the pasta. If you want to change the pasta type, feel free to use penne, fusilli, or rotini. Each type gives a different texture that works well. For a better aroma, use fresh garlic. When you mince it, let it sit for a few minutes before using. This helps release its oils. If you like heat, adjust the spice level by adding more or less red chili flakes. Start with a pinch and taste as you go. To make a complete meal, pair your pasta with a side salad or some crusty bread. The crunch of the bread complements the creaminess of the dish. For plating, use a large bowl to show off the vibrant colors. A sprinkle of fresh basil on top adds a nice touch and aroma. Pro Tips Choose the Right Pasta: Opt for pasta that holds sauce well, like fusilli or rotini, to enhance the creamy texture. Quality Feta Matters: Use a high-quality feta cheese for the best flavor and creaminess; look for one packed in brine for extra moisture. Use Fresh Herbs: Fresh basil not only adds flavor but also brightens the dish; consider adding it just before serving for maximum freshness. Adjust Creaminess: If the sauce is too thick after mixing, add more reserved pasta water gradually until the desired consistency is reached. {{image_4}} You can easily swap ingredients to fit your tastes. If you want a vegan dish, use plant-based feta. Many brands offer great dairy-free options. You can also add more veggies for extra flavor and nutrition. Spinach is a wonderful choice. It wilts nicely and adds a fresh touch. Bell peppers add crunch and sweetness. Just chop them up and mix them in before baking. Want to spice things up? You can add protein to your pasta. Chicken, shrimp, or tofu all work well. Simply cook the protein separately and toss it in with the pasta. This adds heartiness and makes the dish more filling. You can also play with herbs. Try thyme for a floral note or rosemary for something earthy. Mixing different herbs can create a unique flavor profile. This dish is versatile. You can make a baked feta pasta casserole instead of serving it straight from the oven. Just layer the pasta and sauce in a baking dish and add cheese on top. Bake until bubbly and golden. Alternatively, enjoy it cold as a pasta salad. Just let it chill, then toss with some olive oil and fresh veggies. This makes a refreshing meal for hot days. After enjoying your TikTok baked feta pasta, store leftovers in airtight containers. Glass containers work best, as they help prevent odors. You can also use plastic containers, but make sure they close tightly. For refrigeration, let the pasta cool down before sealing. Place the container in the fridge within two hours. If you want to save it for longer, freezing is a great option. Just make sure to leave space in the container, as the pasta expands when frozen. To reheat, use a microwave or stovetop. If using a microwave, heat in short bursts. Stir the pasta between each burst to ensure even heating. If you use the stovetop, add a splash of water or extra olive oil. This keeps the pasta from drying out. After refrigeration, the sauce may seem thick. To bring back the creamy texture, add a little reserved pasta water. Stir well until it becomes smooth and creamy again. In the fridge, the baked feta pasta lasts about 3-4 days. Always check for signs of spoilage before eating. Look for changes in color or a sour smell. If anything seems off, it’s best to throw it away. You can use many types of pasta for this dish. I recommend: - Penne - Fusilli - Rotini These shapes hold the creamy sauce well. You want a pasta that’s fun to eat and captures every bite of that delicious sauce. Just make sure to cook it al dente for the best texture. Yes, you can make this recipe vegan. For a non-dairy option, try these: - Vegan feta cheese: Look for brands made from nuts or tofu. - Gluten-free pasta: Use rice or chickpea pasta if you prefer. These swaps still give you a tasty and creamy dish that everyone can enjoy, even those with dietary restrictions. This dish is perfect for meal prep! Here are some tips: - Cook the pasta and sauce in advance and store them separately. - Use airtight containers to keep them fresh. - Reheat the pasta and sauce together, adding a splash of water if needed. This way, you can enjoy a quick, delicious meal on busy days without losing flavor or creaminess! This blog post covered all the key steps to make baked feta pasta. You learned about the main ingredients and some optional ones for extra flavor. We discussed the cooking method and tips to ensure a creamy sauce. Variations let you customize this dish to your taste. Lastly, I shared how to store leftovers and reheat them properly. Enjoy trying this recipe and adapting it to your liking! You'll impress friends and family with minimal effort.
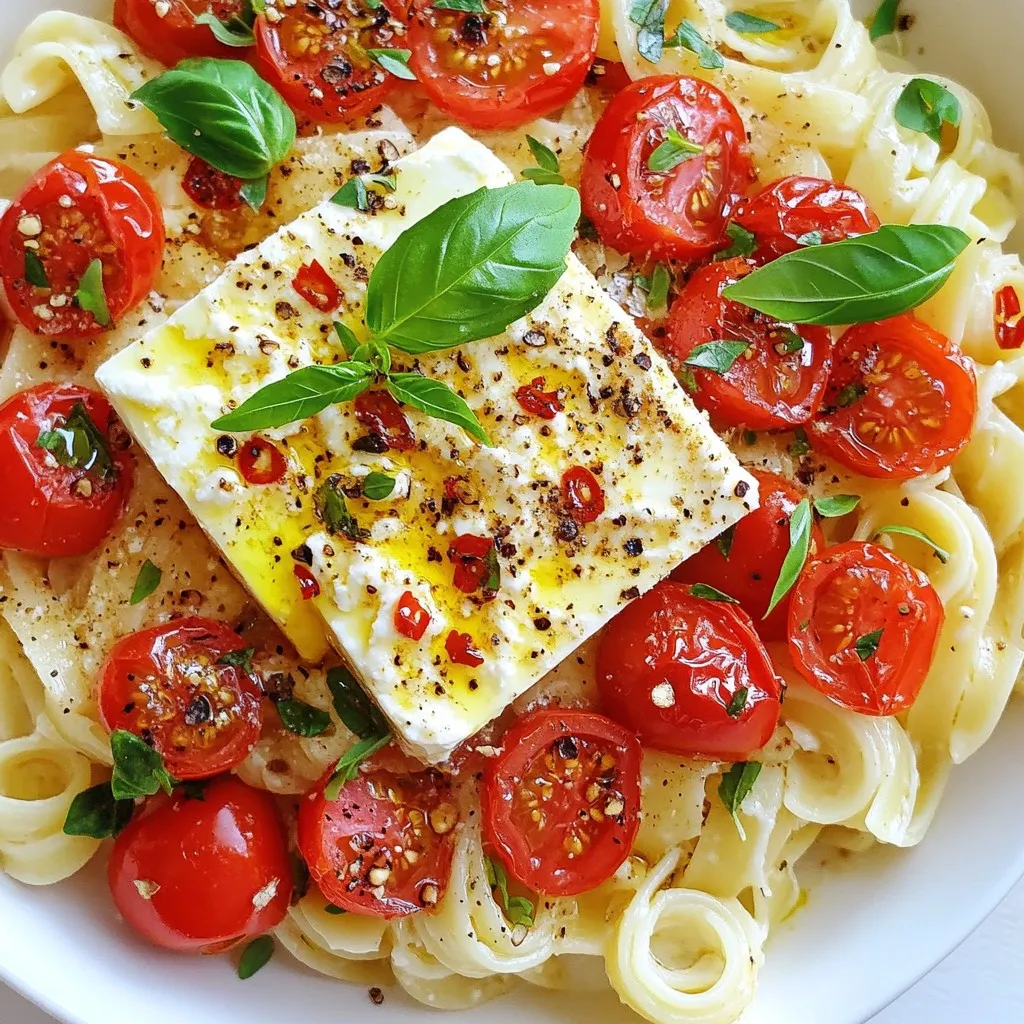
TikTok Baked Feta Pasta Easy and Creamy Recipe
Are you ready to impress your friends with a viral TikTok recipe? This TikTok Baked Feta Pasta is easy and creamy, making it a perfect
- 2 boneless chicken thighs - 2 tablespoons pure maple syrup - 1 teaspoon garlic powder - 1 teaspoon onion powder - 1/2 teaspoon smoked paprika - Salt and pepper, to taste - Fresh parsley, finely chopped (for garnish) Using quality ingredients makes a big difference in flavor. Fresh chicken adds juiciness and texture. Pure maple syrup brings sweetness and depth. Spices like garlic and onion powder enhance the taste. Good ingredients lead to a tasty meal. If you have allergies or preferences, you can swap some ingredients. For a sweeter taste, use honey instead of maple syrup. If you avoid garlic, try using a pinch of celery salt. For a different spice, use regular paprika instead of smoked. These swaps can keep your dish safe and enjoyable. {{ingredient_image_2}} First, set your air fryer to 400°F (200°C). This step will take about 3 minutes. Preheating ensures your chicken cooks evenly and gets a nice, crispy crust. Next, grab a small mixing bowl. Combine 2 tablespoons of pure maple syrup, 1 teaspoon of garlic powder, 1 teaspoon of onion powder, and 1/2 teaspoon of smoked paprika. Add salt and pepper to taste. Blend everything well. This marinade gives the chicken a sweet and savory flavor that is hard to resist! Now, take 2 boneless chicken thighs and place them in a shallow dish. Pour the marinade over the chicken. Make sure both sides are coated. Use your hands or a brush to rub the marinade into the chicken. This helps the flavors soak in nicely. Let it sit for a few minutes while the air fryer finishes preheating. Once the air fryer is hot, carefully place the marinated chicken thighs in the basket. Arrange them in a single layer without overlapping. Cook the chicken for 10 minutes. Flip the thighs halfway through for even cooking. Use a meat thermometer to check the chicken's internal temperature. It should read 165°F (74°C). This step is key for food safety. After cooking, take the chicken out and let it rest for 2 minutes. This helps keep the chicken juicy. Before serving, sprinkle fresh parsley on top for color and flavor! To keep your chicken juicy, marinate it well. The marinade adds flavor and moisture. Coat the chicken thighs fully, and let them sit for at least 10 minutes. This allows the flavors to sink in. Always check the internal temperature. It should reach 165°F (74°C). This ensures the chicken is safe and juicy. One common mistake is overcrowding the air fryer. This can cause uneven cooking. Always place the chicken in a single layer. Another mistake is skipping the marinade. The marinade is key for flavor and moisture. Lastly, don’t forget to flip the chicken halfway. This helps it cook evenly. Preheat your air fryer before cooking. This ensures a hot start. Use a meat thermometer to check the chicken. This gives you confidence in your cooking. Let the chicken rest after cooking. This step keeps it juicy. Finally, pair your dish with colorful sides. This makes your meal more appealing and balanced. Pro Tips Marinade Time: For even more flavor, let the chicken marinate for 30 minutes to an hour in the refrigerator before cooking. This allows the flavors to penetrate deeper into the meat. Cooking in Batches: If you're preparing more than two chicken thighs, cook them in batches to ensure even cooking and optimal crispiness. Overcrowding the air fryer can lead to uneven results. Resting Period: Always allow the chicken to rest after cooking. This step is crucial as it helps the juices redistribute throughout the meat, keeping it moist and tender. Serving Suggestions: Pair your maple chicken with a side of quinoa or brown rice for a healthy meal. Adding a fresh salad can also enhance the dish's flavors and provide a refreshing contrast. {{image_4}} You can change the flavor of your chicken with different marinades. Try using honey instead of maple syrup for a sweet twist. A soy sauce and ginger mix gives an Asian flair. For a spicy kick, add chili powder or hot sauce to the marinade. You can also use herbs like rosemary or thyme for a fresh taste. Mix and match to find your favorite! If you don't have an air fryer, you can cook the chicken in other ways. A grill gives a nice smoky flavor. Just marinate the chicken and cook it on medium heat for about 6-8 minutes per side. You can also bake the chicken in an oven at 400°F for 20-25 minutes. Always check the inside temperature to be sure it reaches 165°F. Pair your maple chicken with sides that balance its sweetness. Steamed broccoli or green beans add color and crunch. A light salad with mixed greens and a lemon dressing works well too. For something heartier, serve it with rice or quinoa. You can also add a slice of crusty bread to soak up the flavors. Each side adds its own charm to your meal! To store your leftover maple chicken, place it in an airtight container. Make sure to cool the chicken to room temperature first. This helps keep the chicken fresh. You can store it in the fridge for up to three days. If you want to save it longer, consider freezing. To reheat, simply take the chicken out of the fridge. You can use the air fryer again for the best results. Preheat the air fryer to 350°F (175°C). Cook the chicken for about 5-7 minutes. This will help keep it juicy and warm. Alternatively, you can use a microwave. Just heat it in short bursts, checking often to avoid overcooking. You can freeze the chicken if you want to save it for later. Wrap each piece in plastic wrap or aluminum foil. Then, place them in a freezer bag. Label the bag with the date. The chicken can stay in the freezer for up to three months. When you are ready to eat, thaw it in the fridge overnight before reheating. Cooking chicken in an air fryer takes about 10 minutes. This time may vary based on thickness. Flip the chicken halfway for even cooking. Always check the internal temperature for safety. Yes, you can use chicken breasts. They may cook a bit faster than thighs. Adjust the cooking time to avoid dryness. Check for an internal temperature of 165°F (74°C). Chicken should reach an internal temperature of 165°F (74°C). Use a meat thermometer for accuracy. This ensures the chicken is safe to eat. It also helps keep the meat juicy. You can double the recipe. Just ensure the air fryer has enough space. Avoid overcrowding the basket. Cook in batches if needed to maintain even cooking. Air frying is healthier than deep frying. It uses less oil, reducing fat and calories. Air frying also keeps the flavor intact. It's a great way to enjoy crispy food without guilt. This blog post covered everything you need to know about air frying chicken. We explored quality ingredients, proper cooking steps, and helpful tips for juicy results. I shared variations and storage info to make meal prep easier. Air frying is not just tasty; it's healthy too. Remember the importance of quality ingredients and avoid common mistakes. With these tips, you can enjoy delicious, perfectly cooked chicken. Get ready to impress your family and friends with your cooking skills!
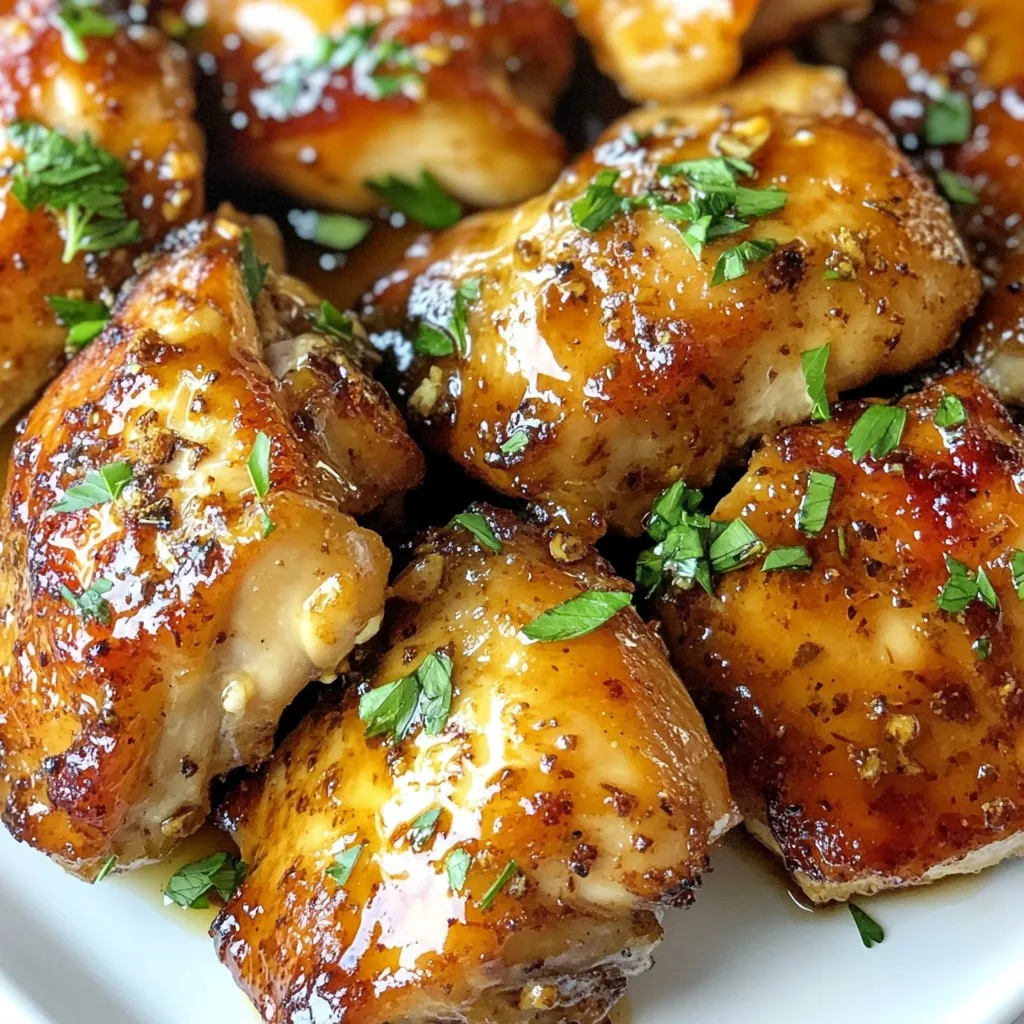
Five Minute Air Fryer Maple Chicken Tasty and Quick Meal
Are you looking for a quick and tasty meal? This Five Minute Air Fryer Maple Chicken is the answer! With simple ingredients and easy steps,
- 4 bone-in, skin-on chicken thighs - 4 medium russet potatoes, cut into fry shapes - 1/4 cup olive oil - 1 tablespoon garlic powder - 1 teaspoon paprika - 1 teaspoon cayenne pepper (adjust based on spice preference) - 1/2 teaspoon salt - 1/2 teaspoon black pepper - 1/2 cup freshly grated Parmesan cheese - 1 tablespoon fresh parsley, finely chopped (for garnish) - 2 tablespoons hot sauce (optional for extra kick) You need these ingredients to create Spicy Garlic Parmesan Chicken and Fries. The chicken thighs offer rich flavor. Using skin-on thighs keeps them juicy. The russet potatoes give you a great base for crispy fries. Olive oil helps the spices stick and adds flavor. For seasoning, I recommend garlic powder for that strong aroma. Paprika adds a nice color and mild taste. Cayenne pepper brings the heat, so adjust it to your liking. Salt enhances every bite. Black pepper adds a touch of warmth. When garnishing, fresh Parmesan cheese melts beautifully. It gives a nice salty flavor that pairs well with garlic. Chopped parsley adds color and freshness. If you like more heat, drizzle hot sauce before serving. This combination makes the dish pop! {{ingredient_image_2}} - Preheat the oven to 425°F (220°C). This step is key for crispy fries. - Cut four medium russet potatoes into fry shapes. Toss them in a large bowl. - Add 2 tablespoons of olive oil, garlic powder, paprika, cayenne pepper, salt, and black pepper. Mix well to coat the potatoes evenly. Spread the fries on a baking sheet lined with parchment paper. - In a separate bowl, blend 2 tablespoons of olive oil with garlic powder, paprika, cayenne pepper, salt, and black pepper. - Rub this tasty mixture all over the chicken thighs. Make sure to cover every bit of the chicken for full flavor. - Place the fries in the preheated oven. Bake them for 20 minutes. This gives them time to start crisping up. - After 20 minutes, take the fries out and make space on the baking sheet. Place the chicken thighs skin-side up on the sheet. Sprinkle the freshly grated Parmesan cheese over the chicken. - Return the baking sheet to the oven. Bake for another 25-30 minutes. The chicken should reach an internal temperature of 165°F (75°C), and the fries should look golden and crispy. Follow these steps, and you will have a delicious meal ready to serve! Marinating chicken boosts the flavor. By letting the chicken sit in the oil and spices, it soaks up all that goodness. I suggest a minimum of 30 minutes but longer is better. This step makes a big difference in taste. Balancing spice is key. If you love heat, add more cayenne pepper. If you prefer less spice, reduce the cayenne. Always taste your seasoning mix before applying it. Adjust it to match your taste. To get crispy fries, use a high oven temp. Spread the fries out on the baking sheet. This helps hot air circulate, making them crispy. Turn them halfway through baking for even crispiness. To check if chicken is done, use a meat thermometer. The safe internal temp is 165°F (75°C). If you don’t have a thermometer, cut into the chicken. The juices should run clear, not pink. For a great presentation, serve the chicken and fries on a large platter. You can sprinkle extra parsley on top. Add a small bowl of hot sauce on the side. This lets everyone customize their meal. Pair your dish with a fresh salad or coleslaw. These sides add crunch and balance to the meal. You can also serve it with a creamy dipping sauce for the fries. Pro Tips Get the Right Crisp: For extra crispy fries, soak the cut potatoes in cold water for at least 30 minutes before seasoning and baking. This helps remove excess starch. Use Fresh Ingredients: Always opt for freshly grated Parmesan cheese instead of pre-grated for better flavor and texture. It melts beautifully! Temperature Matters: For the best results, use a meat thermometer to ensure your chicken thighs reach an internal temperature of 165°F (75°C) for juicy and safe eating. Customize the Spice: Feel free to adjust the amount of cayenne pepper and hot sauce based on your heat preference. You can also add other spices like garlic or onion powder for more flavor. {{image_4}} To change the flavor of your Spicy Garlic Parmesan Chicken and Fries, try new seasonings. You can swap garlic powder for onion powder for a milder taste. If you want more heat, add extra cayenne pepper or even some chili powder. If you cannot find chicken thighs, chicken breasts work well too. They will cook faster, so keep an eye on them. For a different twist, use bone-in, skin-on chicken drumsticks. They will give you juicy meat and crispy skin. If you prefer a healthier option, an air fryer is a great choice. Cook the chicken and fries in the air fryer for a crispy finish with less oil. Set the air fryer to 400°F (200°C) and cook for about 25-30 minutes. This method keeps the flavors while cutting down on fat. In summer, grilling is fun. Marinate the chicken with the same spices, then grill it over medium heat. This gives the chicken a smoky flavor that pairs beautifully with fries. You can also toss the fries on the grill in a grill basket for a charred taste. For a gluten-free option, check the labels on your seasonings. Some spices may contain gluten. You can use gluten-free hot sauce to keep the heat without any gluten. If you want a vegetarian dish, try using cauliflower instead of chicken. Cut the cauliflower into florets, season, and bake them like the chicken. You can also use firm tofu for a protein boost. Just make sure to press the tofu to remove excess moisture before seasoning. To store your spicy garlic Parmesan chicken and fries in the fridge, let them cool first. Place them in an airtight container. This keeps them fresh and tasty. You can store leftovers for up to three days. For reheating, use an oven or an air fryer. Preheat the oven to 375°F (190°C). Place the chicken and fries on a baking sheet. Heat for about 10-15 minutes or until warm. This helps keep the fries crispy. To prepare in advance, you can season the chicken and cut the potatoes a day before. Store the seasoned chicken and potatoes in the fridge. This saves time on cooking day. For long-term storage, you can freeze the seasoned chicken. Wrap it tightly in plastic wrap, then place it in a freezer bag. It will last for up to three months in the freezer. You can also freeze the fries, but they may lose some crispness. Leftovers stay safe to eat for three days in the fridge. If you freeze the chicken, it can last for three months. Signs of spoilage include a bad smell or a change in color. If the chicken feels slimy or the fries look dry, throw them away. Always trust your senses to keep your food safe. How long do I need to cook chicken thighs? You should cook chicken thighs for about 25-30 minutes at 425°F (220°C). This will help them reach an internal temperature of 165°F (75°C). Cooking time may vary based on your oven, so use a meat thermometer to check. Can I make the fries crispy without oil? Yes, you can. To make crispy fries without oil, soak the cut potatoes in water for 30 minutes. This removes excess starch. After soaking, dry them well. Then, bake them at a high temperature. Use parchment paper to prevent sticking. What goes well with Spicy Garlic Parmesan Chicken and Fries? You can serve coleslaw or a simple green salad with your dish. These sides add freshness and crunch. A light vinaigrette can balance the spice. You may also want to include garlic bread for a comforting touch. What's a good dipping sauce for fries? A zesty garlic aioli pairs well with fries. Mix mayo, minced garlic, lemon juice, and a pinch of salt. You can also use ketchup or ranch dressing. For an extra kick, try a spicy sriracha dip. How can I make this dish less spicy? To reduce the spice, simply cut back on the cayenne pepper. You can also skip the hot sauce. Use regular paprika instead of spicy paprika for a milder flavor. Can I use different types of cheese? Absolutely! You can use mozzarella or cheddar cheese instead of Parmesan. Each cheese will add a unique flavor. Feel free to mix cheeses for a fun twist! This recipe blends tasty chicken thighs and crispy fries. You can adjust spice and swap ingredients to fit your taste. Use the cooking tips for perfect results every time. Don’t forget about meal prep and safe storage for leftovers. Enjoy this dish with fun sides and sauces. I hope you feel inspired to make it your own and share it with family and friends. Happy cooking!
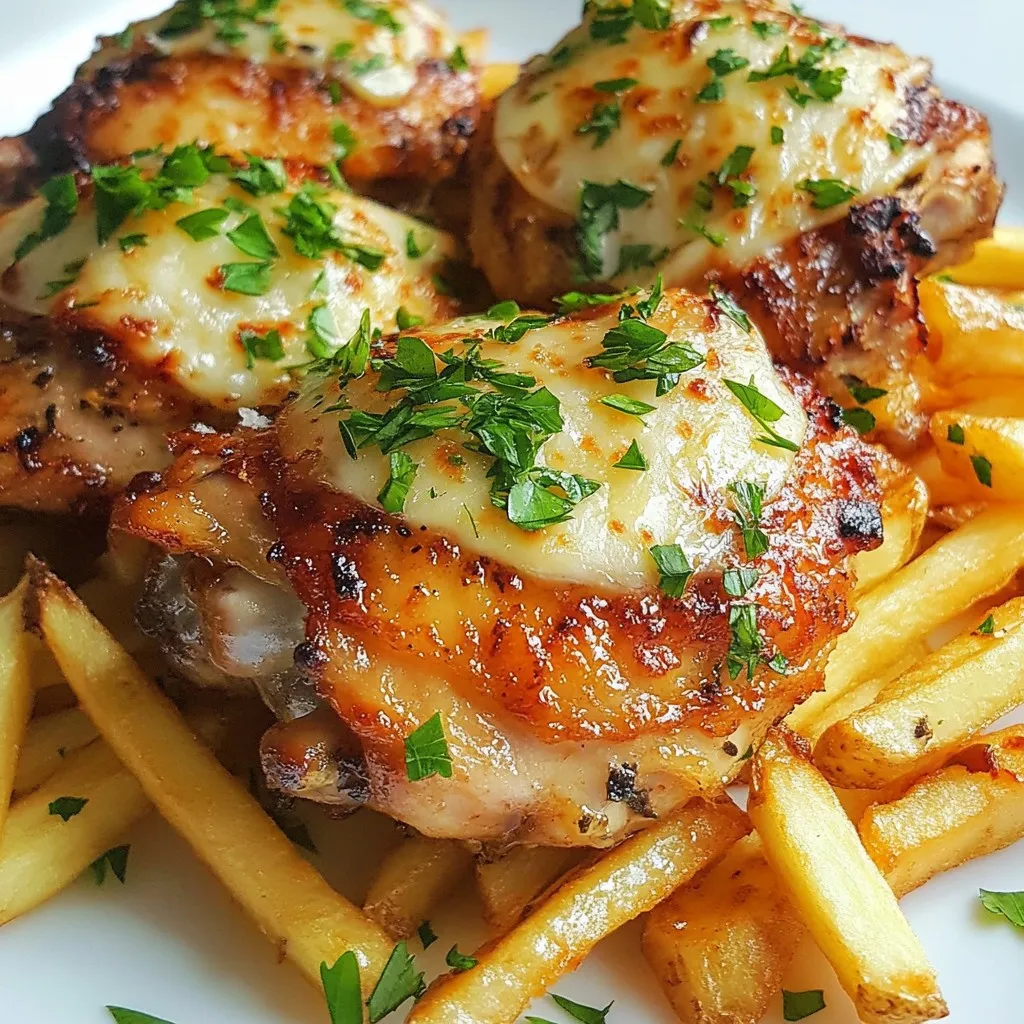
Spicy Garlic Parmesan Chicken and Fries Irresistible Dish
Are you ready for a flavor explosion? Spicy Garlic Parmesan Chicken and Fries is the ultimate comfort food that will leave your taste buds begging
- 4 boneless, skinless chicken breasts - 1 packet (1 oz) ranch seasoning mix - 1 cup cream cheese, softened to room temperature - 1 cup low-sodium chicken broth - 1 cup diced potatoes, about ½-inch cubes - 1 cup frozen peas and carrots mix - 1 teaspoon garlic powder - 1 teaspoon onion powder - Freshly ground salt and pepper, to taste - Fresh parsley, chopped, for garnish To make Creamy Ranch Crockpot Chicken, you need simple ingredients. I love using boneless, skinless chicken breasts. They cook evenly and soak up all the flavors. You’ll also need a packet of ranch seasoning mix. This gives the dish its signature taste. Cream cheese is key for that creamy texture. Make sure it’s softened, so it blends well. Low-sodium chicken broth keeps the dish tasty but not too salty. Diced potatoes add heartiness, and frozen peas and carrots bring color and nutrition. Don’t forget garlic and onion powder for extra flavor. Finally, add salt and pepper to taste. Fresh parsley makes a lovely garnish and adds a pop of color. This mix of ingredients creates a delicious meal that is easy to prepare. {{ingredient_image_2}} - Layering Chicken Breasts Start by laying four boneless, skinless chicken breasts in the crockpot. Make sure they are flat at the bottom. This helps them cook evenly and absorb all the flavors. - Creating the Creamy Ranch Mixture In a medium bowl, mix one packet of ranch seasoning with one cup of softened cream cheese. Add one cup of low-sodium chicken broth, one teaspoon of garlic powder, and one teaspoon of onion powder. Whisk these ingredients well until there are no lumps. The mixture should be smooth and creamy. - Adding Layers in the Crockpot Carefully pour the creamy ranch mixture over the chicken breasts, making sure to spread it evenly. Layer one cup of diced potatoes on top, followed by a cup of frozen peas and carrots. This adds color and nutrition to the dish. - Cooking Time and Settings Season everything with freshly ground salt and pepper. Adjust it to your taste. Cover the crockpot and set it to cook on low for 6-8 hours or on high for 4-5 hours. The chicken should be tender enough to shred when done. - Shredding the Chicken Once the cooking time is up, use two forks to shred the chicken right in the crockpot. This helps mix the chicken with the creamy sauce and vegetables. - Mixing Flavors Together Stir everything well to combine the flavors. Ladle the creamy ranch chicken into bowls and garnish with freshly chopped parsley for a bright finish. Enjoy this delicious meal! Adjusting Seasoning to Taste Taste is key in this dish. Start with the ranch seasoning mix. You can always add more if needed. I like to sprinkle in a bit of salt and pepper, too. This helps bring out the flavors. If you want it spicier, add a dash of cayenne or paprika. Always taste as you go! Ensuring Cream Cheese is Softened Softened cream cheese blends better. Take it out of the fridge about 30 minutes before you start cooking. This way, it mixes smoothly with the other ingredients. If you're in a hurry, you can cut it into small cubes. This helps it soften faster when you whisk it with the ranch mix and broth. Serving with Side Dishes This creamy ranch chicken pairs well with many sides. Try serving it over rice or mashed potatoes for a hearty meal. You can also add warm bread to soak up the sauce. A fresh salad or steamed veggies add a nice touch, too. Presentation Ideas for Garnishing A little garnish goes a long way. After serving, sprinkle fresh parsley on top. It adds color and a burst of flavor. You can also place a lemon wedge on the side. This gives a bright contrast and a zesty taste. A little bit of creativity makes your meal look special! Pro Tips Use Fresh Ingredients: Fresh herbs and vegetables can elevate the dish's flavor, making it even more delicious. Customize Your Veggies: Feel free to swap in your favorite vegetables or whatever you have on hand for a personalized touch. Shred Chicken for Better Flavor: Shredding the chicken allows it to absorb more of the creamy ranch sauce, enhancing every bite. Make It Ahead: This dish is great for meal prep! Cook it in advance and reheat for quick, satisfying meals throughout the week. {{image_4}} Alternatives for Cream Cheese If you want a lighter option, you can swap cream cheese for Greek yogurt. It adds creaminess and a bit of tang. You can also use sour cream for a different taste. Both options work well in this dish. Differing Protein Options Chicken is great, but you can try pork or turkey too. Boneless thighs add flavor and stay juicy. For a vegetarian twist, use chickpeas or tofu. Just make sure to adjust the cooking time. Extra Vegetables to Include Feel free to add more veggies for extra nutrients. Bell peppers or corn can add sweetness. You can also include green beans or broccoli for color and crunch. Just chop them into small pieces for even cooking. Spices for Different Flavor Profiles Spices can change the taste of your dish. Try adding a dash of paprika for smokiness. If you love heat, toss in some cayenne pepper. For an Italian vibe, mix in dried oregano or basil. These simple changes can create a whole new meal. To keep your Creamy Ranch Crockpot Chicken fresh, store it in the fridge. Use an airtight container to prevent spills and keep out air. This dish stays tasty for about 3 to 4 days. Always let it cool before sealing it up. This helps keep the chicken juicy and the flavors intact. If you want to save some for later, freezing is a great option. Start by letting the dish cool completely. Then, scoop it into freezer-safe bags or containers. Make sure to remove as much air as possible to avoid freezer burn. You can freeze it for up to 3 months. When you are ready to eat, thaw it overnight in the fridge. Then, heat it gently in a pot on the stove. Stir it well to maintain the creamy texture. You can also reheat it in the microwave, but be sure to cover it to keep it moist. The cooking time for Creamy Ranch Crockpot Chicken varies by setting. If you use the low setting, it will take about 6 to 8 hours. On the high setting, it cooks in 4 to 5 hours. Always check the chicken for doneness. It should be tender enough to shred easily. Yes, you can use fresh chicken. Fresh chicken cooks faster than frozen. If you decide to use fresh chicken, reduce the cooking time by about 1 hour on each setting. This change helps keep the chicken juicy and tender. You can serve Creamy Ranch Crockpot Chicken with many sides. Here are some good choices: - Warm bread or rolls - Steamed rice or quinoa - A simple garden salad - Roasted vegetables - Mashed potatoes These sides make your meal complete and satisfying. Consider adding a lemon wedge for a fresh twist. This recipe for Creamy Ranch Crockpot Chicken offers a blend of flavors and ease. You used simple ingredients like chicken, cream cheese, and ranch seasoning. The step-by-step instructions guide you through making it perfectly. Remember to adjust flavors based on your taste and keep leftovers for later. This dish is versatile, allowing you to use different proteins and vegetables. You can serve it with various sides for a full meal. Enjoy the cooking process and the delicious result!
Creamy Ranch Crockpot Chicken Simple and Tasty Meal
Looking for a simple, tasty meal that practically cooks itself? Look no further than Creamy Ranch Crockpot Chicken! With just a few easy ingredients, you