Dinner

- 1 pound boneless, skinless chicken breast, thinly sliced into strips - 2 cups broccoli florets, washed - 1 bell pepper, sliced into thin strips (any color you prefer) - 3 cloves garlic, finely minced - 1-inch piece fresh ginger, grated To make this dish pop with flavor, I always use fresh ingredients. The chicken breast cooks quickly and stays juicy. Broccoli adds a nice crunch, while bell pepper brings color. Garlic and ginger give it that aromatic kick. - 3 tablespoons soy sauce (or tamari for a gluten-free option) - 2 tablespoons honey or maple syrup for sweetness - 1 tablespoon sesame oil to enhance flavor - 1 tablespoon olive oil for cooking The sauce is key to this stir fry. I mix soy sauce, honey, sesame oil, and garlic to create a rich taste. You can swap honey for maple syrup if you want a different sweet note. The olive oil helps cook the chicken without sticking. - Sesame seeds - Sliced green onions - Salt and pepper to taste Garnishes add the finishing touch. I love to sprinkle sesame seeds on top for crunch. Green onions add a fresh taste. Just a pinch of salt and pepper brings all the flavors together. These simple additions make the dish look great and taste even better. {{ingredient_image_2}} To start, thinly slice the chicken breast into strips. Aim for uniform pieces so they cook evenly. Use a sharp knife for clean cuts. After slicing, season the chicken lightly with salt and pepper. This boosts the chicken's flavor. Set the seasoned chicken aside while you prepare the other ingredients. Next, bring water to a rolling boil in a medium pot. Add the broccoli florets and blanch them for exactly 2 minutes. This keeps the broccoli bright green and crisp. After blanching, quickly transfer the broccoli to a bowl filled with ice-cold water. This stops the cooking. Once cooled, drain the broccoli and set it aside. In a small bowl, whisk together the soy sauce, honey (or maple syrup), sesame oil, minced garlic, and grated ginger. Mix until well combined. This sauce adds a rich flavor to your stir fry. Set the sauce aside for later use. Heat olive oil in a large skillet or wok over medium-high heat. When the oil is hot, add the sliced chicken strips. Stir-fry the chicken for 3 to 4 minutes. You want it to cook through and turn a light golden-brown. Once cooked, remove the chicken from the skillet and place it on a plate. In the same skillet, add the sliced bell pepper and the blanched broccoli. Stir-fry these vegetables for 2 to 3 minutes. Toss them frequently until they are tender-crisp. This texture keeps them crunchy and colorful. Now it's time to bring everything together. Return the cooked chicken to the skillet with the veggies. Pour the sauce over all the ingredients, ensuring even coverage. Gently toss everything to coat with the sauce. Add the cornstarch mixture to thicken the sauce. Continue to stir-fry for about 1 more minute. Remove the skillet from heat. For a nice touch, garnish your stir fry with sesame seeds and sliced green onions. This adds both flavor and a pop of color. Serve the dish right away, either on its own or over rice or noodles for a complete meal. For a finishing touch, consider drizzling a bit of extra sesame oil on top before serving. Using high heat is key for fast cooking. When you heat your skillet or wok, make sure it's very hot. This helps the chicken cook quickly and evenly. The high heat also gives the chicken a nice golden color. When the pan is hot, add olive oil and let it shimmer before adding chicken. This way, your stir fry stays crisp and fresh. To adjust sweetness and spice, taste as you go. If you want it sweeter, add more honey or maple syrup. For spice, consider adding red pepper flakes or fresh chili. Mixing flavors can elevate your dish. Keep in mind that a little goes a long way, so start small. To achieve tender-crisp vegetables, blanch them first. This means cooking them briefly in boiling water. After two minutes, move them to ice-cold water. This stops the cooking process and keeps them bright green. When stir-frying, cook them just until they are vibrant and slightly soft. This method ensures that your broccoli and bell pepper stay crunchy and full of flavor. Pro Tips Uniform Slicing: Ensure your chicken is sliced uniformly to promote even cooking throughout the stir fry. Blanching Benefits: Blanch the broccoli to maintain its bright color and crisp texture, enhancing both appearance and flavor. Flavor Boosting: Consider adding a splash of rice vinegar or lime juice to the sauce for an extra layer of tangy flavor. Serving Suggestions: For a heartier meal, serve the stir fry over steamed rice or noodles, complementing the flavors beautifully. {{image_4}} You can swap chicken for other proteins. Tofu is a great choice for a veggie meal. It soaks up flavor well and adds protein. Shrimp cooks fast and gives a nice twist. Just be sure not to overcook it. Beef can also work well if you slice it thinly. Each option brings a unique taste to your stir fry. Feel free to mix in other veggies. Carrots add color and sweetness. Snow peas offer a nice crunch. You can even use zucchini for a fresh twist. Just remember to cut them into similar sizes. This way, everything cooks evenly. Play around with what you have on hand! You can easily make this dish fit your needs. For gluten-free, use tamari instead of soy sauce. This keeps all the flavor without gluten. If you want a low-carb meal, skip the rice. Serve the stir fry on its own or with cauliflower rice. You can enjoy a tasty meal while sticking to your diet! To store your chicken and broccoli stir fry, let it cool first. Use an airtight container. This helps keep it fresh. Place it in the fridge for up to three days. If you want to keep it longer, consider freezing. When reheating, use the stovetop or microwave. For the stovetop, heat a pan and add a splash of water. Stir often. This keeps the veggies crunchy and chicken juicy. In the microwave, use a lower power setting. Heat in short bursts and stir in between. Yes, you can freeze stir fry! Make sure it cools down first. Then, use freezer-safe bags. Remove as much air as possible. This helps avoid freezer burn. It can last for up to three months. When ready, thaw in the fridge overnight before reheating. Making chicken and broccoli stir fry takes about 20 minutes. Here’s the timing breakdown: - Prep Time: 10 minutes to slice the chicken and veggies. - Cooking Time: 10 minutes to stir-fry everything. This quick dish fits well into any busy schedule. Yes, you can use frozen broccoli. However, there are pros and cons. Pros: - Frozen broccoli is convenient and ready to use. - It saves time since you don’t need to wash or cut it. Cons: - Frozen broccoli may have a softer texture when cooked. - Fresh broccoli has a better crunch and color. If you choose frozen, use it straight from the bag. No need to thaw. You can serve this dish with several sides for a complete meal: - Steamed rice or quinoa adds a nice base. - Noodles, such as rice noodles, pair well with the stir fry. - A simple salad can add freshness and crunch. These sides enhance the meal and make it more filling. If you want more heat, try these tips: - Add red pepper flakes to the sauce for an instant kick. - Include fresh chopped chili peppers when stir-frying the chicken. - Drizzle sriracha or another hot sauce on top before serving. Adjust the spice to match your taste! This blog post covered how to make a delicious chicken and broccoli stir fry. We looked at key ingredients, sauces, and easy steps. You learned quick cooking techniques, flavor tips, and ways to change the recipe. Storing leftovers and reheating were also explained, ensuring your dish stays tasty. In summary, stir frying is fast and fun. Now you can impress anyone with your cooking skills. Enjoy making this meal and feel confident trying new variations!
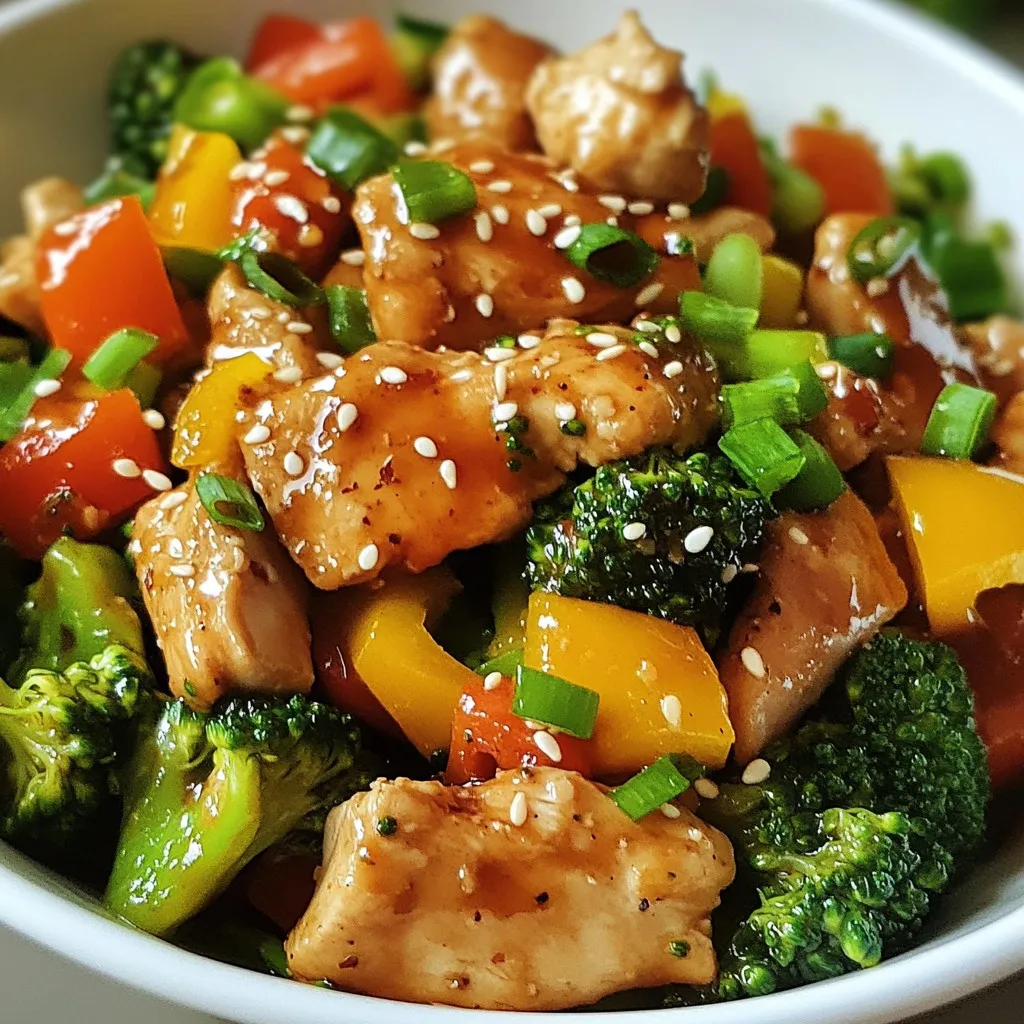
Minute Chicken and Broccoli Stir Fry Recipe Delight
Ready for a quick and tasty meal? This Minute Chicken and Broccoli Stir Fry is a perfect choice. In just minutes, you can whip up
- 1 pre-made pizza dough - 1 cup cooked shredded chicken - 1/2 cup chili garlic sauce - 1 cup mozzarella cheese - 1/2 cup red bell pepper, thinly sliced - 1/2 cup red onion, thinly sliced - 1/4 cup fresh cilantro, chopped - 1 teaspoon olive oil - 1/2 teaspoon crushed red pepper flakes - Salt and pepper, to taste When you gather your ingredients, pick fresh ones for the best flavor. The pre-made pizza dough saves time and effort. You can find it at most grocery stores. If you feel adventurous, you can make your own dough! Shredded chicken is simple. You can use leftover chicken or store-bought rotisserie chicken. The chili garlic sauce adds a bold kick and pairs well with the chicken. Adjust this sauce to fit your spice level. Mozzarella cheese gives that melty, gooey texture we love on pizza. For veggies, red bell pepper and red onion add color and crunch. Fresh cilantro brings a burst of flavor at the end. For seasoning, a touch of olive oil helps the crust golden. Crushed red pepper flakes give extra heat, but skip them if you prefer mild flavors. Don't forget salt and pepper! Season to your taste for the best results. This combination of ingredients makes for a tasty, flavorful pizza. Enjoy the process of gathering and preparing your ingredients! {{ingredient_image_2}} - Preheat your oven to 475°F (245°C). This heat is key for a crispy crust. - Lightly flour your work surface. Roll out the pizza dough to your desired thickness. - In a bowl, combine shredded chicken with chili garlic sauce. - Stir until the chicken is well coated. This makes every bite flavorful. - Brush a thin layer of olive oil on the rolled dough. - Spread the chicken mixture evenly over the dough. - Sprinkle shredded mozzarella cheese on top. - Add sliced red bell pepper and red onion for crunch. - Place the pizza in your hot oven. Bake for 12-15 minutes. - Look for a golden crust and melted cheese. - Let it cool for a few minutes before slicing. To get a great crust, start with the right oven temperature. Preheat your oven to 475°F (245°C). A hot oven makes the crust crispy and delicious. Next, roll out your pizza dough to the right thickness. A thin crust cooks faster and gets crispy, while a thick crust is soft and chewy. Choose what you like best! Adjusting the chili garlic sauce is key to your pizza's taste. If you like it spicy, add more sauce. For a milder flavor, use less. Feel free to mix in some crushed red pepper flakes for extra heat! You can also try adding toppings like sliced mushrooms or olives to enhance the flavor. These add texture and taste. Presentation is important for any dish. Serve your pizza on a wooden pizza board for a rustic look. Cut it into even slices for easy sharing. You can also place extra chili garlic sauce on the side for dipping. For a pop of color, sprinkle fresh cilantro on top just before serving. It makes your pizza look fresh and inviting. Pro Tips Use Fresh Ingredients: Fresh vegetables and high-quality chicken will elevate the flavor of your pizza significantly. Adjust the Spice Level: Taste the chili garlic sauce before adding to the chicken, and adjust the amount based on your heat preference. Let the Dough Rest: Allow your pizza dough to rest at room temperature for about 30 minutes before rolling it out to improve its elasticity. Experiment with Toppings: Don’t hesitate to add other toppings like jalapeños or pineapple to customize your pizza to your liking. {{image_4}} You can add a spicy kick to your chili garlic chicken pizza. Try adding sliced jalapeños or spicy sausage. The jalapeños give a fresh heat that pairs well with the garlic sauce. Spicy sausage adds a rich flavor and a bit of zest. You can adjust the amount based on your taste. Start with a small amount and add more if you like it hotter. If you want a meatless pizza, you can easily swap out the chicken. Use plant-based proteins like tofu or tempeh instead. Toss them in the chili garlic sauce just like you would with chicken. This keeps the bold flavor while making it vegetarian. You can also add more veggies, like mushrooms or spinach, for extra taste and texture. Want to change things up? Explore different sauce bases for your pizza. Try using pesto for a fresh, herby flavor. BBQ sauce can also work for a sweet and smoky twist. These sauces change the taste and can add a fun surprise. Don’t be afraid to mix and match your favorite flavors! To keep your Chili Garlic Chicken Pizza fresh, store any leftovers in the fridge. Place the pizza slices in an airtight container. You can also wrap them in plastic wrap. Make sure to eat the leftovers within three days for the best taste. When you want to enjoy your pizza again, reheat it in the oven. Set your oven to 375°F (190°C). Place the pizza directly on the oven rack for about 10 minutes. This method keeps the crust crispy. If you're in a hurry, you can use a microwave. Just be aware it may make the crust soft. If you want to save your pizza for later, freezing is a great option. First, let the pizza cool completely. Then, slice it and wrap each slice in plastic wrap. Place the wrapped slices in a freezer bag. You can freeze them for up to three months. When you're ready to eat, thaw it in the fridge overnight. Then reheat in the oven for the best results. Chili garlic sauce is a spicy mix of chili peppers, garlic, and vinegar. It adds heat and flavor to dishes. If you don't have it, you can use sriracha or a mix of crushed red peppers and minced garlic. Both options can add a nice kick. Yes, making pizza dough at home is easy. Here’s a simple recipe: - 2 cups all-purpose flour - 1 teaspoon yeast - 1 teaspoon salt - 3/4 cup warm water - Mix flour, yeast, and salt in a bowl. - Add warm water and stir until a dough forms. - Knead for 5-7 minutes, then let it rise for 1 hour. You can control the heat by adjusting the amount of chili garlic sauce. Start with less sauce and taste as you go. If you want more spice, add crushed red pepper flakes. For less heat, use bell peppers or omit the flakes. Experiment until it suits your taste! This blog post covered making a delicious pizza with simple ingredients. We started with main ingredients like pre-made dough, cooked chicken, and chili garlic sauce. I shared steps for prepping, mixing, and baking. Tips helped boost crust quality and flavor. You can also try variations for spice or vegetarian options. Finally, I outlined how to store and reheat your leftovers. Enjoy crafting your pizza and don't hesitate to experiment with flavors!
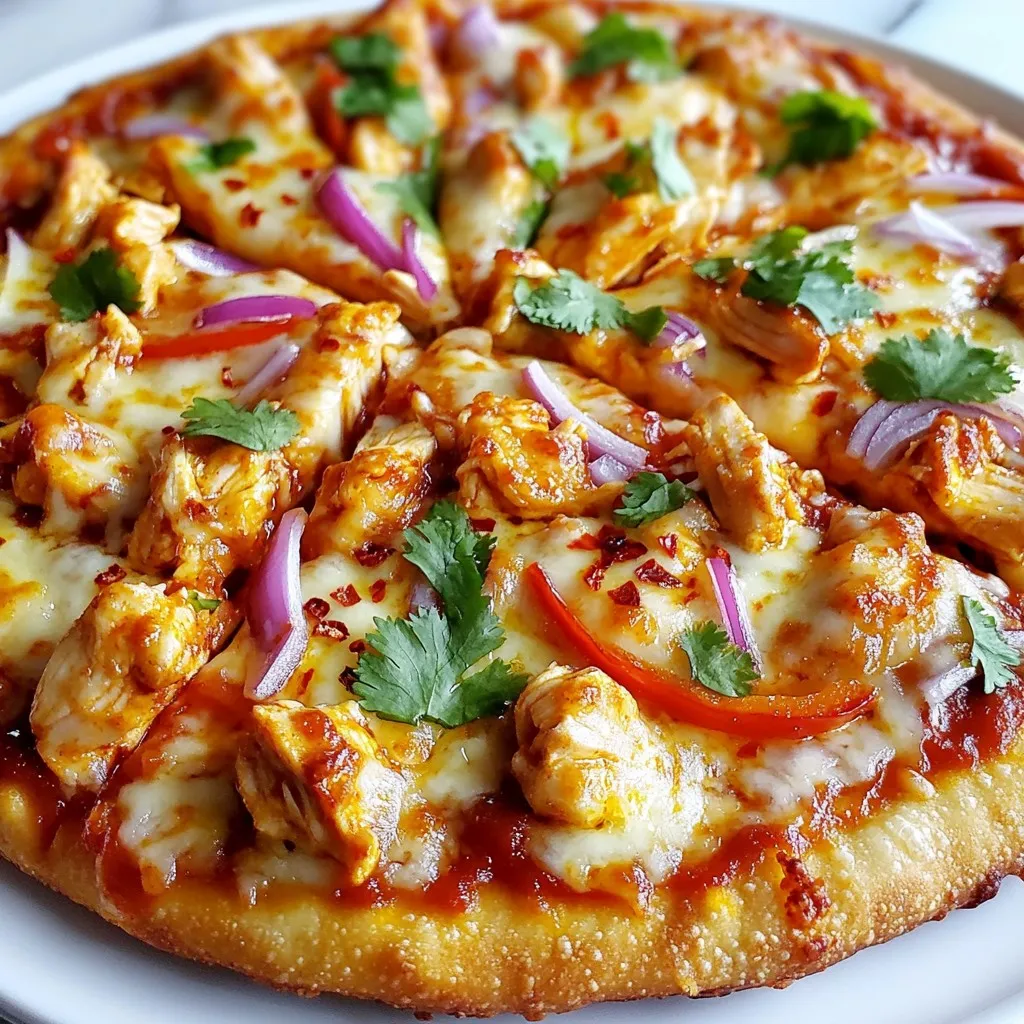
Chili Garlic Chicken Pizza Savory and Flavorful Delight
Craving a pizza with a kick? Meet your new favorite: Chili Garlic Chicken Pizza! This savory dish brings together tender chicken, zesty chili garlic sauce,
For this cozy dish, you need key ingredients to make it hearty. Here’s what you will need: - 2 lbs boneless, skinless chicken breasts, diced into bite-sized chunks - 4 medium carrots, peeled and sliced into rounds - 3 stalks celery, chopped into small pieces - 1 medium onion, finely diced - 1 cup frozen peas - 4 cups chicken broth (low sodium preferred) - 1 cup heavy cream (or coconut cream for a lighter option) - 1/3 cup all-purpose flour (or gluten-free flour for a gluten-free version) - 1 package refrigerated pie crusts (or homemade if you prefer) These ingredients create a rich base and give the pot pie its comforting flavor. The right spices make your pot pie sing. Here’s what you should add: - 1 teaspoon dried thyme - 1 teaspoon dried rosemary - 1 teaspoon garlic powder - 1/2 teaspoon salt - 1/2 teaspoon black pepper Each of these spices adds depth and warmth to the dish. Feel free to get creative! Here are some swaps you can try: - Use chicken thighs instead of breasts for more flavor. - Swap in sweet potatoes for carrots for a sweet twist. - Add corn for a pop of color and taste. - Use almond milk instead of cream for a lighter option. These swaps keep the dish fresh and tailored to your taste. {{ingredient_image_2}} First, gather all your ingredients. You need 2 pounds of boneless, skinless chicken breasts. Dice them into bite-sized chunks. Next, peel and slice 4 medium carrots into rounds. Then, chop 3 stalks of celery into small pieces. Finely dice 1 medium onion. Finally, measure 1 cup of frozen peas. In a large bowl, season the chicken. Mix the chicken with 1/2 teaspoon salt, 1/2 teaspoon black pepper, 1 teaspoon garlic powder, 1 teaspoon dried thyme, and 1 teaspoon dried rosemary. Toss everything together until the chicken is well coated with the spices. This step adds lots of flavor. Now, it’s time to build the layers in the crockpot. Start by adding the sliced carrots, chopped celery, and diced onion as the first layer. This creates a solid base. Next, add the seasoned chicken on top of the vegetables. Spread 1 cup of frozen peas evenly over the chicken. Carefully pour 4 cups of chicken broth over the layers. Make sure everything is submerged. This ensures even cooking. Cover the crockpot with its lid. Set it to cook on low heat for 6-8 hours. The chicken will become tender and delicious. About 30 minutes before you plan to serve, make the filling creamy. In a small bowl, whisk together 1/3 cup of all-purpose flour and 1 cup of heavy cream until smooth. Gradually stir this mixture into the crockpot. Mix well to combine. Cover and continue cooking for another 30 minutes. While the filling thickens, preheat your oven to 425°F (220°C). If you use refrigerated pie crusts, roll them out and trim them if needed. Once the filling is thickened, remove the lid from the crockpot. Gently stir the mixture. You can transfer the filling to a baking dish if you like. Top with the pie crust. Don’t forget to cut several slits in the crust. This allows steam to escape while baking. Bake in the preheated oven for 15-20 minutes. The crust should be golden brown. Let the pot pie cool for a few minutes before slicing. Serve it hot and enjoy! To get that creamy texture, add flour mixed with cream. Combine one-third cup of flour with one cup of cream. Stir this mix into your crockpot about 30 minutes before serving. This helps thicken the filling nicely. If you prefer a lighter dish, use coconut cream. For more flavor, try adding fresh herbs. Chopped parsley or thyme works well. You can also add a splash of lemon juice for a zesty kick. A dash of hot sauce can bring some heat. Experiment with these to find your favorite taste. Prep ahead by chopping vegetables the night before. Store them in the fridge to save time. You can also season the chicken in advance. Just keep it in the fridge overnight. Use frozen peas to cut down on prep time. They add color and flavor without extra work. Pro Tips Use Fresh Herbs: Fresh herbs can elevate the flavor of your pot pie significantly. If you have access to fresh thyme and rosemary, feel free to substitute them for the dried versions for a more vibrant taste. Add a Splash of Lemon: A squeeze of fresh lemon juice before serving can brighten the flavors of the pot pie, adding a refreshing contrast to the creamy filling. Experiment with Vegetables: Don't hesitate to mix in other vegetables like corn, green beans, or potatoes. This not only enhances the flavor but also boosts the nutritional value of your dish. Let It Rest: After baking, allow the pot pie to rest for about 10 minutes before slicing. This helps the filling set and makes serving easier without a runny mess. {{image_4}} You can easily make this dish gluten-free. Just swap the all-purpose flour for gluten-free flour. This change keeps the texture smooth. The rest of the recipe stays the same. You can also use gluten-free pie crusts. Many stores sell them, or you can make your own. Adding more veggies is a great way to boost flavor and nutrition. You can toss in diced potatoes for extra heartiness. Sweet corn adds a touch of sweetness. Green beans give a nice crunch. Feel free to mix and match your favorite vegetables. Just remember to chop them small for even cooking. While chicken is classic, you can switch things up. Try turkey for a nice twist. For a vegetarian option, use hearty mushrooms or lentils. If you're feeling adventurous, you could use shredded beef. Each protein brings its own taste to the pot pie. Just adjust cooking times as needed for different meats. This way, you always enjoy a warm and filling meal. Once your pot pie is cool, store it in an airtight container. This helps keep it fresh. You can keep it in the fridge for about 3 to 4 days. Make sure to cover it well to avoid drying out. If you want to save some for later, freezing works great! Let the pot pie cool completely. Then, wrap it tightly in plastic wrap and foil. This helps to prevent freezer burn. You can keep it in the freezer for up to 3 months. When you're ready to eat, just thaw it in the fridge overnight. To reheat, you have a few options. The best way is to use the oven. Preheat it to 350°F (175°C). Place the pot pie on a baking sheet and cover it with foil. Heat for about 25 to 30 minutes, or until it's warm throughout. If you're in a hurry, you can use the microwave. Heat it in short bursts, about 1 minute at a time, and check often. Be careful, as the filling can get very hot! Yes, you can use frozen chicken. Just add the frozen pieces directly to the crockpot. The cooking time may be a bit longer. Ensure the chicken reaches a safe temperature of 165°F. This method saves time and keeps the meal simple. Crockpot Chicken Pot Pie lasts about 3 to 4 days in the fridge. Store it in an airtight container for best results. To enjoy it later, reheat in the microwave or oven until hot. This dish stays tasty for a few days, making it great for leftovers. Yes, you can make it without cream. Use coconut cream or skip it altogether. If you omit the cream, the filling may be less rich but still flavorful. You can add more broth or a splash of milk for creaminess. This blog post covers everything you need for a tasty Crockpot Chicken Pot Pie. We discussed the main ingredients, spices, and optional substitutions you can make. I shared step-by-step instructions to help you prepare and cook the dish easily. Plus, I provided tips for perfect texture, flavor boosts, and time savers for busy days. You can find variations for gluten-free versions and different proteins. Lastly, we went over storage methods to keep your leftovers fresh. Now you have all the tools to create a delicious meal that suits your needs. Enjoy cooking!
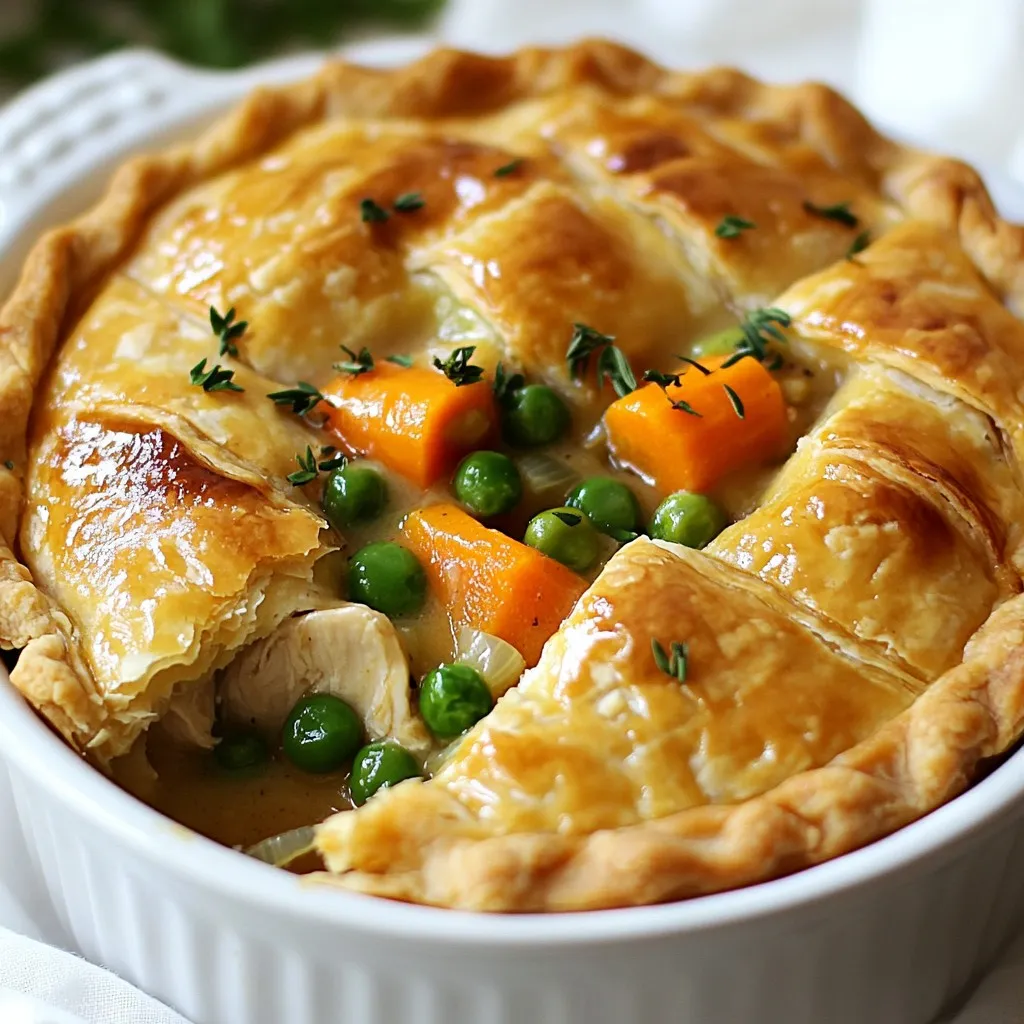
Crockpot Chicken Pot Pie Simple Comfort Food Recipe
Welcome to my kitchen! Today, I’m sharing a simple Crockpot Chicken Pot Pie recipe that brings warmth and comfort. You’ll love how easy it is
- 12 oz cheese tortellini - 1 lb boneless, skinless chicken breasts, diced into bite-sized pieces - 2 tablespoons olive oil - 3 cloves garlic, finely minced - 1 cup heavy cream - 1 cup freshly grated Parmesan cheese - 1 cup fresh spinach, roughly chopped - 1 teaspoon Italian seasoning - Salt and pepper, to taste - Fresh parsley, chopped (for garnish) Gather these ingredients for a creamy and rich meal. The cheese tortellini gives the dish its unique taste. Diced chicken breasts provide protein and flavor. Olive oil helps cook the chicken, while garlic adds a nice aroma. Heavy cream and freshly grated Parmesan cheese make the sauce smooth and rich. Fresh spinach gives a pop of color and nutrition. Italian seasoning, salt, and pepper add depth to the taste. Finally, fresh parsley is perfect for garnish. You can switch up some ingredients based on what you like or have at home. {{ingredient_image_2}} - First, boil salted water in a large pot. - Add 12 oz of cheese tortellini to the pot. - Cook the tortellini according to the package instructions, usually 3-5 minutes. - Once they are al dente, drain them in a colander and set aside. - In a large skillet, heat 2 tablespoons of olive oil over medium heat. - Carefully add 1 lb of diced chicken breasts to the skillet. - Season the chicken with salt, pepper, and 1 teaspoon of Italian seasoning. - Cook the chicken for about 6-8 minutes. Stir occasionally until the chicken is golden brown. - Once the chicken is cooked, add 3 cloves of finely minced garlic to the skillet. - Sauté the garlic for 1-2 minutes until it becomes fragrant. - Lower the heat and pour in 1 cup of heavy cream. Stir well to combine. - Gradually sprinkle 1 cup of freshly grated Parmesan cheese into the skillet. - Stir continuously until the cheese melts and forms a rich sauce. - Gently fold in the cooked tortellini and 1 cup of roughly chopped spinach. - Toss everything together until the spinach wilts and the tortellini is well coated. - Taste the dish, then adjust the seasoning with salt and pepper if needed. To make a creamy sauce, start with low heat. This keeps the cream from curdling. Stir the sauce often. This helps blend the flavors well. Use freshly grated Parmesan cheese. It melts better than pre-grated cheese. This gives your sauce a smooth texture. For tender chicken, cut it into even pieces. This helps it cook evenly. Don't rush the cooking. Cook the chicken until it's golden brown. To check if it's done, cut a piece in half. The inside should be white, not pink. To avoid overcooked tortellini, follow the package instructions closely. Cook it until it's al dente, which means firm to the bite. When draining, do it quickly to keep it from getting mushy. If you have leftovers, store the tortellini in an airtight container. This keeps it fresh for later meals. Pro Tips Perfect Tortellini: Make sure to cook the tortellini just until al dente; overcooking can make them too soft and mushy. Seasoning the Chicken: Don't skip seasoning the chicken well before cooking; it enhances the overall flavor of the dish. Garlic Timing: Add the garlic after the chicken is cooked to prevent it from burning, which can create a bitter taste. Spinach Freshness: For the best color and texture, add the spinach at the end of cooking, just enough to wilt it slightly. {{image_4}} You can switch out chicken for shrimp or tofu. Shrimp cooks fast and adds a nice flavor. Just sauté it for a few minutes until it turns pink. Tofu is a great option for plant-based diets. Use firm tofu, and cook it until golden brown for the best taste. You can add fresh herbs like basil or thyme to the sauce. They bring bright flavors to the dish. If you want to experiment, try different cheese types. Gouda or fontina can add a unique twist to your creamy sauce. Mixing in some cream cheese can also enhance the richness. Seasonal veggies are a great way to change this dish. Try adding asparagus, zucchini, or bell peppers for extra color and taste. You can also toss in leafy greens like kale or arugula. Just add them in with the spinach to let them wilt nicely. To keep your creamy Parmesan chicken tortellini fresh, follow these tips: - Let the dish cool down to room temperature. - Use airtight containers to store the leftovers. - Refrigerate within two hours of cooking. - Consume within three days for the best taste. Using glass or BPA-free plastic containers works well. They help keep the flavors intact. You can freeze creamy Parmesan chicken tortellini for later enjoyment. Here’s how to do it correctly: - First, let the dish cool completely. - Portion it into freezer-safe containers. - Label each container with the date and contents. - Store in the freezer for up to three months. When you’re ready to eat it, thaw the dish overnight in the fridge. To reheat, use a stovetop or microwave. Add a splash of cream or water to restore the sauce’s creaminess. Enjoy your meal just like fresh! Yes, frozen tortellini works great in this recipe. First, boil a large pot of salted water. Add the frozen tortellini directly to the boiling water. Cook it for about 5-7 minutes, or until it floats to the top. Once cooked, drain it and set it aside. This method keeps it easy and quick. To make this recipe gluten-free, use gluten-free tortellini. Many brands offer gluten-free versions made from rice, corn, or other grains. Always check the package for cooking times. This way, you can enjoy the same creamy goodness without the gluten. I recommend serving this dish with a side salad. A simple green salad with mixed greens, cherry tomatoes, and a light vinaigrette is perfect. You can also pair it with garlic bread for a delicious meal. These sides balance the creamy flavors and add freshness to your plate. This article covers the joy of making Creamy Parmesan Chicken Tortellini. You learned about the key ingredients, like cheese tortellini, chicken, and heavy cream. The step-by-step guide helps you cook perfectly. Tips shared ensure creamy sauces and tender chicken. You can even explore variations to suit your taste. In the end, this dish is simple and delicious. Enjoy experimenting with flavors and making it your own!
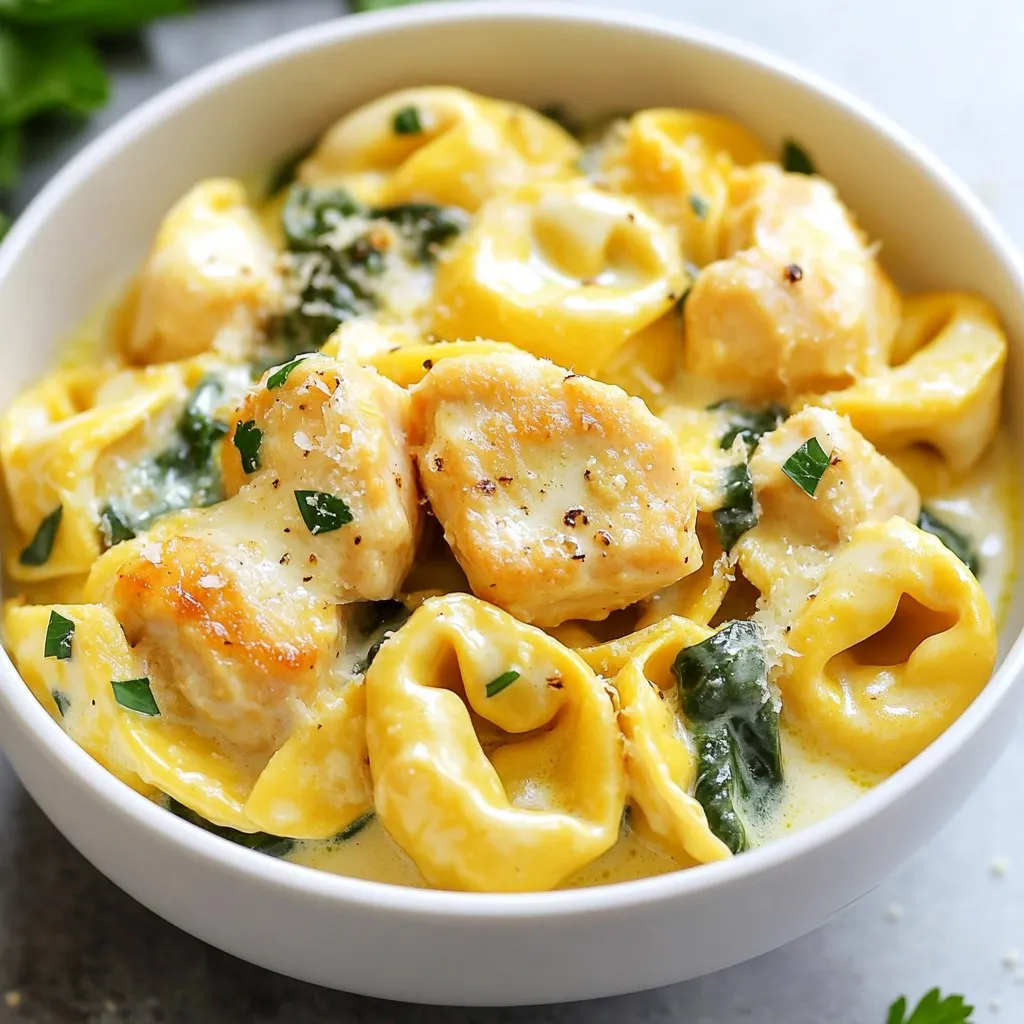
Creamy Parmesan Chicken Tortellini Delight Recipe
Craving a meal that’s both creamy and comforting? Look no further! My Creamy Parmesan Chicken Tortellini Delight is your new go-to dinner. With tender chicken,
- 4 large bell peppers (any color) - 2 cups cooked shredded chicken (suggested rotisserie) - 1/2 cup buffalo sauce (spice level adjustment) - 1 cup cream cheese (softened) - 1 cup shredded cheddar cheese (divided) - 1/2 cup chopped green onions (both white and green parts) - 1 teaspoon garlic powder - 1/2 teaspoon onion powder - Salt and pepper to taste - Fresh cilantro for garnish (optional) Cheesy Buffalo Chicken Stuffed Peppers start with fresh, bright bell peppers. You can choose any color you like. I often go for red or yellow for their sweetness. Next, you need cooked shredded chicken. Rotisserie chicken works best. It adds flavor and saves time. Buffalo sauce is key for that spicy kick. Adjust the amount based on your spice preference. If you want it milder, use less sauce. Then, grab some cream cheese. It makes the filling rich and creamy. Make sure it’s softened for easy mixing. You will also need shredded cheddar cheese. Save some for topping later. Chopped green onions add a nice crunch and flavor. Use both the white and green parts for the best taste. Finally, you need garlic powder, onion powder, salt, and pepper. These spices enhance the overall flavor. For a touch of freshness, consider cilantro for garnish. It adds color and a burst of flavor. Each ingredient plays a role in creating a delicious meal. Gather these items, and you are set to cook! {{ingredient_image_2}} - Preheat the oven to 375°F (190°C). - Cut off the tops of bell peppers and remove seeds. First, we need to get our oven ready. Preheating it to 375°F helps cook the peppers just right. Next, grab the bell peppers. I like to use large ones for a hearty meal. Cut off the tops and scoop out the seeds. This lets the flavors soak in better. Set these aside, and let’s move on! - Combine shredded chicken, buffalo sauce, and cream cheese. - Add shredded cheddar, green onions, garlic and onion powders, salt, and pepper. Now, let’s make the filling! In a large bowl, combine the shredded chicken, buffalo sauce, and softened cream cheese. This mix gives a creamy and spicy base. Next, add half of the shredded cheddar cheese, chopped green onions, garlic powder, onion powder, and a pinch of salt and pepper. Stir it well. You want a smooth mixture that's full of flavor. - Stuff peppers with the buffalo chicken mixture. - Arrange peppers in a baking dish and prepare for baking. Time to stuff those peppers! Take the buffalo chicken mixture and fill each pepper. Press down gently to pack it in. This ensures every bite is delicious. Once filled, place the peppers upright in a baking dish. If you want, add a little water to the bottom. This helps keep the peppers moist while they bake. - Cover with aluminum foil and bake for 25 minutes. - Uncover, add remaining cheese, and bake for another 10-15 minutes. Cover your baking dish with aluminum foil. This helps cook the peppers evenly. Bake them for about 25 minutes. When the time is up, carefully remove the foil. Sprinkle the remaining cheddar cheese on top of each pepper. Bake for another 10 to 15 minutes until the cheese is melted and bubbly. You’ll know they’re ready when they look golden and delicious! - Ensure peppers are well-stuffed for better flavor. This helps them absorb all the tasty goodness. - Use rotisserie chicken for enhanced taste. It adds a rich, savory depth to the dish. - Garnish with fresh cilantro for presentation. It adds a pop of color and fresh flavor. - Serve with extra buffalo sauce on the side. This allows you to adjust the heat to your liking. - Overbaking the peppers can make them mushy. Keep an eye on them during the final bake. - Skipping the pre-baking step can reduce flavor. Pre-baking softens the peppers and brings out their natural sweetness. Pro Tips Choose the Right Peppers: Opt for firm bell peppers that are vibrant in color. They should be free from blemishes and have a sturdy structure to hold the stuffing well. Spice Level Control: Adjust the amount of buffalo sauce according to your taste preference. Start with less and add more if you enjoy extra heat! Mix It Up: Feel free to add other ingredients like black beans or corn for added texture and flavor. This can create a heartier meal! Perfect Cheese Melt: To achieve that perfectly melted cheese topping, broil the stuffed peppers for the last 1-2 minutes of baking. Just keep a close eye to prevent burning! {{image_4}} You can switch up the cheese in this recipe. Try mozzarella or pepper jack for a twist. Each cheese brings a unique flavor and melts beautifully. If you want a lighter option, use turkey or tofu instead of chicken. Both options work well with the buffalo sauce. Turkey adds a lean protein, while tofu makes it plant-based. To add a crunchy texture, dice some celery and mix it in. This extra crunch balances the creamy filling. For a different taste, mix in ranch seasoning. This will give your dish a tangy kick. Both options enhance the flavor of the stuffed peppers. To make your dish gluten-free, check that all your ingredients are certified gluten-free. This ensures everyone can enjoy them safely. If you follow a vegan diet, use vegan cream cheese and chicken substitutes. These swaps make it easy to enjoy a plant-based version of this delicious recipe. Store any leftovers in an airtight container in the refrigerator. This keeps them fresh and safe to eat for a few days. I recommend enjoying them within 3 to 4 days for the best flavor. You can freeze these stuffed peppers for up to three months. To do this, let them cool completely before wrapping tightly in plastic wrap or foil. Thaw in the fridge overnight before reheating. This way, you keep the taste and texture just right. For the best results, reheat in the oven at 350°F (175°C) until warmed through. This helps keep the peppers tender and the cheese nice and melty. If you need a quick option, the microwave works too. Just remember, the texture may change slightly after microwaving. Enjoy your cheesy buffalo chicken stuffed peppers warm! Yes, consider using poblano or jalapeño for a spicier kick. These peppers have a rich flavor that pairs well with the cheesy buffalo chicken mix. They also add a nice heat if you like your food with a little more spice. Just remember to adjust the baking time if you choose thicker peppers. Peppers should be tender, and the cheese should be melted and bubbly. You can use a fork to test the pepper's tenderness. If it goes in easily, your dish is ready. The cheese will also have a nice golden color, which adds to the appeal. Yes, you can assemble them a day in advance and bake when ready. This makes it easy for meal prep. Just cover the dish with plastic wrap and store it in the fridge. When you’re ready to eat, bake them directly from the fridge, adding a few extra minutes to the cooking time. Pair with a side salad or some crispy tortilla chips for a complete meal. A fresh salad adds a nice crunch, balancing the creaminess of the peppers. Tortilla chips can also give you that extra crunch and are perfect for dipping into any leftover buffalo sauce. Cheesy buffalo chicken stuffed peppers are easy and tasty. You learned how to prepare, stuff, and bake them with a few simple ingredients. Remember to watch the baking time to avoid mushy peppers. Feel free to customize by using different cheeses or proteins. Store leftovers safely for later enjoyment. These stuffed peppers are perfect for any meal. Enjoy the fun and fiery flavor they bring to your table!
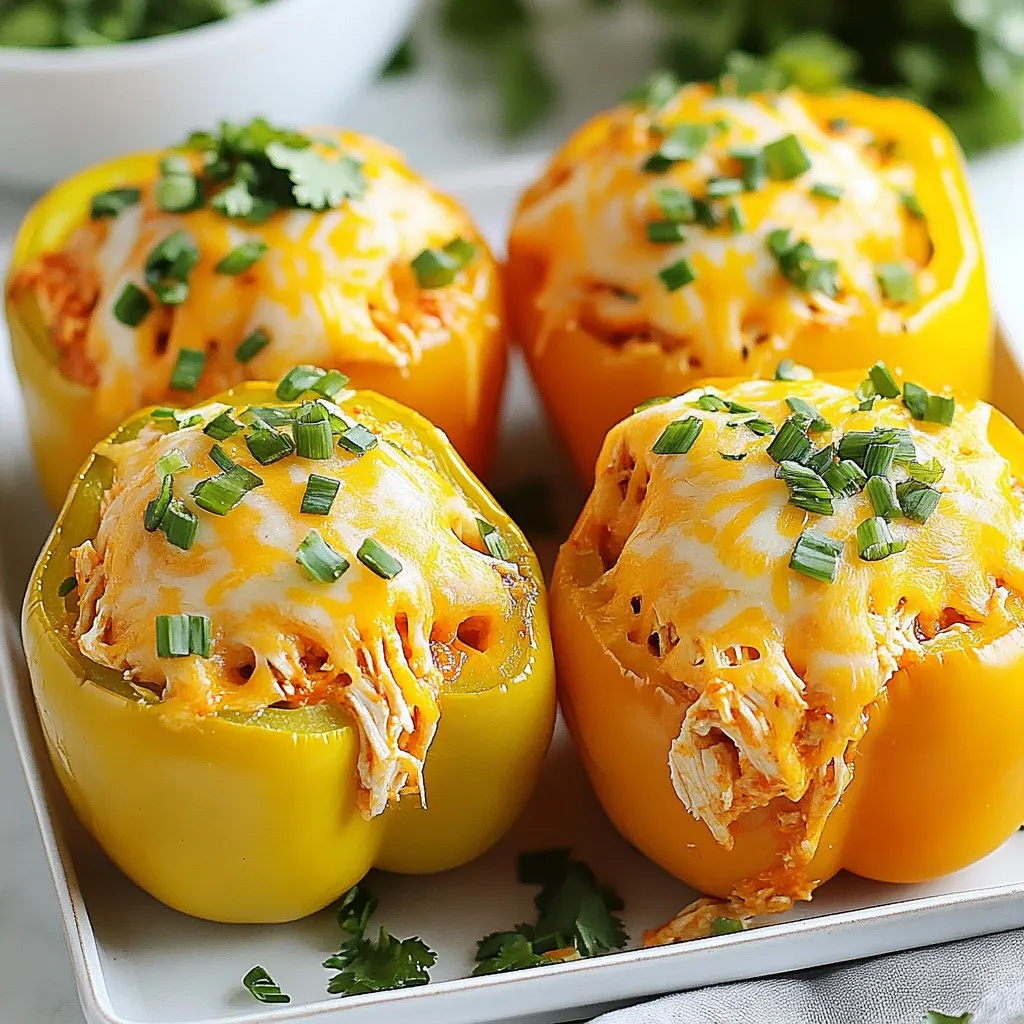
Cheesy Buffalo Chicken Stuffed Peppers Savory Delight
Are you ready to spice up your dinner? I’ve got the perfect recipe for you! These Cheesy Buffalo Chicken Stuffed Peppers are not only easy
- 2 large flatbreads - 1 cup cooked chicken breast, either shredded or diced - 1 cup romaine lettuce, finely chopped - ½ cup Caesar dressing - ¼ cup grated Parmesan cheese, plus extra for serving - ¼ cup cherry tomatoes, cut in half - 1 tablespoon olive oil - Freshly cracked black pepper, to taste - Optional: croutons for added crunch To make the Chicken Caesar Flatbread, gather these key ingredients. The flatbreads serve as a base and add a delicious crunch. Use cooked chicken breast for protein. Shredded or diced works well. Romaine lettuce adds a crisp texture and freshness. Caesar dressing provides that classic flavor. Grated Parmesan cheese enhances taste and creaminess. Cherry tomatoes bring a pop of color and sweetness. Olive oil helps achieve a nice golden finish. Lastly, black pepper adds a kick. Croutons are optional but offer a nice crunch. Enjoy the mix of flavors and textures in each bite! {{ingredient_image_2}} 1. Preheat your oven to 375°F (190°C). This step warms the oven for a crispy flatbread. 2. Place the flatbreads on a baking sheet. Use a pastry brush to coat each flatbread with olive oil. This gives them a lovely golden color when baked. 1. Sprinkle half of the grated Parmesan cheese over the flatbreads. This adds a rich flavor. 2. Distribute the cooked chicken evenly on each flatbread. Make sure every bite has chicken. 3. Generously spread Caesar dressing over the chicken. This helps the flavors blend together. 4. Layer the finely chopped romaine lettuce on top. This adds a fresh crunch. Then, place the halved cherry tomatoes for extra flavor and color. 1. Put the baking sheet in the oven and bake for 10-12 minutes. Watch for the edges to become crispy. 2. Once baked, take the flatbreads out of the oven. Let them cool for one minute. 3. Slice each flatbread into quarters for easy serving. For extra crunch, sprinkle croutons on top before serving. To get crispy edges on your flatbreads, use olive oil. Brush it on before baking. This helps them turn golden brown and crunchy. Bake them at 375°F (190°C) for 10-12 minutes. Keep an eye on them! The edges should be crisp but not burnt. For Caesar dressing, you can make it at home. Mix mayo, garlic, lemon juice, and anchovies. This adds freshness. If you're short on time, store-bought dressings work well too. Just pick your favorite brand. Pair your flatbreads with a simple side salad. A light green salad adds freshness and balance. You can also serve them with a tangy pickled vegetable dish for a fun twist. For presentation, slice the flatbreads into quarters. Arrange them on a platter. Garnish with a sprinkle of extra Parmesan for a fancy touch. You can even add a few whole cherry tomatoes for color. One mistake is overloading your flatbreads with toppings. This can make them soggy and hard to eat. Less is more when it comes to toppings. Another mistake is using soggy flatbreads. Always check that your flatbreads are fresh and crisp. If they are too soft, they will not hold the toppings well. Make sure to use the right cooking time to keep them crunchy. Pro Tips Use Fresh Ingredients: Always opt for fresh romaine lettuce and ripe cherry tomatoes to enhance the flavor and crunch of your flatbread. Customize Your Dressing: Experiment with homemade Caesar dressing by adding extra garlic or anchovy paste for a more robust flavor. Keep an Eye on Baking: Monitor the flatbreads closely in the oven to ensure they don’t overcook; you want them crispy but not burnt. Presentation Matters: For a beautiful presentation, consider adding some fresh herbs like parsley or basil as a garnish before serving. {{image_4}} You can switch up the protein in your flatbread. Grilled shrimp adds a nice twist. It brings a sweet and smoky flavor. Tofu is another great option for a vegetarian meal. Just marinate it in some soy sauce or garlic for extra taste. You can use these proteins to make the dish your own. If you want to try new flavors, consider different dressings. Ranch dressing can offer a creamy change. You can also use a yogurt-based dressing for a lighter option. Mixing flavors like lemon and garlic can give a fresh taste. Explore combinations that match your style or mood. Don't hold back on the toppings! You can add other veggies like bell peppers or cucumbers. These will give your flatbread a crunchy texture. If you want to change the cheese, try feta or goat cheese. Both will add a unique flavor to your dish. To keep your Chicken Caesar Flatbread fresh, place it in an airtight container. This helps prevent moisture loss. You can store it in the fridge for up to three days. If you notice any sogginess, eat it right away. When reheating flatbreads, the oven works best. Preheat your oven to 350°F (175°C). Place the flatbread on a baking sheet. Heat for about 10 minutes. This keeps it crispy. Avoid using the microwave, as it makes the flatbread soft. To freeze your flatbreads, wrap each one tightly in plastic wrap. Place them in a freezer bag for extra protection. They will stay fresh for up to three months. For thawing, move them to the fridge overnight. Reheat in the oven for best results. This way, you can enjoy your Chicken Caesar Flatbread anytime! Chicken Caesar Flatbread is a tasty dish made with flatbreads. It features cooked chicken, crisp romaine, and creamy Caesar dressing. You can top it with Parmesan cheese and fresh tomatoes. It’s easy to make and great for lunch or dinner. Yes, you can use store-bought Caesar dressing. It saves time and still tastes great. Look for a brand with simple ingredients for best flavor. You can also make your own dressing if you prefer fresh flavors. To achieve crispy flatbread, preheat your oven to 375°F (190°C). Coat the flatbreads lightly with olive oil. Bake them for 10-12 minutes, checking for golden edges. Avoid overloading toppings, as this can make them soggy. Chicken Caesar Flatbread pairs well with a simple green salad. You can also serve it with fresh fruit or veggie sticks for crunch. A light soup can complement the flatbread too, creating a balanced meal. Yes, you can make a vegan Chicken Caesar Flatbread. Use plant-based chicken alternatives and vegan Caesar dressing. Replace Parmesan with a vegan cheese or nutritional yeast for a cheesy flavor. Enjoy the same great taste without animal products! You now know how to make Chicken Caesar Flatbread. We covered key ingredients, step-by-step instructions, and helpful tips. Remember to preheat your oven and use quality toppings for the best taste. Think about making it your own with alternative proteins or dressings. Store your leftovers properly and reheat them for delicious meals later. Enjoy creating this tasty dish and impress your family or friends!
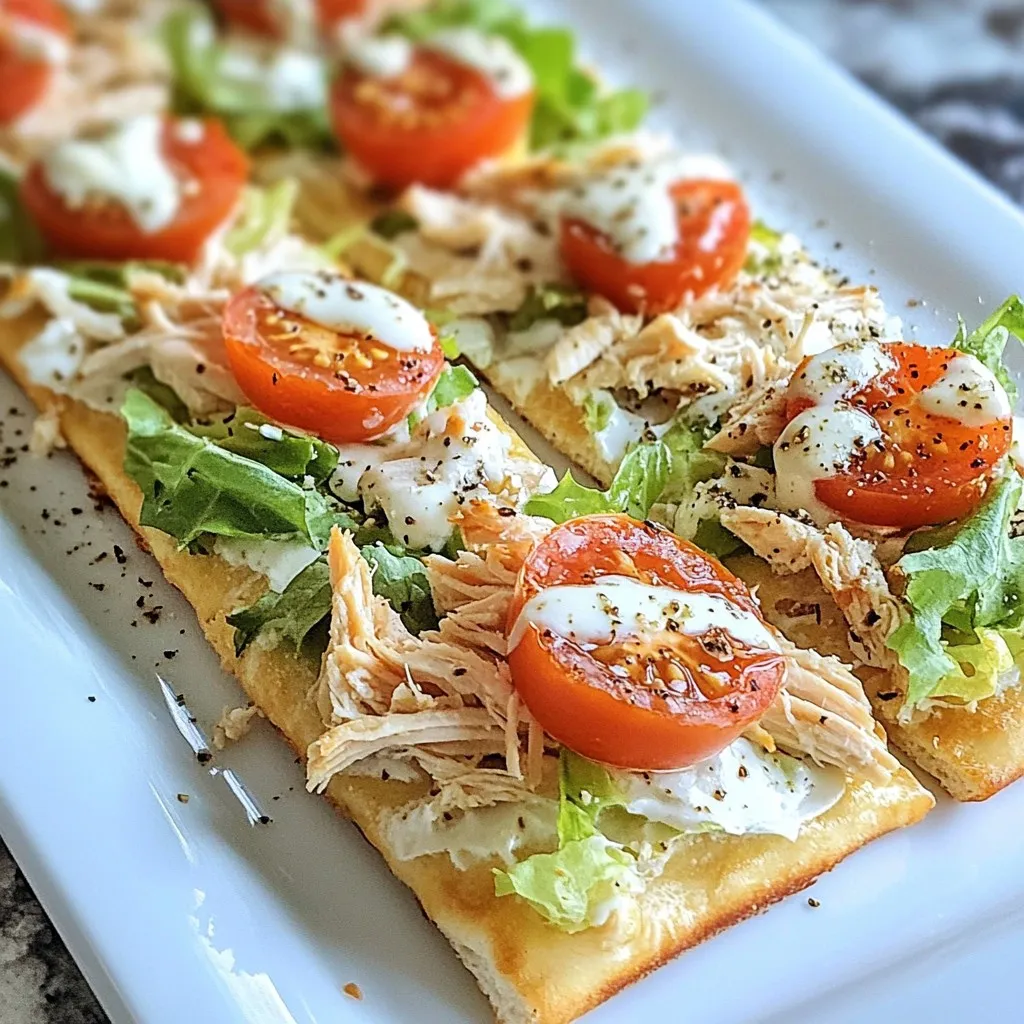
Chicken Caesar Flatbread Fresh and Tasty Recipe
Are you craving a fresh and tasty meal that’s easy to make? Look no further! This Chicken Caesar Flatbread recipe combines crispy flatbreads with juicy
To create a delicious Pineapple Chicken and Rice Skillet, gather the following ingredients: - 1 lb (450g) boneless, skinless chicken breasts, diced into bite-sized pieces - 1 cup jasmine rice, thoroughly rinsed under cold water - 1 can (20 oz) pineapple chunks in juice, drained (reserve juice for later) - 1 bell pepper (choose either red or yellow), diced into small pieces - 1 small onion, finely chopped - 3 cloves garlic, minced for maximum flavor - 1 cup chicken broth (preferably low-sodium) - 2 tablespoons soy sauce (low-sodium if preferred) - 2 tablespoons olive oil for sautéing - 1 teaspoon fresh ginger, finely grated - Salt and pepper to taste - Green onions, thinly sliced (for garnish) - Sesame seeds (for garnish) I recommend using fresh ingredients. They add more flavor to the dish. The sweetness of pineapple pairs well with the savory chicken. The rice absorbs all the flavors, making each bite delightful. Make sure to rinse the jasmine rice well. This step removes excess starch and helps achieve fluffy rice. For the chicken, you can use breast meat for a leaner option. Cut it into small pieces so it cooks evenly. The bell pepper adds color and crunch. You can pick any color you like. The onion gives a sweet, aromatic base, while garlic boosts the taste. Ginger adds warmth and a hint of spice. Using low-sodium soy sauce helps balance the flavors without making it too salty. The sesame seeds and green onions are great for garnish. They add a touch of freshness and make the dish look appealing. Gathering these ingredients will set you up for a fantastic cooking experience. {{ingredient_image_2}} - Heat 2 tablespoons of olive oil in a large skillet over medium heat. - Add 1 pound of diced chicken breasts. Season with salt and pepper. - Cook for 6-8 minutes until the chicken is golden brown and cooked through. - Remove chicken from the skillet and set it aside on a plate. - In the same skillet, add 1 small chopped onion and 1 diced bell pepper. - Sauté for 3-4 minutes until the vegetables are soft and fragrant. - Add 3 cloves of minced garlic and cook for 1 more minute for extra flavor. - Add 1 cup of rinsed jasmine rice and 1 teaspoon of grated ginger to the skillet. - Stir well for about 2 minutes to let the rice toast slightly. This adds flavor. - Pour in the reserved pineapple juice, 1 cup of chicken broth, and 2 tablespoons of soy sauce. - Stir everything together and bring the mixture to a gentle simmer. - Once simmering, cover the skillet and reduce the heat to low. - Cook for 15-18 minutes until the rice is tender and absorbs all the liquid. - Gently fold in the cooked chicken and 1 can of pineapple chunks. - Heat through for 2-3 minutes until everything is warm and flavors meld. - Remove the skillet from heat and keep it covered for 5 minutes. This helps flavors develop. - For presentation, serve in deep bowls. Garnish with sliced green onions and sesame seeds. Toasting the rice is key. It adds a nice nutty taste. Heat the oil, then add the rice. Stir it for about two minutes. This step boosts flavor, making your dish more tasty. For seasonings, use salt, pepper, and fresh ginger. These simple seasonings make a big difference. You can also try adding a touch of garlic powder for depth. Cook your chicken evenly by cutting it into small pieces. This helps it cook through without burning. Heat the olive oil first, then add the chicken. Stir it often until it turns golden brown. For the vegetables, sauté the onion and bell pepper together. Cook them until they are soft and smell great. Add garlic last for maximum flavor. This keeps it fresh and strong. Pair your Pineapple Chicken and Rice Skillet with a side salad. A simple green salad complements the dish well. For garnishes, use green onions and sesame seeds. They add color and extra crunch. Serve in deep bowls to show off the vibrant colors. Enjoy this dish warm for the best taste! Pro Tips Marinate the Chicken: For extra flavor, consider marinating the diced chicken in a mixture of soy sauce, ginger, and garlic for 30 minutes before cooking. Use Fresh Pineapple: If possible, use fresh pineapple instead of canned for a more vibrant flavor and texture in the dish. Adjust the Spice Level: If you prefer a bit of heat, add some red pepper flakes or a dash of sriracha when sautéing the vegetables. Store Leftovers Properly: Store any leftovers in an airtight container in the refrigerator for up to 3 days; reheat thoroughly before enjoying. {{image_4}} You can change proteins in this dish easily. Use shrimp or tofu instead of chicken. Both options add unique flavors and work well with the other ingredients. If you want to go lighter, try using turkey breast. For vegetables, mix things up to suit your taste. You can add broccoli for crunch or snap peas for sweetness. Carrots also add color and flavor. Just remember to chop them small for even cooking. To boost the taste, add spices or herbs. A pinch of red pepper flakes brings heat to the dish. You can also try adding some fresh basil or cilantro for a fresh touch. Experimenting with sauces can make a big difference. Swap soy sauce for teriyaki sauce for a sweeter flavor. You can also use coconut aminos for a gluten-free option. Just keep adjusting until you find the taste you love. If you need gluten-free options, use tamari instead of soy sauce. This keeps the flavor while making it safe for those with gluten issues. For a vegan adaptation, swap chicken for chickpeas or lentils. Replace the chicken broth with vegetable broth. This keeps the dish hearty and satisfying without meat. You won’t miss the chicken at all! To store leftovers, let the dish cool first. Use an airtight container to keep it fresh. Place it in the fridge within two hours of cooking. This will help prevent bacteria growth. It's best to eat leftovers within 3-4 days. When reheating, make sure it is hot all the way through. You can freeze Pineapple Chicken and Rice Skillet for later. Use a freezer-safe container to keep it well sealed. It will stay good for up to three months. To thaw, place it in the fridge overnight. You can also use the microwave for quick thawing. To reheat, warm it in a skillet over medium heat. Stir often to make sure it heats evenly. This dish stays fresh in the fridge for about 3-4 days. If you freeze it, it lasts about three months. Check for signs of spoilage before eating. Look for changes in smell or color. If it seems off, throw it away. Always trust your senses when it comes to food safety. Yes, you can use brown rice. Brown rice takes longer to cook, about 45 minutes. You will need to adjust the liquid as brown rice requires more. Use 1.5 cups of chicken broth instead of 1 cup. This will keep your dish moist and flavorful. To keep chicken juicy, do not overcook it. Cook it for 6-8 minutes, just until golden. Also, let the chicken rest after cooking. This helps it retain moisture. Adding the pineapple and broth at the right time also helps keep it tender. If you need a soy sauce substitute, try tamari or coconut aminos. These options work well for flavor. For a lighter taste, you can mix water with a bit of vinegar. This gives a similar umami flavor without the soy. Yes, you can make this dish in advance. Cook it fully and let it cool. Store it in an airtight container in the fridge. It keeps well for up to 3 days. Just reheat it gently on the stove or in the microwave. This dish pairs well with a fresh salad. A simple green salad adds a nice crunch. You can also serve it with steamed veggies for extra nutrition. Consider adding some crusty bread to soak up the juices. This blog post outlined a delicious Pineapple Chicken and Rice Skillet recipe, showing every step. You learned about the key ingredients, how to cook them, and tips for the best flavor. Use suggested variations for a twist on this dish. Proper storage lets you enjoy it later, and FAQs help address common questions. The mix of chicken, rice, and sweet pineapple is simple yet tasty. I hope you feel ready to create a meal that pleases everyone.
Pineapple Chicken and Rice Skillet Flavorful Delight
If you’re craving a dish that’s bright, savory, and easy to make, look no further than my Pineapple Chicken and Rice Skillet. This one-pan wonder
To make a tasty Chicken and Broccoli Pasta Skillet, you'll need a few key ingredients. Here’s what you should gather: - 2 cups pasta (penne or fusilli) - 1 lb chicken breast, cubed - 2 cups fresh broccoli florets - 3 cloves garlic, minced - 1 cup low-sodium chicken broth - 1 cup heavy cream - 1 teaspoon Italian seasoning - 1 cup grated Parmesan cheese - 2 tablespoons olive oil - Salt and pepper to taste - Fresh parsley for garnish These ingredients create a rich and creamy dish. The chicken brings protein, while broccoli adds color and nutrients. Pasta binds everything together, making it a filling meal. The garlic and Italian seasoning enhance the flavors, creating a comforting dish. Don't forget the Parmesan cheese; it adds a delicious umami taste. Gathering these ingredients sets you up for a successful cooking experience. Enjoy the process and have fun in the kitchen! {{ingredient_image_2}} First, we sauté the chicken. Heat 2 tablespoons of olive oil in a large skillet over medium-high heat. When the oil is hot, add 1 pound of cubed chicken breast. Season it with salt and pepper. Cook the chicken for about 5-7 minutes. Stir it often until it is browned and cooked through. Once done, remove the chicken and set it aside on a plate. Next, we need to sauté the garlic. In the same skillet, turn the heat down to medium. Add 3 minced garlic cloves. Sauté them for 1 minute until they smell great. Be careful not to burn them. Now, pour in 1 cup of low-sodium chicken broth. Bring it to a gentle simmer. Add 2 cups of fresh broccoli florets and cook for 3-4 minutes. The broccoli should be bright green and tender. Now, it’s time to add cream and seasoning. Stir in 1 cup of heavy cream and 1 teaspoon of Italian seasoning. Let this mixture heat up. While it simmers, cook 2 cups of pasta in a separate pot. Follow the package instructions until the pasta is al dente. Drain the pasta and set it aside. Next, add the drained pasta to the skillet along with the cooked chicken. Mix everything carefully until coated with the creamy sauce. For the final touches, sprinkle in 1 cup of grated Parmesan cheese. Stir until the cheese melts and the dish becomes creamy. Taste your dish and adjust the seasoning with salt and pepper if needed. Remove the skillet from the heat. Let it sit for a few minutes to thicken. Serve the pasta hot in deep bowls. Garnish with chopped parsley and extra Parmesan for a lovely touch. To get a golden-brown crust, use medium-high heat. This helps the chicken brown nicely. Make sure to space the chicken cubes out in the skillet. If they are too close, they will steam instead of sear. Cook the chicken for 5 to 7 minutes until it's no longer pink inside. Avoid overcooking by checking it often. Overcooked chicken can be dry and tough. To ensure the sauce is creamy, use heavy cream. Add it after cooking the garlic and broccoli. Stir slowly to mix it well with the broth. Season the sauce with salt and freshly ground black pepper. Adding Italian seasoning will enhance the flavor. Taste the sauce before serving. Adjust the seasoning as needed for the best taste. Cook the pasta according to the package instructions. Aim for al dente, which means it should be firm but cooked. Timing is key here. Start cooking the pasta while you make the sauce. This saves time and keeps everything warm. For this dish, penne or fusilli works best. These shapes hold the sauce well, giving you a tasty bite every time. Pro Tips Perfect Pasta: To achieve the best texture, cook the pasta just until al dente. It will continue to cook slightly when mixed with the hot sauce. Broccoli Brightness: To keep broccoli vibrant and green, avoid overcooking. It should be tender but still crisp when added to the dish. Cheese Choice: For a richer flavor, consider using aged Parmesan or Pecorino Romano instead of regular Parmesan cheese. Flavor Boost: Add a splash of lemon juice or a pinch of red pepper flakes for an extra layer of flavor and a bit of heat. {{image_4}} You can switch out chicken for shrimp or tofu. Shrimp cooks fast, about 3-5 minutes. Tofu needs a bit more time. Cook it until it's golden brown, usually around 7-10 minutes. This way, you keep the dish tasty and healthy. Add other veggies like bell peppers, spinach, or peas. They add color and fresh flavor. Just cut them into small pieces so they cook evenly. If you add more veggies, you may need to cook them a little longer. Check for doneness after 5-7 minutes. Boost the taste with spices like red pepper flakes or fresh herbs. Basil or oregano can really brighten the dish. For cheese, try mozzarella or gouda for a different twist. Just remember to melt it slowly to keep it creamy and smooth. To store leftovers, let the Chicken and Broccoli Pasta cool first. Place it in an airtight container. This prevents air from making it dry. You can keep it in the fridge for up to three days. For best flavor, eat it within two days. The best containers for storage are glass or BPA-free plastic. Glass containers help keep food fresh. They also make it easy to see what's inside. For reheating, use a skillet or microwave. A skillet works best to keep the dish creamy. Heat it on low to medium heat. Stir often to avoid sticking. If using a microwave, place a serving in a bowl. Cover it with a damp paper towel. Heat it for 1 to 2 minutes. Stir halfway to heat evenly. The dish should be hot, around 165°F. Enjoy your meal again! To make this Chicken and Broccoli Pasta Skillet gluten-free, swap regular pasta for gluten-free options. You can use gluten-free penne or fusilli. These pasta types hold up well in the dish and taste great too. Yes, you can use frozen broccoli in this recipe. Just know that frozen broccoli takes longer to cook. Simmer it for about 5 to 6 minutes until it's tender. This way, it will still taste fresh and vibrant. If you want to spice things up, add red pepper flakes. Start with a pinch and adjust as you like. You can also use diced jalapeños for a fresh kick. Both options will add great heat to your dish. To prevent pasta from sticking, stir it often while it cooks. Use plenty of water in the pot and add a pinch of salt. After draining, toss the pasta with a little olive oil. This keeps it from clumping together. This blog post covers a rich chicken pasta recipe that’s simple and tasty. You learned how to cook chicken and sauté garlic and broccoli for a creamy sauce. I shared tips on cooking pasta perfectly and how to store leftovers. You can also try different proteins and veggies to make this dish your own. Cooking at home can be fun and rewarding. By using these steps, you’ll impress your family and friends. Enjoy your meal!
Chicken and Broccoli Pasta Skillet Easy and Tasty Meal
Craving a quick and tasty dinner? Look no further than this Chicken and Broccoli Pasta Skillet! Packed with protein, vibrant veggies, and creamy goodness, this
To create a tasty Southwest Alfredo Pasta, you need a few key ingredients. These will make your dish rich and flavorful. Here’s what you will need: - 8 oz fettuccine pasta - 1 tablespoon olive oil - 1 cup cooked chicken, shredded (or black beans for a vegetarian option) - 1 cup heavy cream - 1 cup freshly grated Parmesan cheese - 1/2 cup corn kernels (canned or frozen work great) - 1/2 cup diced bell peppers (use a mix of colors for fun) - 1 tablespoon taco seasoning - Salt and black pepper, to taste - Fresh cilantro, finely chopped (for a lovely garnish) If you want to kick up the flavor, add some extras. Here are a few options: - Sliced jalapeños for heat - Extra cheese for a creamier texture - A squeeze of lime for brightness You can easily swap ingredients to fit your needs or tastes. Here are some ideas: - Use gluten-free pasta instead of fettuccine if you need a gluten-free option. - Replace chicken with black beans for a vegetarian dish. - For a dairy-free version, try coconut cream and nutritional yeast instead of heavy cream and cheese. These tips help you customize the recipe to make it your own. Enjoy mixing and matching! {{ingredient_image_2}} Start by boiling water in a large pot. Add a pinch of salt to the water. Once the water boils, add 8 oz of fettuccine pasta. Cook it for about 8 to 10 minutes. Always check the package for the exact time. You want the pasta to be al dente, or firm but tender. After cooking, drain the pasta in a colander. Set it aside to let excess moisture evaporate. In a large skillet, pour 1 tablespoon of olive oil. Heat the skillet over medium heat. Once hot, add 1 cup of diced bell peppers. Sauté the peppers for 3 to 4 minutes. They should soften and smell sweet. Next, add 1 cup of shredded chicken or black beans for a vegetarian option. Stir in 1/2 cup of corn kernels and 1 tablespoon of taco seasoning. Cook for another 2 to 3 minutes. Make sure everything is heated through and well mixed. Now, pour in 1 cup of heavy cream into the skillet. Stir gently as it heats. Wait until the mixture starts to simmer. Gradually add 1 cup of freshly grated Parmesan cheese. Keep stirring until the sauce becomes creamy and smooth. Once ready, add the cooked fettuccine to the skillet. Toss the pasta in the sauce until it is well-coated. Season with salt and black pepper to your taste. If you want a spicy kick, add sliced jalapeños now. Serve hot, garnished with freshly chopped cilantro for a bright touch. To cook fettuccine pasta just right, follow these steps: - Use a big pot with lots of water. - Salt the water well before adding the pasta. - Cook until it is al dente. This means it should be firm when you bite it. - Drain the pasta but leave some steam in it for a creamy sauce. To boost the taste of your Southwest Alfredo Pasta, try these ideas: - Use fresh herbs like cilantro for a bright flavor. - Add lime juice for a zesty kick. - Mix in different types of cheese like cheddar for extra richness. - Consider roasted garlic for depth. It gives a sweet, smoky taste that pairs well. Here are some pitfalls to steer clear of when making this dish: - Overcooking the pasta can make it mushy. Keep an eye on the timer! - Forgetting to season the sauce can lead to blandness. Taste as you cook. - Not stirring the sauce can cause clumps of cheese. Stir well for a smooth finish. - Skipping the garnish can miss a chance for a fresh pop. Always top with cilantro and extra cheese! Pro Tips Use Fresh Ingredients: Opt for fresh bell peppers and high-quality Parmesan cheese to enhance the flavors of your Alfredo sauce. Adjust the Creaminess: If you prefer a lighter sauce, you can substitute half of the heavy cream with low-fat milk or a non-dairy alternative. Add Extra Protein: For a more filling meal, consider adding cooked shrimp or sautéed mushrooms along with the chicken or black beans. Garnish for Flavor: Fresh cilantro not only adds a pop of color but also complements the Southwest flavors beautifully—don’t skip it! {{image_4}} You can easily make this dish vegetarian or vegan. For a vegetarian option, just swap the chicken for black beans. They add protein and flavor. If you want a vegan version, use plant-based cream and vegan cheese. These swaps keep the meal rich and creamy without dairy. If you love heat, add sliced jalapeños when cooking. You can also increase the taco seasoning for more spice. If you prefer mild flavors, skip the jalapeños and use less seasoning. This way, you control the spice level to fit your taste. You can change the protein in this dish to suit your preferences. Use shrimp, beef, or tofu as alternatives. Each option will give a unique flavor. For a quick meal, pre-cooked proteins work well. Just heat them in the skillet with the veggies before adding the sauce. Store your Southwest Alfredo Pasta in an airtight container. Make sure it cools down first. This keeps it fresh for up to three days in the fridge. If you want to keep it longer, freezing is a great option. Just remember, the pasta may change texture after freezing. To reheat, use a microwave or a skillet. For the microwave, heat in short intervals. Stir between each interval to avoid hot spots. If using a skillet, add a splash of cream or water. This helps keep the sauce creamy as you warm it up. To freeze, let the pasta cool completely. Portion it into freezer-safe bags or containers. Remove as much air as possible before sealing. Label the bags with the date. You can freeze it for up to three months. When ready to eat, thaw it overnight in the fridge before reheating. Southwest Alfredo Pasta combines creamy Alfredo sauce with bold Southwest flavors. It uses fettuccine pasta, chicken, or black beans. Toss in corn, bell peppers, and taco seasoning for a unique taste. This dish is both rich and comforting, perfect for any meal. Yes, you can prepare Southwest Alfredo Pasta ahead of time. Cook the pasta and sauce separately. Store them in airtight containers in the fridge. When you're ready to eat, reheat each part and combine them. This way, your dish stays fresh and tasty. To add heat, try these tips: - Mix in sliced jalapeños when cooking the sauce. - Use spicy taco seasoning instead of regular. - Add a pinch of cayenne pepper for extra kick. These changes will give your dish a fiery flavor that many will love. This blog post covered how to make tasty Southwest Alfredo Pasta. You learned about the main and optional ingredients. We discussed cooking steps and tips for great flavor. I shared variations for dietary needs and how to store leftovers properly. Try this dish for your family or friends. With these tips, you can make pasta your way. Enjoy creating your own version of Southwest Alfredo Pasta!
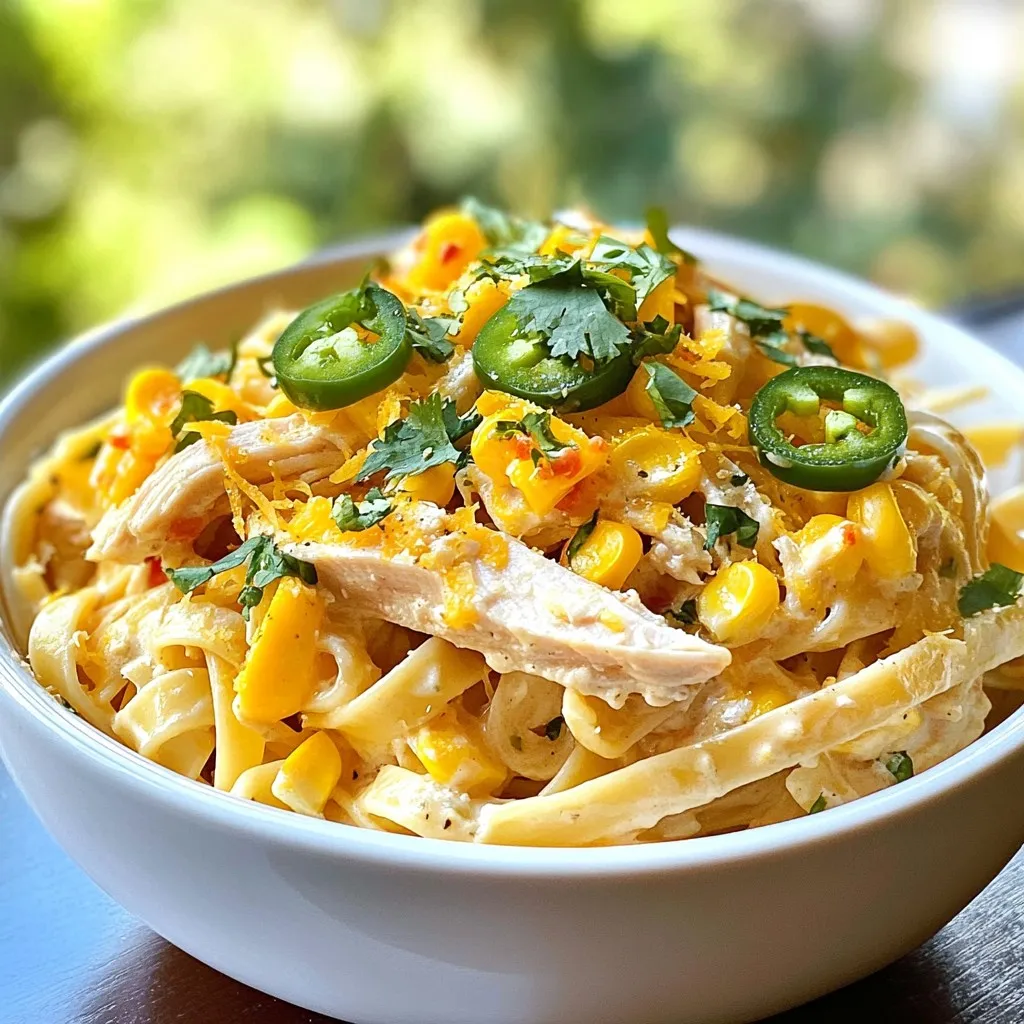
Savory Southwest Alfredo Pasta Quick and Easy Recipe
Are you ready to spice up dinner with a twist? This Savory Southwest Alfredo Pasta combines creamy goodness with bold flavors, making it a perfect
For a tasty Greek chicken bowl, you need the right ingredients. Here’s what to gather: - Chicken - 2 boneless, skinless chicken breasts - Marinade Components - 2 tablespoons extra virgin olive oil - 1 teaspoon garlic powder - 1 teaspoon dried oregano - 1 teaspoon fresh lemon zest - Salt and freshly ground black pepper to taste - Fresh Vegetables - 1 cup cooked quinoa (white, red, or a blend) - 1 cup cucumber, diced into small cubes - 1 cup cherry tomatoes, halved - 1/2 cup red onion, thinly sliced - 1/2 cup Kalamata olives, pitted and sliced - 1/4 cup fresh parsley, finely chopped - Toppings and Garnishes - 1/2 cup feta cheese, crumbled - Juice of 1 fresh lemon - Tzatziki sauce for topping Each ingredient adds flavor and nutrition. You can mix and match based on your taste. Fresh veggies bring crunch, while the chicken offers protein. Enjoy the vibrant colors and flavors as you prepare. {{ingredient_image_2}} To start, you will need to prepare the marinade. In a medium bowl, mix together: - 2 tablespoons extra virgin olive oil - 1 teaspoon garlic powder - 1 teaspoon dried oregano - 1 teaspoon fresh lemon zest - Salt and freshly ground black pepper to taste Add the chicken breasts to the bowl. Make sure they are well-coated in the marinade. Cover the bowl with plastic wrap and refrigerate. Let the chicken marinate for at least 30 minutes. Marinating is key. It adds flavor and keeps the chicken juicy. If your quinoa is not cooked, rinse it under cold water. This step removes bitterness. Cook it according to the package instructions. Once it’s done, fluff the quinoa with a fork. Set it aside to cool for a few minutes. Cooking quinoa correctly makes it light and fluffy, perfect for your bowl. Heat your grill or grill pan over medium-high heat until hot. Remove the chicken from the marinade and place it on the grill. Cook for about 6-7 minutes on each side. The chicken should reach an internal temperature of 165°F/75°C. After cooking, transfer the chicken to a plate and let it rest for 5 minutes. Resting is important; it helps the juices stay inside when you slice it. In a large mixing bowl, add: - 1 cup cucumber, diced - 1 cup cherry tomatoes, halved - 1/2 cup red onion, thinly sliced - 1/2 cup Kalamata olives, pitted and sliced - 1/4 cup fresh parsley, finely chopped Drizzle the juice of one fresh lemon over the veggies. Toss gently to combine. Be careful not to mush the tomatoes. This step brightens the flavors and adds freshness to your bowls. For assembly, start with a base layer of quinoa in each serving bowl. Arrange the sliced grilled chicken on top of the quinoa. Next, add the vibrant vegetable mixture. Layering ingredients this way makes for a colorful and inviting dish. Finally, sprinkle a generous amount of crumbled feta cheese on top. Serve with tzatziki sauce either on the side or directly on top. Tzatziki adds creaminess and flavor to the dish. Enjoying your Greek chicken bowls with these finishes makes each bite delightful! For juicy chicken, you can grill or bake. Grilling gives a nice smoky flavor. Baking is great for even cooking. To keep it juicy, marinate your chicken well. Use olive oil and spices for added moisture. Let the chicken rest after cooking. This helps the juices stay in. Rinse quinoa before cooking. This removes bitter saponins. To add flavor, cook quinoa in vegetable broth instead of water. This makes it taste better. A common mistake is overcooking quinoa. Cook it just until it’s fluffy. This keeps it light and airy. Add fresh herbs like dill or mint for extra freshness. A pinch of cumin can also boost the taste. You can serve your Greek chicken bowls with pita bread or a simple Greek salad. These sides add more color and flavor to your meal. Pro Tips Marinate for Maximum Flavor: Allow the chicken to marinate for at least 30 minutes, but if time permits, let it sit for a few hours or overnight for deeper flavor penetration. Use Fresh Ingredients: Whenever possible, opt for fresh herbs and vegetables. This enhances the flavor and nutritional value of your dish. Perfectly Cooked Quinoa: To avoid mushy quinoa, always rinse it before cooking and use a 2:1 ratio of water to quinoa for fluffy results. Garnish with Intent: Adding fresh herbs or lemon zest just before serving elevates the dish's presentation and adds a burst of freshness to each bite. {{image_4}} You can swap out chicken for grilled vegetables. Try zucchini, bell peppers, and eggplant for great taste. These colorful veggies add flavor and texture. For protein, use chickpeas or lentils. They are hearty and filling, making your bowl satisfying. If you need gluten-free options, use rice or millet instead of quinoa. Both grains cook easily and taste great. For toppings, skip the traditional feta cheese if you want to keep it dairy-free. Instead, try avocado or a sprinkle of nutritional yeast for a cheesy flavor. Get creative with your marinades! Try adding yogurt, honey, or spices to shake things up. You can use seasonal vegetables too. For example, in summer, add sweet corn or in fall, use roasted butternut squash. Each season brings unique flavors to enjoy in your Greek chicken bowl. To keep your Greek chicken bowls fresh, store leftovers in an airtight container. This helps prevent spills and keeps the flavors intact. You can safely store them in the fridge for up to three days. If you want to enjoy your meal later, be sure to keep the tzatziki sauce separate until serving. This keeps the sauce fresh and creamy. If you want to freeze your Greek chicken bowls, use freezer-safe containers. Make sure to let the chicken and quinoa cool first before sealing them. They can last in the freezer for up to three months. When you're ready to eat, thaw them overnight in the fridge. To reheat, you can use a microwave or oven. Just make sure the chicken reaches 165°F (75°C) again for safe eating. Batch cooking is a great way to save time. You can cook a large batch of chicken and quinoa ahead of time. Store them in individual containers for quick meals. I recommend using glass containers for easy reheating and to avoid any lingering smells. You can prep veggies like cucumbers and tomatoes in advance too. Just store them in separate containers to keep them fresh and crunchy. Yes, you can use chicken thighs. They are juicier and have more flavor. Thighs can stay moist during cooking. However, they have more fat, which adds calories. If you prefer a leaner meal, choose chicken breasts. Both cuts work well in Greek chicken bowls. If you don’t have tzatziki, try plain Greek yogurt. Add garlic and cucumber for a similar taste. Hummus is another great dip. You can also use ranch or tahini sauce for a different flavor. These options keep your meal tasty and fresh. Quinoa is very healthy. It is high in protein and fiber. Quinoa also contains vitamins and minerals. It is gluten-free, making it a good choice for many diets. You can use brown rice or farro as alternatives. However, quinoa stands out for its health benefits. Yes, you can prep this dish ahead of time. Cook the chicken and quinoa in advance. Store them in the fridge for up to three days. Prepare the vegetables the day before to save time. Just keep everything separate until you’re ready to assemble. This keeps the flavors fresh and bright. In this post, we covered the key ingredients and steps for making a delicious chicken bowl. You learned how to marinate chicken, cook quinoa, and assemble a tasty dish with fresh vegetables. Remember, marinating is key to juicy chicken. Use the tips for storage to enjoy leftovers safely. Exploring variations also opens up new flavors. Whether you choose vegetarian options or gluten-free grains, there’s always a way to mix it up. Enjoy your cooking adventure!
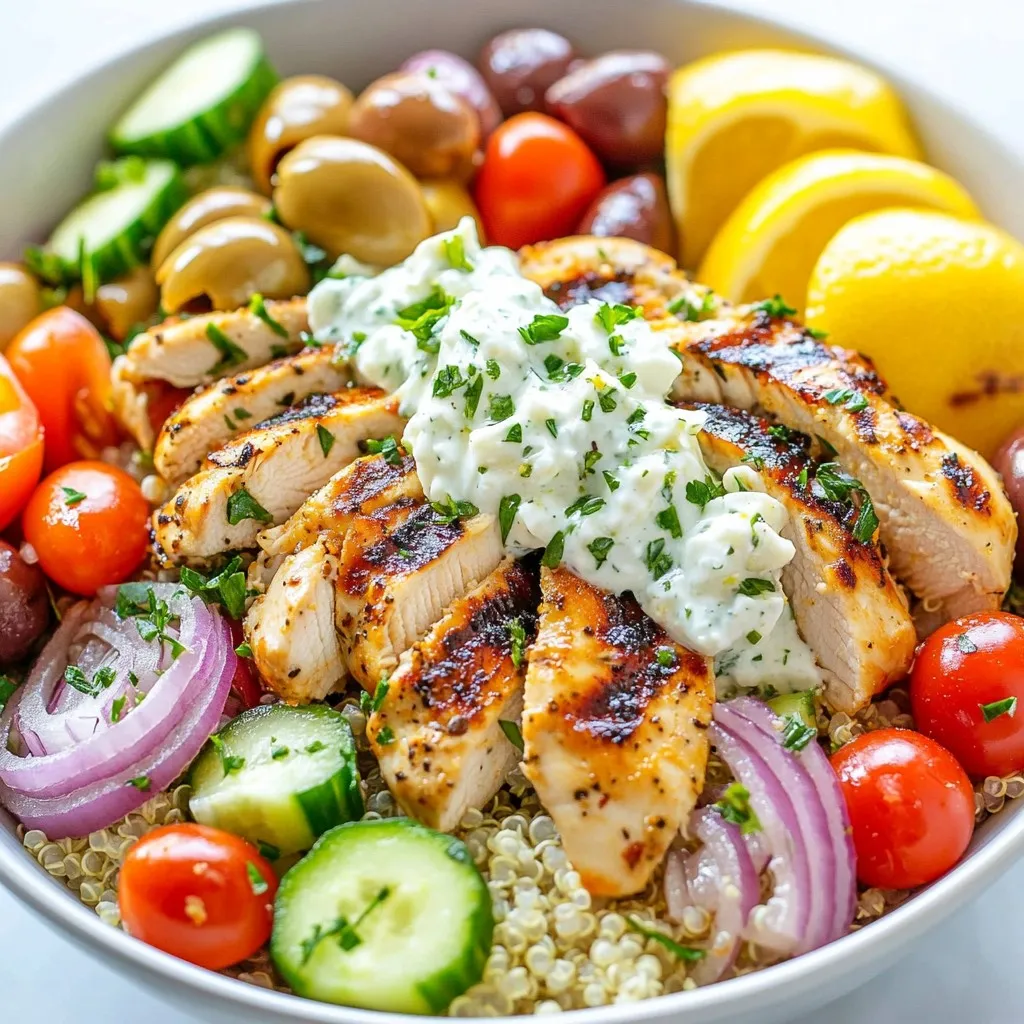
Greek Chicken Bowls Tasty and Healthy Meal Idea
Looking for a tasty and healthy meal idea? Greek Chicken Bowls are your answer! Packed with protein, fresh veggies, and flavor, these bowls are easy