Dinner

- 4 large bell peppers (any color of your choice) - 1 pound cooked chicken, shredded - 1 cup ranch dressing - 1 cup corn kernels (can be fresh or frozen) - 1 cup black beans, rinsed and drained - 1 cup shredded cheddar cheese - 1 teaspoon garlic powder - 1 teaspoon onion powder - 1 teaspoon smoked paprika - Salt and pepper to taste - Fresh cilantro, chopped (for garnish, optional) - Baking dish - Mixing bowl - Spoon and spatula - Oven - Knife The right ingredients make all the difference in Ranch Chicken Stuffed Peppers. First, choose large bell peppers. You can pick any color you like. Next, use one pound of cooked chicken. Shredded chicken works best for mixing. You will need one cup of ranch dressing. This dressing makes the dish creamy and tasty. Corn is next. One cup of corn kernels adds sweetness. You can use fresh or frozen corn. Black beans are important too. Use one cup, and rinse and drain them well. They add protein and texture. Don’t forget cheese! You will use one cup of shredded cheddar cheese. This will melt on top and create a tasty layer. For flavor, add one teaspoon each of garlic powder, onion powder, and smoked paprika. These spices add depth. Lastly, season with salt and pepper to taste. If you want, sprinkle fresh cilantro on top for a pop of color. Gather these ingredients, and you are ready to create a delightful meal. {{ingredient_image_2}} - Preheat the oven to 375°F (190°C). - Rinse the bell peppers well. Cut off the tops and remove the seeds. - In a large bowl, combine the shredded chicken, ranch dressing, corn, and black beans. - Add garlic powder, onion powder, smoked paprika, salt, and pepper. - Stir the mixture until everything is mixed well. - Use a spoon to fill each bell pepper with the chicken mixture. - Press the mixture down lightly so it fits well. - Sprinkle shredded cheese on top of each pepper. - Cover the dish with foil and bake for 25 minutes. - After 25 minutes, remove the foil and bake until the cheese melts. - Always ensure chicken is fully cooked before shredding. This keeps the meat safe and tasty. - Pack the filling tightly for best results. This way, every bite is full of flavor. - Drizzle with ranch dressing before serving. It adds a creamy touch that everyone loves. - Garnish with cilantro for color. This makes your dish look fresh and inviting. - Don't skip pre-cooking the chicken. Using raw chicken can lead to undercooked meat. - Be careful not to overfill the peppers. This can cause spillage and mess in your oven. Pro Tips Choose Colorful Peppers: Using a mix of bell pepper colors not only enhances the visual appeal of your dish but also adds a variety of flavors. Customize the Filling: Feel free to add other ingredients like diced tomatoes, jalapeños, or even cream cheese for a different flavor profile. Optimal Cheese Melting: For an extra gooey texture, consider using a mix of cheeses like Monterey Jack or mozzarella along with cheddar. Serve with Flair: Pair the stuffed peppers with a side salad or some tortilla chips to make a complete meal, and drizzle with extra ranch dressing for added flavor. {{image_4}} You can switch things up with ground turkey or beef instead of chicken. This change can give you a new taste. If you want a lighter meal, try low-fat ranch dressing. It still brings that ranch flavor but cuts some calories. For more moisture, add diced tomatoes to the filling. This small step can make a big difference. If you like heat, toss in some jalapeños. They add a spicy kick that elevates the dish. Need a gluten-free meal? Just ensure there is no cross-contamination with gluten. You can also make these peppers vegan. Use dairy-free cheese to replace regular cheese. This way, everyone can enjoy the meal! How do you refrigerate stuffed peppers? To refrigerate stuffed peppers, let them cool first. Once cool, place them in an airtight container. Make sure to separate layers with parchment paper to avoid sticking. This keeps the peppers fresh. What are best practices for freezing? To freeze stuffed peppers, wrap each one in plastic wrap tightly. Then, place them in a freezer-safe bag. Remove as much air as possible. This helps prevent freezer burn and keeps them tasty. What is the oven method for optimal texture? For the oven method, preheat your oven to 350°F (175°C). Place the stuffed peppers in a baking dish. Cover with foil to keep moisture in. Bake for about 20 minutes or until heated through. What about the microwave method for quick reheating? For the microwave method, place a stuffed pepper on a microwave-safe plate. Cover it with a damp paper towel. Heat on high for about 2-3 minutes. Check if it's warm enough, and repeat if needed. How long can you store them in the fridge? You can store stuffed peppers in the fridge for up to 3 days. After that, the quality may decline. Always check for signs of spoilage before eating. What are signs of spoilage to look out for? Signs of spoilage include a sour smell, mold, or a slimy texture. If you see any of these, it's best to throw them away. Keeping food safe is very important! No, do not use raw chicken. Cooked chicken is key for flavor. Raw chicken takes longer to cook. It can also lead to food safety issues. Always start with pre-cooked chicken. Shredded rotisserie chicken works great for this dish. These stuffed peppers pair well with many sides. Try a simple green salad for freshness. Cornbread adds a nice touch of sweetness. For something hearty, serve with rice. You can also add a side of tortilla chips and salsa for crunch. Bake the stuffed peppers at 375°F for about 35-40 minutes. Cover them for the first 25 minutes. Remove the foil to let the cheese brown. The peppers should become tender and the cheese bubbly. Yes, you can prepare them ahead. Stuff the peppers and store them in the fridge. Cover them tightly with foil or plastic wrap. Bake them when you're ready to eat. They can stay in the fridge for up to 24 hours before baking. You learned how to make Ranch Chicken Stuffed Peppers with ease. We covered the ingredients, preparation steps, and helpful tips. I also shared ideas for swapping ingredients, storing leftovers, and reheating. These stuffed peppers are tasty and flexible. You can customize them to fit your needs. I hope you feel inspired to try this delicious recipe. Enjoy every bite!
Ranch Chicken Stuffed Peppers Tasty and Simple Dish
Looking for a quick and tasty dinner idea? Ranch Chicken Stuffed Peppers pack a flavorful punch with simple ingredients and easy preparation. You’ll blend shredded
To make the best honey garlic shrimp tacos, gather these key ingredients: - 1 lb shrimp, peeled and deveined - 2 tablespoons honey - 3 cloves garlic, finely minced - 1 tablespoon soy sauce (low sodium preferred) - 1 tablespoon freshly squeezed lime juice - 1 teaspoon chili powder - 8 small flour or corn tortillas - 1 cup red cabbage, thinly shredded - 1 ripe avocado, sliced - A handful of fresh cilantro leaves, for garnish - Lime wedges, for serving - Salt and freshly ground black pepper, to taste These ingredients blend to create a sweet and savory flavor. The shrimp soak in a tasty marinade, while the toppings add crunch and freshness. If you want to elevate your tacos, consider these optional garnishes: - Diced tomatoes for added freshness - Sliced jalapeños for a spicy kick - Crumbled feta or queso fresco for creaminess - A drizzle of sour cream or Greek yogurt for tanginess Feel free to mix and match toppings to suit your taste. Each option adds a unique twist to your dish. These tacos are not only delicious but also pack a nutritious punch. Here’s a rough estimate per serving: - Calories: 320 - Protein: 24g - Carbohydrates: 30g - Fats: 12g - Fiber: 6g This meal offers a good balance of protein and carbs, making it a satisfying choice. Enjoy these flavorful tacos guilt-free! {{ingredient_image_2}} To start, gather your ingredients. In a mixing bowl, combine: - 2 tablespoons honey - 3 cloves garlic, finely minced - 1 tablespoon soy sauce - 1 tablespoon lime juice - 1 teaspoon chili powder - A pinch of salt and pepper Whisk these together until smooth. This marinade will give your shrimp a sweet and savory flavor. Next, add 1 pound of peeled and deveined shrimp to the bowl. Toss the shrimp gently in the marinade. Make sure every piece is well coated. Cover the bowl with plastic wrap. Let it sit for 15 to 20 minutes. This allows the shrimp to soak in the flavors. Now, heat a non-stick skillet over medium-high heat. Once it's hot, add the marinated shrimp in a single layer. Cook for 2 to 3 minutes until they turn pink. Flip the shrimp and cook for another 2 to 3 minutes. They should be fully cooked and opaque. Remove the skillet from heat. While the shrimp cook, take another skillet to warm your tortillas. Place each tortilla in the skillet for about 30 seconds on each side. They should be soft and pliable, not crisp. Keep them warm by wrapping in a clean kitchen towel. To build your tacos, lay a few shrimp onto each warmed tortilla. Top with a handful of shredded red cabbage. Add several slices of avocado for creaminess. Finish your tacos with fresh cilantro leaves on top. Squeeze fresh lime juice over everything for a bright flavor. For presentation, arrange your tacos on a colorful platter. Serve with lime wedges on the side for guests to enjoy. To make the best marinade, use fresh garlic and quality honey. Mix the honey, garlic, soy sauce, lime juice, and chili powder in a bowl. This mix gives the shrimp a sweet and savory taste. A pinch of salt and pepper adds depth. Marinate the shrimp for 15-20 minutes to soak up the flavors. Don't skip this step; it makes a big difference. Cook your shrimp on medium-high heat for the best results. Heat your skillet until hot, then add the marinated shrimp. Cook one side for 2-3 minutes until pink. Flip them over and cook the other side for the same time. Shrimp cook quickly, so watch them closely. They should be opaque when done. Overcooking makes shrimp tough and rubbery. Warming tortillas is key to a great taco. Use a dry skillet over medium heat. Place each tortilla in the skillet for 30 seconds on each side. You want them soft, not crispy. Keep them warm by wrapping in a clean towel. This keeps them pliable for easy folding. Enjoy your tacos with warm tortillas for the best taste! Pro Tips Marinate for Maximum Flavor: Allow the shrimp to marinate for at least 20 minutes to absorb all the delicious flavors from the honey and garlic. Keep it Fresh: Use fresh lime juice instead of bottled for a brighter, more vibrant flavor in your tacos. Perfectly Cooked Shrimp: Make sure not to overcook the shrimp; they should be pink and opaque. Overcooking can lead to rubbery texture. Customize Your Toppings: Feel free to add your favorite toppings like diced tomatoes, jalapeños, or a drizzle of sour cream for extra flavor and texture. {{image_4}} You can swap shrimp for other proteins. Chicken works well in this recipe. Use boneless, skinless chicken breasts. Cut them into bite-sized pieces and marinate as you would shrimp. Tofu is another great option. Choose firm tofu and cut it into cubes. Press it to remove excess moisture before marinating. Both options give the same sweet and savory flavor. Tacos are fun, but you can change the style. Try lettuce wraps for a low-carb option. Use large leaves, like romaine or butter lettuce. Place the shrimp and toppings inside the leaves. Burrito style is another choice. Take a larger tortilla and fill it with the shrimp, cabbage, and avocado. Roll it up tightly for a tasty, handheld meal. You can boost the flavor with a few simple tweaks. Add spices like smoked paprika or cumin to the marinade. This gives your dish a deeper taste. For toppings, consider diced tomatoes or sliced jalapeños for heat. A drizzle of sour cream or yogurt can add creaminess. These enhancements let you personalize your tacos to fit your taste. After enjoying your honey garlic shrimp tacos, you may have some shrimp left. Store the leftover shrimp in an airtight container. Make sure to refrigerate them within two hours of cooking. They will stay fresh for up to three days. If you want to freeze them, use a freezer-safe bag. They can last for about two months in the freezer. To reheat the shrimp, it’s best to use a skillet. Heat the skillet over medium heat. Add the shrimp and cook for about 3-4 minutes until hot. Stir gently to avoid overcooking. You can also microwave the shrimp. Place them in a microwave-safe dish and cover. Heat for 30 seconds, then check if they're warm. If not, heat in 15-second intervals. For leftover tortillas, place them in a resealable plastic bag. Keep the bag sealed to prevent them from drying out. Store them in the fridge for up to a week. If you want to keep them longer, freeze the tortillas. Wrap them in foil or plastic wrap before placing in the freezer. When ready to use, thaw them overnight in the fridge. To keep shrimp tender, cook them quickly. Shrimp only need about 2-3 minutes per side. Look for them to turn pink and opaque. If you see them curling tightly, they are overcooked. Use a timer if needed. This will help you keep track of cooking time. Yes, you can prep the shrimp ahead of time. Marinate them for up to 30 minutes. If you want to store them longer, keep them in the fridge for 1-2 hours. Avoid marinating overnight, as it can change the texture. Cook them just before serving for the best taste. These tacos go well with many sides. Try serving them with: - Mexican rice - Black beans - Grilled corn - Chips and salsa - A fresh green salad These sides brighten the meal and complement the shrimp's flavors. You can make this recipe vegan by using tofu or tempeh instead of shrimp. Marinate them just like you would the shrimp. For a seafood taste, consider using jackfruit or mushroom. Both options have a nice texture and will soak up the honey garlic flavor well. Honey garlic shrimp tacos are a tasty choice. We covered the key ingredients and how to prepare them. You learned about optional toppings to add more flavor. I shared tips for cooking shrimp just right and warming tortillas. Try different proteins or styles to mix it up. Store leftovers properly for future meals. With these steps, you can enjoy great tacos any time. Experiment, have fun, and enjoy your cooking adventure!
Honey Garlic Shrimp Tacos Flavorful and Quick Meal
Get ready for a meal that bursts with flavor: Honey Garlic Shrimp Tacos! This dish is quick to make and perfect for busy nights. With
- Chicken - 4 boneless, skinless chicken breasts - Marinade Components - 3 lemons (zested and juiced) - 1/4 cup extra virgin olive oil - 4 cloves garlic, minced - 1 tablespoon dried oregano - 1 teaspoon salt - 1 teaspoon freshly ground black pepper - 1/2 teaspoon red pepper flakes (optional for heat) - Garnishing Elements - 1/4 cup fresh parsley, finely chopped (for garnish) - Additional lemon slices (for garnish) The key to this dish is the balance of fresh flavors. The lemons give a bright taste, while the garlic and oregano add depth. Olive oil keeps the chicken juicy and enhances the marinade. Each ingredient plays a role in making the chicken delicious. Using fresh herbs like parsley adds a nice pop of color and flavor. Lemon slices not only look great but also give extra zest when served. Choose high-quality olive oil for the best taste. This dish is all about simple, fresh ingredients that shine. {{ingredient_image_2}} Preparing the Marinade Start with a large bowl. Whisk together juice and zest from three lemons. Add 1/4 cup of olive oil, 4 minced garlic cloves, 1 tablespoon of oregano, 1 teaspoon of salt, and black pepper. For a kick, mix in 1/2 teaspoon of red pepper flakes. Coating the Chicken Add 4 boneless, skinless chicken breasts to the bowl. Use your hands to coat each piece well. Make sure every inch gets the marinade. This step is key for flavor. Refrigeration Time Cover the bowl with plastic wrap. Let it sit in the fridge for at least 30 minutes. For deeper flavor, you can marinate it for up to 2 hours. Preheating the Grill Heat your grill to medium-high. This temperature helps get nice grill marks. A hot grill is vital for great chicken. Cooking Instructions Remove the chicken from the marinade. Let excess marinade drip off. Place the chicken on the grill. Cook for 6-7 minutes on one side. Flip it over and grill for another 6-7 minutes. Checking Doneness Use a meat thermometer to check if the chicken is done. The internal temperature should reach 165°F (75°C). The outside should be charred and have grill marks. Resting Time After grilling, transfer the chicken to a cutting board. Allow it to rest for 5 minutes. This step keeps the chicken juicy. Presentation Tips Slice the chicken into generous pieces. Serve it warm on a large platter. Garnish with freshly chopped parsley and lemon slices. This adds color and freshness to your dish. Enhancing Flavor To make the marinade pop, use fresh ingredients. Fresh lemons are key. The zest adds a strong citrus taste. Use high-quality olive oil for richness. Garlic gives a nice kick. Dried oregano brings depth. Add salt and pepper for balance. If you want heat, toss in red pepper flakes. Let the chicken soak in this mix for at least 30 minutes. If you have time, two hours is even better. Alternative Ingredients You can swap ingredients to suit your taste. Try using lime juice instead of lemon for a twist. Fresh herbs like thyme or rosemary can replace oregano. For a creamier marinade, mix in some yogurt. This will give you a tangy flavor. Experiment with different spices like cumin or coriander to find what you love. Tips for Getting Grill Marks To get those perfect grill marks, start with a hot grill. A medium-high heat is best. Make sure to oil the grill grates lightly. Place the chicken on the grill and don’t move it for the first few minutes. This helps the marks form. After 6-7 minutes, flip the chicken gently. You’ll see beautiful char lines on both sides. Avoiding Dry Chicken To keep your chicken juicy, don’t overcook it. Use a meat thermometer to check the internal temperature. It should reach 165°F (75°C). Rest the chicken for five minutes after grilling. This allows the juices to settle back into the meat. Slice it right before serving to keep it moist and tasty. Pro Tips Marinate Longer for More Flavor: For the best results, marinate the chicken for at least 2 hours or even overnight. This allows the flavors to deeply penetrate the meat, enhancing its taste. Use a Meat Thermometer: To ensure your chicken is cooked perfectly, use a meat thermometer. The internal temperature should reach 165°F (75°C) for safe consumption. Let it Rest: After grilling, let the chicken rest for 5 minutes before slicing. This helps the juices redistribute throughout the meat, keeping it moist and flavorful. Add Fresh Herbs: Enhance the dish by incorporating fresh herbs like thyme or dill into the marinade for an extra layer of flavor that complements the lemon and garlic beautifully. {{image_4}} You can cook Greek lemon chicken in different ways. If you want to bake it, here’s how. Oven-Baked Greek Lemon Chicken: 1. Preheat the oven to 400°F (200°C). 2. Place the marinated chicken in a baking dish. 3. Bake for 25-30 minutes. Check that the chicken reaches 165°F (75°C). 4. The chicken will be juicy and full of flavor. Skillet Cooking Options: 1. Heat a skillet over medium heat with olive oil. 2. Add the marinated chicken and cook for 6-7 minutes on each side. 3. Look for a nice golden brown color. The chicken should be safe at 165°F (75°C). You can also make Greek lemon chicken your own with some extra flavors. Adding Herbs and Spices: 1. Consider fresh herbs like thyme or rosemary for extra taste. 2. Add a pinch of cumin or coriander for warmth. 3. You might try fresh basil for a sweet note. Incorporating Vegetables: 1. Slice bell peppers or zucchini to grill alongside the chicken. 2. Toss in cherry tomatoes for a burst of color and flavor. 3. This adds nutrition and makes your dish more vibrant. After you cook the Greek lemon chicken, let it cool to room temperature. Place it in an airtight container. This keeps the chicken fresh. You can store it in the fridge for up to four days. For best results, slice the chicken before storing. This helps it cool faster and makes it easier to reheat. If you have leftover marinade, do not mix it with the cooked chicken. Always discard used marinade to avoid contamination. You can freeze Greek lemon chicken for longer storage. First, let the cooked chicken cool completely. Wrap each piece tightly in plastic wrap. Then place the wrapped chicken in a freezer bag. Remove as much air as possible before sealing. This prevents freezer burn. You can freeze it for up to three months. To thaw, move the chicken from the freezer to the fridge for several hours or overnight. This keeps it safe and helps maintain its flavor and texture. If you need it faster, you can use the microwave. Just be careful to not cook it in the microwave while thawing. Enjoy your delicious Greek lemon chicken anytime! You should marinate the chicken for at least 30 minutes. This gives the chicken time to soak up the flavors. If you have more time, marinate it for up to 2 hours. The longer it sits, the more zesty it becomes. Just make sure to keep it in the fridge while it marinates. Yes, you can use bone-in chicken for this recipe. Bone-in chicken can add more flavor and moisture. Just adjust the cooking time to ensure it cooks through. Use a meat thermometer to check if it reaches 165°F (75°C) at the thickest part. Greek Lemon Chicken goes well with many sides. Here are some tasty options: - Greek salad with tomatoes, cucumbers, and feta - Roasted vegetables, like zucchini and bell peppers - Lemon rice or couscous for a light touch - Pita bread with tzatziki sauce for dipping These sides balance the flavors and make a full meal. In this post, we explored how to make Greek Lemon Chicken. First, we listed key ingredients, including chicken and marinade components. Then, we outlined steps for marinating, grilling, and serving the dish. I shared tips for enhancing flavor and avoiding dry chicken. You can also try different cooking methods and flavor variations. Finally, we covered storage tips for leftovers. Greek Lemon Chicken is simple and tasty. Now you can enjoy a delicious meal!
Greek Lemon Chicken Flavorful and Easy Grilling Recipe
Looking for a quick and tasty meal that bursts with flavor? You’ve found it! This Greek Lemon Chicken recipe combines juicy marinated chicken with fresh
- 1 lb boneless, skinless chicken thighs - 1 cup jasmine rice - 1 cup broccoli florets - 1 medium carrot, julienned - ½ cup low sodium soy sauce - ¼ cup honey - 2 tablespoons rice vinegar - 1 tablespoon sesame oil - 1 tablespoon freshly grated ginger - 2 garlic cloves, minced - 1 tablespoon cornstarch - 2 tablespoons cold water - 2 green onions, thinly sliced - Sesame seeds for garnish For this teriyaki chicken rice bowl, I use chicken thighs for their juicy flavor. Jasmine rice gives a lovely aroma, and the vegetables add color and crunch. The marinade combines soy sauce and honey, creating a sweet and salty mix. Fresh ginger and garlic give the dish an extra kick. Cornstarch helps thicken the sauce for a perfect coating. I love using sesame seeds and green onions to garnish the bowl. They add a nice finish and a pop of flavor. With these ingredients, you create a tasty and satisfying meal everyone will enjoy. {{ingredient_image_2}} To start, you need to mix the marinade. In a bowl, whisk together: - ½ cup low sodium soy sauce - ¼ cup honey - 2 tablespoons rice vinegar - 1 tablespoon sesame oil - 1 tablespoon freshly grated ginger - 2 minced garlic cloves Once it’s well mixed, place the chicken thighs in a resealable bag or dish. Pour the marinade over the chicken, making sure it’s coated. Seal the bag or cover the dish and chill it in the fridge. I suggest marinating for at least 30 minutes, but 2 hours gives better flavor. Now, let's cook the jasmine rice. First, rinse 1 cup of rice under cold water until the water runs clear. This removes excess starch. Next, in a medium pot, add the rinsed rice and 1 ½ cups of water or chicken broth. Bring it to a boil over medium-high heat. Once boiling, lower the heat, cover the pot, and let it simmer for about 15 minutes. When the rice is tender, take it off the heat and let it sit for another 10 minutes. This helps the rice steam and become fluffy. While the rice cooks, prepare the sauce. Pour the leftover marinade into a small saucepan and bring it to a gentle simmer over medium heat. In a bowl, mix 1 tablespoon of cornstarch with 2 tablespoons of cold water to create a slurry. Once the marinade is simmering, stir in the cornstarch slurry. Let it simmer for about 2 minutes or until it thickens nicely. Set it aside for later. Next, heat a large skillet over medium-high heat. Take the marinated chicken out of the bag and let any excess marinade drip off. Place the chicken in the hot skillet. Cook for about 5-7 minutes on each side. The chicken should be golden brown and cooked through. Use a meat thermometer to check the internal temperature, which should reach 165°F (75°C). In the same skillet, toss in the broccoli florets and julienned carrot. Stir-fry them for about 3-4 minutes. You want them to be tender but still crisp. If needed, add a splash of water to help steam the veggies evenly. Once the chicken is done, slice it into strips. Add it back to the skillet with the vegetables. Pour the thickened teriyaki sauce over everything and toss gently to coat. Now, fluff the cooked rice with a fork and divide it among four bowls. Top each bowl with the chicken and vegetable mix. If you like, drizzle with extra sauce and garnish with sliced green onions and sesame seeds. Enjoy your teriyaki chicken rice bowl! To get the best flavor in your teriyaki chicken, marinate the chicken well. I recommend marinating for at least 30 minutes. If you can, let it sit for two hours. This longer time helps the chicken soak up all the tasty sauce. Using low-sodium soy sauce is smart. It gives the same great flavor but with less salt. This makes the dish healthier and lets the sweetness of the honey shine through. To avoid dry chicken, don’t overcook it. Cook the chicken thighs for about 5-7 minutes on each side. Use a meat thermometer to check the chicken. It should reach 165°F (75°C) for safety. Set the skillet on medium-high heat. This heat is perfect for getting that nice golden color on the chicken. If the heat is too low, the chicken may cook too slowly and dry out. For plating, use a wide bowl. Start with a base of fluffy jasmine rice. Then, add the chicken and vegetables on top. This makes each bowl look colorful and appetizing. Garnish with sliced green onions and sesame seeds for extra flair. These add a nice crunch and bright colors to your dish, making it look even more delicious. Pro Tips Marinate Longer for Flavor: For the best flavor, marinate the chicken thighs for at least 2 hours, or even overnight. This allows the marinade to penetrate the meat more deeply, resulting in a juicier and more flavorful dish. Use Chicken Broth for Rice: Cooking the jasmine rice in chicken broth instead of water adds an extra layer of flavor that complements the teriyaki chicken beautifully. Vegetable Variations: Feel free to swap in your favorite vegetables! Bell peppers, snap peas, or bok choy can make great additions or substitutions for the broccoli and carrots. Serving Suggestions: Serve the teriyaki chicken rice bowl with a side of pickled ginger or a small bowl of miso soup to enhance the Japanese dining experience. {{image_4}} You can swap the broccoli and carrots for many other veggies. Try snap peas, bell peppers, or zucchini. These add great color and taste. Seasonal veggies work too! In spring, add asparagus. In summer, use corn or green beans. If you want a different protein, consider using tofu, beef, or shrimp. Tofu works well for a vegetarian twist. Cook it for 5-6 minutes until golden. For beef, slice it thin and cook for 4-5 minutes. Shrimp cooks fast, just 2-3 minutes until pink. You can change the rice too! Brown rice is a hearty choice. It takes longer to cook, about 40 minutes. Cauliflower rice is a low-carb option. Just sauté it for 5-7 minutes. For extra flavor, cook rice in chicken broth instead of water. To keep your teriyaki chicken rice bowl fresh, use airtight containers. Glass containers work best because they don't absorb odors. You can also use plastic containers, but make sure they are safe for the microwave. Store leftovers in the fridge within two hours of cooking. They should last for about 3 to 4 days. You can reheat your dish in two ways: the microwave or the stovetop. For the microwave, place the bowl in for 1-2 minutes, stirring halfway. If you choose the stovetop, heat a skillet on medium-low. Add a splash of water to help steam the rice and chicken. Cover the skillet to keep the moisture in. This helps the food stay soft. Make sure to check that everything is heated through before serving. Freezing is a great way to save leftovers. To freeze your teriyaki chicken rice bowl, let it cool completely first. Then, place it in a freezer-safe container or a resealable bag. Squeeze out as much air as possible before sealing. It can last for up to 3 months in the freezer. When you're ready to eat, thaw it in the fridge overnight. For best results, reheat it from thawed, not frozen. This keeps the texture nice and tasty. You can use chicken breasts for a leaner option. They cook faster but may be drier. If you prefer plant-based, try tofu or tempeh. Both absorb flavors well. You can also use beef or shrimp. Adjust cooking times for these proteins as needed. Yes, making teriyaki sauce at home is easy. Combine ½ cup soy sauce, ¼ cup honey, 2 tablespoons rice vinegar, 1 tablespoon sesame oil, 1 tablespoon grated ginger, and 2 minced garlic cloves. Mix well and simmer until thickened. This sauce adds a fresh touch. This teriyaki chicken rice bowl is not spicy. The flavors are sweet and savory. If you like spice, add red pepper flakes or sriracha to the sauce. Start with a little, and taste as you go. This way, you can find the right heat for you. Yes, this recipe works great for meal prep! Cook the chicken and vegetables in advance. Store them in airtight containers with rice. Keep the sauce separate until ready to eat. This keeps everything fresh. You can enjoy it throughout the week. To make this dish gluten-free, swap soy sauce for tamari. Tamari has a similar taste without gluten. Check that the honey and rice vinegar are gluten-free as well. Use gluten-free cornstarch for thickening. This way, everyone can enjoy this tasty meal! This blog post covered a delicious teriyaki chicken rice bowl. We explored key ingredients, from chicken thighs to fresh veggies. You learned each step, from marinating the chicken to creating a flavorful sauce. We discussed tips for the best taste and smart storage ideas. Finally, I shared variations and answered common questions. Now you're ready to cook this tasty meal! Enjoy it with your family or friends.
Teriyaki Chicken Rice Bowl Simple and Tasty Recipe
Are you ready to enjoy a delicious Teriyaki Chicken Rice Bowl? This simple recipe combines tender chicken thighs, fluffy jasmine rice, and colorful veggies for
- 1 lb boneless chicken thighs - 1/2 cup all-purpose flour - 1/4 cup cornstarch - 1 cup orange juice - Zest of 1 medium orange The chicken thighs give a juicy texture. I love using them for this dish. The all-purpose flour and cornstarch create a crispy coating. The orange juice and zest add brightness and flavor. - 1/4 cup packed brown sugar - 2 tablespoons soy sauce - 1 tablespoon rice vinegar - 1 teaspoon freshly grated ginger - 1 clove garlic, minced The brown sugar balances the tartness. Soy sauce brings umami depth. Rice vinegar adds a slight tang. Ginger and garlic give warmth and a nice kick. - 1 teaspoon baking powder - 1/2 teaspoon salt - 1/4 teaspoon black pepper - 1 tablespoon sesame oil - Sliced green onions - Sesame seeds Baking powder makes the coating fluffier. Salt and pepper enhance all the flavors. Sesame oil adds a nutty aroma. Green onions and sesame seeds give a beautiful finish and crunch. {{ingredient_image_2}} - In a large bowl, mix the flour, cornstarch, baking powder, salt, and black pepper. - In another bowl, whisk the egg until smooth. - Take a piece of chicken, dip it in the egg, and coat it with the flour mix. Press gently to help it stick. - Heat oil in a skillet over medium-high heat. - Once the oil shimmers, add coated chicken pieces in batches. - Fry each piece for about 5-6 minutes until golden brown. Flip them halfway for even cooking. - Transfer cooked chicken to a plate with paper towels to absorb excess oil. - In a medium saucepan, combine orange juice, orange zest, brown sugar, soy sauce, rice vinegar, ginger, garlic, and sesame oil. - Stir well and bring to a gentle simmer. - Let the sauce cook for 5-7 minutes until it thickens slightly, stirring occasionally. - Once the sauce is ready, add the fried chicken to the saucepan. - Use tongs or a spatula to toss the chicken in the sauce until fully coated. - Cook for another 2 minutes to warm the chicken and glaze it with sauce. - Transfer the orange chicken to a serving plate or bowl. - Garnish with sliced green onions and sesame seeds for a colorful finish. To get that perfect crispy texture, start with your coating. Use a mix of flour and cornstarch. This combination helps the chicken get extra crunchy. Make sure to coat each piece well. Press the coating onto the chicken. This helps it stick better while frying. For the frying, use medium-high heat. The oil should shimmer but not smoke. This temperature cooks the chicken evenly. If it's too hot, the outside burns before the inside cooks. Fry in small batches. This keeps the temperature steady and ensures even cooking. You can easily adjust the sauce to fit your taste. If you want it sweeter, add more brown sugar. For more acidity, squeeze in some extra orange juice or add rice vinegar. To spice it up, consider adding chili flakes or hot sauce. Experimenting with flavors is key. You can even try different spices like cumin or paprika. These can add a new twist to your dish. Pair your orange chicken with some tasty sides. Steamed rice or fried rice works well. You can also serve it with stir-fried veggies. They add color and nutrition to your meal. For serving, use a nice bowl or plate. Garnish with sliced green onions and sesame seeds. This not only looks great but adds extra flavor. Enjoy your meal with friends or family for a fun dining experience. Pro Tips Double Coating: For an extra crispy texture, consider double coating the chicken. After the first dip in egg and flour mixture, let it rest for a few minutes and then dip it again in the egg and flour mixture before frying. Marinating Time: For enhanced flavor, marinate the chicken in the orange juice, soy sauce, and ginger mixture for at least 30 minutes before frying. This will infuse the chicken with citrusy goodness. Oil Temperature: Ensure the oil is hot enough before adding the chicken. If the oil is too cool, the chicken will absorb more oil and become greasy. Use a thermometer to check that the oil reaches 350°F (175°C). Garnishing Variations: Feel free to experiment with garnishes! Add some toasted nuts, like cashews or almonds, or even a sprinkle of chili flakes for an extra kick. {{image_4}} You can make orange chicken healthier in two great ways. First, try baked orange chicken. Instead of frying, coat the chicken pieces and bake them. This cuts down on oil and calories. Second, use chicken breast instead of thighs. Chicken breast is leaner, making your dish lighter while still tasty. Want to mix it up? Adding chili flakes brings some heat to your orange chicken. You can start with a pinch and adjust to your taste. You can also incorporate additional fruits. Pineapple or mango adds a sweet twist to the dish, enhancing the citrus flavor. If you prefer a plant-based meal, substitute chicken with tofu. Use firm tofu for a great texture. You can marinate the tofu in the orange sauce for added flavor. Another option is using vegetable alternatives like cauliflower or chickpeas. These ingredients soak up the sauce well, giving you a satisfying meal. To keep your orange chicken fresh, use airtight containers. Glass or plastic containers work well. Allow the chicken to cool down before sealing. Store it in your fridge for easy access. Place it on the middle shelf, where the temperature stays even. This way, you can enjoy your meal later. If you want to save it for later, freezing is a great option. First, cool the chicken completely. Then, pack it in freezer-safe bags or containers. Squeeze out any air before sealing. This helps prevent freezer burn. When you are ready to eat, thaw it in the fridge overnight. Reheat it in the oven or on the stovetop until it’s hot. In the fridge, your orange chicken lasts about three to four days. Always check for signs of spoilage. If it smells bad or looks slimy, throw it away. Freshness matters, so enjoy your dish while it’s still good! The best chicken for orange chicken is boneless chicken thighs. They stay juicy and tender when cooked. Thighs also absorb flavors well, making your dish taste great. You can use chicken breasts if you prefer, but they may dry out more easily. Yes, you can use store-bought orange juice. Fresh juice tastes better and is healthier, but store-bought works too. Just make sure it’s 100% orange juice without added sugars. The taste might be slightly different, but it will still be tasty. To make orange chicken gluten-free, swap all-purpose flour for gluten-free flour. Use a gluten-free soy sauce as well. Make sure all your ingredients are certified gluten-free to avoid cross-contamination. This way, you can enjoy orange chicken without gluten. Serve orange chicken with steamed rice or fried rice. You can also pair it with stir-fried vegetables for a healthy option. Noodles with a light sauce work well too. Add a simple salad for extra freshness. Yes, you can prepare orange chicken in advance. Cook the chicken and sauce, then store them separately. When you’re ready to eat, heat them together until warm. This keeps the chicken crispy and the sauce fresh. In conclusion, this guide walked you through making delicious orange chicken, starting with key ingredients like chicken thighs and orange juice. We covered step-by-step instructions for frying and saucing the chicken. You learned tips for crispiness and variations for different diets. Remember to store leftovers properly to enjoy later. With these insights, you can enjoy a tasty meal that fits your style. Happy cooking!
Ingredient Orange Chicken Simple and Tasty Recipe
If you’re craving a sweet and tangy dish, you’re in the right place! This simple orange chicken recipe combines tender chicken thighs with a zesty
- 2 cups cooked chicken, shredded - 1 cup shredded cheddar cheese - 1 cup cooked rice (white or brown) - 1/2 cup black beans, rinsed and drained - 1/2 cup corn (canned or frozen) - 1/2 cup salsa - 4 large flour tortillas I love using cooked chicken because it saves time. You can use leftover chicken or store-bought rotisserie chicken. Shredded cheddar gives that nice, melty texture. The rice adds bulk and makes the burrito filling. Black beans are a great source of protein and fiber. Corn adds a sweet crunch, while salsa brings all the flavors together. Lastly, using large flour tortillas helps wrap everything nicely. - Sour cream - Guacamole - Fresh cilantro Adding sour cream gives a creamy touch. Guacamole adds richness and flavor. Fresh cilantro brings a bright taste. You can mix and match these toppings to suit your taste. - 1 tablespoon olive oil - 1 teaspoon ground cumin - Salt and pepper to taste Olive oil helps brown the tortillas. Ground cumin adds a warm, earthy flavor. Don’t forget to season with salt and pepper to enhance all the tastes. These simple seasonings transform the burrito into something special. {{ingredient_image_2}} First, grab a big bowl. In this bowl, mix together the shredded chicken, cooked rice, black beans, corn, and salsa. Make sure to combine them well. You want each piece of chicken to mingle with the rice and beans. Now, add one teaspoon of ground cumin, along with salt and pepper to taste. This step adds a warm, earthy flavor to your filling. Mix everything again until it’s all blended nicely. Next, lay a large flour tortilla flat on a clean surface. Spoon about half a cup of your filling right in the center. This will give you a hearty bite. Now, sprinkle roughly a quarter cup of shredded cheddar cheese on top of the filling. This cheese will melt and bring the burrito together. To roll the burrito, fold the sides of the tortilla over the filling. Then, start from the bottom and roll it up tightly. Keep the filling inside as you roll. Repeat this with your other tortillas and filling until you have all your burritos rolled and ready. Now it’s time to cook! Heat one tablespoon of olive oil in a large skillet over medium heat. Wait until the oil shimmers, then carefully place the burritos seam side down in the skillet. Make sure not to overcrowd the pan; give each burrito some space. Cook them for about three to four minutes on one side. Then, flip them over and cook for another three to four minutes. You want the tortillas to turn golden brown and crispy, and the cheese inside to melt. Once cooked, remove the burritos from the skillet and let them rest for a minute. This helps the cheese set a bit. Now, you’re ready to enjoy your tasty creations! How to roll burritos without spilling: Start with a good tortilla. Lay it flat on your surface. Place filling in the center. Fold the sides in first, then roll from the bottom. Tuck the filling in as you go. Keep it tight but not too tight. This way, your burrito will hold its shape. Tips for achieving crispy tortillas: Heat a skillet with olive oil. Make sure it's hot before adding burritos. Cook seam side down first. Flip only when golden brown. This gives a nice crunch. Alternatives for chicken: You can use shredded beef or pork. Leftover rotisserie chicken works great too. For a lighter option, try turkey. Vegan options: Replace chicken with tofu or tempeh. Use beans like black or pinto. For added protein, try lentils. Suggested spices and toppings: Add spices like chili powder or paprika for heat. Fresh lime juice adds a nice zest. Top with sour cream, guacamole, or cilantro. These add fresh flavors. Pairing ideas with sides and drinks: Serve with a side of rice or a fresh salad. Chips and salsa make a great snack. For drinks, try iced tea or a refreshing soda. Pro Tips Fresh Ingredients: Using freshly cooked chicken and homemade salsa can elevate the flavor of your burritos significantly. Cheese Choice: Experiment with different types of cheese such as Monterey Jack or pepper jack for a unique twist. Cooking Technique: For an even crispier burrito, consider grilling them instead of pan-frying. Make Ahead: You can prepare the filling in advance and refrigerate it for quick assembly on busy weeknights. {{image_4}} To spice things up, try adding jalapeños and avocado. These ingredients pack flavor and texture. Chop a few jalapeños and mix them into the filling. They add heat and a nice crunch. Slice ripe avocado and place it inside the burrito for creaminess. This mix gives the burritos a fresh twist that truly shines. If you want a meatless meal, use tofu or more beans. Crumble firm tofu into the filling mix. It soaks up flavors well and adds protein. You can also double the amount of black beans. This keeps the burrito hearty and filling. You won't miss the chicken at all. For a morning treat, make a breakfast burrito. Start by scrambling some eggs with breakfast sausage. Combine these with your chicken mixture or use beans for a lighter option. Layer in the cheese and roll it all up. This breakfast burrito is quick to make and perfect for busy mornings. To keep your Minute Cheesy Chicken Burritos fresh, use airtight containers. Glass or plastic containers work well. You can also wrap them tightly in foil or plastic wrap. Leftovers last in the fridge for up to three days. Check for any signs of spoilage before eating. You can freeze both uncooked and cooked burritos. For uncooked burritos, wrap each one in plastic wrap, then place them in a freezer bag. They will last about three months in the freezer. For cooked burritos, let them cool first. Wrap them in foil and place in a freezer-safe container. They are best eaten within two months. To reheat burritos, you have two great options: microwave or oven. For the microwave, place a burrito on a plate and cover it with a damp paper towel. Heat for 1-2 minutes until warm. For the oven, preheat to 350°F. Place the burrito on a baking sheet and heat for about 10-15 minutes. This makes the tortilla crispy again. Enjoy your meal! To keep your burritos from falling apart, follow these tips: - Use large tortillas: A bigger tortilla holds more filling. - Don’t overfill: Aim for about half a cup of filling per burrito. - Fold properly: After adding filling, fold in the sides first. Then roll from the bottom up, tucking as you go. - Seal the edges: Use a bit of water or olive oil on the edges to help seal them. - Cook seam side down: This helps keep the burrito closed while it cooks. Yes, you can prepare these burritos ahead of time. Here’s how: - Assemble the burritos: Follow the recipe steps and prepare the burritos. - Wrap tightly: Use plastic wrap or foil to keep them sealed. - Store in the fridge: They can last for up to two days in the fridge. - Freeze for longer: If you want to keep them longer, freeze them. They can last for up to three months in the freezer. You can pair your burritos with many tasty sides: - Mexican rice: This adds flavor and is a great side. - Refried beans: They complement the burritos well. - Fresh salad: A light salad with lime dressing adds freshness. - Chips and salsa: Perfect for crunch and extra flavor. - Guacamole: It’s a classic that pairs well with burritos. Feel free to mix and match these sides for a complete meal! You now have all the steps to create delicious burritos at home. Start with your main ingredients like chicken, cheese, and rice. Customize them with optional extras like sour cream and guacamole. Use spices to enhance the flavor. Follow the step-by-step guide to assemble and cook your burritos. Remember the tips for rolling and storing leftovers. Whether you stick to classic recipes or try new variations, these burritos can fit any meal. Enjoy your cooking and the tasty results!
Minute Cheesy Chicken Burritos Flavorful and Easy Meal
Looking for a simple yet tasty dinner idea? You’ll love these Minute Cheesy Chicken Burritos! They’re quick to make and packed with flavor. Using easy
- 1 cup uncooked jasmine rice - 2 cups beef broth - 1 pound flank steak, thinly sliced - 1 cup queso dip - 1 cup cherry tomatoes, halved - 1 cup corn - 1 ripe avocado, diced - Fresh cilantro leaves for garnish - 1 teaspoon smoked paprika - 1 teaspoon garlic powder - 1 teaspoon ground cumin - Salt and freshly cracked black pepper - Lime wedges - Additional toppings When making Queso Rice with Steak Strips, start with high-quality jasmine rice. This rice gives a soft and fluffy texture. Using beef broth instead of water adds depth. For the protein, flank steak works best. Thinly sliced, it absorbs flavors well. Next, the queso dip is essential. It brings creamy richness and ties everything together. For added freshness, include cherry tomatoes and corn. These add color and a slight sweetness. Top with avocado for creaminess and cilantro for brightness. Now, let’s not forget the spices. Smoked paprika gives a nice smokiness, while garlic powder adds aroma. Cumin gives warmth and earthiness. Finally, salt and pepper boost the flavors. For serving, lime wedges are a must. They add a tangy kick that brightens each bite. Feel free to add other toppings like sour cream or hot sauce for extra zest. {{ingredient_image_2}} - Rinsing the rice: Start by rinsing 1 cup of uncooked jasmine rice under cold water. This helps wash away extra starch and keeps your rice fluffy. You want the water to run clear. - Combining with beef broth: In a medium saucepan, mix the rinsed rice with 2 cups of beef broth. This gives the rice a rich flavor as it cooks. - Cooking process and fluffing: Bring the mixture to a boil. Then, lower the heat, cover the pot, and let it simmer for 15-20 minutes. Once done, fluff the rice with a fork. Set it aside while you prepare the steak and veggies. - Seasoning techniques: Take 1 pound of flank steak, thinly sliced against the grain. In a bowl, drizzle 1 tablespoon of extra virgin olive oil over the steak. Sprinkle with 1 teaspoon of smoked paprika, garlic powder, cumin, and a pinch of salt and pepper. Toss to coat the meat evenly. - Cooking methods and timings: Heat a large skillet over medium-high heat. Add the seasoned steak strips and cook for about 3-4 minutes. Flip halfway through to get a nice brown color. - Desired doneness: Cook until the steak reaches your preferred doneness. Remember, flank steak is best when not overcooked. Remove it from the skillet and set aside. - Techniques for sautéing: In the same skillet, add 1 cup of corn and 1 cup of halved cherry tomatoes. Sauté for about 2-3 minutes. Stir occasionally to prevent burning. - Flavor enhancement tips: Season the veggies with a pinch of salt and freshly cracked black pepper. This brings out their natural sweetness and adds extra flavor. To make the best rice, use a 1:2 ratio of rice to broth. Rinsing the jasmine rice removes extra starch, making it fluffy. Once you boil the broth, lower the heat and cover it. Cook for 15-20 minutes until soft. You can also try brown rice for a nuttier taste, but adjust the cooking time to about 40 minutes. Marinating the flank steak can add great depth. You can use lime juice, soy sauce, or even hot sauce for a kick. Let it sit for at least 30 minutes. When cooking, use a hot skillet to get a good sear. This keeps the juices inside and adds a nice crust. To incorporate queso smoothly, warm it slightly before adding. This helps it blend easily with the rice and steak. You can also mix different cheeses like cheddar or pepper jack for added flavor. Adjust the types based on your taste. Pro Tips Rinse the Rice: Rinsing jasmine rice before cooking removes excess starch, preventing it from becoming gummy and ensuring a fluffy texture. Let the Steak Rest: After cooking, allow the steak to rest for a few minutes. This helps the juices redistribute, making each bite more tender and flavorful. Customize the Toppings: Feel free to add your favorite toppings such as jalapeños, sour cream, or additional veggies for extra flavor and texture. Use Fresh Ingredients: Whenever possible, use fresh corn and ripe avocados. They add more vibrant flavors and better texture to your dish. {{image_4}} You can switch up proteins in this dish for variety. Chicken or shrimp work great. Chicken thighs add juiciness, while shrimp cooks fast and tastes fresh. For a vegetarian twist, use black beans or grilled veggies. These options still pack flavor and keep the meal hearty. To enhance the taste, try adding spices like chili powder or cayenne for heat. You can also mix different cheeses into your queso. Pepper jack cheese brings a nice kick, while cheddar adds richness. Experimenting with flavors makes each bowl unique. You can serve this dish in many ways. Create burrito bowls with extra toppings like salsa or sour cream. If you prefer, wrap the mixture in tortillas for tacos. This dish adapts easily, making it fun for gatherings or weeknight dinners. To keep your queso rice with steak strips fresh, store it in an airtight container. Place it in the fridge within two hours of cooking. This helps maintain its flavor and texture. Leftovers can last in the fridge for three to four days. If you want to save it longer, consider freezing it. For freezing, let the dish cool completely. Then, portion it into freezer-safe bags or containers. Be sure to remove as much air as possible. Frozen leftovers can stay good for up to three months. When you’re ready to eat, just thaw in the fridge overnight before reheating. When reheating, the best method is using the stovetop. Add a splash of water or broth to help with moisture. Heat it over medium heat, stirring often. This keeps the rice fluffy and prevents it from sticking. If you use a microwave, cover the dish with a damp paper towel. This will keep moisture in and help avoid soggy rice. Heat in short intervals, stirring in between. For the queso dip, check the label if you bought it. Store any leftover queso in the fridge and use it within a week. If you made it from scratch, it should also last about a week in an airtight container. Always look for signs of spoilage before using. As for fresh produce, use cherry tomatoes and avocado within a few days. Keep them in the fridge to make them last longer. Corn can last a week in the fridge if stored properly. If frozen, corn can be used for up to a year. You can use sirloin, skirt steak, or even chicken. Sirloin is tender and has good flavor. Skirt steak cooks quickly and is also tasty. For chicken, use boneless breast or thighs. Cut them into thin strips for quick cooking. Cook them the same way as flank steak. This keeps your dish juicy and full of flavor. Yes, you can prepare this dish ahead. Cook the rice and steak, then store them separately. Place them in airtight containers in the fridge. They stay fresh for about 3 to 4 days. When ready to eat, just reheat and combine. This makes for easy meals throughout the week. Absolutely! You can swap the steak for mushrooms or tofu. Use portobello mushrooms for a meaty feel. Firm tofu is great too; just marinate it for flavor. You can also add more veggies like bell peppers or zucchini. These swaps create a delicious, filling dish without meat. This blog covers how to make a flavorful dish using simple ingredients and spices. You learned about key steps from cooking the rice to preparing the steak and sautéing vegetables. I shared tips for perfecting the rice and enhancing the steak's flavor. You can customize the recipe or store leftovers with ease. Enjoy experimenting with variations for a meal that suits your taste. Cooking can be fun and creative!
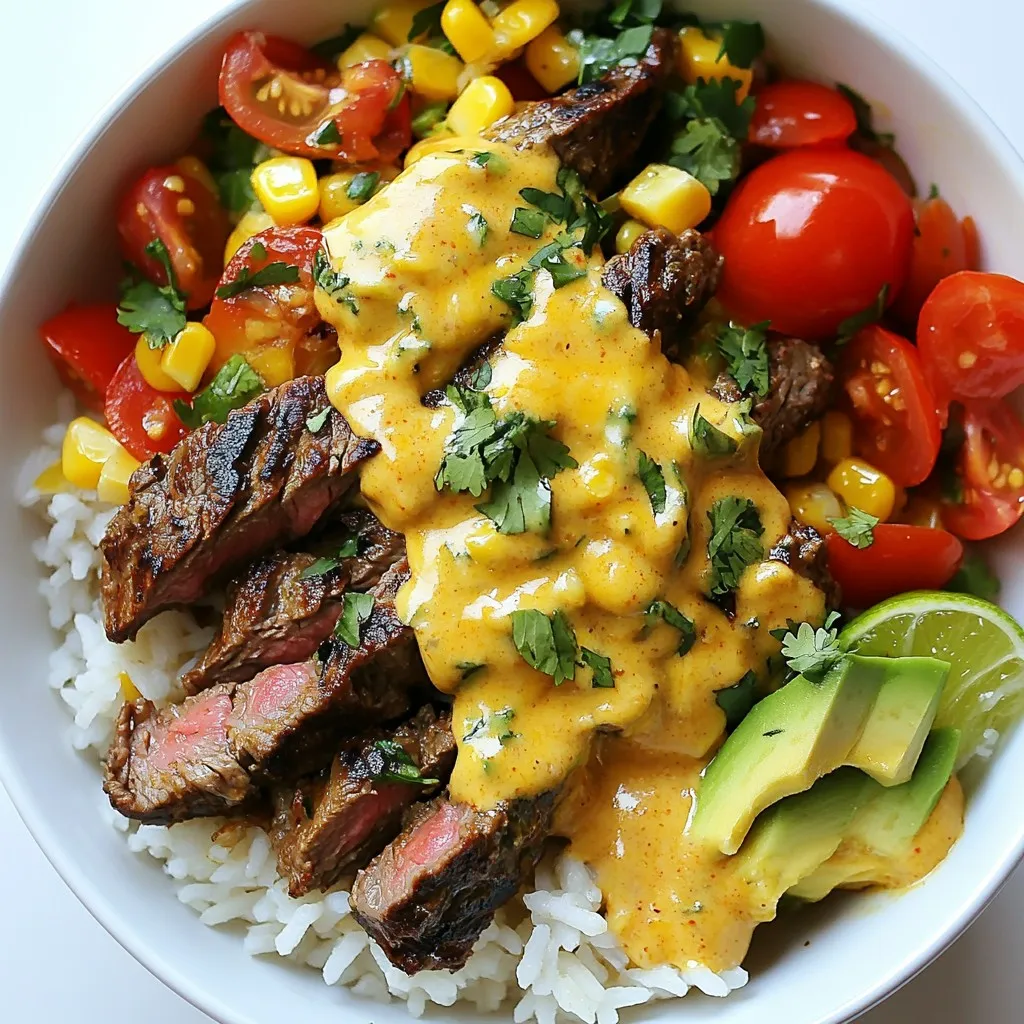
Queso Rice with Steak Strips Flavorful Comfort Meal
Ready to savor a dish that’s warm, hearty, and oh-so-delicious? Queso Rice with Steak Strips is your new go-to comfort meal! This recipe combines fluffy
- 4 bone-in, skin-on chicken thighs - 1 cup plain Greek yogurt - 2 tablespoons extra virgin olive oil - 3 cloves fresh garlic, minced - 1 tablespoon freshly squeezed lemon juice - 1 teaspoon ground cumin - 1 teaspoon smoked paprika - 1 teaspoon onion powder - 1/2 teaspoon cayenne pepper - Salt and black pepper to taste - Fresh cilantro or parsley, finely chopped, for garnish When measuring ingredients, precision matters. For example, use a standard cup for yogurt. Use a tablespoon for olive oil and lemon juice. For spices, a teaspoon works best. This keeps the flavors balanced. You can change a few ingredients if needed. If you can't find Greek yogurt, use regular yogurt. It may be a bit thinner but will still work. If you dislike cumin, swap it with coriander or chili powder. For those who want less spice, skip the cayenne. Fresh herbs like basil or dill can also replace cilantro or parsley. These swaps keep your dish tasty and fun! {{ingredient_image_2}} First, grab a medium mixing bowl. Add 1 cup of plain Greek yogurt. Then, pour in 2 tablespoons of extra virgin olive oil. Next, add 3 cloves of minced garlic and 1 tablespoon of fresh lemon juice. Now, sprinkle in 1 teaspoon of ground cumin, 1 teaspoon of smoked paprika, and 1 teaspoon of onion powder. If you like it spicy, add 1/2 teaspoon of cayenne pepper. Finally, season with salt and black pepper to taste. Whisk this mixture until it is smooth and well combined. Take your 4 bone-in, skin-on chicken thighs and place them in a large resealable plastic bag or a deep, shallow dish. Pour the yogurt marinade over the chicken. Make sure each piece is well-coated with the marinade. Seal the bag tightly or cover the dish with plastic wrap. Now, place it in the refrigerator. Let it marinate for at least 2 hours. For the best flavor, try to leave it overnight. Preheat your oven to 400°F (200°C). Once the chicken has marinated, take it out of the fridge. Remove the chicken thighs from the marinade and let any excess drip off. Arrange the thighs on a baking sheet lined with parchment paper. Place them skin-side up to get that crispy skin. Roast the chicken in the oven for 35-40 minutes. You want the internal temperature to reach 165°F (75°C) and the skin should look golden brown and crisp. After cooking, take the chicken out and let it rest for 5 minutes. This helps the juices stay in the meat. Before serving, sprinkle fresh cilantro or parsley on top for a bright finish. For the best flavor, marinate your chicken thighs for at least two hours. I recommend marinating overnight for deep flavor. Use a resealable plastic bag or a dish to coat the chicken well. Make sure all parts of the chicken are covered with the yogurt mix. This helps the flavors soak in better. To get that crispy skin everyone loves, start with dry chicken. After marinating, let the thighs sit for a few minutes. This helps remove excess moisture. Place the chicken skin-side up on a baking sheet. A hot oven at 400°F (200°C) is key. Roast until the skin turns golden brown. This usually takes about 35-40 minutes. Use a meat thermometer to check for 165°F (75°C) inside. Serve the chicken thighs on a large platter. A sprinkle of fresh cilantro or parsley adds color. For sides, rice or a salad works great. You can drizzle olive oil or add lemon slices for extra flair. This meal is perfect for family dinners or gatherings. Enjoy the juicy, flavorful chicken! Pro Tips Marination Time: For the best flavor, marinate the chicken thighs overnight. This allows the spices and yogurt to deeply penetrate the meat, resulting in a more flavorful dish. Temperature Check: Always use an instant-read thermometer to check the internal temperature of the chicken. It should reach 165°F (75°C) for safe consumption, ensuring juicy and tender meat. Resting Period: Let the chicken rest for at least 5 minutes after roasting. This helps the juices redistribute throughout the meat, making it more succulent and flavorful. Garnish for Freshness: Add a sprinkle of fresh cilantro or parsley just before serving. This not only enhances the presentation but also adds a burst of freshness to the dish. {{image_4}} You can use different types of yogurt for this recipe. Plain Greek yogurt is great, but you can also try flavored yogurts. For a tangy twist, use lemon or herb yogurt. If you want a sweet touch, honey yogurt works well. Each type adds its own special flavor to the chicken. Adjusting the spice level is easy. If you like mild food, skip the cayenne pepper. You can also use less than the recipe calls for. For more heat, add more cayenne or include chili powder. Feel free to explore spices like chili flakes or hot sauce. Each option changes the dish's flavor, so experiment to find your favorite. You can cook yogurt marinated chicken thighs in different ways. Baking is simple and keeps the chicken juicy. Preheat your oven to 400°F (200°C) for roasting. Place the thighs skin-side up for crispy skin. Grilling adds a smoky flavor. Heat the grill to medium-high. Cook the thighs for about 6-7 minutes per side. Always check for an internal temperature of 165°F (75°C). Both methods yield delicious chicken, so choose what fits your style. After you enjoy the yogurt marinated chicken thighs, store leftovers properly. Allow the chicken to cool to room temperature. Then, place it in an airtight container. This helps keep the chicken juicy and flavorful. Store the container in the fridge for up to 3 days. If you want to keep it longer, freezing is a great option. To reheat the chicken, take it out of the fridge. Preheat your oven to 350°F (175°C). Place the chicken on a baking sheet. Cover it with foil to keep it moist. Heat for about 15-20 minutes or until warmed through. You can also use a microwave for quick reheating. Just make sure to cover the chicken to avoid drying it out. If you want to freeze the chicken, wrap it tightly in plastic wrap. Then, put the wrapped chicken in a freezer bag. Make sure to remove as much air as possible. This helps prevent freezer burn. You can freeze the chicken for up to 3 months. When ready to eat, thaw it in the fridge overnight before reheating. You can marinate chicken thighs in yogurt for at least 2 hours. For the best flavor, I recommend marinating them overnight. The longer the chicken sits in the yogurt, the more tender and juicy it becomes. The yogurt breaks down the meat fibers, making each bite delicious. Yes, you can use boneless chicken thighs. They will cook faster than bone-in thighs. Just keep an eye on the cooking time. Aim for an internal temperature of 165°F (75°C). This will ensure they are safe to eat and still juicy. Yogurt marinated chicken thighs go great with many sides. Here are some ideas: - Fragrant rice, like basmati or jasmine - A fresh salad with lemon vinaigrette - Roasted vegetables for added flavor - Pita bread to soak up any juices These sides will complement the chicken well and make your meal complete. In this post, we explored how to make yogurt-marinated chicken thighs. We covered the key ingredients, step-by-step cooking methods, and helpful tips for perfecting your dish. You learned about variations, storage tips, and answered common questions. Remember, using yogurt adds flavor and tenderness to your chicken. Whether you grill or bake, the final meal will shine. Enjoy your cooking journey and share your results with friends!
Yogurt Marinated Chicken Thighs Flavorful and Juicy Meal
Are you ready to transform your weeknight dinners? Yogurt marinated chicken thighs pack bold flavors and stay juicy inside. This easy recipe will impress your
- 2 cups sushi rice - 2 ½ cups water - 1 tablespoon rice vinegar - 1 tablespoon sugar - 1 teaspoon salt - 8 ounces fresh salmon, skinless and finely chopped - 2 tablespoons sriracha sauce - 2 tablespoons mayonnaise - 1 ripe avocado, thinly sliced - 1 cucumber, julienned - 2 green onions, finely sliced - 1 sheet nori, cut into small squares - Toasted sesame seeds for garnish You can swap fresh salmon for canned salmon or tuna. This works well if you are short on time. For a lighter touch, use Greek yogurt instead of mayonnaise. It adds creaminess without too much fat. When it comes to rice, short-grain rice is best for sushi. If you can't find it, try medium-grain rice as a substitute. {{ingredient_image_2}} First, rinse the sushi rice. Place it in a bowl and run cold water over it. Keep rinsing until the water runs clear. This step removes extra starch. It helps the rice cook well. Next, cook the rice. In a medium saucepan, add the rinsed rice and water. Bring it to a boil on medium-high heat. Once boiling, lower the heat to low and cover the pan. Let it simmer for about 18 minutes. The water should be fully absorbed, and the rice should be tender. After cooking, take the pan off the heat. Keep it covered for ten more minutes. This steaming step makes the rice fluffy. In a small bowl, mix rice vinegar, sugar, and salt. Whisk until dissolved. Fluff the rice with a fork and fold in the vinegar mix. Set the rice aside to cool. Now, let’s make the spicy salmon mixture. Take a mixing bowl and add chopped salmon. Then, pour in the sriracha sauce and mayonnaise. Stir it well until everything blends smoothly. This mix gives your sushi bake its kick! Time to assemble! Grab a baking dish and spread an even layer of the cooled sushi rice on the bottom. Press it down gently to form a base. Next, spread the spicy salmon mixture evenly over the rice. Make sure all the rice gets covered. Preheat your oven to 400°F (200°C). Place the baking dish in the oven. Bake for 15 to 20 minutes. The salmon should turn opaque and be fully cooked. Once baked, take the dish out and let it cool for a few minutes. Finally, garnish the dish with sliced avocado, julienned cucumber, and chopped green onions. Sprinkle toasted sesame seeds on top for a nice finish. Enjoy your spicy salmon sushi bake warm! To make a great sushi bake, focus on the rice. Start with rinsing the sushi rice. Rinse it under cold water until the water runs clear. This step removes extra starch and helps the rice cook well. After rinsing, boil it in water. The rice should be sticky yet fluffy when cooked. Next, let's talk about the salmon. Use fresh salmon for the best flavor. Make sure to chop it finely. This helps it cook evenly. When you mix the salmon with sriracha and mayonnaise, combine them well. This mix gives the dish a creamy texture and a spicy kick. Presentation matters. Use a nice baking dish to show off your sushi bake. After baking, add toppings like avocado, cucumber, and green onions. These give color and crunch. Serve nori squares on the side. You can wrap bites in the nori or crumble it on top for added flavor. Pair your sushi bake with pickled ginger and soy sauce. These sides enhance the taste. They balance the spiciness of the dish and add layers of flavor. One big mistake is overcooking the salmon. Keep an eye on it while it bakes. Salmon should be opaque but still moist. Check it around the 15-minute mark. Another mistake is skipping the rice rinsing. This step is key for perfect rice. Not rinsing can lead to mushy or sticky rice, which won't hold up well in the bake. Take the time to rinse; your sushi bake will thank you! Pro Tips Perfectly Cooked Rice: Rinse your sushi rice thoroughly to remove excess starch, which helps achieve a perfect sticky texture that holds together well. Fresh Salmon Selection: Choose high-quality, sushi-grade salmon for the best flavor and safety. Always check for freshness and odor before purchasing. Spice Level Control: Adjust the amount of sriracha to suit your taste. If you're sensitive to spice, start with a smaller amount and gradually increase. Serving Suggestions: Serve with soy sauce, pickled ginger, and wasabi on the side for an authentic sushi experience that enhances the flavors. {{image_4}} You can change the spice level to fit your taste. Try using less sriracha for a mild flavor. If you want more heat, add chili paste or fresh jalapeños. You can also switch up the seafood. Shrimp and crab work great in this recipe. Just chop them finely and mix them with the sauces. If you prefer plant-based meals, you have options. Use cooked tofu or tempeh instead of salmon. You can also add more veggies like bell peppers or carrots. For a veggie sushi bake, layer your rice with these ingredients. Top it off with avocado and cucumber for a fresh taste. Toppings can take your sushi bake to the next level. Try sprinkling furikake on top for extra umami flavor. You can also add chili flakes for a spicy kick. Other great options include sliced radishes or sesame seeds. These toppings add crunch and flavor to your dish. To keep your spicy salmon sushi bake fresh, refrigerate it right away. Place it in an airtight container. Make sure it's sealed tight to prevent air from getting in. This will help keep the flavors intact. The sushi bake lasts about 2 to 3 days in the fridge. After that, it might not taste as good. When you want to enjoy leftovers, reheating is easy. You can use an oven or a microwave. If using an oven, preheat to 350°F (175°C). Cover the dish with foil to avoid drying it out. Heat for about 10-15 minutes. For the microwave, place a portion on a microwave-safe plate. Add a small splash of water to keep it moist. Heat in short bursts of 30 seconds until warm. This method helps maintain the texture and flavor. Enjoy your meal just like the first time! Yes, you can freeze Spicy Salmon Sushi Bake. To freeze, let it cool first. Cut it into portions. Wrap each piece tightly in plastic wrap. Then place them in a freezer bag. When you're ready to enjoy it, take it out. Thaw it overnight in the fridge. Reheat in the oven at 350°F (175°C) until warm. If you don't have sushi rice, you can use short-grain rice or jasmine rice. Both types can work well in this recipe. They hold moisture and shape nicely. Quinoa is another option, though it changes the texture. Just adjust the cooking method accordingly for these alternatives. To adjust the spice level, you can add more or less sriracha. Start with a small amount and taste as you mix. If you want less heat, reduce the sriracha. You can also add more mayonnaise for creaminess. For extra heat, mix in chili flakes or hot sauce when serving. This recipe can be gluten-free if you choose the right ingredients. The sushi rice and fresh salmon are gluten-free. However, ensure the sriracha and mayonnaise are gluten-free too. Some brands add gluten. Always check the labels before using them. In this article, we covered how to make a Spicy Salmon Sushi Bake, from key ingredients to step-by-step instructions. We explored tips for perfect texture, common mistakes to avoid, and delicious variations. Remember, adjusting the spice level and using substitutes can make this dish work for everyone. Enjoy experimenting with toppings and serving suggestions to make it your own. Your sushi bake journey is just beginning, and I hope you feel inspired to create a dish your whole family will love.
Spicy Salmon Sushi Bake Easy and Flavorful Recipe
Do you love sushi but want something even easier to make? The Spicy Salmon Sushi Bake is your answer! Packed with flavor and simple to
- 2 boneless, skinless chicken breasts - 8 oz penne pasta - 1 cup heavy cream - 1/2 cup freshly grated Parmesan cheese - Salt and freshly ground black pepper - 1 teaspoon garlic powder - 1 teaspoon dried Italian herbs - 1 cup cherry tomatoes, halved - 2 cups fresh baby spinach - Fresh basil leaves for garnish Marry Me Chicken Pasta needs simple yet tasty ingredients. Start with chicken breasts for protein. The penne pasta adds heartiness. Heavy cream gives a rich texture while Parmesan cheese adds flavor. For seasoning, use salt and pepper to taste. Garlic powder brings warmth, while Italian herbs give depth. Fresh vegetables like cherry tomatoes and spinach add color and nutrition. Lastly, fresh basil leaves not only look nice but also boost taste. Feel free to tweak these ingredients. You can use different pasta or fresh herbs if you like. The key is to enjoy the cooking process! {{ingredient_image_2}} Start by boiling a large pot of salted water. When the water is bubbling, add 8 oz of penne pasta. Cook it according to the package instructions. Stir occasionally to keep it from sticking. Once cooked to al dente, drain the pasta. Set it aside, but save a bit of pasta water for later. While the pasta cooks, take two boneless, skinless chicken breasts. Season both sides with salt, pepper, garlic powder, and dried Italian herbs. Make sure each side gets a good coat. In a large skillet, heat 2 tablespoons of olive oil over medium heat. When the oil is hot, place the seasoned chicken breasts in the skillet. Sear them for about 6-7 minutes on each side. They should turn golden brown and reach an internal temperature of 165°F. Once done, transfer the chicken to a plate and let it rest for a few minutes before slicing it. In the same skillet, without cleaning it, add 1 cup of halved cherry tomatoes. Sauté them for about 3-4 minutes until they soften and release juices. This adds great flavor to the dish. Next, toss in 2 cups of fresh baby spinach. Cook for about 2 minutes, stirring until the spinach wilts. Lower the heat slightly and pour in 1 cup of heavy cream while stirring. Then, add 1/2 cup of freshly grated Parmesan cheese. Mix it until the cheese melts and the sauce thickens. If it feels too thick, add a splash of reserved pasta water. Now, slice the rested chicken into strips and return it to the skillet. Add the drained penne pasta and toss everything together. Make sure the pasta gets coated in the creamy sauce. Finally, taste the dish and adjust flavors as needed. Serve hot, garnished with fresh basil leaves for an extra burst of flavor. How to ensure chicken stays juicy To keep chicken juicy, don't skip the resting step. After cooking, let the chicken rest for a few minutes. This helps the juices stay inside. Also, use a meat thermometer. Cook until it reaches 165°F (75°C). This guarantees it's safe and not dry. Tips for a creamier sauce For a creamier sauce, use heavy cream. It thickens well and adds richness. If the sauce is too thick, add a splash of reserved pasta water. This helps blend everything together smoothly. Stir gently to combine, and don’t rush this step. Best side dishes to pair with Marry Me Chicken Pasta Pair this dish with a simple salad. A fresh green salad with lemon vinaigrette works great. Garlic bread is another good choice. Its crunch complements the creamy pasta well. You can also serve it with roasted vegetables for added color and flavor. Garnishing ideas for a beautiful presentation Garnish your dish with fresh basil leaves. They add a lovely pop of color. You can sprinkle some extra Parmesan cheese on top too. This makes the dish look elegant. A drizzle of olive oil can enhance the look and flavor. Recommended cookware and utensils Use a large skillet for this dish. It helps cook the chicken evenly. A good pot for boiling pasta is also important. Make sure to have a wooden spoon for stirring. This keeps your non-stick surfaces scratch-free. Importance of a good skillet A good skillet heats evenly. This helps avoid hot spots that can burn food. Choose one that’s non-stick for easier cleanup. A heavy-bottomed skillet offers better heat retention too. This means your sauce will cook more evenly. Pro Tips Use Fresh Herbs: Fresh basil or parsley can elevate the flavor profile of your dish. Add them at the end to preserve their vibrant taste and aroma. Perfectly Cooked Chicken: To ensure juicy chicken, let it rest after cooking. This allows the juices to redistribute, keeping the meat tender and flavorful. Pasta Water Magic: Reserve some pasta water before draining. The starchy water can be used to adjust the sauce's consistency, making it cling beautifully to the pasta. Customize Your Veggies: Feel free to add other vegetables like bell peppers or zucchini for added nutrition and color. Just sauté them along with the tomatoes. {{image_4}} Alternatives for heavy cream If you want a lighter sauce, you can use half-and-half. You can also try using coconut cream for a dairy-free option. Both options still offer a creamy texture. Using different types of pasta Penne works great, but you can switch to fusilli or farfalle. These shapes hold the sauce well. You can even use whole wheat pasta for added fiber. Making it gluten-free To make this dish gluten-free, choose gluten-free pasta. Many brands offer tasty options that cook well. Always check the package for cooking times. Vegan variations For a vegan twist, swap chicken for grilled tofu or chickpeas. Use cashew cream or a plant-based cream instead of heavy cream. Nutritional yeast can replace Parmesan for a cheesy flavor. Adding spices or herbs You can boost flavors by adding red pepper flakes or smoked paprika. Fresh herbs, like thyme or parsley, add brightness. Don’t be shy; a little extra seasoning can go a long way. Incorporating additional vegetables Try adding bell peppers, zucchini, or mushrooms for extra color and nutrients. Sauté them with the tomatoes for great flavor. You can also mix in peas or asparagus for a pop of freshness. To store leftovers properly, let the dish cool down first. Place the pasta in airtight containers. This keeps it fresh and safe. Use glass or BPA-free plastic containers for meal prep. They are great for storing food and easy to clean. The best way to reheat Marry Me Chicken Pasta is on the stove. Heat it over low to medium heat. Stir it gently to keep the texture nice. If it looks dry, add a splash of milk or cream. This brings back the creamy goodness. You can also add fresh spinach or more cheese to refresh the dish before serving. Yes, you can freeze Marry Me Chicken Pasta! First, let it cool completely. Then, scoop portions into freezer-safe bags or containers. Remove as much air as possible to prevent freezer burn. Label the bags with the date. To thaw, place it in the fridge overnight. When ready to eat, reheat it on the stove or in the oven until hot throughout. What to serve with Marry Me Chicken Pasta? You can pair this dish with a fresh green salad. A simple Caesar salad works well. Garlic bread is another great side. It soaks up the creamy sauce perfectly! Can I make this recipe in advance? Yes, you can make Marry Me Chicken Pasta ahead of time. Just store it in an airtight container in the fridge. Reheat it gently when you are ready to serve. Why is my sauce too thick? If your sauce is too thick, you can add a splash of reserved pasta water. This will help loosen the sauce and make it creamy. How to fix overcooked pasta? If your pasta is overcooked, try adding it to the sauce quickly. The sauce can help mask the texture. You can also toss in some fresh spinach to add a bit of crunch. Is Marry Me Chicken Pasta healthy? Marry Me Chicken Pasta has a mix of protein and carbs. The chicken gives you lean protein, while the spinach adds nutrients. It’s not low in calories due to the cream and cheese. Caloric breakdown of the ingredients - Chicken breasts: about 300 calories - Penne pasta: around 300 calories - Heavy cream: roughly 800 calories - Parmesan cheese: about 200 calories Total: approximately 1600 calories for the entire dish, serving four, which is 400 calories per serving. This blog post covered all you need to know about Marry Me Chicken Pasta. We explored key ingredients, cooking steps, and tips for perfecting your dish. We also discussed how to store leftovers and offered fun variations to try. Cooking can be simple and fun with the right guide. Enjoy making this meal and watch it impress your loved ones!
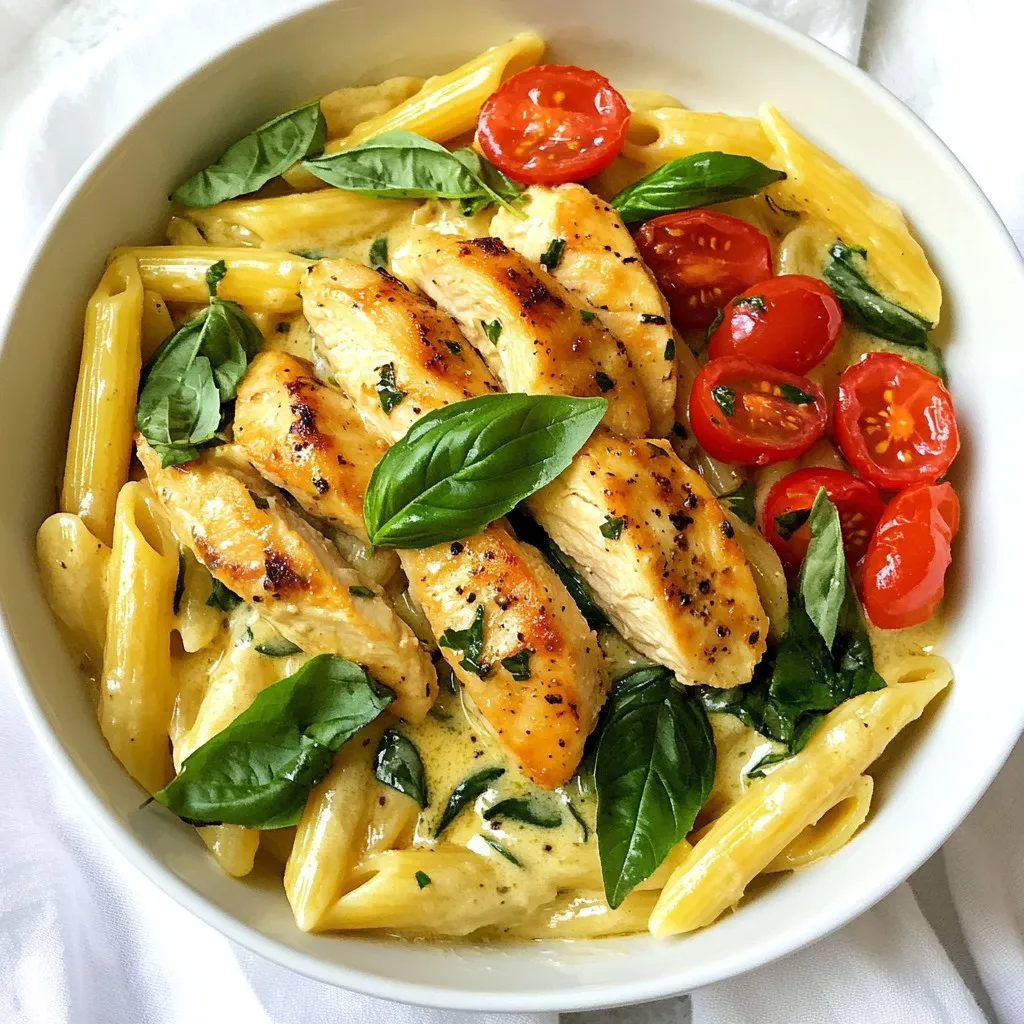
Marry Me Chicken Pasta Creamy and Flavorful Delight
Looking for a dish that will impress with its creamy goodness? Look no further than Marry Me Chicken Pasta! This recipe combines tender chicken, flavorful