Dinner

- 2 boneless, skinless chicken breasts - 4 cups fresh broccoli florets - 3 tablespoons olive oil, divided - 2 cloves garlic, finely minced - 1 tablespoon soy sauce - 1 tablespoon honey - 1 teaspoon sesame oil - Salt and freshly ground pepper, to taste - 2 cups cooked brown rice or quinoa, for serving - 1 tablespoon sesame seeds, for garnish - Fresh cilantro leaves or chopped green onions, for garnish When choosing your chicken, look for fresh and organic options. This will give your dish a better taste. For the broccoli, pick bright green florets. Dark spots or yellowing means it may be old. Use fresh garlic for the best flavor. Also, choose high-quality olive oil as it greatly enhances the sauce. Each ingredient plays a role in making your meal tasty and healthy. If you want a plant-based option, swap chicken for firm tofu or tempeh. Both work well with the garlic sauce. For a gluten-free version, use tamari instead of soy sauce. Quinoa is a great choice if you need grain-free. You can also use cauliflower rice instead of brown rice. This keeps the meal light but still filling. {{ingredient_image_2}} First, gather your ingredients. You need boneless chicken breasts, garlic, soy sauce, honey, sesame oil, olive oil, salt, and pepper. In a bowl, mix 1 tablespoon of olive oil, minced garlic, soy sauce, honey, sesame oil, salt, and pepper. Add the chicken breasts and coat them well. Cover the bowl and let it sit for 30 minutes. For more flavor, let it marinate in the fridge for up to 2 hours. While the chicken marinates, it's time to prepare the broccoli. Fill a large pot with water and bring it to a boil. Once boiling, add 4 cups of broccoli florets. Blanch for 2-3 minutes until they turn bright green. Quickly transfer the broccoli to a bowl with ice water. This stops the cooking process and keeps the broccoli crisp and colorful. Next, preheat your grill or grill pan over medium-high heat. Take the marinated chicken out of the bowl and throw away the leftover marinade. Place the chicken on the grill and cook for about 6-7 minutes on each side. The chicken should reach an internal temperature of 165°F. After grilling, move the chicken to a plate and cover it loosely with foil. Let it rest for about 5 minutes, then slice it into strips. Now, let’s sauté the broccoli. In a large skillet, heat 2 tablespoons of olive oil over medium heat. Once hot, add the blanched broccoli. Sauté for 3-4 minutes until heated through and slightly crispy. Season with salt and pepper to taste. For assembly, prepare 4 serving bowls. Place cooked brown rice or quinoa at the bottom of each bowl. Top with sautéed broccoli and sliced grilled chicken. If you like, drizzle extra garlic sauce over the top. Lastly, sprinkle sesame seeds on each bowl and add fresh cilantro or chopped green onions for garnish. Enjoy your delicious Grilled Chicken and Broccoli Bowls! To make your chicken taste great, marinate it well. I mix olive oil, garlic, soy sauce, honey, and sesame oil. This mix gives the chicken a rich flavor. Allow the chicken to soak in the marinade for at least 30 minutes. For best results, marinate for up to 2 hours in the fridge. This time lets the flavors really get in. Grilling chicken can be easy. First, preheat your grill. You want it hot before adding the chicken. Remove the chicken from the marinade and toss the leftover liquid. Grill the chicken for about 6-7 minutes on each side. Make sure the center reaches 165°F. Let the chicken rest for 5 minutes before slicing. This keeps it juicy and tender. The garlic sauce is key to this dish. It needs a good balance of salty and sweet. The soy sauce gives saltiness, while honey adds sweetness. You can adjust them based on your taste. If you love garlic, add a bit more minced garlic. This sauce elevates the whole bowl by adding depth and flavor. Pro Tips Marinate for Maximum Flavor: For enhanced flavor, marinate the chicken for up to 2 hours in the refrigerator. This allows the ingredients to penetrate deeper into the meat for a more robust taste. Perfectly Blanched Broccoli: To achieve perfect broccoli, ensure you immediately transfer it to ice water after blanching. This will preserve its vibrant color and crisp texture. Grill Temperature Matters: Make sure your grill is preheated to medium-high heat before adding the chicken. This helps to create a nice sear and prevents sticking. Garnish for Flavor and Presentation: Don’t skip the garnishes! Fresh cilantro or green onions not only enhance the dish's appearance but also add a fresh flavor that complements the meal beautifully. {{image_4}} You can boost nutrition by adding more veggies. Try bell peppers, carrots, or snap peas. Chop them small and sauté them with the broccoli. This adds color and flavor. Chicken is great, but you can switch it up. Use shrimp, tofu, or chickpeas instead. Each option brings a new taste. Marinate them just like the chicken for best results. While brown rice and quinoa are tasty, feel free to explore. Use farro, couscous, or even cauliflower rice for a low-carb choice. Each grain adds its own texture and flavor. To keep your grilled chicken and broccoli bowls fresh, let them cool first. Place the food in an airtight container. Make sure to store each component separately if possible. The chicken, broccoli, and rice or quinoa can stay fresh in the fridge for up to three days. Label the container with the date so you remember when to eat it. When you're ready to enjoy your leftovers, there are easy ways to reheat them. You can use a microwave for quick heat. Place your food on a microwave-safe plate. Cover it with a damp paper towel to keep it moist. Heat in 30-second intervals, stirring in between. If you prefer, reheat in a skillet over medium heat. Add a splash of water to keep the food from drying out. Stir until heated through. If you want to save some bowls for later, freezing is a great option. Let everything cool down before packing. Use freezer-safe containers or bags. You can freeze the chicken, broccoli, and grain base together or separately. Just remember to label them with the date. They can stay in the freezer for up to three months. When you're ready to eat, thaw them in the fridge overnight. Then, reheat as described above. Yes, you can prepare this dish in advance. Marinate the chicken and blanch the broccoli a day ahead. Store them in the fridge. When you’re ready, grill the chicken and sauté the broccoli. This will save time and keep flavors fresh. If you need an alternative to soy sauce, try coconut aminos. It offers a similar taste but is soy-free. You can also use tamari for a gluten-free option. Both will add a nice flavor to your dish. To keep the chicken juicy, don’t skip the marinating step. Use a good amount of olive oil in the marinade. Grill the chicken on medium heat and avoid overcooking it. Always let it rest before slicing. This helps keep the juices locked inside. Yes, this recipe can be gluten-free. Just replace soy sauce with a gluten-free option like tamari or coconut aminos. Check your honey and sesame oil for gluten-free labels too. With these swaps, you can enjoy this dish worry-free. You can serve the bowls with cooked brown rice or quinoa as the base. Add a side salad or steamed vegetables for more nutrients. For extra flavor, try a light vinaigrette or a tangy sauce. Enjoy this meal with a refreshing drink to complete your dining experience. This blog post covered ingredients, preparation, cooking methods, and useful tips. You learned about quality ingredients and how to grill chicken perfectly. We also explored ways to customize the dish and store leftovers effectively. Remember, you can experiment with flavors and add your favorite veggies. This recipe is flexible and easy to adapt. Enjoy making your own delicious grilled chicken and broccoli bowls!
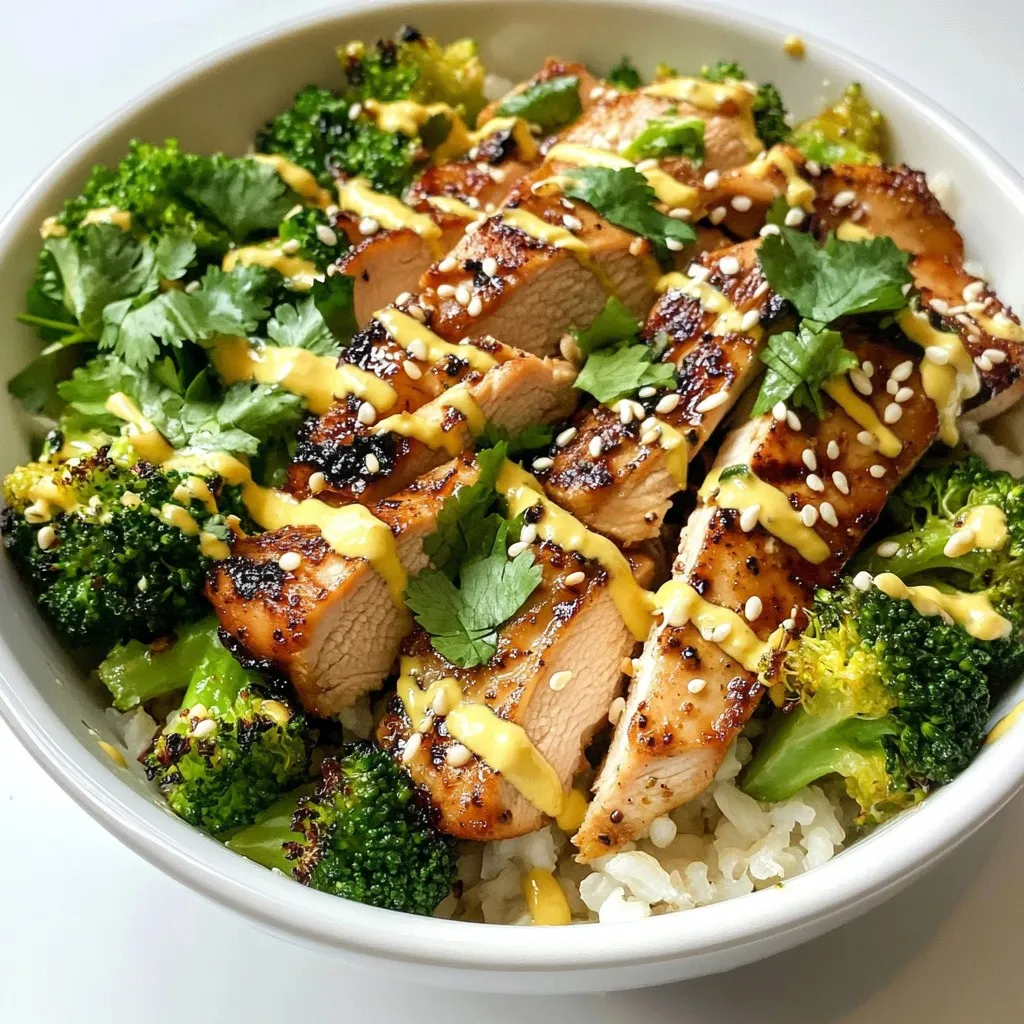
Grilled Chicken and Broccoli Bowls with Garlic Sauce Delight
If you’re craving a meal that’s both healthy and delicious, you’ve hit the jackpot! Grilled Chicken and Broccoli Bowls with Garlic Sauce is your go-to
- 1 tablespoon olive oil - 1 medium onion, diced - 2 cloves garlic, minced - 2 medium carrots, diced - 2 stalks celery, diced - 6 cups chicken broth - 2 cups cooked chicken, shredded - 1 package (9 ounces) fresh cheese tortellini - 1 can (14.5 ounces) diced tomatoes with green chilies - 1 teaspoon dried oregano - 1 teaspoon dried basil - Salt and pepper to taste - 2 cups baby spinach - Fresh cilantro for garnish - Crusty bread for serving - Additional herbs or spices This soup is rich and filling. The olive oil starts the flavor, adding depth as you sauté the onion, garlic, carrots, and celery. The chicken broth brings warmth and richness, while the shredded chicken makes it hearty. The fresh cheese tortellini gives a delightful texture. Diced tomatoes with green chilies add a gentle kick. For a pop of color, add baby spinach at the end. It wilts quickly and keeps its bright green hue. Garnish with fresh cilantro for an extra layer of flavor. Consider serving with crusty bread to scoop up the delicious soup. You can even sprinkle more herbs for extra flair. Each ingredient plays a role in making this soup a comforting meal. {{ingredient_image_2}} - Heat 1 tablespoon of olive oil in a large pot over medium heat. - Add 1 medium diced onion and sauté for about 3-4 minutes. The onion should turn soft and slightly golden. - Next, add 2 minced garlic cloves, 2 diced carrots, and 2 diced celery stalks. Stir well and cook for 5 minutes. This helps all the veggies soften nicely. - Carefully pour in 6 cups of chicken broth and increase the heat. Bring the mixture to a gentle boil. - Once boiling, stir in 2 cups of shredded cooked chicken, 1 package of fresh cheese tortellini, and 1 can of diced tomatoes with green chilies. Add 1 teaspoon of dried oregano and 1 teaspoon of dried basil, then season with salt and pepper to taste. - Lower the heat and let the soup simmer for 5-7 minutes. Stir occasionally until the tortellini is fully cooked and tender. - Gently fold in 2 cups of baby spinach, allowing it to wilt for 1-2 minutes. This keeps the spinach bright and fresh. - Taste the soup and adjust the seasoning if needed. Add more salt or pepper if you like. - Serve the soup hot, garnished with fresh cilantro on top for a lovely touch. To sauté vegetables well, use medium heat. Start with the onion and cook it for 3-4 minutes. This helps it turn soft and golden. Next, add garlic, carrots, and celery. Stir often for about 5 minutes. This way, all the veggies become tender and flavorful. To avoid mushy tortellini, cook them just right. Add them to the soup when it simmers. Keep an eye on the time. They usually need just 5-7 minutes. This keeps them firm and tasty. To boost flavor, use spices and herbs. Dried oregano and basil work great in this soup. They add warmth and depth. You can also sprinkle in a pinch of red pepper flakes for some heat. Balancing seasoning is key. Start with a little salt and pepper. Taste often and adjust as you go. This way, the flavors blend well, and each bite is perfect. For a lovely presentation, serve the soup in deep, wide bowls. This makes it look inviting. Top each bowl with fresh cilantro and a sprinkle of black pepper. It not only adds color but also enhances the taste. Choose bowls that are bright or colorful. This adds a fun touch to your meal. It’s all about making the dish look as good as it tastes! Pro Tips Use Fresh Ingredients: For the best flavor, opt for fresh vegetables and herbs. This will enhance the overall taste and aroma of your soup. Customize Your Protein: Feel free to substitute the cooked chicken with shredded rotisserie chicken or even turkey for a different twist. Adjust the Spice Level: If you prefer a spicier soup, consider adding jalapeños or a dash of hot sauce to elevate the heat. Make It a Meal: Pair the soup with crusty bread or a side salad to turn it into a complete meal for a cozy dinner. {{image_4}} You can change up the soup by adding different vegetables. Try bell peppers for a sweet crunch or corn for a touch of sweetness. These veggies add color and flavor, making the soup even better. For protein, consider using turkey or tofu. Turkey gives a leaner option, while tofu is great for a plant-based meal. Each change keeps the soup fresh and exciting. You can also switch the broth. Using vegetable broth makes this soup vegetarian-friendly. It still packs a lot of flavor without the meat. Want a creamier soup? Add a splash of cream for a richer texture. This makes each spoonful feel cozy and comforting. When it comes to tortellini, you have choices. Try different pasta shapes like shells or bow ties if you can't find tortellini. Both will still soak up the tasty broth. If you need a gluten-free option, look for gluten-free tortellini. You can even make your own! Homemade tortellini can be fun and lets you choose your fillings. Each variation offers a unique twist to this classic dish. To keep your chicken tortellini soup fresh, store it in a sealed container. Make sure it cools first before sealing. Place it in the fridge. It will stay good for 3 to 4 days. If you want to enjoy it later, freezing is a great option. To freeze chicken tortellini soup, let it cool completely. Then, pour the soup into freezer-safe bags. Remove as much air as you can. This helps prevent freezer burn. The soup can be frozen for up to 3 months. When you're ready to eat, thaw it in the fridge overnight. For the best flavor, reheat your soup slowly. The stovetop is a great choice. Pour the soup into a pot and heat over low. Stir often until it is hot. If using a microwave, heat in short bursts. Stir in between to keep it even. Be careful not to overheat, as this can change the taste and texture. Can I make this soup ahead of time? Yes, you can make Chicken Tortellini Soup ahead of time. Just store it in the fridge. It tastes even better the next day. When you reheat it, make sure to warm it on low heat. This helps keep the flavors intact. What can I substitute for chicken? If you want to replace chicken, try using cooked turkey or shredded rotisserie chicken. You can also use beans or tofu for a vegetarian option. These choices keep the soup hearty and delicious. Is Chicken Tortellini Soup gluten-free? This soup is not gluten-free due to the tortellini. However, you can find gluten-free tortellini at many stores. Just swap the regular tortellini for the gluten-free version. This way, you can enjoy the soup without any gluten. Can I make this recipe dairy-free? Yes, you can make this soup dairy-free. Use dairy-free tortellini and skip any cheese. You can also add coconut milk for a creamy texture. This keeps the soup rich and tasty without dairy. How long does it take to cook tortellini? Fresh tortellini cooks quickly. It usually takes about 5-7 minutes in boiling soup. You’ll know it’s ready when it floats to the top and is tender. What is the best way to know when the soup is done? The soup is done when the tortellini is soft and the spinach is wilted. Make sure to taste it for seasoning before serving. Adjust with salt and pepper to make it just right. This blog post covered all you need to know for a tasty chicken tortellini soup. We looked at the key ingredients and the steps to prepare it. Plus, I shared tips to enhance flavor and presentation. You can even try variations to make it your own. Lastly, I explained how to store and reheat leftovers. You now have everything to make a soup that warms the heart. Enjoy creating and sharing this comforting dish!
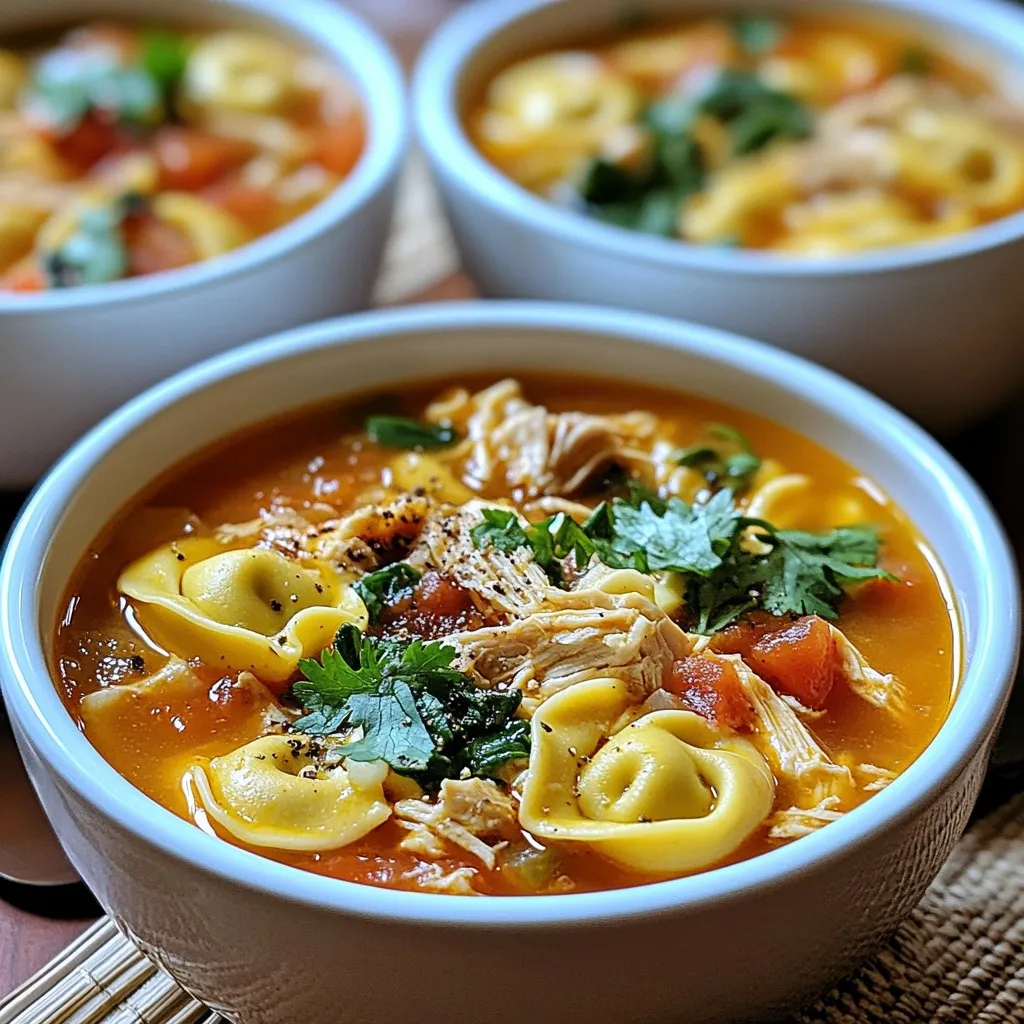
Chicken Tortellini Soup Hearty and Comforting Meal
If you’re seeking a meal that warms your heart and fills your belly, look no further than Chicken Tortellini Soup. This hearty dish combines savory
- 1 pound flank steak, thinly sliced against the grain - 1 bell pepper (choose red, green, or yellow), sliced into strips - 1 medium onion, sliced into rings - 3 cloves garlic, minced - 1-inch piece ginger, finely minced - 2 tablespoons soy sauce - 2 tablespoons cornstarch - 2 tablespoons vegetable oil - 1 tablespoon oyster sauce - 1 tablespoon sugar - ¼ cup beef broth - ¼ teaspoon black pepper You need fresh ingredients for this dish. Start with flank steak. It is tender and flavorful. Slice it thin against the grain. This helps it stay juicy. Next, grab a bell pepper. You can choose any color. Red, green, or yellow will work great. Slice it into strips. Now, take a medium onion. Slice it into rings for the stir-fry. The onion adds sweetness. You will also need garlic and ginger. Mince them finely. They give the dish its signature flavor. For the marinade, soy sauce is key. It adds saltiness and depth. Mix it with cornstarch for a nice coating. The vegetable oil helps everything cook evenly. Finally, the sauce needs oyster sauce for richness. Sugar helps balance the flavors. Beef broth adds moisture and flavor. Don’t forget black pepper for a hint of spice. These ingredients come together for a tasty meal. Prepare them fresh for the best results. {{ingredient_image_2}} - Combine steak with soy sauce and cornstarch. - Allow steak to marinate for 15 minutes. Start by taking your flank steak. Slice it thinly against the grain. This helps keep it tender. In a medium mixing bowl, add the sliced steak. Pour in the soy sauce and cornstarch. Mix well until each piece is coated. Let it sit for 15 minutes. This step boosts the flavor and makes the steak melt in your mouth. - Slice bell pepper and onion. - Mince garlic and ginger. While the steak marinates, turn your focus to the veggies. Grab a bell pepper and an onion. Slice the bell pepper into strips. Cut the onion into rings. Next, take 3 cloves of garlic and mince them finely. Don’t forget about the ginger. You only need a small piece, about an inch. Mince that too. Keep these veggies separate on a plate until you are ready. - Heat the oil. - Sear the steak. - Stir-fry the vegetables. - Add sauce and combine. Now, let's get cooking! In a large skillet or wok, heat 2 tablespoons of vegetable oil over medium-high heat. Wait until the oil is hot but not smoking. Carefully add the marinated steak. Spread it out evenly in the pan. Let it sear for about 2-3 minutes. You want a nice crust on one side. After that, stir-fry the steak for another minute until it turns brown and is cooked through. Remove the steak and place it on a plate. In the same skillet, toss in the sliced onion and bell pepper. Stir-fry them for 2-3 minutes. You want them to be tender but still crunchy. Next, add the minced garlic and ginger. Stir for 30 seconds until fragrant. Return the cooked steak to the skillet. In a small bowl, mix the oyster sauce, sugar, black pepper, and beef broth. Pour this sauce over the steak and veggies. Toss everything together. Cook for another 2 minutes until the sauce thickens and coats every piece. Now you're ready to serve! Choosing flank steak is key. This cut is lean, tender, and full of flavor. Other cuts may not give you the same taste. When slicing, always cut against the grain. This means you go across the lines of muscle. Doing this makes the meat more tender and easier to chew. To make your dish pop, think about adding more veggies. Try snap peas, mushrooms, or carrots. These add color and crunch. You can also adjust your sauce. If you like it sweeter, add more sugar. If you want more depth, increase the oyster sauce. This is your dish, so make it your own. Getting the right doneness is important. For medium-rare, aim for 130°F. Use a meat thermometer to check. Avoid overcooking the steak. Cook it just until it's browned. Then, remove it from the heat. The meat will continue to cook a bit after you take it off the stove. Remember, you want it juicy and tender—not tough and dry. Pro Tips Slice Against the Grain: Cutting the flank steak against the grain helps to break down the muscle fibers, resulting in a more tender bite. Use High Heat: Cooking over high heat allows for a great sear on the steak and keeps the vegetables crisp, enhancing both texture and flavor. Let It Rest: After searing the steak, let it rest for a few minutes before slicing. This helps retain the juices, making the meat more flavorful. Add Spice: For an extra kick, consider adding some sliced jalapeños or a dash of chili flakes when stir-frying the vegetables. {{image_4}} You can switch flank steak for chicken or tofu. Chicken works well when sliced into thin strips. Use skinless chicken breast or thighs for the best flavor. Tofu is a great plant-based option. Press it to remove excess water, then cut it into cubes. Marinate it just like the beef to soak up those great flavors. Feel free to change up the veggies. Broccoli adds a nice crunch and color. Just chop it into small florets and add it with the bell peppers. Snap peas are another tasty choice. They add sweetness and a crisp bite. Toss in any veggies you like for a fun twist! If you love heat, make it spicy! Add chili flakes or a splash of hot sauce to the sauce mix. Start with a little and taste as you go. You can also toss in sliced fresh chilies during the stir-fry. This will give it a nice kick that wakes up your taste buds! To store your Chinese pepper steak and onions, first let it cool. Place it in an airtight container. This keeps it fresh longer. It lasts in the fridge for up to three days. Make sure to label the container with the date. This helps you track how long it has been stored. If you want to freeze the dish, first let it cool completely. Use a freezer-safe container or a zip-lock bag. Press out as much air as possible to prevent freezer burn. This dish can last up to three months in the freezer. When you're ready to eat, thaw it overnight in the fridge. Reheat it in a pan over medium heat until hot. Serve your Chinese pepper steak with steamed rice or noodles. These sides soak up the sauce well. You can also add a side of stir-fried vegetables for more color and nutrients. A simple salad can round out the meal nicely. Enjoy your delicious dish! To make Chinese Pepper Steak & Onions, follow these steps: 1. Marinate the Steak: Mix thinly sliced flank steak with soy sauce and cornstarch. Let it sit for 15 minutes. 2. Prepare the Vegetables: Slice the bell pepper and onion. Mince the garlic and ginger. 3. Heat the Oil: Warm vegetable oil in a large skillet over medium-high heat. 4. Sear the Steak: Add the marinated steak to the skillet. Sear for 2-3 minutes. Stir-fry for another minute. 5. Stir-Fry the Vegetables: Add sliced onion and bell pepper. Cook for 2-3 minutes. Add garlic and ginger, cooking for 30 seconds. 6. Add the Sauce: Return the steak to the skillet. Mix oyster sauce, sugar, black pepper, and beef broth. Pour over ingredients. Cook for 2 minutes. 7. Finish and Serve: Remove from heat. Garnish with green onions. Serve hot over rice or noodles. Yes, you can use frozen steak. However, consider these tips: - Thaw Properly: Always thaw the steak in the fridge overnight. This keeps it safe. - Slice Thinly: Once thawed, slice the steak against the grain. This helps keep it tender. - Marinate Longer: If using frozen steak, marinate for a bit longer to enhance flavor. If you cannot use oyster sauce, try these alternatives: - Soy Sauce: Use additional soy sauce for a similar flavor. - Hoisin Sauce: This adds sweetness and depth. - Vegetarian Oyster Sauce: Made from mushrooms, this is great for a plant-based option. Yes, Chinese Pepper Steak & Onions works well for meal prep. Here’s how: - Portioning: Divide into servings before storing. This makes it easy to grab and go. - Reheating: Reheat gently in a skillet or microwave. Add a splash of water to keep it moist. - Storage: Store in airtight containers. It lasts up to 4 days in the fridge. This recipe for Chinese Pepper Steak & Onions highlights key ingredients like flank steak, bell pepper, and garlic. You learned how to marinate the steak and prepare the vegetables. We discussed tips for selecting the best cuts and variations to try. You can store leftovers properly for later enjoyment. In conclusion, this dish is a delicious option for any meal. With a few simple steps, you can bring tasty flavors to your table. Enjoy cooking and try new ideas to make this dish your own!
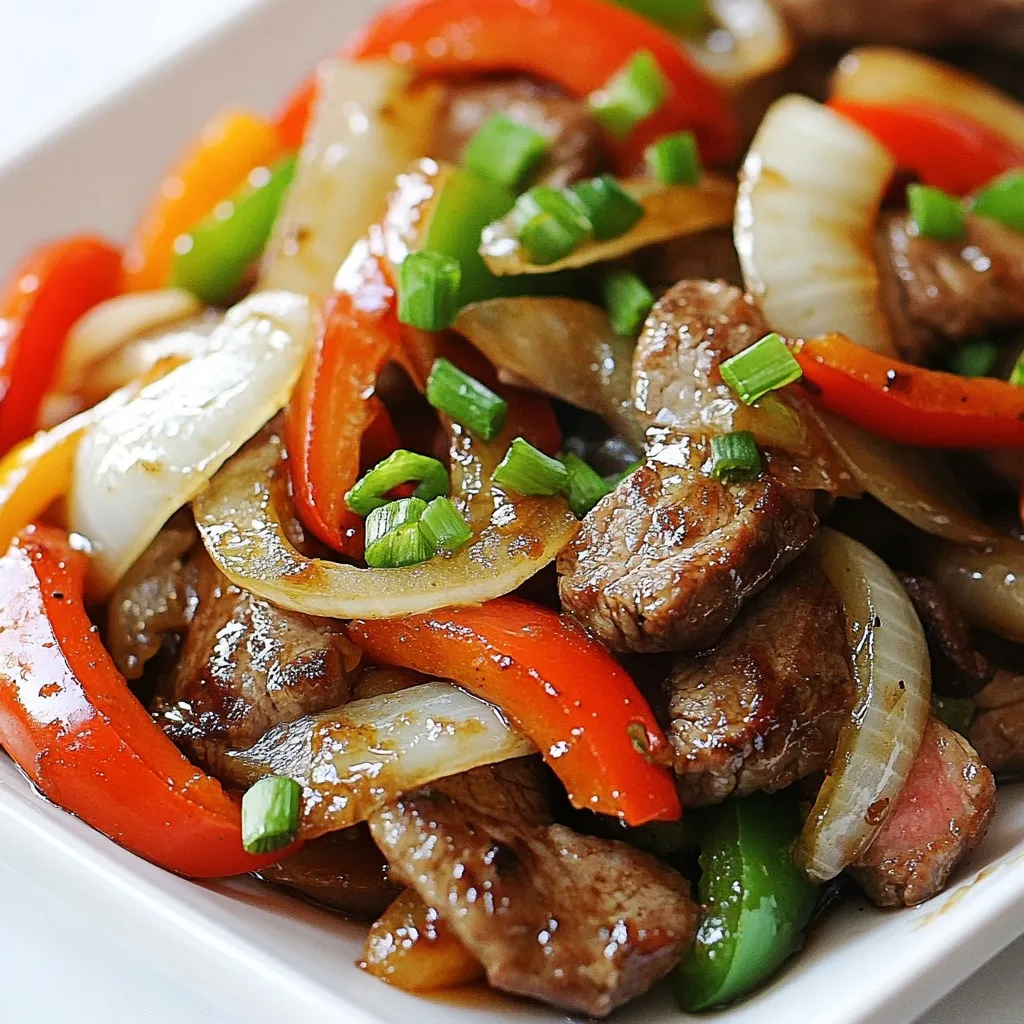
Chinese Pepper Steak & Onions Flavorful Stir-Fry Delight
If you’re craving a quick and tasty dinner, Chinese Pepper Steak & Onions is the answer! This dish combines tender flank steak with vibrant bell
- 2 salmon fillets (6 oz each) - 1 cup jasmine rice - 1/4 cup teriyaki sauce (store-bought or homemade) - 1 cup broccoli florets, steamed - 1/2 cup carrots, shredded - 1 tablespoon sesame oil - 1 green onion, finely sliced - 1 tablespoon sesame seeds - Sea salt and black pepper, to taste For teriyaki salmon rice bowls, the right ingredients make all the difference. First, let's talk about the salmon. I prefer using fresh fillets for a rich flavor. The jasmine rice serves as a soft base, soaking up all the tasty sauce. Teriyaki sauce adds a sweet and savory kick, making the dish exciting. In addition to the salmon and rice, I love adding steamed broccoli and shredded carrots. These veggies not only bring color, but they also add important nutrients. For seasoning, sesame oil is a must. It gives the salmon a nice, nutty flavor. Don’t forget the green onion and sesame seeds for garnish. They add a delightful crunch and freshness. Sea salt and black pepper help enhance the flavors of each ingredient, making every bite delicious. With these ingredients, you are set to create a meal that is both vibrant and satisfying. {{ingredient_image_2}} First, rinse the jasmine rice under cold water. Keep rinsing until the water is clear. This helps remove the extra starch and makes the rice fluffy. Next, in a medium saucepan, combine the rinsed rice and 2 cups of water. Bring it to a boil over high heat. Once boiling, reduce the heat to low and cover the saucepan. Let it simmer for about 15 minutes, until the water is gone and the rice is soft. After that, take it off the heat and let it sit for 5 minutes. Fluff the rice with a fork before serving. While the rice cooks, season the salmon fillets. Use sea salt and black pepper on both sides. This adds great flavor. In a large skillet, heat sesame oil over medium heat. When it’s hot, gently place the salmon fillets in the skillet, skin side down. Cook for 4 to 5 minutes until the skin is crispy. Then, flip the salmon using a spatula. Cook for another 3 to 4 minutes until the fish flakes easily. Next, lower the heat. Pour the teriyaki sauce over the salmon in the skillet. Let the sauce bubble and caramelize around the salmon for about 2 minutes. After that, remove the skillet from the heat. To build the rice bowls, scoop a generous amount of fluffy jasmine rice into each bowl. Place one salmon fillet on top of the rice in each bowl. Drizzle any remaining teriyaki sauce over the salmon for extra taste. Now, arrange the steamed broccoli florets and shredded carrots around the salmon. This makes your bowl colorful and fun. Finally, garnish with finely sliced green onions and a sprinkle of sesame seeds. This adds a nice texture and nutty flavor. To make the best jasmine rice, rinse it first. Rinse until the water runs clear. This step removes extra starch and helps the rice stay fluffy. For jasmine rice, use a 1:2 rice-to-water ratio. If you prefer, you can use other rice types like basmati or brown rice. Just keep in mind that cooking times may vary. For crispy skin, heat your skillet before adding the salmon. This helps the skin brown nicely. Season both sides of the fillets with sea salt and black pepper. When cooking, start with the skin side down. This method allows the skin to crisp up. To check for doneness, use a fork. The fish should flake easily when it's done. You can make your teriyaki sauce at home, or use store-bought. Homemade sauce often tastes fresher and can be customized. To make it, mix soy sauce, honey, garlic, and ginger. You can also add more flavor with sesame oil or a splash of lime juice. For extra seasoning, try adding garlic powder or chili flakes. These will give your dish a nice kick! Pro Tips Rice Rinsing: Rinsing the jasmine rice until the water runs clear not only removes excess starch but also ensures a fluffier texture once cooked. Salmon Temperature: For perfectly cooked salmon, aim for an internal temperature of 145°F (63°C). This ensures the fish is moist and flaky. Teriyaki Sauce Glaze: Allowing the teriyaki sauce to bubble around the salmon enhances the flavor and creates a delightful glaze that adheres to the fish. Garnish for Flavor: Adding green onions and sesame seeds not only enhances the visual appeal of the dish but also adds a burst of freshness and nuttiness. {{image_4}} You can switch the salmon for chicken. Chicken teriyaki offers a tasty twist. Just grill or pan-fry chicken breast. Then, add teriyaki sauce just like with the salmon. If you prefer plant-based meals, try tofu or tempeh. Both soak up the teriyaki sauce well. Cut tofu into cubes and pan-fry until golden. For tempeh, steam it first for a softer texture, then cook it in the sauce. Feel free to mix in other veggies. Bell peppers, snap peas, or zucchini work great. These choices add crunch and color. You can also use seasonal vegetables. Fresh asparagus or green beans are tasty in spring, while squash shines in fall. Want a change from jasmine rice? Try quinoa or cauliflower rice. Quinoa adds extra protein and a nutty flavor. Cauliflower rice is a low-carb option that still fills you up. You can also play with flavored rice. Coconut rice or garlic rice can elevate your bowl. They add unique tastes that pair well with teriyaki. To keep your teriyaki salmon rice bowls fresh, store leftovers in an airtight container. Make sure to place the salmon, rice, and veggies together. This helps keep the flavors intact. You can keep them in the fridge for up to three days. When it's time to reheat, use a microwave. Place the rice bowl in the microwave and cover it with a damp paper towel. Heat in short bursts, checking every 30 seconds. This keeps the salmon moist and the rice fluffy. If you want to freeze your rice bowls, it's best to do this before adding fresh veggies. You can store the salmon and rice together in a freezer-safe container. Wrap them tightly to avoid freezer burn. They can last up to three months in the freezer. For thawing, move the container to the fridge the night before you plan to eat. Let it thaw slowly overnight. If you’re in a rush, you can use the microwave's defrost setting. This method works well for both the salmon and rice, keeping the meal tasty and fresh. To make homemade teriyaki sauce, you need just a few simple ingredients. Here’s how: - Ingredients: - 1/4 cup soy sauce - 2 tablespoons honey or brown sugar - 1 tablespoon rice vinegar - 1 teaspoon garlic, minced - 1 teaspoon ginger, minced - 1 teaspoon cornstarch mixed with 1 tablespoon water (optional for thickening) 1. In a small saucepan, combine soy sauce, honey, rice vinegar, garlic, and ginger. 2. Heat over medium heat until it starts to simmer. 3. If you want a thicker sauce, add the cornstarch mixture. 4. Continue to cook for a few more minutes until it thickens. This sauce adds a sweet and savory flavor to your salmon! Yes, you can make this recipe in advance! Here are some tips: - Meal Prep: Cook the rice and salmon ahead of time. Store them separately in airtight containers in the fridge. - Storage: Keep cooked salmon in the fridge for up to 2 days. The rice stays fresh for about 4 days. - Reheating: When ready to eat, reheat the salmon in a skillet on medium heat. Warm the rice in the microwave or on the stove with a splash of water. This way, you can enjoy your teriyaki salmon rice bowl quickly on busy days! You can serve a variety of sides to enhance your meal: - Steamed Vegetables: Broccoli, bell peppers, or snap peas work well. - Salad: A simple cucumber and sesame salad adds freshness. - Pickled Vegetables: They can give a nice tang to balance the dish. - Fruit: Sliced oranges or mango can complement the flavors. Feel free to mix and match for a colorful, tasty meal! This blog post covered how to make delicious teriyaki salmon rice bowls. We discussed main ingredients like salmon, jasmine rice, and vegetables. You learned step-by-step how to cook the rice and salmon, then assemble the bowls. I shared tips for perfecting your dish and suggested tasty variations. Proper storage is also key for leftovers. Enjoy making these rice bowls for a quick meal. With practice, you’ll cook them like a pro!
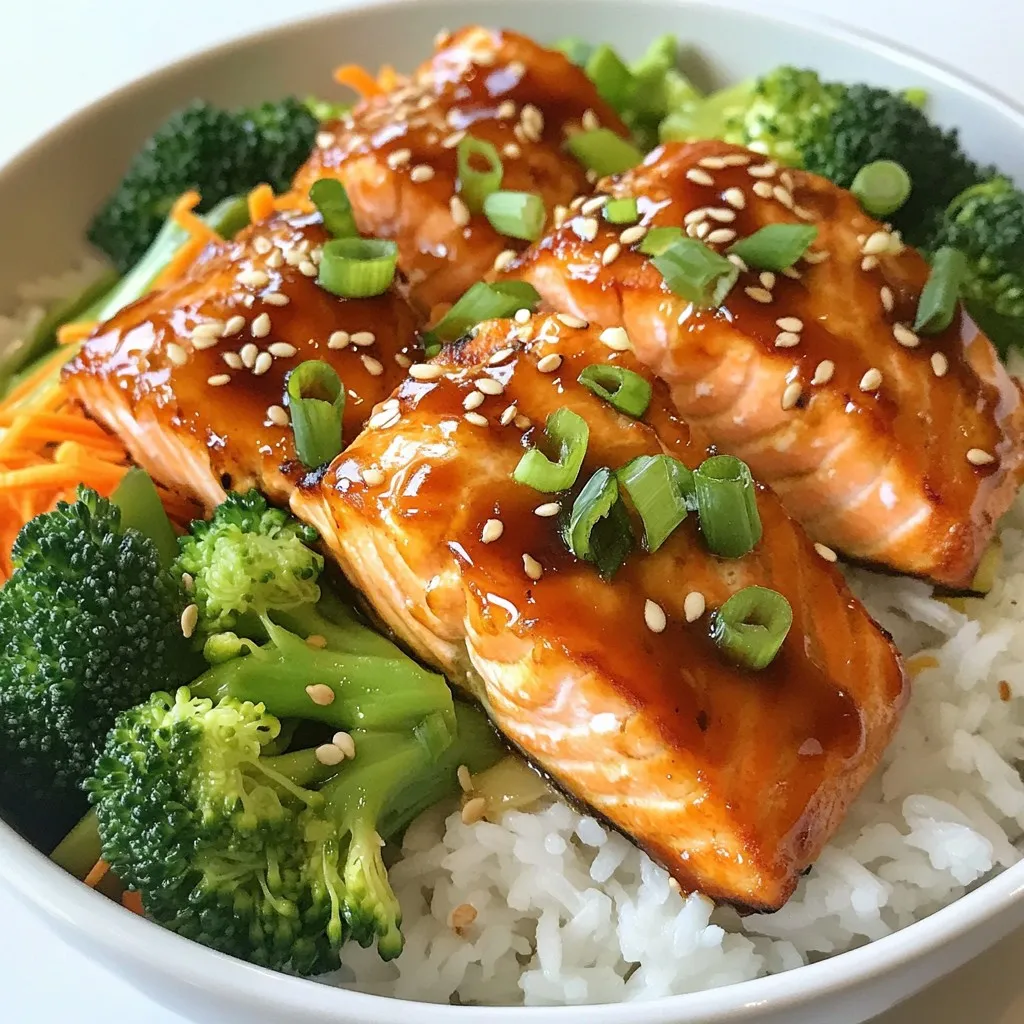
Teriyaki Salmon Rice Bowls Flavorful and Easy Meal
Do you want a tasty meal that’s simple to make? Look no further than teriyaki salmon rice bowls! They’re packed with flavor and easy enough
To create a tasty Hobo Ground Beef Casserole, gather these ingredients: - 1 lb ground beef - 1 medium onion, diced - 2 cloves garlic, minced - 1 cup bell peppers (mixed colors), diced - 3 cups fresh spinach, roughly chopped - 2 cups Yukon Gold potatoes, thinly sliced - 1 can (15 oz) diced tomatoes, undrained - 1 cup shredded sharp cheddar cheese - 1 tablespoon Worcestershire sauce - 1 teaspoon smoked paprika - 1 teaspoon dried oregano - Salt and freshly ground black pepper, to taste - 2 tablespoons olive oil You can swap out some of the fresh produce based on what you have. Here are some ideas: - Use frozen spinach instead of fresh. - Try other potatoes, like red or sweet potatoes. - Instead of bell peppers, you can use zucchini or mushrooms. - If you lack fresh garlic, garlic powder works too. The cheese adds a nice flavor and texture to the dish. Here are some great options: - Sharp cheddar is the classic choice. - Monterey Jack offers a milder taste. - You can use mozzarella for a stretchy texture. - Consider a blend of cheeses for extra flavor. {{ingredient_image_2}} First, gather all your ingredients. You will need: - 1 lb ground beef - 1 medium onion, diced - 2 cloves garlic, minced - 1 cup bell peppers, diced - 3 cups fresh spinach, chopped - 2 cups Yukon Gold potatoes, thinly sliced - 1 can diced tomatoes, undrained - 1 cup shredded sharp cheddar cheese - 1 tablespoon Worcestershire sauce - 1 teaspoon smoked paprika - 1 teaspoon dried oregano - Salt and pepper to taste - 2 tablespoons olive oil Next, preheat your oven to 375°F (190°C). This step helps cook the casserole evenly. In a large skillet, heat the olive oil over medium heat. Add the diced onion and minced garlic. Cook them for 3-4 minutes until the onion is soft and clear. Then, add the ground beef. Use a spatula to break it apart as it cooks. Brown the meat for about 5-7 minutes. Drain any extra fat to keep it light. Mix in the diced bell peppers and cook for another 2-3 minutes. You want them to soften a bit. Stir in the chopped spinach, undrained diced tomatoes, Worcestershire sauce, smoked paprika, and oregano. Season with salt and pepper. Cook this for 2 more minutes to let the flavors blend. Grease a 9x13-inch baking dish. Start layering with half of the sliced potatoes at the bottom. Then, spoon half of the beef and vegetable mix over the potatoes. Spread it evenly to ensure every bite is tasty. Repeat this process. Add the rest of the sliced potatoes, followed by the remaining beef mixture. Make sure to distribute everything well. Cover the dish tightly with aluminum foil. Bake it in the oven for 30 minutes. This helps the flavors meld and the potatoes cook through. After 30 minutes, carefully take off the foil. Sprinkle the shredded cheddar cheese over the top. Return the dish to the oven and bake uncovered for another 15 minutes. The cheese should melt and turn golden brown. Let the casserole rest for a few minutes before serving. This helps the layers set for easier slicing. Enjoy your meal! To stop your casserole from being greasy, drain the fat from the beef after cooking. This step is key. Use a spatula to break up the meat well. This helps it cook evenly. You can also use leaner beef if you prefer. Ground turkey is a great choice too. It gives the same flavor but with less fat. When you sauté, heat your pan first. Add olive oil before the onions. Cook the onions until they are soft. This should take about 3-4 minutes. Next, add garlic for more flavor. Stir them often to avoid burning. After the onions and garlic, add your bell peppers. Sauté them until just soft, about 2-3 minutes. This keeps them bright and tasty. Serve your hobo ground beef casserole hot from the oven. For a nice touch, add a sprinkle of fresh parsley on top. This adds color and a fresh taste. You can serve it with a side salad or some crusty bread. Sour cream on top is a great way to add creaminess. Enjoy it with family or friends for a cozy meal! Pro Tips Brown the Beef Well: Ensuring the ground beef is browned thoroughly enhances the flavor of the casserole, giving it a rich, savory base. Layering Technique: For optimal cooking, layer the potatoes and beef mixture evenly. This ensures that both the potatoes and beef cook through and meld together nicely. Cheese Variation: Experiment with different types of cheese such as Monterey Jack or Gouda for a unique flavor twist that complements the dish. Rest Before Serving: Allow the casserole to rest for a few minutes after baking. This helps the layers set, making it easier to cut and serve without falling apart. {{image_4}} You can easily turn this dish vegetarian. Replace the ground beef with plant-based meat. Options like lentils or mushrooms work great. Lentils add protein, while mushrooms give a nice texture. You can also add more beans for extra fiber. Just adjust the cooking time as needed. Cook the lentils until tender before adding them to the dish. To boost flavor, try adding different spices. A pinch of cayenne pepper adds heat. You can also mix in some fresh herbs like basil or thyme. Adding a splash of balsamic vinegar gives it a sweet tang. Other options are olives or capers for a briny bite. You can cook this casserole in several ways. Use a slow cooker for a hands-off approach. Just layer everything in and let it cook on low for 6-8 hours. If you prefer a quicker method, try using an Instant Pot. Cook for about 15 minutes, then let it release naturally. You can also bake it in a cast-iron skillet for a rustic look and feel. Each method brings out different flavors in the dish. After enjoying your hobo ground beef casserole, let it cool first. Transfer leftovers to an airtight container. Store in the fridge for up to three days. If you want to enjoy it later, freezing is a great option. To freeze the casserole, cool it completely. Cut it into individual portions for easy reheating. Wrap each portion tightly in plastic wrap or foil, then place them in a freezer-safe bag. This way, you can enjoy it for up to three months. When you're ready to eat, thaw the casserole in the fridge overnight. Preheat your oven to 350°F (175°C). Place the casserole in an oven-safe dish, cover it with foil, and heat for about 20-25 minutes. If you like, remove the foil for the last five minutes to crisp the cheese. Enjoy every bite! Yes, you can make this casserole ahead of time. Prepare it up to the baking step and cover it tightly with foil. Store it in the fridge for up to 24 hours. When ready, just bake it. You may need to add a few extra minutes to the cooking time if it's cold from the fridge. This casserole is a complete meal, but you can add sides for more variety. Here are a few ideas: - Green Salad: A fresh salad with mixed greens pairs well. - Garlic Bread: Toasted garlic bread adds a nice crunch. - Steamed Veggies: Broccoli or green beans can add color and nutrients. Ovens can vary in how they cook. If you have a convection oven, reduce the cooking time by about 10%. For older ovens, check the casserole a bit earlier than the suggested time. Use a fork to probe the potatoes. They should be tender when done. In this blog post, we covered all you need for a great hobo ground beef casserole. We discussed the key ingredients, fresh produce options, and cheese recommendations. I shared step-by-step instructions for prep and cooking, plus layering techniques. You learned tips to avoid greasy casseroles and best sautéing practices. Finally, we explored variations, storage tips, and answered common questions. You now have the tools to create a delicious meal. Enjoy experimenting in your kitchen!
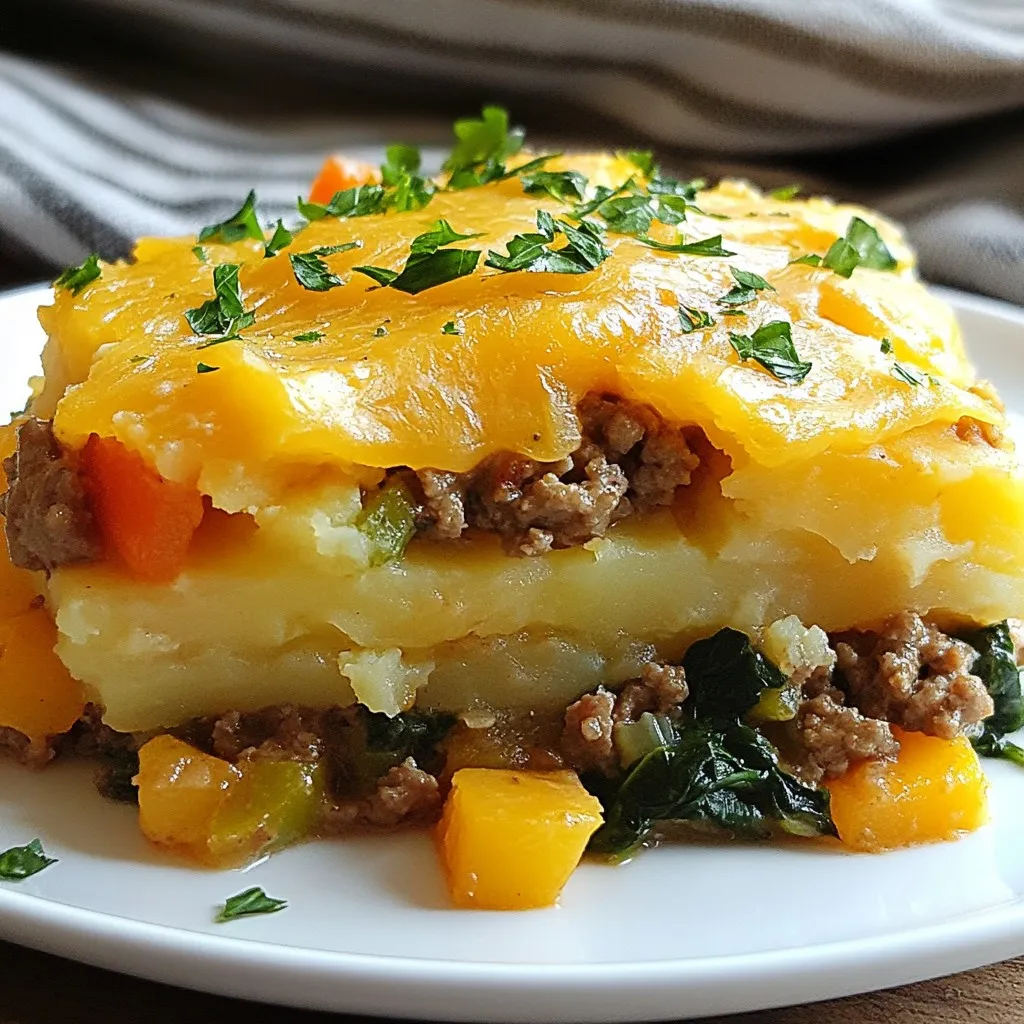
Hobo Ground Beef Casserole Quick and Tasty Recipe
Are you ready for a quick and tasty meal? This Hobo Ground Beef Casserole is your new go-to dish. It’s simple, satisfying, and packed with
To make this creamy potato soup, you'll need: - 4 medium russet potatoes, peeled and diced - 1/2 cup onion, finely chopped - 1/4 cup celery, finely chopped - 1/4 cup carrots, finely chopped - 3 cloves garlic, minced - 4 cups chicken broth (or vegetable broth) - 1 cup heavy cream - 1/2 cup sour cream - 1 teaspoon dried thyme - 1 teaspoon smoked paprika - Salt and pepper to taste These ingredients create a rich and hearty soup. Each one plays an important role in flavor and texture. You can add some fun toppings to make it special: - 1 cup shredded cheddar cheese - 1/2 cup green onions, chopped These garnishes give extra flavor and a nice look to your soup. The cheese melts into the warm soup, while the green onions add a fresh crunch. If you need to change things up, here are some swaps: - Use sweet potatoes for a different taste. - Swap heavy cream with coconut milk for a dairy-free option. - Replace chicken broth with vegetable broth for a vegetarian dish. These substitutes keep the soup tasty while fitting your diet. Don’t be afraid to get creative! {{ingredient_image_2}} Start by peeling the russet potatoes. Dice them into bite-sized pieces. Next, finely chop the onion, celery, and carrots. Mince the garlic cloves. This mix of fresh veggies adds flavor and texture to the soup. In a large pot, combine the diced potatoes, chopped onion, celery, carrots, minced garlic, and chicken broth. Place the pot over medium-high heat. Bring the soup to a rolling boil. Once boiling, lower the heat to medium-low. Let the soup simmer for 15-20 minutes. The potatoes should be tender when pierced with a fork. After the potatoes are tender, use a potato masher. Gently mash some of the potatoes in the pot. This helps create a creamy texture while keeping some chunks. Next, stir in the heavy cream, sour cream, dried thyme, and smoked paprika. Season with salt and pepper to taste. Let the soup simmer for another 5 minutes, stirring occasionally. This step blends all the flavors together, making your soup rich and satisfying. When making Copycat Outback Potato Soup, avoid overcooking the potatoes. They should be tender but not mushy. Don’t skip the mashing step. It adds a creamy texture. If you don’t use enough salt and pepper, the flavors may fall flat. Remember, tasting your soup as you go is key! To boost flavor, use fresh herbs like parsley or chives. They add brightness to the soup. You can also add a splash of lemon juice for a zesty kick. Experiment with spices too. A bit of cayenne pepper can add heat, while smoked paprika gives a unique depth. Use a large pot for even cooking. A potato masher is great for achieving that creamy texture. A good knife makes chopping veggies easy and safe. Don’t forget your measuring cups for precise amounts. An immersion blender can help if you prefer a smoother soup. Pro Tips Choose the Right Potatoes: For the best texture and flavor, use russet potatoes as they become creamy when cooked. Avoid waxy potatoes as they may not break down properly. Adjusting Thickness: If you prefer a thicker soup, mash more of the potatoes or add a cornstarch slurry (1 tablespoon cornstarch mixed with 2 tablespoons of water) while simmering. Flavor Enhancements: Experiment with additional herbs such as rosemary or chives for a unique twist on the classic flavor. A squeeze of lemon juice can also brighten the soup. Storage Tips: Store any leftover soup in an airtight container in the refrigerator for up to 3 days. Reheat gently on the stove, adding a splash of broth to restore creaminess. {{image_4}} To make a vegetarian version, swap the chicken broth for vegetable broth. This simple change keeps all the flavor and heartiness. Use the same amount of broth as in the original recipe. You can also add extra veggies like corn or bell peppers for added taste. They add color and crunch to the soup, making it even more enjoyable. If you like heat, add some spice! A pinch of cayenne pepper or a splash of hot sauce gives the soup a nice kick. You can also stir in diced jalapeños for a fresh, zesty flavor. This will make your creamy potato soup extra exciting. Just be careful not to add too much spice at once. You can always add more if needed. For a gluten-free version, ensure your broth is labeled gluten-free. Most vegetable and chicken broths are safe, but always check the label. You can also use cornstarch to thicken your soup if needed. Mix 1 tablespoon of cornstarch with cold water before adding it to the soup. This will help make your soup creamy without adding gluten. Enjoy your delicious and safe potato soup! To store your soup, let it cool first. Use an airtight container to keep it fresh. It’s best to store the soup in the fridge. This way, it stays tasty for up to three days. Don’t forget to label the container with the date. This helps you keep track of its freshness. When you’re ready to eat, take the soup out of the fridge. Pour it into a pot over low heat. Stir it often so it heats evenly. You can also microwave it in a bowl. Heat it in 30-second bursts, stirring in between. This keeps the soup creamy and warm without cooking it further. If you want to save some for later, freezing is a great option. Use a freezer-safe container but leave space at the top. The soup will expand when frozen. To thaw, place it in the fridge overnight. For a quick thaw, put the container in cold water. Once thawed, heat it up as usual. Just remember, freezing may change the texture a bit, but it’ll still taste great! Copycat Outback Potato Soup stays fresh for about three to five days in the fridge. Store it in an airtight container to keep it safe. If you want to enjoy it later, don’t forget to label it with the date. Yes, you can make this soup in a slow cooker. Start by placing the diced potatoes, onion, celery, carrots, garlic, and broth inside. Cook on low for six to eight hours or on high for three to four hours. When the veggies are tender, add the cream and seasonings. Stir well and serve hot. The best toppings for potato soup include: - Shredded cheddar cheese - Chopped green onions - Crispy bacon bits - Sour cream - Fresh herbs like parsley or chives Try mixing and matching for your perfect bowl! In this blog post, we explored every aspect of making Copycat Outback Potato Soup. We covered the key ingredients, step-by-step instructions, and tips to avoid common mistakes. You learned about variations, storage info, and answers to frequent questions. Now you can make a delicious potato soup that friends and family will love. Enjoy customizing your soup to fit your taste. With these insights, you'll create a warming dish that impresses all. Happy cooking!
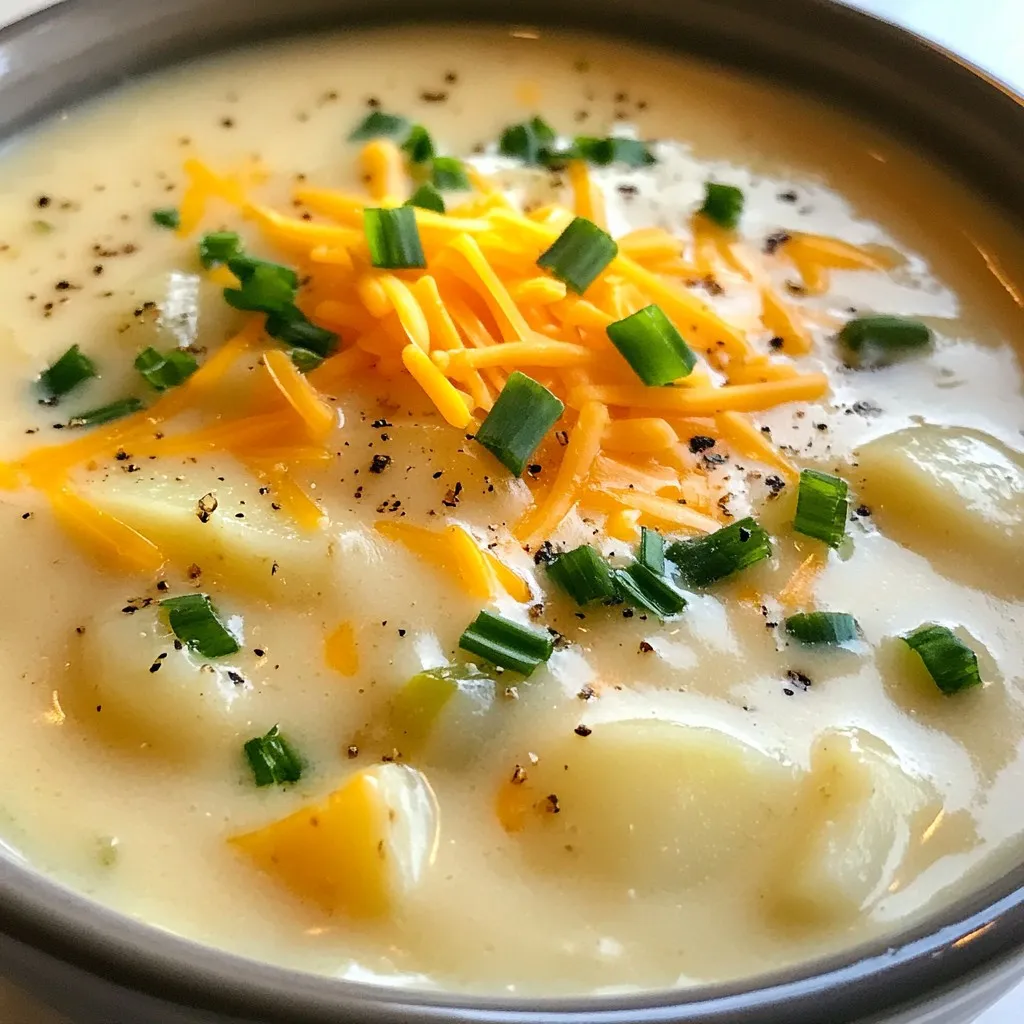
Copycat Outback Potato Soup Creamy Comfort Recipe
If you crave the creamy comfort of Outback Potato Soup, you’re in the right place! This Copycat Outback Potato Soup recipe is easy to make
- 2 boneless, skinless chicken breasts - 2 cups fresh broccoli florets - 1 vibrant red bell pepper - Soy sauce - Honey or maple syrup - Garlic - Ginger - Sesame oil - Olive oil - Salt - Pepper - Garnishes The main ingredients in this dish are simple yet flavorful. You start with chicken breasts. They are easy to cut and cook. Next, add fresh broccoli florets. Their bright green color looks nice on the plate. The red bell pepper adds sweetness and crunch. The marinade is what makes the chicken taste great. Soy sauce gives it a salty kick. Honey or maple syrup adds a hint of sweetness. Garlic and ginger provide a zesty punch. These flavors work together to make the chicken juicy and tasty. For cooking, sesame oil and olive oil help everything cook well. Salt and pepper bring out the flavors. Don’t forget the garnishes! Toasted sesame seeds and chopped cilantro add a nice touch. They make the dish look pretty and add even more flavor. {{ingredient_image_2}} - In a bowl, mix together soy sauce, honey, minced garlic, and grated ginger. - Add a pinch of salt and pepper. - Place the chicken in the bowl and stir well. - Make sure every piece is coated. - Cover the bowl and let it marinate for at least 15 minutes. - This step helps the chicken soak up the flavor. - Rinse the broccoli and chop it into small florets. - Slice the red bell pepper into thin strips. - Uniform cuts help the veggies cook evenly. - This makes the dish look nice, too. - Heat 1 tablespoon of olive oil in a large skillet over medium-high heat. - Once hot, add the marinated chicken in a single layer. - Stir-fry for 5-7 minutes until golden brown. - Flip and stir often to cook evenly. - Remove the chicken and set it aside on a plate. - In the same skillet, add another tablespoon of olive oil. - Toss in the broccoli and bell pepper. - Stir-fry for about 4-5 minutes. - Cook until broccoli is bright green and tender-crisp. - This keeps the veggies fresh and crunchy. - Add the chicken back into the skillet with the veggies. - Mix everything well and pour any leftover marinade over it. - Cook for another 2-3 minutes to meld the flavors. This step-by-step guide makes your Minute Chicken and Broccoli easy and quick. Enjoy the vibrant mix of flavors! - Best oil for stir-frying: I recommend using sesame oil for stir-frying. It adds a rich, nutty flavor to your dish. You can also mix it with extra virgin olive oil. This combo brings out the best in your chicken and broccoli. - How to avoid overcooking chicken: To avoid dry chicken, don’t cook it too long. Stir-fry it for about 5-7 minutes until it's golden and no longer pink. Cut the chicken into even pieces for quick cooking and even results. - Ways to adjust sweetness and spice: If you like a sweeter taste, add a bit more honey or maple syrup. For some heat, sprinkle red pepper flakes while cooking. These small changes can really boost the flavor! - Importance of fresh ingredients: Always use fresh broccoli and bell peppers. Fresh veggies not only taste better, but they also keep their nutrients. Fresh garlic and ginger add a punch of flavor, too. - Serving suggestions with rice or quinoa: Serve your chicken and broccoli over a bed of steamed rice or fluffy quinoa. This adds substance and helps soak up the delicious sauce. - Garnishing techniques for visual appeal: For a pop of color, sprinkle toasted sesame seeds and chopped cilantro on top. This makes your dish look vibrant and inviting. A good presentation makes the meal even tastier! Pro Tips Marinate Longer for Flavor: For an even deeper flavor, consider marinating the chicken for at least 30 minutes, or even up to 2 hours if time allows. Use Fresh Ingredients: Fresh garlic and ginger will provide a more robust flavor than their dried counterparts, enhancing the overall taste of the dish. Customize Your Veggies: Feel free to add other vegetables like snap peas, carrots, or mushrooms to diversify the flavors and textures in your stir-fry. Serve with a Side: Pair your stir-fry with steamed jasmine rice or quinoa to create a complete meal that balances the savory flavors. {{image_4}} You can easily change this dish for different diets. If you want a vegan option, use tofu instead of chicken. Tofu absorbs flavor well and has a nice texture. Just press it to remove extra water, then slice it into cubes. Use the same marinade to soak the tofu. If you need a gluten-free dish, swap soy sauce with tamari. Tamari offers the same taste without gluten. Always check labels to ensure they are gluten-free. Feel free to mix in other vegetables. Carrots, snap peas, or bell peppers work great too. You can even use green beans for a fresh crunch. For seasonal variations, try asparagus in spring or zucchini in summer. These veggies add color and flavor to your meal. You can change the sauce to match your taste. For a spicy kick, add chili paste or sriracha to the marinade. If you want a citrusy flavor, mix in some lime or lemon juice. For health-conscious options, use less honey or maple syrup. You can also try using coconut aminos for a lower-sodium choice. This keeps your dish tasty and friendly for various diets. To keep your chicken and broccoli fresh, store leftovers in an airtight container. Make sure to let it cool before sealing. Place it in the fridge right away. When stored correctly, this dish stays fresh for about 3 to 4 days. When reheating, use the stovetop for best results. Heat a pan over medium heat, add a splash of water or oil, and stir the dish gently. This method helps keep the chicken tender and the broccoli crisp. Avoid using the microwave, as it can make the chicken dry and rubbery. Yes, you can freeze this dish! To freeze, let it cool completely, then pack it in a freezer-safe container. This dish can last up to 3 months in the freezer. To defrost, move it to the fridge overnight. Reheat it on the stovetop for the best texture. Yes, you can use frozen broccoli. However, the texture and flavor may change. Fresh broccoli is crisp and vibrant. Frozen broccoli tends to be softer and may lose some crunch. If you use frozen, cook it a bit less to keep some texture. Cooking this chicken and broccoli dish is quick. The total time is about 30 minutes. You will spend 15 minutes marinating the chicken. Cooking the chicken takes about 5-7 minutes. Stir-frying the broccoli and bell pepper takes another 4-5 minutes. Combine everything and heat for 2-3 minutes. Yes, you can prepare this dish ahead of time. Cook the chicken and veggies, then store them in the fridge. It stays good for about 3 days. To reheat, just warm it in a pan. You can also prep the marinade and chop veggies earlier. This saves time when you are ready to cook! This blog post covers a tasty chicken stir-fry with broccoli and bell pepper. You learned about the main ingredients, marinade, and cooking techniques. I shared tips for perfect cooking and creative variations for different diets. Remember, fresh ingredients boost flavor, and proper storage keeps your meal fresh longer. For a quick, healthy dish, follow these steps. Enjoy a delicious meal that is easy to prepare and fun to customize. Happy cooking!
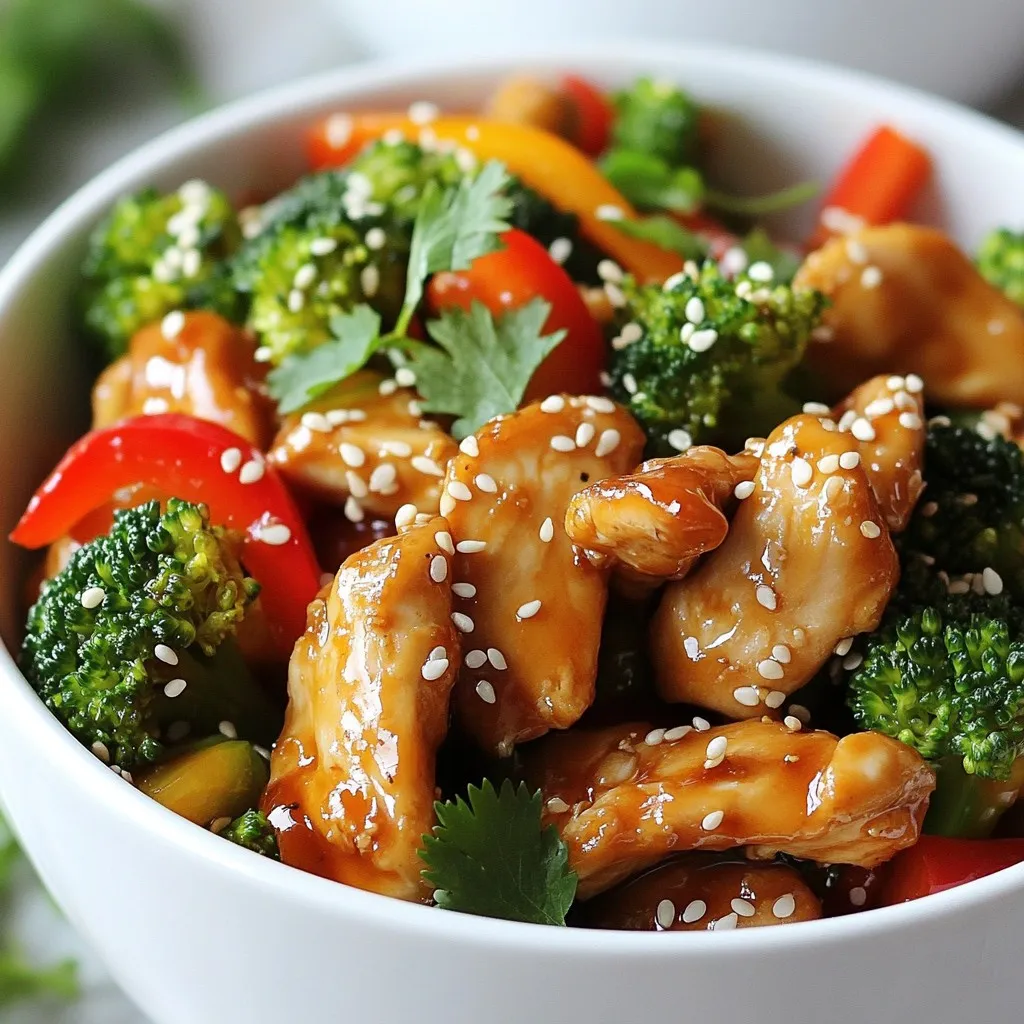
Minute Chicken and Broccoli Easy Quick Recipe
Are you short on time but craving a delicious meal? This Minute Chicken and Broccoli recipe is perfect for you! With just a few simple
- 2 cups cooked chicken breast, shredded - 1 cup low-fat Greek yogurt - 1 cup shredded low-fat mozzarella cheese - 1 can (10 oz) green enchilada sauce - 1 cup diced green bell pepper - 1/2 cup corn kernels (fresh or frozen) - 1 teaspoon garlic powder - 1 teaspoon onion powder - 1/2 teaspoon ground cumin - 1/2 teaspoon chili powder - Salt and pepper to taste - 8 whole wheat tortillas - Fresh cilantro, chopped (for garnish) You can swap out ingredients to fit your needs. For a dairy-free option, use cashew cream instead of Greek yogurt and a dairy-free cheese. If you're looking for a lower-carb choice, try lettuce wraps instead of tortillas. You can also replace chicken with shredded jackfruit for a vegan twist. These enchiladas are a protein powerhouse. Each serving offers a great balance of protein, fiber, and healthy fats. You get about 25 grams of protein per serving, thanks to the chicken and Greek yogurt. Whole wheat tortillas add fiber, helping with digestion. Plus, veggies like bell peppers and corn boost vitamins and minerals. Enjoy a meal that is both tasty and nutritious! {{ingredient_image_2}} To start, preheat your oven to 350°F (175°C). This is the perfect heat for baking enchiladas. In a large bowl, mix together the chicken, Greek yogurt, half of the mozzarella cheese, green bell pepper, corn, garlic powder, onion powder, cumin, chili powder, and some salt and pepper. Make sure everything is well combined. You want each bite to have great flavor. Next, pour 1/2 cup of green enchilada sauce into your baking dish. This gives a nice base for the enchiladas. Now, take a whole wheat tortilla and place about 1/3 cup of your chicken mixture in the middle. Roll it tightly and place it seam-side down in the dish. Repeat until you use all the tortillas. Once they're all in, drizzle the remaining enchilada sauce on top. Finish by sprinkling the rest of the mozzarella cheese over them. Cover the dish with aluminum foil. This helps keep the cheese from burning. Bake for 20 minutes, then remove the foil. Bake for another 10 minutes until the cheese is bubbly and lightly golden. Once done, let the enchiladas cool for a few minutes. Before serving, add some fresh cilantro on top for a pop of color and flavor. Serve them in the dish with extra cilantro and lime wedges for a fresh touch. Enjoy your high-protein white chicken enchiladas! To get the best taste from your enchiladas, use fresh ingredients. Fresh bell peppers and corn add great flavor. Mix in spices like cumin and chili powder to boost taste. Remember, seasoning is key! Taste your filling before rolling it up. Adjust salt and pepper as needed. Baking at the right temperature makes a big difference. Preheat your oven to 350°F (175°C) before you start. This helps the cheese melt and the flavors blend well. Cover the dish with foil for the first part of baking. This keeps moisture in and prevents burning. Remove the foil later to brown the cheese perfectly. For a complete meal, pair your enchiladas with a simple side salad. A fresh salad adds crunch and balance. Lime wedges are a great touch too. They give a zesty kick that brightens the dish. You can also serve it with black beans or rice for more protein. Pro Tips Use Rotisserie Chicken: For even quicker preparation, consider using store-bought rotisserie chicken. It adds flavor and saves time on cooking and shredding the chicken. Customize Your Veggies: Feel free to mix in other vegetables like spinach, mushrooms, or zucchini for added nutrition and flavor. Just ensure they are chopped finely. Make Ahead: These enchiladas can be assembled ahead of time. Just cover them tightly and refrigerate for up to 24 hours before baking. Extra Creaminess: For an even creamier filling, mix in a little bit of cream cheese with the Greek yogurt. It will enhance the texture and taste! {{image_4}} You can easily make this dish vegetarian. Replace the chicken with cooked beans. Black beans work well. Use 2 cups of black beans in place of the chicken. Add diced zucchini and spinach for extra flavor and nutrients. You can also use a mix of bell peppers for a colorful filling. The Greek yogurt and cheese will still keep it creamy and delicious. To make this recipe gluten-free, swap out the whole wheat tortillas. Look for gluten-free tortillas made with corn or almond flour. They hold up well with the filling. Check the enchilada sauce too; some brands contain gluten. Make sure to choose a gluten-free option. This way, you can enjoy the same great taste without any gluten. If you love heat, add some spice! You can mix diced jalapeños into the filling. Use spicy enchilada sauce for an extra kick. Another idea is to sprinkle crushed red pepper flakes on top before baking. You can also serve the enchiladas with a side of salsa or hot sauce. These options will bring warmth and excitement to your meal! To keep your enchiladas fresh, place them in an airtight container. Make sure the lid seals tightly. Store them in the fridge for up to three days. If you want to keep them longer, freezing is a great option. If you want to freeze the enchiladas, wrap them tightly in plastic wrap. Then place them in a freezer-safe bag or container. They can last for up to two months. Label the bag with the date so you know when to use them. To reheat, you can use the oven or the microwave. For the oven, preheat it to 350°F (175°C). Place the enchiladas in a baking dish and cover them with foil. Bake for about 20 minutes until heated through. If using a microwave, put a damp paper towel over the dish. Heat for 1-2 minutes, checking often. Enjoy your meal! Yes, you can use different cheeses. Cheddar or pepper jack work well. These cheeses add unique flavors to your enchiladas. Just make sure they melt nicely. Avoid very hard cheeses, as they may not melt well. To make this dish dairy-free, replace Greek yogurt with a dairy-free yogurt. Use plant-based cheese for the topping. Almond or cashew cheese can be great options. Check the labels to ensure they fit your dietary needs. These enchiladas pair well with a simple side salad. You can also serve them with guacamole or salsa for extra flavor. Lime wedges add a zesty touch too. For a heartier meal, consider adding black beans or quinoa on the side. This guide covered the main ingredients for high-protein white chicken enchiladas, ways to adjust for different diets, and a health overview. I detailed steps for preparing the filling, assembling, and baking the enchiladas. Tips included flavor improvement and cooking methods for the best results. I also shared variations like vegetarian, gluten-free, and spicy options. Finally, I provided storage tips and answers to common questions. Enjoy creating a meal that is tasty and fits your needs!
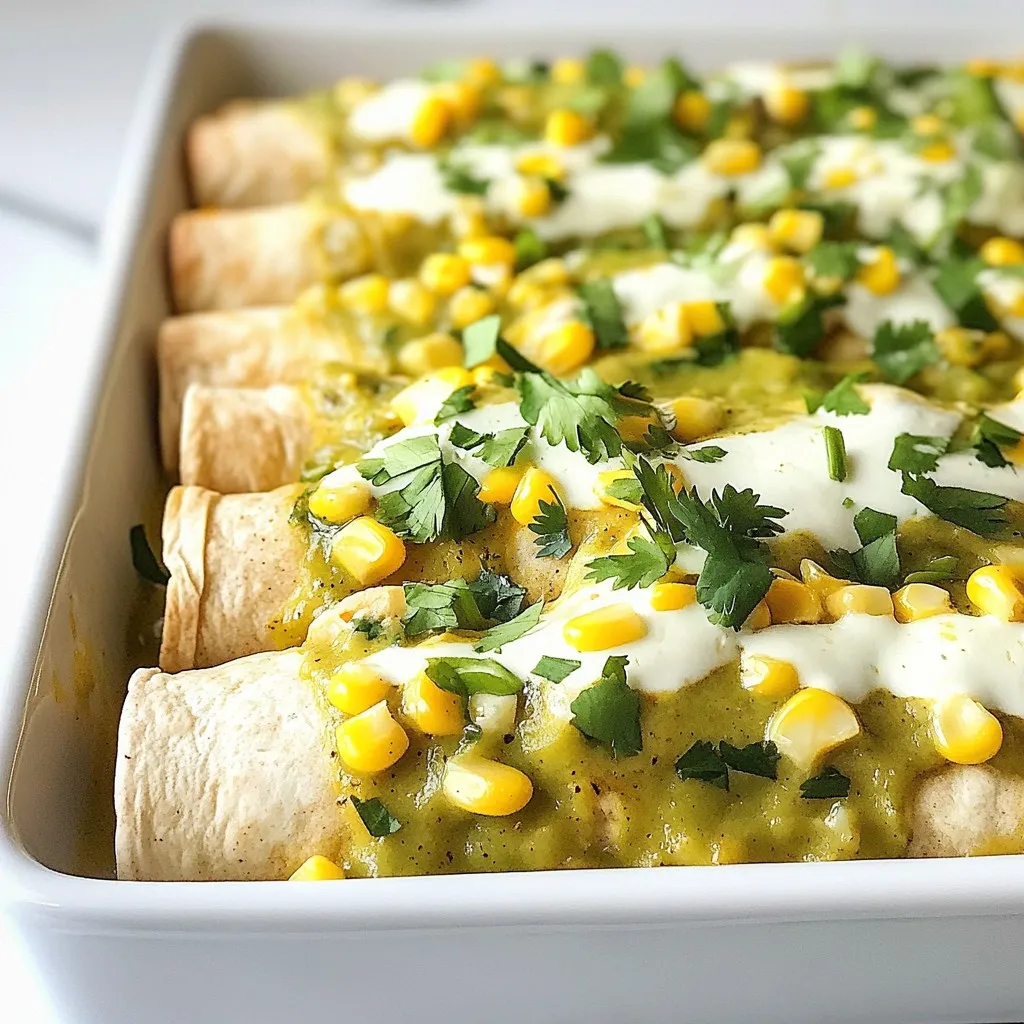
High-Protein White Chicken Enchiladas Simple Recipe
Looking to pack your meal with protein while enjoying a delicious twist? You’ve come to the right place. In this simple recipe for High-Protein White
- Pasta options: You can choose between elbow macaroni or rotini pasta. Elbow macaroni is small and easy to eat. Rotini has twists that hold sauce well, making every bite tasty. - Recommended beef blend for flavor: I suggest using an 80/20 ground beef blend. This mix has 80% lean meat and 20% fat. The fat adds great flavor and keeps the beef juicy. - Additional seasonings and their roles: You will need onion powder and garlic powder. These spices add depth to the dish. Salt and black pepper enhance all the flavors. Don't forget the diced tomatoes and beef broth for a rich base. Lastly, cream cheese, cheddar, and mozzarella create a creamy texture. The dill pickles, mustard, and ketchup give that classic cheeseburger taste. {{ingredient_image_2}} To cook the pasta, start by boiling salted water. Once it bubbles, add the elbow macaroni or rotini. Follow the package instructions, but aim for al dente. This means the pasta should be firm but not hard. After cooking, drain the pasta in a colander. Rinsing is not needed, as the starch helps the sauce stick. For the beef, use medium heat. This heat level helps the meat cook evenly. Add the ground beef to the pot after draining the pasta. Break it apart with a spatula as it cooks. Make sure to crumble it well for even cooking. Cook until it is no longer pink, about 5-7 minutes. After browning, drain any excess fat to keep the dish from being greasy. Once you brown the beef, it's time to add flavor. Sprinkle onion powder, garlic powder, salt, and pepper over the meat. Stir well so that the spices mix in. Next, add diced tomatoes and beef broth. Stir again and let it simmer for 2-3 minutes. This allows the flavors to blend nicely. Now, lower the heat to a gentle simmer. Add the softened cream cheese next. Stir constantly until it's melted. Then, mix in the shredded cheddar and mozzarella. This creates a creamy sauce. Finally, gently fold in the drained pasta. Make sure every piece gets coated in that cheesy goodness. Add diced pickles, yellow mustard, and ketchup last. Stir well to combine everything. This step adds a tangy twist that makes it taste just like a cheeseburger! For seasoning, you can swap onion powder for fresh onions. Fresh onions give a nice crunch and flavor. If you like garlic, fresh minced garlic works well too. To enhance the cheese sauce, add a splash of Worcestershire sauce. It adds a rich umami taste that makes each bite special. When melting cheese, keep the heat low. High heat can cause the cheese to clump. Stir it slowly until smooth. To avoid a greasy dish, drain the excess fat after cooking the ground beef. This keeps your pasta creamy, not oily. Garnish your loaded cheeseburger pasta with chopped green onions. They add color and freshness. For family meals, serve in large bowls with a side salad. This makes it easy for everyone to dig in and enjoy. Pro Tips Choose the Right Pasta: Opt for elbow macaroni or rotini to better hold the creamy sauce and meat mixture, ensuring every bite is flavorful. Ingredient Temperature: Make sure the cream cheese is at room temperature before adding it to the pot for easier melting and a smoother sauce. Mix Up the Cheeses: Feel free to experiment with different cheeses, like pepper jack for a spicy kick or gouda for a smoky flavor. Add Fresh Herbs: Consider adding chopped fresh herbs like parsley or chives at the end for an extra layer of flavor and freshness. {{image_4}} You can change proteins in this dish. Use ground turkey for a leaner option. If you want a vegetarian twist, try lentils or a meat substitute. They work well and keep the meal hearty. For cheese lovers, consider dairy-free cheese. Many brands offer great options. This keeps the taste while catering to different diets. Adding veggies can boost nutrition and taste. Chop bell peppers, spinach, or zucchini. These veggies add color and crunch. They fit right in with the pasta and beef. If you like heat, consider adding jalapeños or crushed red pepper. This gives your dish a spicy kick. Adjust the amount based on your taste. For a fun twist, try baked cheeseburger pasta. Just mix your ingredients in a baking dish. Top with more cheese and bake until bubbly. This adds a crispy layer on top that everyone loves. You can also make this a one-pot meal. Cook your pasta, beef, and sauce in one pot. This cuts down on clean-up time. Plus, it keeps all the flavors together. To keep your loaded cheeseburger pasta fresh, use airtight containers. Glass or plastic containers with tight lids work best. This helps prevent air and moisture from spoiling your meal. You can store it in the fridge for up to three days. Make sure the pasta is cool before sealing the container. This keeps it from getting soggy. When reheating, you want to keep that creamy goodness. The best way is to use a skillet on low heat. Add a splash of beef broth or water to help bring back the creaminess. Stir well to mix everything. If you want to refresh your leftovers, add a little extra cheese or pickles. This brings back flavor and adds a fun twist. You can also toss in some fresh herbs for a burst of color. Enjoy your delicious comfort food again! Can I use whole wheat or gluten-free pasta? Yes, you can use whole wheat or gluten-free pasta. Both options work well in this recipe. Whole wheat pasta adds fiber and nutrients. Gluten-free pasta gives those with gluten sensitivity a tasty choice. How can I make this pasta dish spicier? To spice it up, add red pepper flakes or diced jalapeños. You can also use spicy mustard instead of yellow mustard. These changes will give the dish a nice kick without losing its cheeseburger flavor. Caloric information per serving Each serving of loaded cheeseburger pasta has about 600 calories. This number can vary based on the cheese and beef you choose. Always check the product labels for precise details. Tips for making it lighter or healthier To make this dish lighter, swap ground beef for turkey or chicken. Use low-fat cheese and cream cheese. Adding more vegetables can also boost nutrition while keeping flavors strong. How to make this dish appealing to children Make it fun by adding colorful toppings, like green onions or cheese. Use shapes of pasta that kids enjoy. They love elbow macaroni or rotini for their fun twists. Ways to incorporate vegetables without them noticing Chop spinach or zucchini very finely and mix it into the pasta. The cheese sauce hides the veggies well. Kids won’t even know they are eating healthy foods! This blog post covered how to make loaded cheeseburger pasta from start to finish. We explored the best pasta types, like elbow macaroni and rotini. We looked at choosing the right beef and seasonings for great flavor. I shared tips for cooking the pasta, browning the meat, and creating a creamy sauce. You can swap ingredients for variety and store leftovers correctly. Remember, this dish can be tailored to fit any diet or preference. Enjoy making this meal your own and savor the flavors. Happy cooking!
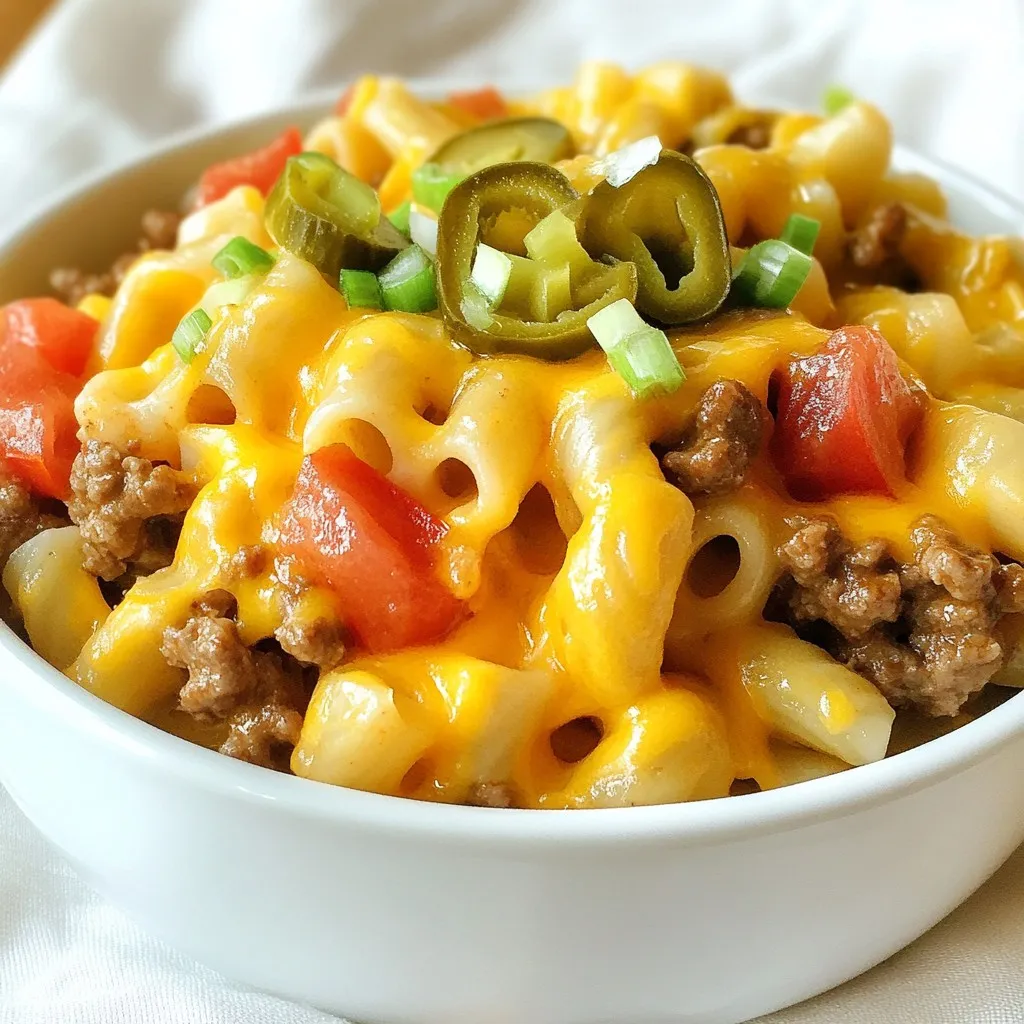
Loaded Cheeseburger Pasta Tasty Comfort Food Delight
If you’re craving a rich and hearty dish, Loaded Cheeseburger Pasta is your answer! This tasty comfort food combines all the great flavors of a
- 2 boneless, skinless chicken breasts, diced into bite-sized pieces - 2 tablespoons pure honey - 1 tablespoon chipotle pepper in adobo sauce, finely minced - 1 tablespoon extra virgin olive oil - 1 teaspoon garlic powder - 1 teaspoon ground cumin - Salt and freshly ground black pepper, to taste In this dish, chicken breasts are the star. I use bite-sized pieces for quick cooking. Honey adds a sweet touch, while chipotle gives a spicy kick. Olive oil brings all the flavors together. Garlic powder and cumin add depth to the taste. Don’t forget the salt and pepper to enhance all the flavors. - 1 cup quinoa or brown rice, uncooked - 2 cups low-sodium vegetable or chicken broth - 1 cup corn (canned, drained, or frozen) - 1 medium red bell pepper, diced into small pieces - 1 ripe avocado, sliced into wedges - Fresh cilantro, chopped, for garnish For the base, I love using quinoa or brown rice. They make the dish hearty. Cooking them in broth gives more flavor. Corn adds sweetness, while red bell pepper brings crunch. The avocado adds creaminess and freshness. Cilantro is a must for a bright finish. - Lime wedges - Optional toppings and spices Lime wedges are key for that zesty burst. They brighten up the whole dish. You can add extra toppings like chili flakes for heat or even cheese for creaminess. These small touches make each bowl personal and fun. {{ingredient_image_2}} - First, mix honey, chipotle pepper, olive oil, garlic powder, cumin, salt, and pepper in a bowl. - Then, add the diced chicken and toss it well to coat. - Cover the bowl and place it in the fridge. Let it marinate for 30 minutes up to 2 hours. - Rinse your quinoa or rice under cold water to remove bitterness. - In a saucepan, combine rinsed grains with vegetable or chicken broth. - Bring it to a boil, then lower the heat. Cover and let it simmer for 15-20 minutes. - Once ready, fluff the grains with a fork and set them aside. - Heat a large skillet over medium-high heat. - Add the marinated chicken to the skillet, leaving the excess marinade behind. - Cook the chicken for 6-8 minutes, stirring often until cooked through and slightly charred. - In the last few minutes, stir in diced bell pepper and corn. Cook for 2-3 minutes until warm. - Start with a scoop of quinoa or rice in each bowl. - Add a generous portion of the chicken and vegetable mix on top. - Top with sliced avocado and a sprinkle of fresh cilantro for flavor. - Finish by squeezing lime juice over everything for a fresh zesty taste. - Optimal marinating time: Marinate the chicken for at least 30 minutes. This helps the flavors soak in. For a deeper taste, go for 2 hours. - Ensuring chicken is cooked through: Cook the chicken until it is no longer pink inside. This usually takes 6-8 minutes over medium-high heat. Use a meat thermometer. Aim for 165°F (74°C) to be safe. - Bowl styling ideas: Start with a layer of quinoa or rice. Then, add the chicken and veggies on top. Finish with avocado slices for a nice look. - Adding colors and textures: Use bright bowls to make the dish pop. Garnish with lime wedges and fresh cilantro. Consider adding chili flakes for an extra touch of color. - Suggested spices or herbs: Try adding paprika or oregano to the marinade for extra flavor. These spices blend well with chipotle. - Adjusting spice level: If you like more heat, add extra chipotle or some cayenne pepper. For less spice, reduce the chipotle amount in the marinade. Pro Tips Marinate for Maximum Flavor: For the best flavor, allow the chicken to marinate for at least 1 hour. If time permits, marinate overnight in the refrigerator for an even deeper flavor profile. Perfectly Cooked Grains: Always rinse quinoa or brown rice before cooking to remove any bitterness, ensuring a clean and pleasant flavor in your dish. Customize Your Heat Level: Adjust the amount of chipotle pepper in the marinade to cater to your spice preference. Start with less if you're sensitive to heat and add more to taste. Fresh Ingredients Matter: Use fresh, ripe avocados and vibrant vegetables for the best taste and nutritional value. Fresh cilantro adds a burst of flavor and freshness, making the dish more enjoyable. {{image_4}} You can easily swap chicken for tofu or shrimp. Tofu works well in this dish. It absorbs flavors and has a nice texture when cooked. Use firm tofu and press it to remove water. Shrimp cooks fast and adds a nice touch. Sauté shrimp until pink and firm, about 3-4 minutes. You can also use other meats. Turkey works great if you want a leaner option. Pork or beef can add different flavors, too. Just make sure to adjust cooking times based on the meat you choose. If you want to switch grains, consider using farro or barley. Both grains add a nutty flavor and chewy texture. You can also try brown rice or quinoa for a gluten-free option. For low-carb choices, you can use cauliflower rice. It’s light and takes on the flavors well. Spiralized zucchini is another fun option. It adds a fresh taste and color to your bowl. To make this dish plant-based, use tofu or tempeh instead of chicken. Both options are high in protein and soak up flavors. For flavor substitutes, use maple syrup in place of honey for a vegan twist. Use smoked paprika instead of chipotle for a different spice. This keeps the dish flavorful while meeting your dietary needs. To keep your honey chipotle chicken bowls fresh, use airtight containers. Glass or plastic containers work well. Make sure to let the food cool before sealing. This helps prevent moisture build-up. Store the bowls in the fridge for up to three days. If you want to keep them longer, freezing is a great option. Reheat leftovers in the microwave for quick meals. Place the food in a microwave-safe dish and cover it loosely with a lid or paper towel. Heat in short bursts, stirring in between, until warm. You can also reheat in a pan over low heat. This keeps the chicken juicy and tasty. Add a splash of broth if it seems dry. Yes, you can freeze honey chipotle chicken bowls! To do this, let the food cool completely. Then, place it in freezer-safe containers or bags. Remove as much air as possible to avoid freezer burn. You can freeze it for up to three months. When you are ready to eat, thaw it in the fridge overnight. Heat thoroughly before serving. You can use several substitutes for chipotle peppers. Here are some options: - Smoked paprika: This gives a smoky flavor without much heat. - Cayenne pepper: Use sparingly for heat. - Sriracha sauce: A spicy sauce that adds heat and flavor. - Red pepper flakes: These can add heat to your dish. Each of these options alters the flavor slightly, but they work well in a pinch. Yes, you can easily make these bowls ahead of time. Here are some tips: - Marinate the chicken: You can marinate the chicken for up to 24 hours. - Cook grains in advance: Prepare quinoa or rice a few days early. - Store components separately: Keep chicken, grains, and vegetables in separate containers. This helps keep the dish fresh and tasty when you reheat it. To add more heat to your honey chipotle chicken bowls, try these tips: - Increase chipotle peppers: Use more minced chipotle in your marinade. - Add fresh jalapeños: Chop and toss them in with the chicken and veggies. - Use spicy sauce: Drizzle hot sauce over your finished bowl for an extra kick. Adjust the spice level to suit your taste. These bowls taste great with a variety of sides. Here are some suggestions: - Black beans: A protein-packed option that complements the flavors. - Grilled veggies: Zucchini or asparagus add color and crunch. - Green salad: A fresh salad with lime dressing balances the meal. - Tortilla chips: Crunchy chips can add texture and fun to your meal. These sides enhance your overall dining experience. In this post, we explored the tasty honey chipotle chicken bowls. We covered ingredients like chicken, grains, and fresh veggies. You learned how to marinate chicken, cook grains, and sauté everything together. I shared tips for great presentation and fun variations, including vegetarian options. These bowls are easy to make and perfect for any meal. Try your own twist to make them even better! Enjoy the flavors and simplicity of creating delicious meals at home.
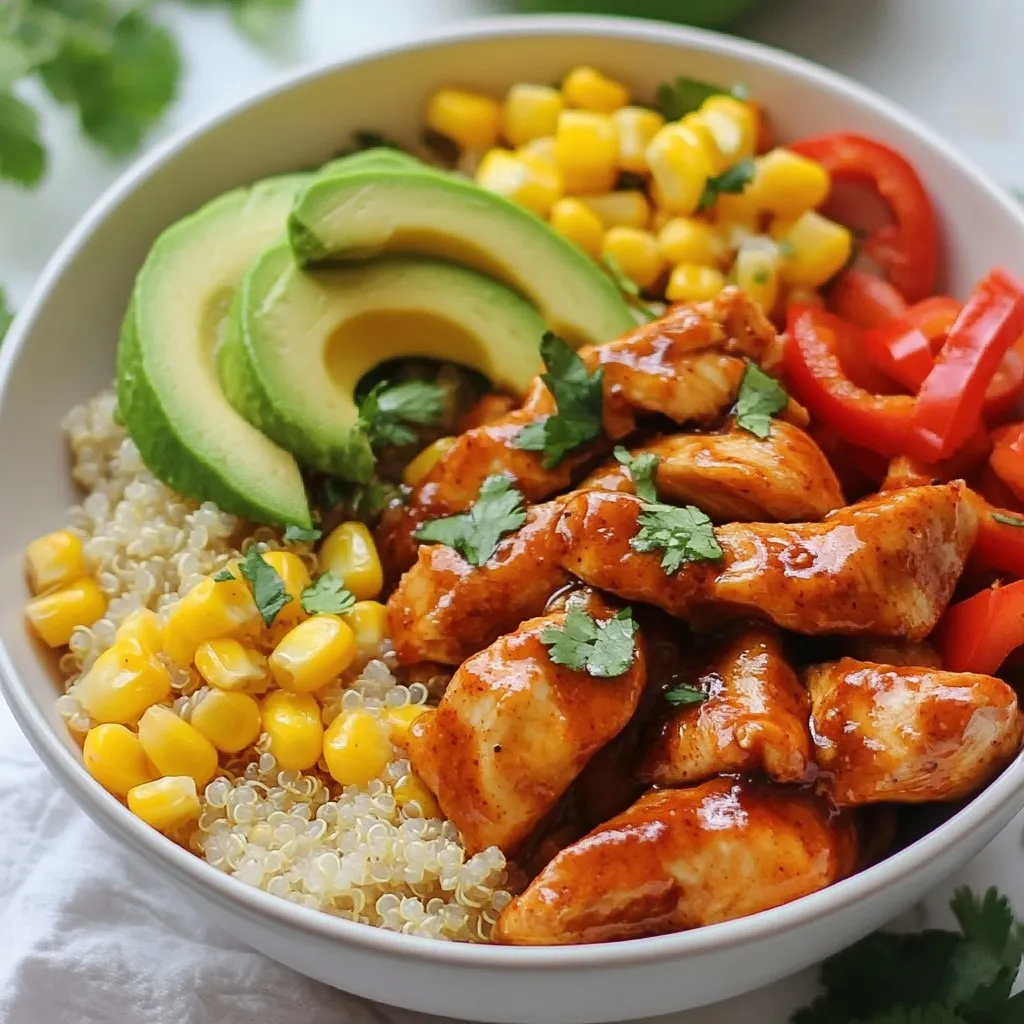
Honey Chipotle Chicken Bowls Flavorful and Simple Dish
Ready to spice up your dinner routine with a tasty Honey Chipotle Chicken Bowl? This dish combines sweet honey with smoky chipotle for a flavor