Dinner

To make Minute Chicken Ramen Stir Fry, you need some simple ingredients. These items work together to create a tasty meal. Here is what you will need: - Instant ramen noodles - 200g chicken breast, thinly sliced - 1 tablespoon soy sauce - 1 tablespoon oyster sauce - 1 teaspoon sesame oil - 1 carrot, julienned - 1 bell pepper, sliced (any color you prefer) - 1 cup broccoli florets - 2 green onions, finely chopped - 2 tablespoons vegetable oil (divided) - 2 cloves garlic, minced - Sesame seeds for garnish Each ingredient adds flavor and color to the dish. The chicken gives protein, while the veggies add crunch. Soy and oyster sauce bring umami depth. Garlic boosts the taste, and sesame seeds add a nice finish. This mix makes for a well-balanced meal that is both quick and satisfying. {{ingredient_image_2}} - Boil a pot of water. - Add the instant ramen noodles. - Cook them for 3-4 minutes until tender. - Drain the noodles and set them aside. - Heat 1 tablespoon of vegetable oil in a large skillet over medium-high heat. - Add the thinly sliced chicken breast. - Stir-fry the chicken for 5-6 minutes until golden brown. - Add 2 cloves of minced garlic and stir-fry for one more minute. - Toss in the julienned carrot, sliced bell pepper, and broccoli florets. - Stir-fry the vegetables for 3-4 minutes. They should stay crisp. - Pour in 1 tablespoon of soy sauce, 1 tablespoon of oyster sauce, and 1 teaspoon of sesame oil. - Mix well for 1-2 minutes to coat everything in sauce. - Gently fold in the drained ramen noodles with the chicken and veggies. - Mix carefully to coat the noodles with sauce. - Cook for another minute to warm everything through. - Remove from heat and garnish with chopped green onions and sesame seeds before serving. To boost the taste of your Minute Chicken Ramen Stir Fry, try adding some extra seasonings. Here are a few ideas: - Chili oil: Add a splash for heat. - Ginger: Grate some fresh ginger for warmth. - Lime juice: A squeeze adds brightness. For the best vegetable texture, cut them into even sizes. This helps them cook evenly. Stir-fry quickly over high heat to keep them crisp. Serve your stir fry in shallow bowls. This makes the dish look nice and inviting. You can also layer the ingredients for a colorful display. For garnishing, sprinkle sesame seeds and chopped green onions on top. This adds flavor and a nice crunch. A good skillet or wok is key for this dish. Use a non-stick skillet for easy cooking. A wok works well too, as it heats quickly. Gather these kitchen tools for efficient prep: - Cutting board: For chopping veggies and chicken. - Sharp knife: For clean cuts. - Tongs or spatula: For easy stirring and serving. Pro Tips Use Fresh Ingredients: Using fresh vegetables and high-quality chicken elevates the flavor and nutritional value of your stir-fry. Customize Your Veggies: Feel free to swap in your favorite vegetables like snap peas or mushrooms to add variety to the dish. Control the Heat: If you prefer a spicier dish, add some sliced chili peppers or a splash of sriracha when stir-frying. Leftover Friendly: This stir-fry is perfect for using up leftover proteins or vegetables—get creative with what you have! {{image_4}} You can switch up the protein in this dish. Shrimp works well if you want seafood. Just cook it for 3-4 minutes until pink. Tofu is a great choice for a vegetarian option. Use firm tofu and sauté it until golden. You can also try pork or beef. Just slice the meat thinly for even cooking. Feel free to mix in seasonal veggies. Zucchini, snap peas, or bell peppers are great in spring. In the fall, try adding squash or kale. Frozen vegetables can save time and are often just as good as fresh. Just remember to thaw and drain them first. Experiment with different sauces for a new flavor. You can use teriyaki or hoisin sauce for something sweet. Want some heat? Add chili paste or sriracha to make it spicy. To give it a tangy flavor, a splash of vinegar works well. Just be careful not to overdo it! To store leftovers, let the Minute Chicken Ramen Stir Fry cool to room temperature. Place it in an airtight container. This helps keep it fresh. Store it in the fridge for up to three days. For the best results, use glass containers. They don't stain or hold odors. Make sure to choose containers that seal tightly. This will keep the flavors inside and moisture out. When reheating the stir fry, use a skillet over medium heat. Add a splash of water or broth to keep it moist. Stir often to ensure even heating. This prevents the noodles from sticking together. To maintain texture and flavor, avoid using a microwave if possible. Microwaves can make the noodles mushy. If you must use one, heat in short bursts. Stir between each burst to ensure even warming. Enjoy your meal as if it were freshly made! Yes, you can easily make this dish vegetarian. Here are some options for protein substitutes: - Tofu: Use firm or extra-firm tofu. Press it to remove excess water, then cut it into cubes. Stir-fry until golden. - Tempeh: This is a great option for a nutty flavor. Slice it thinly and stir-fry it for a few minutes. - Seitan: This protein option has a meat-like texture. Cut it into strips and cook until warm. These substitutes will keep your stir fry hearty and flavorful. The total time for this meal is about 20 minutes. Here’s the breakdown: - Prep time: 10 minutes to slice the chicken and veggies. - Cook time: 10 minutes to stir-fry everything until done. This quick meal is perfect for busy days. Yes, you can freeze this stir fry. Here are some guidelines for freezing and thawing: - Cool the stir fry completely before freezing. - Store it in an airtight container or freezer bag. - It will last up to three months in the freezer. To thaw, place it in the fridge overnight. Reheat in a skillet or microwave until warm. This blog post walks you through a simple and tasty stir-fried ramen dish. We covered key ingredients like noodles, chicken, and fresh vegetables. You learned easy steps to cook and combine all the flavors. Plus, we shared tips to enhance taste and make your dish look great. Remember, you can swap proteins or veggies based on your preference. Enjoy experimenting with this recipe, and don't hesitate to get creative! With the right techniques, you will make a dish that you and others will love.
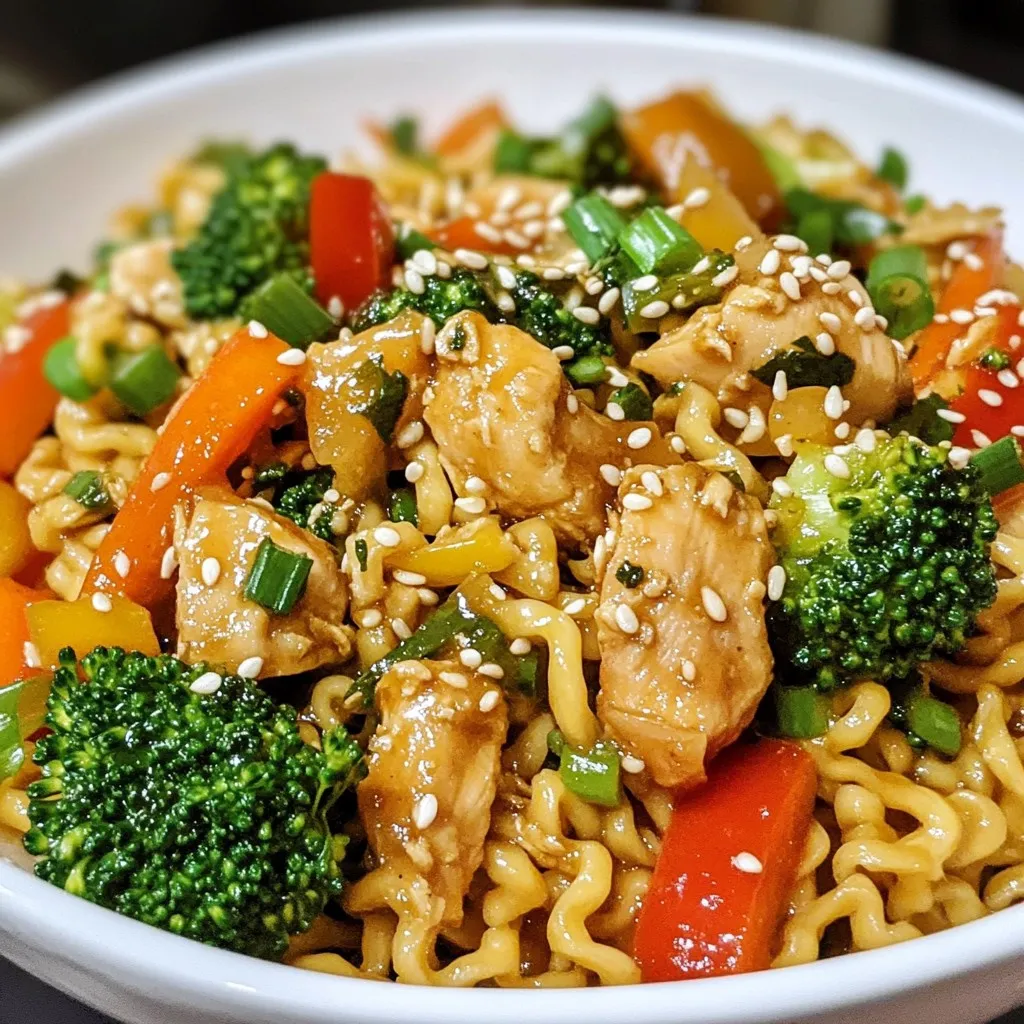
Minute Chicken Ramen Stir Fry Quick and Savory Meal
Craving a quick, tasty meal? Look no further! My Minute Chicken Ramen Stir Fry packs flavor, speed, and satisfaction all in one bowl. You’ll whip
- 2 cups cooked chicken, shredded - 1 cup shredded cheddar cheese - 1 cup shredded mozzarella cheese - 1 cup black beans, rinsed and drained - 1 red bell pepper, diced - 1 small onion, finely chopped - 2 cloves garlic, minced - 1 teaspoon ground cumin - 1 teaspoon smoked paprika - Salt and pepper to taste - 8 large flour tortillas - 2 tablespoons olive oil To make loaded chicken quesadillas, start with cooked chicken. I prefer shredded chicken for the best texture. Use a mix of cheeses like cheddar and mozzarella to achieve that gooey melt. Black beans add protein and a rich taste. Fresh veggies like diced red bell pepper and onion keep it colorful and crunchy. Garlic gives a strong flavor, while cumin and smoked paprika add warmth. Don't forget your salt and pepper for seasoning! - Sour cream - Salsa - Fresh herbs When serving, you can elevate your quesadillas with tasty toppings. Sour cream adds creaminess and coolness. Salsa brings a zesty kick that pairs well. Fresh herbs, like cilantro, add a burst of color and flavor. These toppings make each bite more exciting. - Large skillet - Spatula - Cutting board Your kitchen tools can make cooking easier. A large skillet is key for sautéing and cooking quesadillas. A spatula helps flip them without breaking. Lastly, a cutting board is perfect for prepping your veggies and slicing quesadillas. Having the right tools can simplify the cooking process. {{ingredient_image_2}} To start, heat 1 tablespoon of olive oil in a large skillet over medium heat. Once it’s hot, add the finely chopped onion and diced red bell pepper. Sauté them for about 5 minutes. You want the onion to turn translucent and the pepper to soften. Next, add 2 cloves of minced garlic into the skillet. Cook this for 1 more minute. Stir it constantly until you smell that nice, fragrant aroma. Now, mix in the shredded chicken and rinsed black beans. Add 1 teaspoon of ground cumin and 1 teaspoon of smoked paprika for flavor. Don’t forget to season with salt and pepper. Stir everything well. Cook until it’s all heated through, which should take about 3-4 minutes. Once done, remove the skillet from the heat and set aside your tasty filling. Grab a clean skillet and heat it over medium-low heat. Take one large flour tortilla and place it in the skillet. On one half of the tortilla, sprinkle about ¼ cup of shredded cheddar cheese and ¼ cup of mozzarella cheese. Next, spoon a quarter of your chicken mixture over the cheese. Carefully fold the tortilla in half to enclose that delicious filling. Cook it for 2-3 minutes on one side. You want the cheese to melt and the tortilla to turn a beautiful golden brown. Then, gently flip the quesadilla. Cook the other side for another 2-3 minutes until it’s crisp and golden. When done, transfer the quesadilla to a cutting board and slice it into wedges. Repeat this with the remaining tortillas and filling until all are prepared. To serve, cut your quesadilla into wedges and place them on a large serving platter. For a nice touch, drizzle a zigzag of sour cream over the top. Garnish with a sprig of fresh cilantro for a pop of color. You can also add bowls of colorful salsa on the side. This not only looks great but also adds to the fun of dipping! Enjoy your loaded quesadillas while they’re hot! To get the best cheese melt, use a mix of cheddar and mozzarella. Cheddar adds sharp flavor, while mozzarella gives that gooey texture. Heat your skillet to medium-low for even melting. Avoid soggy tortillas by cooking them dry. Use just enough oil to coat the pan lightly. Too much oil leads to a soggy mess. Always cook the quesadilla until golden brown on both sides. Add a pinch of cayenne for heat or a splash of lime juice for zest. Fresh herbs like cilantro can brighten the dish too. Use rotisserie chicken for quick prep and great flavor. Shred it finely to mix well with other ingredients. Don’t overfill your quesadilla. A quarter cup of filling is perfect. Too much filling makes it hard to flip and can lead to spills. Watch your cooking times. Cooking too long can burn the tortillas. Keep a close eye on the heat. Aim for a golden color, not dark brown. Pro Tips Use Fresh Ingredients: Opt for fresh vegetables and high-quality cheeses to enhance the flavor and texture of your quesadillas. Customize Your Fillings: Feel free to add other ingredients like jalapeños, corn, or avocado to suit your taste preferences. Keep the Heat Moderate: Cooking the quesadillas over medium-low heat ensures the tortillas get crispy while the cheese melts perfectly. Serve Immediately: Quesadillas are best enjoyed hot and fresh, so serve them right off the skillet for optimal taste and texture. {{image_4}} You can easily make loaded quesadillas vegetarian. Instead of chicken, use black beans or chickpeas. These add protein and keep the dish filling. You can also mix in diced vegetables like zucchini, mushrooms, or corn. These veggies add color and crunch. Just sauté them like you would the chicken. This way, you still enjoy all the flavors. Cheese plays a big role in quesadillas. While cheddar and mozzarella are great, you can try others. Pepper jack adds a nice kick, while gouda gives a smoky taste. If you want a dairy-free option, use vegan cheese. Many brands melt well and taste great. Blend different types for a rich flavor. Want to spice things up? Add jalapeños for heat. You can slice them fresh or use pickled ones. Hot sauce is another simple way to bring in some heat. If you prefer mild flavors, skip the spicy ingredients. Sweet peppers or a touch of honey can balance the flavors. Adjusting the spice level is easy, so make it your own! To store leftover loaded chicken quesadillas, follow these tips: - Refrigerate: Place cooled quesadillas in an airtight container. They stay fresh for up to 3 days. - Freeze: Wrap each quesadilla in plastic wrap. Then, place them in a freezer bag. They last for up to 3 months. For the best flavor and texture when reheating, consider these methods: - Skillet: Heat a skillet over medium heat. Cook each quesadilla for 2-3 minutes on each side. This keeps them crispy. - Microwave: If you need a quick option, use the microwave. Heat on a plate for about 30-60 seconds, but this may make them a bit soft. Keep an eye on the freshness of your quesadillas. Use these tips: - Shelf life in the refrigerator: Consume within 3 days for the best taste. - Signs of spoilage: Look for off smells, mold, or changes in texture. If you notice any, it’s best to toss them. To make quesadillas crispy, use a hot skillet. Heat it well before adding the tortilla. Use enough oil to coat the pan. This helps the tortillas crisp up nicely. Flip them gently to avoid spills. Cook each side until golden brown. - Use medium-low heat for even cooking. - Press down slightly with a spatula for better contact. - Let them rest for a minute after cooking for added crunch. Yes, you can use other meats in quesadillas. Ground turkey or beef works well. Shredded pork adds a great flavor. You can also use fish or shrimp for a twist. Just make sure to cook any meat thoroughly before adding it to the quesadilla. - Cooked beef or turkey for a hearty taste. - Shredded pork for a smoky touch. - Fish or shrimp for a seafood option. Loaded chicken quesadillas are great for freezing. To freeze, let them cool completely first. Wrap each quesadilla tightly in plastic wrap. This prevents freezer burn. Store them in a freezer bag for easy access. - Reheat in the oven or a skillet for the best texture. - Avoid microwaving if you want to keep them crispy. - They last up to three months in the freezer. In this blog post, we explored how to make delicious chicken quesadillas. We covered ingredients, from the cooked chicken and cheese to the veggies and spices. You learned about optional toppings that can enhance flavor, like sour cream and fresh herbs. We discussed key kitchen tools and offered step-by-step instructions for preparation and cooking. Tips on perfecting your quesadillas and avoiding common mistakes were also shared. In my final thoughts, remember that crafting the perfect quesadilla is about balance. Enjoy experimenting with different flavors and techniques to find your favorite version. Happy cooking!
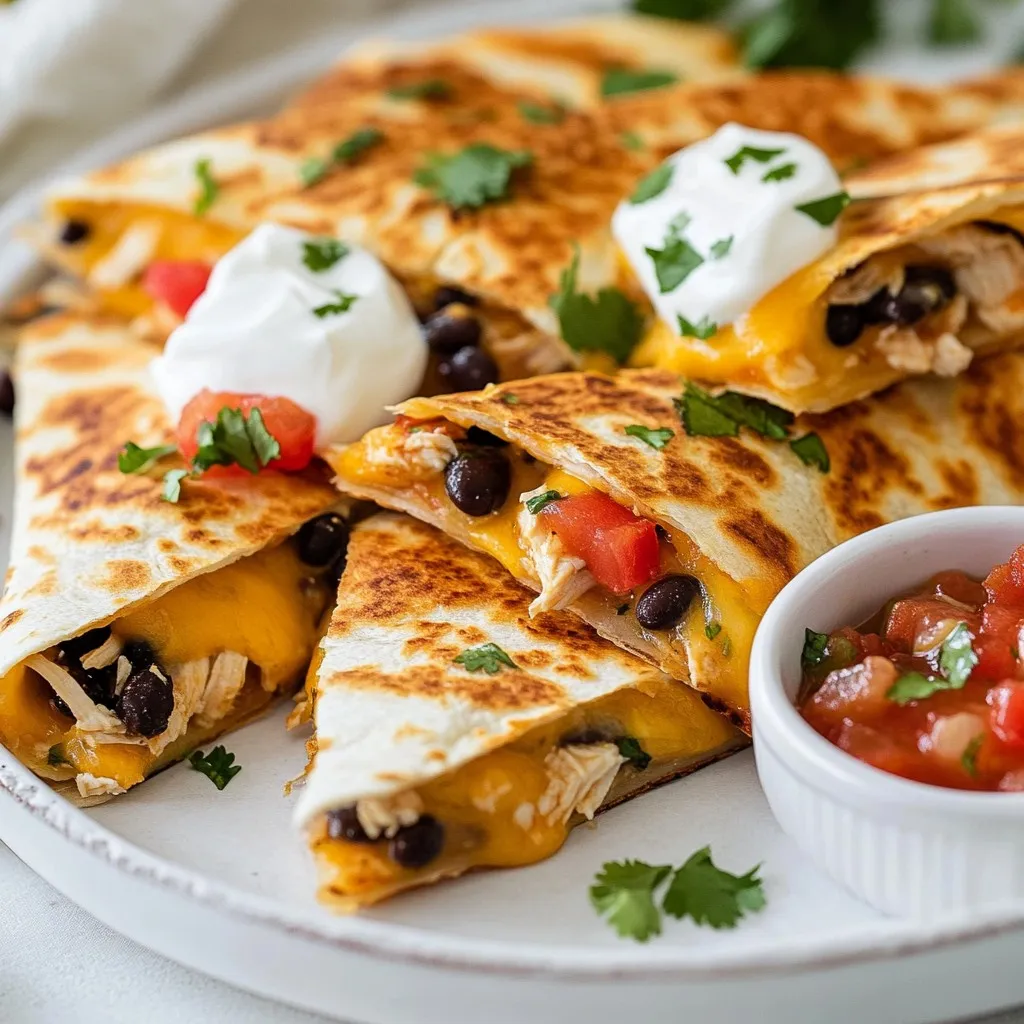
Loaded Chicken Quesadillas Irresistible Flavor Feast
Welcome to the delicious world of Loaded Chicken Quesadillas! If you’re craving a meal filled with irresistible flavor and gooey cheese, you’ve found the right
- 2 pounds boneless, skinless chicken breast - 1 packet (1 oz) ranch seasoning mix - 8 oz cream cheese, softened - 1 cup chicken broth (low-sodium preferred) - 1 cup shredded cheddar cheese - 1/2 cup chopped green onions - 1/2 teaspoon garlic powder - 1 teaspoon black pepper - Salt, to taste Each ingredient plays a key role in making Slow Cooker Crack Chicken rich and tasty. The chicken breast is the heart of the dish. It stays juicy and tender as it cooks slowly. The ranch seasoning mix adds a burst of flavor. Cream cheese makes it creamy and comforting. For the additional ingredients, low-sodium chicken broth helps keep the dish moist. Shredded cheddar cheese brings a rich, cheesy layer. Green onions add a fresh bite and color. In the seasoning section, garlic powder boosts the savory flavor. Black pepper gives it a slight kick. Salt rounds out all the tastes nicely. This blend of ingredients ensures a hearty meal that everyone will love. {{ingredient_image_2}} First, I place the chicken breasts flat in the slow cooker. I make sure they are in a single layer. This helps them cook evenly. Next, I sprinkle the ranch seasoning mix over the chicken. I ensure every piece gets coated for great flavor. Then, I spoon the softened cream cheese right on top of the chicken. This makes the dish creamy and rich. After that, I pour the chicken broth over everything. This will help create a delicious sauce as it cooks. Now, I add garlic powder and black pepper to the mix. I also adjust the salt to my taste for more flavor. I secure the lid on the slow cooker. I set it to cook on low for 6-7 hours or high for 3-4 hours. The chicken should be tender and fully cooked. Once done, I use two forks to shred the chicken in the slow cooker. I stir the chicken into the creamy sauce. This ensures it soaks up all the yummy flavors. Lastly, I mix in the shredded cheddar cheese. I let it melt and blend with the chicken and sauce. To make your slow cooker crack chicken truly shine, start with the ranch seasoning. Make sure to sprinkle it evenly over the chicken. This step is key for full flavor in every bite. If you find the dish too mild, adjust the seasoning with salt to taste. Taste as you go, and add more if needed. This way, you get the perfect flavor balance. For that creamy texture, slowly mix in the cheddar cheese. Add it gradually to ensure it blends well. Stir until you see it melt into the sauce. This creates a rich, smooth dish. Also, let the chicken soak up the sauce fully. After shredding the chicken, mix it well with the sauce. This ensures each piece is coated and flavorful. How you serve this dish can make a big difference. I love serving it over fluffy white rice. It soaks up the creamy sauce perfectly. You can also wrap it in warm tortillas for a tasty handheld meal. To finish, garnish with chopped green onions and a sprinkle of cheddar. This adds color and a fresh touch to your plate. Enjoy! Pro Tips Use Fresh Herbs: Adding fresh herbs like parsley or thyme at the end of cooking can enhance the flavor and add brightness to the dish. Chicken Broth Choice: Opt for low-sodium chicken broth to control the saltiness of your dish, allowing you to adjust the seasoning to your taste. Perfectly Shredded Chicken: For easier shredding, let the chicken rest in the slow cooker for a few minutes after cooking before using forks to shred. Meal Prep Friendly: This dish can be made ahead of time and stored in the refrigerator for up to 3 days or frozen for up to 3 months, making it perfect for meal prep. {{image_4}} You can easily change the taste of your Slow Cooker Crack Chicken. Adding paprika or chili flakes gives it a nice kick. If you prefer a milder flavor, try different cheese options. Mozzarella is a great choice. It melts well and adds a creamy texture. You can even mix cheeses for a unique taste. Want a low-carb option? Use cauliflower rice instead of regular rice. It pairs well with the creamy chicken. For those who need a dairy-free version, there are cream cheese alternatives. Brands now offer cashew or almond-based cream cheeses. They blend nicely and keep the dish creamy without dairy. You can serve Slow Cooker Crack Chicken in many fun ways. One idea is to make Crack Chicken wraps. Just spoon the chicken into a tortilla and roll it up. You can also serve it with different sides. Steamed vegetables or a fresh salad complement the dish well. These options make the meal more balanced and delicious. Store your Slow Cooker Crack Chicken in an airtight container. This will keep it fresh. I recommend eating leftovers within three to four days. If you want to enjoy it later, proper storage is key. Make sure it cools down before sealing the container. For freezing, place the chicken in a freezer-safe bag. Try to remove as much air as you can. This helps prevent freezer burn. You can freeze it for up to three months. When you're ready to eat it, thaw the chicken in the fridge overnight. Reheat it gently on the stove or in the microwave for the best taste. If you have a busy week ahead, prep this dish in advance. You can make a big batch and store it in portioned containers. This way, you have quick meals ready to go. Just heat and enjoy! Yes, you can use frozen chicken breasts in the slow cooker. Just remember to add about an hour to your cooking time. This way, the chicken will cook evenly and stay moist. When using frozen chicken, do not thaw it first. Just place it directly into the slow cooker. You can tell the chicken is cooked when it reaches an internal temperature of 165°F. Use a meat thermometer for accuracy. Look for signs like the chicken shredding easily and turning white inside. If it still looks pink, it needs more time. Yes, you can modify the recipe for greater or milder heat. If you like more spice, add paprika or chili flakes. For less heat, reduce the black pepper or skip the garlic powder. Taste as you go to find the right balance for you. This blog covered an easy slow-cooker chicken recipe. You learned about the main and additional ingredients, like ranch seasoning and cream cheese. I shared step-by-step instructions for perfect results. Tips helped enhance flavor and presentation. Variations allow you to customize the dish to your taste. Finally, I provided storage info to keep leftovers fresh. Cooking should be fun and simple, and I hope you enjoy trying this dish. Happy cooking!
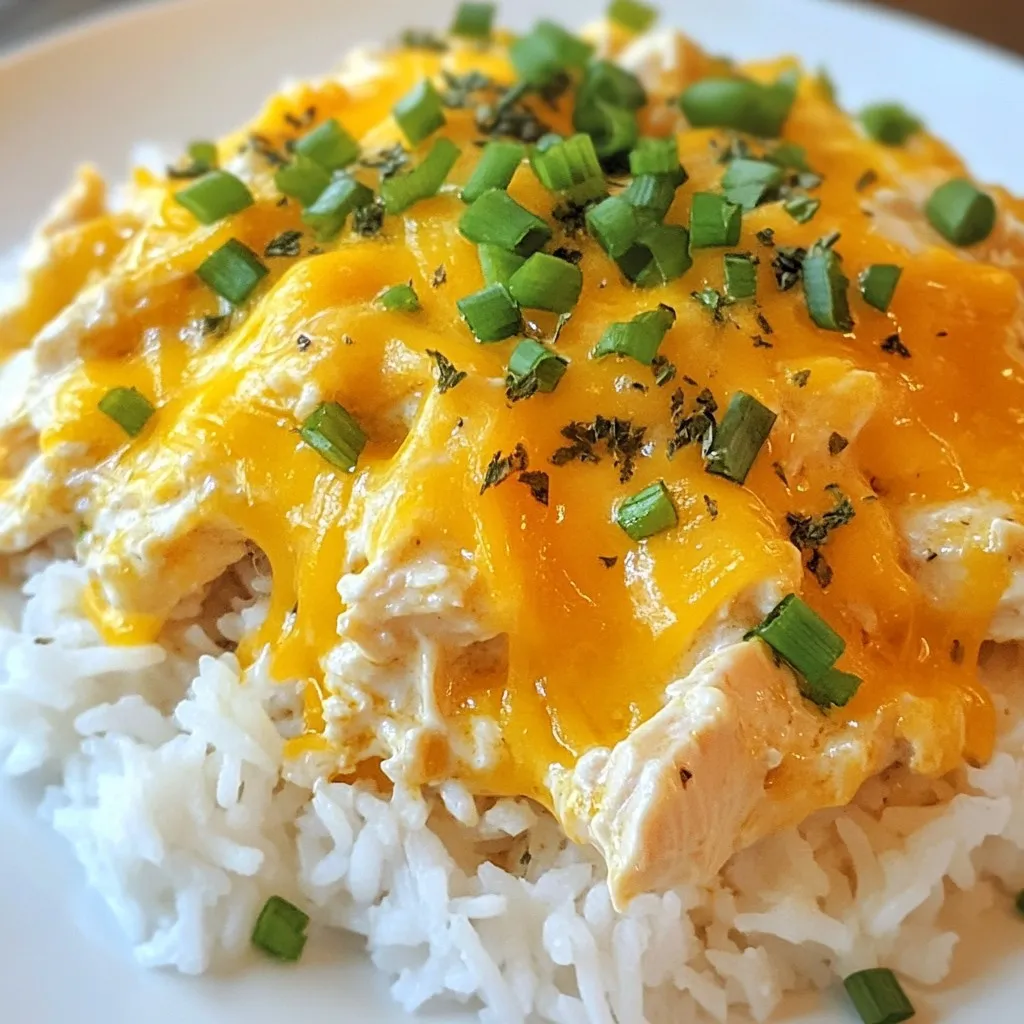
Slow Cooker Crack Chicken Comforting and Creamy Dish
Are you ready to dive into a warm bowl of comfort? This Slow Cooker Crack Chicken is a creamy, dreamy dish that you’ll crave time
To make this Garlic Butter Shrimp Scampi Bake, you will need: - 1 lb large shrimp, peeled and deveined - 6 tablespoons unsalted butter, divided - 4 cloves garlic, minced - 1 lemon, zested and juiced - 1 teaspoon red pepper flakes (or to your desired spice level) These ingredients are the heart of the dish. The shrimp gives a sweet and briny flavor, while the garlic and butter create a rich base. The lemon adds brightness, and the red pepper flakes bring a hint of heat. You can make this dish even better with some add-ins: - 1 cup fresh spinach, roughly chopped - 1 cup cherry tomatoes, halved - ½ cup grated Parmesan cheese - 2 tablespoons fresh parsley, finely chopped Adding spinach and tomatoes gives color and nutrition. The cheese adds a creamy texture, while the parsley provides freshness. Feel free to mix and match these add-ins based on your taste. To enhance the flavors, use these seasonings: - Salt and pepper to taste - Adjust the spice level to your liking Salt and pepper are essential to balance flavors. If you want more heat, add more red pepper flakes. You can also try different spices to create your own twist on this dish. {{ingredient_image_2}} First, preheat your oven to 375°F (190°C). This helps cook the dish evenly. While the oven heats up, prepare your shrimp. You want them peeled and deveined. Next, chop your spinach and halve the cherry tomatoes. Having your ingredients ready makes cooking easy and fun. Now, grab a large skillet. Melt 4 tablespoons of unsalted butter over medium heat. When the butter is melted and bubbly, add 4 cloves of minced garlic. Sauté the garlic for about 1 minute. You want it fragrant but not brown. Then, add the shrimp to the skillet. Cook them for 2-3 minutes until they turn pink. Squeeze in fresh lemon juice and add lemon zest. Toss in 1 teaspoon of red pepper flakes, salt, and pepper to taste. Mix well to coat the shrimp. Fold in the chopped spinach and halved tomatoes. Cook for another 2 minutes until the spinach wilts and tomatoes soften. Next, carefully transfer the shrimp and vegetable mixture into a baking dish. Spread it out evenly. In a separate bowl, combine 1 cup of panko breadcrumbs, ½ cup of grated Parmesan cheese, and 2 tablespoons of chopped parsley. Pour in the remaining 2 tablespoons of melted butter. Stir until the breadcrumbs are coated. Evenly sprinkle this mixture over the shrimp and veggies in the baking dish. Place the dish in your preheated oven. Bake for 15-20 minutes until the top is golden brown and the shrimp are cooked through. To get shrimp just right, look for a few key signs. First, the shrimp should turn a bright pink color. This means they are cooked through. The flesh will also become opaque. Overcooking can make shrimp tough and rubbery. To prevent this, watch the time closely. Cook them only until they change color, about 2-3 minutes in the pan. If you want to be extra sure, use a meat thermometer. The ideal internal temperature for shrimp is 120°F (49°C). A great topping can make your dish shine. For a golden brown crust, spread the panko mix evenly over the shrimp. Use fresh Parmesan cheese for a richer taste. If you want a twist, try adding crushed crackers or cornmeal for crunch. You can also mix in some herbs, like thyme or oregano, for extra flavor. For a fun change, consider using crushed tortilla chips instead of breadcrumbs. They add a unique taste and texture. To boost flavor, think about adding herbs and spices. Fresh parsley and basil brighten up the dish. You might also like to add a pinch of smoked paprika for a smoky note. A dash of lemon zest can enhance the lemony flavor too. If you enjoy heat, consider adding more red pepper flakes or even diced jalapeños. These small changes can take your Garlic Butter Shrimp Scampi Bake from good to amazing! Pro Tips Use Fresh Shrimp: For the best flavor and texture, opt for fresh shrimp rather than frozen. If using frozen, ensure they are fully thawed before cooking. Customize the Spice Level: Adjust the amount of red pepper flakes according to your preference. For a milder dish, start with a small pinch and increase as desired. Perfectly Golden Topping: To achieve a beautifully golden breadcrumb topping, consider broiling for the last 2-3 minutes of baking. Just keep a close eye to prevent burning! Pairing Suggestions: Serve the dish with crusty bread for dipping in the garlic butter sauce or alongside a light salad to balance the richness. {{image_4}} You can swap shrimp for other seafood. Scallops work great. They have a sweet taste and cook fast. Lobster is another option. Its rich flavor will elevate your dish. Just adjust cooking times based on the seafood you choose. If you want a vegetarian version, replace shrimp with mushrooms. They add a meaty texture. For a vegan option, use plant-based butter. You can also replace cheese with nutritional yeast. This gives a cheesy flavor without dairy. To kick up the heat, add different peppers. Jalapeños or serranos can bring a fiery twist. You might also try hot sauce. A few dashes can make a big difference. Just remember to adjust the spice to your taste! To keep your Garlic Butter Shrimp Scampi Bake fresh, use an air-tight container. Make sure the dish cools down properly before sealing it. This prevents moisture build-up, which can make the shrimp soggy. Store it in the fridge for up to three days. When reheating, you can choose between the microwave and the oven. The microwave is quick but can make the shrimp tough. If you want the best taste, use the oven. Preheat it to 350°F (175°C) and bake for about 10 minutes. You can freeze this dish if you have leftovers. First, let it cool completely. Then, place it in a freezer-safe container. It can last up to three months in the freezer. To defrost, move it to the fridge overnight. Reheat as mentioned above for the best results. To peel and devein shrimp, follow these steps: 1. Rinse the shrimp under cold water to clean them. 2. Hold the shrimp firmly in one hand. 3. Remove the shell by pulling it off from the head to the tail. 4. Use your fingers to pull off the shell completely. 5. To devein, make a shallow cut along the back of the shrimp. 6. Remove the dark vein with the tip of your knife or your fingers. This method keeps the shrimp clean and ready for cooking. Fresh shrimp will taste best in your Garlic Butter Shrimp Scampi Bake. Yes, you can prepare this dish ahead of time. Here’s how: - Prepare the shrimp mixture as directed and place it in a baking dish. - Cover the dish with plastic wrap or foil. - Refrigerate for up to 24 hours before baking. - When ready to cook, remove it from the fridge. - Bake as directed, adding a few extra minutes if needed. This makes dinner planning easy and stress-free! For a perfect meal pairing, consider these side dishes: - Crusty bread to soak up the garlic butter sauce. - Light green salad to balance the dish. - Roasted vegetables for extra nutrients and flavor. These sides complement the shrimp scampi bake and make your meal delicious! This recipe for Garlic Butter Shrimp Scampi Bake combines simple ingredients for great taste. You learned how to prepare the shrimp, bake it, and achieve the perfect crust. Remember, adjustments can make it fit your taste, whether adding spice or switching the protein. Enjoy leftovers with the right storage tips and reheating methods. With these steps and tricks, you can impress anyone at your table. Now, it's time to create your own delicious dish!
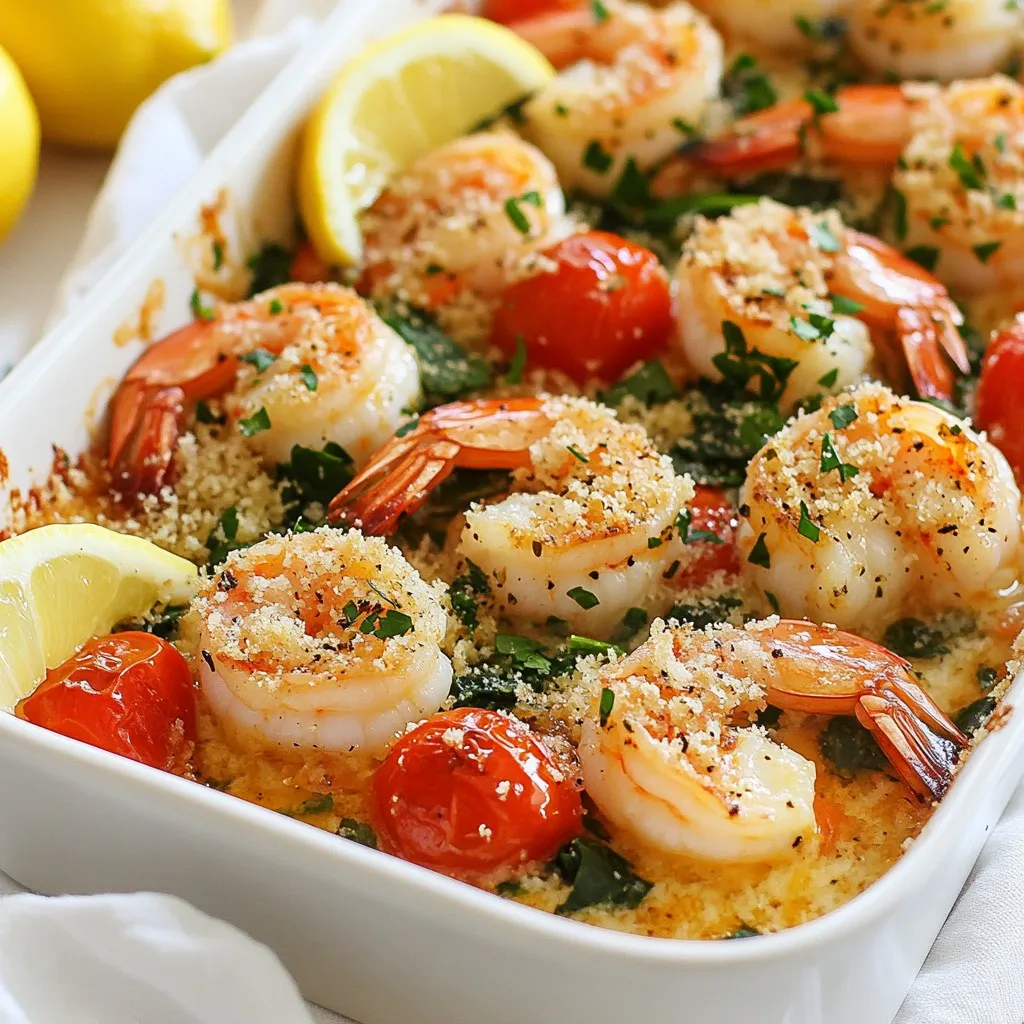
Garlic Butter Shrimp Scampi Bake Delightful Dinner
Looking for a dish that brings joy to your dinner table? Let me introduce you to Garlic Butter Shrimp Scampi Bake! This delightful meal combines
To make a tasty Minute Tortellini Carbonara, gather these essential ingredients: - 15 oz package of refrigerated tortellini (cheese or spinach-filled) - 2 large eggs (at room temperature) - 1 cup finely grated Parmesan cheese - 5 strips of turkey bacon or plant-based bacon (chopped) - 2 cloves garlic (minced) - 1 cup frozen peas (thawed) - Salt and fresh cracked pepper (to taste) - Fresh parsley (chopped, for garnish) - Zest of 1 lemon (for added flavor) These ingredients create a rich and creamy dish that everyone will love. You can elevate your carbonara with some optional items: - Red pepper flakes (for a spicy kick) - Fresh basil leaves (for a fragrant touch) - Extra lemon zest (for more brightness) These additions can bring new flavors to your plate. When picking tortellini, consider these tips: - Choose stuffed tortellini for more flavor. Cheese or spinach are great options. - Check the package for freshness. Refrigerated options often taste better. - If you prefer a lighter dish, look for whole wheat or gluten-free tortellini. Making the right choice will set the stage for a delicious meal. {{ingredient_image_2}} To start, fill a large pot with water and add salt. Bring it to a boil. Once boiling, carefully add the tortellini. Cook them based on the package directions, usually around 3-5 minutes. You want them to be al dente. Before draining, remember to save 1 cup of the pasta water. This water helps to make your sauce creamy later. After saving the water, drain the tortellini and set them aside. While your tortellini cooks, grab a large skillet. Set it over medium heat. Add the chopped turkey bacon to the skillet. Let it cook until it turns crispy and golden brown, which takes about 5-7 minutes. Stir it often to ensure it cooks evenly. Once crispy, it’s time to add flavor. In a medium bowl, whisk together the eggs and Parmesan cheese. Mix them until they are smooth. Now, take a few tablespoons of the hot pasta water and add it slowly to the egg mixture. While adding the water, keep whisking. This step is important to avoid scrambling the eggs. You want a nice, creamy sauce. After that, combine the drained tortellini with the bacon and garlic in the skillet. Remove the skillet from the heat. Quickly pour the egg and cheese mix over the tortellini. Toss everything gently to combine. The heat will cook the egg mixture, making a silky sauce. If the sauce seems thick, add more pasta water until it reaches your desired creaminess. To make the sauce creamy, you need the right method. Start with warm pasta water. This helps mix the sauce without cooking the eggs too fast. When you whisk the eggs, add the hot water slowly. This step keeps your sauce smooth. If it feels thick, add more reserved water bit by bit. Taste is key in cooking. For more flavor, use fresh herbs. Basil or thyme can bring a fresh taste. The lemon zest adds brightness, but you can add more if needed. Salt and pepper are also important. Adjust to your liking for the best dish. Want to save time? Choose pre-chopped veggies or frozen peas. They cut down prep time and still taste great. Cook the tortellini while you prepare the sauce. This way, you finish quicker. Once you get the hang of it, this dish will be on your table in no time. Pro Tips Use Fresh Ingredients: For the best flavor, opt for fresh garlic and high-quality Parmesan cheese. This will significantly enhance the overall taste of your carbonara. Control the Heat: Make sure to remove the skillet from the heat before adding the egg mixture. This prevents the eggs from scrambling and ensures a creamy sauce consistency. Perfect Pasta Water: The reserved pasta water is your secret weapon. Use it to adjust the sauce's consistency, making it as creamy or as light as you prefer. Customize Your Bacon: Feel free to use regular bacon or a different type of meat if you prefer. Just ensure it is crispy to add the right texture to the dish. {{image_4}} You can easily make a vegetarian version of this dish. Just swap the turkey bacon for mushrooms or smoked tofu. Both options give a nice, umami flavor. Use cheese tortellini for a creamy base. Add some sautéed spinach or kale for extra greens. This keeps the dish light and fresh while still being satisfying. If you need a gluten-free meal, choose gluten-free tortellini. Many brands offer great pasta made from rice or chickpeas. Look for certified gluten-free labels. Be sure to check your bacon too. Use turkey bacon or plant-based bacon that is gluten-free. This way, you can enjoy the dish without worry. Boost the flavor by adding more veggies or spices. Try adding diced bell peppers or zucchini for color and nutrition. Fresh herbs like basil or thyme can also brighten the dish. A pinch of red pepper flakes adds a nice kick. If you want more zest, add extra lemon juice or zest for a fresh taste. These small changes can elevate your Minute Tortellini Carbonara to a new level! After enjoying your Minute Tortellini Carbonara, store any leftovers in an airtight container. Let the dish cool down to room temperature before sealing it. This helps prevent condensation, which can make the pasta soggy. Keep it in the fridge for up to 3 days. To reheat, add the leftover tortellini to a skillet over low heat. You can add a splash of water or broth to keep it moist. Stir gently to warm everything without overcooking. You can also use the microwave. Place it in a microwave-safe bowl, cover it, and heat in short bursts, stirring in between. If you want to save some for later, you can freeze the tortellini carbonara. Scoop portions into freezer-safe containers, leaving some space for expansion. Seal tightly and label with the date. It can last up to 2 months in the freezer. When ready to eat, thaw it in the fridge overnight before reheating. Yes, you can use frozen tortellini. Just cook it according to the package directions. This makes it easy to enjoy a quick meal. Frozen tortellini tastes great, so don’t worry about flavor. Simply adjust the cooking time if needed. If you want a substitute for bacon, try pancetta or turkey bacon. You can also use mushrooms for a vegetarian option. They will add a nice umami flavor. Another choice is plant-based bacon for a healthier twist. To stop the sauce from scrambling, whisk the egg and cheese mixture well. Gradually add hot pasta water while whisking. This warms the eggs slowly, making it creamy. Remember to remove the skillet from heat before adding the sauce. This will help keep it silky. You can prepare the tortellini and sauce ahead of time but store them separately. Mix them just before serving to keep everything fresh. Reheat gently on the stove, adding a splash of water if needed. This keeps the dish creamy and tasty. In this blog post, I covered the key ingredients for Tortellini Carbonara and outlined how to cook it step-by-step. We explored tips to make the sauce perfect and discussed variations to fit different diets. Storing leftovers and reheating tips were also shared. Cooking this dish can be fun and rewarding. With these simple steps, you can impress anyone at your table. Now, gather your ingredients and enjoy making your own delicious Tortellini Carbonara!
Minute Tortellini Carbonara Quick and Easy Recipe
Looking for a quick and delicious meal? This Minute Tortellini Carbonara is your answer! In just a few steps, you’ll whip up a creamy, flavorful
- 1 lb boneless, skinless chicken breasts - 2 tablespoons olive oil, divided - 1 teaspoon garlic powder - 1 teaspoon onion powder - 1 teaspoon smoked paprika - 1 teaspoon dried oregano - Salt and freshly ground black pepper, to taste - 1 cup cherry tomatoes, halved - 1 cup cucumber, diced - 1 red bell pepper, thinly sliced - 1/4 cup plain Greek yogurt - 2 tablespoons mayonnaise - 1 tablespoon freshly squeezed lemon juice - 1 teaspoon dried dill - 1/4 cup fresh parsley, finely chopped Gather these fresh and vibrant ingredients before you start. The chicken breasts give the dish protein and flavor. The olive oil adds richness, while the spices bring a burst of taste. Use cherry tomatoes, cucumber, and red bell pepper for color and crunch. For the slaw, Greek yogurt and mayonnaise create a creamy base. Fresh herbs and lemon juice add brightness and zing. This blend not only tastes great but also adds a healthy touch to your meal. The combination of these ingredients makes for a delightful and satisfying dish. {{ingredient_image_2}} - Preheat oven to 425°F (220°C). - Line a baking sheet with parchment paper for easy cleanup. - In a bowl, combine 2 tablespoons of olive oil, garlic powder, onion powder, smoked paprika, dried oregano, salt, and pepper. - Whisk these ingredients until they blend well. - Brush this marinade over both sides of the chicken breasts. - Place the marinated chicken on the baking sheet. - Arrange halved cherry tomatoes, diced cucumber, and sliced red bell pepper around the chicken. - Drizzle about 1 teaspoon of olive oil over the veggies and season with salt and pepper. - Roast in the oven for 20 to 25 minutes. - Check if the chicken reaches 165°F (75°C) and that the vegetables are tender. - In a separate bowl, whisk together Greek yogurt, mayonnaise, lemon juice, dried dill, salt, and pepper. - Adjust seasoning to your taste. - Gently fold in the chopped fresh parsley for added flavor. - After roasting, let the chicken rest for 5 minutes. - Slice the chicken into strips. - For each whole wheat pita, fill it with sliced chicken, roasted vegetables, and a scoop of herb ranch slaw. To make your chicken burst with flavor, customize the marinade. You can add a splash of lemon juice or a bit of honey for sweetness. For a kick, try adding a dash of cayenne pepper. Marinating time matters. Aim for at least 30 minutes. If you have more time, marinate for up to 4 hours. This lets the chicken soak up flavors, making it more tasty. Keeping your chicken juicy is key. Do not overcook it. Use a meat thermometer to check for doneness. The chicken should reach 165°F (75°C). To get perfectly roasted vegetables, cut them into even pieces. This helps them cook evenly. Toss them in olive oil and season with salt. This enhances their natural sweetness. Presentation can elevate your meal. Serve the filled pitas on a wooden board. This adds a rustic touch. Garnish with extra parsley and lemon wedges for a fresh look. Pair your pitas with a side of sweet potato fries or a light salad. This adds balance and color to your plate. Enjoy every bite of this flavorful dish! Pro Tips Marinate Longer for Flavor: For even more flavor, consider marinating the chicken for at least 30 minutes or up to overnight in the refrigerator. This allows the spices to penetrate the meat more deeply. Customize Your Veggies: Feel free to swap out the vegetables based on what's in season or your personal preferences. Zucchini, bell peppers, or even asparagus work beautifully in this recipe. Rest the Chicken: Letting the chicken rest for a few minutes after roasting helps retain its juices, ensuring every bite is moist and tender. Serve with Extra Sauce: Always offer extra herb ranch slaw or a side of your favorite dipping sauce for those who love an extra punch of flavor! {{image_4}} You can switch the chicken for turkey or tofu. Turkey gives a leaner option, while tofu is great for a plant-based meal. Grilling adds a smoky flavor, while roasting keeps the meat juicy. Make sure to adjust cooking times. Turkey needs about 25 to 30 minutes, and tofu cooks faster, around 15 to 20 minutes. Feel free to mix in other veggies. Bell peppers, zucchini, or even asparagus work well. Seasonal veggies can elevate your dish. In summer, add fresh corn or snap peas. In fall, butternut squash or Brussels sprouts add depth and flavor. Try different dressings for your slaw. A spicy mayo can add a kick, while a tangy vinaigrette offers a fresh taste. You can also switch herbs. Use cilantro for a bold flavor, or basil for a hint of sweetness. Adjust the herbs based on what you enjoy or have on hand. To keep your Sheet Pan Chicken Pitas fresh, store them in airtight containers. Make sure to separate the chicken, veggies, and slaw. This prevents sogginess and keeps flavors intact. Proper storage helps maintain quality and taste. The recommended shelf life for these pitas in the fridge is about 3 to 4 days. After that, the flavors may fade, and the texture might change. Reheating the chicken and pitas can be simple. For the chicken, preheat your oven to 350°F (175°C). Place the chicken on a baking tray, cover it with foil, and heat for about 10 to 15 minutes. This keeps the chicken juicy. For pitas, warm them in the oven for about 5 minutes. You can also microwave them for about 20 seconds, but keep an eye on them to avoid making them tough. To maintain texture and flavor, avoid reheating the slaw. Instead, add fresh slaw after warming the chicken and pitas. This way, you enjoy the crunch and taste of the herb ranch slaw just like when you first made it. Yes, you can prepare this meal in advance. For meal prep, marinate the chicken one day before. Store it in the fridge to enhance flavor. You can also chop the veggies and make the herb ranch slaw ahead of time. Keep slaw in an airtight container. Just assemble the pitas right before serving for the best taste. You can serve many sides with these pitas. Here are a few ideas: - A fresh garden salad - Crispy sweet potato fries - Roasted vegetables - Quinoa or couscous To check if the chicken is cooked, use a meat thermometer. Insert it into the thickest part of the chicken. It should read 165°F (75°C). If you don't have a thermometer, ensure the chicken is no longer pink inside and the juices run clear. Absolutely! You can try various pita types. Options include: - White pitas - Gluten-free pitas - Mini pitas for a fun twist This recipe serves four and has many health benefits. Here’s a quick overview: - Calories: About 400 per serving - Protein: Around 30g - Carbohydrates: Roughly 40g - Healthy fats: About 10g from olive oil and yogurt Enjoy the tasty flavors and healthy ingredients in this dish! This blog post walks you through making delicious Sheet Pan Chicken Pitas. You start with simple ingredients like chicken, veggies, and a tasty herb ranch slaw. The step-by-step guide makes cooking easy and fun. I shared tips to help you perfect your marinade and ensure juicy chicken. You can even mix up the recipe with different proteins and veggies. Finally, store leftovers well for later enjoyment. With these insights, you can whip up this meal anytime and impress everyone at the table!
Sheet Pan Chicken Pitas with Herb Ranch Slaw Delight
Ready for a flavor-packed meal that’s as easy as it is tasty? My Sheet Pan Chicken Pitas with Herb Ranch Slaw brings you juicy chicken,
For this quick dish, gather these items: - 8 oz lo mein noodles - 1 cup mixed vegetables (like julienned carrots, sliced bell peppers, and snap peas) - 1 cup cooked protein (choose chicken, shrimp, or tofu) - 3 tablespoons soy sauce (adjust for taste) - 1 tablespoon sesame oil - 1 tablespoon fresh ginger, grated - 1 garlic clove, finely minced - 2 green onions, thinly sliced - Sesame seeds for garnish (optional) You can swap ingredients based on your taste. - Use rice noodles instead of lo mein for a different texture. - Any mix of fresh veggies works well; try broccoli or zucchini. - For protein, use tempeh or seitan if you want a plant-based dish. - Substitute low-sodium soy sauce for a healthier option. Fresh veggies make a big difference in taste. - Look for bright colors and firm textures. - Avoid any that are wilted or have brown spots. - Buy seasonal vegetables for the best flavor and price. - If possible, shop at local markets for fresh produce. {{ingredient_image_2}} First, fill a large pot with water. Heat it until it boils quickly. Add the lo mein noodles to the pot. Cook the noodles for about 4-5 minutes. Check the package for exact times. When they are soft, drain them in a colander. Make sure all the water is gone. Set them aside while you prepare the rest. Grab a large skillet or wok. Pour in 1 tablespoon of sesame oil. Heat it over medium heat. Add the minced garlic and grated ginger. Stir them for about 1 minute. You want to smell their lovely scent. Be careful not to let them burn! Now, it’s time to add your protein. If you have cooked chicken, shrimp, or tofu, add it to the skillet. Next, toss in the mixed vegetables. Stir everything together for about 3-4 minutes. You want the veggies to be soft but still a bit crunchy. Gently add the drained lo mein noodles to the skillet. Drizzle 3 tablespoons of soy sauce over the top. Use tongs or a spatula to mix everything well. Make sure the noodles are coated in the sauce. Heat it all together for another 2 minutes. Once everything is hot, take the skillet off the heat. Top your lo mein with sliced green onions and a sprinkle of sesame seeds. This adds a nice crunch. Serve the lo mein in bowls while it’s steaming. Enjoy the colorful and tasty dish! To cook lo mein noodles just right, start with boiling water. Use a large pot for more space. Add the noodles and stir gently. Cook for about 4-5 minutes. Check the package for exact times. The noodles should be al dente, firm but not hard. Drain them well in a colander to remove excess water. This keeps your dish from getting soggy. You can adjust the soy sauce to fit your taste. Start with 3 tablespoons. After mixing in the noodles, taste the dish. If you want more flavor, add a bit more soy sauce. Remember, too much can make it salty. A splash of sesame oil adds a nice touch, enhancing the aroma. For quick cooking, cut your vegetables small and thin. This helps them cook evenly and fast. Sauté them in hot sesame oil. Start with garlic and ginger to build flavor. Add mixed veggies next and cook for 3-4 minutes. You want them tender yet still crisp. This keeps the colors bright and the textures varied, making your dish more fun to eat. Pro Tips Perfect Noodle Texture: To achieve the best texture for your lo mein, make sure to cook the noodles until just al dente, as they will continue to cook slightly when combined with the hot ingredients. Variety of Vegetables: Feel free to customize your lo mein by adding different vegetables based on the season or your preferences, such as broccoli, bok choy, or snow peas for added color and nutrition. Enhance Flavor: For an extra depth of flavor, consider adding a splash of oyster sauce or a pinch of red pepper flakes for a bit of heat to your lo mein. Meal Prep Friendly: This recipe is perfect for meal prep. Make a larger batch and store leftovers in the fridge for up to three days for a quick and satisfying lunch or dinner option. {{image_4}} You can easily make Minute Lo Mein vegetarian or vegan. Just skip the meat and use tofu. Tofu adds protein and texture. Use soy sauce and sesame oil for flavor. You can also try adding miso paste for a deeper taste. For a vegan dish, ensure the noodles are egg-free. If you want to mix things up, try different proteins. Chicken and shrimp are popular choices. You can also use beef or pork for a heartier meal. If you prefer plant-based options, tempeh or seitan works well too. These choices add unique flavors and make the dish your own. Feel free to get creative with vegetables. Carrots, bell peppers, and snap peas are great. You can also add broccoli, mushrooms, or bok choy. Just make sure to cut them small for even cooking. Mix and match to suit your taste. The more colors, the better! After enjoying your Minute Lo Mein, store any leftovers in a container. Use an airtight container to keep flavors fresh. Allow the dish to cool down before sealing it. Keep the leftovers in the fridge for up to three days. If you want to keep it longer, freezing is a great option. When ready to enjoy your leftovers, reheat them carefully. You can use a microwave for quick reheating. Place your lo mein in a microwave-safe bowl. Add a splash of water or soy sauce to keep it moist. Heat in short bursts of 30 seconds, stirring in between. You can also reheat it on the stove. Warm it in a skillet over low heat, stirring until hot. Freezing is a smart way to prepare meals ahead of time. Portion out your lo mein in meal-sized servings. Use freezer-safe bags or containers to prevent freezer burn. Be sure to label each bag with the date. You can keep frozen lo mein for up to three months. When you’re ready to eat, thaw it overnight in the fridge. Then, reheat as discussed above for a quick meal. It takes about 20 minutes to make Minute Lo Mein. This includes cooking the noodles and sautéing the veggies and protein. The prep time is around 10 minutes, and cooking takes about 10 minutes. Yes, you can make Minute Lo Mein ahead. Store it in the fridge for up to three days. Just reheat it on the stove or in the microwave when you’re ready to eat. You can use lo mein noodles, egg noodles, or even spaghetti. Each type gives a different taste and texture. Fresh noodles cook faster than dried ones, so keep that in mind. Traditional lo mein uses wheat noodles, which contain gluten. However, you can find gluten-free noodles made from rice or other grains. Always check the package to ensure they are labeled gluten-free. I covered the key ingredients, step-by-step cooking methods, and helpful tips for making Lo Mein. I shared how to choose fresh veggies and customize the dish. You can create variations with different proteins and veggies to suit your taste. Remember to store leftovers properly and use quick reheating methods. With these easy steps, you can enjoy tasty Lo Mein at home. Now, you’re ready to impress your friends and family with your cooking skills!
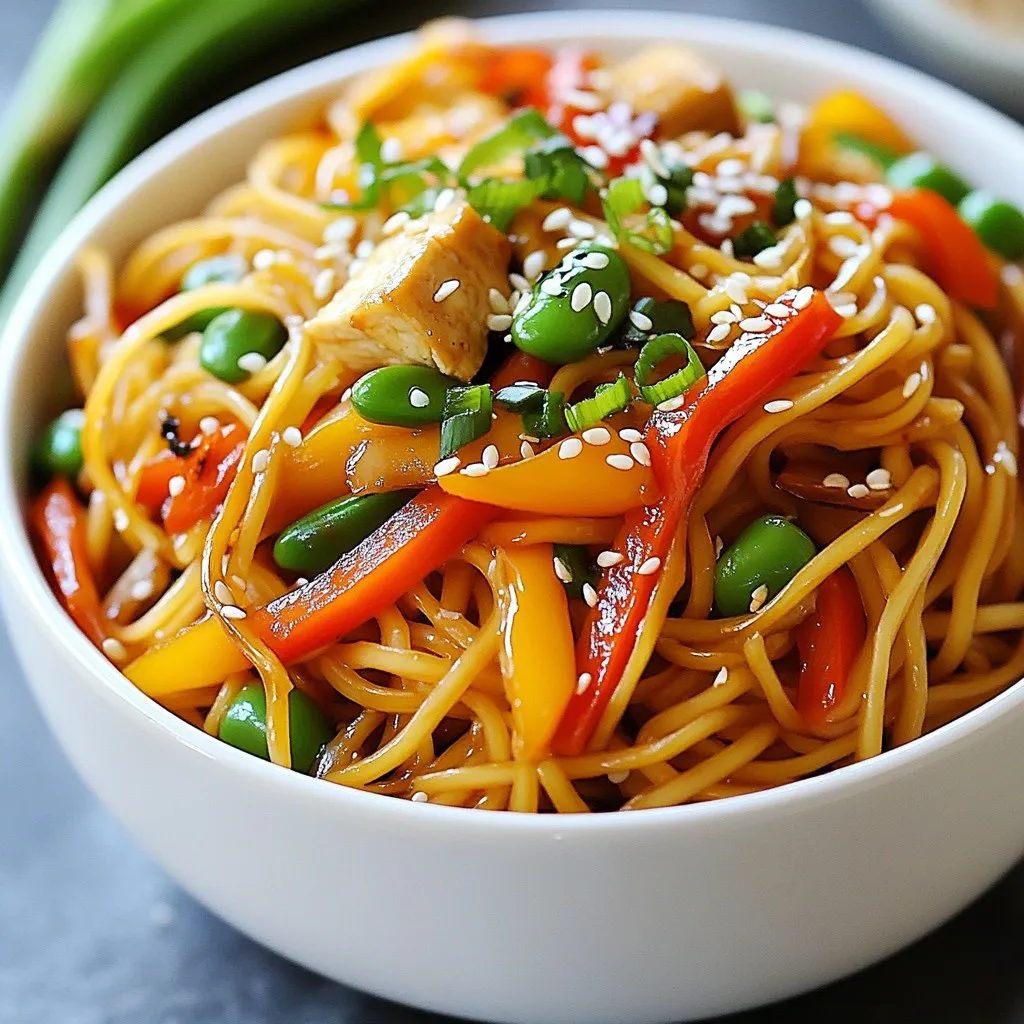
Minute Lo Mein Quick and Flavorful Dinner Recipe
Looking for a quick, tasty dinner idea? You’ve found it! This Minute Lo Mein recipe packs flavor into every bite. In just minutes, you can
- 4 salmon fillets - 2 tablespoons olive oil - 3 cloves garlic, finely minced - Fresh basil leaves, torn, for garnish - Additional seasonings (salt and pepper) - 1 cup cherry tomatoes, halved - 1 cup fresh spinach leaves - 1 cup heavy cream - 1/2 cup freshly grated Parmesan cheese - 1 teaspoon dried Italian herbs (oregano, basil, thyme) To make Creamy Tuscan Salmon, you'll need fresh and simple ingredients. The main star is the salmon, which brings a rich flavor. You will also need olive oil for searing. Garlic adds a great aroma and taste. For the sauce, cherry tomatoes bring sweetness. Fresh spinach adds color and nutrients. Heavy cream delivers that creamy texture we all love. Grated Parmesan cheese gives it a nice depth. The dried Italian herbs enhance the overall flavor, making this dish irresistible. Optional ingredients like torn basil leaves make the dish look pretty. You can also adjust the taste with salt and pepper. Gather these ingredients, and you will be ready to cook a delicious meal! {{ingredient_image_2}} To start, heat 2 tablespoons of olive oil in a large skillet on medium heat. Wait until it shimmers. Next, place 4 salmon fillets skin-side down. Season them with salt and freshly ground black pepper. Sear each fillet for about 4-5 minutes. You'll know it's ready when the fish looks opaque and has a golden brown crust. When done, carefully remove the salmon from the skillet and set it aside on a warm plate. In the same skillet, add 3 finely minced cloves of garlic. Sauté for around 30 seconds. Stir constantly to avoid burning the garlic. Once fragrant, add 1 cup of halved cherry tomatoes. Let them cook for 3-4 minutes. This will help them soften and release their juices. Next, stir in 1 cup of fresh spinach leaves. Cook until they wilt. This should take about 1-2 minutes. Now, pour in 1 cup of heavy cream. Bring the mixture to a gentle simmer. Reduce the heat, then add 1/2 cup of freshly grated Parmesan cheese and 1 teaspoon of dried Italian herbs. Stir until the cheese melts and the sauce is creamy. Carefully return the seared salmon fillets to the skillet. Spoon the creamy sauce over each fillet. Allow everything to simmer for an additional 2-3 minutes. This will help the flavors meld together. Taste the sauce and adjust with more salt and freshly ground black pepper if needed. Serve the creamy Tuscan salmon on warm plates, topped with the sauce and garnished with torn fresh basil leaves for a burst of color. To get the best sear on your salmon, start with a hot skillet. Warm the olive oil until it shimmers. Place the salmon skin-side down. This helps keep it moist. Cook for 4-5 minutes per side. Look for a nice golden crust. For doneness, check the center. It should be opaque and flake easily with a fork. Want to switch things up? You can swap salmon for trout or even chicken. If you like a lighter sauce, try half-and-half instead of heavy cream. To boost flavor, use more garlic or add lemon juice. You can also mix in fresh herbs like dill or parsley. Adjust the seasoning by adding more salt or pepper to your taste. For a beautiful plate, serve the salmon over creamy mashed potatoes or pasta. Drizzle the sauce on top and sprinkle with extra Parmesan. Add fresh basil leaves for color. You can also use a lemon wedge on the side. This adds a nice pop and makes the dish look vibrant. Pro Tips Use Fresh Ingredients: Opt for fresh spinach and ripe cherry tomatoes for the best flavor. Fresh produce enhances the dish’s overall taste and texture. Perfectly Sear the Salmon: Ensure the skillet is hot enough before adding the salmon to achieve a nice golden crust. This adds a delicious depth of flavor. Adjust Creaminess: If you prefer a lighter sauce, you can substitute half of the heavy cream with chicken or vegetable broth while maintaining the richness with the Parmesan cheese. Garnish with Flair: Adding torn fresh basil right before serving not only adds a pop of color but also elevates the dish's aroma and flavor profile. {{image_4}} You can switch up the salmon for other fish like trout. Trout has a nice flavor and cooks fast. If you want a lighter option, use chicken. Just make sure to cook it until it's safe to eat. For a plant-based dish, use tofu or tempeh. Both soak up flavors well and add great texture. Feel free to play with the herbs in this dish. Try adding fresh dill or parsley for a new twist. You can also add red pepper flakes for some heat. A squeeze of lemon juice brightens the dish and adds a fresh taste. Just mix it in before serving for a zesty kick. This creamy salmon pairs well with many sides. Try serving it over creamy mashed potatoes or with pasta. Both soak up the sauce nicely. For a fresh touch, add a salad with mixed greens and a light vinaigrette. You can also serve it with crusty bread to mop up the creamy sauce. To store leftover salmon, let it cool first. Then, place the salmon in an airtight container. It keeps well in the fridge for up to three days. For the creamy sauce, store it separately in its own container. This helps to keep it fresh and tasty. When you’re ready to eat, reheat the salmon gently. Use a skillet on low heat. Add a splash of cream to keep it moist. Heat for about 5-7 minutes. You want it warm but not overcooked. You can also microwave it on medium for 2-3 minutes. Just cover it with a damp paper towel to keep it from drying out. Yes, you can freeze creamy Tuscan salmon! Place the salmon and sauce in a freezer-safe container. Make sure to leave some space for expansion. It can stay good for up to three months. To thaw, move it to the fridge overnight. Reheat it slowly as mentioned before. This way, you enjoy great flavor even after freezing. Making Creamy Tuscan Salmon takes about 25 minutes in total. The prep time is quick, just 10 minutes. Searing the salmon takes about 10 minutes. Cooking the sauce with garlic, tomatoes, and spinach takes another 5 to 7 minutes. This dish is fast and fits well into a busy schedule. Yes, you can make this recipe ahead of time! You can cook the salmon and sauce separately. Store them in the fridge for up to two days. When you are ready to serve, reheat the salmon gently. Warm the sauce on low heat. This method keeps the flavors fresh and tasty. Creamy Tuscan Salmon goes well with many side dishes. Here are some tasty options: - Creamy mashed potatoes - Al dente pasta - Steamed vegetables like broccoli or asparagus - A fresh green salad with a light dressing - Garlic bread for a crunchy side These pairings enhance the meal and add variety to your plate. Enjoy exploring different combinations! This blog post covered how to make delicious Creamy Tuscan Salmon. We looked at key ingredients, step-by-step cooking instructions, and helpful tips. You learned how to create a flavorful sauce and achieve the perfect sear on salmon. Remember, you can customize this dish with different ingredients or sides. Whether you add herbs or swap proteins, the options are endless. Enjoy making and sharing this tasty meal with others!
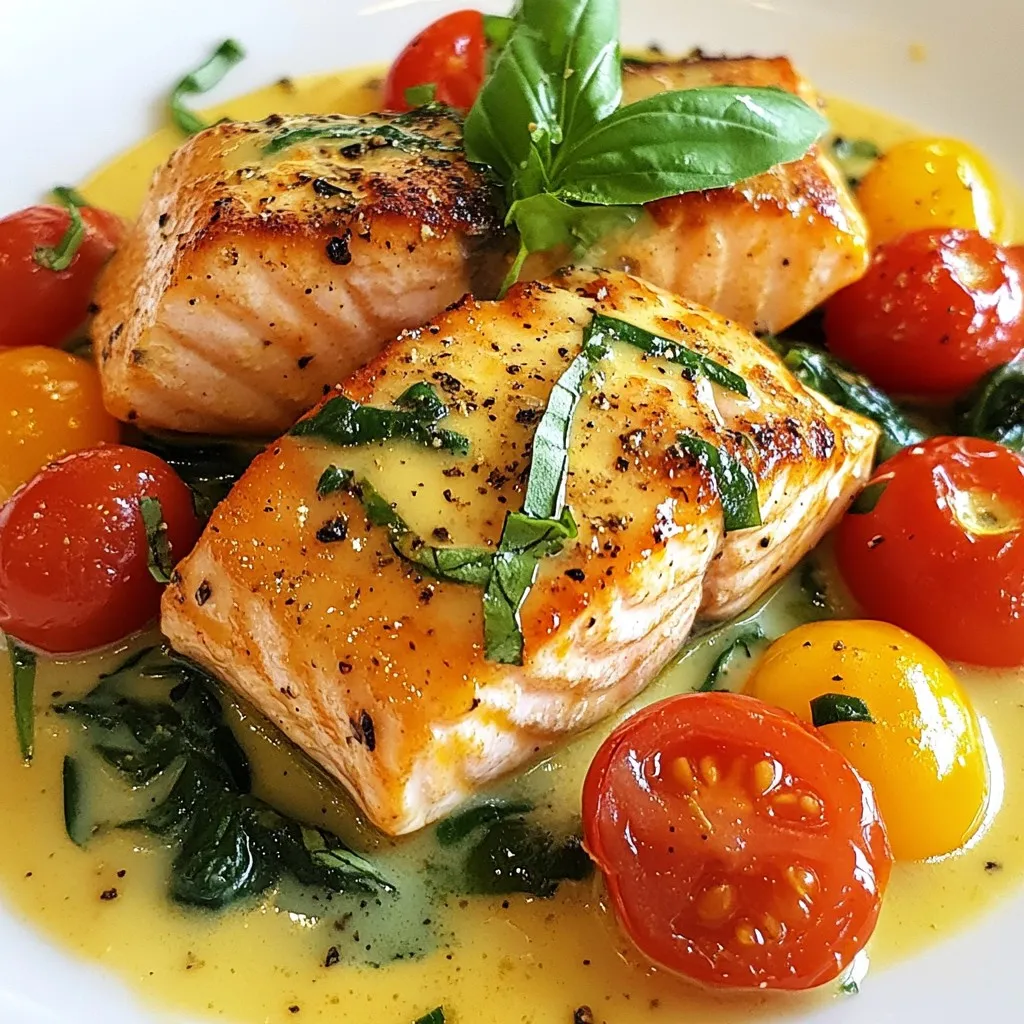
Creamy Tuscan Salmon Irresistibly Flavorful Dish
If you’re craving a dish that’s rich, creamy, and bursting with flavor, look no further! Creamy Tuscan Salmon combines tender salmon with a luscious sauce
- 1 lb skinless salmon fillet, cut into 1-inch cubes - 3 tablespoons unsalted butter - 4 cloves garlic, finely minced - Juice and zest of 1 large lemon - 1 tablespoon fresh parsley, finely chopped (plus extra for garnish) - Salt and freshly ground black pepper to taste - Lemon wedges for serving The key to making Lemon Garlic Butter Salmon Bites is using fresh ingredients. Salmon is full of healthy fats and protein, making it a great choice. I love using skinless salmon fillets. They cook nicely and are easy to cut into cubes. Butter adds rich flavor. Unsalted butter lets you control the salt. Fresh garlic gives a sweet, aromatic touch. Make sure to mince the garlic finely for even cooking. For brightness, lemon juice and zest are essential. They balance the fat and enhance the dish. Chopped parsley adds a fresh note. It also makes the dish look pretty. For seasoning, I suggest using salt and freshly ground black pepper. These simple seasonings let the salmon shine. Finally, serve with lemon wedges on the side. They add a zing and can brighten up each bite. Enjoy this dish with your favorite sides for a complete meal! {{ingredient_image_2}} First, rinse the salmon cubes under cool running water. This helps remove any residue. Next, gently pat the salmon dry using paper towels. Drying is key for a nice sear. Now, season the salmon cubes with salt and freshly ground black pepper. Make sure to coat all sides well for great flavor. In a large non-stick skillet, melt the unsalted butter over medium heat. Wait until it bubbles, then add the finely minced garlic. Sauté the garlic for about 1-2 minutes. Stir often until it becomes fragrant and lightly golden. Be careful not to burn it, as that can ruin the taste. Next, increase the heat to medium-high. Add the seasoned salmon cubes in a single layer. Make sure they have space to cook. Let them sear undisturbed for about 2-3 minutes. Look for a golden-brown crust on one side. Now, gently flip each salmon bite over using a spatula. Lower the heat back to medium. Squeeze fresh lemon juice over the salmon, then add the lemon zest and chopped parsley. Cook for another 2-3 minutes. The salmon should be opaque and flake easily with a fork. This keeps it moist and tender. Once the salmon bites are done, remove the skillet from heat. Let the bites rest for about a minute. This helps the flavors settle. For a nice finish, garnish with more chopped parsley. Serve right away with fresh lemon wedges on the side. The lemon adds a bright, zesty flavor that pairs perfectly. To make these salmon bites truly shine, start with the right seasoning. Use a good amount of salt and freshly ground black pepper. This helps enhance the salmon's natural flavor. I recommend seasoning the salmon cubes well on all sides before cooking. This small step makes a big difference. For cooking time, aim for 2-3 minutes per side. You want a golden-brown crust. After flipping, cook for another 2-3 minutes. The salmon should be opaque and flake easily. This ensures a moist and tender bite. To take the flavor up a notch, consider adding spices or herbs. A pinch of cayenne can add a nice kick. Fresh dill or thyme could also work well. Experiment with what you like! For sides, I suggest serving these salmon bites with a fresh salad or steamed veggies. Rice or quinoa also pairs nicely. These options balance the rich butter and lemon flavors. Presentation matters, especially for a dish like this. Use a clean white plate to show off the colors. Arrange the salmon bites in a neat line or cluster. For garnishing, sprinkle extra parsley on top. You can also add a lemon wedge on the side. This not only looks good but also gives a fresh burst of flavor. Pro Tips Choose Fresh Salmon: Always opt for fresh salmon for the best flavor and texture. Look for bright, shiny skin and a mild scent. Perfectly Melted Butter: Make sure the butter is completely melted before adding garlic to prevent it from burning and developing a bitter taste. Don’t Overcrowd the Pan: Cook the salmon in batches if necessary to ensure proper searing and to achieve that golden-brown crust. Rest Before Serving: Allow the salmon bites to rest for a minute after cooking. This helps to lock in the juices for a more flavorful bite. {{image_4}} You can change the taste of your lemon garlic butter salmon bites. One way is to make a spicy lemon garlic butter. Add some red pepper flakes or cayenne pepper to the butter and garlic mix. This will give your dish a nice kick. Another option is to use herbs de Provence. This mix has dried herbs like thyme, rosemary, and basil. Just sprinkle some into your butter and garlic before cooking the salmon. It gives a lovely herbal flavor that pairs well with the fish. If you want to switch things up, try using shrimp or chicken bites. For shrimp, cook until they turn pink and opaque. They will take less time than salmon, so watch them closely. You can also try a vegetarian option with tofu. Use firm tofu and cut it into cubes. Marinate it in the lemon garlic butter mix before cooking. This gives the tofu a burst of flavor while keeping it light. You can cook these salmon bites in an air fryer for a quicker option. Set the air fryer to 400°F (200°C). Cook the salmon bites for about 8-10 minutes, turning halfway through. This method makes them crispy and delicious. Grilling is another fantastic way to prepare these bites. Preheat your grill to medium heat. Thread the salmon onto skewers for easy handling. Grill for about 3-4 minutes on each side. This will add a smoky flavor that enhances the dish. To keep your Lemon Garlic Butter Salmon Bites fresh, store them in an airtight container. Make sure the container seals well to prevent air from entering. Place the salmon bites in the fridge within two hours of cooking. They will stay fresh for up to three days. If you notice any off smells or changes in color, it's best to discard them. When it’s time to enjoy leftovers, the best method to reheat salmon bites is using a skillet. Heat a small amount of butter or oil over medium heat. Add the salmon bites and cook for about two to three minutes on each side. This method helps keep the texture nice and flaky. Avoid using the microwave, as it can make the salmon rubbery. If you must use a microwave, heat on low power for short bursts. Freezing is a great way to save leftover salmon bites. Start by letting them cool completely. Then, arrange the bites in a single layer on a baking sheet and freeze them for one to two hours. Once frozen, transfer the bites to a freezer-safe bag or container. They can last up to three months in the freezer. When you're ready to eat, thaw the salmon bites in the fridge overnight. Reheat them using the skillet method for the best results. Yes, you can use frozen salmon. Just remember to thaw it first. The best way to thaw salmon is in the fridge overnight. If you're short on time, you can seal it in a bag and place it under cold water for about an hour. Make sure it’s fully thawed before cooking. This way, the salmon cooks evenly and tastes great. Lemon Garlic Butter Salmon Bites taste great with many sides. Here are a few quick ideas: - Steamed broccoli or asparagus - Garlic mashed potatoes - A fresh green salad with lemon vinaigrette - Quinoa or rice for a filling option These sides add color and flavor to your meal. To check if your salmon is done, look for a few signs: - The salmon should turn opaque and flake easily with a fork. - The center should not be translucent. - You can also use a food thermometer. It should read 145°F (63°C) for safe eating. These tips help ensure your salmon is perfect every time. This blog post covered how to make delicious Lemon Garlic Butter Salmon Bites. We discussed the key ingredients, including salmon, butter, and garlic, and shared step-by-step instructions for perfect preparation. I provided tips for enhancing flavor and offered ideas for presentation. You also learned about different variations, proper storage, and reheating methods. In conclusion, salmon bites are easy to make and full of flavor. Enjoy experimenting with different spices and sides to make this dish your own. Your kitchen will soon smell amazing, and your taste buds will thank you!
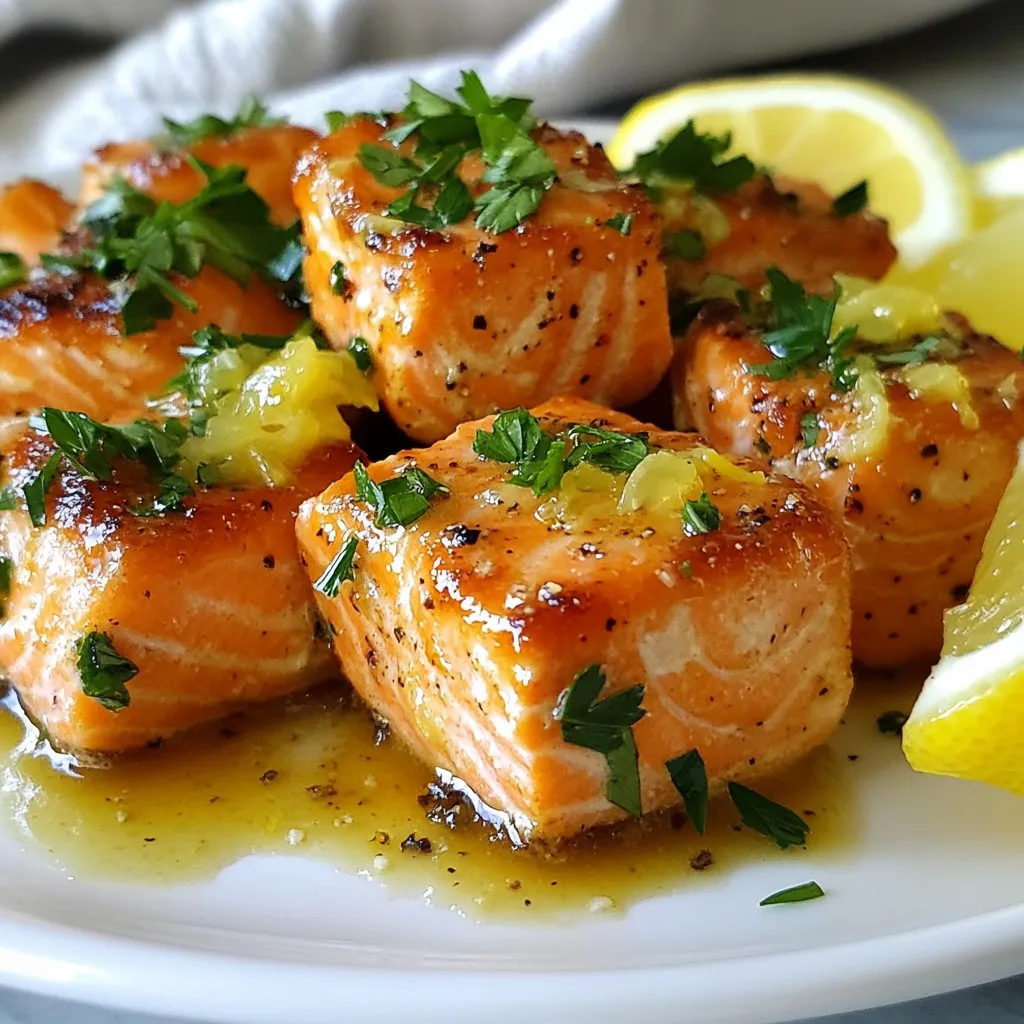
Lemon Garlic Butter Salmon Bites Tasty and Easy Recipe
Looking for a quick and tasty dinner idea? You’ll love these Lemon Garlic Butter Salmon Bites! They are simple to make and packed with flavor.
- 2 cups cooked white or brown rice - 1 lb boneless, skinless chicken thighs or breasts - 1 cup corn kernels (fresh, canned, or frozen) - 1 medium red bell pepper, diced - 1/2 cup red onion, finely chopped - 1 ripe avocado, sliced - Fresh cilantro, chopped, for garnish - 2 tablespoons olive oil - 2 tablespoons fresh lime juice - Spice mix: chili powder, smoked paprika, ground cumin, salt, and pepper In this recipe, I focus on simple, fresh ingredients. You can choose white or brown rice, which makes a great base. The chicken is the star, and you can use thighs or breasts for juicy flavor. Corn adds sweetness and a nice crunch to the dish. For the veggies, red bell pepper brightens up the bowl. It not only looks good but also packs in vitamins. The red onion gives a sharp bite, while the avocado adds creaminess. I love to sprinkle fresh cilantro on top. It brings a burst of flavor that ties everything together. The seasonings are key to making this dish pop. Olive oil and lime juice make a tangy marinade for the chicken. The spice mix of chili powder, smoked paprika, and cumin creates warmth and depth. Salt and pepper enhance all the flavors in each bite. This easy meal is packed with colors and flavors. Plus, it’s healthy and satisfying. You can enjoy it as a quick dinner or a tasty lunch. {{ingredient_image_2}} First, I whisk together the marinade ingredients. I mix olive oil, lime juice, chili powder, smoked paprika, ground cumin, salt, and pepper. This creates a tasty blend. I then add the chicken to the bowl. I make sure each piece is coated well. After that, I cover the bowl and put it in the refrigerator. I let the chicken marinate for at least 30 minutes. This helps the flavors soak in. Next, I preheat my grill pan or skillet over medium-high heat. Once it’s hot, I place the marinated chicken pieces on it. I cook each side for about 6-7 minutes. I watch for the chicken to be fully done. The inside should reach 165°F (75°C). After cooking, I remove the chicken from heat. I let it rest for a few minutes before slicing it into strips. In the same skillet, I add diced red bell pepper and corn kernels. I sauté them over medium heat for about 5 minutes. I stir occasionally to ensure even cooking. The bell pepper should turn tender and bright. I season the mix with salt and pepper to taste. Now, I grab four serving bowls. I evenly distribute the cooked rice as the base layer in each bowl. On top of the rice, I arrange the sliced chicken, sautéed corn, and bell pepper mix. I artfully place sliced avocado over the top. This makes the dish look colorful and inviting. To finish, I sprinkle crumbled feta cheese on top. I also add a generous handful of fresh chopped cilantro. This adds a burst of flavor and freshness. The bowls are now ready to impress! - Ensure chicken reaches 165°F internal temperature. This keeps it safe to eat. - Use a non-stick skillet for easy cooking. It helps prevent sticking and makes cleanup easy. - Serve with lime slices and extra cilantro. This adds color and freshness to your dish. - Use colorful bowls for visual appeal. Bright bowls make the meal look more inviting. - Experiment with additional spices or toppings. Try adding jalapeños for heat or lime zest for brightness. - Use grilled vegetables for added taste. Grilled corn or zucchini can boost the flavor profile. Pro Tips Marinate Longer for Flavor: For even more depth of flavor, consider marinating the chicken for a few hours or overnight. This allows the spices to penetrate the meat more thoroughly. Use a Meat Thermometer: To ensure the chicken is cooked perfectly, use a meat thermometer. It should reach an internal temperature of 165°F (75°C) for safe consumption. Add Heat with Jalapeños: If you enjoy a bit of spice, diced jalapeños can be sautéed with the corn and bell pepper for an extra kick. Experiment with Toppings: Feel free to customize your bowls with additional toppings like black beans, sour cream, or salsa to suit your taste. {{image_4}} You can switch the chicken for shrimp or tofu. Shrimp cooks fast and adds a sweet touch. Tofu is a great option for plant-based meals. You can also try different cuts of chicken. Thighs are juicier, while breasts are leaner. Each cut offers a unique taste and texture. For a vegetarian twist, swap chicken with black beans or chickpeas. Both options offer protein and a hearty feel. If you want a vegan meal, just leave out the feta cheese. You still get a tasty bowl full of flavor and color. Using seasonal vegetables brightens the dish. Fresh corn, squash, or peppers add a pop of color and taste. You can also change spices based on what’s in season. This keeps your bowls fresh and exciting all year round. Store any leftovers in airtight containers. This keeps them fresh and tasty. You can keep the bowls in the fridge for up to 3 days. Remember to let them cool before sealing. This helps prevent condensation inside the container. If you want to save the meal for later, freeze chicken and toppings separately if possible. This way, you retain the best texture. The flavors stay bright. It's best to eat frozen meals within 1 month. Label each container with the date for easy tracking. When it’s time to eat, reheat in a microwave or skillet until warm. Stir occasionally to heat evenly. Avoid overcooking to prevent dryness and keep the chicken juicy. Check the temperature; it should be hot all the way through before serving. Yes, brown rice can be used for added nutrition. Brown rice has more fiber and minerals than white rice. It gives a nutty flavor and chewy texture that pairs well with the other ingredients. Just remember to cook it a bit longer than white rice. Add more chili powder or jalapeños for heat. You can also try hot sauce or diced fresh chilies. Adjust the spice level to your taste. Start with a small amount and add more as needed. This way, you control the heat in your dish. Yes, marinate chicken or prepare bowls ahead for convenience. You can marinate the chicken a day before, so it absorbs more flavor. Cooked rice can also be prepped in advance. Assemble the bowls shortly before serving to keep everything fresh. This article shared a simple and tasty recipe for chicken rice bowls. You learned about the main ingredients, the steps to cook, and helpful tips. The variations let you customize your meal to your taste. You can make this dish vegetarian, use different proteins, or even adjust spices for seasonal flavors. Remember, proper storage keeps your bowls fresh for longer. With this guide, you can create a nutritious, delightful meal at home any time. Enjoy cooking and eating your tasty chicken rice bowls!
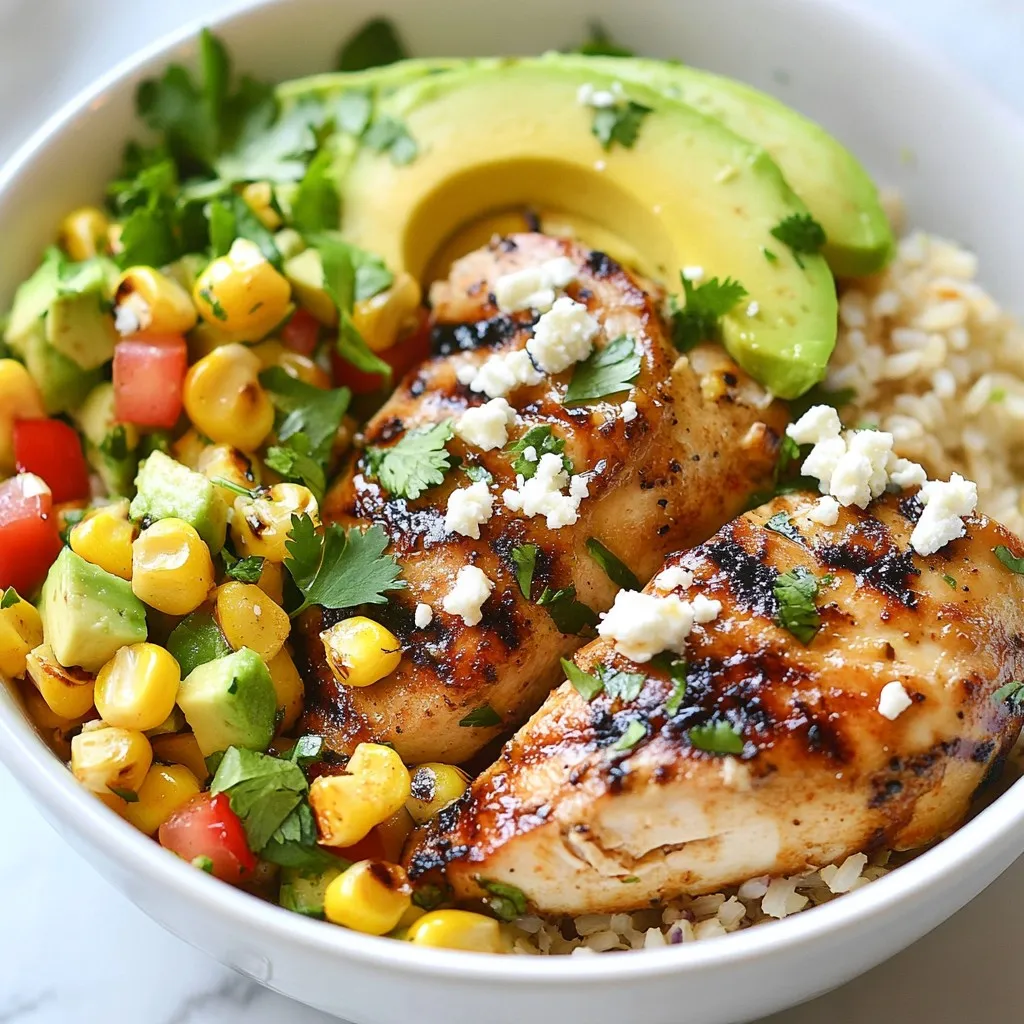
Street Corn Chicken & Rice Bowls Flavorful and Easy Meal
Are you ready to enjoy a bowl full of flavor? My Street Corn Chicken & Rice Bowls are easy to make and packed with delicious