Dinner
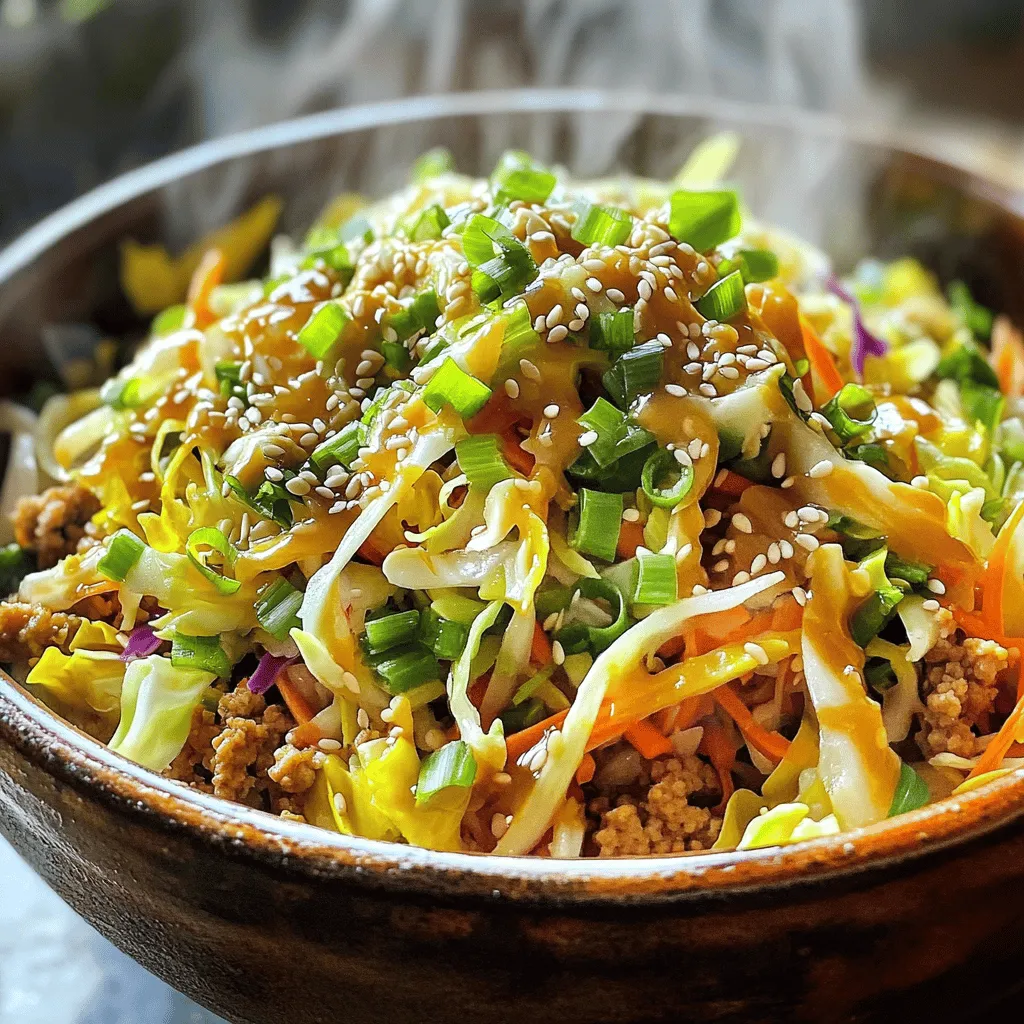
Easy Egg Roll in a Bowl Simple and Flavorful Dish
Looking for a quick and tasty meal? My Easy Egg Roll in a Bowl recipe delivers bold flavors in just minutes! This simple dish combines
![The right ingredients make Garlic Parmesan Pasta rich and creamy. Here’s what you need: - 12 oz fettuccine or spaghetti - 4 tablespoons unsalted butter - 6 cloves garlic, finely minced - 1 cup heavy cream - 1 cup freshly grated Parmesan cheese - 1 teaspoon sea salt - 1/2 teaspoon freshly ground black pepper - 1/4 teaspoon red pepper flakes (optional for a kick) - 2 tablespoons fresh parsley, finely chopped (for garnish) - Additional grated Parmesan for serving Each ingredient plays a key role. The fettuccine or spaghetti serves as the base, bringing together all the flavors. Unsalted butter adds richness, while garlic infuses that wonderful aroma. Heavy cream creates the creamy texture, and Parmesan cheese gives depth and tang. Sea salt and black pepper enhance the overall taste. Red pepper flakes offer a nice kick, but you can skip them if you prefer a milder flavor. Fresh parsley brightens the dish with color and freshness, making it more appealing. When you gather these ingredients, you're ready to make a dish that warms the heart. Check out the Full Recipe for detailed steps on how to put these ingredients together into a delicious meal. 1. Bringing water to a boil and cooking time: Start by filling a large pot with water. Add a generous amount of salt, then bring the water to a rolling boil. This should take about 5-7 minutes. Once boiling, add 12 ounces of fettuccine or spaghetti. Cook according to the package instructions, usually around 8-10 minutes. Aim for al dente, which means the pasta will be firm but cooked through. 2. Reserving pasta water: Before draining the pasta, be sure to save one cup of the starchy pasta water. This water will help make your sauce creamy and smooth. 3. Draining the pasta: After cooking, carefully drain the pasta in a colander. Set it aside while you prepare the sauce. 1. Melting butter: In a large skillet, add 4 tablespoons of unsalted butter. Heat it over medium heat until it melts completely. This should take about 1-2 minutes. 2. Cooking garlic to the perfect doneness: Next, add 6 cloves of finely minced garlic to the melted butter. Sauté the garlic for 1-2 minutes, stirring often. Keep an eye on it to avoid burning, as burnt garlic can taste bitter. Cook until the garlic is fragrant and lightly golden. 1. Lowering heat and adding cream: Now, lower the heat to a gentle simmer. Carefully pour in 1 cup of heavy cream. Stir the cream continuously as it warms up. This keeps it from burning on the bottom. 2. Incorporating Parmesan cheese: Gradually add 1 cup of freshly grated Parmesan cheese to the cream. Add it a handful at a time, stirring until it melts and blends smoothly into the sauce. This creates a rich and creamy base for your Garlic Parmesan Pasta. For the full recipe, refer to the earlier section. Enjoy your cooking! To get the right sauce thickness, use reserved pasta water. This starchy water helps the sauce cling to the pasta. Start by adding a little at a time. Mix well until you reach your desired consistency. Always taste test the sauce before serving. You want it to be just right. Adjust salt and pepper as needed. You can add more spices and herbs for extra flavor. A pinch of Italian seasoning or fresh basil can elevate the dish. Experiment with what you like. When choosing Parmesan, opt for freshly grated cheese. It melts better and has a richer taste than pre-grated options. This small change can make your dish shine. Garlic Parmesan Pasta pairs well with many sides. A fresh green salad or garlic bread works great. For a pop of color, add a sprinkle of chopped parsley on top. This makes the dish look fancy and inviting. Serve it in a beautiful bowl to impress your guests. This simple tip adds charm to your meal. For a complete experience, check the Full Recipe for more ideas. {{image_4}} To make Garlic Parmesan Pasta heartier, you can add proteins. Chicken, shrimp, or tofu work great. - Chicken: Cook diced chicken until golden. Add it after the garlic step. - Shrimp: Sauté shrimp until pink. Mix it into the pasta right before serving. - Tofu: Use firm tofu. Sauté cubes until crisp and golden. Add them at the end. Adding proteins boosts flavor and makes the dish more filling. Fresh vegetables can enhance your pasta. Think about adding seasonal options for a pop of color and taste. - Spinach: Toss in fresh spinach just before serving. It wilts beautifully. - Peas: Add sweet peas during the last few minutes of cooking. They add a nice crunch. - Broccoli: Steam broccoli florets and mix them in. They pair well with the creamy sauce. Using vegetables not only makes the dish healthier, but it also adds vibrant colors. You can easily adapt this dish for different diets. Here are some options. - Gluten-free pasta: Swap regular pasta with gluten-free options like rice or lentil pasta. - Vegan adaptations: Use plant-based butter and cream. Nutritional yeast can replace Parmesan for a cheesy flavor. These modifications let everyone enjoy Garlic Parmesan Pasta, no matter their dietary needs. For the full recipe, check out the [Full Recipe]. To keep your Garlic Parmesan Pasta fresh, store it in an airtight container. Make sure it cools down to room temperature first. Then, place it in the fridge. It will last for about 3 to 5 days. When you're ready to eat, check for any signs of spoilage before reheating. The best way to reheat Garlic Parmesan Pasta is on the stove. Use a skillet over low heat. Add a splash of water or cream to keep it creamy. Stir often to heat evenly. If you don’t have a skillet, you can use the microwave. Put it in a microwave-safe dish and cover it. Heat in short bursts, stirring in between. Yes, you can freeze Garlic Parmesan Pasta! To do this, let it cool completely. Then, divide it into portions and place it in freezer bags. Squeeze out all the air before sealing. It can last up to 3 months in the freezer. When you’re ready to eat, thaw it overnight in the fridge. Reheat it gently on the stove, adding a little cream or water for creaminess. For the full recipe, check out the Garlic Parmesan Pasta Delight. Garlic Parmesan Pasta is a creamy dish that blends garlic and cheese. This dish has roots in Italian cooking. It usually features fettuccine or spaghetti coated in a rich, buttery sauce. The flavors come from garlic, cream, and Parmesan cheese. This dish is simple yet elegant, perfect for any night. If you love garlic, you have options! Use more cloves than the recipe calls for. You can also roast garlic before adding it to the dish. Roasted garlic has a sweet flavor that adds depth. Another tip is to add garlic powder for an extra kick. Yes, you can prepare Garlic Parmesan Pasta ahead of time. Cook the pasta and sauce separately. Store them in airtight containers in the fridge. This way, you can combine them when ready to serve. Just remember to reheat gently, adding a splash of cream or pasta water to loosen the sauce. Garlic Parmesan Pasta pairs well with many sides. A fresh green salad adds a nice crunch. Garlic bread is a classic choice to soak up the sauce. You can also serve steamed veggies for a healthy touch. Grilled chicken or shrimp can make it a complete meal. Absolutely! Garlic Parmesan Pasta works great for meal prep. It keeps well in the fridge and reheats nicely. You can pack it in containers for your lunches or dinners. Just remember to store the pasta and sauce separately for the best results. Garlic Parmesan Pasta is simple yet rich in flavor. You learned the key ingredients, easy steps, and tips to perfect this dish. Variations let you customize it to your taste, adding proteins or veggies. Proper storage helps keep leftovers fresh. Make this pasta for any occasion or meal prep, and enjoy. This dish is not just easy; it’s also fun to share with family and friends. Give it a try and make your meal special!](https://meltedrecipes.com/wp-content/uploads/2025/06/efb3a24e-9381-4442-b30d-5b04f59c67ee.webp)
Garlic Parmesan Pasta Rich and Creamy Comfort Food
Craving a dish that’s both rich and creamy? Garlic Parmesan Pasta is your answer! I’ll guide you through this easy recipe that wraps you in
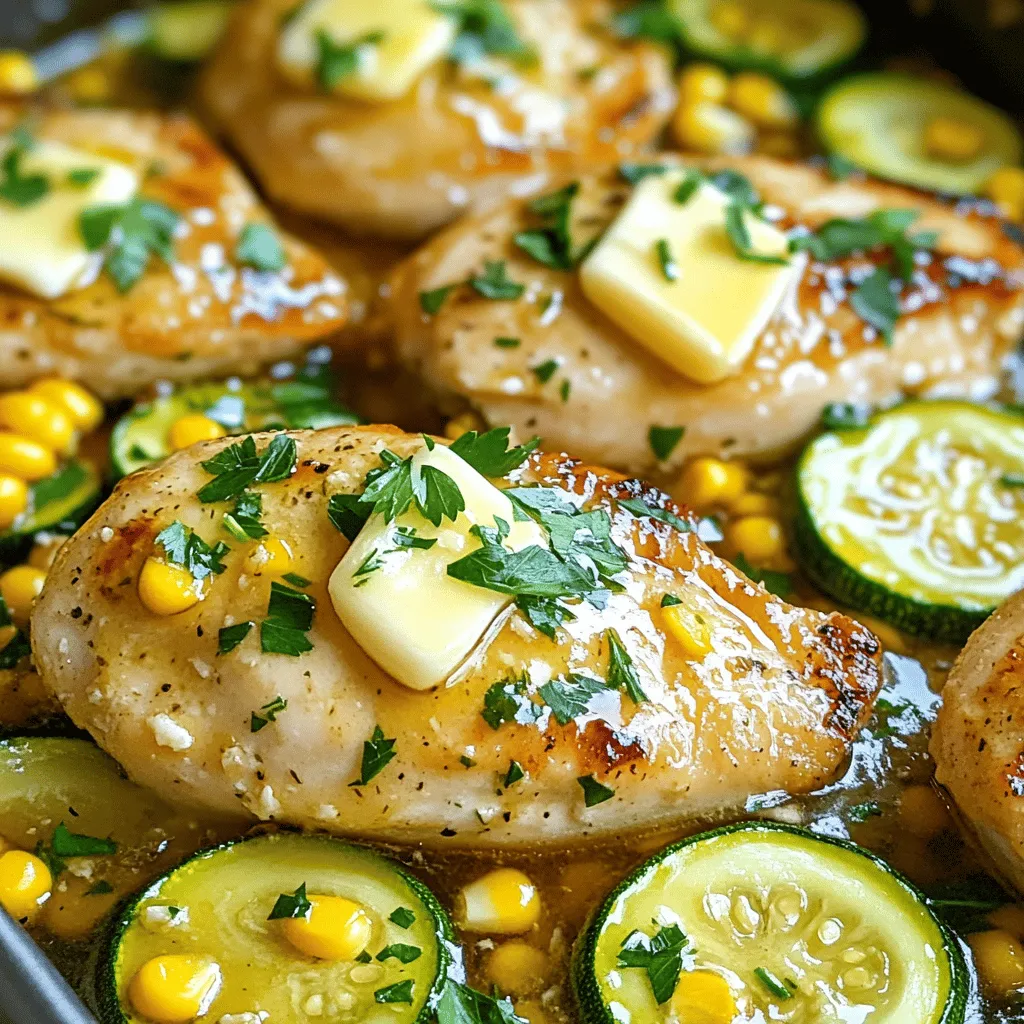
Garlic Butter Chicken with Zucchini and Corn Delight
Get ready to wow your taste buds with my Garlic Butter Chicken with Zucchini and Corn Delight! This dish combines juicy chicken, fresh zucchini, and
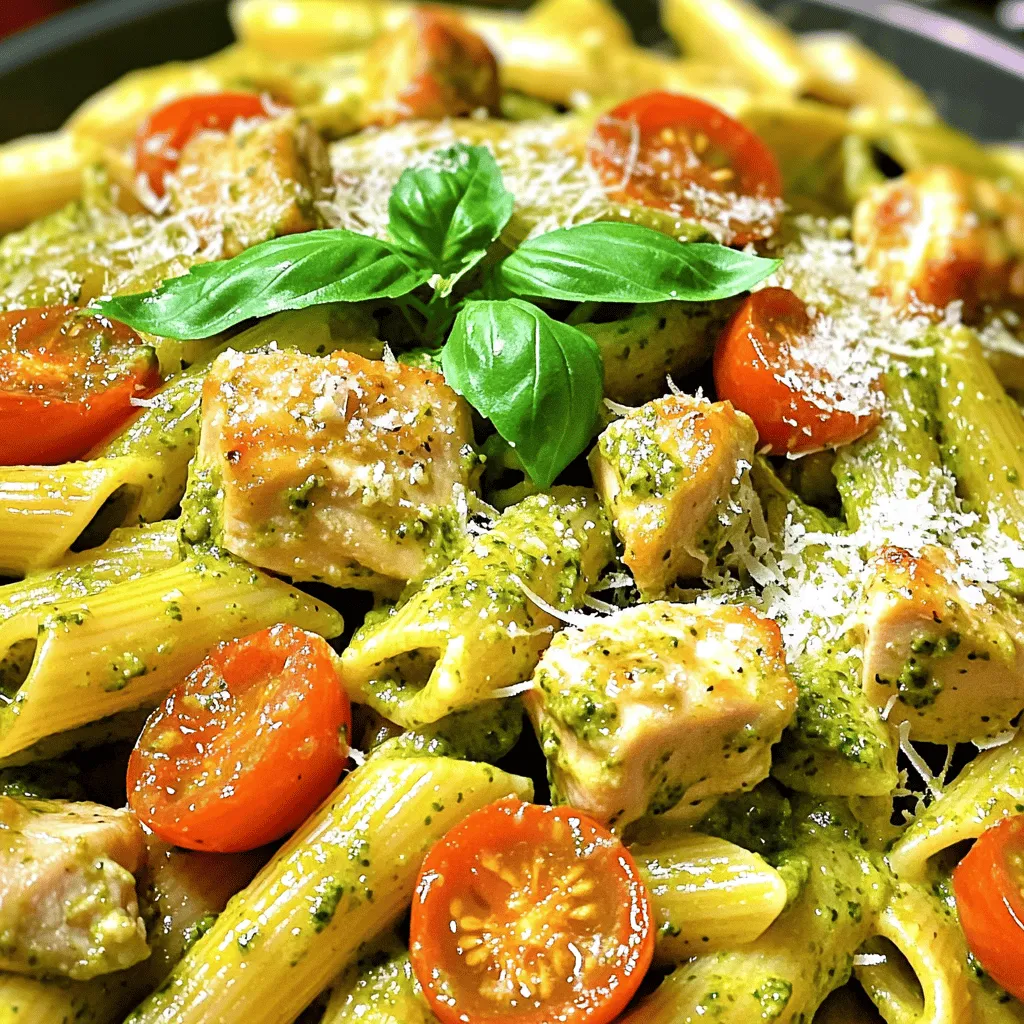
Creamy Chicken Pesto Pasta Simple and Tasty Meal
Are you ready to whip up a dish that is simple yet packed with flavor? Creamy Chicken Pesto Pasta is the perfect meal for any
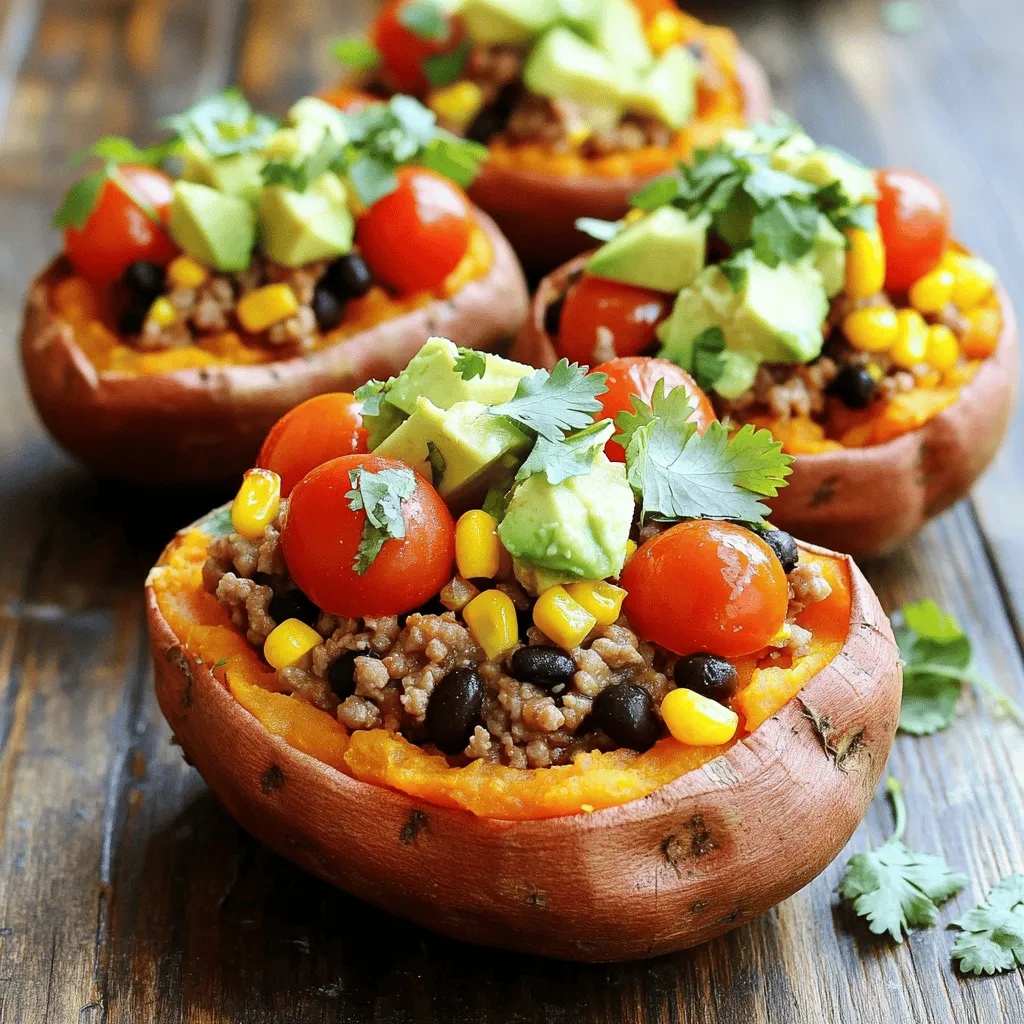
Taco Stuffed Sweet Potatoes Healthy Flavorful Meal
Looking for a healthy meal that packs big flavor? Taco Stuffed Sweet Potatoes are here to save the day! This dish combines tender sweet potatoes
![- 12 ounces rigatoni pasta - 2 tablespoons extra virgin olive oil - 3 cloves garlic, finely minced - 1 cup cherry tomatoes, halved - 4 cups fresh spinach, washed and dried - 1 cup heavy cream - ½ cup freshly grated Parmesan cheese - Salt and freshly ground black pepper to taste - ½ teaspoon red pepper flakes (optional) - Fresh basil leaves for garnish For this creamy rigatoni with spinach and tomato delight, I use simple yet fresh ingredients. The rigatoni pasta forms the base, and it holds the sauce beautifully. Extra virgin olive oil adds a rich flavor. Garlic gives it a nice aroma and taste that fills your kitchen. I love cherry tomatoes because they burst with sweetness. They add color and freshness to the dish. Spinach is my go-to for adding greens; it wilts down nicely and adds nutrients. Heavy cream creates that rich and creamy sauce that binds everything together. For seasoning, freshly grated Parmesan cheese is key. It melts into the sauce, making it even creamier. I add salt and black pepper to taste, and red pepper flakes bring a hint of heat if you like a little spice. Finally, fresh basil leaves not only look pretty but also add a burst of flavor. This combination of ingredients makes a simple, tasty dish that everyone will enjoy. You can find the full recipe to make this delightful meal. Bring a large pot of salted water to a rolling boil. I use about a tablespoon of salt. It makes the pasta taste better. Once the water is boiling, add the rigatoni. Cook it for about 8 to 10 minutes until it is al dente. This means it should be firm but not hard. Before draining, reserve 1 cup of that pasta water. It has the starch that helps the sauce stick. In a large skillet, heat 2 tablespoons of olive oil over medium heat. Once it’s hot, add 3 cloves of minced garlic. Sauté the garlic for about 30 seconds until it smells good. Be careful not to burn it. Next, add 1 cup of halved cherry tomatoes. Cook them for about 3 to 4 minutes until they soften and release their juices. This brings out their sweet flavor. Now, stir in 4 cups of fresh spinach. Cook it until it wilts, which takes about 2 to 3 minutes. If you like a little heat, sprinkle in ½ teaspoon of red pepper flakes. Next, pour in 1 cup of heavy cream. Lower the heat and let it simmer for 2 to 3 minutes. Gradually add ½ cup of freshly grated Parmesan cheese. Stir until it melts and the sauce becomes creamy. Taste it, then season with salt and black pepper. Add the cooked rigatoni to the skillet. Toss it in the creamy sauce until every piece is coated. If the sauce is too thick, use the reserved pasta water. Add it a little at a time until you reach the right consistency. This step makes your creamy rigatoni just perfect. For the full recipe, check out the detailed instructions above. To get a creamy sauce, use heavy cream. It blends well with other ingredients. Pour it in slowly to control the thickness. Adding freshly grated Parmesan cheese is key. It melts better and adds rich flavor. Pre-packaged cheese might not give you the same result. To boost taste, try adding fresh herbs like basil or thyme. A pinch of garlic powder or onion powder can also enhance the dish. To balance the creaminess, add a splash of lemon juice or vinegar. This will brighten the flavors and keep the dish fresh. Serve creamy rigatoni in wide, shallow bowls. This gives it room to shine. Sprinkle extra Parmesan on top for a nice touch. Fresh basil leaves not only add flavor but also look great. For a pop of color, consider adding a few cherry tomatoes on top. This makes the dish visually appealing and delicious. {{image_4}} You can easily add protein to your creamy rigatoni. Grilled chicken or shrimp works great. Just cook them separately and toss them in at the end. This adds flavor and makes the dish heartier. If you prefer a vegetarian option, try chickpeas. They are packed with protein and add a nice texture. Simply rinse and drain a can of chickpeas, then mix them in with the pasta. This keeps your meal bright and nutritious. Spinach is a classic, but you can mix it up. Try kale or arugula instead. Both greens add a different flavor and texture. Just sauté them until they wilt, just like you do with spinach. You can also add other veggies. Mushrooms and bell peppers are excellent choices. Sauté them with garlic for extra taste. This not only enhances the dish but also gives it more color. If you're looking for gluten-free options, swap the rigatoni for gluten-free pasta. Many brands offer great alternatives that taste just as good. Just follow the cooking instructions on the package. For a vegan dish, use plant-based cream instead of heavy cream. Almond or coconut cream works well. You still get that rich, creamy texture without dairy. Try these adjustments to fit your dietary needs while enjoying a delicious meal. For the complete recipe, check out the [Full Recipe]. To store leftover creamy rigatoni, let it cool down first. Place the pasta in a shallow container. Cover it tightly with a lid or plastic wrap. This helps keep it fresh. Use a container that is airtight to avoid any odors. I recommend glass or BPA-free plastic containers for best results. If you want to freeze creamy rigatoni, follow these steps. First, let the dish cool completely. Portion it into freezer-safe containers. Leave some space at the top for expansion. Seal the containers tightly. To thaw, move the dish to the fridge overnight. Reheat it on the stove or in the microwave for great taste. In the fridge, creamy rigatoni lasts about 3 to 4 days. In the freezer, it stays good for up to 2 months. Always check for signs of spoilage. If it smells off or has changed color, it’s best to throw it away. Enjoy your Creamy Rigatoni Delight fresh and delicious! For the complete recipe, check out the Full Recipe section. You can use several options to replace heavy cream. Here are some ideas: - Half-and-half: A mix of milk and cream works well. - Whole milk with butter: Combine ¾ cup of whole milk with ¼ cup of melted butter. - Cream cheese: Soften and blend it for a creamy texture. - Greek yogurt: Use plain Greek yogurt for a tangy taste. These substitutes make the dish lighter while still keeping it rich and tasty. Yes, you can prepare creamy rigatoni in advance. Cook the pasta and make the sauce, then mix them together. Store it in the fridge. When ready to eat, reheat it on low heat. Add a splash of water or broth to loosen the sauce. This keeps the dish creamy without drying it out. To boost the flavor of your pasta, try these tips: - Use fresh herbs: Basil, parsley, or thyme add a fresh taste. - Add lemon juice: A splash brightens the dish and cuts the creaminess. - Season well: Taste and adjust salt and pepper as needed. - Sauté vegetables: Cook onions or peppers for added depth. These simple steps enhance the overall flavor without much extra work. Creamy rigatoni is almost a one-pot meal. You cook the pasta and sauce in one pan, which makes cleanup easy. Just boil the pasta first, then sauté and mix everything in the same skillet. This method saves time and keeps flavors combined. Creamy rigatoni pairs nicely with several sides: - Garlic bread: Perfect for soaking up the sauce. - Mixed greens salad: A light salad adds a fresh crunch. - Roasted vegetables: Carrots or zucchini complement the dish. These sides balance the creaminess and add variety to your meal. For the full recipe, check the section above. This blog post guides you through making creamy rigatoni. We covered the main and additional ingredients. I detailed the cooking steps and tips for perfecting the cream sauce. You learned about variations to suit diets and how to store leftovers. In conclusion, this dish is easy to customize and enjoyable for all. Experiment with flavors and ingredients to make it your own. Enjoy your cooking journey!](https://meltedrecipes.com/wp-content/uploads/2025/06/e16ce7e1-3717-40ca-b3cc-a4fb36c292a7.webp)
Creamy Rigatoni with Spinach and Tomato Delight
Get ready to treat your taste buds with my creamy rigatoni with spinach and tomato delight! This dish blends rich cream, fresh spinach, and sweet
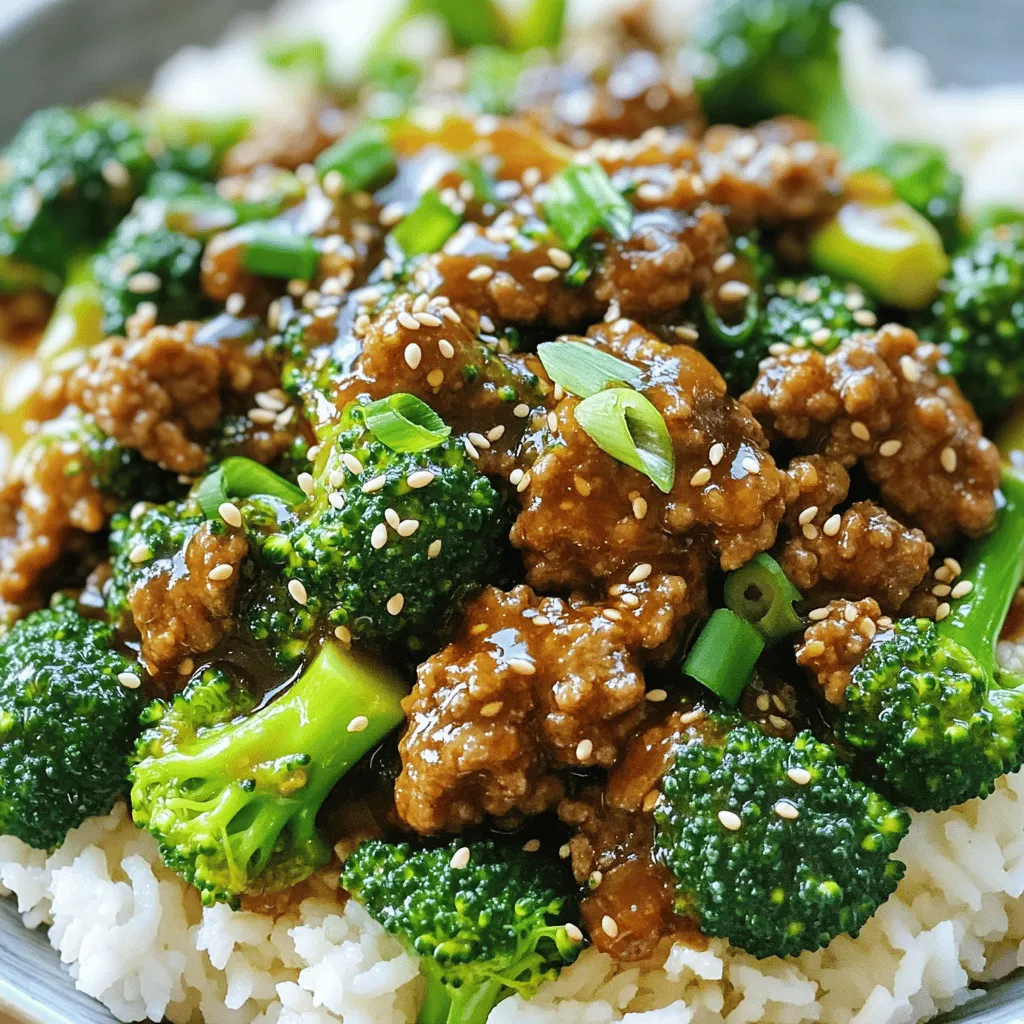
Easy Honey Garlic Ground Beef and Broccoli Recipe Delight
Looking for a quick and tasty meal? You’ve found it! My Easy Honey Garlic Ground Beef and Broccoli recipe is a winner. With just a
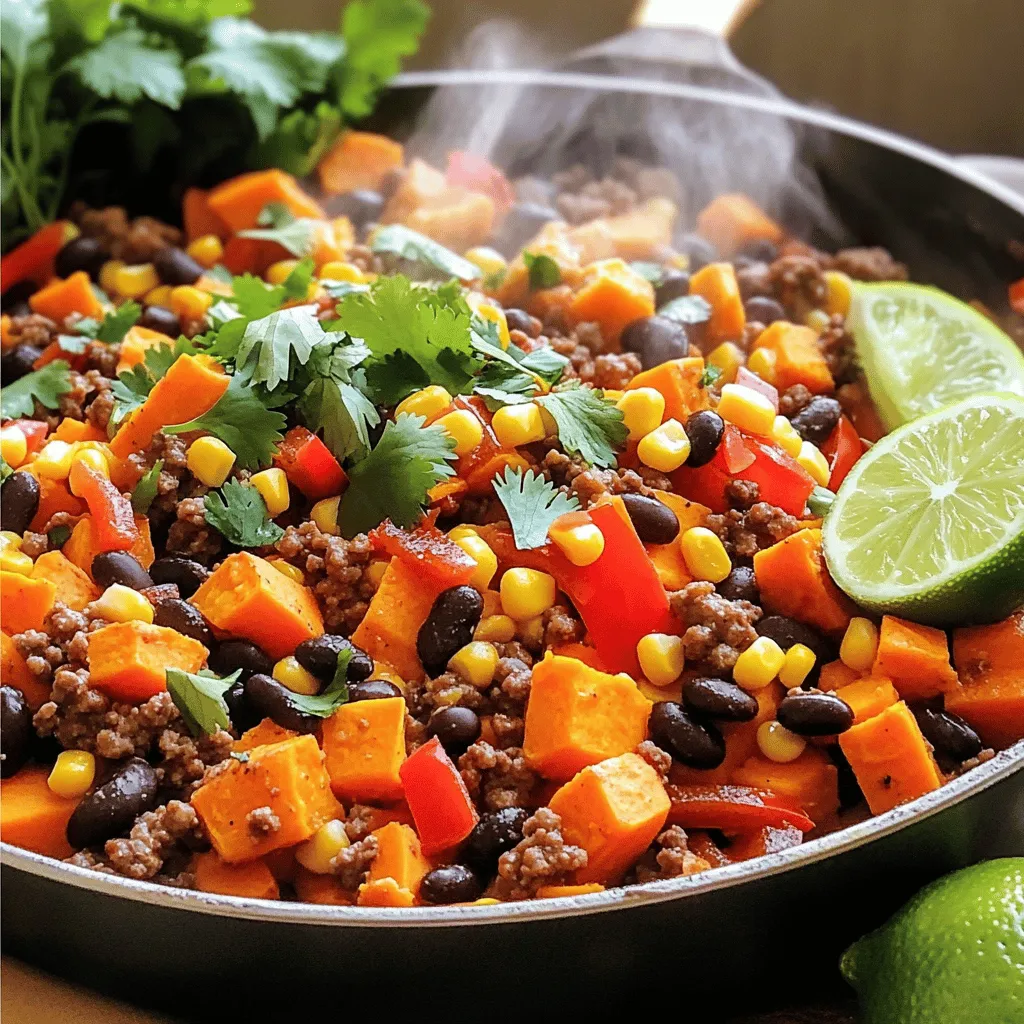
Southwestern Ground Beef Sweet Potato Skillet Delight
Are you ready to whip up a delicious meal that’s both hearty and healthy? My Southwestern Ground Beef Sweet Potato Skillet is packed with flavor
![To make Beef and Garlic Butter Pasta, gather these fresh items: - 250g spaghetti or your preferred pasta - 300g ground beef - 4 tablespoons unsalted butter - 5 cloves garlic, finely minced - 1 small onion, chopped finely - 1 teaspoon dried oregano - 1 teaspoon chili flakes (optional for a kick) - Salt and freshly ground black pepper to taste - ½ cup grated Parmesan cheese - Fresh parsley, chopped (for garnish) - Zest of 1 lemon While spaghetti is a classic choice, you can use other types of pasta too. I love fettuccine for its wide texture. Penne holds sauce well, making it a great option. If you're feeling adventurous, try pappardelle for a fun twist. Remember, choose pasta that cooks to an al dente texture for the best bite. Fresh herbs bring bright flavors to your dish. I recommend using fresh parsley and oregano if you can find them. They add a burst of freshness. Dried herbs work too and provide convenience. Use one teaspoon of dried oregano if fresh is not available. Just remember, dried herbs have a stronger taste. Adjust the amount to suit your preference. Start by filling a large pot with water. Add a good amount of salt. Bring the water to a boil. Once boiling, add 250g of spaghetti or your favorite pasta. Stir it gently to keep it from sticking. Cook according to the package instructions until it is al dente. When it's done, save 1 cup of the starchy water, then drain the pasta. This water will help make the sauce creamy. In a large skillet, heat 2 tablespoons of butter over medium heat. Once melted, add 1 small chopped onion and 5 finely minced garlic cloves. Sauté them for about 3 minutes. You want the onion to turn soft and clear. The garlic should smell nice and fragrant. This step builds flavor for your dish. Now, raise the heat to medium-high. Add 300g of ground beef to the skillet. Use a spatula to break it apart as it cooks. Cook for about 5-7 minutes until the beef is brown. If you see too much fat, be careful and drain it off. Then, sprinkle in 1 teaspoon of dried oregano, chili flakes if you want heat, and a good pinch of salt and pepper. Stir it all together and let it cook for another 1-2 minutes to blend the flavors. For the complete recipe, check the [Full Recipe]. To get the right pasta texture, cook your pasta until al dente. This means it should be firm but not hard. Use a large pot with plenty of salted water. This helps the pasta cook evenly. Remember to stir it often. After cooking, save some pasta water. This starchy water helps to make your sauce creamy. You can boost the flavor of your dish with a few simple extras. Adding fresh herbs like basil or thyme makes it fresh. A splash of lemon juice brightens the dish. You can also toss in some sautéed mushrooms or spinach for added nutrition. If you love spice, try adding more chili flakes. Each of these tweaks can take your pasta to the next level. One common mistake is overcooking the pasta. Always check the cooking time on the package. Another mistake is not seasoning enough. A little salt in the cooking water and while cooking the beef goes a long way. Lastly, don’t skip the cheese! It adds rich flavor. Follow these tips for perfect beef and garlic butter pasta every time. For the full recipe, check the link above. {{image_4}} You can boost the healthiness of your Beef and Garlic Butter Pasta by adding vegetables. Veggies add color and nutrients. Consider adding spinach, bell peppers, or zucchini. Just chop them small and sauté them with the onions and garlic. They will soften and blend well with the dish. This not only makes it healthier but also adds a nice crunch. If you want to change things up, try using different proteins. Ground turkey or chicken work great instead of beef. You can also use shrimp or tofu for a lighter meal. Each protein brings its unique flavor. Adjust the cooking time based on what you choose. For shrimp, cook until they turn pink, which takes about 3-4 minutes. For those who love heat, making the dish spicy is easy. You can add more chili flakes or even some sliced fresh jalapeños. Another option is to use spicy sausage instead of ground beef. This will give your pasta a bold kick. Just remember, spice levels vary. Start with a small amount and taste as you go. You can store leftover Beef and Garlic Butter Pasta in the fridge. Place it in an airtight container. It stays fresh for up to three days. Make sure to cool it down before sealing the container. This helps keep the pasta from getting mushy. If you want to save the pasta for later, freezing works great. Place the cooled pasta in freezer-safe bags or containers. Remove as much air as possible to avoid freezer burn. It can last in the freezer for about two months. When ready to eat, thaw in the fridge overnight. To reheat, you have a few options. For the best taste, use the stove. Add a splash of water or broth in a skillet over low heat. Stir often until it’s hot. You can also microwave it. Place the pasta in a bowl and cover it with a damp paper towel. Heat in short bursts, stirring in between, until warmed through. Enjoy your Beef and Garlic Butter Pasta just as delicious as the first time! For the full recipe, check the earlier section. To make this dish gluten-free, use gluten-free pasta. Many brands offer great options that taste good. Ensure all sauces and seasonings are also gluten-free. This way, you can enjoy the same great flavors without gluten. Yes, you can use any pasta you like! Penne, fusilli, or even zucchini noodles work well. Each type will give a new twist to the dish. Choose your favorite for a fun meal. This pasta pairs well with a simple salad or garlic bread. You can also serve it with steamed veggies for a healthy side. A light wine or sparkling water can enhance the meal. You can prepare the beef and garlic butter sauce ahead of time. Just cook it as usual, let it cool, and store it in the fridge. When you’re ready to eat, just cook the pasta and mix everything together. Absolutely! This dish is great for meal prep. You can store servings in airtight containers. It stays tasty for up to three days in the fridge. Just reheat it in the microwave or on the stovetop for a quick meal. For the full recipe, check the details above. In this blog post, we explored the key ingredients, step-by-step cooking, and helpful tips for Beef and Garlic Butter Pasta. We covered everything from fresh herbs to cooking techniques. Remember, you can easily customize the dish by adding veggies or changing the protein. Always aim to avoid common mistakes for the best results. With these guidelines, you can store or reheat your dish perfectly. Enjoy the process and create a meal that your whole family will love. Happy cooking!](https://meltedrecipes.com/wp-content/uploads/2025/06/01eb0804-0c1b-4b15-9956-832cf4ab192f.webp)
Savory Beef and Garlic Butter Pasta Easy Dinner Recipe
Are you ready for a dinner that’s both easy and packed with flavor? This Savory Beef and Garlic Butter Pasta recipe is your go-to dish!
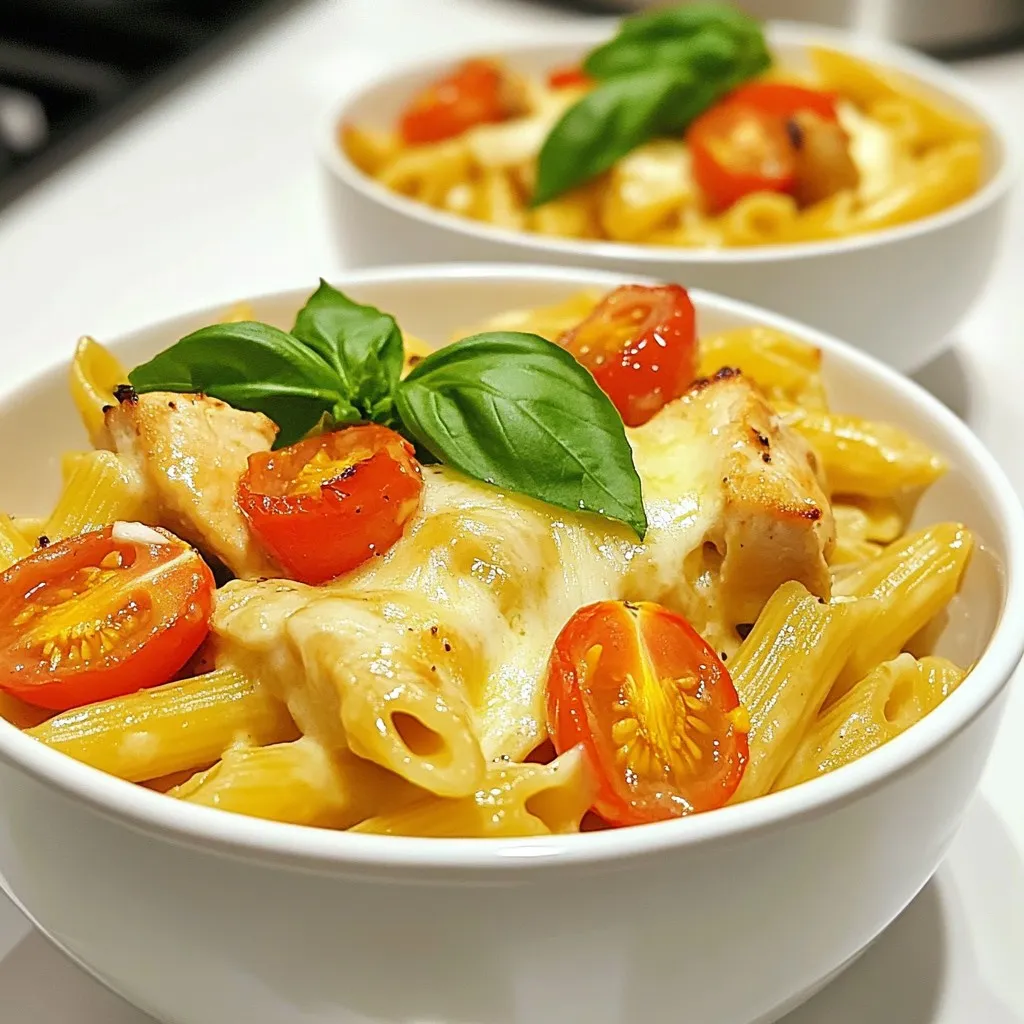
Cheesy Chicken Pasta Delicious Weeknight Dinner Idea
Looking for a tasty meal that’s quick and easy? Cheesy Chicken Pasta is the answer! This dish combines tender chicken, creamy cheese sauce, and your