Dinner

- Pre-made pie crust: You can use a store-bought crust or make your own. A store-bought crust saves time. It also gives a nice, flaky base. If you choose homemade, use flour, butter, and cold water for the best results. - Types of tomatoes: I recommend using ripe tomatoes. Varieties like Roma or heirloom are great choices. These tomatoes have rich flavors and juicy textures. Choose tomatoes that feel heavy for their size. - Importance of fresh mozzarella: Fresh mozzarella is key for this pie. It melts beautifully and adds creaminess. Look for mozzarella packed in water for the best taste. Slice it thinly to layer easily. - List of seasonings: Use salt, pepper, garlic powder, and dried oregano. These simple spices enhance the dish. They bring out the tomato and cheese flavors. - Options for drizzling: A balsamic glaze can add a sweet touch. Drizzle it just before serving for a burst of flavor. It pairs well with the pie's freshness. - Suggested garnishes: Fresh basil leaves brighten the dish. They add a lovely color and aroma. Sprinkle them on top for an elegant finish. For the full recipe, check out the details above! Preheat your oven to 400°F (200°C). This high heat helps the pie crust bake evenly. If you use a frozen pie crust, let it thaw for a few minutes. Fit the crust into a 9-inch pie dish, pressing it down gently. Next, use a fork to prick the bottom. This step prevents the crust from puffing while it bakes. In a large bowl, combine four thinly sliced tomatoes with two tablespoons of olive oil. Add a generous pinch of salt, black pepper, half a teaspoon of garlic powder, and half a teaspoon of dried oregano. Gently toss the tomatoes and seasonings together. Make sure the tomatoes are well-coated to enhance their flavor. Start by placing half of the seasoned tomatoes in the pie crust. Next, add half of the sliced mozzarella cheese and half of the chopped basil. Repeat this layering process with the remaining tomatoes, mozzarella, and basil. Distributing the ingredients evenly is key. This way, every slice has a balanced taste. Carefully transfer the pie to the preheated oven. Bake it for 30 to 35 minutes. The pie is done when the tomatoes soften and release juices. The cheese should melt into a bubbly, slightly golden topping. Keep an eye on it to avoid burning. After baking, remove the pie from the oven. Let it cool for about 5 to 10 minutes. This resting time helps the pie set. You can drizzle balsamic glaze on top to add a tangy sweetness. Slice the pie into wedges and serve it warm. It’s also great at room temperature. For a lovely presentation, serve it on a rustic wooden board or a white platter, garnished with whole basil leaves. A side salad of mixed greens pairs well with this dish. For the full recipe, check out the recipe section above. To enhance the flavor of your tomatoes, choose ripe ones. Look for tomatoes that feel heavy for their size. Slice them thinly to let their juices mingle with the cheese and herbs. You can also add a pinch of sugar to balance acidity. For cheese, fresh mozzarella shines, but you can try burrata or fontina for a twist. Avoid overloading your pie crust. Too many toppings can make the pie soggy. Stick to a balanced layer of tomatoes and cheese. Also, remember to season well. A lack of salt and pepper can dull the flavors. Taste your tomato mix before layering it in the crust. For the best results, use a 9-inch pie dish. This size helps the pie cook evenly. A sharp knife or mandoline makes slicing tomatoes easy and quick. Keep a mixing bowl handy for combining your ingredients. Lastly, use a fork to prick the crust. This step helps it bake evenly and stay crisp. {{image_4}} You can swap out tomatoes for other veggies. Zucchini and bell peppers add nice flavor and texture. Just slice them thin and layer them like the tomatoes. You can also try different herbs. Thyme and rosemary give a fresh twist. Mix them in with the other herbs for a new taste. Want a gluten-free pie? Use a gluten-free crust. Many stores carry good options. If you want a vegan dish, you can use plant-based cheese. Look for brands that melt well. They can replace fresh mozzarella without losing taste. Serve this pie as an appetizer or a main dish. It works great in both roles. If you serve it as a main, pair it with a light salad. A side of mixed greens enhances the meal. This pie also tastes great at room temperature, making it perfect for picnics. For the full recipe, check out the details above. To store leftover Tomato Mozzarella Pie, let it cool first. Once cool, slice it into wedges. Place the slices in an airtight container. You can also wrap them in plastic wrap or foil. This keeps the pie fresh and tasty. Store it in the fridge for up to three days. For longer storage, you can freeze the pie. Just make sure to wrap it tightly to avoid freezer burn. For reheating, the oven gives the best results. Preheat your oven to 350°F (175°C). Place the pie slices on a baking sheet. Heat for about 10-15 minutes or until warm. This method keeps the crust crispy. If you use a microwave, it’s faster but can make the crust soft. Heat on a microwave-safe plate for about 30 seconds. If you want to keep it crispy, try the oven method instead. Enjoy your Tomato Mozzarella Pie warm! You can store Tomato Mozzarella Pie in the fridge for up to three days. If you freeze it, it can last for about three months. Make sure to wrap it well to keep it fresh. Yes, you can use canned tomatoes, but they may change the pie's texture. Fresh tomatoes offer a crisper bite and a burst of flavor that canned tomatoes cannot match. This pie pairs well with several side dishes. Consider serving it with a fresh garden salad, garlic bread, or roasted vegetables. These sides will enhance the pie's flavors. You can prep the pie a day ahead. Assemble it, but do not bake it. Cover it well and refrigerate. When you're ready, bake it straight from the fridge. This makes meal time easy. Yes, this pie works great for meal prep. You can portion it out after baking. Reheat slices in the oven or microwave. This keeps the pie tasty and ready to enjoy. For the full recipe, check out the detailed instructions above. This blog post explored how to make a delicious Tomato Mozzarella Pie. We covered essential ingredients, from pie crust choices to key seasonings. You learned the step-by-step process, from preparing the oven to tasty variations. I shared tips for perfecting flavor, avoiding common mistakes, and effective storage methods. Now, with this knowledge, you can create your own tasty pie. Enjoy experimenting with flavors for a meal everyone will love. Happy cooking!
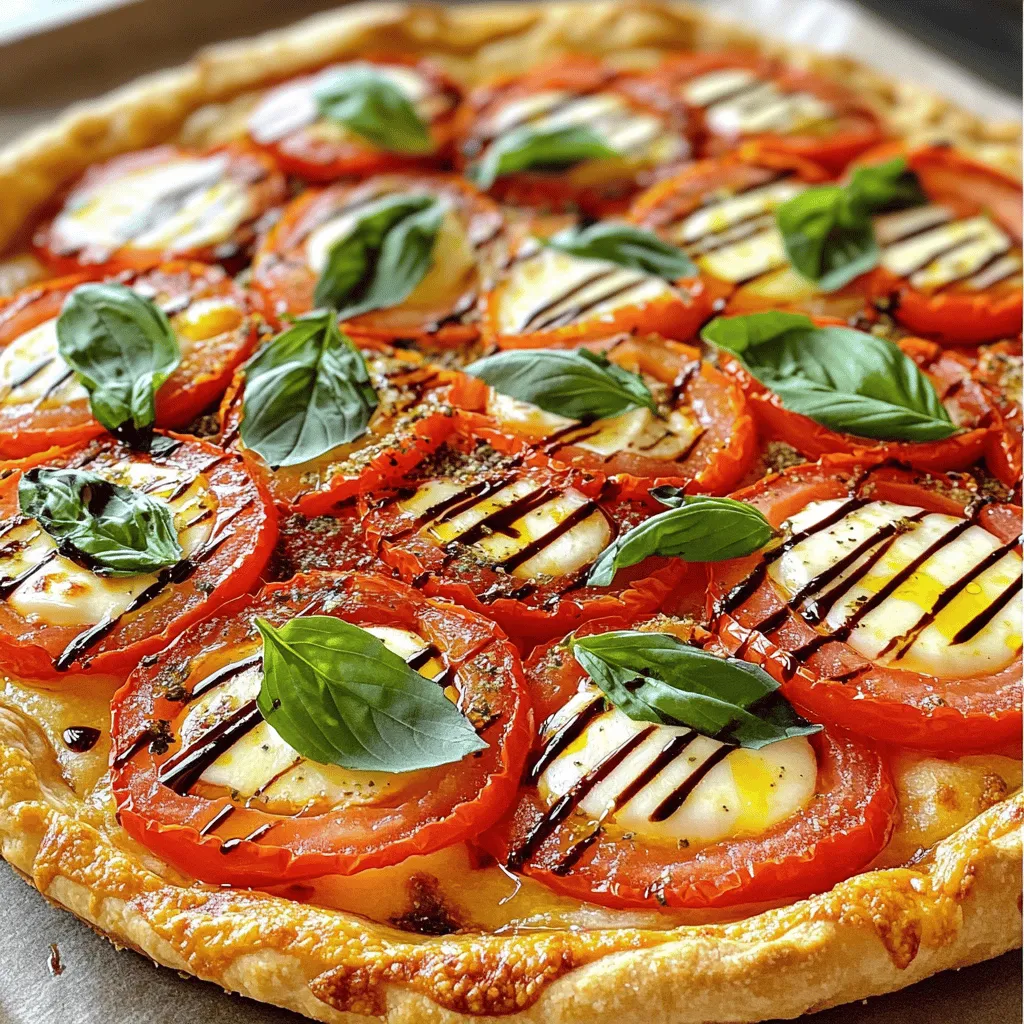
Tomato Mozzarella Pie Flavorful and Simple Delight
If you’re searching for a dish that’s both simple and bursting with flavor, look no further! This Tomato Mozzarella Pie combines fresh ingredients and easy
- 1 lb boneless, skinless chicken thighs, diced - 2 cups fresh baby spinach leaves - 1 cup cherry tomatoes, halved - 8 oz farfalle or penne pasta - 1 teaspoon Italian seasoning blend - 2 tablespoons extra virgin olive oil - 3 cloves garlic, minced - 1 cup heavy cream - ½ cup freshly grated Parmesan cheese - 4 cups low-sodium chicken broth - Sea salt, to taste - Black pepper, to taste This recipe uses simple, fresh ingredients to create a rich dish. The chicken thighs provide a juicy base. Spinach and tomatoes add color and nutrients. Choose farfalle or penne pasta for a fun texture. The Italian seasoning gives it a classic flavor. Olive oil and garlic add depth. Heavy cream and Parmesan cheese create the creamy sauce. Low-sodium chicken broth keeps it light but flavorful. Don’t forget to season with salt and pepper for balance. {{ingredient_image_2}} First, gather your chicken thighs. Cut them into bite-sized pieces. Heat 2 tablespoons of olive oil in a large pot over medium heat. Once the oil is hot, add the chicken. Season it with salt, pepper, and 1 teaspoon of Italian seasoning. Cook the chicken for 5 to 7 minutes. Look for a nice golden color. When it’s done, take the chicken out and set it on a plate. Next, lower the heat a bit. Add 3 cloves of minced garlic to the pot. Sauté the garlic for about 1 minute. Stir it often. You want it to smell great but not turn brown. After that, add 1 cup of halved cherry tomatoes. Cook for 2 to 3 minutes. Stir occasionally until the tomatoes soften and let out their juices. Now, it’s time to boil the pasta. Pour in 4 cups of low-sodium chicken broth and bring it to a boil. Once it’s bubbling, add 8 ounces of pasta. You can use farfalle or penne. Lower the heat and cover the pot. Let it simmer for 10 to 12 minutes. Stir it from time to time until the pasta is al dente. Add 1 cup of heavy cream, the cooked chicken, and 2 cups of fresh spinach to the pot. Cook for another 2 to 3 minutes. This will help the spinach wilt and thicken the sauce. Finally, take the pot off the heat. Gradually stir in ½ cup of grated Parmesan cheese. Mix until it melts into a creamy sauce. Taste it, and if needed, adjust the seasoning with more salt and pepper. Enjoy! - Where to find fresh ingredients: Look for fresh chicken thighs, spinach, and tomatoes at local farmers' markets. Grocery stores often have good selections too. Buy organic if you can for better taste. - Substitutions for dietary needs: If you need a healthier option, use turkey instead of chicken. For a vegetarian version, swap chicken for mushrooms or tofu. Gluten-free pasta works well too. - Ensuring pasta cooks perfectly: Use a large pot for even cooking. Stir the pasta often to prevent sticking. Check it a minute before the time is up to ensure it’s al dente. - Tips for achieving the right creamy texture: Add cream slowly while stirring. This helps it mix well with the broth. Mixing in the Parmesan cheese at the end adds richness and makes it smooth. - Garnishing suggestions: Top your pasta with fresh basil leaves for color and aroma. A sprinkle of extra Parmesan can make it look fancy too. - Serving suggestions for the best experience: Serve in wide bowls to show off the creamy sauce. Pair with garlic bread and a light salad for a complete meal. Pro Tips Use Fresh Ingredients: Fresh spinach and ripe cherry tomatoes will enhance the flavors and nutritional value of your dish. Always opt for the freshest produce available. Adjust the Creaminess: If you prefer a lighter sauce, you can reduce the amount of heavy cream or substitute half with low-fat milk. This will still give you a creamy texture without being too heavy. Perfect Pasta Cooking: To avoid overcooking the pasta, check for doneness a minute before the package instructions indicate. The pasta will continue to cook slightly after being mixed with the sauce. Herb Variations: Feel free to experiment with different herbs. Adding a sprinkle of fresh thyme or oregano can bring a new dimension to the dish, enhancing the Tuscan flavor profile. {{image_4}} You can switch the chicken for other proteins. Shrimp or turkey works well here. Both options add a new taste. For a lighter meal, try gluten-free pasta. This keeps the dish friendly for more diets. Want to kick up the flavor? Add sun-dried tomatoes or artichokes. These ingredients bring a rich taste that shines. Fresh herbs like basil or parsley add brightness. They make each bite feel fresh and exciting. If you want a lighter feel, use milk or yogurt instead of cream. This gives a nice, creamy texture without all the fat. For a vegan option, try coconut milk or cashew cream. These substitutes keep the dish rich while meeting dietary needs. To store leftovers, let the pasta cool to room temperature. Place it in an airtight container. This helps keep it fresh. You can store it in the fridge for up to three days. After that, the taste may start to fade. When you reheat the pasta, use a stovetop or microwave. If using the stovetop, add a splash of chicken broth. This keeps the dish creamy and tasty. Stir it often for even heating. If using the microwave, cover the bowl with a damp paper towel. This helps keep moisture. Heat it in short bursts, stirring in between. Yes, you can freeze this dish! Place the cooled pasta in a freezer-safe container. Make sure to leave some space for expansion. It can stay fresh for up to three months. When you’re ready to eat, thaw it overnight in the fridge. Reheat it on the stovetop with some chicken broth for best results. This will help revive the creamy sauce. Yes! You can use beef, turkey, or shrimp. For beef, try diced sirloin or ground beef. Turkey works well, too; just cook it until brown. If you opt for shrimp, add them in the last few minutes of cooking. This way, they stay tender. Vegetarian options include chickpeas or mushrooms. Both add great flavor and texture. To add spice, try red pepper flakes. A pinch goes a long way. You can also add sliced jalapeños for a fresh kick. If you want more heat, consider a dash of hot sauce. Mix it in during the cooking process for even heat throughout. Store leftovers in an airtight container. This keeps the dish fresh for up to three days. Make sure to let it cool before sealing. For longer storage, freeze it for up to two months. Just thaw in the fridge overnight before reheating. When reheating, use low heat on the stove. Add a splash of broth to keep it creamy. This blog post covered a simple dish that you'll love. We discussed key ingredients like chicken thighs, spinach, and farfalle pasta. The seasonings, including Italian herbs and garlic, bring great flavor. I provided step-by-step cooking tips to ensure your meal turns out perfect every time. Remember, you can personalize it with swaps and variations. Store any leftovers the right way for freshness. These tips will help you enjoy the dish longer. Cooking can be fun and rewarding, so try it out! Enjoy your meal!
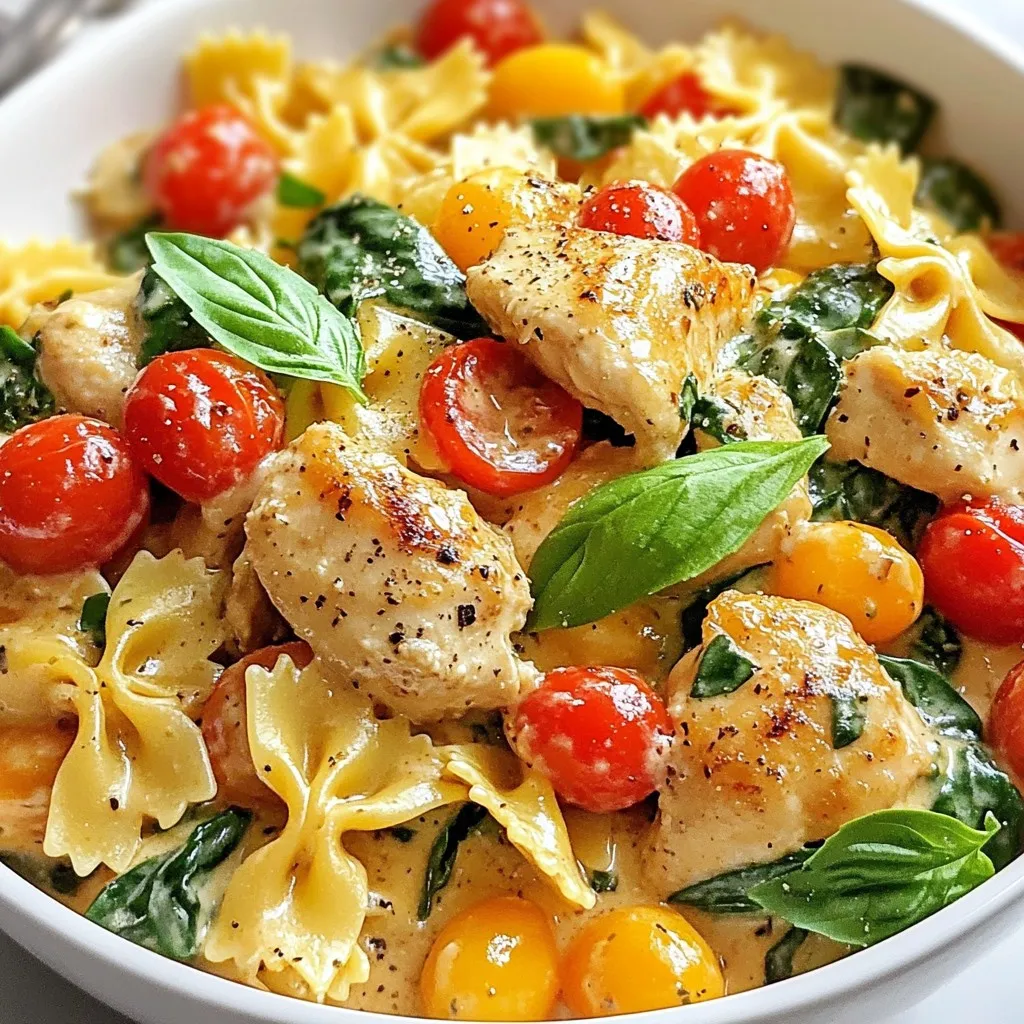
One-Pot Creamy Tuscan Chicken Pasta Delight
Are you looking for a delicious, easy meal that will impress everyone? This One-Pot Creamy Tuscan Chicken Pasta is just the dish for you! With
- 2 boneless, skinless chicken breasts - 1 tablespoon extra virgin olive oil - 4 cloves garlic, finely minced - 1 teaspoon dried oregano - 1 teaspoon smoked paprika - Salt and freshly ground black pepper to taste - 1 cup shredded mozzarella cheese - 1/2 cup cream cheese, at room temperature - 4 large tortillas (flour or whole grain) - 1 cup fresh baby spinach leaves - 1/2 cup ripe tomatoes, finely diced - Fresh parsley, chopped - Garlic-infused olive oil When I make Cheesy Garlic Chicken Wraps, I love to use fresh ingredients. The chicken breasts are the star of the dish. They are juicy and tender when cooked right. I marinate them in olive oil, garlic, and spices. This adds great flavor. The cheese mix is another highlight. Cream cheese and mozzarella blend nicely. This combo makes the wraps creamy and cheesy. I always use fresh spinach and ripe tomatoes in my fills. They add color and crunch. For the wraps, I prefer flour tortillas. They hold the filling well. Whole grain tortillas are a healthy choice too. They bring a nutty taste. Garnishes like parsley and garlic oil give a nice finish. They add aroma and bright color. Each ingredient plays a role in making these wraps easy and flavorful. {{ingredient_image_2}} To start, you need to combine the marinade ingredients. In a medium bowl, mix 1 tablespoon of olive oil, 4 minced garlic cloves, 1 teaspoon of dried oregano, 1 teaspoon of smoked paprika, salt, and black pepper. This blend gives your chicken a robust flavor. Coat the chicken breasts well in this mixture. Aim to marinate for at least 15 minutes. For a deeper flavor, marinating for up to 2 hours in the fridge works wonders. Next, heat your grill pan or skillet over medium-high heat. Once it’s hot, add the marinated chicken breasts. Cook each side for about 6-7 minutes. You want the chicken to be golden brown and reach an internal temperature of 165°F. After cooking, transfer the chicken to a cutting board. Let it rest for 5 minutes before slicing it into thin strips. Now, let’s prepare the cheesy filling. In a mixing bowl, combine the softened cream cheese and 1 cup of shredded mozzarella cheese. Mix until both cheeses blend smoothly. This creamy mixture is key to your wraps. On a clean surface, lay out the tortillas. Spread a generous amount of the cheesy filling down the center of each tortilla, leaving some space at the edges. For the grilling step, place the wraps seam-side down in the same skillet or grill pan. Cook each wrap for about 2-3 minutes on both sides. You want the tortillas to be golden brown and nice and crispy. This adds great texture to your wraps. Once grilled, take the wraps out of the skillet and let them cool slightly. Cut each wrap in half for easier handling. To serve, drizzle some garlic-infused olive oil over the wraps. Sprinkle freshly chopped parsley on top for a bright finish. Serve with marinara sauce for dipping or a fresh salad on the side. Enjoy the burst of flavors! To get the best flavor in your chicken, marinate it well. Marinate for at least 15 minutes. If you have more time, try two hours. Use olive oil, minced garlic, oregano, smoked paprika, salt, and pepper. This blend gives the chicken a rich taste. When cooking, heat your grill pan or skillet to medium-high. Cook the chicken for about 6 to 7 minutes on each side. Look for that golden brown color. Make sure the chicken reaches 165°F (75°C) inside. Let it rest for 5 minutes before slicing. This keeps it juicy. If you want different cheese flavors, try alternatives. Use gouda for a smoky taste. Feta adds a salty kick. For a creamier option, go with ricotta. For vegan or dairy-free wraps, use plant-based cheeses. Cream cheese alternatives work great too. Look for brands that melt well. This way, you still enjoy that cheesy goodness without dairy. You can customize the wraps easily. Add fresh veggies like bell peppers or cucumbers for crunch. Avocado gives a creamy texture. You can also try different greens like arugula or kale. If you have dietary needs, adjust the fillings. Use gluten-free tortillas for a gluten-free option. Swap chicken for turkey, beef, or tofu. This makes it a meal everyone can enjoy. Pro Tips Marinate for Maximum Flavor: Allow the chicken to marinate for at least 2 hours if possible. This enhances the flavor and tenderness of the meat, making it more delicious. Choose Your Cheese Wisely: Experiment with different types of cheese like cheddar or pepper jack for a unique twist on the flavor profile of your wraps. Warm Your Tortillas: Warm the tortillas in a dry skillet or microwave for a few seconds before assembling the wraps. This makes them more pliable and easier to roll without tearing. Serve with Dipping Sauce: Pair your wraps with a side of marinara or ranch dressing for dipping, adding extra flavor and a fun element to the meal. {{image_4}} You can switch out chicken for other proteins. Turkey works well and stays juicy. Beef adds a rich taste, while tofu offers a plant-based option. When using turkey or beef, cook until they reach 165°F (75°C). Tofu needs just a few minutes to brown nicely. Adjust cooking time based on the type of protein you choose. Want a spicy kick? Add diced jalapeños or crushed red pepper to the filling. This will give your wraps a fun kick. For a fresh twist, mix in herbs like basil or cilantro. A touch of lemon zest can brighten the flavor too. Choose what excites your taste buds! If you need gluten-free wraps, look for rice or corn tortillas. These work just as well. For a low-carb option, use lettuce leaves instead. They wrap up nicely and add crunch. Pita bread is another fun way to enjoy these wraps. It creates a pocket for your fillings and is easy to eat on the go! To keep your cheesy garlic chicken wraps fresh, wrap them in plastic wrap or foil. This prevents air from drying them out. Place the wraps in an airtight container. Store them in the fridge for up to three days. If you want to keep them longer, consider freezing. When it's time to eat your leftovers, you want to keep the flavor and texture. The best way to reheat wraps is in a skillet. Heat the skillet over medium heat. Place the wrap in the pan and cook for about three minutes on each side. This brings back the crispiness. You can also use a microwave, but the wrap may become soft. If using a microwave, cover the wrap to keep it moist. You can freeze prepared wraps for later use. Wrap each one tightly in plastic wrap and then in foil. This double layer helps prevent freezer burn. Store them in a freezer-safe bag or container. They can last for up to three months. When ready to eat, thaw in the fridge overnight before reheating. This keeps the flavor and texture intact, so you enjoy every bite! Yes, you can prepare these wraps in advance. Here are some meal prep tips: - Cook the Chicken: You can cook the chicken a day ahead. Store it in the fridge. - Make the Filling: Prepare the cheesy filling and keep it in a sealed container. - Assemble Later: When ready to eat, just assemble and grill the wraps. This saves time. This method keeps the flavors fresh. You can enjoy them anytime! A few dipping sauces pair nicely with Cheesy Garlic Chicken Wraps: - Marinara Sauce: This classic is always a hit. - Ranch Dressing: Creamy and cool, it matches well. - Garlic Aioli: For garlic lovers, this adds a nice kick. You can also serve with fresh veggies or a salad for a colorful side. To make vegetarian Cheesy Garlic Wraps, you can replace the chicken with tasty substitutes: - Grilled Veggies: Use zucchini, bell peppers, or mushrooms. - Beans: Black beans or chickpeas add protein. - Tofu: Marinate and grill tofu for a filling option. These changes keep the wraps delicious and satisfying. You’ll still have a great cheesy filling! For a party, presentation matters. Here are some tips: - Cut Them: Slice the wraps in half for easy handling. - Use a Platter: Arrange the halves on a colorful platter. - Garnish: Add fresh parsley and lime wedges for a pop of color. These wraps look great on any table. Guests will love them! This blog post covered how to create flavorful Cheesy Garlic Chicken Wraps. You learned about the key ingredients, from chicken and spices to cheeses and tortillas. The step-by-step instructions helped you cook and assemble these wraps perfectly. You also discovered tips for customizing and storing them. In conclusion, these wraps are easy to make and versatile. You can tailor them to your taste. Enjoy experimenting with different proteins and flavors. Your next meal can impress friends and family with these delicious wraps. Happy cooking!
Cheesy Garlic Chicken Wraps Easy and Flavorful Meal
Looking for a quick meal that’s packed with flavor? Cheesy Garlic Chicken Wraps are your answer! With tender chicken, creamy cheese, and fresh veggies all
- 4 large heirloom tomatoes, beautifully sliced - 1 cup shredded mozzarella cheese (divided) - 1 cup creamy ricotta cheese - 1/2 cup fresh grated Parmesan cheese - 1/2 cup fresh basil leaves, chopped - 1 teaspoon dried oregano for extra flavor - 1/2 teaspoon garlic powder to enhance the taste - Salt and pepper, to taste - 1 pre-made pie crust (store-bought or homemade for a personal touch) - 1 tablespoon extra-virgin olive oil If you want to change the flavors, you can try different cheeses. Goat cheese or feta can add a nice twist. If you need a gluten-free option, look for gluten-free pie crusts in stores. You can also make your own. Fresh herbs give the best flavor, but dried herbs work too in a pinch. Choosing heirloom tomatoes is key. Look for firm tomatoes with rich color. The taste of fresh ingredients makes a big difference. Always pick ripe tomatoes and fresh herbs. These add more taste and joy to your dish. - Preheat your oven to 375°F (190°C). This ensures even cooking. - In a bowl, mix the ricotta, half of the mozzarella, Parmesan, basil, oregano, garlic powder, salt, and pepper. Blend until smooth. - Place the pie crust in a 9-inch dish, pressing it firmly against the bottom. - Arrange half of the tomato slices on the crust. Season them lightly with salt and pepper. - Spread the cheese mixture over the tomatoes, covering them completely. - Add the remaining tomato slices on top of the cheese mixture. Drizzle with olive oil for extra flavor. - Bake the casserole for 35 to 40 minutes. Look for bubbling cheese and a golden top. - Let it cool for about 10 minutes before slicing. This helps it set nicely. Feel free to check the Full Recipe for more detailed instructions! To cook your casserole evenly, use even slices of tomatoes. This helps the heat spread well. Layer your tomatoes from the bottom up, ensuring they fit snugly. To avoid a soggy crust, bake the crust for a few minutes before adding the filling. This step helps the crust stay crisp. Add fresh herbs like basil and thyme for a burst of taste. Mixing in some garlic powder also makes a big difference. You can use fresh oregano for a brighter flavor. For a richer taste, consider using aged cheeses or adding a splash of balsamic vinegar. When serving, cut the casserole into large pieces for a good presentation. Garnish with extra basil leaves for color and aroma. This dish pairs well with a light salad or crusty bread to soak up the juices. Want more tips? Check the Full Recipe for additional serving ideas! {{image_4}} You can change up the heirloom tomatoes for different types. Try using green or purple heirlooms. Each variety has its own taste and charm. You can also mix in seasonal veggies. Zucchini, bell peppers, or even corn add a nice crunch. Fresh ingredients not only boost flavor but also give you colorful layers. If you need a vegan option, swap the cheeses for plant-based ones. Cashew cheese or tofu works well in this dish. For a dairy-free choice, try coconut yogurt in place of ricotta. If you're watching carbs, use a cauliflower crust instead of a pie crust. This keeps the dish light and healthy. Adding meats can take this casserole to the next level. Cooked sausage or diced chicken blends nicely with the flavors. For a twist, use spices from different cuisines. Add cumin for a Mexican flair, or curry powder for an Indian touch. Feel free to mix and match until you find your favorite flavor! To keep your heirloom tomato pie casserole fresh, cool it down first. Once it's at room temperature, wrap it tightly in plastic wrap or place it in an airtight container. This method helps to keep moisture in and prevents the casserole from drying out. For the best results, store it in a glass or plastic container with a secure lid. These containers keep the casserole fresh longer and help avoid any fridge odors. If you have leftovers, you can freeze them for later. Cut the casserole into portions and use freezer-safe containers. Ensure to leave some space for expansion. Wrap each piece tightly with plastic wrap, followed by aluminum foil for extra protection. Label them with the date. To reheat, simply thaw the casserole overnight in the fridge. Then, bake it at 350°F (175°C) until heated through, about 25-30 minutes. In the fridge, your heirloom tomato pie casserole will last about 3 to 5 days. When frozen, it can stay good for up to 3 months. Always check for any off smells or changes in texture before enjoying your leftovers. Storing it properly helps maintain its delightful taste and quality. Can I make this casserole ahead of time? Yes, you can prepare this casserole the day before. Assemble it, cover it, and store it in the fridge. Bake it the next day when you're ready to serve. This saves time and allows the flavors to blend. What can I use if I don’t like ricotta cheese? If you don’t like ricotta cheese, you can use cottage cheese or cream cheese instead. Both options provide a creamy texture. You can even try goat cheese for a tangy flavor. How do I know when it's fully cooked? The casserole is ready when the cheese bubbles and turns golden brown. A knife inserted in the middle should come out hot. The tomatoes should be soft and juicy. What to do if the crust is burning? If the crust starts to burn, cover it with aluminum foil. This will protect it from direct heat. Make sure to check it often to avoid overbaking. How to fix too much moisture? If your casserole has too much moisture, try draining the tomatoes before adding them. You can also bake it a bit longer to help evaporate excess liquid. Caloric content per serving Each serving of this casserole has around 250 calories. This makes it a hearty yet satisfying dish. Health benefits of heirloom tomatoes Heirloom tomatoes are rich in vitamins and antioxidants. They support heart health and boost your immune system. Plus, their bright colors add nutrients to your meal! You learned how to create a delicious heirloom tomato pie casserole. We covered essential ingredients and their substitutes, plus tips for quality. The step-by-step instructions guide you through preparation and baking. We shared tricks for enhancing flavor and offered variations to suit diets. Proper storage and answers to common questions help you keep your casserole fresh. Enjoy your cooking adventure and explore different flavors. A well-made casserole can brighten any meal. Dive in, have fun, and savor each bite!
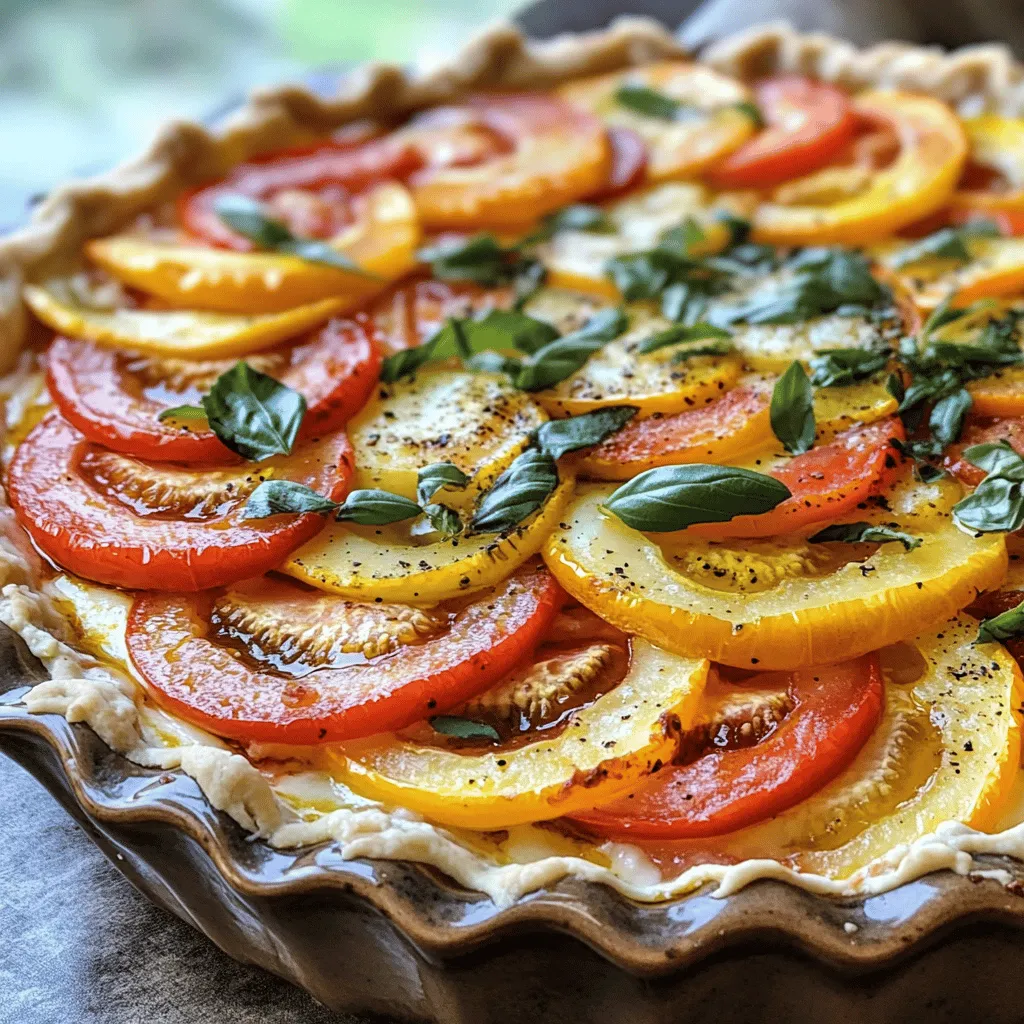
Easy Heirloom Tomato Pie Casserole Tasty Family Dish
If you’re looking for a tasty family dish that celebrates fresh produce, you’ve come to the right place! This Easy Heirloom Tomato Pie Casserole is
- Chicken options: 4 pieces of chicken (thighs, drumsticks, or breasts with skin) - Buttermilk: 1 cup for marinating - Hot sauce: 1 teaspoon (optional for heat) - All-purpose flour: 1 ½ cups for coating - Smoked paprika: 1 teaspoon for extra depth - Garlic powder: 1 teaspoon for flavor - Onion powder: 1 teaspoon for sweetness - Cayenne pepper: ½ teaspoon (adjust for heat preference) - Kosher salt: 1 teaspoon for seasoning - Freshly cracked black pepper: ½ teaspoon for spice - Vegetable oil: enough for frying (about 2 inches in the pan) These ingredients make your fried chicken crispy and packed with flavor. The buttermilk helps tenderize the chicken, while the spices in the flour create a crunchy, tasty coating. - Large deep skillet or Dutch oven: This will hold the oil for frying. - Thermometer for oil temperature: This ensures your oil is hot enough. - Mixing bowls and whisk: Use these to mix your buttermilk and spices. With these ingredients and tools, you are ready to make the best fried chicken. The crispy texture and rich flavors will impress anyone who tries it. For the full recipe, check out the details in the earlier section! Marinating chicken is key to great flavor. It helps the meat soak up spices and moisture. For this recipe, we use buttermilk. It makes the chicken tender and juicy. Mix 1 cup of buttermilk with 1 teaspoon of hot sauce if you want some heat. Place the chicken in this mixture. Cover it and put it in the fridge for at least 2 hours, or overnight if you can. The longer it sits, the better it gets! Next, we prepare the coating. In a shallow bowl, mix 1 ½ cups of flour with your spices. Use 1 teaspoon of smoked paprika, garlic powder, and onion powder. Add ½ teaspoon of cayenne pepper for heat, along with 1 teaspoon of kosher salt and ½ teaspoon of black pepper. Stir this well to spread the flavors evenly. To make the coating stick, remove the chicken from the buttermilk. Let any extra liquid drip off. Then, dredge the chicken in the flour mix, pressing gently to make sure it sticks. Now it's time to cook! Heat vegetable oil in a large, deep skillet. Use about 2 inches of oil and heat it to 350°F (175°C). A thermometer helps here for the perfect temperature. Carefully place the coated chicken in the hot oil. Do not overcrowd the pan; fry in batches if needed. Cook for about 12-15 minutes, turning halfway through. The chicken should turn a nice golden brown. Make sure its internal temperature reaches 165°F (75°C). Once cooked, place the fried chicken on a wire rack or a plate with paper towels. This helps drain excess oil and keeps it crispy. To get that perfect crispy skin, start with a few simple tricks. First, ensure you marinate the chicken well. A good soak in buttermilk helps tenderize the meat and adds flavor. The longer you marinate, the better it gets. Aim for at least two hours, but overnight is best. Next, when you coat the chicken, press the flour mix onto the meat. This helps it stick better. For frying, heat your oil to 350°F (175°C). Use a thermometer for accuracy. This temperature creates a nice golden crust while keeping the inside juicy. To spice up your flour mix, add smoked paprika, garlic powder, onion powder, and cayenne pepper. These spices give your chicken a flavorful kick. You can adjust the cayenne based on how spicy you like it. For dipping sauces, consider serving honey mustard or ranch. These pair well with fried chicken. You can also try a spicy aioli for an extra kick. These sauces add a fun twist and enhance the overall flavor. For the full recipe, check out the Crispy Dreams Fried Chicken. {{image_4}} Fried chicken varies greatly across regions. Southern fried chicken is known for its crispy crust and juicy meat. It often uses a simple blend of flour and spices. This method gives it a classic taste. On the other hand, Nashville hot chicken brings the heat. It features a spicy oil paste that coats the fried chicken. This adds a fiery kick to every bite. You can serve it with pickle slices to cool down the spice. Asian-inspired fried chicken offers delightful twists. Korean fried chicken is double-fried for extra crispiness. It often has a sweet and spicy glaze made from gochujang. Japanese karaage uses a soy marinade and potato starch for a light, crunchy coating. Each style has unique flavors and textures. Exploring these options can make your fried chicken experience even more exciting. If you're looking for healthier ways to enjoy fried chicken, consider oven-fried versions. These recipes use less oil and still achieve a crispy outside. You can coat chicken pieces with seasoned breadcrumbs or a mix of flour and spices. Bake them until golden and crunchy. Baked chicken can also mimic fried chicken flavors. You can use similar spices and marinades. Marinating in buttermilk keeps the meat juicy. Oven-baking allows you to control the fat content while still enjoying tasty chicken. These options let you savor the deliciousness without the extra grease. To keep your fried chicken crispy, store it correctly. First, let the chicken cool. If you put hot chicken in a container, it gets soggy. Place the chicken on a wire rack. This allows air to circulate around it. Use an airtight container for storage. A heavy-duty plastic bag works well too. Line the container with paper towels. This absorbs any moisture and helps keep the chicken crispy. Store it in the fridge if you plan to eat it within a few days. Reheating fried chicken can be tricky. You want it hot without losing its crunch. The air fryer is a great choice. Preheat it to 375°F (190°C). Place the chicken in a single layer. Heat for about 5-7 minutes. This method brings back the crispiness. You can also use the oven. Preheat it to 400°F (200°C). Place the chicken on a baking sheet. Heat for 10-15 minutes. This method works well but may take longer. For the best results, always check the internal temperature. It should reach 165°F (75°C) to ensure it’s safe to eat. The secret to juicy fried chicken lies in marination and cooking temperature. Marinating the chicken in buttermilk adds moisture and flavor. It also helps tenderize the meat. I recommend marinating for at least two hours, but overnight is best. This gives the buttermilk time to work its magic. Cooking temperature is just as crucial. Make sure your oil reaches 350°F (175°C) before adding the chicken. This high heat creates a crispy crust while keeping the inside juicy. If your oil is too cool, the chicken will absorb more oil and become greasy. Use a thermometer for accuracy. Yes, you can freeze fried chicken! To freeze it properly, let the chicken cool completely. Once cool, wrap each piece in plastic wrap. Then place them in a freezer bag. Removing as much air as possible helps prevent freezer burn. When you are ready to enjoy it, thaw the chicken in the fridge. This keeps it safe and helps maintain texture. Reheat in the oven at 375°F (190°C) to get the skin crispy again. You can keep leftover fried chicken in the fridge for up to four days. Store it in an airtight container to maintain freshness. If you want it to last longer, freezing is a great option. Just remember to follow the freezing tips I shared. For the best taste and safety, eat your fried chicken within these time frames. This way, you can enjoy that crispy, flavorful goodness! To make the best fried chicken, start with quality ingredients like fresh chicken and buttermilk. Use the right tools for frying to ensure safety and efficiency. Follow the steps for marinating, coating, and cooking to achieve crispy, juicy results. Experiment with seasoning and regional styles for variety. Finally, store your chicken properly and reheat it the right way to keep it delicious. Perfect fried chicken can be yours with practice and these tips. Enjoy every bite and make it your own!
The Best Fried Chicken Crispy and Flavorful Recipe
Are you ready to make the best fried chicken ever? Crispy, juicy, and packed with flavor, this recipe will take your cooking to the next
- 1.5 lbs chicken wings or drumsticks - 1 cup all-purpose flour - 1 cup cornstarch - 1 teaspoon baking powder - 1 teaspoon garlic powder - 1 teaspoon onion powder - 1 teaspoon salt - 1/2 teaspoon freshly ground black pepper - Vegetable oil (for frying) For the chicken, I love using wings or drumsticks. They cook evenly and stay juicy. The flour and cornstarch mixture gives the chicken that perfect crunch. The baking powder helps it puff up nicely. Garlic and onion powder add rich flavors. Don't skip the salt and pepper; they season the chicken well. - 1/2 cup gochujang (Korean chili paste) - 1/4 cup honey - 1/4 cup soy sauce - 2 tablespoons rice vinegar - 1 tablespoon sesame oil - 2 cloves garlic, finely minced - 1 tablespoon fresh ginger, finely minced The sauce is the star here! Gochujang brings heat and depth. Honey adds sweetness, while soy sauce gives umami. Rice vinegar adds a tangy note. Sesame oil rounds it all out, making the sauce rich. Fresh garlic and ginger boost the flavor even more. - Sesame seeds - 2 green onions, thinly sliced Garnishes make your dish pop! Sesame seeds add crunch and a nutty flavor. Green onions bring freshness and color. They both enhance the look and taste of your dish. Remember, you can find the full recipe for detailed steps and tips. To start, you need to make the flour coating. Grab a large mixing bowl. Add the following dry ingredients: - 1 cup all-purpose flour - 1 cup cornstarch - 1 teaspoon baking powder - 1 teaspoon garlic powder - 1 teaspoon onion powder - 1 teaspoon salt - 1/2 teaspoon freshly ground black pepper Whisk these ingredients together well. This mixture gives the chicken a crispy texture you will love. Now, let’s coat the chicken. First, pat the chicken wings or drumsticks dry with paper towels. This step helps the coating stick better. Next, take each piece and dredge it through the flour mixture. Make sure it’s fully coated. Shake off any extra flour mix to avoid clumps. Heat up some vegetable oil in a deep frying pan. Aim for about 2 inches deep. Bring the oil to around 350°F (175°C). Carefully add the coated chicken pieces in small batches. Fry them for about 8-10 minutes. Turn them occasionally for even cooking. They should turn golden brown. Make sure the chicken reaches an internal temperature of 165°F (75°C). Once done, move the chicken to a wire rack or paper towels to drain excess oil. Now, it’s time to make the sweet and spicy sauce. In a medium saucepan, mix the following ingredients over medium heat: - 1/2 cup gochujang (Korean chili paste) - 1/4 cup honey - 1/4 cup soy sauce - 2 tablespoons rice vinegar - 1 tablespoon sesame oil - 2 cloves garlic, finely minced - 1 tablespoon fresh ginger, finely minced Stir the mixture well. Let it come to a simmer. Cook for about 5 minutes. This will thicken the sauce. Once thickened, remove the pan from heat. To finish, pour the sauce over the fried chicken in a large bowl. Toss until each piece is well coated. For an added touch, sprinkle sesame seeds and sliced green onions on top. This is the key to your homemade sweet and spicy Korean fried chicken delight. To achieve crispy chicken texture, start with dry chicken. Pat your chicken wings or drumsticks with paper towels. This step helps the coating stick better. Next, use a mix of flour and cornstarch for the best crunch. The cornstarch adds a lightness that flour alone cannot provide. Heat your oil to about 350°F (175°C). This temperature ensures the chicken fries evenly and gets that golden brown color. Fry in small batches to avoid overcrowding. This keeps the temperature steady and allows for even cooking. Adjusting thickness and sweetness is key to a great sauce. For a thicker sauce, let it simmer longer. If it’s too thick, add a splash of water or more vinegar. Sweetness can be increased by adding more honey. Taste as you go! Balance is crucial; you want sweet, spicy, and savory all at once. The sauce should coat the chicken well but not be too runny. A good rule is to make it thick enough to cling to the chicken without dripping off. For a fantastic presentation, arrange the fried chicken on a large platter. Drizzle extra sauce over the top for a glossy look. Sprinkle sesame seeds generously to add texture. Green onions make a fresh garnish and add color. Serve with pickled radishes on the side. They give a nice contrast to the richness of the chicken. You can also add steamed rice or a fresh salad for a complete meal. Try these options to make your chicken dish even more delightful! {{image_4}} You can switch up the chicken for different proteins. Chicken thighs work well if you want dark meat. They stay juicy and tender during cooking. If you're vegan or vegetarian, use tofu or tempeh instead. Press the tofu to remove excess moisture. Then, cut it into bite-sized pieces. You can also use cauliflower for a tasty veggie option. Just coat the florets like you would with chicken. You can change the sauce to match your taste. If you like it sweeter, add more honey. If you want more heat, include extra gochujang. You can also add some sriracha for a different kick. For a tangy twist, add lime juice or more rice vinegar. This lets you create a flavor that is perfect for you. If you or your guests need gluten-free meals, you can easily adjust the recipe. Use gluten-free flour instead of all-purpose flour. Cornstarch is already gluten-free, so you’re set there. Check the soy sauce label and pick a gluten-free version. This way, everyone can enjoy this dish without worry. Feel free to get creative and make this dish your own! For the complete recipe, visit the Full Recipe section. To keep your sweet and spicy Korean fried chicken fresh, use good storage methods. First, let the chicken cool to room temperature. Then, place it in an airtight container. Make sure to separate layers with parchment paper to avoid sticking. Store it in the fridge. It will last up to three days. To reheat, the goal is to keep the chicken crispy. Preheat your oven to 375°F (190°C). Place the chicken on a baking sheet lined with foil. Bake for about 10-15 minutes. This method revives the crunch. You can also use a toaster oven for smaller batches. Avoid using the microwave; it makes the chicken soggy. If you want to freeze your chicken, prepare it first. Allow it to cool completely. Wrap each piece in plastic wrap, then place them in a freezer bag. Squeeze out as much air as you can. Label the bag with the date. You can freeze it for up to three months. To thaw, move it to the fridge overnight before reheating. Making this dish takes about 50 minutes. You need around 20 minutes to prep. Frying the chicken takes about 10 minutes. The sauce takes another 5 minutes. Overall, it’s a quick and tasty meal for any day. Yes, you can use an air fryer. It’s a healthier option. Preheat your air fryer to 375°F (190°C). Lightly coat the chicken with oil before placing it in the basket. Cook for about 25-30 minutes. Check the chicken is crispy and reaches 165°F (75°C) inside. To change the spice level, use less gochujang in the sauce. You can also add honey for sweetness. If you like more heat, add extra gochujang or some chili flakes. Adjust to your taste as you mix the sauce. You learned how to make sweet and spicy Korean fried chicken. I covered main ingredients, cooking steps, and tips. You can customize this dish by changing proteins or sauces. Remember to store leftovers correctly and reheat to keep them crispy. This recipe is fun and easy to adapt for everyone. Enjoy your cooking adventure and share the joy of this tasty dish!
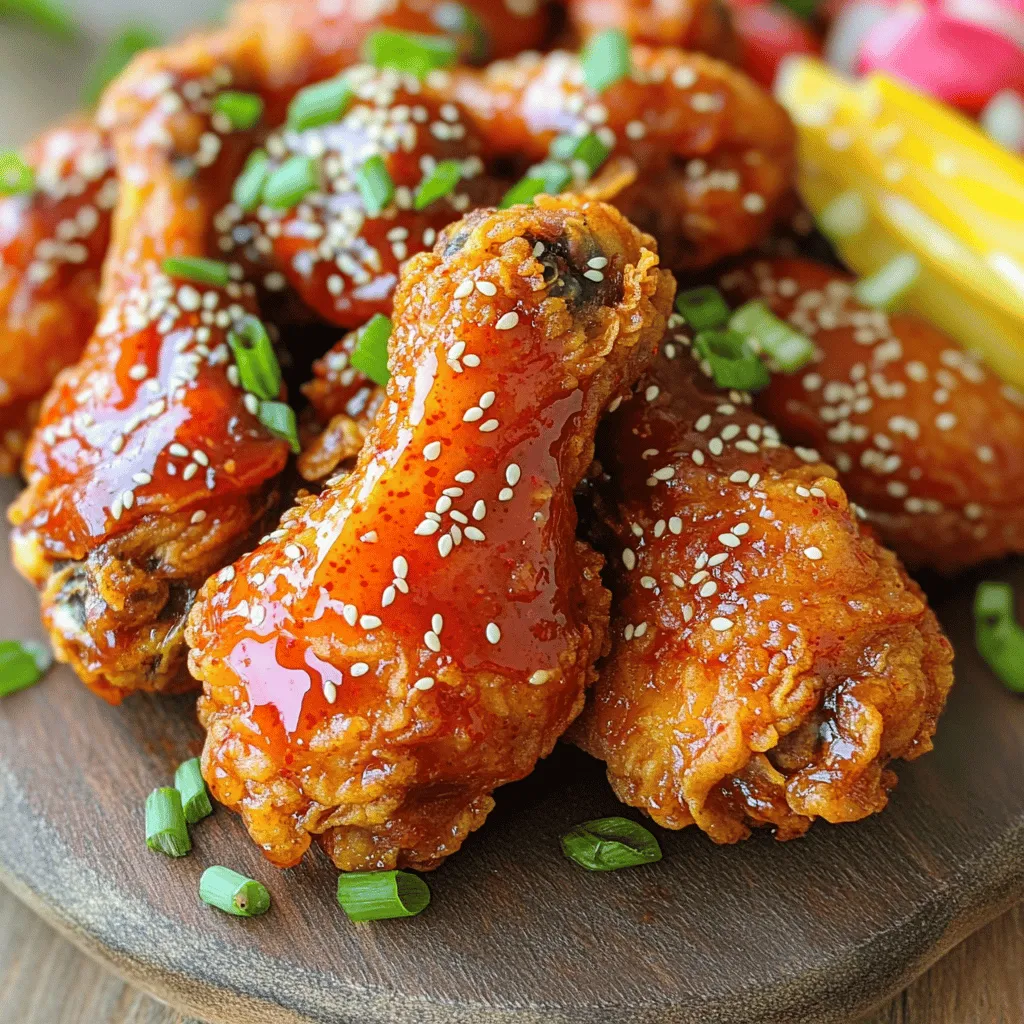
Homemade Sweet & Spicy Korean Fried Chicken Delight
Are you craving a flavor explosion? Homemade Sweet & Spicy Korean Fried Chicken is your answer! I’ll show you how to make crispy chicken coated
For this recipe, you need 2 to 4 frozen chicken breasts. They should weigh about 1.5 to 2 pounds. Frozen chicken breasts are great for quick meals. The seasoning gives the chicken great flavor. Here’s what you need: - 2 teaspoons garlic powder - 1 teaspoon onion powder - 1 teaspoon paprika - 1 teaspoon Italian seasoning - Salt and freshly cracked pepper to taste Mix these spices together in a bowl. This blend makes your chicken taste amazing. You can use broth to keep the chicken juicy. Here are your choices: - 1 cup chicken broth (for rich flavor) - 1 cup vegetable broth (for a lighter taste) The broth adds moisture and helps the chicken cook evenly. You can find both options at any grocery store. For the full recipe, check out Instant Pot Magic: Juicy Frozen Chicken Breasts. Start by plugging in your Instant Pot. Select the 'Sauté' function and add one tablespoon of olive oil. Let it heat for about one minute until it looks shiny. This step helps to add flavor and color to your chicken. While the pot warms up, grab a small bowl. Mix together these spices: - 2 teaspoons garlic powder - 1 teaspoon onion powder - 1 teaspoon paprika - 1 teaspoon Italian seasoning - Salt and freshly cracked pepper to taste Take your frozen chicken breasts and rub the spice mix all over them. Make sure to cover each piece well. The seasoning will help the chicken taste great. When the olive oil is hot, carefully place the seasoned frozen chicken breasts in the pot. Pour one cup of chicken broth around the edges of the pot. This broth adds moisture and keeps the chicken tender without touching it directly. Next, close the lid and set the steam valve to 'Sealing'. Press the 'Manual' or 'Pressure Cook' button. Set the timer for 10 minutes if your chicken is thin, or 12 minutes for thicker pieces. After cooking, let the pressure release naturally for about 5 minutes. Then, switch the steam valve to 'Venting' to let out any remaining pressure. Open the lid carefully. Use a meat thermometer to check that the chicken's internal temperature reaches at least 165°F (75°C). If it’s done, you can serve it whole or shred it with two forks. For extra flavor, you can make a sauce with the leftover broth. Follow these steps, and you'll have juicy, tasty chicken in no time. For the full recipe, check the earlier section. To ensure your chicken is cooked just right, use a meat thermometer. The internal temperature should reach 165°F (75°C). If your chicken breasts are thick, you might need to increase the cooking time slightly. After cooking, let the chicken rest for a few minutes. This helps keep it juicy and tender. You can boost the flavor of your chicken with simple changes. Try adding lemon juice or zest to the broth for brightness. Fresh herbs like thyme or rosemary can also add depth. If you like it spicy, include some cayenne pepper or crushed red pepper flakes in your seasoning mix. These small tweaks can turn a good dish into a great one. How you serve your chicken matters. Slice the breasts into even pieces to show off the juicy interior. Arrange them on a nice platter and sprinkle fresh parsley or cilantro on top. This adds color and makes the dish look inviting. Pair your chicken with colorful sides like roasted veggies or a fresh salad. A well-presented plate not only looks good, but it also enhances the dining experience. For more detailed instructions and tips, check out the Full Recipe. {{image_4}} You can change up the flavor by using different spices. Try using taco seasoning for a zesty twist. Or, go for a sweet and smoky flavor with barbecue seasoning. For an Asian flair, use soy sauce, ginger, and sesame oil. You can also use fresh herbs like rosemary or thyme for a bright taste. Sauces can take your chicken to the next level. A simple lemon butter sauce is fresh and rich. Mix melted butter with lemon juice and a bit of garlic for a bright flavor. For a creamy option, whisk together sour cream, ranch seasoning, and a splash of milk. You can also try a spicy buffalo sauce for a kick. Serving your chicken well makes it look appealing. Slice the chicken and place it on a bed of rice or quinoa for a filling meal. You can also shred it for tacos or sandwiches. Pair it with crunchy vegetables for a salad. Drizzle with your favorite sauce to add flavor and color. For a heartier option, serve it alongside roasted potatoes or pasta. For more ideas, check out the Full Recipe for inspiration! After you cook your chicken, let it cool. Place leftover chicken in a shallow container. Cover it tightly with a lid or plastic wrap. This helps keep it fresh. Store the chicken in the fridge. It will last for up to four days. If you want to save it longer, you can freeze it. To reheat leftover chicken, use the microwave or the oven. If using the microwave, place the chicken on a plate. Cover it with a damp paper towel. Heat it in short bursts, checking often. In the oven, set it to 350°F (175°C). Place the chicken in a baking dish. Add a splash of broth to keep it moist. Heat for about 15 to 20 minutes. If you freeze cooked chicken, it will stay fresh for up to three months. Cut the chicken into pieces for easy storage. Wrap each piece in plastic wrap, then place it in a freezer bag. Remove as much air as possible. Label the bags with the date. When ready to eat, thaw the chicken overnight in the fridge. You can also use it straight from the freezer in soups or stews. Yes, you can cook fresh chicken breasts in the Instant Pot. The cooking time will be shorter. For fresh chicken, set the timer for about 6 to 8 minutes. Always check the internal temperature. It should reach 165°F (75°C) for safe eating. If your chicken isn't done, don't worry. Simply seal the pot again and cook for a few more minutes. Check the temperature again afterward. This is why a meat thermometer is a great tool. It helps you ensure perfect doneness every time. To make this recipe low-carb, choose a low-carb broth. You can also skip any added sugars in seasoning. Use more herbs and spices for flavor. Serve with non-starchy veggies like broccoli or cauliflower to keep it low-carb and delicious. For full details, check the Full Recipe. This guide showed you how to cook chicken breasts in an Instant Pot. We covered ingredients, step-by-step instructions, and tips for perfect results. You learned how to enhance flavors and present your dish well. Variations and storage tips help you adapt and keep leftovers fresh. With answers to common questions, you're now ready to create a delicious meal. Enjoy cooking and experimenting with your chicken dishes!
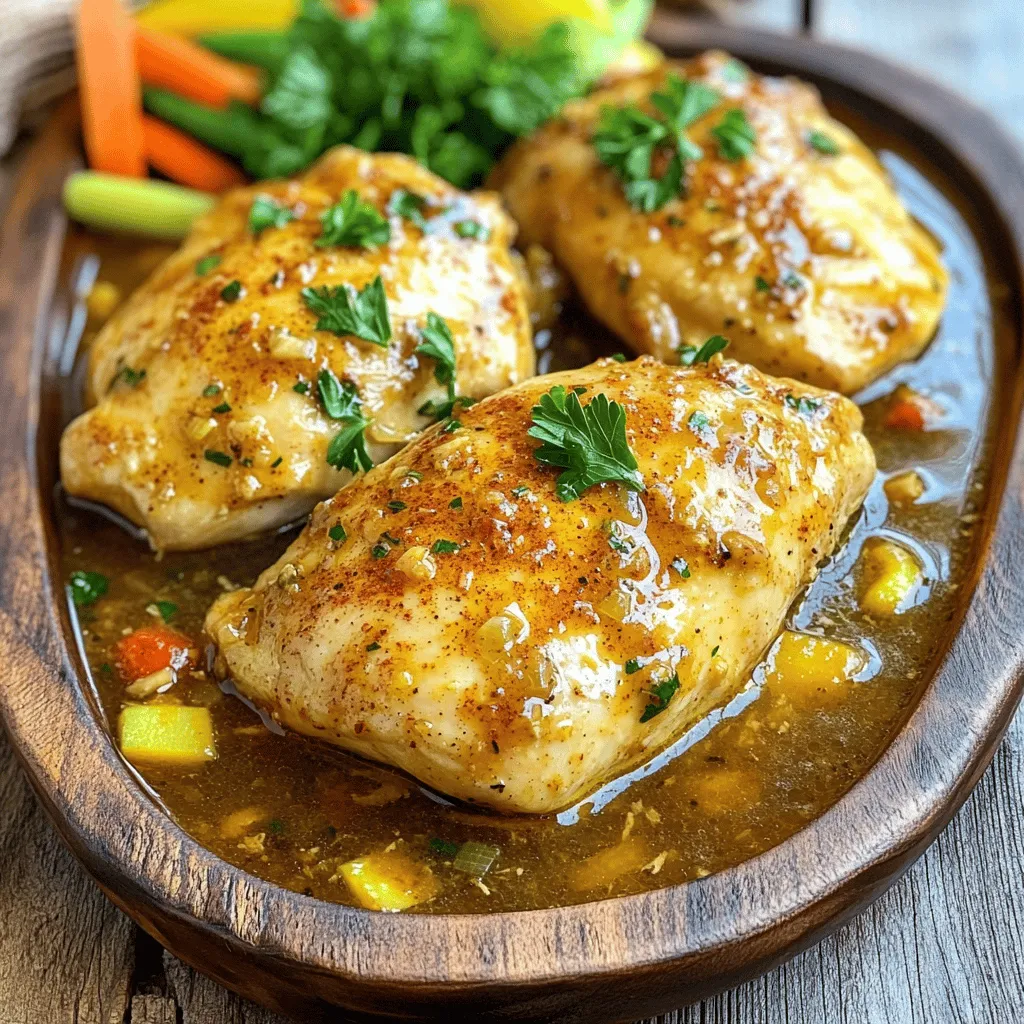
How To Cook Frozen Chicken Breasts In The Instant Pot
Do you have frozen chicken breasts but no time to thaw? The Instant Pot is your answer! In this guide, I’ll show you how to
- 1 large eggplant, sliced into 1/4 inch rounds - 2 large ripe tomatoes, sliced - 1 medium onion, thinly sliced - 2 cloves garlic, minced Eggplant is the star of this dish. Its rich and creamy texture pairs well with tomatoes. You want ripe tomatoes for the best flavor. The onion adds sweetness, while garlic gives it a savory kick. - 1 cup creamy ricotta cheese - 1 cup shredded mozzarella cheese - 1/2 cup finely grated Parmesan cheese Cheese makes this pie extra tasty. I love using ricotta for its creaminess. Mozzarella melts beautifully, adding a gooey layer. Parmesan gives a nice salty touch, enhancing the overall taste. - 1 teaspoon dried oregano - 1 teaspoon fresh basil, chopped (or 1/2 teaspoon dried basil) - 1 tablespoon extra virgin olive oil - 1 pre-made pie crust (store-bought or homemade) Seasonings bring life to the pie. Dried oregano adds an Italian flair, while fresh basil offers brightness. Olive oil helps everything blend together. You can use a store-bought pie crust for ease or make your own for that homemade touch. Check out the Full Recipe for more details! 1. Preheat your oven to 375°F (190°C). This helps cook the pie evenly. 2. Slice the eggplant into 1/4 inch rounds. Place them on a baking sheet. 3. Drizzle olive oil over the eggplant slices. Use enough to coat them well. 4. Season the slices with sea salt and black pepper. 5. Roast the eggplant in the oven for about 20 minutes. Flip the slices halfway through for even browning. Once done, take them out and let them cool. 1. Heat a skillet over medium heat. Add a splash of olive oil. 2. Sauté the thinly sliced onion until soft and translucent, about 3-4 minutes. 3. Stir in the minced garlic. Cook for another minute until fragrant. Remove the skillet from the heat. 1. In a mixing bowl, combine ricotta cheese, half of the mozzarella, Parmesan, oregano, basil, and a pinch of salt and pepper. Mix until smooth. 2. Roll out your pie crust and fit it into a pie dish. Make sure it covers the bottom and sides evenly. 3. Spread the ricotta mixture evenly on the crust. 4. Layer the roasted eggplant slices over the ricotta. Follow with the sliced tomatoes. 5. Sprinkle the sautéed onions and garlic on top for added flavor. 1. Scatter the remaining mozzarella cheese over the top of the pie. 2. Place the pie in the preheated oven. Bake for 25-30 minutes. 3. Check for a golden-brown top and melted cheese. Once done, let it rest for about 10 minutes. This makes slicing easier and lets flavors meld together. For more details, refer to the Full Recipe. - Roasting eggplant: To avoid sogginess, slice the eggplant into 1/4 inch rounds. Lay them flat on a baking sheet. Lightly drizzle with olive oil. Sprinkle sea salt and black pepper. Roast for 20 minutes, flipping halfway. This method helps keep them firm and tasty. - Ensuring even melting of cheese: Use freshly shredded mozzarella cheese. Spread it evenly on top of the pie. This way, it melts evenly and creates a golden crust. - Slicing and garnishing suggestions: When serving, slice the pie into wedges. Each slice should show off the layers. Garnish with fresh basil leaves for color and taste. A drizzle of balsamic reduction adds elegance and flavor. - Serving with accompaniments: Pair your pie with a light salad. A simple arugula or mixed greens salad works well. You can also serve it with crusty bread for a hearty meal. - Overcooking vegetables: Keep an eye on your veggies. Overcooking can make them mushy. Aim for tenderness without losing structure. - Using too much liquid: Be careful with sauces. Excess liquid can make your pie soggy. Stick to the recipe for the right balance. These tips will help you create a delightful Eggplant Tomato Pie that impresses everyone at the table. For the complete guide, check the Full Recipe. {{image_4}} You can make this dish fit your diet. If you're vegan, try using dairy-free cheese. Brands like Daiya or Follow Your Heart work well. These cheeses melt nicely and taste great. If you need a gluten-free option, look for gluten-free pie crusts. Many stores offer ready-made crusts, or you can make one from almond flour or rice flour. This keeps the pie delicious and safe for all diets. To boost the flavor, add spices or herbs. You could sprinkle in some red pepper flakes for heat. Fresh herbs like thyme or rosemary also add depth. You can include protein too. Ground turkey or beef adds heartiness. For a plant-based option, use chickpeas or lentils. These options make the pie more filling and tasty. You can change this pie based on the season. In summer, add zucchini or bell peppers for freshness. In fall, try sweet potatoes or butternut squash for a cozy twist. These seasonal changes keep the dish exciting and new. To keep your Eggplant Tomato Pie fresh, store it in the fridge. Here’s how: - Wait until the pie cools down. - Cover it tightly with plastic wrap or aluminum foil. - Place it in an airtight container for best results. For freezing, follow these steps: - Slice the pie into portions. - Wrap each slice in plastic wrap. - Place the wrapped slices in a freezer-safe bag or container. This way, you can enjoy it later without losing flavor. When it’s time to reheat, the oven is the best choice. Here’s why: - Preheat your oven to 350°F (175°C). - Place the pie on a baking sheet. - Cover it with foil to avoid drying out. Bake for about 15-20 minutes, or until it's hot. If you need a quicker option, use the microwave: - Place a slice on a microwave-safe plate. - Heat for about 1-2 minutes. However, this method can make the crust soft. The oven keeps the texture and flavor intact. Enjoy your delicious pie! Bake the Eggplant Tomato Pie for 25 to 30 minutes. You want the cheese to melt and bubble. It should turn a lovely golden brown color. Check it at 25 minutes to avoid overbaking. Yes, you can prepare this dish ahead of time. Assemble the pie and cover it tightly. Store it in the fridge for up to 24 hours before baking. This can save you time on busy days. This pie pairs well with a fresh salad. Try a simple green salad with a light vinaigrette. You can also serve it with crusty bread or a side of roasted vegetables. These sides enhance the meal and add more flavors. Yes, you can omit the cheese if you prefer. Use a vegan cheese substitute or skip it entirely. The pie will still taste great with the roasted eggplant and tomatoes. Just ensure you add a bit more seasoning for flavor. Eggplant tomato pie combines tasty ingredients for a delightful dish. You learned about the key ingredients, like eggplant, tomatoes, and cheese. I shared step-by-step instructions to make perfect pie layers. You received tips to avoid common mistakes and enhance flavors. Don't forget the storage and reheating tips for leftovers. With these insights, you can create a delicious eggplant tomato pie that impresses everyone at the table. Enjoy the cooking process and savor every bite!
Eggplant Tomato Pie Flavorful and Simple Recipe
Welcome to the world of flavorful cooking! Today, I’ll share my simple and tasty Eggplant Tomato Pie recipe. This dish combines fresh eggplant, juicy tomatoes,
For a tasty Tomato Basil Chicken, you need these main items: - 4 boneless, skinless chicken breasts - 2 cups cherry tomatoes, halved - 1 cup fresh basil leaves, finely chopped - 3 cloves garlic, finely minced - 1 teaspoon dried oregano - 1 teaspoon balsamic vinegar - 1/4 cup extra virgin olive oil - Salt and freshly ground pepper to taste These ingredients work together to create a fresh and vibrant dish. You can enhance your dish with these optional items: - Fresh mozzarella cheese, sliced (for topping) - A squeeze of lemon juice - Red pepper flakes for heat Adding these can give your meal a personal touch. Freshness matters! Here’s how to choose the best: - Chicken: Look for bright pink, moist breasts. Avoid any that look gray or slimy. - Tomatoes: Choose firm, shiny cherry tomatoes. They should smell sweet and fruity. - Basil: Pick bright green basil leaves. They should feel fresh, not wilted. Using fresh ingredients makes your dish taste better. For the full recipe, check out my delicious Tomato Basil Chicken Delight. To start, let's make the tomato basil mixture. Grab a large mixing bowl. In it, add: - 2 cups cherry tomatoes, halved - 3 cloves garlic, finely minced - 1/4 cup extra virgin olive oil - 1 teaspoon dried oregano - 1 teaspoon balsamic vinegar - 1 cup fresh basil leaves, finely chopped - Salt and freshly ground pepper to taste Mix these ingredients gently. You want the tomatoes to be well-coated. The garlic adds a nice kick, while the basil gives freshness. This mixture is key for flavor. Next, we need to sear the chicken. Heat one tablespoon of olive oil in a large oven-safe skillet over medium-high heat. While the skillet heats, season both sides of the chicken breasts with salt and pepper. Once the skillet is hot, add the chicken. Sear each side for about five minutes. Look for a golden-brown crust. This step locks in the juices and flavor. After searing, pour the tomato basil mixture over the chicken. If you want, add slices of fresh mozzarella on top. Now, it's time to bake. Carefully put the skillet in the preheated oven at 375°F (190°C). Bake for 20 to 25 minutes. Check that the chicken reaches an internal temperature of 165°F (75°C). The tomatoes should bubble and soften. Once done, take the skillet out and let it rest for five minutes. This helps the chicken stay juicy. Now, you can serve it up and enjoy the delicious flavors of your hard work! For the full recipe, refer to the complete list of steps. To get the best chicken texture, start with fresh, high-quality chicken breasts. Before cooking, let the chicken rest at room temperature for about 15 minutes. This helps it cook evenly. When you sear the chicken, don’t overcrowd the skillet. Give each piece space to brown. This creates a nice crust. Sear each side for about five minutes. Then, bake it just until it reaches 165°F. This keeps the meat juicy and tender. To boost the flavor, use fresh herbs like thyme or parsley along with basil. You can also add a pinch of red pepper flakes for heat. If you like a bit of sweetness, try adding a tablespoon of honey to the tomato mixture. Using fresh lemon juice adds brightness to the dish. If you're a cheese lover, sprinkle some grated Parmesan cheese over the chicken just before serving. This adds a savory touch. Presentation makes a big impact. After cooking, plate each chicken breast neatly. Spoon the tomato and basil mix generously on top. For a pop of color, add fresh basil leaves as a garnish. Serve with a side of green beans or a light salad for a well-rounded meal. You can also drizzle a bit of olive oil over the dish for shine. This simple step makes your meal look gourmet. For the full recipe, check out the details above. {{image_4}} For a smoky flavor, try grilling your chicken. Use the same ingredients from the full recipe, but change the cooking method. Start by marinating the chicken breasts in olive oil, garlic, and balsamic vinegar for at least 30 minutes. This step helps the chicken soak up all the great flavors. Preheat your grill to medium-high heat. Grill each side for about 6-8 minutes. You want the chicken to reach 165°F. Once done, top with the fresh tomato and basil mixture. If you like a one-pan meal, the skillet method shines. You can add chopped bell peppers or zucchini to the tomato mixture. Just toss them in while you sear the chicken. This adds a nice crunch and extra nutrients. You can also use different types of cheese, like feta, for a tangy twist. Searing gives the chicken a lovely brown crust, then bake as usual. You can switch up ingredients based on what you have. If you don’t have cherry tomatoes, use regular tomatoes and chop them. Dried basil can replace fresh basil in a pinch, but use less since dried herbs are stronger. If you need a dairy-free option, skip the cheese or use a nut-based cheese. You can also swap the chicken for turkey or fish, adjusting your cooking time as needed. After enjoying your Tomato Basil Chicken, store leftovers properly. First, let the dish cool completely. Then, place it in an airtight container. This keeps the chicken fresh and tasty. Store it in the fridge for up to three days. If you want to keep it longer, consider freezing it. When it's time to eat your leftovers, heat them gently. The best method is to use the oven. Preheat the oven to 350°F (175°C). Place the chicken in an oven-safe dish. Cover it with foil to keep it moist. Heat for about 20 minutes. If you prefer the microwave, use it on medium power. Heat for 2-3 minutes, checking often. This keeps the chicken juicy. If you want to freeze your Tomato Basil Chicken, it’s easy! Cut the chicken into portions. Place them in freezer-safe bags. Remove as much air as possible. Label the bags with dates. You can freeze it for up to three months. When ready to eat, thaw it in the fridge overnight. Then, follow the reheating instructions for the best taste. Enjoy your meal later on! For the full recipe, check the detailed instructions above. You can serve Tomato Basil Chicken with many sides. Here are some great options: - Steamed seasonal vegetables for a healthy touch. - A light salad to complement the dish. - Garlic bread for a nice crunch. - Rice or pasta to soak up the sauce. These sides add balance to your meal and make it more filling. Yes, you can use dried basil. However, fresh basil gives a brighter taste. If using dried, remember: - Use one teaspoon of dried basil for every tablespoon of fresh. - Add it earlier in cooking to allow the flavor to bloom. Dried herbs are handy, but fresh basil enhances the dish. The best way to check chicken is by using a meat thermometer. Insert it into the thickest part of the chicken. Look for: - An internal temperature of 165°F (75°C). - Clear juices running from the chicken when you cut it. If you don't have a thermometer, cut into the chicken. The meat should be white, not pink. Cooking the chicken fully keeps it safe and tasty. This blog post covered everything you need for Tomato Basil Chicken. We explored key ingredients, from essential to optional ones, and tips for selecting fresh produce. You learned easy steps for prep, cooking, and baking to gain the best flavor. Plus, we shared useful tips for texture and presentation. Variations and storage ideas helped expand options for your meals. Keep these tips in mind to make your cooking easier and more delicious every time. Enjoy your tasty dishes!
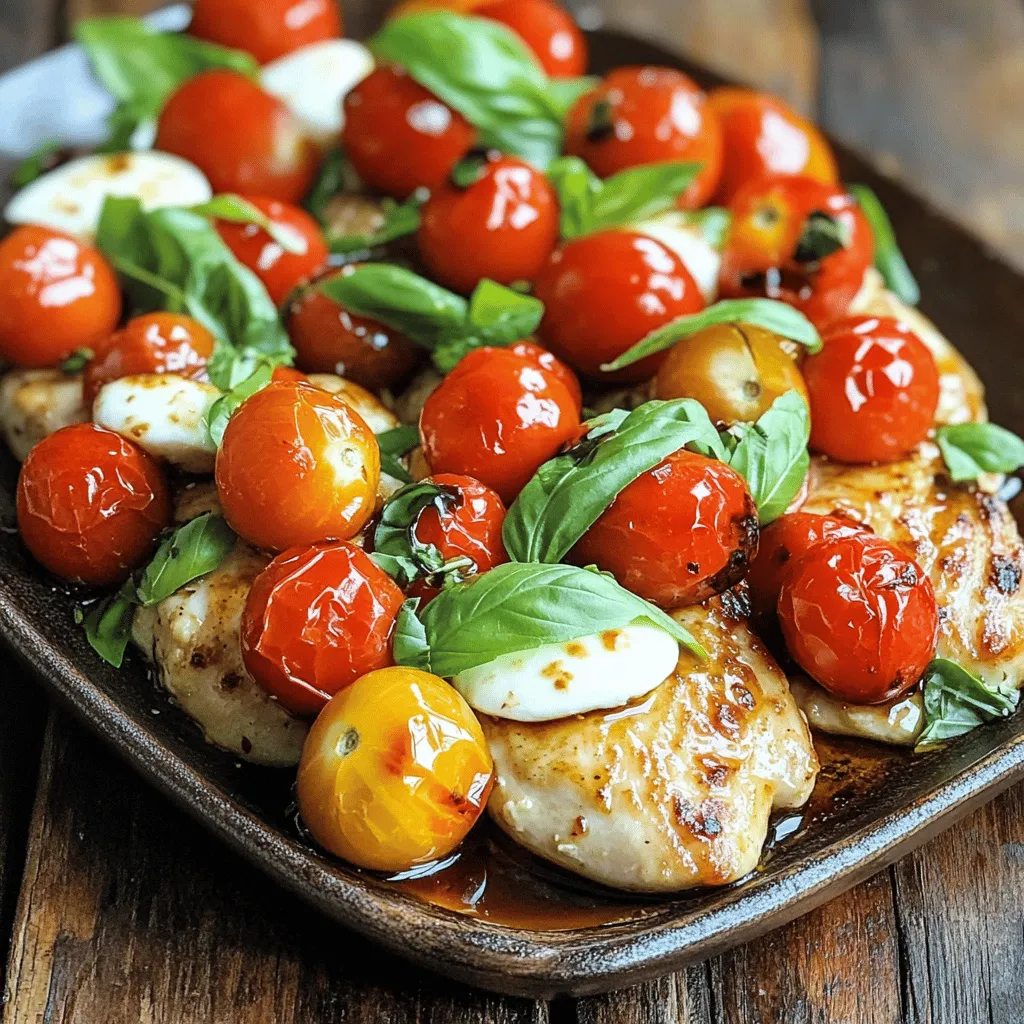
Savory Tomato Basil Chicken Easy Recipe for Dinner
Looking for a quick and tasty dinner idea? This Tomato Basil Chicken recipe is your answer! It’s simple, fresh, and bursting with flavor. You’ll love
- 4 boneless, skinless chicken breasts - 1 cup 7UP soda - 1/4 cup extra virgin olive oil - 1 tablespoon Worcestershire sauce - 2 cloves garlic, finely minced To start, you need some good chicken. I prefer boneless, skinless chicken breasts because they cook evenly. Next, grab a cup of 7UP. This soda adds sweetness and helps tenderize the chicken. You also need a quarter cup of extra virgin olive oil for richness. A tablespoon of Worcestershire sauce adds depth. Lastly, use two cloves of finely minced garlic for flavor. - 1 teaspoon smoked paprika - 1 teaspoon onion powder - 1/2 teaspoon freshly ground black pepper - 1/2 teaspoon sea salt - 1 tablespoon freshly chopped herbs for garnish These seasonings make your chicken pop. Smoked paprika gives a nice smoky taste. Onion powder adds a hint of sweetness. Black pepper and sea salt bring out all the flavors. Don’t forget the herbs! They add freshness to your dish. - Fresh lemon wedges for serving Lemon wedges are optional, but they are a great addition. A squeeze of lemon brightens up the flavors. It gives your grilled chicken a fresh, zesty finish. For the full recipe, check out the details above. Enjoy cooking your 7UP Grilled Chicken! To start, gather your marinade ingredients. In a medium bowl, mix together: - 1 cup 7UP soda - 1/4 cup extra virgin olive oil - 1 tablespoon Worcestershire sauce - 2 cloves garlic, finely minced - 1 teaspoon smoked paprika - 1 teaspoon onion powder - 1/2 teaspoon freshly ground black pepper - 1/2 teaspoon sea salt Whisk these ingredients well until you have a smooth marinade. Next, place the chicken breasts into a large resealable bag or a shallow glass dish. Pour the marinade over the chicken, ensuring that each piece is well coated. Seal the bag or cover the dish tightly. Refrigerate for at least 1 hour, but up to 4 hours is even better for flavor. While the chicken marinates, it’s time to prepare your grill. Preheat your grill to a medium-high temperature, around 375°F to 400°F (190°C to 200°C). Make sure the grates are clean and well-oiled to prevent sticking. This step is key for achieving those perfect grill marks. Once your grill is ready, take the chicken out of the marinade and discard the leftover marinade. Place the chicken breasts gently on the grill. Grill each side for about 6-7 minutes. The chicken is done when its internal temperature reaches 165°F (75°C). This ensures the chicken is fully cooked and juicy. After grilling, transfer the chicken to a clean plate. Let it rest for about 5 minutes before serving. This resting time helps the juices stay in the meat, making it tender and delicious. For the best flavor, marinate the chicken for at least one hour. If you can, aim for four hours. The longer it sits, the more flavor it absorbs. Using 7UP in the marinade adds sweetness and helps tenderize the chicken. The acidity breaks down the meat, making it juicy and soft. To flip the chicken without sticking, let it cook on one side until it easily releases. Avoid moving it too soon. Resting the chicken after grilling is key. Let it sit for five minutes so the juices redistribute. This keeps the meat tender and flavorful. For garnish, use fresh herbs like parsley or cilantro. They add color and freshness. Serve the chicken with grilled veggies or a crisp salad. Lemon wedges bring a zesty finish. You can find the Full Recipe to guide you through the process effortlessly. {{image_4}} You can switch up the flavor of 7UP grilled chicken with fun marinades. One idea is a citrus marinade. Use lime or orange juice to add a bright taste. Just mix the juice with 7UP and your favorite herbs. This gives the chicken a fresh twist. If you crave heat, try a spicy version. Add hot sauce to the 7UP marinade. Just a few dashes can make a big difference. It creates a zesty kick that many will love. Experimenting with different marinades keeps your meals exciting. You can also cook 7UP chicken in different ways. If you don’t have a grill, try oven baking. Preheat your oven to 375°F (190°C). Place the marinated chicken in a baking dish. Bake for about 25-30 minutes or until the chicken is cooked through. For super tender chicken, use a slow cooker. Just add the marinated chicken to the slow cooker. Cook on low for 6-8 hours or high for 3-4 hours. This method makes the chicken juicy and flavorful. The fun doesn’t stop with cooking methods. You can serve 7UP chicken in many ways. One tasty option is to make tacos. Shred the grilled chicken and pile it into soft tortillas. Add toppings like avocado and salsa for a delicious meal. Another idea is to use the chicken as a salad topping. Slice the grilled chicken and place it over mixed greens. Add your favorite veggies and dressing. This makes for a fresh and healthy dish that is easy to prepare. For the full recipe and more details, check out the Full Recipe section. To keep your 7UP grilled chicken fresh, store it in an airtight container. Let it cool completely before sealing. This helps lock in moisture and flavor. You can safely refrigerate the chicken for up to 4 days. Always check for any off smell or change in texture before eating. If you want to keep your chicken longer, freezing is a great choice. Wrap the grilled chicken tightly in plastic wrap or foil. Then, place it in a freezer-safe bag. This helps prevent freezer burn. You can freeze the chicken for up to 3 months. When you're ready to eat, transfer it to the fridge overnight to thaw slowly. This keeps it juicy and tasty. When reheating your 7UP grilled chicken, do it gently. The best way is to use an oven set to 350°F (175°C). Place the chicken in a baking dish, cover it with foil, and heat for about 15-20 minutes. This keeps it from drying out. You can also use a microwave, but add a splash of water to keep it moist. Heat in short bursts, checking often. Enjoy your juicy and flavorful delight! Yes, you can use diet 7UP. It will change the taste a bit. The regular soda adds sweetness and a slight zing. Diet soda has less sugar and fewer calories. Your chicken may taste less sweet but still be flavorful. If you want a lighter option, diet 7UP works fine. Check the internal temperature of the chicken. It should reach 165°F (75°C). This means it is safe to eat. Use a meat thermometer for the best results. Insert it into the thickest part of the chicken. If it hits 165°F, your chicken is done. This step is key to avoid undercooked chicken. You can use soy sauce if you need a substitute. It offers a similar salty flavor. Another option is to mix soy sauce with a bit of vinegar. You can also try balsamic vinegar for a different taste. Each option will give your chicken a unique flavor twist. This blog post covered how to make a flavorful grilled chicken using 7UP and simple ingredients. You learned about the right marinating, grilling, and serving techniques, plus useful tips on variations and storage. The key to great chicken lies in the marinade, cooking method, and resting time. Apply these steps and enjoy your tasty meals. With a little creativity, you can make this dish your own. Perfect results are just a grill away!
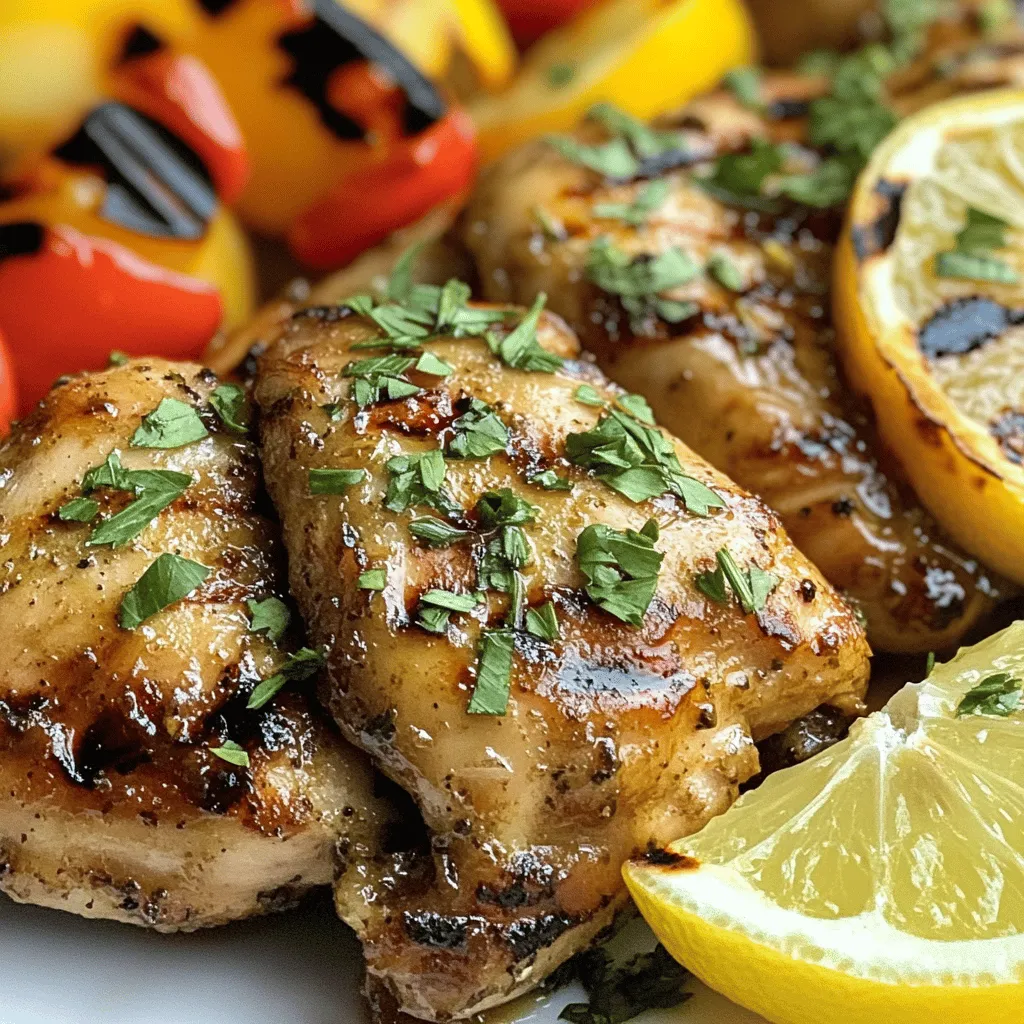
7UP Grilled Chicken Juicy and Flavorful Delight
Are you ready for a meal that bursts with flavor? My 7UP Grilled Chicken is juicy, tender, and easy to make! This recipe uses 7UP