Dinner
. - Choosing the right zucchinis: Pick firm, medium-sized zucchinis. Look for smooth skin and no soft spots. Fresh zucchinis make better noodles. - Tips for perfect spiralizing: Use a spiralizer or julienne peeler. Cut off both ends first. Secure the zucchini well and twist slowly. This ensures even noodles. - Ensuring noodles maintain a crunch: Do not overcook the noodles. Sauté them for just 2-3 minutes. This keeps them crisp yet tender. - Adjusting spice levels to taste: Start with less red pepper flakes if you want it milder. You can always add more later. Taste as you go to find your perfect heat. - Ideal serving dishes for presentation: Use shallow bowls or large plates. This allows the colors to shine. Garnish with fresh cilantro and whole peanuts for a nice touch. - Pairing ideas with protein or sides: Serve with grilled chicken or shrimp. A side of steamed broccoli works well too. This adds balance and makes the meal complete. For more details, check out the Full Recipe. {{image_4}} You can easily make this dish gluten-free. Just swap soy sauce for tamari. Tamari has a similar taste without the gluten. For vegan options, ensure your soy sauce is plant-based. All other ingredients in this recipe are vegan-friendly. Feel free to get creative with your veggies. Adding bell peppers, carrots, or snap peas can boost flavor and color. Want more protein? Try adding tofu, chicken, or shrimp. You can also adjust the spice level. If you prefer mild noodles, use less red pepper flakes. For extra heat, feel free to add more. Don’t hesitate to experiment with different sauces. Peanut sauce adds a rich, nutty flavor. Teriyaki sauce brings a sweet, tangy twist. Chili sauce can amp up the heat even more. Mixing these sauces can create a unique taste in your noodles. For more ideas, check out the Full Recipe for Spicy Garlic Chinese Zucchini Noodles. To store leftover zucchini noodles, place them in an airtight container. This keeps them fresh for a few days. Make sure to separate the noodles from excess sauce. If they sit in sauce, they can become soggy. For best results, refrigerate them within two hours of cooking. You can freeze zucchini noodles if you want to save them for later. First, blanch the noodles in boiling water for about one to two minutes. Then, cool them in ice water. Drain and pat dry. Place the noodles in freezer bags, removing as much air as possible. They can last up to three months in the freezer. When reheating, thaw them overnight in the fridge. Use a skillet over medium heat to warm them for a few minutes. Avoid cooking them too long, or they will turn mushy. You can keep Spicy Garlic Chinese Zucchini Noodles in the fridge for about three days. After that, they may lose their texture and flavor. Always check for signs of spoilage, like off smells or changes in color. Enjoy your leftovers while they’re still fresh! Yes, you can use other vegetables. Here are some great options: - Carrots: Peel and spiralize them like zucchini. - Sweet Potatoes: Peel and spiralize. They add a nice sweetness. - Cucumber: Use a spiralizer or julienne peeler. This gives a refreshing crunch. - Bell Peppers: Slice them into thin strips for a colorful twist. Prepare these veggies similarly. Wash, cut, and spiralize them. Each will add its own flavor and texture to the dish. To make the dish less spicy, follow these tips: - Reduce Red Pepper Flakes: Cut the amount in half or leave them out. - Add More Zucchini: Increase the zucchini amount to balance the heat. - Creamy Elements: Stir in some plain yogurt or sour cream. This will cool the spice. - Sweetness: Add a drizzle of honey or sugar. It can help tone down the heat. These adjustments keep the dish tasty while making it milder for everyone. Here are some tasty side dishes to enjoy with zucchini noodles: - Grilled Chicken: Adds protein and pairs well with the flavors. - Steamed Broccoli: Offers a healthy crunch and bright color. - Spring Rolls: Fresh and light, they complement the noodles well. - Fried Rice: A classic side that enhances the meal's heartiness. Combining these sides will create a well-rounded meal that everyone will love. Yes, you can prepare this dish ahead of time. Here’s how: - Prep Zucchini Noodles: Spiralize the zucchinis and store them in a sealed container in the fridge. - Make the Sauce: You can prepare the garlic sauce and keep it in the fridge. Just reheat it when you're ready to cook. - Combine Before Serving: Cook the noodles and sauce together right before serving. This keeps them fresh and crunchy. Planning this way saves time and makes meal prep easy. For the full recipe, check the earlier section. This blog post covered the key ingredients and steps to make Spicy Garlic Chinese Zucchini Noodles. I shared tips for spiralizing and cooking, variations for different diets, and how to store leftovers. Remember, this dish is quick, easy, and full of flavor. You can personalize it to your taste. Enjoy creating a meal that’s healthy and delicious! Dive into your kitchen and try this recipe today!](https://meltedrecipes.com/wp-content/uploads/2025/07/4b7d8588-53a2-4b25-9eef-36da12903b8a.webp)
Spicy Garlic Chinese Zucchini Noodles Simple Recipe
Craving a quick and flavorful dish? Try my Spicy Garlic Chinese Zucchini Noodles! This simple recipe brings together fresh zucchini, aromatic garlic, and a kick

Honey Garlic Chicken Breasts Simple Flavorful Meal
Looking for a quick and tasty meal? Honey Garlic Chicken Breasts are simple to make and packed with flavor. You only need a few ingredients
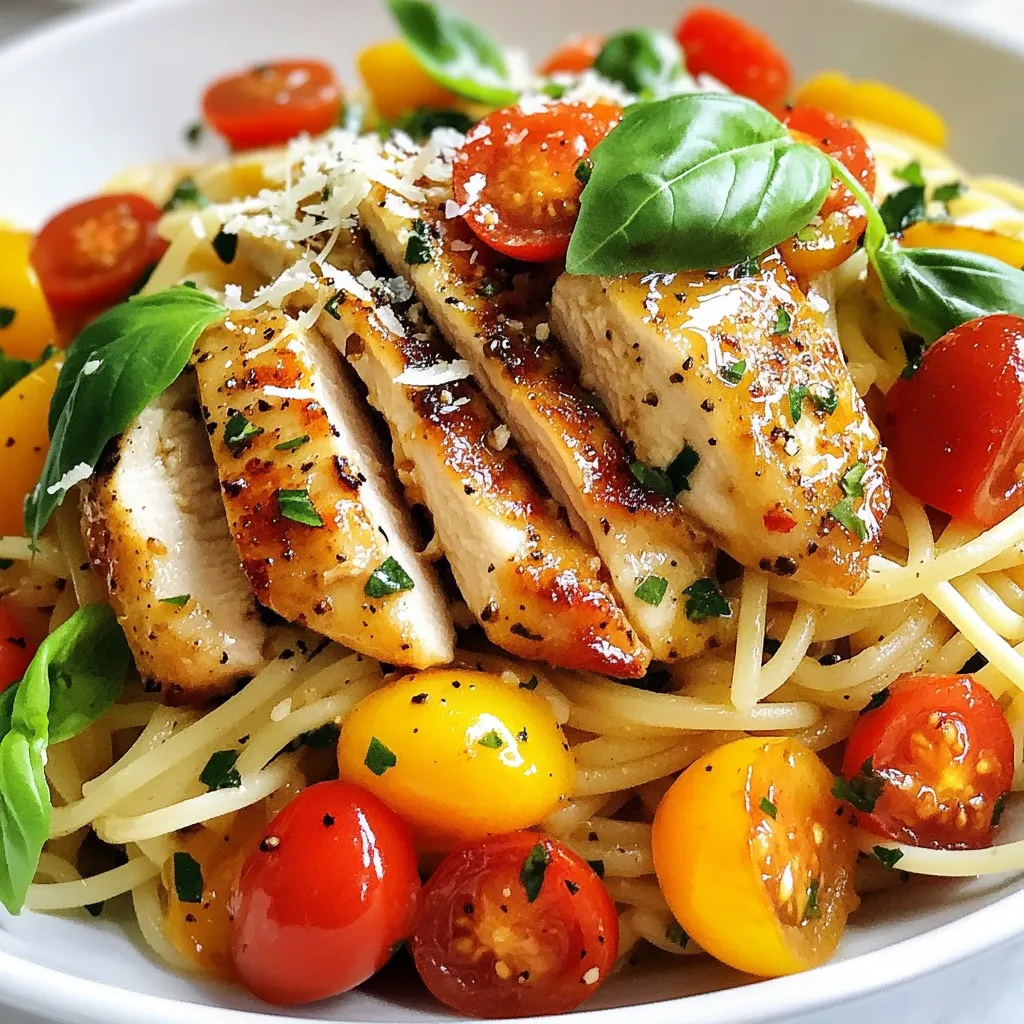
Honey Pepper Chicken Pasta Flavorful and Easy Recipe
Looking for a tasty, quick meal? Honey Pepper Chicken Pasta is your answer! This easy recipe mixes savory chicken, sweet honey, and a hint of
![To make this dish, you need a few key ingredients. Here’s what you’ll need: - 4 boneless, skinless chicken breasts - 1 tablespoon olive oil - 4 cloves of garlic, finely minced - 1 cup freshly grated Parmesan cheese - 1 teaspoon dried oregano - 1 teaspoon dried thyme - 1 teaspoon salt - 1/2 teaspoon freshly cracked black pepper - 1/2 cup panko breadcrumbs - 1/4 cup fresh parsley, finely chopped - Lemon wedges These items create a tasty and crunchy coating. The chicken turns juicy and flavorful with each bite. You can add a few optional ingredients to boost the flavor even more. Consider these: - A pinch of red pepper flakes for heat - A teaspoon of smoked paprika for a smoky taste - A splash of lemon juice in the mix for brightness These extras can make your chicken shine. Try mixing and matching to find your perfect taste. If you don’t have something on hand, don’t worry! Here are some easy swaps: - Use chicken thighs instead of breasts for more flavor and moisture. - Swap olive oil for melted butter for a richer taste. - Grated Pecorino Romano can replace Parmesan for a different flavor profile. - If you lack panko, regular breadcrumbs will work, but the crunch may be less. These substitutions can keep your dish fresh and exciting. Feel free to experiment! For the full recipe, check out the details above. First, gather all your ingredients. You will need: - 4 boneless, skinless chicken breasts - 1 tablespoon olive oil - 4 cloves of garlic, finely minced - 1 cup freshly grated Parmesan cheese - 1 teaspoon dried oregano - 1 teaspoon dried thyme - 1 teaspoon salt - 1/2 teaspoon freshly cracked black pepper - 1/2 cup panko breadcrumbs - 1/4 cup fresh parsley, finely chopped - Lemon wedges for serving Next, preheat your oven to 400°F (200°C). Grease a baking dish lightly with cooking spray or a drizzle of olive oil. This helps the chicken not to stick. Then, mix the Parmesan cheese, minced garlic, oregano, thyme, salt, black pepper, and panko breadcrumbs in a medium bowl. Make sure everything is well combined. Now, dry the chicken breasts with paper towels. This step helps the chicken get a nice crispy layer. Drizzle olive oil on both sides of each breast, coating them evenly. Take each chicken breast and press it firmly into the cheese mixture. Make sure to cover all sides well. Place the coated chicken breasts in the greased baking dish. Transfer the dish to your preheated oven. Bake for 25-30 minutes. The chicken is ready when it reaches an internal temperature of 165°F (75°C) and has a golden brown crust. After baking, remove the chicken from the oven. Let it rest for about 5 minutes. This resting time keeps the chicken juicy. Before serving, garnish the chicken with freshly chopped parsley. Serve with lemon wedges for extra flavor. To get that perfect crunchy texture, pat the chicken dry well. This helps the coating stick better and crisp up nicely. Use fresh Parmesan cheese instead of pre-grated. Fresh cheese melts better and gives a richer flavor. If you want extra crunch, add more panko breadcrumbs. The more, the crunchier! Finally, let the chicken rest after baking. This step locks in moisture and keeps it tender. For the full recipe, check out the details above. Enjoy your savory garlic Parmesan chicken! To keep chicken moist, start with fresh, high-quality meat. Dry chicken lacks flavor. Pat your chicken breasts dry and then coat them with olive oil. This step locks in moisture. Bake the chicken at 400°F to ensure even cooking. Once cooked, let it rest for five minutes. This resting time allows juices to redistribute. For extra flavor, use a marinade or brine before baking. Try a simple mix of salt, pepper, and lemon juice. Using the right tools makes cooking easier. A good set of knives helps with prep. Use a cutting board to safely chop your ingredients. For baking, a sturdy baking dish is essential. I prefer glass or ceramic for even heat distribution. A meat thermometer is key to check doneness. Aim for 165°F for safe chicken. Finally, use mixing bowls for combining your ingredients easily. Savory Garlic Parmesan Chicken pairs well with many sides. Consider serving it with roasted vegetables. Broccoli, carrots, and bell peppers add color and taste. A crisp green salad balances the meal nicely. For starch, try garlic mashed potatoes or quinoa. You can also add lemon wedges for a fresh zing. If you want a twist, serve it with a creamy pasta. For a complete experience, add garlic bread on the side. Want the full recipe? Check out the [Full Recipe]. {{image_4}} You can jazz up your savory garlic Parmesan chicken with some fun add-ins. Here are a few ideas: - Spinach: Add fresh spinach to the breadcrumb mix for color and nutrients. - Sun-Dried Tomatoes: Chopped sun-dried tomatoes add a sweet-tart flavor that brightens the dish. - Red Pepper Flakes: A pinch of red pepper flakes gives a nice kick to your meal. - Cheese Variety: Mix in mozzarella or cheddar for a different cheesy taste. Adding these ingredients can enhance your dish and make it more exciting. You can cook this chicken in different ways. Each method gives a unique flavor and texture. - Grilling: Preheat your grill to medium-high heat. Grill each chicken breast for about 6-7 minutes per side. Make sure the internal temperature reaches 165°F (75°C). Grilling gives a smoky flavor and nice grill marks. - Air Frying: Preheat your air fryer to 380°F (193°C). Cook the chicken for 12-15 minutes, flipping halfway through. This method makes the chicken crispy without extra oil. Both methods are quick and keep the chicken juicy. To make your meal complete, pair the chicken with tasty sides. Here are some great options: - Sautéed Vegetables: Use seasonal veggies like zucchini and bell peppers for color and crunch. - Crisp Salad: A fresh green salad with a simple lemon vinaigrette complements the rich chicken. - Rice or Quinoa: Serve it with fluffy rice or quinoa to soak up all the flavors. - Garlic Bread: Crusty garlic bread makes for a delightful side that everyone loves. These sides will make your savory garlic Parmesan chicken shine even more. For the full recipe, check out the complete guide. To store leftover Savory Garlic Parmesan Chicken, let it cool first. This step keeps the chicken fresh and tasty. Place the chicken in an airtight container. Make sure to cover it well to avoid air exposure. It will last in the fridge for up to three days. If you want it to last longer, consider freezing it. You can freeze Savory Garlic Parmesan Chicken too. Wrap each piece tightly in plastic wrap. Then, place the wrapped chicken in a freezer bag. Squeeze out as much air as you can before sealing. This method helps prevent freezer burn. It can stay in the freezer for up to three months. To make it easy, label the bag with the date. When you're ready to eat your leftovers, reheat them properly. The best way is in the oven. Preheat the oven to 350°F (175°C). Place the chicken on a baking sheet. Cover it lightly with foil to keep it moist. Heat for about 15-20 minutes. If you want a crispier outside, remove the foil for the last few minutes. You can also reheat it in the microwave. Just set it on medium power for one to two minutes. Always check the internal temperature. It should reach 165°F (75°C) for safety. Enjoy your meal again! To ensure your chicken is cooked through, use a meat thermometer. Insert it into the thickest part of the chicken breast. The internal temperature should reach 165°F (75°C). Another way is to cut the chicken open. The meat should be white, not pink. Cooking time is also key. In this recipe, bake for 25-30 minutes at 400°F (200°C) for best results. Yes, you can use chicken thighs! They have more fat, which keeps them juicy. This will change the cooking time slightly. Thighs may take a few extra minutes to cook through. Just check the internal temperature to ensure it reaches 165°F (75°C). The flavor will be richer, adding a nice twist to the dish. If you don’t have Parmesan cheese, try pecorino Romano. It has a similar taste but is saltier. You can also use nutritional yeast for a vegan option. It adds a cheesy flavor without dairy. Another choice is mozzarella, but it won’t have the same sharpness. Pick what suits your taste! Check the full recipe for more details. In this blog post, we explored how to make savory garlic Parmesan chicken. We covered the key ingredients, preparation steps, and cooking tips. You learned how to keep the chicken moist, try different cooking methods, and store leftovers correctly. Remember, the best chicken comes from good ingredients and careful cooking. Enjoy trying new flavors and methods. This dish can be a hit at any meal!](https://meltedrecipes.com/wp-content/uploads/2025/07/1435f53c-0949-4953-ba59-d4d07f5cd32b.webp)
Savory Garlic Parmesan Chicken Easy Flavorful Meal
Are you ready to delight your taste buds with a simple yet delicious dish? Savory Garlic Parmesan Chicken is a meal that packs a punch
![- 2 cups cooked and pureed butternut squash - 2 cups all-purpose flour - 1 cup sharp cheddar cheese, shredded - 1/4 cup unsalted butter, softened - 2 large eggs - 1/4 cup milk - 1/4 cup fresh parsley, chopped - 1 tablespoon fresh thyme, chopped - 1 teaspoon baking powder - 1/2 teaspoon baking soda - 1 teaspoon salt - 1/2 teaspoon black pepper The core of this Herb and Cheddar Squash Bread lies in its ingredients. Each one plays a key role in flavor and texture. The butternut squash adds moisture and a hint of sweetness. The cheese brings a rich, sharp taste that pairs well with the herbs. - Alternative veggies for flavor: You can swap the squash for pumpkin or zucchini for a different taste. - Different cheese options: Try using gouda or mozzarella for a milder flavor. - Gluten-free flour alternatives: Use almond flour or a gluten-free blend to adapt for dietary needs. These substitutions allow you to customize the recipe. You can experiment with flavors that you enjoy while keeping the recipe simple. This flexibility makes cooking fun and personal. How to preheat the oven First, preheat your oven to 350°F (175°C). This step is key for even baking. Preparing the loaf pan Next, take a 9x5-inch loaf pan. Grease it with butter or cooking spray. Then, dust it lightly with flour to keep the bread from sticking. Combining wet ingredients In a large mixing bowl, combine 2 cups of pureed butternut squash, 1/4 cup of softened butter, 2 large eggs, and 1/4 cup of milk. Use a whisk or spatula to mix until smooth. Incorporating dry ingredients In another bowl, whisk together 2 cups of all-purpose flour, 1 teaspoon of baking powder, 1/2 teaspoon of baking soda, 1 teaspoon of salt, and 1/2 teaspoon of black pepper. This mix helps the bread rise and adds flavor. Slowly add the dry mix to the wet ingredients. Stir gently until just combined. Pouring batter into the pan Carefully fold in 1 cup of shredded cheddar cheese, 1/4 cup of chopped parsley, and 1 tablespoon of chopped thyme. Then, pour the batter into your prepared loaf pan. Use a spatula to even out the top. Signs of doneness Bake the bread for 50-60 minutes. To check if it’s done, insert a toothpick into the center. It should come out clean when ready. Enjoy your Herb and Cheddar Squash Bread with a lovely garnish! For the complete recipe, see the Full Recipe. - Avoiding overmixing: Mix the wet and dry ingredients just until combined. If you mix too much, your bread can become dense and tough. A few lumps are okay! - Ensuring proper baking temperature: Always check your oven with an oven thermometer. An oven that is too hot or too cold can change your baking time and the bread's texture. - Adding extra herbs or spices: Try adding a pinch of garlic powder or some dried oregano. These can elevate the taste and bring new flavors to your bread. - Pairing with dips or spreads: This bread pairs well with creamy dips like hummus or cheese spreads. You can also enjoy it with butter or a dash of olive oil. - Serving suggestions: Slice the bread warm and serve it on a wooden board. This adds a rustic touch and makes it look inviting. - Garnishing with fresh herbs: Top your slices with a sprinkle of fresh parsley or thyme. This not only looks pretty but also adds a nice fresh flavor. To make this bread shine, follow these tips and tricks. For the complete recipe and step-by-step guide, check out the Full Recipe. Enjoy baking! {{image_4}} You can change the squash in this recipe. Try using acorn or spaghetti squash. Each type of squash brings a different taste and texture. This keeps the bread fresh and exciting. Adding nuts or seeds can bring crunch. Consider walnuts or pumpkin seeds. They add flavor and healthy fats. Just mix them in with the cheese and herbs. If you want a vegan version, swap the eggs for flax eggs. Mix one tablespoon of flaxseed meal with three tablespoons of water. Let it sit for a few minutes until it thickens. You can also replace the milk with almond or oat milk. For low-carb options, use almond flour instead of all-purpose flour. This makes the bread keto-friendly. You can also cut the cheese to lower carbs further. Incorporate seasonal veggies to change the flavor. Try adding zucchini in summer or roasted sweet potatoes in fall. These swaps can give the bread a unique taste all year. For holiday flavors, add spices like cinnamon or nutmeg. You can even include cranberries for a festive twist. These seasonal changes make the bread perfect for any gathering. Explore the [Full Recipe] to see how these variations work. To keep your Herb and Cheddar Squash Bread fresh and tasty, follow these tips: - Room Temperature: Store the bread in a cool, dry place. Wrap it in plastic wrap or foil to keep it moist. Place it in a bread box or on the counter. This way, it stays soft and flavorful. - Freezing Instructions: If you want to save some for later, freezing works great. First, let the bread cool completely. Then, wrap it tightly in plastic wrap and place it in a freezer bag. Label the bag with the date. You can freeze it for up to three months. When ready to eat, thaw it at room temperature for a few hours. The shelf life of your Herb and Cheddar Squash Bread can vary: - Room Temperature: When stored properly, the bread lasts about 3-5 days. It tastes best when eaten fresh. - Refrigeration Effects on Texture: Storing bread in the fridge can dry it out. If your kitchen is warm or humid, it might be better to refrigerate. However, you may lose some softness and flavor. Can I make this recipe ahead of time? Yes, you can make this bread ahead of time. Bake it, let it cool, and then wrap it tightly. Store it in the fridge for up to five days. You can also freeze it for up to three months. Just thaw it overnight before serving. How do I know if the bread is fully baked? To check if the bread is done, insert a toothpick into the center. If it comes out clean, the bread is ready. If it has wet batter, bake it for a few more minutes. What can I serve with Herb and Cheddar Squash Bread? This bread pairs well with soup or salad. You can also enjoy it with butter or a cheese spread. For extra flavor, try serving it with a dip made from herbs. Can I double the recipe? Yes, you can double the recipe. Just use two loaf pans and bake them one at a time. Keep an eye on the baking time as it may change slightly. How to adjust for high-altitude baking? At high altitudes, reduce baking powder by 1/8 teaspoon. Add an extra tablespoon of liquid. This helps the bread rise properly and keeps it moist. What to do if the bread is too dense? If your bread is too dense, you may have overmixed it. Next time, mix until just combined. Also, check your baking powder for freshness. Why did my bread not rise? If your bread did not rise, the yeast or baking powder may be old. Make sure to check the dates on your ingredients. Also, ensure your oven is at the right temperature before baking. In this blog post, we explored the ingredients, steps, and tips for making flavorful Herb and Cheddar Squash Bread. You learned how to mix your ingredients, bake your loaf, and even customize it to fit your needs. Remember, cooking is about creativity and fun. Don’t hesitate to try new flavors or swap out ingredients. Use these tips to make your baking experience enjoyable. Happy baking, and trust your taste!](https://meltedrecipes.com/wp-content/uploads/2025/07/e8ad67bb-fdd6-4036-869c-c56998c4b291.webp)
Herb and Cheddar Squash Bread Flavorful and Easy Recipe
Are you ready to bake something truly delightful? Herb and Cheddar Squash Bread is packed with flavor and easy to make. Imagine a warm, cheesy

Baked Garlic Lemon Pepper Chicken Simple and Tasty
Are you ready to elevate your dinner game? Let me introduce my Baked Garlic Lemon Pepper Chicken, a dish that’s simple yet bursting with flavor.
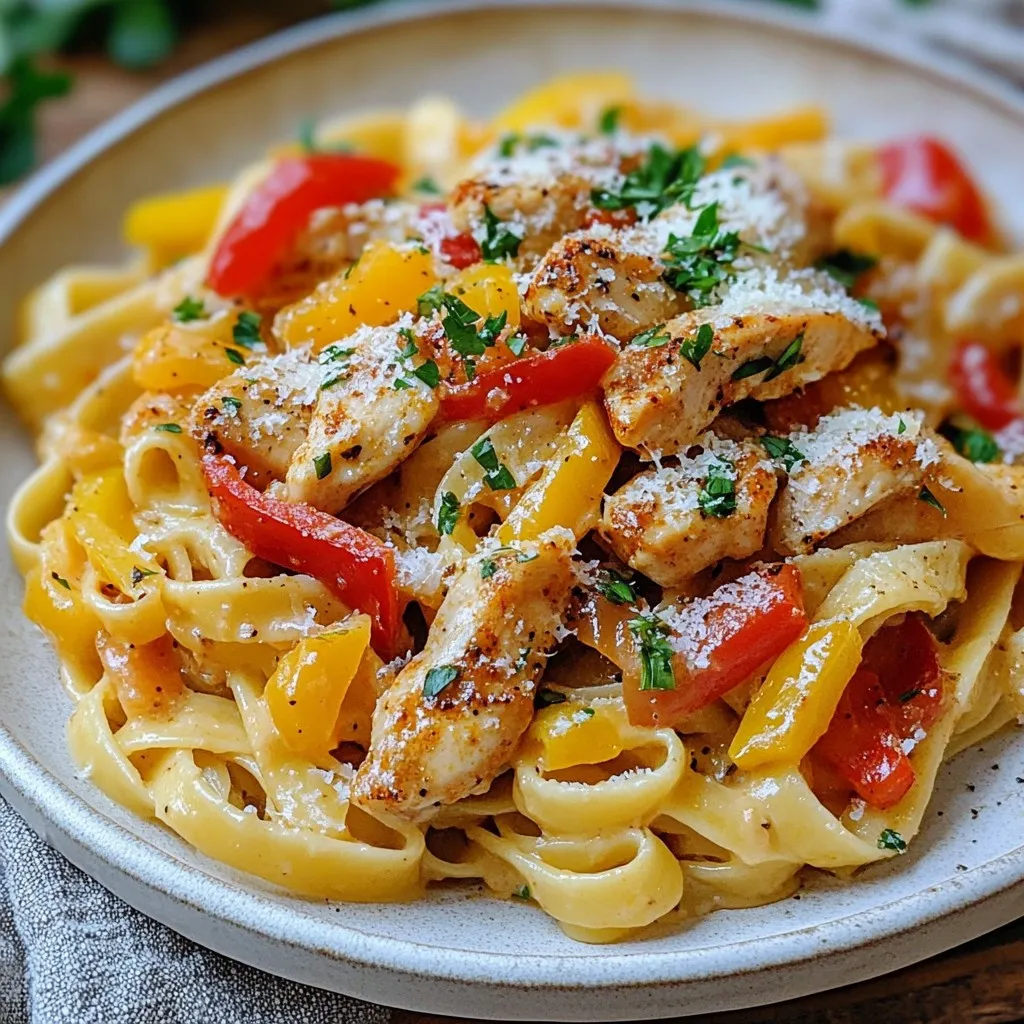
Creamy Cajun Chicken Pasta Flavorful Dinner Delight
Craving a rich and flavorful meal? Let me introduce you to Creamy Cajun Chicken Pasta, a dish that delivers big on taste! This easy recipe
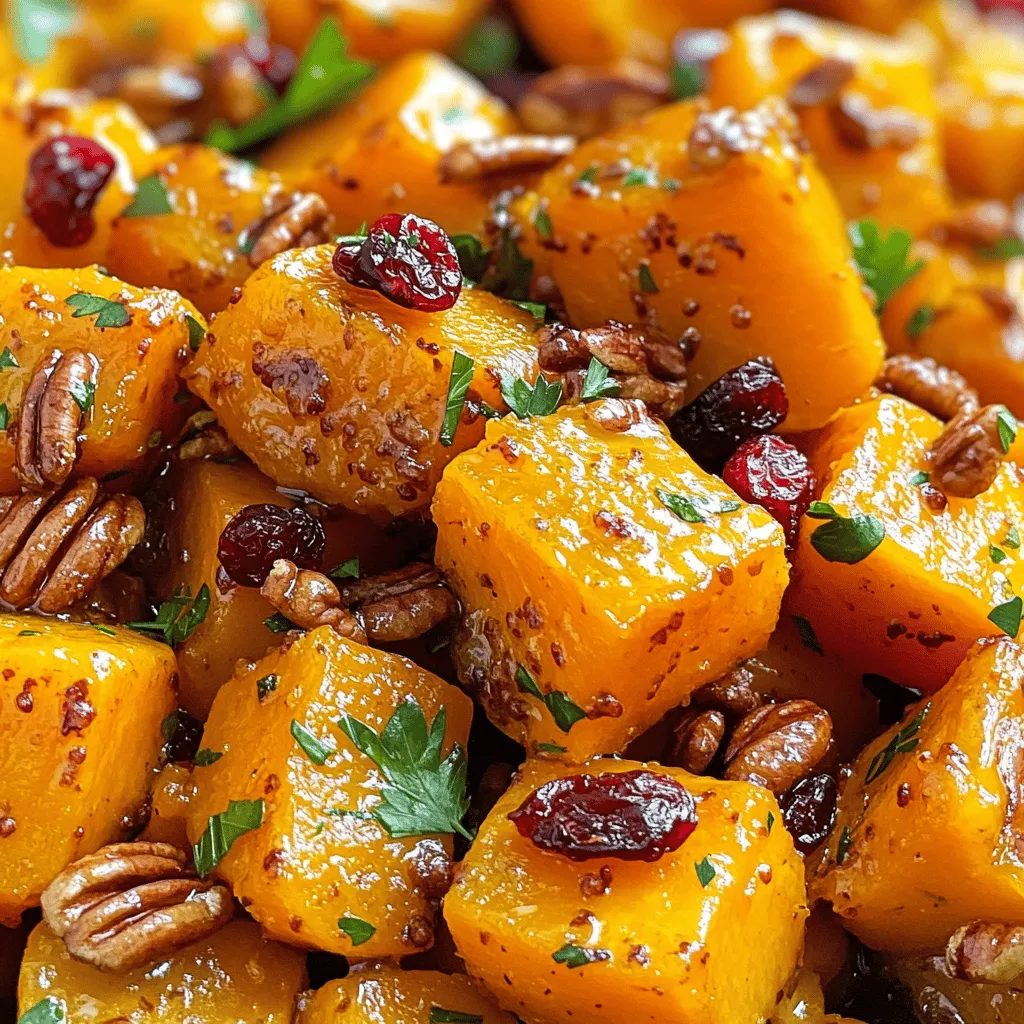
Sweet and Savory Honey Roasted Butternut Squash Dish
Want to impress your friends with a healthy and delicious dish? My Sweet and Savory Honey Roasted Butternut Squash is the answer! This recipe bursts

Mexican Zucchini Boats Flavorful and Healthy Dinner
Looking for a fun, healthy dinner idea? Try these Mexican Zucchini Boats! Packed with flavor and nutrition, they’re easy to make and perfect for any
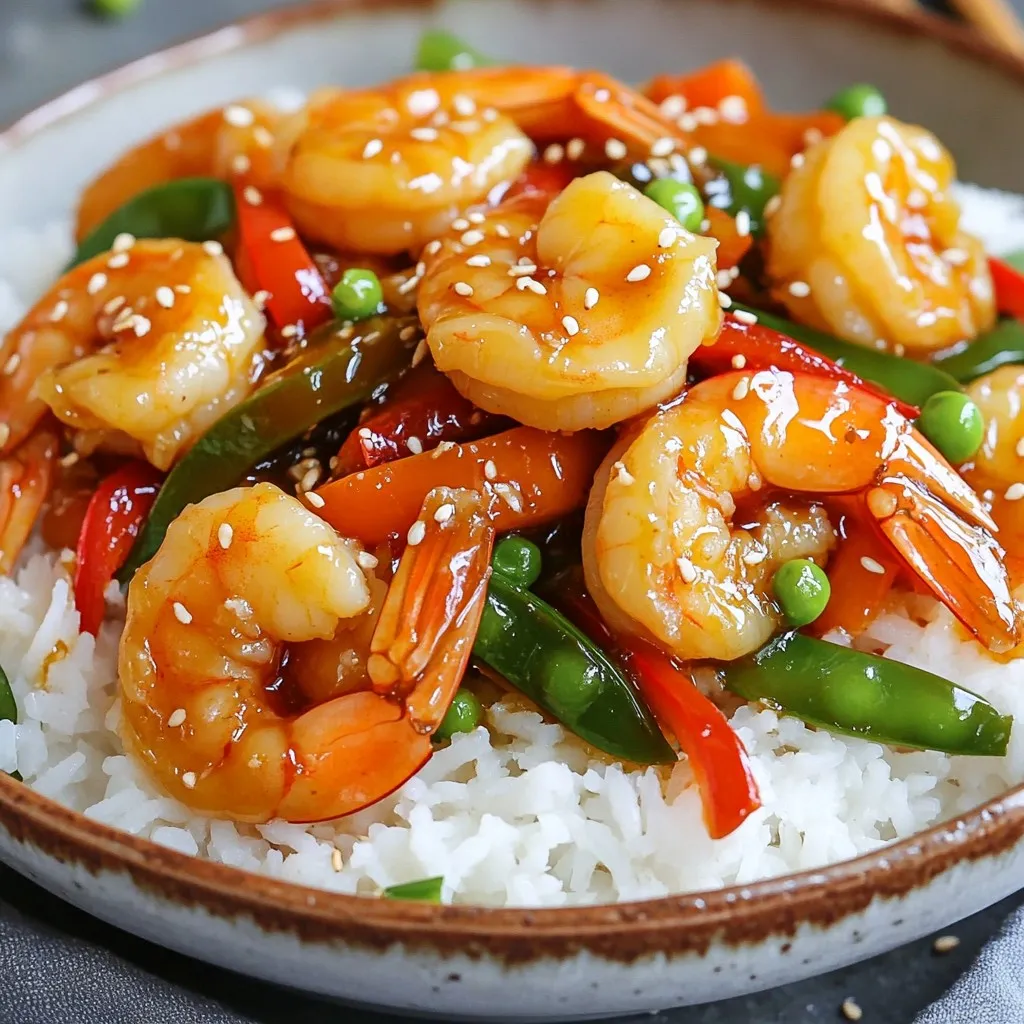
Honey Garlic Shrimp Stir-Fry Quick and Flavorful Meal
Craving a quick and tasty meal? Look no further! My Honey Garlic Shrimp Stir-Fry is packed with flavor and simple to make. You’ll whip this