Dinner

The BEST Lasagna Soup Mouthwatering Comfort Food
If you’re craving comfort food that warms the soul, look no further! This lasagna soup recipe combines all the classic flavors of lasagna in an

Spicy Salmon Sushi Bake Flavorful and Easy Recipe
If you crave bold flavors and easy recipes, you’ll love this Spicy Salmon Sushi Bake! It combines fresh salmon, creamy Sriracha mayo, and perfectly cooked

Healthy Crustless Chicken Pot Pie Comfort Food Recipe
If you’re craving comfort food without the extra calories, I have a treat for you! This Healthy Crustless Chicken Pot Pie is warm, savory, and

Grilled Sesame Chicken Simple and Flavorful Recipe
Are you ready to elevate your dinner routine? This Grilled Sesame Chicken recipe combines juicy chicken thighs with a simple, flavorful marinade that packs a

Caprese Chicken Delight Quick and Easy Recipe
If you love simple and tasty meals, then you’re in for a treat! This Caprese Chicken recipe is quick, easy, and packed with flavors. It’s

Creamy Honey Pepper Chicken Mac and Cheese Delight
Craving comfort food? Let’s whip up a dish that’s rich, creamy, and sure to please! In this blog post, I’ll show you how to make
. Enjoy your cooking! To get the best flavor, sear your meat first. Heat olive oil in a skillet. Season your cubed steaks with salt, black pepper, onion powder, garlic powder, and smoked paprika. Sear them for 2-3 minutes on each side until they turn golden-brown. This step locks in moisture and adds flavor. To prevent dryness, cook on low heat in the crock pot for 6-8 hours. This slow cooking makes the steaks tender and juicy. To boost flavor, consider adding fresh herbs and spices. Rosemary, thyme, or bay leaves pair well with beef. Adjust the seasoning based on your taste. If you like it spicy, add a pinch of cayenne pepper. For a milder taste, reduce the garlic and onion powder. Taste the broth before serving to ensure it meets your preference. For a nice serving, use a rustic plate. Place the cubed steak in the center and spoon the rich gravy and vegetables over the top. A sprinkle of fresh parsley brightens the dish. Pair it with creamy mashed potatoes or fluffy rice. They soak up the gravy well, making each bite delicious. This presentation not only looks good but also makes the meal more enjoyable. {{image_4}} You can switch up the protein in this dish. Try using chicken thighs or pork chops. These cuts can bring their own flavor to the meal. If you want a vegetarian option, use hearty mushrooms or tofu. Both can soak up all the great flavors. The broth you choose can change the taste. Beef broth offers richness, but chicken or vegetable broth works too. You can add fresh herbs like thyme or rosemary for more depth. Adding vegetables like carrots or bell peppers makes it colorful and healthy. If you want to try a different method, use an Instant Pot. You can cook the cubed steak in about an hour. Just follow the same steps but set the pot to high pressure. For oven cooking, place the dish in a covered pot at 300°F. Cook for about 2-3 hours until the meat is tender. For the full experience, check out the Full Recipe to bring these ideas to life! To store leftover cubed steak, first cool it quickly. Place it in a shallow dish. This helps it cool faster. Use airtight containers for best results. Glass or plastic containers work well. Make sure to seal them tightly. Leftovers last about three to four days in the fridge. When reheating, aim to keep the flavor intact. You can use the microwave or stovetop. For the microwave, place the steak in a safe dish. Add a splash of broth to keep it moist. Cover it with a lid or plastic wrap. Heat in short bursts, checking often. On the stovetop, use a pan over low heat. Add a little broth and cover it. This keeps the meat tender. To freeze leftovers, let them cool completely. Then, cut the steak into smaller pieces. Place the steak in freezer-safe bags. Remove any air before sealing. Label the bags with the date. You can freeze cubed steak for up to three months. When ready to eat, thaw it in the fridge overnight. Reheat slowly to maintain the rich flavors. For the best taste, avoid reheating in the microwave. Instead, use the stovetop method mentioned earlier. This way, you’ll enjoy your delicious meal again! You can pair crock pot cubed steak with many side dishes. Here are some ideas: - Creamy mashed potatoes - Fluffy rice - Steamed green beans - Roasted carrots - Fresh salad - Cornbread These sides complement the rich flavors of the steak and gravy. They also help soak up the delicious juices. Yes, you can use frozen cubed steak. Just follow these tips: - Thaw it first: This helps it cook evenly. - Increase cooking time: Frozen meat takes longer to cook. Add 1-2 hours to the total time. Make sure the steak reaches a safe internal temperature before serving. Cubed steak needs about 6-8 hours on low heat. Cooking times may vary based on your crock pot. - Check for tenderness: The steak should be fork-tender when done. - Adjust time as needed: If it’s not tender yet, let it cook longer. The low and slow method makes the meat juicy and flavorful. Yes, this recipe is great for meal prep. Here’s how to handle it: - Storage: After cooking, let it cool. Store in airtight containers in the fridge for up to 3 days. - Reheat: Use the microwave or a skillet to reheat. Add a splash of broth to keep it moist. You can easily enjoy delicious meals throughout the week with this recipe. For the complete recipe, check out the Full Recipe. This blog post guides you through making a flavorful crock pot cubed steak. You learned about the key ingredients, from cubed steaks to fresh mushrooms. I shared step-by-step instructions for preparing, cooking, and enhancing flavors. You also found tips for storage and meal prep. With the right techniques, you can create delicious meals that impress. Enjoy exploring variations to make the recipe your own. Have fun cooking!](https://meltedrecipes.com/wp-content/uploads/2025/07/a28b23aa-3f28-44cb-a835-ed1feb03a001.webp)
Crock Pot Cubed Steak Tender and Flavorful Dish
Are you ready to transform dinner into a tender, flavorful experience? In this guide, I’ll show you how to make the best Crock Pot cubed

Honey Garlic Chicken Skewers Tasty and Simple Recipe
Craving a quick and tasty meal? My Honey Garlic Chicken Skewers recipe is just what you need! This dish is simple to make and packed
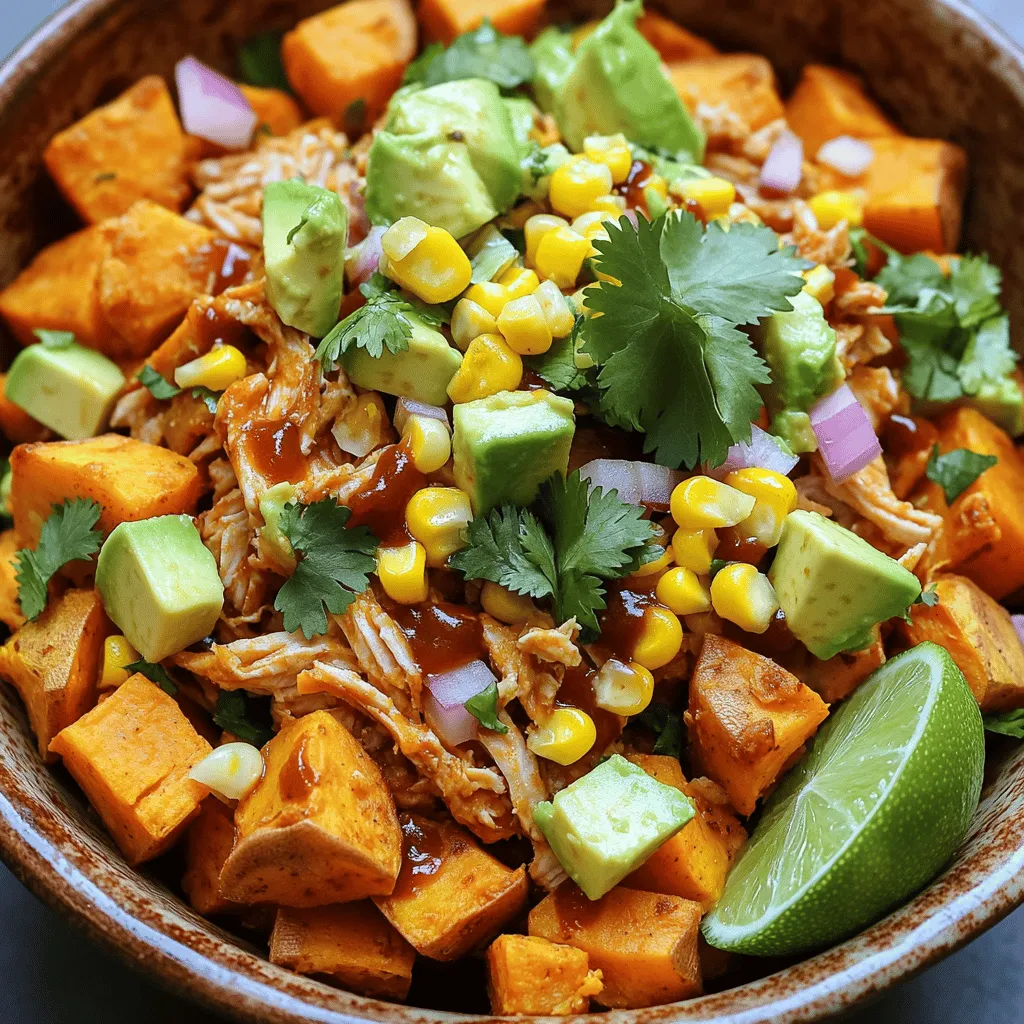
BBQ Chicken Sweet Potato Bowl Flavorful and Filling Meal
Looking for a tasty and filling meal? The BBQ Chicken Sweet Potato Bowl is your answer! This dish combines tender sweet potatoes and juicy BBQ

Savory French Dip Sandwiches Easy to Make at Home
Are you craving something savory and satisfying? French dip sandwiches are easy to make at home, and they’re sure to please your taste buds. With