Dinner
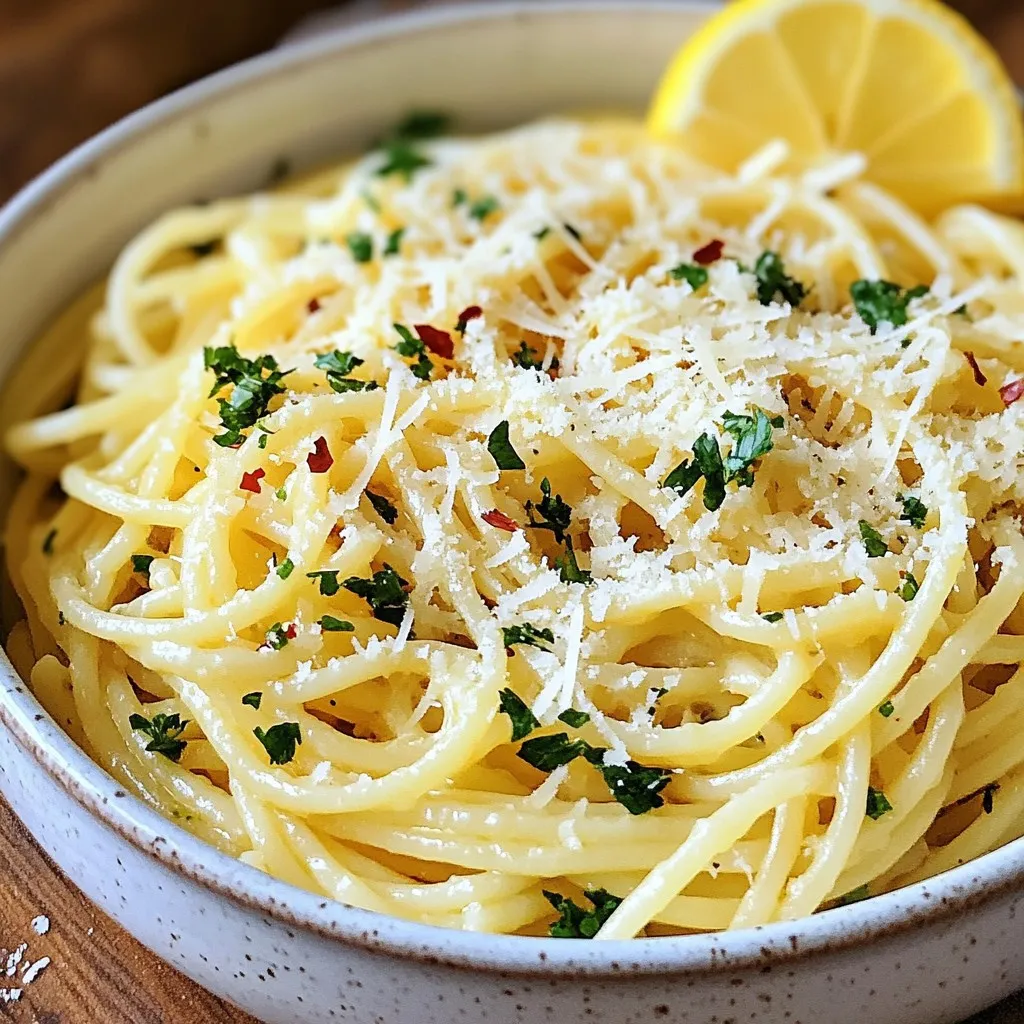
Garlic Parmesan Spaghetti Quick and Flavorful Dish
Garlic Parmesan Spaghetti is a quick and tasty meal you can whip up in no time. With just a few simple ingredients, you can create

Copycat Parmesan Crusted Chicken Simple and Tasty Meal
If you’re craving a quick, tasty meal, this Copycat Parmesan Crusted Chicken is perfect. With just a few simple steps, you can enjoy crispy, cheesy
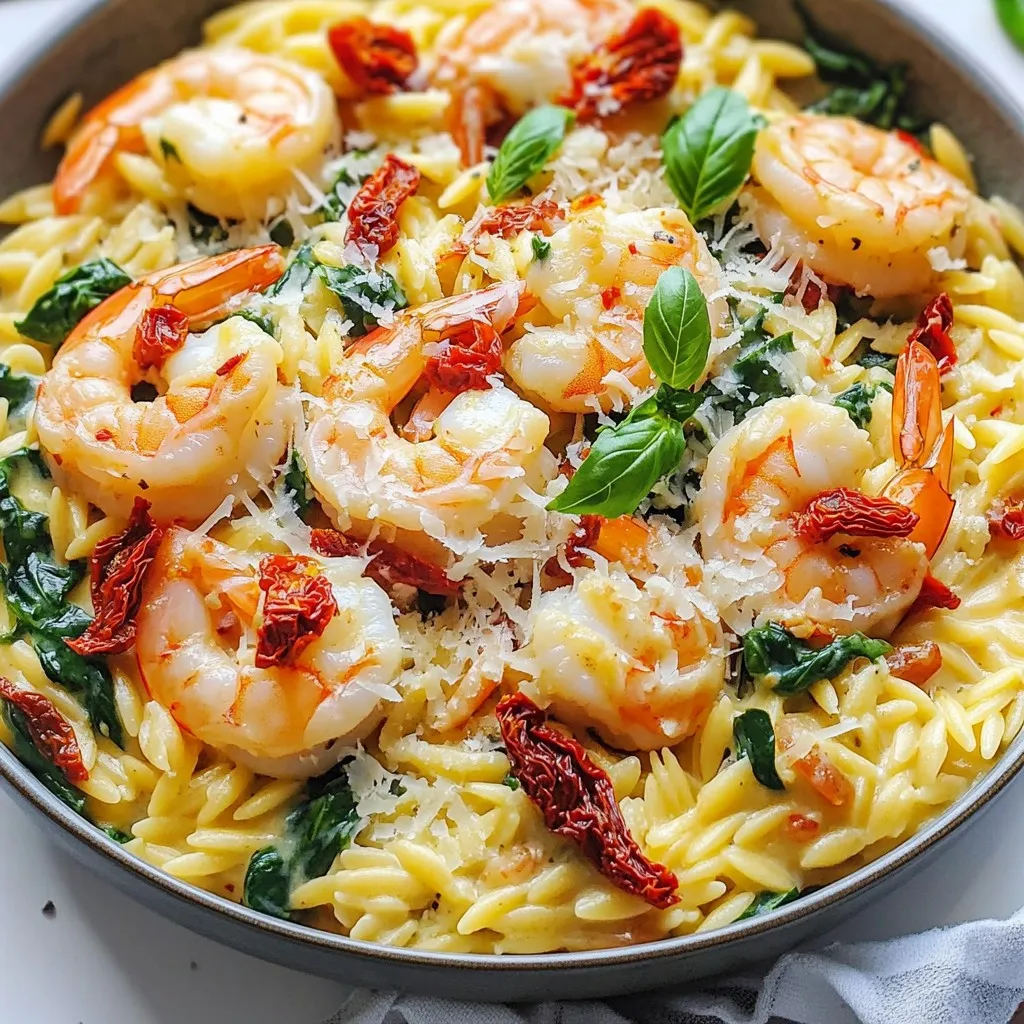
Creamy Tuscan Shrimp Orzo Skillet Delight
Welcome to my kitchen! Today, you’re in for a treat with my Creamy Tuscan Shrimp Orzo Skillet Delight. This one-pan recipe combines succulent shrimp, creamy

Sweet Potato Cornbread Moist and Flavorful Delight
Welcome to your new favorite recipe! Sweet Potato Cornbread is the perfect blend of moist and flavorful. I’ll share how to make this delight, with
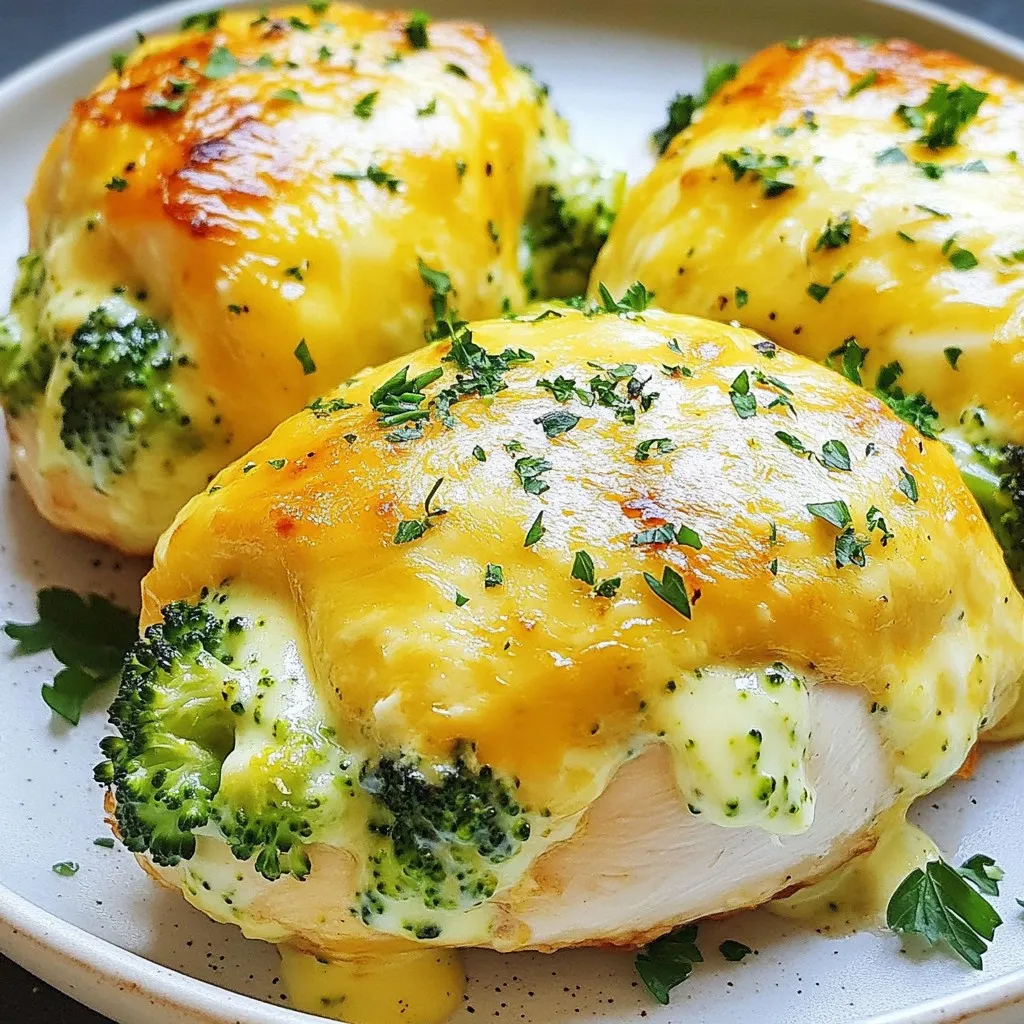
Cheesy Broccoli Stuffed Chicken Delicious and Easy Meal
Are you ready to transform your dinner routine? This Cheesy Broccoli Stuffed Chicken is the perfect blend of flavors and textures, making it an easy,
![- 2 tablespoons extra virgin olive oil - 1 medium onion, finely diced - 3 cloves garlic, minced - 1 pound boneless, skinless chicken breasts, cut into bite-sized pieces - 1 can (15 oz) great northern beans, thoroughly drained and rinsed - 1 can (4 oz) diced green chilies - 1 teaspoon ground cumin - 1 teaspoon chili powder - ½ teaspoon smoked paprika - 4 cups low-sodium chicken broth - 1 cup corn kernels (fresh, frozen, or canned) - 1 cup heavy cream - Salt and freshly ground black pepper, to taste - Fresh cilantro leaves and ripe avocado slices, for garnish Gathering these ingredients is the first step to making white chicken chili. Each item adds a unique flavor and texture. The olive oil brings richness, while the onion and garlic offer a great base. Chicken breasts provide the heartiness we crave in a chili. The beans and corn add creaminess and a touch of sweetness. Spices like cumin, chili powder, and smoked paprika create warmth and depth. The chicken broth keeps everything moist and flavorful. Finally, heavy cream makes the chili rich and smooth. Don’t forget the garnishes! Fresh cilantro and avocado slices make the dish pop. They add a fresh touch and make it more inviting. For the full recipe and instructions, check out the [Full Recipe]. - Heat the olive oil in a large pot over medium heat. - Add the finely diced onion and sauté for about 5 minutes. The onion should become soft and clear. - Next, add the minced garlic. Sauté it for 1 minute until it smells good. - Now, add the diced chicken to the pot. Sprinkle in ground cumin, chili powder, smoked paprika, salt, and pepper. - Cook the chicken for 5 to 7 minutes until it is brown on all sides. - Gently fold in the drained great northern beans and diced green chilies. - Pour in the low-sodium chicken broth and bring it to a gentle simmer. - Let it cook uncovered for about 20 minutes. Stir it occasionally. - After 20 minutes, add the corn kernels and heavy cream. Stir well to combine. - Allow it to simmer for an additional 10 minutes. This makes the chili thick and creamy. - Carefully taste the chili and adjust the seasoning if needed. Add more salt or pepper to your liking. - Serve the chili hot in bowls. Top each bowl with fresh cilantro and ripe avocado slices. - For an extra touch, serve tortilla chips on the side for crunch. This adds texture to your meal. For the complete recipe, check [Full Recipe]. To make your white chicken chili shine, avoid burning the garlic. When you sauté garlic, it should be fragrant but not brown. If it burns, it can make your chili taste bitter. Always stir the garlic for a minute before adding other ingredients. Next, simmer your chili to reach the thickness you want. A longer simmer allows flavors to meld beautifully. If you want a thicker chili, let it cook uncovered for a while. This helps steam escape and thickens the mix just right. Garnish your chili with fresh cilantro and ripe avocado slices. They add color and flavor that brighten each bowl. You can also serve it with tortilla chips. The crunch of the chips pairs well with the creamy chili. It makes for a fun and tasty scoop! Adjust the spices to match your taste. If you like it spicier, add more chili powder or cumin. Taste as you go to find your ideal balance. For a creamy consistency, be sure to mix in the heavy cream slowly. Stir it in well to ensure it blends perfectly. If your chili is too thick, a splash of chicken broth can help. This keeps it creamy without losing flavor. Enjoy your cooking! For the full recipe, check out the Creamy White Chicken Chili section above. {{image_4}} You can easily modify this white chicken chili for different diets. For a vegetarian or vegan version, swap the chicken for mushrooms or jackfruit. Use vegetable broth instead of chicken broth. For gluten-free options, check that your broth and spices are gluten-free. This way, everyone can enjoy a bowl of comforting chili without worry. To make your chili pop with flavor, try adding different chili peppers. Jalapeños can add heat, while poblanos bring a mild, smoky taste. You can also include more vegetables. Bell peppers, zucchini, or spinach can enhance the dish. They add texture and nutrition, making it even better! This chili fits any season. In winter, add warming spices like cinnamon or nutmeg. These spices create a cozy vibe. In summer, brighten it up with fresh herbs. Basil, cilantro, or even mint can give a refreshing twist. Using seasonal ingredients can make your chili feel new and exciting every time you make it. To store leftover chili, let it cool down first. Use an airtight container to keep it fresh. You can store it in the fridge for up to three days. When you want to reheat it, pour it into a pot. Heat it over medium heat, stirring often. This helps it warm evenly. You can also use a microwave-safe bowl if you prefer the microwave. Heat it in short bursts, stirring in between. If you want to keep the chili longer, freezing is a great choice. First, let it cool completely. Then, place it in freezer-safe bags or containers. Remove as much air as possible to prevent freezer burn. It can last for about three months in the freezer. When you are ready to eat it, take the chili out of the freezer. The best way to thaw it is in the fridge overnight. If you need it fast, you can thaw it in the microwave. Just remember to stir it often. When reheating, check the texture. If it seems too thick, add a little broth or water to get it just right. For more cooking tips, check out the Full Recipe for creamy white chicken chili! What can I substitute for heavy cream in white chicken chili? You can use half-and-half or whole milk. For a dairy-free option, try coconut milk or cashew cream. These will give you a creamy texture without heavy cream's richness. How do I make white chicken chili thicker? To thicken your chili, you can mash some of the beans. Alternatively, add a cornstarch slurry. Mix cornstarch with water and stir it in while cooking. Can I use canned chicken? Yes, using canned chicken is a great time-saver. Just drain and add it to your chili. It cuts down on prep time but may alter the texture slightly. How long can I store white chicken chili in the fridge? Store it in an airtight container for up to four days. Make sure to let it cool before putting it in the fridge. Can I make it spicier? Absolutely! Add extra chili powder or diced jalapeños for more heat. You can also use hot green chilies instead of mild ones. How to enhance the flavor of white chicken chili? To boost the flavor, add fresh lime juice or zest. Fresh herbs like cilantro or parsley also enhance the dish. A dash of hot sauce or smoked paprika adds depth. For the full recipe, check out the [Full Recipe]. You now have a complete guide to making white chicken chili. We covered all the key ingredients and step-by-step cooking instructions. Remember to adjust spices and try different veggie options. Don’t forget tips on storing and reheating leftovers. The flexibility of this dish means you can make it your own. Whether you want it spicy or mild, the choice is yours. Enjoy your delicious, creamy chili and make it a go-to recipe for any time!](https://meltedrecipes.com/wp-content/uploads/2025/07/89466853-fbac-4b91-ade5-c0f8bda27767.webp)
White Chicken Chili Flavorful and Comforting Recipe
Are you ready to warm your soul with a comforting bowl of White Chicken Chili? This recipe blends tender chicken, creamy goodness, and zesty spices,
. Start by boiling a large pot of salty water. Use about a tablespoon of salt for great flavor. Once the water bubbles, add the elbow macaroni. Cook it until it is al dente, which usually takes about 7 to 9 minutes. When done, drain the macaroni and set it aside for later. In a large saucepan, melt the unsalted butter over medium heat. Once it is all melted, sprinkle in the all-purpose flour. Whisk it well for about 2 minutes to create a light roux. You want it to bubble a bit but not brown. Next, gradually pour in the whole milk while whisking. This helps keep the sauce smooth and free of lumps. Keep cooking and stirring until the sauce thickens, taking about 3 to 5 minutes. Now it's time to add the cream cheese. Lower the heat to a gentle simmer, then mix in the softened cream cheese. Stir until it melts and the sauce is nice and smooth. Next, mix in the sharp cheddar and mozzarella cheese. Continue to stir until all the cheese melts into a rich sauce. Then add the garlic powder, onion powder, smoked paprika, and season with salt and pepper to taste. If you want extra flavor, fold in cooked ground beef or diced pickles at this stage. Finally, gently fold the cooked macaroni into the cheese sauce. Make sure every piece is coated in that cheesy goodness! To make a great cheese sauce, avoid lumps when you add milk. Start by whisking in the milk slowly. This keeps the sauce smooth. Stir continuously, and don't rush. If you do this right, you will have a creamy base. Choosing the right cheese is also key. Sharp cheddar gives a bold flavor. Mozzarella adds stretch and creaminess. Cream cheese makes it rich. Together, they create a great blend for your Monster Mac and Cheese. Make your dish eye-catching with fun serving ideas. You can serve the mac and cheese in mini loaf breads. Hollowed-out bell peppers also work great. These ideas make your meal fun and unique. Garnishes can add color and freshness. Chopped parsley on top brightens the dish. Extra crispy fried onions add a nice crunch. These touches make your meal look and taste even better. Baking is the final step for the best texture. You want a golden brown topping. This adds a nice crunch to each bite. Use a shallow baking dish for even cooking. A 9x13 inch pan works well. It allows the top to get crispy while the inside stays creamy. This is the secret to the perfect Monster Mac and Cheese. {{image_4}} You can easily make a vegetarian version of Monster Mac and Cheese. Start by substituting the ground beef with your favorite veggies. Spinach and tomatoes work great! This change adds color and nutrients. The creamy cheese sauce pairs perfectly with the fresh flavors of the vegetables. If you enjoy some heat, try adding jalapeños or hot sauce. This spicy twist gives your mac and cheese a fun kick. You can also use pepper jack cheese for an extra layer of flavor. The creaminess will balance the spice, making each bite exciting. For a smoky flavor, mix in some BBQ sauce. This adds a sweet and tangy taste that contrasts well with the cheese. Pair your Monster Mac and Cheese with smoked cheeses for added depth. The combination creates a unique dish that stands out at any gathering. Feel free to explore these variations to keep your meals fun and delicious. You can start with the [Full Recipe] for the base and then customize it to your liking! To keep your Monster Mac and Cheese fresh, place it in the fridge. Make sure it cools down first. Use an airtight container to prevent drying out. If you have a lot of leftovers, divide them into smaller portions. This way, you can grab what you need later without wasting food. When reheating, the best method is the oven. Preheat it to 350°F (175°C). Place the mac and cheese in an oven-safe dish. Cover it with foil to keep moisture in. Heat for about 20 minutes until warm. You can also use the microwave if in a hurry. Heat in 30-second bursts, stirring in between, until hot. If you want to freeze Monster Mac and Cheese, let it cool completely first. Use a freezer-safe container or bag. Make sure to remove as much air as possible. Label it with the date. It can last in the freezer for up to three months. When ready to eat, thaw it overnight in the fridge before reheating. To make Monster Mac and Cheese, follow these key steps: 1. Cook the Pasta: Boil salted water and add elbow macaroni. Cook until al dente, then drain. 2. Make the Cheese Sauce: Melt unsalted butter in a pan. Sprinkle in flour and whisk for about 2 minutes. 3. Add Milk: Slowly pour in whole milk while whisking. Stir until thickened. 4. Incorporate Cream Cheese: Lower heat and mix in softened cream cheese until smooth. 5. Melt Cheeses: Stir in shredded sharp cheddar and mozzarella until melted. 6. Season: Add garlic powder, onion powder, and smoked paprika. Mix in cooked ground beef or pickles if desired. 7. Combine: Fold cooked macaroni into the cheese sauce. 8. Bake: Pour into a greased dish, top with fried onions, and bake at 350°F for 20-25 minutes. Yes, you can! Here are some great substitutes for elbow macaroni: - Penne: Its tube shape holds sauce well. - Fusilli: The spirals trap cheese for extra flavor. - Shells: These hold cheese inside, making each bite cheesy. - Cavatappi: The corkscrew shape adds fun and texture. For the best flavor and texture, try these cheese combinations: - Sharp Cheddar: Offers a strong flavor that stands out. - Mozzarella: Adds stringiness and a creamy base. - Cream Cheese: Creates a smooth and rich texture. - Gruyère: Adds nuttiness and depth. Achieving a creamy consistency is easy with these tips: - Use whole milk: It adds richness compared to lower-fat options. - Melt cheese slowly: Stir gently to avoid clumps. - Add cream cheese: It helps bind everything together and adds creaminess. - Don’t overbake: Bake just until bubbly and golden for the best texture. For the complete process, check out the Full Recipe. Monster Mac and Cheese is a fun dish that's easy to make. We covered ingredient choices, from main cheeses like cheddar and mozzarella to add-ins like ground beef. You learned how to make a creamy sauce and tips for avoiding lumps. We also explored variations, so you can spice things up. Lastly, remember how to store and reheat leftovers for the best taste. Now, get ready to enjoy this cheesy delight! With your newfound skills, you’ll impress family and friends. Let's dig in!](https://meltedrecipes.com/wp-content/uploads/2025/07/90d5b32b-f44b-4fa3-a3d0-c11a80f43881.webp)
Monster Mac and Cheese Delightful Cheesy Comfort Meal
If you love mac and cheese, get ready for a treat! Monster Mac and Cheese is a cheesy comfort meal that goes beyond the ordinary.
![- 1 pound ground turkey - 1/2 cup breadcrumbs - 1/4 cup feta cheese, crumbled - 1/4 cup grated Parmesan cheese - 1/4 cup fresh parsley, finely chopped - 1 cup cherry tomatoes, halved - 1 cucumber, sliced into rounds - 2 cups mixed greens (like arugula or spinach) You start with ground turkey, which is lean and packed with protein. It’s the base for your meatballs. Feta cheese adds a tangy flavor that makes the meatballs taste great. I love using fresh parsley for a burst of color and taste, too. Cherry tomatoes and cucumbers bring freshness to the lunchbox. Mixed greens add crunch and make your meal feel light. - 1 teaspoon garlic powder - 1 teaspoon onion powder - 1/2 teaspoon salt - 1/4 teaspoon freshly ground black pepper - 1/2 teaspoon dried oregano The spices are key to flavor. Garlic powder and onion powder give depth to the meatballs. Salt and pepper enhance everything, while oregano adds an earthy touch. These spices work together to create a tasty bite with every mouthful. - You can try adding chopped spinach or bell peppers for extra veggies. - A dash of red pepper flakes can add some heat. - Serve with hummus or tzatziki for dipping. Feel free to play with your ingredients! You can customize your lunchbox by adding whatever you like. Try different cheeses, or mix in other spices. These options let you create a unique meal each time. Preheat your oven to 400°F (200°C). This step is key for perfect meatballs. While the oven heats, line a baking sheet with parchment paper. This helps the meatballs cook evenly and prevents sticking. In a large mixing bowl, combine the ground turkey, breadcrumbs, crumbled feta, grated Parmesan, chopped parsley, garlic powder, onion powder, salt, and black pepper. Use your hands or a spatula to mix until everything is blended well. This is where the magic begins! Now, take small portions of the mixture and roll them into meatballs about one inch wide. Place each meatball on the lined baking sheet. Make sure they have space between them. This allows hot air to circulate and cook them evenly. Drizzle the meatballs with a bit of olive oil. This helps them brown nicely. Place the baking sheet in the preheated oven and bake for 20-25 minutes. Check for a golden brown color and ensure they reach an internal temperature of 165°F (74°C). Remember to turn them halfway through baking for even cooking. While the meatballs bake, wash your vegetables. In a medium bowl, mix halved cherry tomatoes and sliced cucumber. Drizzle with olive oil and sprinkle dried oregano. Toss gently so they are coated well. To assemble your lunchbox, take a container and place a handful of mixed greens on one side. Next, add the cooked meatballs, and then top with the seasoned tomatoes and cucumber. Just before you eat, drizzle balsamic vinegar over everything. This adds a nice tangy flavor. For a beautiful presentation, separate each food item. Garnish with fresh parsley for a pop of color. Enjoy your delicious Turkey Meatball & Feta Lunchbox! For the complete recipe, check out the [Full Recipe]. - Ensure even cooking by spacing meatballs well on the baking sheet. - Turn meatballs halfway through baking for a uniform crisp. To achieve crispy meatballs, drizzle them lightly with olive oil before baking. This helps them brown nicely. If you want extra crunch, broil them for the last few minutes. Just keep an eye on them to avoid burning. - Prepare meatballs in advance for easy meals throughout the week. - Store leftovers in airtight containers to keep them fresh. When you meal prep, make a double batch of meatballs. You can freeze half for quick dinners later. Label your containers with the date. This helps you keep track of how fresh your food is. - Pair your turkey meatballs with fresh veggies for a balanced meal. - Use a mix of flavors and textures for a delightful lunchbox. For the lunchbox, add a side of cherry tomatoes and cucumber. The crunch contrasts well with the tender meatballs. Drizzle balsamic vinegar over the greens for added flavor. This makes the meal fun and tasty. You can find the full recipe in the main article! {{image_4}} You can easily switch up the meat in this recipe. Ground chicken works well. It gives a lighter flavor. Ground beef is another choice. It brings a richer taste and texture. For a vegan option, try lentils or chickpeas. You can mash them for a similar texture. These alternatives keep the meal tasty and fulfilling. Want to change the flavor? You can add spices or herbs to the mix. Try paprika for a smoky kick. A touch of cumin adds warmth. Fresh herbs like basil or dill bring freshness. You can also swap out the feta cheese. Try goat cheese for a tangy twist. Or use mozzarella for a milder taste. This lunchbox pairs well with many sides. For veggies, consider roasted bell peppers or steamed broccoli. They add color and nutrients. You could also add some carbs like whole grain pita or brown rice. Dips like tzatziki or hummus work great too. They add flavor and keep it fun to eat. To store leftovers, place them in an airtight container. Make sure to cool the meatballs before sealing. This keeps moisture in and prevents drying. Store in the fridge for up to three days. When reheating, use a microwave or oven. Heat until the meatballs reach 165°F. This ensures they are safe to eat. For freezing meatballs, let them cool completely first. Place them in a single layer on a baking sheet. Freeze until solid, then transfer to a freezer-safe bag. Label the bag with the date. Use within three months for best taste. To thaw, move them to the fridge overnight. Reheat in the oven or microwave until hot. Cooked turkey meatballs last about three days in the fridge. If stored properly, frozen meatballs can last up to three months. Check for signs of spoilage, like a sour smell or color change. If you notice any, it’s best to discard them. Keeping track of dates helps you avoid waste. To check if your turkey meatballs are done, use a meat thermometer. The internal temperature should reach 165°F (74°C). This ensures they are safe to eat. The meatballs should also look golden brown on the outside. If they are firm to the touch, they are likely cooked through. Always cut one open to check if it is no longer pink. This way, you can be sure you serve safe and tasty meatballs. Yes, you can easily prepare this turkey meatball recipe ahead of time. Mix the meatball ingredients and shape them into balls. Store them in the fridge for up to 24 hours. This makes meal prep easy. You can also bake the meatballs in advance. Just store them in an airtight container in the fridge. They will stay fresh for about three days. Reheat them gently in the oven or microwave before serving. If you don’t have feta cheese, there are several great alternatives. You can use goat cheese for a similar tangy flavor. Cream cheese can also work well, giving a creamy texture. For a dairy-free option, try using nutritional yeast. This gives a cheesy flavor without the dairy. Another option is to use shredded mozzarella or cheddar, which will melt nicely in the meatballs. You can add a kick to your turkey meatball and feta lunchbox easily. Try mixing in some red pepper flakes for heat. Fresh herbs like basil or cilantro can brighten up the dish. A squeeze of lemon juice adds a fresh, zesty flavor. You might also want to drizzle some hot sauce or a spicy vinaigrette over the salad. These small changes can bring your lunchbox to life and make it even more exciting! This blog post covered everything you need for turkey meatballs with feta. You learned about key ingredients, from ground turkey to various spices. I shared step-by-step instructions, along with tips for meal prep and cooking. You also discovered fun variations and how to store leftovers. In conclusion, with simple methods and tasty flavors, these meatballs can enhance your lunches. By experimenting with ingredients, you can make them your own. Happy cooking and enjoy your delicious creations!](https://meltedrecipes.com/wp-content/uploads/2025/07/1ffbe7ef-556c-4e3a-b69e-08a4fddd5c9a.webp)
Turkey Meatball & Feta Lunchbox Simple and Delicious
Looking for a quick and tasty lunch that packs a protein punch? You’re in the right place! My Turkey Meatball & Feta Lunchbox is simple,
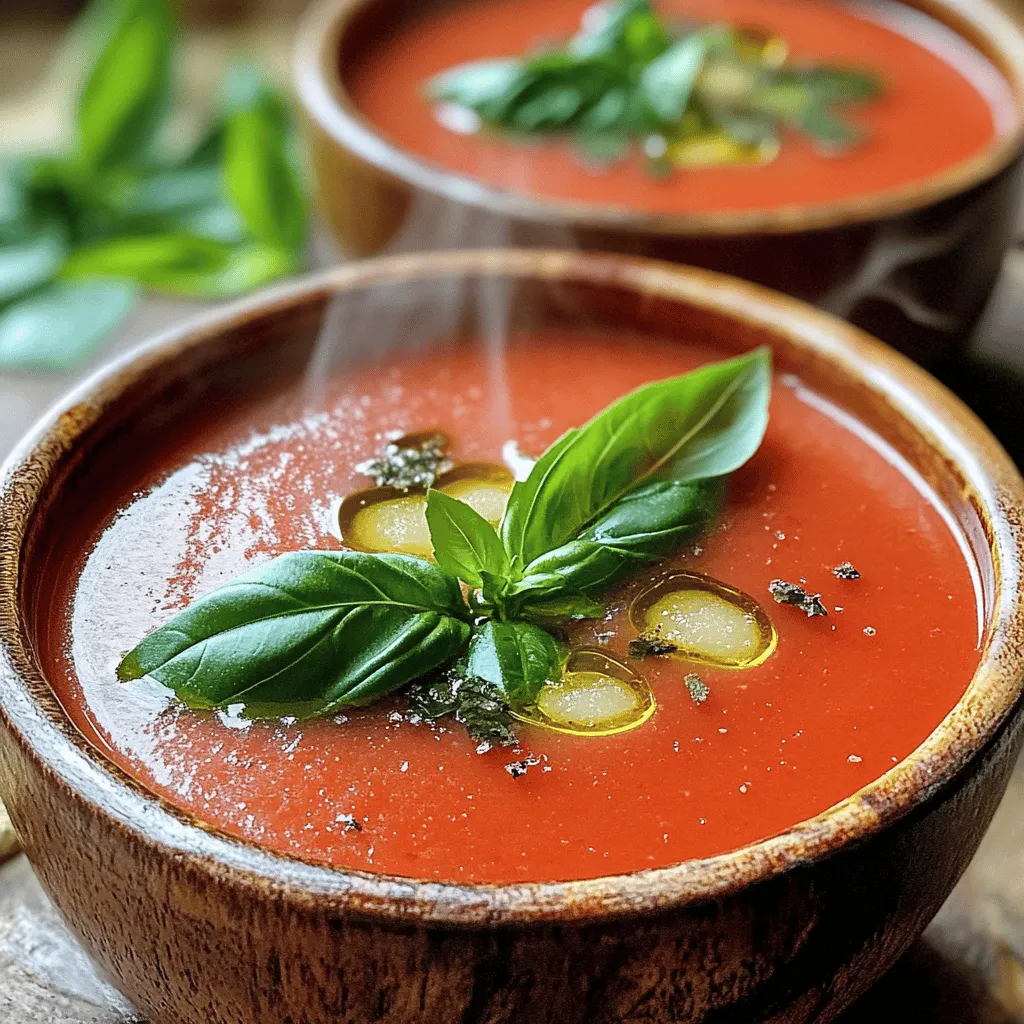
Creamy Roasted Garlic Tomato Soup Flavorful Comfort Dish
Welcome to the warm embrace of comfort food with my Creamy Roasted Garlic Tomato Soup! This dish combines fresh, ripe tomatoes and roasted garlic for
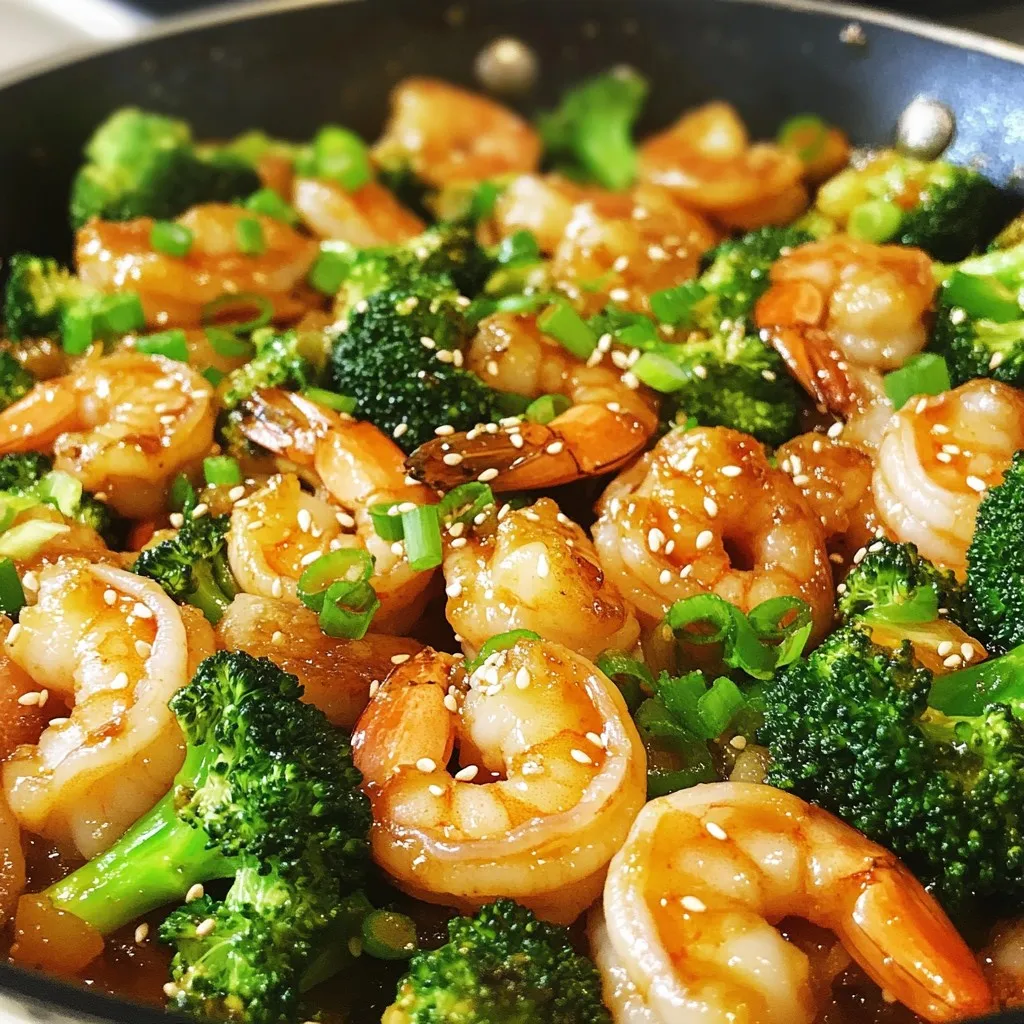
Low Carb Shrimp & Broccoli Skillet Simple and Tasty
Ready for a tasty and healthy meal? Try my Low Carb Shrimp & Broccoli Skillet! This dish is quick, filling, and packed with flavor. With