Dinner

To create a nourishing bowl of Mystical Witch Soup, gather these essential ingredients: - 1 tablespoon olive oil - 1 medium onion, diced - 3 cloves garlic, minced - 2 large carrots, diced - 2 stalks celery, diced - 1 medium zucchini, chopped - 1 cup mushrooms, sliced - 4 cups vegetable broth - 1 can (15 oz) chickpeas, drained and rinsed - 1 teaspoon dried thyme - 1 teaspoon smoked paprika - 1 bay leaf - Salt and pepper to taste - 1 cup kale, chopped - Juice of 1 lemon These ingredients bring flavor and nutrition to the soup. The olive oil serves as the base, adding richness. Onions and garlic give a sweet and savory depth. Carrots and celery add crunch and sweetness. Zucchini and mushrooms enhance the texture. The vegetable broth acts as the soup's heart. Chickpeas provide protein, making it filling. Thyme and smoked paprika add earthy notes. The bay leaf infuses a subtle aroma. Finally, kale and lemon juice bring freshness and brightness. To elevate your soup, consider these optional garnishes: - Edible flowers (like pansies or nasturtiums) - Suggested bread accompaniments (such as crusty baguette or whole-grain toast) - Additional herbs (like fresh parsley or cilantro) These garnishes add color and flair. Edible flowers create a mystical look. Bread serves as a perfect side for dipping. Fresh herbs enhance flavor and visual appeal. Adding these touches makes your soup not only delicious but also beautiful. For a full recipe, refer to the earlier sections. 1. Heat 1 tablespoon of olive oil in a large pot over medium heat. 2. Add 1 medium diced onion and sauté for about 3-4 minutes. The onion should be soft and look clear. 3. Stir in 3 minced garlic cloves and cook for another minute. This will make your kitchen smell amazing! 4. Next, add 2 diced large carrots and 2 diced stalks of celery. Cook these for about 5 minutes. The veggies should get a bit soft. 5. Mix in 1 chopped medium zucchini and 1 cup of sliced mushrooms. Cook for another 3-4 minutes until everything is tender. 1. Pour in 4 cups of vegetable broth and add 1 can of drained chickpeas. 2. Sprinkle in 1 teaspoon of dried thyme, 1 teaspoon of smoked paprika, and add 1 bay leaf. 3. Let the soup simmer gently for 15-20 minutes. This helps all the flavors blend. 4. Taste and season with salt and pepper as you like. 1. In the last few minutes, stir in 1 cup of chopped kale. 2. Squeeze the juice of 1 lemon into the soup. This adds a nice zing! 3. Don’t forget to take out the bay leaf before serving. 4. For presentation, ladle the soup into bowls and top with edible flowers. This makes it look magical! 5. Serve with crusty bread for a complete meal. This recipe is truly delightful! For the full recipe, check the details above. To make the best Mystical Witch Soup, start with choosing the right broth. I prefer vegetable broth for a light and fresh taste. You can also use homemade broth for more depth. Next, adjusting seasoning to taste is key. Add salt and pepper gradually. Taste as you go. Each ingredient brings its own flavor. The dried thyme and smoked paprika add warmth and earthiness. Make sure to balance these flavors with care. Sautéing is a crucial step in making this soup. Use medium heat to warm the olive oil. Start with the onion and cook it until it is soft. This helps build the base flavor. Add garlic next, as it cooks quickly. Stir it in for just a minute to avoid burning. When adding the carrots and celery, stir them often. This helps them soften without sticking. Cook them for about five minutes. Then, add the zucchini and mushrooms. Cook until they are tender, around three to four minutes. This method keeps the vegetables bright and crunchy. Presentation matters too! For a beautiful touch, use edible flowers like pansies or nasturtiums. They add color and make the soup look magical. After serving the soup in bowls, sprinkle the flowers on top. Serving with crispy bread also enhances the meal. This contrast makes each bite delightful. Enjoy the combination of flavors and colors for a truly enchanting experience. {{image_4}} You can easily adapt Mystical Witch Soup for different diets. For a vegan version, simply use vegetable broth and skip any animal products. This soup is already gluten-free since it uses fresh veggies and beans. If you want to add protein, try swapping chickpeas for lentils or tofu. Both options will keep the soup hearty and filling. To spice things up, add some chili flakes or cayenne pepper. This will give your soup a warm kick. You can also explore seasonal veggies. In fall, try adding butternut squash or sweet potatoes. In summer, fresh corn or bell peppers can brighten the dish. Many cultures have their own takes on witch soup. In Italy, a version might include pasta and basil. In Eastern Europe, you might find a beetroot base, giving the soup a vibrant color. Each region brings its own history and flavors to this versatile dish. To store leftovers of your Mystical Witch Soup, first let it cool. Then, pour it into a clean, airtight container. Keep it in the fridge for up to three days. This soup tastes great the next day! Reheat it on the stove or in the microwave. Just make sure it gets hot all the way through. You can freeze this soup for later meals. First, let it cool completely. Pour it into freezer-safe bags or containers. Leave some space at the top for expansion. Seal them tightly. Your soup can last in the freezer for up to three months. When ready to eat, thaw it overnight in the fridge. Reheat it on low heat until hot. For the best taste, eat the soup within three days if stored correctly in the fridge. If frozen, aim to eat it within three months. While it may still be safe to eat after this, the flavor may change. Always check for any off smells or changes in color before enjoying your soup. Mystical Witch Soup is a warm, hearty dish. It blends fresh veggies with herbs. This soup has roots in folklore and tradition. People often make it during cooler months. The colors and flavors create a magical vibe. It is nourishing and perfect for cozy nights. Yes, you can easily prep this soup ahead of time. Make a big batch on the weekend. Store it in the fridge for up to three days. You can also freeze it for later. Just make sure to cool it first. When you're ready, reheat it on the stove or in the microwave. To add some heat, you can try a few tricks. Add a pinch of cayenne pepper or red pepper flakes. You can also stir in some chopped jalapeños. Taste as you go to find your perfect spice level. Spicy flavors can bring out the soup's magic. Yes, this soup is kid-friendly! The flavors are mild and tasty. If your kids are picky, blend it smooth for a creamier texture. You can also cut back on spices. Add fun toppings like cheese or croutons. Kids will love the colorful veggies too! This blog post guided you through making Mystical Witch Soup. We covered essential ingredients like olive oil, fresh veggies, and chickpeas. You learned about cooking techniques and how to enhance flavor with herbs and garnishes. We also shared tips for dietary modifications and creative variations. Remember, you can personalize this soup to fit your taste. Explore different flavors and enjoy its warmth. This dish is not just food; it’s an experience. Make your own magic in the kitchen!
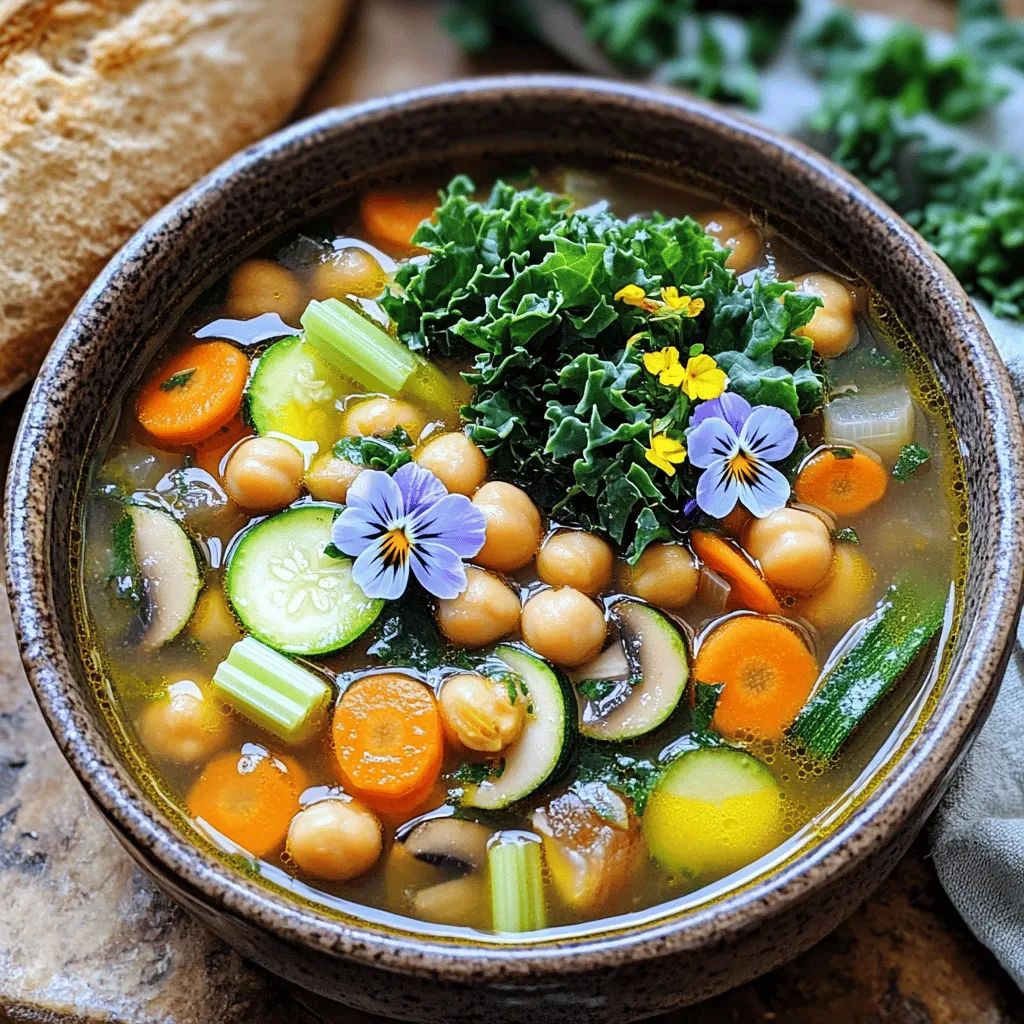
Mystical Witch Soup Nourishing and Wholesome Recipe
Welcome to my kitchen, where I’m excited to share a delicious recipe for Mystical Witch Soup! This nourishing dish is packed with fresh veggies, chickpeas,
To create a creamy roasted garlic butternut squash pasta, you need fresh, simple ingredients. Here’s what you’ll need: - 1 medium butternut squash, peeled and cut into 1-inch cubes - 1 whole head of garlic - 3 tablespoons extra virgin olive oil - Sea salt and freshly cracked black pepper, to taste - 8 ounces pasta (fettuccine or any preferred type) - 1 cup vegetable broth - 1 cup heavy cream (substitute with coconut cream for a vegan alternative) - 1/2 teaspoon ground nutmeg - 1/4 cup grated Parmesan cheese (or nutritional yeast for a vegan option) - Fresh parsley, finely chopped for garnish Each ingredient plays a key role in the dish's flavor and texture. The butternut squash adds natural sweetness. Roasting it with garlic gives a deep, rich taste. Olive oil helps bind the flavors and allows for easy cooking. The pasta type can vary based on your preference, but I suggest fettuccine for its ability to hold the sauce well. For those who prefer dairy-free options, coconut cream or nutritional yeast works great. Seasoning with nutmeg creates warmth in the dish. Finally, fresh parsley brightens the plate and adds a splash of color. For the complete recipe, check out the Full Recipe. To make this dish shine, you need to roast the butternut squash and garlic. Start by preheating your oven to 400°F (200°C). Cut the squash into 1-inch cubes. Spread them out on a baking sheet. Drizzle with olive oil and season well. This is key to bringing out the sweet, nutty flavor. For the garlic, slice the top off a whole head and drizzle it with olive oil. Wrap it in foil to keep it moist. Roast both the squash and garlic for about 25-30 minutes. You want the squash fork-tender and the garlic soft and golden. Now it’s time to create that creamy sauce. Once the squash and garlic cool a bit, squeeze the roasted garlic into a blender. Add the butternut squash cubes, vegetable broth, heavy cream, ground nutmeg, and Parmesan cheese. Blend until the mixture is smooth and velvety. This is where you can adjust the taste. If it needs more salt or pepper, add it now. The sauce should be rich and flavorful. While making the sauce, cook your pasta in a pot of salted boiling water. Follow the package instructions for al dente pasta. This means it should still have a slight bite. Once the pasta is done, reserve some cooking water and then drain it. In a large skillet, combine the creamy sauce with the drained pasta. Toss well, ensuring the pasta is fully coated. If the sauce is too thick, add some reserved pasta water, one tablespoon at a time, until it’s just right. Enjoy your creamy roasted garlic butternut squash pasta! For the full recipe, refer to the earlier section. To make great roasted garlic, choose a whole head of fresh garlic. Slice off the top to expose the cloves. Drizzle it with olive oil and wrap it in foil. Roast it alongside the butternut squash. This method keeps the garlic sweet and soft. To avoid bitterness, do not let the garlic burn. Keep an eye on it while it roasts. For a creamy sauce, use the pasta water wisely. After cooking the pasta, save some water before draining. If the sauce is too thick, add a bit of the reserved water. This helps thin it out without losing flavor. If you want extra creaminess, try using coconut cream instead of heavy cream. This option is tasty and vegan-friendly. To make your dish look great, serve it in shallow bowls. Create a swirl of sauce on top. This adds a nice touch. A sprinkle of fresh parsley brightens up the dish. You can also drizzle a bit of olive oil for extra flavor. Pair this pasta with a simple green salad or crusty bread for a full meal. For the full recipe, check out the [Full Recipe]. {{image_4}} You can easily make this dish vegan and dairy-free. For the cream, use coconut cream instead of heavy cream. Its rich texture mimics dairy well. For cheese, substitute Parmesan with nutritional yeast. This gives a cheesy flavor without dairy. To enhance flavor without dairy, try adding more herbs. Fresh basil or thyme works great. You can also add a splash of lemon juice for brightness. This will keep the dish vibrant and tasty. If you need gluten-free pasta, several brands are great. Look for brands like Barilla Gluten Free or Banza Chickpea Pasta. They hold up well in sauces and taste good. When cooking gluten-free pasta, follow package instructions closely. These noodles can cook faster than regular pasta. Check them often to avoid overcooking. Rinse them in cold water after draining. This helps stop the cooking process. You can change this dish based on the seasons. In fall, add sautéed spinach for color and nutrition. In winter, add roasted kale for extra crunch. For proteins, consider adding chickpeas or grilled chicken. They will make the meal heartier. You can also adjust spices based on what’s fresh. Fresh herbs like parsley or sage can brighten the dish. Feel free to explore these variations to keep your creamy roasted garlic butternut squash pasta exciting and fresh. You can find the full recipe above to guide you with the main ingredients and steps. To store leftovers, cool the pasta to room temperature. Place it in an airtight container. This keeps the dish fresh and safe. The creamy roasted garlic butternut squash pasta lasts about 3-4 days in the fridge. For freezing, let the pasta cool completely. Use a freezer-safe container or bag. Remove as much air as possible to prevent freezer burn. The pasta can stay frozen for up to 2 months. When you’re ready to eat, thaw it overnight in the fridge. Reheat it in a skillet over low heat. Add a splash of vegetable broth or water to keep it creamy. Enjoy your meal just like the first time! Yes, you can use other squashes. Good choices include acorn squash or pumpkin. Both offer a nice sweetness. They blend well with garlic and cream. Just make sure to adjust cooking times as needed. To add heat, try red pepper flakes. A pinch will do the trick! You can also mix in some diced jalapeños. If you love a smoky flavor, add smoked paprika. Experiment until you find your perfect spice level. Fettuccine works great for this dish. Its wide shape holds the sauce well. You can also use penne or rotini. Both pasta types grab the creamy sauce nicely. Choose whatever you enjoy most! Start by roasting the squash and garlic. You can store these in the fridge for up to three days. Make the sauce and cook the pasta just before serving. This keeps everything fresh and tasty. If you want, you can freeze the sauce, too. Just thaw and reheat when ready to enjoy. For the full recipe, check out the instructions above! This article covered a delicious butternut squash pasta dish. We explored the ingredients, like roasted squash and garlic, and how to blend them into a creamy sauce. The step-by-step guide showed how to cook the pasta and mix it all together. You learned tips for perfecting flavors and even ways to make vegan or gluten-free versions. In closing, this recipe is versatile and easy, perfect for any occasion. Enjoy making it your own!
Creamy Roasted Garlic Butternut Squash Pasta Delight
Welcome to a world of creamy comfort! Today, I’ll show you how to make Creamy Roasted Garlic Butternut Squash Pasta. This dish combines sweet squash
Here are the ingredients you will need for the creamy chicken and rice soup. Each one adds a layer of flavor that makes this dish special. - 1 tablespoon olive oil - 1 onion, finely diced - 2 carrots, peeled and sliced - 2 celery stalks, finely diced - 3 garlic cloves, minced - 1 teaspoon dried thyme - 1 teaspoon dried rosemary - 4 cups chicken broth (preferably low-sodium) - 1 cup cooked chicken, shredded or diced - 1 cup uncooked white rice (use long grain or jasmine for the best texture) - 1 cup heavy cream - Salt and freshly ground black pepper to taste - Fresh parsley, finely chopped (for garnish) Each ingredient plays a key role. The olive oil creates a nice base for cooking. The onion, carrots, and celery give a sweet and savory taste. Garlic adds a bold flavor, while thyme and rosemary bring warmth. Chicken broth makes the soup rich and hearty. Cooked chicken gives protein, while rice thickens the dish. Heavy cream adds a lovely creaminess. Finally, salt, pepper, and parsley brighten everything up. For the full recipe, make sure to check out the complete steps! 1. In a large pot, heat the olive oil over medium heat. 2. When the oil shimmers, add the finely diced onion, sliced carrots, and diced celery. 3. Sauté the mixture for about 5-7 minutes. Stir often until the veggies soften. The onion should turn translucent. 1. Now, incorporate the minced garlic, dried thyme, and dried rosemary into the pot. 2. Sauté for one more minute. Stir frequently until the garlic becomes fragrant and lightly golden. 3. This step brings out the best flavors. It sets the stage for our rich soup. 1. Carefully pour in the chicken broth. Increase the heat until it boils. 2. Once boiling, add the uncooked white rice. 3. Reduce the heat to a gentle simmer and cover the pot. Cook for 15-20 minutes. The rice should be tender and soak up some broth. 1. When the rice is ready, stir in the shredded chicken. Mix well to combine everything. 2. Gradually pour in the heavy cream while stirring gently. This thickens the soup and adds richness. 3. Let the soup simmer uncovered for another 5 minutes. 4. Taste it and season generously with salt and freshly ground black pepper. 5. For a creamier texture, blend part of the soup using an immersion blender. Return it to the pot and mix well. 6. Serve the soup hot in bowls. Garnish with a sprinkle of finely chopped fresh parsley. This adds color and flavor. Enjoy making this creamy chicken and rice soup. The full recipe is simple and rewarding! To ensure a flavorful broth, use low-sodium chicken broth. It gives you control over salt. Always taste your soup before adding more salt. Fresh herbs like thyme and rosemary add depth. Sauté them with your vegetables for the best result. When choosing rice, pick long grain or jasmine. These types cook well and stay fluffy. Avoid using instant rice, as it can turn mushy. Rinse the rice before cooking to remove excess starch. This step helps keep the rice separate and light. For the best garnishing practices, sprinkle chopped fresh parsley on top. This adds color and freshness. A drizzle of extra cream enhances the soup's look and taste. You can also use croutons for crunch. Pair your soup with crusty bread or a side salad. A simple green salad complements the flavors. You might enjoy a light vinaigrette to balance the creaminess. For a creamier texture, use an immersion blender. Blend part of the soup, then mix it back in. This trick makes the soup rich without adding more cream. Consider adding grated cheese for extra flavor. Parmesan melts well and adds depth. You can also stir in some cooked spinach or kale for added nutrition. These greens blend nicely and boost the soup's color. For the full recipe, check the detailed instructions mentioned earlier. {{image_4}} You can switch proteins in this soup. Use turkey for a different taste. If you want a vegetarian option, try chickpeas or lentils. Both options add protein and flavor. You can also change the rice. Long grain rice works well, but jasmine rice adds a nice aroma. For a healthier twist, use quinoa or brown rice. These grains offer more fiber and nutrients. Customize the flavor with spices and herbs. Sage and dill can add a fresh twist. If you want a kick, try a pinch of cayenne pepper or smoked paprika. Adding vegetables boosts nutrition. Toss in peas, spinach, or kale for extra color and health benefits. You can mix in bell peppers or corn for sweetness. If you need a dairy-free option, use coconut milk or almond milk. Both will keep the soup rich and creamy without dairy. For different cream substitutes, consider Greek yogurt for a tangy taste. Silken tofu can also create a smooth base while adding protein. You can blend it into the soup for a creamy texture. For the full recipe, check out the complete guide. Store your soup in airtight containers. Glass or plastic works well. This keeps the soup fresh. In the fridge, it lasts for about 3 to 4 days. Always let it cool down before sealing. This helps avoid condensation, which can make the soup watery. You can freeze this soup for later use. Use freezer-safe containers or bags. Leave some space at the top since the soup expands when frozen. It stays good for about 2 to 3 months. When you want to eat it, thaw it overnight in the fridge. To reheat, warm it in a pot over low heat. Stir often and add a splash of broth or water if it seems thick. You can also use a microwave. Heat in short bursts, stirring in between, until hot. Enjoy your creamy chicken and rice soup! For the full recipe, check the previous sections. You can easily make this soup ahead. Just follow the recipe and let it cool. Store it in an airtight container in the fridge for up to three days. When you reheat, add a bit more broth or cream to restore the creamy texture. This method keeps the flavors fresh and delicious. Yes, rotisserie chicken works great! It saves time and adds flavor. Just shred the chicken and add it to the soup after cooking the rice. This makes the dish even easier while still tasting homemade. If your soup is too thick, simply add more chicken broth or water. Stir it in slowly until you reach your desired consistency. Taste it again to ensure the flavor stays rich and enjoyable. To make a lower-calorie version, use low-fat milk instead of heavy cream. You can also reduce the amount of rice you use and add more veggies. This keeps the soup filling without the extra calories. For sides, crusty bread is a great choice. It complements the creamy soup well. A fresh salad also works nicely, adding crunch and color. You can even serve some simple crackers on the side for extra texture. In this post, we explored a comforting creamy chicken and rice soup. We covered the key ingredients and showed how to cook them step by step. I shared tips for perfecting your broth and enhancing creaminess. You learned about ingredient swaps and variations for your taste. Finally, we discussed storage tips for leftovers. This soup is not just tasty; it’s a great way to nourish your body. Enjoy making it your own!
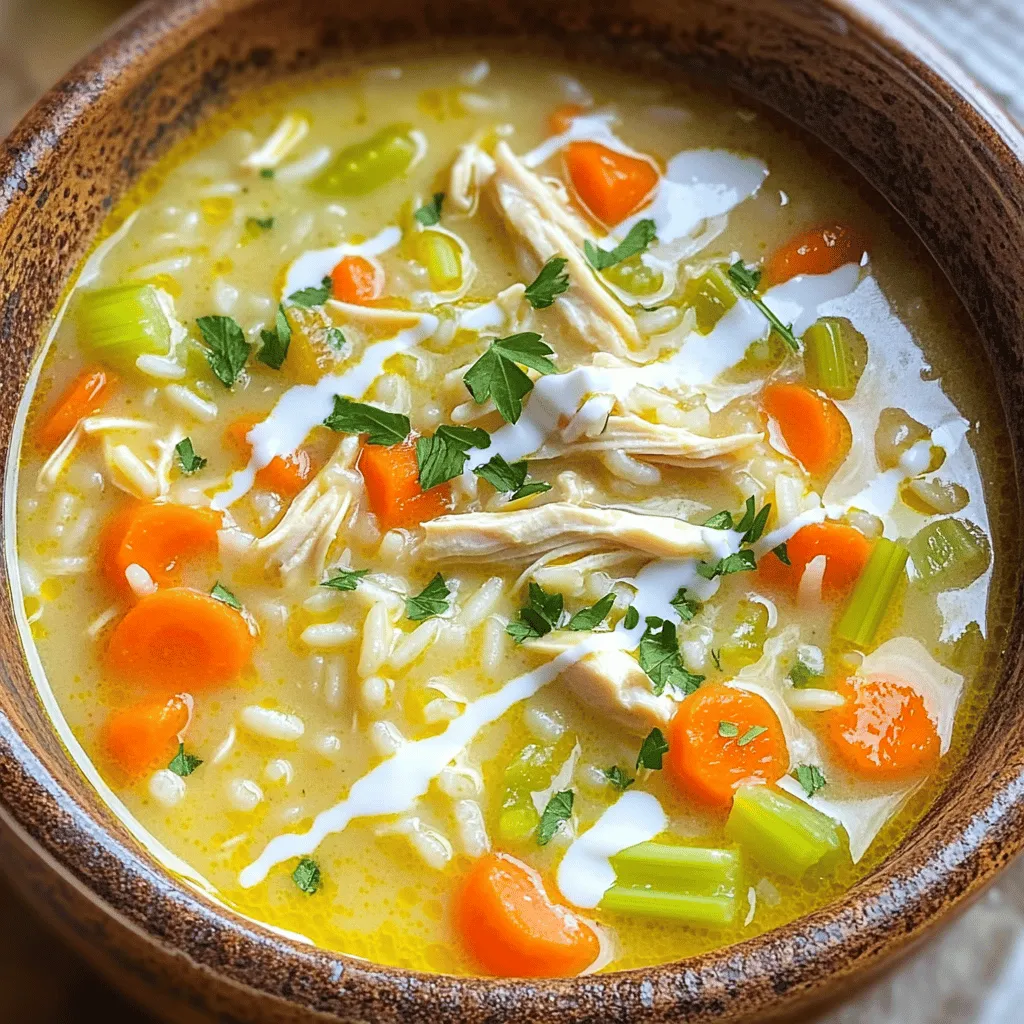
Creamy Chicken and Rice Soup Simple Rich Flavor
If you’re craving a warm and filling dish, look no further than creamy chicken and rice soup. This simple recipe brings rich flavor with just
For Honey Sesame Chicken, gather these items: - 1 lb boneless, skinless chicken thighs, cut into bite-sized pieces - 1/2 cup all-purpose flour - 1/4 cup cornstarch - 1 tsp salt - 1/2 tsp black pepper - 1/2 tsp garlic powder - 1/4 tsp cayenne pepper (optional, for a spicy kick) - 1/2 cup honey - 1/4 cup low-sodium soy sauce - 1 tbsp rice vinegar - 1 tbsp sesame oil - 2 tablespoons vegetable oil (for frying) - 1/4 cup toasted sesame seeds (for garnish) - 3 green onions, finely sliced (for garnish) - Cooked white rice or jasmine rice (for serving) Measuring ingredients helps ensure great taste. Use dry measuring cups for flour and cornstarch. Level off the top for accuracy. For liquids, use a clear measuring cup. Check at eye level. Always use a scale for precise weight, especially for chicken. This keeps your dish balanced and flavorful. Fresh ingredients often bring brighter flavors. Use fresh garlic for a strong taste. Dried spices can work, but they may not have the same punch. For sesame seeds, toasted adds depth. If you opt for dried herbs, use them sparingly. Their flavor is more concentrated. Fresh green onions give a nice crunch and bright color to the dish. {{ingredient_image_2}} Start by gathering your chicken. Use 1 pound of boneless, skinless chicken thighs. Cut them into bite-sized pieces. Next, grab a medium mixing bowl. In it, whisk together: - 1/2 cup all-purpose flour - 1/4 cup cornstarch - 1 tsp salt - 1/2 tsp black pepper - 1/2 tsp garlic powder - 1/4 tsp cayenne pepper (optional) Add the chicken pieces to the bowl. Toss them well so each piece is coated with the mix. This coating will help the chicken turn crispy when fried. Heat a large skillet or wok over medium-high heat. Add 2 tablespoons of vegetable oil. Wait until the oil is hot. This step is key for a good fry. Add the chicken in batches. Don’t crowd the pan. Fry each batch for about 5 to 7 minutes. You want the chicken to turn golden brown and be cooked through. Use a slotted spoon to remove the chicken, and place it on a plate lined with paper towels. This will soak up any extra oil. After frying, it’s time to make the sauce. Carefully drain the excess oil from the skillet, leaving about 1 tablespoon. Lower the heat to medium. Add the following ingredients to the skillet: - 1/2 cup honey - 1/4 cup low-sodium soy sauce - 1 tbsp rice vinegar - 1 tbsp sesame oil Whisk the sauce together until smooth. Allow it to simmer for about 3 to 5 minutes. This will thicken the sauce slightly. Once it's ready, return the fried chicken to the skillet. Toss the chicken gently in the sauce. Cook for an additional 1 to 2 minutes to let the flavors blend. Frying chicken is simple but needs care. Start with dry chicken pieces. Pat them with paper towels to remove moisture. This helps the coating stick better. Use a heavy skillet or wok for even heating. Heat your oil until it's hot but not smoking. You can test the oil by dropping in a small piece of chicken. If it sizzles, it's ready. Fry in small batches. Overcrowding cools the oil and makes the chicken soggy. Cook until golden brown, about 5-7 minutes. If your sauce is too thin, simmer it longer. This cooks off extra liquid and thickens the sauce. If it’s too thick, add a splash of water or more soy sauce. Mix it well and heat until it reaches your desired thickness. You can boost the flavor with more ingredients. Try adding vegetables like bell peppers or snap peas. They add crunch and nutrition. For a spicy kick, toss in some crushed red pepper flakes. If you like garlic, add minced garlic to the sauce. These simple tweaks make your dish even better. Enjoy your cooking! Pro Tips Ensure Even Coating: Make sure each piece of chicken is evenly coated with the flour and cornstarch mixture for a consistent texture and crunch when frying. Oil Temperature Matters: Test the oil temperature by dropping a small piece of chicken in; it should sizzle immediately. This ensures a crispy exterior without absorbing too much oil. Thickening the Sauce: Allow the sauce to simmer for a few minutes to achieve the right thickness; this will help it cling better to the chicken. Garnish for Flavor and Color: Don’t skip the sesame seeds and green onions; they not only add flavor but also enhance the visual appeal of the dish. {{image_4}} You can boost the nutrition of your Honey Sesame Chicken by adding veggies. This not only enhances the dish but also adds color and flavor. Good options include: - Broccoli florets - Bell peppers, sliced - Snap peas - Carrots, julienned To add them, stir-fry the vegetables in the skillet before adding the sauce. This way, they stay crisp and vibrant. You can use any vegetables you enjoy or have on hand. If you want to switch up the protein, there are many tasty choices. Instead of chicken, consider using: - Tofu for a vegetarian option - Shrimp for a seafood twist - Beef strips for a heartier meal Ensure you adjust cooking times based on your chosen protein. Each option offers a unique flavor and texture to the dish. You can easily change the sweetness of your Honey Sesame Chicken. If you want it sweeter, add more honey. Start with an extra tablespoon and taste as you mix. If you prefer less sweetness, reduce the honey. You can also balance it with more soy sauce for a savory kick. Finding the right sweetness makes this dish perfect for your taste! After you enjoy your Honey Sesame Chicken, store leftovers in the fridge. Place it in an airtight container. This keeps the chicken fresh for up to three days. Make sure it cools to room temperature before sealing. If you leave it out too long, it can spoil. When reheating, use the stovetop for the best results. Heat a skillet over medium heat. Add a splash of water or oil to keep it moist. Stir occasionally until the chicken is hot. You can also use a microwave, but the stovetop keeps it crispy. To freeze, let the dish cool completely. Place it in a freezer-safe bag or container. Remove as much air as possible to prevent freezer burn. It can last up to three months in the freezer. When ready to eat, thaw it in the fridge overnight before reheating. Yes, you can make Honey Sesame Chicken in advance. Cook the chicken and sauce as directed. Allow them to cool before storing. Place the chicken and sauce in an airtight container. Store in the fridge for up to three days. When ready to serve, just reheat the chicken in a pan. This keeps the flavors fresh. Honey Sesame Chicken pairs well with many sides. Here are some great options: - Steamed broccoli - Fried rice - Snap peas - Stir-fried vegetables - Asian-style coleslaw - Egg rolls These sides add color and balance to the meal. To add spice, use cayenne pepper in the flour mix. Start with 1/4 teaspoon. You can increase it for more heat. Another option is to add red pepper flakes to the sauce. Fresh jalapeños can also give it a kick. Adjust the spice to your taste for a perfect dish. You learned how to create delicious Honey Sesame Chicken with clear steps and tips. We covered the best ingredients, preparation, and frying methods. You now have advice on customizing flavors and storing leftovers. Remember, cooking is fun! Try new ideas and adjust the recipe to your taste. You can enjoy this dish any night of the week, impressing family and friends. Enjoy your cooking adventure and savor every bite!
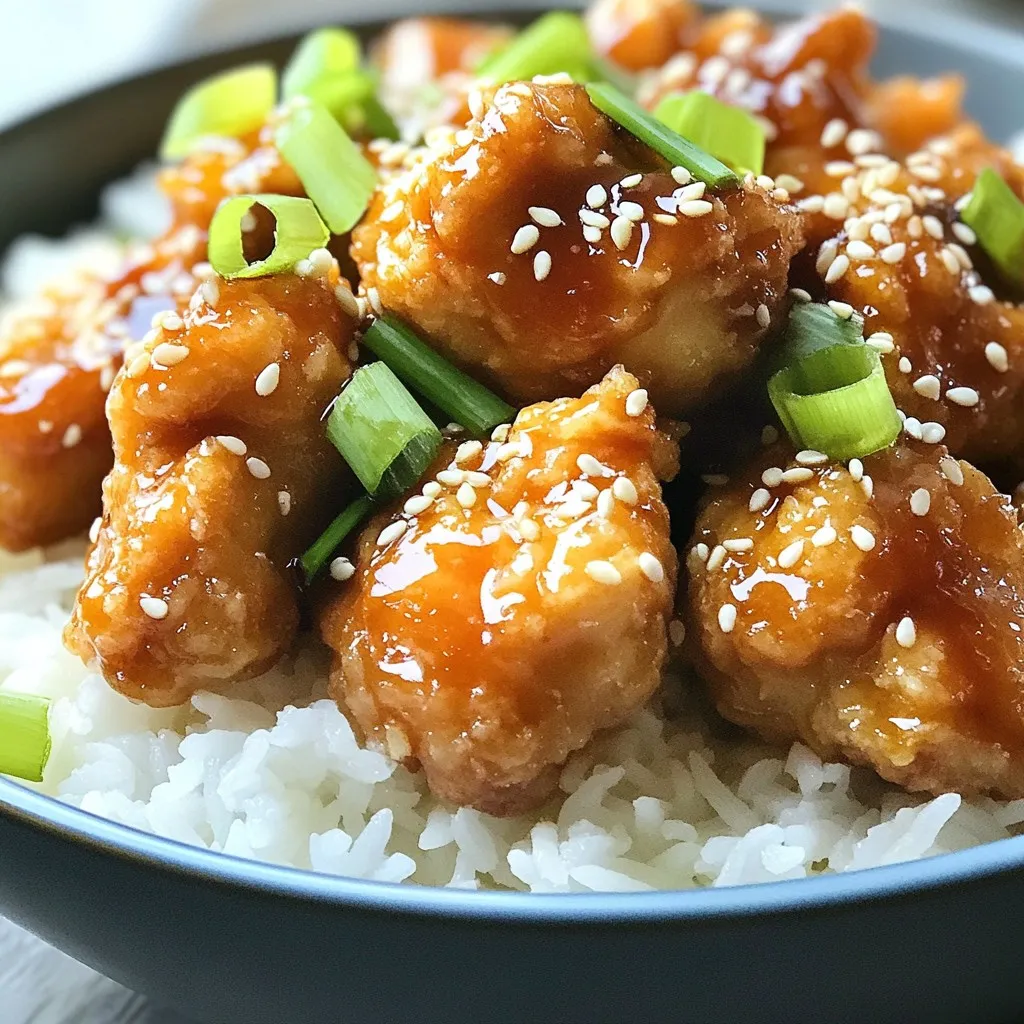
Honey Sesame Chicken Quick and Tasty Recipe Guide
Craving a quick, tasty meal? Look no further than this Honey Sesame Chicken recipe! In just a few steps, I’ll show you how to cook
- 4 medium sweet potatoes, peeled and cut into 1-inch cubes - 3 tablespoons honey - 2 tablespoons extra virgin olive oil - 1 teaspoon ground cinnamon - ½ teaspoon grated nutmeg - Salt and freshly ground black pepper to taste - 2 tablespoons fresh rosemary, finely chopped (or 1 tablespoon dried) - Optional: ¼ cup pecans or walnuts, coarsely chopped - Optional: Feta cheese crumbles for garnish Gathering the right ingredients is key to making honey roasted sweet potatoes shine. Start with medium sweet potatoes. These should be peeled and cut into 1-inch cubes. This size helps them cook evenly. Honey adds natural sweetness and a lovely glaze. Extra virgin olive oil keeps the sweet potatoes moist while roasting. Ground cinnamon and nutmeg bring warmth and depth. Don’t forget salt and pepper. These enhance all the flavors. Fresh rosemary adds a fragrant touch. If you want crunch, use chopped pecans or walnuts. For a creamy finish, sprinkle feta cheese on top. All these ingredients work together to create a dish that is both tangy and flavorful. You can find the full recipe to make this delightful dish. - Preheat the oven to 425°F (220°C). - Line a large baking sheet with parchment paper. - In a mixing bowl, combine: - 3 tablespoons honey - 2 tablespoons extra virgin olive oil - 1 teaspoon ground cinnamon - ½ teaspoon grated nutmeg - Salt and freshly ground black pepper to taste Whisk these together until smooth. This mix brings a warm sweetness. - Add 4 medium sweet potatoes, peeled and cut into 1-inch cubes to the sauce. - Toss to coat evenly. Each piece should shine with sauce. - Spread the coated sweet potatoes on the prepared baking sheet. - Ensure they lay in a single layer. This step helps them roast evenly. - Sprinkle 2 tablespoons fresh rosemary over the sweet potatoes. - If desired, add ¼ cup chopped pecans or walnuts. These add crunch and flavor. - Place the baking sheet in the oven. - Roast for 25-30 minutes. Toss halfway through for even cooking. - When finished, the sweet potatoes should be golden and tender. - If you like, garnish with feta cheese before serving. This simple process creates a tasty dish. For the full recipe, check out the detailed instructions above! To get sweet potatoes that are soft inside and crisp outside, follow these tips: - Cut the sweet potatoes into even 1-inch cubes. This helps them cook at the same rate. - Spread the cubes out on your baking sheet. They need space to roast and caramelize. - Use a hot oven set to 425°F (220°C). This temperature brings out the sweetness and keeps them from getting soggy. - Position the baking sheet in the center of the oven. This ensures even heat all around. Want to add more flavor? Try these ideas: - Add spices like chili powder or smoked paprika for a nice kick. - Fresh herbs like thyme or sage can brighten the dish. - If you want a different sweetener, maple syrup works well too. It gives a rich taste. Serve honey roasted sweet potatoes with these ideas: - Pair them with grilled chicken or fish for a balanced meal. - They also go well with quinoa or brown rice for a hearty vegetarian dish. - For a pretty presentation, serve them in a colorful bowl. - Add a drizzle of honey or a sprinkle of fresh herbs on top for extra flair. For the full recipe, check the details above. Enjoy your cooking! {{image_4}} You can change the taste of honey roasted sweet potatoes in fun ways. - Add spices: Chili powder or paprika gives a nice kick. - Citrus zest: Try adding lemon or orange zest for a fresh twist. These flavors make the dish more exciting and can surprise your taste buds. You can make this dish fit different diets easily. - Vegan option: Use maple syrup instead of honey. - Gluten-free: This recipe is already gluten-free, so enjoy without worry. - Low-calorie: Cut down on the honey or oil for a lighter option. These simple swaps keep the dish tasty while meeting your needs. Mix in seasonal fruits and veggies to keep it interesting. - Fall favorites: Add apples or brussels sprouts for a cozy feel. - Summer twist: Toss in some zucchini or bell peppers for freshness. These additions not only enhance flavor but also boost nutrition. For the full recipe, check out the details above! To keep your honey roasted sweet potatoes fresh, store them in the fridge. Place the leftovers in an airtight container. This helps them stay moist and tasty. They can last up to four days. If you want to freeze them, let them cool first. Then, spread the sweet potatoes on a baking sheet. Freeze them for about an hour until firm. After that, transfer them to a freezer bag. They will stay good for up to three months. When you are ready to enjoy your leftovers, reheating is key. For the best results, use your oven. Preheat it to 350°F (175°C). Place the sweet potatoes on a baking sheet lined with parchment paper. Heat them for about 10-15 minutes. This method keeps the texture crispy. If you are short on time, you can use the microwave. Heat them in short bursts of 30 seconds. Check them often to avoid sogginess. These tips will help your sweet potatoes taste great again! Honey roasted sweet potatoes can last up to five days in the fridge. To store them, place the cooled sweet potatoes in an airtight container. This helps keep them fresh. When you want to eat them, simply reheat. Yes, you can make honey roasted sweet potatoes ahead of time. Just prepare and roast them as usual. After roasting, let them cool completely. Store them in your fridge for later use. Sweet potatoes are rich in vitamins and minerals. They are high in fiber, which helps digestion. They also contain antioxidants that protect your body. Plus, they are great for keeping your skin healthy. You can use other potatoes, but the taste will change. Regular potatoes or Yukon gold will work, but they won't have the same sweetness. Sweet potatoes add a unique flavor to this dish. To add spice, include chili powder or cayenne pepper in the honey sauce. You can also sprinkle crushed red pepper flakes on top before roasting. Adjust the amount to fit your heat preference. Honey roasted sweet potatoes are simple and tasty. You learned the key ingredients and steps to make them. I shared tips for perfect roasting and ideas for fun variations. These sweet potatoes work well for any meal. They can even fit into many diets. With proper storage, leftovers stay fresh. Enjoy making this delicious dish at home! You'll find joy in each sweet bite.
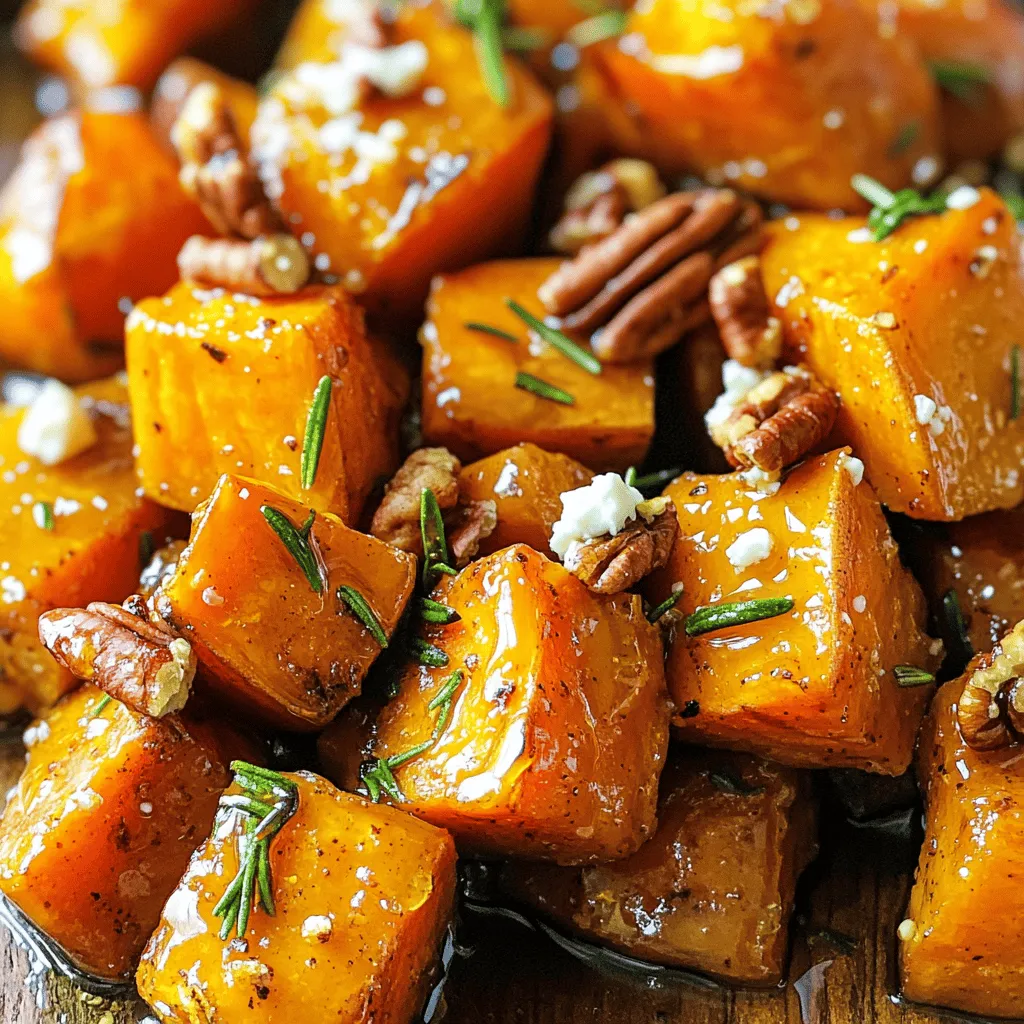
Honey Roasted Sweet Potatoes Tangy and Flavorful Delight
Get ready for a dish that bursts with flavor: Honey Roasted Sweet Potatoes! This recipe mixes sweet and savory for a delightful twist on a
- 1 cup cooked chicken, shredded - 1 cup pumpkin puree - 1 cup all-purpose flour - 1 teaspoon baking powder - 1/2 teaspoon salt - 1/4 teaspoon black pepper - 1/4 teaspoon ground ginger - 1/4 teaspoon garlic powder - 1/4 cup milk (plus more if needed) - 2 tablespoons fresh parsley, chopped I love using simple, fresh ingredients for my chicken and pumpkin dumplings. You start with tender, cooked chicken. When you shred it, it mixes well with the pumpkin puree. You can use canned pumpkin or make your own by roasting pumpkin slices until they are soft. All-purpose flour gives the dumplings their shape. Adding baking powder makes them light and fluffy. The spices, like salt, black pepper, ground ginger, and garlic powder, bring out the flavor. Milk is key for the right dough texture. You can add more if it feels too dry. Fresh parsley adds a nice touch of color and flavor. It’s a great way to elevate your dish! - Fresh parsley - Warm broth or sauce Garnishing your dumplings is fun! Fresh parsley on top looks great and adds taste. You can serve them with warm broth or sauce for dipping. This makes each bite even more enjoyable! To start, gather your dry ingredients. In a medium bowl, mix these items: - 1 cup all-purpose flour - 1 teaspoon baking powder - 1/2 teaspoon salt - 1/4 teaspoon black pepper - 1/4 teaspoon ground ginger - 1/4 teaspoon garlic powder Use a whisk to blend everything well. This helps the baking powder distribute evenly. Next, take another bowl for the chicken and pumpkin. Add: - 1 cup cooked chicken, shredded - 1 cup pumpkin puree Mix these two with a fork until they are smooth. This step combines the savory chicken with the sweet pumpkin. Now, it's time to make the dough. Gradually add the dry mix into the chicken and pumpkin blend. Stir gently with a spatula or spoon. You want to combine them without overmixing. Then, slowly pour in: - 1/4 cup milk (plus more if needed) Fold it in until the dough is soft and slightly sticky. If it feels dry, add a little more milk. Fill a large pot with water and bring it to a gentle boil. While you wait, scoop out portions of the dumpling mix. Roll them into balls, about 1 inch wide. Carefully drop the dumplings into the boiling water. Don’t overcrowd the pot. Cook for about 6-8 minutes. They will float when they are done. Using a slotted spoon, lift the dumplings from the water. Place them on a plate to drain. Serve them warm with a sprinkle of fresh parsley. For the full recipe, check the section above. To make great dumplings, avoid overmixing the dough. When you combine the wet and dry ingredients, mix just until they come together. Overmixing can make the dumplings tough. You want them light and fluffy. For extra flavor, try adding herbs like thyme or sage. These herbs blend well with pumpkin and chicken. Just a pinch can elevate the taste without overpowering it. You can also experiment with spices like nutmeg or a dash of cayenne for warmth. To keep your dumplings fresh, refrigerate or freeze them. If you have leftovers, place them in an airtight container. For longer storage, freeze the dumplings. They can last for up to three months in the freezer. When ready to eat, reheat them in warm water or a gentle steam. This keeps them moist and tasty. {{image_4}} You can swap chicken for turkey. It gives a similar taste. If you prefer plant-based meals, try a vegetarian option. Use cooked lentils or chickpeas for protein. These alternatives keep the dish hearty and satisfying. You can use roasted pumpkin or canned puree. Roasted pumpkin adds a sweet, rich flavor. It also gives a nice texture to the dumplings. Canned puree is convenient and saves time. Both options work well in this recipe, so choose what fits your day. Serve your dumplings with vegetables or sides. Steamed broccoli or sautéed greens pair nicely. A light broth adds warmth and flavor. You can also enjoy them with a tangy sauce for a fun twist. Experiment with sides to find your favorite combination. To store uncooked dumplings, place them in airtight containers. This keeps them fresh. Make sure the dumplings are not touching each other. You can also freeze them if you want to save them for later. Just layer parchment paper between each dumpling. This way, they won't stick together. Once you cook the dumplings, let them cool for a bit. Place them in a sealed container in the fridge. They stay good for about three days. If you want to keep them longer, freeze them. Wrap each dumpling in plastic wrap or foil. Put them in a freezer bag, and they can last up to three months. To reheat cooked dumplings, there are a few methods. You can steam them for the best texture. This helps keep them moist. If you prefer, you can also microwave them. Just add a little water in a bowl to create steam. Heat for about 30 seconds at a time. Check until they are warm throughout. Enjoy your Chicken and Pumpkin Dumplings warm! Yes, you can use other squash types. Butternut squash works well. Acorn squash is another great option. You can even try zucchini for a different taste. Just keep the texture in mind. Make sure to puree the squash for the right dumpling mix. Dumplings are cooked when they float to the top. This usually takes about 6-8 minutes. They should feel firm yet soft to the touch. If they are too squishy, they need more time. Always check one to be sure. This recipe is not gluten-free due to all-purpose flour. You can use gluten-free flour instead. Almond flour or rice flour are good choices. Just ensure that the mix holds together well. Adjust the liquid as needed for the right texture. Feel free to check the Full Recipe if you want more details! This blog post explored a simple chicken and pumpkin dumpling recipe. We covered ingredients, cooking steps, and tips for success. You can mix and match flavors to suit your taste. Remember to store leftovers properly for later enjoyment. With these insights, you can create warm, delicious dumplings for any meal. Enjoy the cooking process, and don't hesitate to experiment. Your kitchen is a place for fun and creativity. Happy cooking!
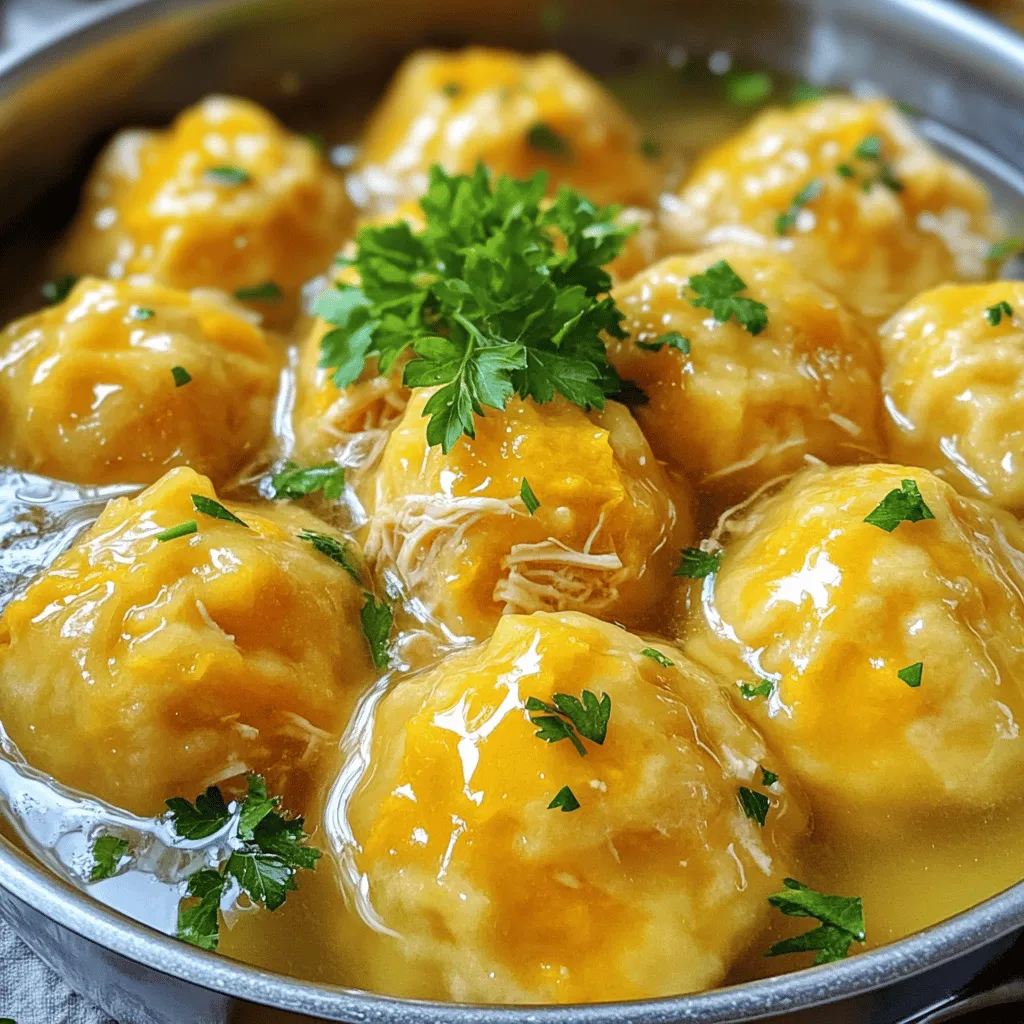
Chicken and Pumpkin Dumplings Tasty Comfort Food
Looking for a cozy meal that warms the soul? Chicken and pumpkin dumplings are the answer! This dish blends hearty chicken with sweet pumpkin, creating
To make Brown Butter Sage Dinner Rolls, gather these items: - 4 cups all-purpose flour - 1 packet (2 ¼ teaspoons) active dry yeast - 1 cup warm milk (about 110°F) - 1/4 cup brown sugar - 3/4 cup unsalted butter (divided: 1/4 cup for mixing and 1/2 cup for browning) - 1 teaspoon salt - 1/2 teaspoon freshly ground black pepper - 1/4 cup fresh sage leaves, finely chopped - 1 large egg - 1 tablespoon honey (optional, for brushing) Accurate measuring is key to great rolls. Use a dry measuring cup for flour. Spoon the flour into the cup and level it off with a knife. Avoid packing it down. For brown sugar, fill the cup and press it firmly. Use a digital scale for precise amounts. This can help you achieve perfect texture every time. Choose high-quality ingredients for the best taste. Use fresh sage leaves, as they give a vibrant flavor. Opt for unsalted butter to control salt levels. Select active dry yeast that is fresh to ensure good rise. Milk should be warm, not hot, for the yeast to activate properly. Quality matters as it enhances the overall flavor of your rolls. To start, melt 1/2 cup of unsalted butter in a small saucepan. Use medium heat and stir it often. Watch closely as it foams and changes color. You want it to turn a rich golden brown. This will give your rolls a nutty flavor. Once it reaches the right color, remove it from the heat. Let it cool for a few minutes while you gather the other ingredients. In a large mixing bowl, combine 1 cup of warm milk, 1/4 cup of brown sugar, and 1 packet of active dry yeast. Stir gently and let it sit for about 5 to 10 minutes. You should see bubbles forming. This means the yeast is alive and ready. Next, add the cooled brown butter, chopped sage, 1 teaspoon of salt, 1/2 teaspoon of black pepper, and 1 large egg. Mix everything until it blends well. Gradually add 4 cups of all-purpose flour, one cup at a time. Use a wooden spoon or spatula to mix. Once a soft dough forms, turn it onto a floured surface. Knead the dough for about 8 to 10 minutes. You want it to be smooth and elastic. Press it lightly, and it should spring back. After kneading, place the dough in a greased bowl. Turn it over to coat lightly with oil. Cover it with a clean kitchen towel and set it in a warm spot. Let it rise for about 1 hour or until it doubles in size. Once the dough has risen, gently punch it down to release air. Turn it out onto the floured surface again. Divide the dough into 12 equal pieces. Shape each piece into a smooth ball. Place the balls in a greased baking dish, leaving space between each one. Cover them again with the towel and let them rise for another 30 minutes. Follow these steps from the Full Recipe for perfect Brown Butter Sage Dinner Rolls! To get soft, fluffy rolls, use warm milk. It helps the yeast grow. Make sure your butter is browned but not burnt. This adds a rich flavor. Knead the dough well for about 8-10 minutes. You want it smooth and elastic. Let the dough rise in a warm spot. This helps the rolls puff up nicely. Here are some tools I always use: - Mixing bowl - Wooden spoon or spatula - Measuring cups and spoons - Kitchen towel - Baking dish - Rolling pin (optional) - Oven mitts These tools make the process easier and more fun. Using the right equipment helps you get the best results. If your rolls are too dense, check the yeast. Make sure it's fresh and active. If they don't rise, your kitchen might be too cool. Try placing the dough near a warm oven. If the rolls are dry, you may have added too much flour. Always measure carefully. You can also brush them with butter for added moisture. {{image_4}} You can add cheese to the dough for a savory twist. I love using sharp cheddar or Gruyère. Mix in about one cup of shredded cheese when you add the flour. The cheese melts and creates a gooey center. It pairs well with the nutty flavor of brown butter and sage. Serve these rolls warm for a cheesy experience. If you need a gluten-free version, use a gluten-free flour blend. Make sure it has xanthan gum for structure. Follow the same steps in the recipe. The rolls may be denser, but they will still taste great. You can also add a bit of extra brown butter for flavor. This option allows everyone to enjoy these rolls. Experiment with herbs for a unique taste. Rosemary or thyme works well with brown butter. Use about one tablespoon of finely chopped herbs in place of sage. You can also mix herbs for a richer flavor. This is a fun way to customize your rolls. Each batch can surprise you with new tastes. To keep your Brown Butter Sage Dinner Rolls fresh, store them in an airtight container. Place a paper towel inside to absorb moisture. This helps maintain their soft texture. You can also wrap them in plastic wrap for added protection. Keep them at room temperature for up to three days. If you want to keep them longer, freezing is a great option. If you have extra rolls, freeze them for later use. Allow the rolls to cool completely before freezing. Place them in a single layer on a baking sheet. Once frozen, transfer them to a freezer bag. Remove as much air as possible to prevent freezer burn. These rolls can last up to three months in the freezer. When ready to eat, simply thaw them at room temperature. To enjoy your leftover rolls, reheating is key. Preheat your oven to 350°F (175°C). Place the rolls on a baking sheet. Cover them lightly with foil to keep them moist. Heat for about 10-15 minutes, or until warm. You can also microwave them for 15-20 seconds each. If you prefer a crispy crust, the oven works best. Enjoy these rolls warm for the best flavor and texture! Yes, you can make these rolls ahead of time. Prepare the dough as directed, but stop before the second rise. After shaping the rolls, place them in the baking dish, cover, and refrigerate overnight. When ready to bake, allow them to rise at room temperature for about 30 minutes before baking. This method adds great flavor and saves you time. These rolls pair well with many dishes. Here are some ideas: - Roasted meats like chicken or pork - Creamy soups, such as butternut squash or potato leek - Salads, especially those with nuts or cheese - A warm bowl of pasta with garlic butter sauce These rolls add warmth and flavor to any meal. Brown Butter Sage Dinner Rolls are best enjoyed fresh. However, you can store them in an airtight container at room temperature for up to three days. For longer freshness, freeze them. Wrap the rolls tightly in plastic wrap and place them in a freezer bag. They can last up to three months in the freezer. To enjoy, simply thaw and reheat in the oven. For the full recipe, check the detailed steps and ingredients above. In this post, we covered how to make delicious Brown Butter Sage Dinner Rolls. You learned about key ingredients, step-by-step instructions, and essential tips for success. I also shared fun variations to try, storage methods for leftovers, and answers to your common questions. Baking these rolls is simple and rewarding. With practice, you'll perfect your skills and create tasty meals everyone will love. Enjoy your baking journey!
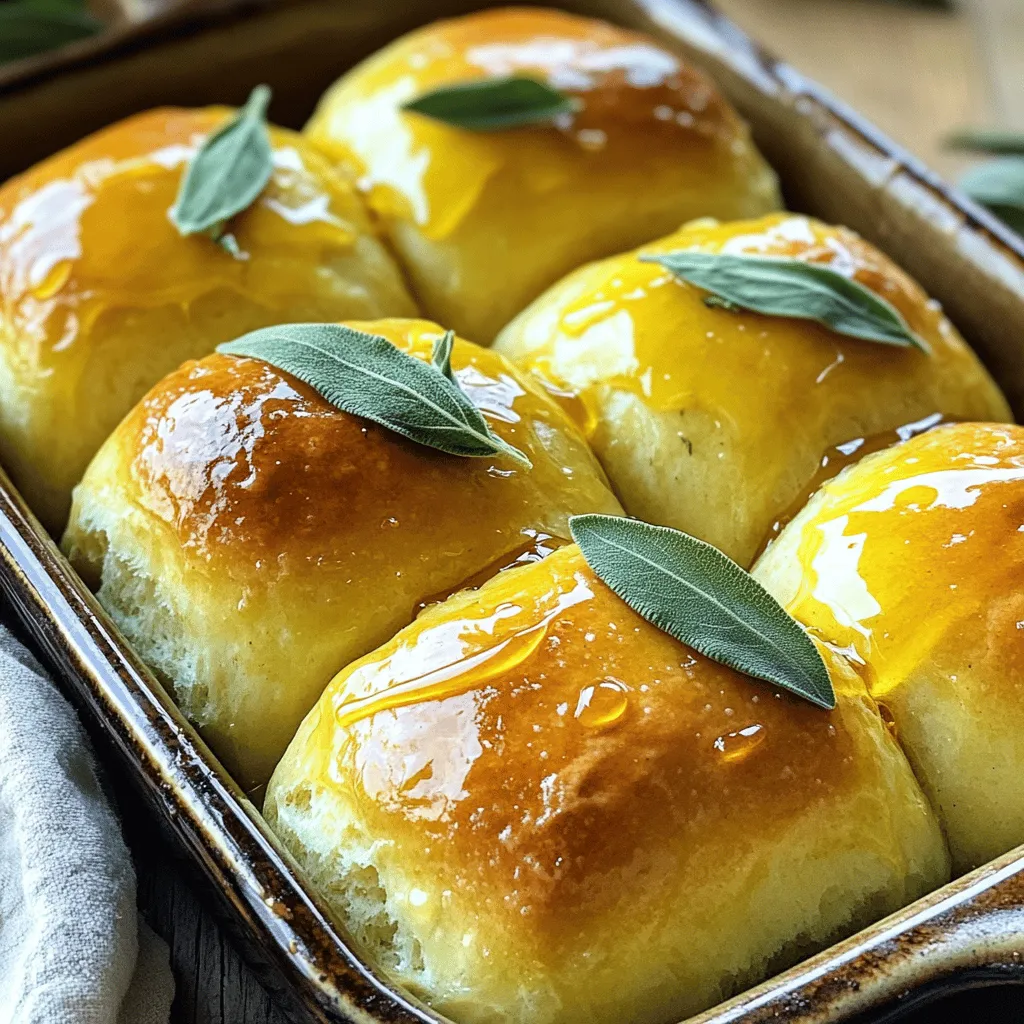
Brown Butter Sage Dinner Rolls Fluffy and Flavorful
Get ready to elevate your bread game with my Brown Butter Sage Dinner Rolls! These rolls are fluffy, flavorful, and bursting with savory notes that
Gathering the right ingredients is key to making Honey Butter Sweet Potato Cornbread. Here’s what you need: - 1 cup mashed sweet potatoes (roughly 2 medium sweet potatoes, cooked and mashed) - 1/2 cup unsalted butter, melted and slightly cooled - 1/3 cup honey (preferably local) - 1 large egg, beaten - 1 cup buttermilk (or substitute with regular milk plus 1 tablespoon white vinegar) - 1 cup cornmeal (preferably yellow for color) - 1 cup all-purpose flour - 1 tablespoon baking powder - 1/2 teaspoon baking soda - 1/2 teaspoon salt - 1 cup corn kernels (fresh, frozen, or canned, drained) - 1 teaspoon ground cinnamon (optional for a warm spice) Using fresh and high-quality ingredients makes a big difference. Sweet potatoes add a natural sweetness and a soft texture. Local honey brings out rich flavors and supports local farms. If you want, you can swap buttermilk with regular milk and vinegar. Cornmeal gives the cornbread its classic texture. Don't forget the corn kernels for a fun pop of sweetness! 1. Preheat the oven. Set it to 400°F (200°C) and grease your baking pan. Use butter or non-stick spray. 2. Mix the wet ingredients. In a large bowl, combine the mashed sweet potatoes, melted butter, honey, beaten egg, and buttermilk. Stir until smooth. 3. Prepare the dry mix. In another bowl, whisk together cornmeal, flour, baking powder, baking soda, salt, and optional cinnamon. Make sure there are no lumps for a light cornbread. 1. Combine mixtures. Gradually add the dry mix into the wet ingredients. Fold gently to combine, but do not overmix. This keeps the cornbread light. 2. Add corn kernels. Carefully fold in the corn kernels. This adds a sweet bite to each piece. 3. Prepare for baking. Pour the batter into the greased pan. Use a spatula to level the top. 4. Bake the cornbread. Place in the oven for 25-30 minutes. It is ready when golden brown and a toothpick comes out clean. Follow the Full Recipe for more details on this delightful dish. Enjoy the process and the wonderful smells that fill your kitchen! To make the best honey butter sweet potato cornbread, you need to focus on a few key points: - Avoid overmixing for light texture: When you mix the wet and dry ingredients, do it gently. Overmixing can make the cornbread dense. You want a light, fluffy texture that melts in your mouth. - Use fresh ingredients for the best flavor: Fresh sweet potatoes and local honey make a big difference. They add rich flavors that store-bought items can't match. Always choose the freshest options you can find. Serving your cornbread is just as important as making it. Here are a couple of great ideas: - Drizzle with honey and butter before serving: This adds a sweet touch that pairs wonderfully with the cornbread. It makes every bite feel special and indulgent. - Garnish with fresh herbs or a sprinkle of cinnamon for visual appeal: A small amount of fresh herbs like thyme or a light dusting of cinnamon can brighten the dish. It makes your cornbread look as good as it tastes. For the complete method, check out the Full Recipe to ensure you have all the steps down! {{image_4}} You can easily change some ingredients to make this cornbread your own. Here are a couple of ideas: - Substitute whole wheat flour for all-purpose flour: This swap adds fiber and gives a nuttier flavor. - Try adding jalapeños for a spicy kick: This gives your cornbread a fun twist and a bit of heat. Enhancing flavors can truly elevate your cornbread experience. Here are some options you might enjoy: - Add cheese to the batter for a savory twist: Cheese like cheddar or pepper jack melts beautifully and adds richness. - Use maple syrup instead of honey for a different sweetness: Maple syrup brings a unique flavor that pairs well with sweet potatoes. For the full recipe, check out my detailed guide above. You can keep Honey Butter Sweet Potato Cornbread at room temperature. Just cover it well. It will stay fresh for up to 2 days. This makes it easy to grab a piece for a quick snack. If you want to store it longer, put it in the fridge. It will last for up to a week there. For even more time, freeze the cornbread. It stays good for up to 3 months in the freezer. To thaw, just leave it on the counter or warm it in the oven. Enjoy it fresh from the oven, even after a long freeze! You can serve this cornbread with many dishes. Here are some tasty ideas: - Chili: The sweet taste balances well with spicy chili. - Fried Chicken: A classic combo that never fails. - BBQ Ribs: The sweetness pairs great with smoky flavors. - Salads: A fresh salad adds a nice crunch. - Soups: Pair with a warm soup for comfort. These options create a fun and tasty meal with your cornbread. Yes, you can make this recipe vegan with some simple swaps. Here’s how: - Egg Substitute: Use flaxseed meal or chia seeds mixed with water. - Butter Substitute: Replace with coconut oil or vegan butter. - Buttermilk Substitute: Mix regular plant milk with vinegar or lemon juice. These changes keep the flavor and texture, making it vegan-friendly. Reheating cornbread keeps it tasty. Here are the best methods: - Oven: Preheat your oven to 350°F. Wrap cornbread in foil and heat for about 10-15 minutes. - Microwave: Place a slice on a plate and cover it with a damp paper towel. Heat for 20-30 seconds. - Skillet: Heat a pan on low. Add a little butter, then warm the slice for about 2-3 minutes. These methods ensure your cornbread stays soft and flavorful. For more details, check the Full Recipe. This blog post covered a delicious recipe for Honey Butter Sweet Potato Cornbread. You learned about the key ingredients and step-by-step instructions for making it. I shared tips to perfect your cornbread and delicious serving suggestions. You also discovered variations to customize the recipe and storage tips for leftovers. In summary, this cornbread is not just flavorful; it’s easy to make and versatile. Try it, and enjoy a tasty dish that suits your taste!
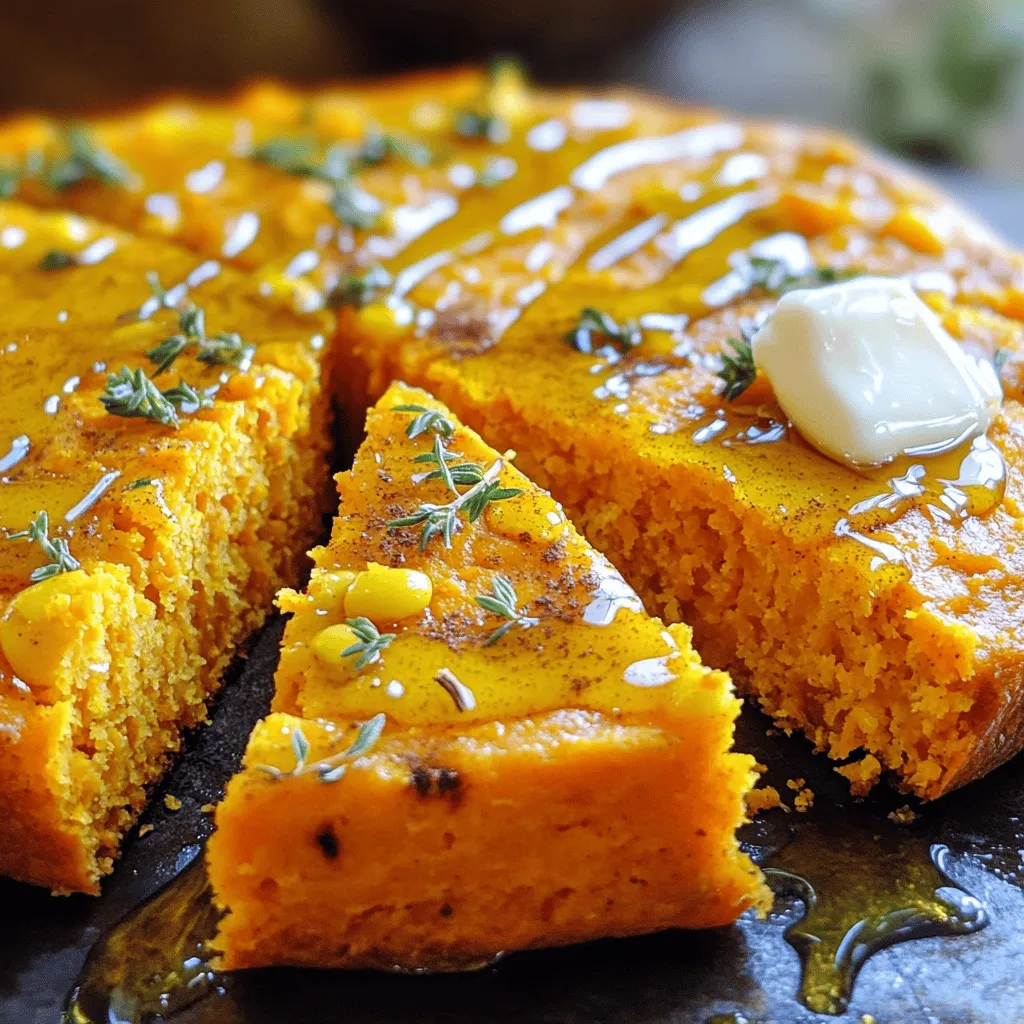
Honey Butter Sweet Potato Cornbread Delight Recipe
If you’re craving a warm, sweet treat, you’ve found it! My Honey Butter Sweet Potato Cornbread combines the earthy taste of sweet potatoes with a
To make my very special chili, gather these ingredients: - 1 lb ground beef or ground turkey - 1 can (15 oz) kidney beans, thoroughly drained and rinsed - 1 can (15 oz) black beans, thoroughly drained and rinsed - 1 can (28 oz) crushed tomatoes with herbs - 1 medium onion, finely chopped - 2 cloves garlic, minced - 1 bell pepper, diced (choose any vibrant color for freshness) - 2 tablespoons chili powder - 1 teaspoon ground cumin - 1 teaspoon smoked paprika for a smoky depth - 1 teaspoon dried oregano - 1 teaspoon salt, or to taste - 1/2 teaspoon freshly ground black pepper - 1 tablespoon extra virgin olive oil - 1 tablespoon apple cider vinegar to brighten flavors - Fresh cilantro leaves and diced avocado for garnish You can switch some ingredients if needed. Here are a few ideas: - Ground turkey can replace ground beef for a lighter option. - If you prefer fresh beans, use cooked ones instead of canned. - Any type of canned tomatoes works; just avoid sweetened ones. - Use onion powder if you lack fresh onion. - For spice, add jalapeños or cayenne instead of chili powder. - Use lime juice instead of apple cider vinegar for a different zing. To make this chili shine, choose fresh and high-quality ingredients: - Pick lean ground meat for a better taste and texture. - Buy canned beans with no added sugar or preservatives. - Choose ripe tomatoes for a rich flavor. - Select colorful bell peppers for sweetness and nutrition. - Fresh herbs add a burst of flavor, so use them when possible. - Always taste as you cook; it helps to adjust flavors. You can find the full recipe for this tasty chili above. Gather all your ingredients before you start. This makes cooking easy and fun. Chop the onion, garlic, and bell pepper. Measure out your spices. Rinse and drain the beans. This should take about 10 minutes. 1. Heat the olive oil in a large pot over medium heat. 2. Add the chopped onion, garlic, and bell pepper. Cook for 5 minutes. Stir them often until soft. 3. Increase the heat slightly and add the ground beef or turkey. Brown it for about 7-10 minutes. Use a wooden spoon to break it apart. 4. Once the meat is brown, add the chili powder, cumin, smoked paprika, oregano, salt, and black pepper. Stir for 2 minutes to toast the spices. 5. Pour in the crushed tomatoes and the rinsed beans. Mix everything well. 6. Add the apple cider vinegar and stir again. Bring the chili to a boil. 7. Lower the heat and cover the pot. Let it simmer for at least 30 minutes. For better flavor, let it simmer for an hour. Stir occasionally. After simmering, taste your chili. Adjust the salt or pepper if needed. Serve hot in bowls. Top with fresh cilantro and creamy avocado. Enjoy! You can find the full recipe above. To boost your chili's taste, try these tips: - Use fresh herbs like cilantro for bright notes. - Add a splash of lime juice before serving. - Consider a dash of hot sauce for extra heat. - Let the chili sit overnight in the fridge. The flavors deepen and blend beautifully. - If you love smoky flavors, add a bit more smoked paprika. Having the right tools makes cooking easier. Here are my must-haves: - A large pot or Dutch oven for even cooking. - A wooden spoon for stirring. It prevents scratching your pot. - A sharp knife for chopping veggies efficiently. - Measuring spoons for precise spice control. - A timer to keep track of simmering time. How you serve your chili can make it even more special: - Use rustic, deep bowls for a cozy look. - Add a wedge of lime for a fresh touch. - Top with shredded cheese for a rich flavor that melts. - Garnish with diced avocado and fresh cilantro for color. - Consider serving with crusty bread or cornbread on the side. For the full recipe, see the section above. Enjoy your cooking adventure! {{image_4}} You can make a tasty vegetarian chili that still packs a punch. Swap the ground beef or turkey for 1 pound of chopped mushrooms or lentils. Use the same spices and beans to keep flavor strong. Add more veggies like zucchini or corn for texture and sweetness. This version is just as hearty and satisfying as the original. Do you like your chili hot, or do you prefer it mild? You can control the heat easily. For a spicy kick, add diced jalapeños or a dash of cayenne pepper. If you want it mild, skip the spicy peppers and use a sweeter bell pepper. Remember that spices can build over time, so taste as you go. Beans add texture and protein to chili. If you're not a fan of kidney or black beans, try pinto beans or chickpeas. You can also skip the beans altogether for a meatier dish. Just add an extra cup of veggies to maintain a good balance. Each type of bean brings its unique flavor, so experiment to find your favorite. For the complete recipe, check out the Full Recipe. After cooking, let your chili cool down. Once cool, place it in an airtight container. Store it in the fridge for up to four days. The flavors blend better as it sits. Make sure you cover it well to avoid spills and odors. You can freeze chili for longer storage. Allow it to cool first, then put it in freezer-safe bags or containers. Remove as much air as possible before sealing. This chili stays good for up to three months in the freezer. When ready to eat, thaw it in the fridge overnight. To reheat chili, use a pot on the stove over medium heat. Stir often to heat it evenly. For a quick option, use the microwave. Heat in short bursts, stirring in between. Make sure it's hot all the way through before serving. If it thickens too much, add a splash of broth or water to loosen it. Enjoy your chili just like the first time! For the full recipe, check out the Ultimate Firehouse Chili Recipe! This chili recipe is special because it blends rich flavors and textures. I use ground beef or turkey to create a hearty base. The mix of kidney and black beans adds protein and fiber. Crushed tomatoes with herbs give it a bright and fresh taste. I also add spices like chili powder and smoked paprika for warmth. The splash of apple cider vinegar brightens the whole dish. This recipe is easy to make and perfect for any occasion. You can store this chili in the fridge for about 3 to 4 days. Make sure to keep it in an airtight container. If you want to keep it longer, freeze it. In the freezer, it can last for up to 3 months. To reheat, simply thaw in the fridge overnight and warm it on the stove or in the microwave. Yes, you can easily modify the spice level! If you like it mild, use less chili powder. For more heat, add cayenne pepper or more chili powder. You can also add fresh jalapeños or hot sauce while cooking. Taste as you go to find your perfect level of spice. Absolutely! This chili recipe is great for meal prep. It stores well and tastes even better the next day. You can make a big batch and divide it into portions. Pack it for lunch or enjoy it for dinner throughout the week. With the right storage, you’ll have a delicious meal ready whenever you need it. You can find the Full Recipe above for easy reference. This blog post covered everything you need for a great chili. We explored key ingredients and easy swaps. I shared tips for quality and flavor, plus essential cooking steps. You learned presentation tricks, storage info, and fun variations. Chili can be simple and quick, yet so tasty. Feel free to customize your dish according to your taste. Enjoy making this recipe your own. Dive in, and savor every bite!
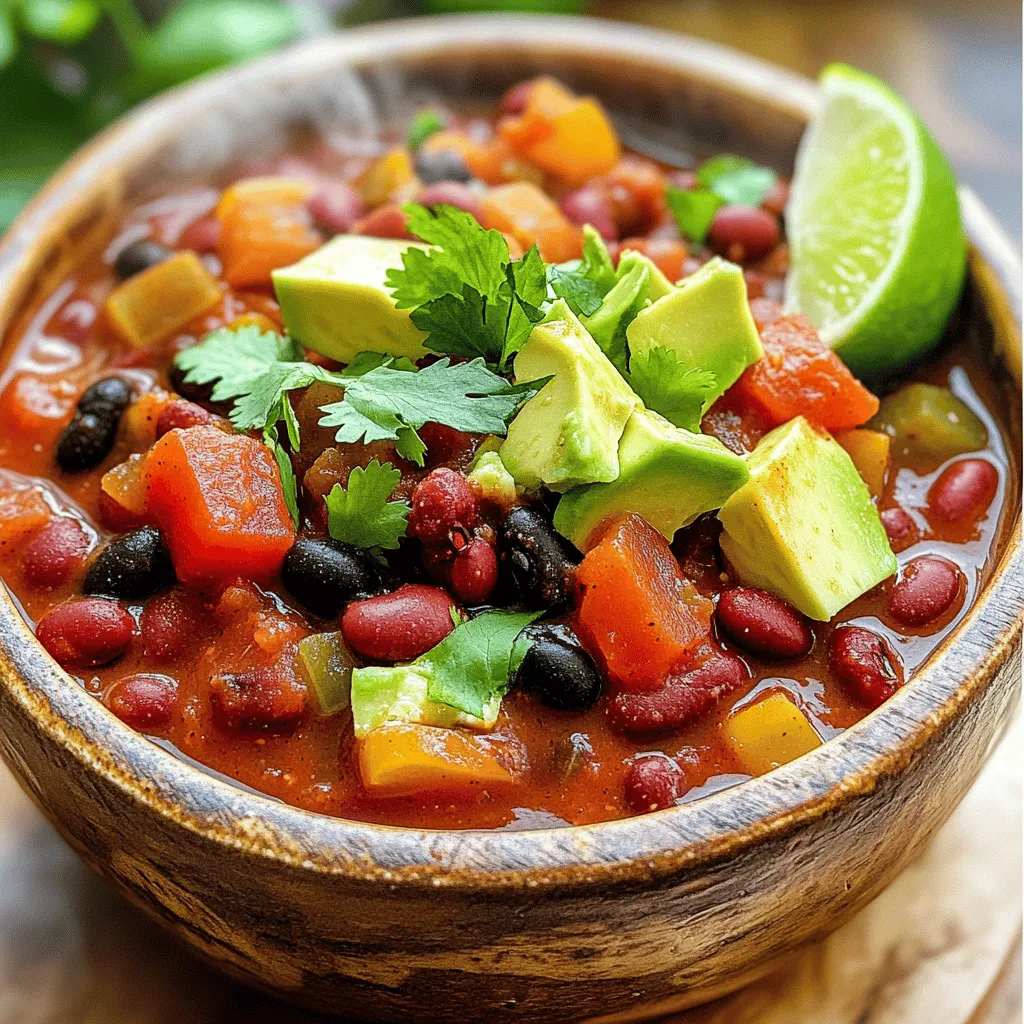
A Very Special Chili Recipe Flavorful and Easy
Chili is the ultimate comfort food, and I have a very special recipe just for you. It’s flavorful, easy to make, and perfect for any
- Sushi Rice Essentials - 1 ½ cups sushi rice - 2 cups water - Fillings and Toppings - 1 pound imitation crab meat, shredded - 1 avocado, diced - ½ cucumber, finely chopped - 1 cup cream cheese, softened to room temperature - 2 tablespoons mayonnaise - 1 tablespoon sriracha (adjust based on your spice preference) - 2 tablespoons green onions, chopped for garnish - Sesame seeds for garnish - Seasoning Components - 1 tablespoon rice vinegar - 1 tablespoon sugar - ½ teaspoon salt The sushi bake relies on simple yet fresh ingredients. First, the sushi rice forms the base. It gives a nice chewy texture. Then, the fillings add flavor and creaminess. The crab meat and cream cheese blend well together. The avocado and cucumber bring a nice crunch. For seasoning, rice vinegar, sugar, and salt balance the flavors. You can adjust the sriracha based on your spice level. This recipe allows for easy customization. You can swap out ingredients to match your taste. Enjoy the fun of making this dish! {{ingredient_image_2}} Rinsing and Cooking the Rice Start by rinsing 1 ½ cups of sushi rice under cold water. Keep rinsing until the water runs clear. This step removes excess starch. Next, place the rinsed rice in a pot and add 2 cups of water. Bring it to a boil over medium-high heat. Once it boils, lower the heat and cover the pot. Let it cook for 18-20 minutes. Check that the rice is tender and all water is gone. After cooking, turn off the heat and let the rice sit, covered, for 10 minutes. This makes the rice fluffy. Seasoning the Rice In a small bowl, mix 1 tablespoon of rice vinegar, 1 tablespoon of sugar, and ½ teaspoon of salt. Stir until the sugar and salt dissolve. Once the rice is cooked, move it to a large bowl. Gently fold the vinegar mix into the rice using a spatula. Be careful not to mash the grains. Let the rice cool a bit at room temperature. Combining Ingredients In another bowl, mix together 1 pound of shredded imitation crab meat, 1 diced avocado, and ½ finely chopped cucumber. Add 1 cup of softened cream cheese and 2 tablespoons of mayonnaise. Finally, add 1 tablespoon of sriracha. This is where you can control the heat! Mix everything well until combined. Adjusting Spice Levels Taste your filling. If you want more heat, add more sriracha. This is your sushi bake, so make it how you like! Layering the Ingredients First, preheat your oven to 350°F (175°C). Grease a 9x9 inch baking dish to prevent sticking. Spread the seasoned sushi rice evenly on the bottom of the dish. Press it down gently to make a solid layer. Then, spread the crab filling evenly over the rice. Use a spatula to smooth it out. Baking Time and Temperature Put the dish in the preheated oven. Bake for 20-25 minutes. Look for a golden brown and bubbly top. This shows it’s ready to eat. Achieving Fluffiness in Sushi Rice To make fluffy sushi rice, start by rinsing the rice well. Rinse until the water is clear. This step removes extra starch. Next, cook the rice with just the right amount of water. Use 1 ½ cups of sushi rice and 2 cups of water. After cooking, let it steam for 10 more minutes. This will help the rice become light and airy. Tips for a Golden Brown Top For a golden brown top, bake the sushi for 20-25 minutes at 350°F. Check the dish halfway through. If it’s not golden yet, leave it a bit longer. Keep an eye on it to avoid burning. You can also broil it for a minute at the end for extra color. How to Serve with Nori Cut nori sheets into strips for serving. Each person can take a strip and scoop some sushi bake. This makes it fun and interactive. It’s like sushi but easier to eat! You can also serve the sushi bake straight from the dish. Pairing with Dipping Sauces Pair your sushi bake with dipping sauces. Sriracha adds a nice kick. You can also try soy sauce or a creamy sauce. Offer a few options on the side. This way, everyone can pick their favorite! Pro Tips Perfectly Cooked Rice: Ensure your sushi rice is perfectly cooked by letting it steam for an additional 10 minutes after the heat is turned off. This step ensures fluffy rice without any excess moisture. Balance Your Flavors: Adjust the sriracha in the filling to match your desired spice level, and taste as you go. This allows you to find the perfect balance of flavors for your palate. Use Fresh Ingredients: Always opt for the freshest ingredients, especially the avocado and cucumber, as they significantly enhance the overall taste and texture of your sushi bake. Serving Suggestions: For an extra kick, serve the sushi bake with a side of soy sauce or additional sriracha for dipping. This adds an exciting layer of flavor to each bite. {{image_4}} You can switch up the filling for your sushi bake. Here are some great ideas: - Vegetarian Options: Use tofu instead of crab. Add chopped bell peppers, carrots, and spinach for crunch and color. You can also use cream cheese with herbs for extra flavor. - Seafood Variations: If you love seafood, try shrimp or salmon. Cook the shrimp and chop it before adding. For salmon, use canned or cooked chunks. Both options give a tasty twist. Changing the seasonings can make your sushi bake unique. Consider these options: - Sriracha Substitutes: If you want less heat, use sweet chili sauce. It gives a nice flavor without much spice. You can also use hoisin sauce for a sweet touch. - Flavor Enhancements: Add sesame oil for a nutty flavor. Mixing in lime juice can also brighten the taste. Try adding chopped cilantro for a fresh twist. To keep your sushi bake fresh, store leftovers in the fridge. First, let it cool to room temperature. Then, cover it tightly with plastic wrap or transfer it to an airtight container. It will stay good for up to three days. When ready to eat, you can reheat it. Place the sushi bake in the oven at 350°F (175°C) for about 15 minutes. This warms it up evenly and helps keep the top crispy. If you want to save some for later, freezing is a great option. Cut the sushi bake into portions. Wrap each piece in plastic wrap, then place them in a freezer bag. This way, they won’t stick together. The sushi bake will last in the freezer for about a month. For thawing, move a portion to the fridge the night before. Once it's thawed, you can reheat it in the oven at 350°F (175°C) for about 15 to 20 minutes until it’s hot. Enjoy your tasty treat again! Sushi bake is a fun twist on traditional sushi. It combines sushi rice with tasty fillings and bakes it in the oven. This dish became popular on TikTok due to its ease and deliciousness. You can prepare it quickly for parties or family dinners. The warm, creamy filling makes it a crowd-pleaser. Plus, you can scoop it up with nori strips, making it interactive. Yes, you can prep sushi bake ahead of time. Cook the sushi rice and prepare the filling earlier in the day. Keep each part in the fridge separately. When you are ready to eat, just assemble and bake. This will save time and stress. You can also bake it the night before and reheat it when needed. To make sushi bake for fewer servings, simply scale down the ingredients. For example: - Use 1 cup of sushi rice instead of 1 ½ cups. - Halve the crab meat and cream cheese. - Adjust the other ingredients accordingly. This way, you can enjoy the dish without waste. Just remember to keep the baking time similar, checking for that golden brown top. You now have all the key ingredients and steps to make a delicious sushi bake. We covered the rice, fillings, and tasty seasonings. I shared tips for the best texture and how to serve it. You learned about variations and smart storage options. Sushi bake is fun and easy to make at home. With these guidelines, you can impress family and friends. Enjoy experimenting with your own unique flavors and presentations!
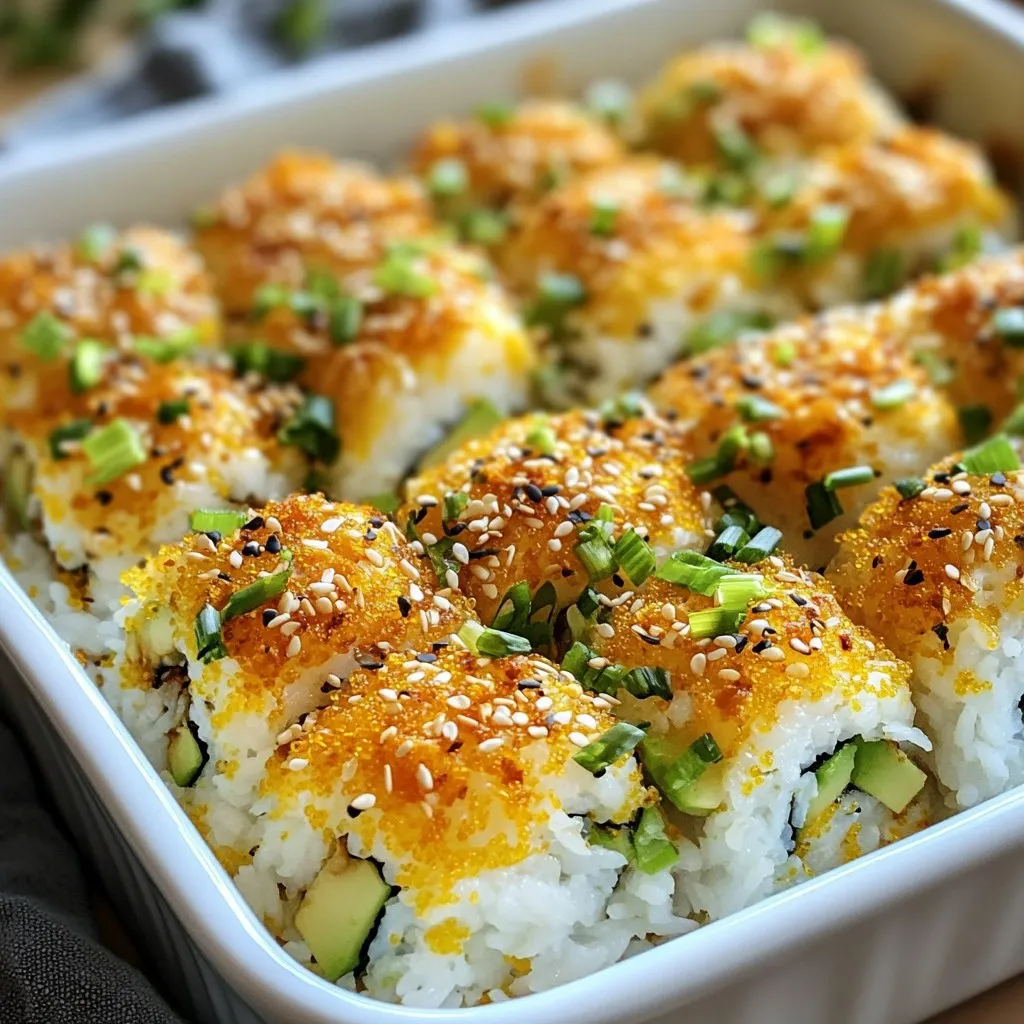
TikTok Viral Sushi Bake Tasty and Fun Recipe
Are you ready to dive into the latest food trend? The TikTok Viral Sushi Bake is not just visually stunning; it’s also tasty and easy