Dinner

- 1 pound potato gnocchi - 1 medium butternut squash, peeled and diced into 1-inch cubes - Olive oil, smoked paprika, ground cinnamon, salt, and pepper - Fresh spinach, Parmesan cheese, walnuts, fresh sage leaves First, preheat the oven to 400°F (200°C). Next, take your diced butternut squash and spread it out on a baking sheet. Drizzle 1 tablespoon of olive oil over the squash. Now sprinkle smoked paprika, ground cinnamon, salt, and pepper on top. Toss everything well so the squash is coated in spices. Roast the squash in the oven for 25-30 minutes. Stir halfway through to ensure even cooking. The squash should be tender and slightly caramelized when ready. While the squash roasts, prepare the potato gnocchi. Bring a large pot of salted water to a boil. Add the gnocchi to the boiling water. Cook them according to the package instructions, usually 2-3 minutes, or until they float to the top. Once cooked, drain the gnocchi and set them aside. In a large skillet, heat the remaining tablespoon of olive oil over medium heat. Add 2 cloves of minced garlic and sauté for about 1 minute until you smell the garlic. Then, add 1 cup of roughly chopped fresh spinach. Cook the spinach, stirring often, until it wilts, which takes about 2 minutes. Now, add the roasted butternut squash to the skillet. Gently toss in the cooked gnocchi, mixing everything well. Taste your dish and adjust seasoning with extra salt and pepper if needed. Finally, remove the skillet from heat and stir in half of the grated Parmesan cheese. Mix until the cheese melts and coats all ingredients. For the full recipe, check out the details above. Enjoy your delicious Autumn Gnocchi with Butternut Squash! To get the best gnocchi, focus on two main things: texture and timing. First, make sure to use fresh potato gnocchi. If you can, choose a brand that feels light and fluffy. When cooking, bring a large pot of salted water to a boil. Drop in the gnocchi gently. They usually take only 2-3 minutes. Watch for them to float. When they do, they are ready! Drain them right away to keep them from getting mushy. To make this dish pop with flavor, try adding extra spices. For a warm twist, consider adding a pinch of nutmeg or allspice. You can also swap the spinach for kale or arugula for a different taste. If you love heat, a dash of red pepper flakes can bring a nice kick. Feel free to mix in different herbs like thyme or rosemary to complement the butternut squash. A beautiful dish makes every meal more special. To present your gnocchi nicely, start with a clean plate. Spoon the gnocchi into the center, letting them mound slightly. Sprinkle the remaining Parmesan cheese on top for a snowy look. Add the chopped walnuts for crunch and a pop of color. Finally, place a few fresh sage leaves on top. This not only looks great but also adds a fresh aroma. For an extra touch, drizzle some olive oil over the dish just before serving. For the full recipe, check out the details above. You can easily change this dish to fit your needs. For a dairy-free option, use nutritional yeast instead of Parmesan cheese. It adds a cheesy flavor without the dairy. If you want more protein, try adding cooked chickpeas or lentils. They blend well with the flavors of squash. You can also mix in other veggies like kale or bell peppers. These add color and nutrition. Feel free to change the spices to match your taste. Want a kick? Add red pepper flakes. Prefer more warmth? Try nutmeg or ginger. You can also swap smoked paprika for regular paprika if you like a milder flavor. Experimenting with spices can make this dish your own. To make your meal even better, think about side dishes. A simple mixed green salad pairs well with the gnocchi. You might also serve it with garlic bread for a cozy touch. For a garnish, sprinkle fresh herbs like parsley or thyme. These add freshness and color to your plate. Enjoy your delicious Autumn Gnocchi with Butternut Squash by following the Full Recipe. {{image_4}} To store your autumn gnocchi with butternut squash, let it cool first. Place it in an airtight container. This helps keep it fresh. You can store it in the fridge for up to three days. If you want to keep it longer, consider freezing. When reheating gnocchi, you want to maintain its lovely texture. The best way is to use a skillet. Add a splash of water or broth and heat over medium. Stir gently until warmed through. This will help prevent sogginess. You can also microwave it for one to two minutes. Just cover it to keep the moisture in. To freeze, start by letting the dish cool completely. Portion it into meal-sized containers. Make sure to leave some space in the container for expansion. Freeze for up to three months. When ready to eat, move it to the fridge to thaw overnight. You can then reheat it as mentioned above. This way, you enjoy a delicious meal any time! Making this dish is quite simple! Here’s the time breakdown: - Prep Time: 15 minutes - Cooking Time: 35 minutes - Total Time: 50 minutes You can enjoy a delightful meal in under an hour. The prep involves dicing and seasoning the butternut squash. Cooking the gnocchi is quick, taking only a few minutes. Yes, you can easily adapt this recipe! To make it vegetarian, simply keep the Parmesan cheese. For a vegan version, swap the cheese for a dairy-free alternative. You can also add tofu or chickpeas for protein. This way, everyone can enjoy the dish. Great question! Here are some side dish ideas that go well with gnocchi: - A simple green salad with a light vinaigrette - Roasted Brussels sprouts or green beans - Garlic bread for a comforting touch These sides will enhance your meal and balance the flavors nicely. For the full recipe, check out the recipe section. In this guide, we explored making autumn gnocchi with butternut squash. You learned about the key ingredients, step-by-step cooking instructions, and tips for perfecting the dish. I shared variations for different tastes and dietary needs, along with storage and reheating best practices. Autumn gnocchi is a warm, comforting meal that you can easily customize. Enjoy experimenting with flavors and making this dish your own.
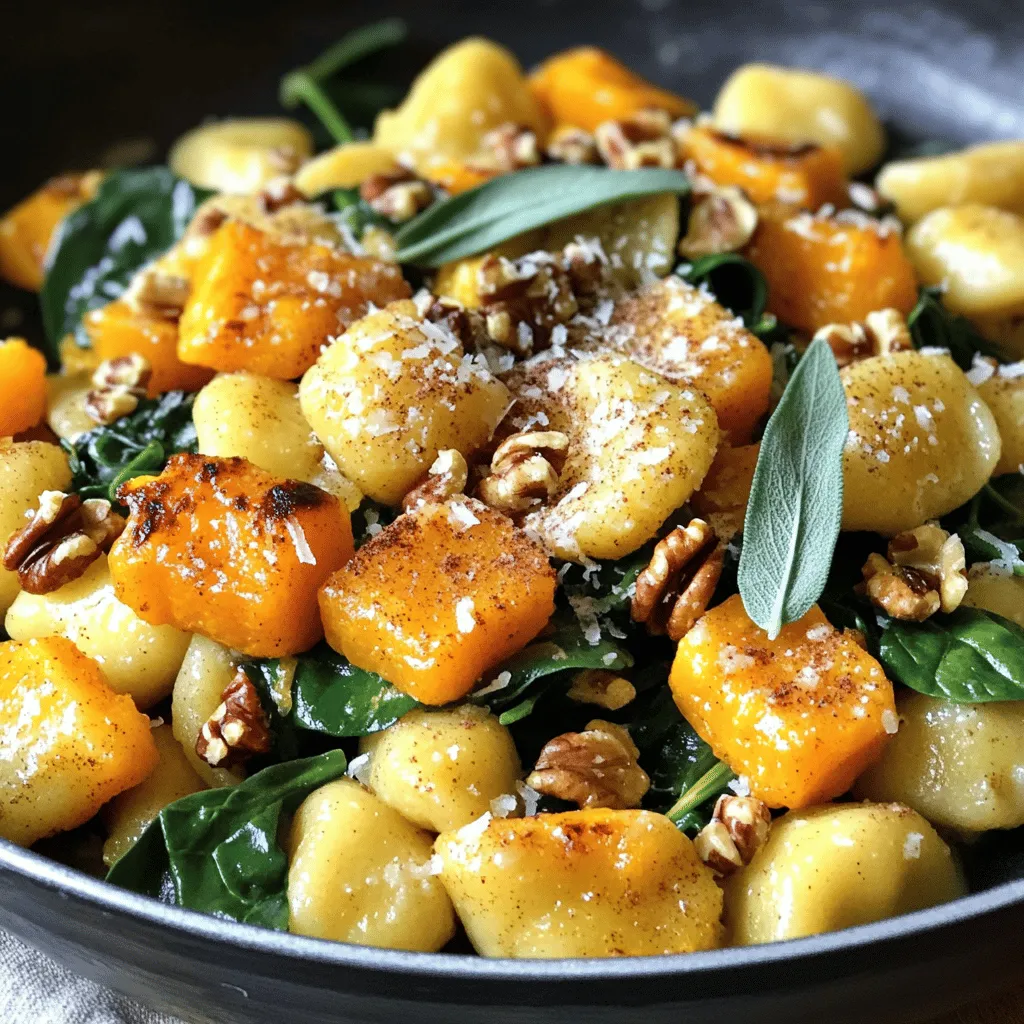
Autumn Gnocchi with Butternut Squash Delightful Dish
As the leaves turn and the air gets crisp, it’s time for cozy meals. Let me share my go-to recipe: Autumn Gnocchi with Butternut Squash.
To make Creamy Chicken Tortilla Soup, you'll need some simple yet flavorful ingredients. Here’s the list: - 2 tablespoons olive oil - 1 medium onion, diced - 3 cloves garlic, minced - 1 bell pepper (red or yellow), diced - 2 medium carrots, diced - 1 jalapeño, minced (adjust based on desired spice level) - 1 teaspoon ground cumin - 1 teaspoon smoked paprika - 6 cups chicken broth - 2 cups cooked chicken, shredded - 1 cup corn kernels (fresh or frozen) - 1 can (15 oz) black beans, drained and rinsed - 1 cup heavy cream - Salt and pepper to taste - 1 cup cherry tomatoes, halved - 1 cup cilantro, chopped - Tortilla strips for garnish - Avocado slices for garnish - Lime wedges for serving These ingredients work together to create a rich and comforting soup. The olive oil helps to sauté the veggies, while the chicken broth forms the soup’s base. The combination of spices, like cumin and smoked paprika, adds depth. I love using shredded chicken for heartiness and black beans for protein. The heavy cream brings creaminess, while the fresh garnishes make it bright and fun. You can find the full recipe in the earlier sections. - Sautéing onions and garlic: Start by heating 2 tablespoons of olive oil in a large pot over medium heat. Add 1 diced onion and 3 minced garlic cloves. Cook for about 3-4 minutes. You want the onion to turn translucent and the garlic to smell great. - Adding vegetables and spices: Next, toss in 1 diced bell pepper and 2 diced carrots. If you like heat, add 1 minced jalapeño. Stir this mix for about 5 minutes. The veggies should soften a bit. Now, add 1 teaspoon each of ground cumin and smoked paprika. Stir for 30 seconds to wake up the spices. - Incorporating chicken broth and chicken: Carefully pour in 6 cups of chicken broth. Stir it all together. Bring the pot to a boil, then lower the heat to let it simmer for 10 minutes. This step helps the flavors blend. After that, add 2 cups of shredded cooked chicken. Stir well and let it all simmer for another 10 minutes. - Adding corn and black beans: Now, it’s time to make it hearty! Add 1 cup of corn kernels and 1 can (15 oz) of black beans that you’ve drained and rinsed. Stir everything in and let it simmer for about 5 more minutes. - Incorporating cream and seasoning: Slowly pour in 1 cup of heavy cream while stirring. Let the soup simmer gently on low heat for about 5 minutes. Season it with salt and pepper to taste. This adds richness to the soup. - Folding in cherry tomatoes and cilantro: Just before serving, fold in 1 cup of halved cherry tomatoes and 1 cup of chopped cilantro. This adds freshness and color. Serve the soup hot, topped with crispy tortilla strips and avocado slices. Add lime wedges for a zesty kick. For the complete recipe, check the Full Recipe. - How to enhance flavors with spices I love using spices to boost flavor. Ground cumin and smoked paprika add warmth and depth. Toast them briefly in the pot before adding liquids. This step brings out their best flavors. - Adjusting spice levels with jalapeño If you want a kick, add jalapeño. For mild soup, remove the seeds. For more heat, keep some seeds. Remember, you control the spice! - Techniques for creamy texture To get that rich, creamy texture, add heavy cream last. Stir it in slowly. Let the soup simmer gently. This keeps it smooth and luscious. - Best garnishes for presentation Garnishing makes soup shine! Top it with crispy tortilla strips. A few slices of avocado add creaminess. Fresh cilantro brightens the dish. - Pairing ideas This soup pairs great with rice or crusty bread. Try serving it with a side of tortilla chips for crunch. Your guests will enjoy it! - How to serve for parties or gatherings For gatherings, serve in a big pot. Provide bowls and spoons for easy access. Let everyone customize their bowls with their favorite toppings. It's fun and interactive! {{image_4}} You can change the proteins in this soup. Try adding shrimp or turkey for a twist. Both bring different tastes and textures. If you want a vegetarian option, skip the chicken. Use more beans instead. Black beans, kidney beans, or chickpeas are great choices. This makes the soup hearty and filling without meat. Sometimes, you might want a lighter soup. Swap heavy cream for coconut milk. It adds a nice flavor and is dairy-free. You can also switch up the veggies. Instead of just corn, add zucchini or spinach. Both options add nutrients and taste. Feel free to mix and match ingredients to find your favorite version. For more details, check the Full Recipe. To keep your creamy chicken tortilla soup fresh, store it properly. Use an airtight container. This helps prevent spills and keeps odors in check. Make sure it cools down a bit before sealing. You can keep the soup in the fridge for about 3 to 4 days. If you want to enjoy it later, freezing is a great option. To freeze the soup, let it cool completely. Pour it into freezer-safe bags or containers. Leave some space at the top. The soup will expand as it freezes. When you’re ready to eat, thaw the soup in the fridge overnight. To reheat, warm it on the stove over low heat. Stir it well to mix it evenly. This way, you'll enjoy the creamy goodness again! Can I make creamy chicken tortilla soup in a slow cooker? Yes, you can. Start by sautéing the onion, garlic, and spices in a pan. Then, add them to the slow cooker with the broth, chicken, and veggies. Cook on low for 6-8 hours. Add the cream at the end, just before serving. What are the best toppings for tortilla soup? Some great toppings are crispy tortilla strips, sliced avocado, and fresh cilantro. You can also add lime wedges and cheese for extra flavor. Consider jalapeños for a spicy kick! How can I make this soup spicier? To spice it up, add more jalapeño or use a hotter pepper. You can also add red pepper flakes or hot sauce to taste. Adjust according to your heat preference for the perfect kick! Is creamy chicken tortilla soup healthy? Yes, it can be healthy. The soup has protein from chicken and beans. It also has fresh veggies that add vitamins and fiber. Just watch the cream and salt to keep it lighter. What are the calorie counts per serving? Each serving of creamy chicken tortilla soup has about 350-400 calories. This can vary based on the toppings and cream you use. For a lighter option, reduce the cream or serve with fewer toppings. For the full recipe, check the [Full Recipe]. In this blog post, we explored making creamy chicken tortilla soup with easy steps and tips. We covered the basic ingredients, clear cooking instructions, and flavorful variations. You can enhance flavors, choose different proteins, and find the best ways to serve and store your soup. Remember, cooking should be fun and creative! Enjoy experimenting with this soup to make it your own.
Creamy Chicken Tortilla Soup Hearty and Comforting Dish
Craving something warm and satisfying? You’ll love my Creamy Chicken Tortilla Soup! This hearty dish combines tender chicken, vegetables, and a touch of spice in
- 1 pound ground chicken - 1 tablespoon olive oil - 1 small onion, finely chopped - 2 cloves garlic, minced - 1 teaspoon chili powder - 1/2 teaspoon ground cumin - 1/2 teaspoon smoked paprika - 1/2 teaspoon fine sea salt - 1/4 teaspoon freshly cracked black pepper - 1 cup black beans, drained and rinsed - 1 cup corn, frozen or fresh - 1 cup shredded cheese (cheddar or a Mexican blend) - 12 mini taco shells (store-bought or homemade) - 1/2 cup salsa (your choice) - Fresh cilantro, chopped (for garnish) - Sour cream (optional) - For vegetarians, swap ground chicken with crumbled tofu or lentils. - Use shredded rotisserie chicken for a quicker option. - Replace black beans with pinto beans or chickpeas for a different taste. - Add diced bell peppers or zucchini for extra veggies. - Calories: 300 - Protein: 20g - Carbohydrates: 25g - Fat: 15g - Fiber: 6g - Sugar: 2g This recipe offers a delightful mix of flavors. You’ll enjoy the crunch of the mini taco shells combined with the warm, savory filling. The spices really bring the chicken to life, making each bite a treat. Plus, with so many variations, you can customize it to fit your taste or dietary needs. {{ingredient_image_2}} Start by preheating your oven to 375°F (190°C). This is key for getting the tacos crispy and warm. While it heats, gather your ingredients. This keeps everything organized and easy to find. In a large skillet, pour in the olive oil and heat over medium. Once hot, add the finely chopped onion. Sauté for 4-5 minutes until it becomes soft and clear. Next, stir in the minced garlic and cook for another 1-2 minutes. You want it to smell great but not burn. Now, add the ground chicken to the skillet. Use a spatula to break it apart as it cooks. Stir often for about 7-10 minutes. Cook until the chicken is no longer pink. Season it with chili powder, cumin, smoked paprika, salt, and pepper. Stir well to mix the spices into the chicken. Next, add the rinsed black beans and corn. Cook for another 2-3 minutes until heated through. Remove from heat and let the mixture cool slightly. This step is important. It helps keep the taco shells from getting soggy. On a baking sheet, arrange the mini taco shells. Fill each shell with the chicken mixture. Press down gently to pack it in. Sprinkle shredded cheese over each taco. Drizzle a spoonful of salsa on top for extra flavor. Bake the tacos in your preheated oven for 10-12 minutes. Look for the cheese to melt and bubble. Once done, take them out and let them cool for a few minutes. Garnish with freshly chopped cilantro for a pop of color and taste. If you like, serve with sour cream on the side. To keep your taco shells crispy, fill them right before baking. Let the chicken mix cool first. This step stops moisture from making the shells soggy. You can also bake the empty shells for a few minutes before adding the filling. This simple trick makes a big difference! For the best melted cheese, use a blend of cheeses. A mixture of cheddar and Mexican cheese works well. Sprinkle the cheese on top of the filled tacos before baking. Bake until you see bubbles and the cheese turns golden. This will give you that perfect melt and pull. Garnish your tacos with fresh cilantro for a great taste. Add a dollop of sour cream for creaminess. A squeeze of lime juice can also brighten the flavors. Serve with extra salsa on the side for those who like a kick. These small touches make your tacos even more delicious! Pro Tips Choose Your Cheese: Experiment with different types of cheese for unique flavors. Pepper jack adds a spicy kick, while mozzarella offers a milder taste. Keep It Crispy: To maintain the crunch of the taco shells, avoid overfilling them with the chicken mixture and serve immediately after baking. Mix Up the Veggies: Feel free to add diced bell peppers or jalapeños to the chicken mixture for added texture and flavor. Make Ahead: Prepare the chicken filling in advance and store it in the refrigerator. Assemble and bake the tacos right before serving for a fresh meal. {{image_4}} You can switch the ground chicken for other proteins. Beef adds a rich taste. Turkey is leaner and still tasty. Tofu is a great choice for a veggie option. Just make sure to press it dry first. This helps the tofu absorb flavors better. Each protein brings its own twist to the tacos. Want to spice up your tacos? Add some extra chili powder or garlic powder. A pinch of cayenne can kick things up a notch. Fresh herbs like cilantro or parsley add a pop of flavor too. You can also try adding lime juice for a zesty kick. The right spices can make these tacos your favorite dish. If you want a lighter option, try lettuce wraps instead of taco shells. They are fresh and crunchy. You can also make homemade taco shells using corn tortillas. Just bake them in the oven until crispy. This way, you control the ingredients and flavors. These alternatives can change the whole feel of the meal. Store leftover mini baked chicken tacos in an airtight container. Keep them in the fridge for up to three days. Make sure they cool down first. This helps keep the shells from getting soggy. To reheat, preheat your oven to 350°F (175°C). Place the tacos on a baking sheet. Heat them for about 10 minutes or until warm. You can also use a microwave. Just heat them for 30-60 seconds. Be careful not to overheat, as that can make the shells tough. You can freeze the chicken mixture before baking. Let it cool, then store in a freezer-safe bag. It will last up to three months. When you want to eat, thaw it in the fridge overnight. Fill the taco shells and bake as usual. This saves time and makes meal prep easy! Yes, you can use regular taco shells. Just keep in mind that the filling amount may differ. Regular shells hold more filling, so adjust your mix accordingly. If you prefer the mini version, they are fun and bite-sized. You can use ground turkey or beef as a substitute. If you want a vegetarian option, try black beans or lentils. These options still give great flavor and texture. Choose what fits your taste and diet. Yes, they are freezer-friendly! You can freeze the assembled tacos before baking. Just wrap them tightly in plastic wrap. When ready to eat, bake them straight from the freezer, adding a few extra minutes to the cook time. To add heat, mix in chopped jalapeños or cayenne pepper. You can also choose a spicy salsa to drizzle on top. Adjust the spice level to suit your taste buds. Enjoy the kick! This blog post covered how to make tasty tacos with many options. We listed ingredients, gave variations, and shared nutritional facts. You learned step-by-step instructions to prepare and bake. We shared tips to avoid soggy shells and best cheese methods. You also found ways to store and reheat leftovers. Tacos are fun and flexible. With so many choices, you can create a meal that fits your taste and needs. Enjoy these ideas and make your next taco night a hit!
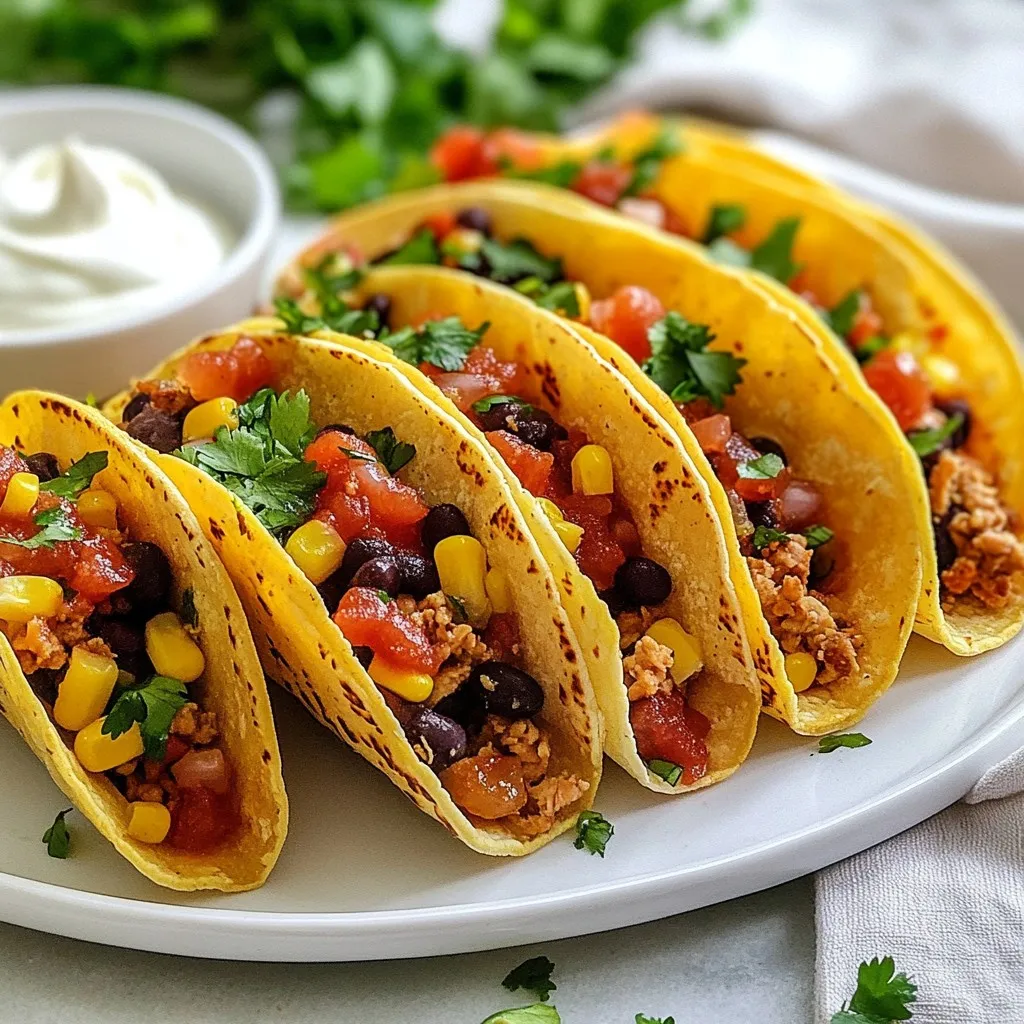
Mini Baked Chicken Tacos Flavorful and Easy Recipe
Are you ready to enjoy a fun twist on taco night? My Mini Baked Chicken Tacos are packed with flavor and super easy to make.
- 1 lb boneless, skinless chicken thighs - 1 cup uncooked long-grain rice - 1 cup salsa verde - 2 cups chicken broth - 1 medium onion - 2 cloves garlic - 1 bell pepper - 1 cup black beans (optional) - 1 cup corn - 1 cup shredded cheddar cheese - Ground cumin - Smoked paprika - Salt and pepper - Fresh cilantro I love this recipe for Salsa Verde Chicken and Rice Skillet. It brings together simple, fresh ingredients. You only need a few main items. The chicken thighs add flavor and tenderness. The long-grain rice soaks up all the tasty juices. Salsa verde gives a zesty kick. Chicken broth enhances the dish with its rich taste. For the veggies, I often use a medium onion and two cloves of garlic. They add depth to the dish. A bell pepper brings color and crunch. You can also add black beans and corn for extra texture. They make the meal heartier. Seasoning is key. Ground cumin and smoked paprika create a warm flavor. Don't forget salt and pepper to taste. Fresh cilantro adds a bright finish. It’s perfect for garnishing the dish. This meal is not just tasty, but also easy to make. You can get creative with the ingredients. The combinations are endless! {{ingredient_image_2}} - Heat 1 tablespoon of olive oil in a large skillet over medium heat. - Add the diced onion and sauté for 3-4 minutes until it turns translucent. - Season the chicken pieces with salt, pepper, ground cumin, and smoked paprika. - Add the chicken to the skillet and brown it on all sides for about 6-8 minutes. - Once the chicken is cooked, stir in 1 cup of uncooked rice with the chicken and veggies. - Pour in 1 cup of salsa verde and 2 cups of chicken broth, then bring to a gentle simmer. - Cover the skillet and cook for about 20 minutes until the rice is tender. - During the last 5 minutes, stir in 1 cup of black beans and 1 cup of corn. - Remove from heat and sprinkle 1 cup of shredded cheddar cheese on top. Let it sit for 2-3 minutes to melt. - Fluff the rice gently with a fork and garnish with fresh cilantro before serving. Cooking over medium heat is key to this dish. It helps cook the chicken evenly. If the heat is too high, the chicken can burn. You want a nice golden color. This ensures the chicken stays moist inside. Stir often to avoid sticking. This method gives the best flavor and texture. Want to boost the taste? Add a squeeze of lime juice. This adds a bright, fresh kick. You can also try adding more spices, like chili powder. For the best flavor, use homemade salsa verde. It’s easy to make and tastes great. Fresh ingredients will enhance your dish even more. Pair this skillet meal with simple sides. Try a fresh salad or tortilla chips. Cold drinks like iced tea go well too. For extra flavor, top with sliced avocado or jalapeños. You can also add a dollop of sour cream. These toppings make the meal even more delightful! Pro Tips Use Fresh Ingredients: Fresh herbs and vegetables can elevate your salsa verde chicken and rice skillet. Opt for fresh cilantro and ripe bell peppers for a vibrant flavor. Customize the Heat: Adjust the spiciness of your dish by choosing mild or hot salsa verde. You can also add fresh jalapeños or red pepper flakes for an extra kick. One-Pan Wonder: This recipe is designed to be made in one skillet, making cleanup a breeze. Ensure your skillet has a tight-fitting lid to trap steam and moisture. Meal Prep Friendly: This dish can be made in advance and stored in the fridge for up to 3 days, making it perfect for meal prep. Reheat gently on the stove or in the microwave. {{image_4}} You can switch up the protein in this dish. Using chicken breast instead of thighs is an option. Chicken breast has less fat, making it leaner. It will still soak up the flavors well. If you want a vegetarian dish, try using tofu or chickpeas. Tofu will soak in the salsa verde nicely. Chickpeas add a hearty texture and protein. For rice, you have some great choices. Brown rice offers more fiber and a nutty taste. Quinoa is another option and is high in protein. If you want to keep carbs low, use cauliflower rice. It cooks quickly and blends well with the flavors. To change the flavor profile, try adding jalapeños for heat. They will give the dish a spicy kick. You can also add different vegetables like zucchini or spinach. These add color and nutrition. Mixing in veggies makes the meal even more delightful. To keep your Salsa Verde Chicken and Rice Skillet fresh, store leftovers in airtight containers. This helps maintain flavor and texture. It lasts in the fridge for about 3 to 4 days. Make sure to cool it down before sealing. Label your containers with the date. This way, you know when to eat them. If you want to save some for later, you can freeze leftovers. Use freezer-safe containers or bags. Be sure to leave space for expansion. The dish can last in the freezer for up to 3 months. For best results, cool it completely before freezing. When you’re ready to eat, thaw it in the fridge overnight. You can reheat your dish on the stovetop or in the microwave. For stovetop reheating, add a splash of water or broth, and warm it over low heat. Stir often to keep it even. In the microwave, cover the container and heat for 2-3 minutes, stirring halfway through. This helps keep the texture and flavor intact. Yes, you can make this dish ahead of time. Cook it fully and let it cool. Store it in an airtight container in the fridge for up to three days. Reheat it on the stove or in the microwave. Just add a splash of broth if it seems dry. You can swap salsa verde with other sauces. Try green enchilada sauce or tomatillo salsa. If you want a different flavor, use regular salsa or even a homemade blend of green tomatoes and herbs. To add heat, mix in jalapeños or diced serrano peppers. You can also use spicy salsa verde or add chili powder. Adjust the amount to match your taste. Adding a dash of hot sauce right before serving can also enhance the spice. Absolutely! If you prefer a dairy-free dish, simply leave out the cheese. The meal will still taste great without it. You can add avocado or guacamole for creaminess instead. Yes, this recipe is gluten-free if you choose gluten-free broth. Most rice is also gluten-free. Always check labels on any packaged items, like salsa or beans, to ensure they meet your dietary needs. This recipe for Salsa Verde Chicken and Rice Skillet combines easy steps with flavorful ingredients. You learned about main and additional ingredients, cooking techniques, and tips to enhance taste. I shared variations for proteins and rice options to suit your needs. As you try this dish, remember you can adjust it to fit your taste. Enjoy making it and sharing it with friends!
Salsa Verde Chicken and Rice Skillet Delightful Meal
If you’re looking for a quick and tasty dinner, look no further. The Salsa Verde Chicken and Rice Skillet is your new best friend. With
- 5-6 fresh Hatch chiles, roasted and peeled - 2 tablespoons olive oil - 1 medium onion, finely chopped - 3 cloves garlic, minced - 1 teaspoon ground cumin - 1 teaspoon smoked paprika - 2 cups vegetable broth - 1 tablespoon lime juice - Salt and pepper to taste - 1 teaspoon sugar (optional) - Baking sheet - Medium saucepan - Immersion blender (optional) - Plastic wrap - Prep Time: 10 min - Cook Time: 25 min - Total Time: 35 min - Servings: 4 cups This recipe for quick and easy Hatch Chile enchilada sauce is simple. You need fresh Hatch chiles for the best flavor. These chiles are mild but full of taste. Roasting them brings out their sweet, smoky notes. I suggest using a baking sheet to roast them evenly. You can also prepare your cooking tools ahead. A medium saucepan is essential for mixing ingredients. An immersion blender can help you achieve a smooth texture. If you don’t have one, a regular blender works too. Just let the sauce cool a bit before blending. The sauce makes about 4 cups. This is perfect for several meals. You can use it for enchiladas, tacos, or even as a dip. The lime juice adds a bright kick. If you like it sweeter, a teaspoon of sugar can balance the flavors. For the full recipe, you can check the detailed steps later on. Enjoy the process and get creative! - Roast the chiles until blistered and charred. - Steam and peel the skins, then remove seeds. Start by preheating your oven to 400°F. Place the fresh Hatch chiles on a baking sheet. Roast them for 15 to 20 minutes. Turn them occasionally. Look for blistered and charred skins. Once they are done, put them in a bowl. Cover the bowl tightly with plastic wrap. This helps steam the chiles for about 10 minutes. When they are cool enough to handle, peel off the skins. Remove the seeds and chop the chiles finely. - Sauté onions and garlic in olive oil. - Add spices and chopped chiles. In a medium saucepan, heat 2 tablespoons of olive oil over medium heat. Add the finely chopped onion. Cook for about 5 minutes. Stir often until the onion is soft and clear. Next, add 3 cloves of minced garlic. Cook for another minute. Make sure the garlic smells nice but does not burn. Now, mix in the chopped Hatch chiles, 1 teaspoon of ground cumin, and 1 teaspoon of smoked paprika. Cook this for 2 to 3 minutes. This lets the flavors blend well together. - Simmer with vegetable broth. - Adjust seasoning and blend to desired consistency. Pour in 2 cups of vegetable broth. Turn up the heat to bring it to a gentle simmer. Let it cook for 10 to 15 minutes. Stir occasionally. The sauce should thicken and become rich in flavor. After that, remove the saucepan from the heat. Stir in 1 tablespoon of fresh lime juice. Taste the sauce and add salt and pepper as needed. If you like, add 1 teaspoon of sugar to balance the acidity. For a smooth sauce, use an immersion blender. Blend until you reach your desired consistency. You can also leave it slightly chunky if you prefer more texture. For the full recipe, check out Quick & Easy Hatch Chile Enchilada Sauce. To roast your chiles evenly, place them on a baking sheet. Turn them often while they roast. This way, all sides get blistered and charred. You can also use a grill or broiler for roasting. If you use a grill, set it to medium heat. For a broiler, keep it on high and watch closely. Both methods work well to bring out great flavor. Want to change the heat? To make your sauce spicier, add more roasted chiles. For a milder sauce, remove the seeds and membranes. You can also swap Hatch chiles for other chiles. Try jalapeños for heat or poblanos for a milder taste. Store your enchilada sauce in an airtight container. It keeps well in the fridge for up to one week. To reheat, pour it into a saucepan. Heat it over low heat, stirring often. This helps to keep the flavor rich and vibrant. If you have leftovers, use them in soups or as a dip. {{image_4}} You can make this sauce even better! Try adding chopped tomatoes or tomatillos. These will add freshness and a nice tang. Just toss them in with the chiles when cooking. You can also mix in herbs like cilantro or oregano. Fresh herbs will brighten the sauce. Dried herbs can work too, but use less. Experiment with spices as well. Try adding chili powder for more heat or coriander for a hint of sweetness. Want to make it gluten-free? This recipe is already good for you! Just check your broth for gluten. For a vegan version, use vegetable broth and skip any animal products. You can also make a low-sodium sauce. Simply choose low-sodium broth and use less salt. This helps keep it tasty without the extra sodium. There are many ways to enjoy this sauce! Of course, it’s perfect for enchiladas. Just pour it over your rolled tortillas, add cheese, and bake. You can also use it as a dip. Serve it with tortilla chips or fresh veggies. It pairs well with rice or beans too. Try drizzling it over grilled chicken or fish for a zesty kick. The flavors work in many dishes! For the full recipe, check out the Quick & Easy Hatch Chile Enchilada Sauce! You can store the enchilada sauce in the fridge for up to one week. To keep it fresh, use an airtight container. Glass jars or plastic containers work great. Make sure the lid seals tightly to prevent air from getting in. To freeze the sauce, pour it into freezer-safe bags or containers. Leave some space at the top to allow for expansion. When you want to use it, thaw the sauce in the fridge overnight or warm it gently in a pot. The sauce can last up to three months in the freezer. You can use leftover enchilada sauce in many ways. It makes a great dip for chips or veggies. Try adding it to soups or stews for extra flavor. You can also drizzle it over grilled meats or roasted veggies. The possibilities are endless! Yes, you can use dried Hatch chiles, but the flavor will change. Fresh chiles have a vibrant taste, while dried chiles are deeper and smokier. If you use dried chiles, soak them in hot water for about 30 minutes. This will help soften them before blending. The sauce might not be as bright, but it will still be tasty. If you want a thicker sauce, try these tips: - Simmer longer: Cook the sauce for a few extra minutes to reduce it. - Add a thickener: You can mix in a bit of cornstarch or flour. Mix one tablespoon with cold water first, and then stir it in. - Blend less: If you blend the sauce, stop before it gets too smooth. A little texture can help it feel thicker. This sauce is not just for enchiladas! Here are some fun ideas: - Pour it over tacos for a spicy kick. - Use it as a topping for burritos or quesadillas. - Serve it as a dip with tortilla chips or veggies. - Drizzle it over grilled chicken or fish for extra flavor. Feel free to explore and get creative with this sauce! For the complete recipe, check out the Full Recipe section. In this article, we covered how to create a delicious enchilada sauce using fresh Hatch chiles. You learned about the ingredients, cooking tools, and step-by-step instructions. We also explored tips for roasting chiles, adjusting spice levels, and storage ideas. Finally, we discussed ways to customize the sauce and various dishes to pair it with. Enjoy making this sauce and tasting the flavors it brings to your meals!
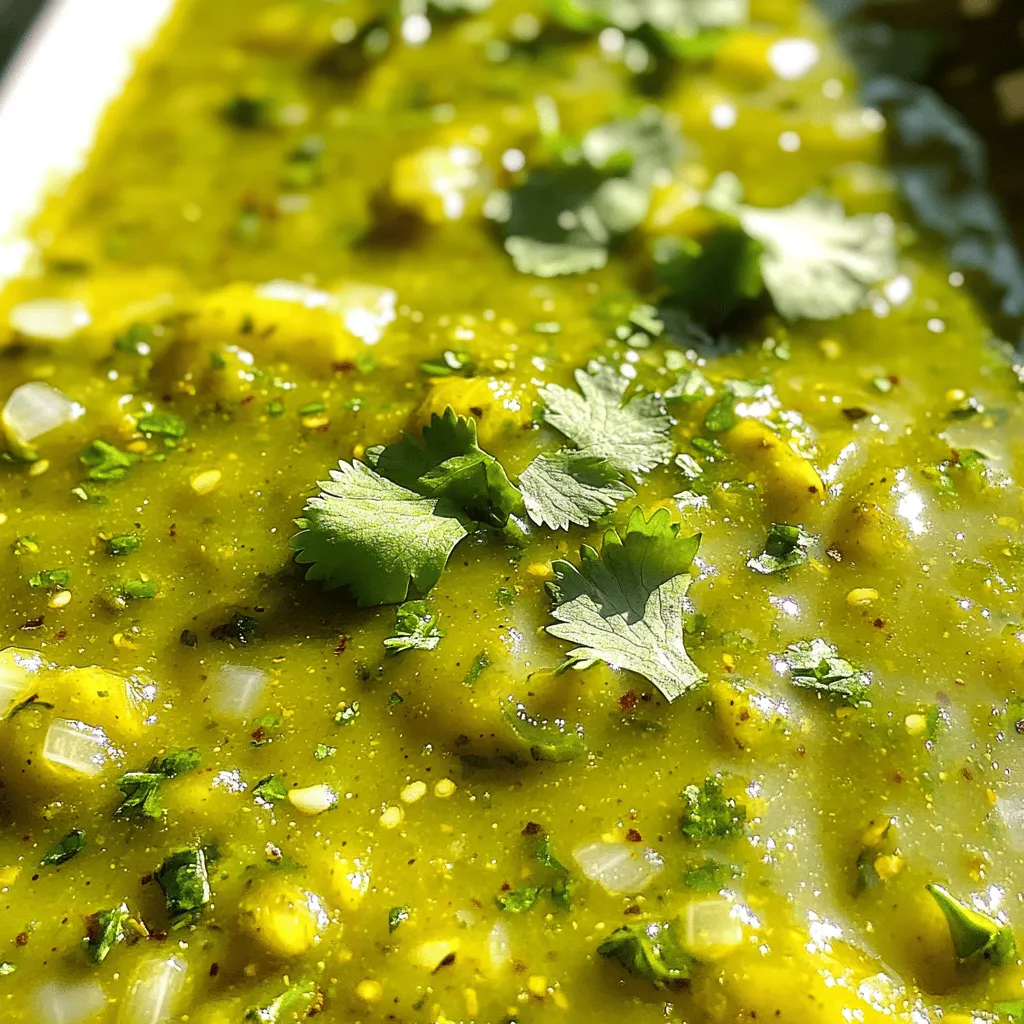
Quick & Easy Hatch Chile Enchilada Sauce Recipe
Are you tired of store-bought enchilada sauces that lack flavor? I’ve got the perfect solution for you! This Quick & Easy Hatch Chile Enchilada Sauce
What makes Amish Hamburger Steak Bake so special? It’s a warm dish that fills you up and brings comfort. This recipe uses simple, fresh ingredients that blend well together. - 1 pound ground beef - 1 medium onion, finely chopped - 2 cloves garlic, minced - 1 cup breadcrumbs (fresh or dried) - 1 egg, lightly beaten - 1 teaspoon Worcestershire sauce - Salt and black pepper, to taste - 4 medium-sized potatoes, thinly sliced - 1 cup rich beef broth - 1 cup shredded sharp cheddar cheese - 1 tablespoon fresh parsley, chopped (for garnish) Start by preheating your oven to 375°F. This helps cook everything evenly. In a bowl, mix the ground beef, onion, garlic, breadcrumbs, egg, Worcestershire sauce, salt, and pepper. Next, shape this mix into four oval patties. They should be about 1 inch thick. Now, heat a skillet over medium heat and add some oil. Once hot, sear each patty for about 4 minutes on both sides. They don’t need to be fully cooked yet. In a greased baking dish, lay half of the sliced potatoes. Sprinkle a little salt and pepper on top. Place the browned patties on this layer. Now, add the rest of the potatoes on top of the patties, again seasoning lightly. Pour the beef broth over the entire dish. This broth keeps the potatoes moist while baking. Cover the dish with aluminum foil and bake for 45 minutes. This time allows the flavors to blend. After 45 minutes, take off the foil and sprinkle the cheddar cheese on top. Bake it again for 15 minutes. The cheese should melt and the potatoes will be fork-tender. When it’s done, let it cool for a few minutes. Garnish with parsley right before serving. This dish is best served warm and can pair well with vegetables or a salad. Enjoy the hearty flavors that come from this simple, yet delightful, meal! {{ingredient_image_2}} I cannot summarize specific blog post outlines without the details. However, let's recap a general structure. We explored key points about the topic, detailing its importance and impact. We covered practical tips and insights to help you understand and engage with this subject better. It's crucial to apply what you've learned. Using this knowledge can lead to positive change and improved outcomes. Keep exploring, and don't hesitate to revisit the core messages. Your journey in this topic matters.
Amish Hamburger Steak Bake Hearty Comfort Dish
Are you ready for a dish that warms both body and soul? The Amish Hamburger Steak Bake is a hearty, comforting meal perfect for any
To create a sweet and spicy pineapple chili, gather these fresh and flavorful ingredients: - 1 can (15 oz) black beans, drained and rinsed - 1 can (15 oz) kidney beans, drained and rinsed - 1 can (15 oz) diced tomatoes, undrained - 1 cup frozen corn - 1 fresh pineapple, peeled, cored, and diced into bite-sized pieces - 1 large red bell pepper, chopped into 1-inch pieces - 1 small red onion, diced finely - 2 cloves garlic, minced - 2 tablespoons olive oil - 1 tablespoon chili powder - 1 teaspoon ground cumin - 1 teaspoon smoked paprika - ½ teaspoon cayenne pepper (adjust based on spice preference) - Salt and freshly ground black pepper to taste - 2 tablespoons honey or maple syrup for sweetness - Fresh cilantro leaves for garnish Each ingredient plays a vital role in bringing the sweet and spicy flavors to life. The black and kidney beans add protein and texture, while the pineapple brings a lovely sweetness. The spices create warmth, making each bite a delightful experience. I love using fresh ingredients because they enhance the dish's vibrant taste. 1. Cooking the base mixture Start by heating 2 tablespoons of olive oil in a large saucepan over medium heat. Add 1 small diced red onion and 1 large chopped red bell pepper. Sauté these for about 5 minutes. You want the onion to be clear and fragrant. 2. Adding fresh pineapple Next, add 1 fresh pineapple that you’ve peeled, cored, and diced into bite-sized pieces. Cook this mix for 3 to 4 minutes. Stir occasionally until the pineapple turns golden and caramelizes. 3. Incorporating beans and tomatoes Now, stir in 1 can of drained black beans, 1 can of drained kidney beans, and 1 can of undrained diced tomatoes. Also, add 1 cup of frozen corn. Mix all these well to combine everything evenly. 4. Seasoning and sweetening Season the chili with 1 tablespoon of chili powder, 1 teaspoon of ground cumin, 1 teaspoon of smoked paprika, and ½ teaspoon of cayenne pepper. Add salt and pepper to taste. Then, drizzle in 2 tablespoons of honey or maple syrup. Stir until the spices and sweetener blend into the mixture. 1. Adjusting the heat and flavors Lower the heat to simmer the chili. Let it cook for 20 to 25 minutes. Stir occasionally to keep it from sticking and to help the flavors blend well. 2. Cooking time and techniques As the chili cooks, the flavors meld together beautifully. The pineapple adds a sweet touch, while the spices kick up the heat. 3. Final adjustments before serving After simmering, taste the chili. If you want it spicier, add more cayenne pepper. Once the chili is thickened, turn off the heat. Let it rest for a few minutes to enhance the flavors before serving. For the full recipe, be sure to check the detailed steps above! Enjoy your sweet and spicy creation! To get the best flavor, focus on three main areas: spice levels, sweetness, and sautéing. Adjusting spice levels: Start with half a teaspoon of cayenne pepper. Taste it, then add more if you like extra heat. Remember, you can always add spice, but you can't take it out! Sweetening methods: Honey or maple syrup enhances the chili's sweetness. Use two tablespoons to balance the heat. For a twist, try brown sugar or agave syrup. Sautéing techniques: Sauté the onions and peppers until they are soft. This brings out their natural sweetness. Cook them for about five minutes. Add garlic last to avoid burning it. Presentation matters! Serve your chili in bright bowls. Top with fresh cilantro for a visual spark. A lime wedge adds a refreshing twist. Best side dishes to pair: Crispy tortilla chips are a great match. They add crunch and texture. You might also enjoy cornbread or a light salad on the side. Garnish for enhanced flavor: Sprinkle chopped green onions or a dollop of sour cream for creaminess. These add depth and balance to the spicy chili. Enjoy experimenting with your own toppings! {{image_4}} If you want to mix things up, consider different beans. You can use pinto beans or cannellini beans for a new taste. Each type adds its own flair to the chili. For the fresh pineapple, you can use canned pineapple chunks. Just be sure to drain it well. This option saves time and still brings sweetness to the dish. If you're feeling adventurous, try mango for a fun twist. If you crave more heat, add jalapeños or serrano peppers. These spicy options will kick up the flavor. You can also increase the cayenne pepper to suit your taste. Making this chili vegan is easy. Simply skip the honey and use maple syrup instead. This keeps it sweet without animal products. For gluten-free chili, check your spices. Most are gluten-free, but always read labels. If you use canned beans, ensure they're labeled gluten-free. If you're watching sugar intake, reduce the sweetener. You can even skip it altogether. The natural sweetness of the pineapple may be enough for you. For more ideas, check out the Full Recipe. This allows you to explore every option and find what works best for you. - Use an airtight container for best results. - Let the chili cool down before sealing. - Store in the fridge for up to 5 days. - Freeze in a freezer-safe container. - Leave some space for expansion. - It can last up to 3 months in the freezer. - For stovetop reheating, use a saucepan over low heat. - Stir often to keep flavors intact. - For microwave reheating, cover with a lid to avoid splatters. - Heat for 1-2 minutes, stirring halfway through. I find that knowing how to store and reheat your Sweet & Spicy Pineapple Chili makes it easier to enjoy later. This dish is perfect for meal prep, and it tastes even better the next day! What to do if the chili is too spicy? If your chili is too spicy, add more sweeteners like honey or maple syrup. You can also mix in extra beans or corn to balance the heat. If it is still too hot, serve it with sour cream or yogurt. This cools down the spice nicely. Can I make this dish in advance? Yes, you can make Sweet & Spicy Pineapple Chili ahead of time. Store it in an airtight container in the fridge. It will taste even better the next day as the flavors blend. Just reheat it on the stove or in the microwave when you are ready to serve. What can I serve with Sweet & Spicy Pineapple Chili? This chili pairs well with rice or quinoa. You can also serve it with tortilla chips for crunch. A fresh salad or some cornbread makes for a great side too. Full Recipe access for details For the full recipe and step-by-step guide, check the full recipe section above. Variations for different tastes You can change the flavor by using different beans. Black beans and pinto beans work well. If you want it sweeter, add more pineapple or a splash of orange juice. For a spicier kick, use jalapeños or hot sauce. Tips for enhancing flavor further To enhance the flavor, sauté the garlic until it’s fragrant but not burnt. This gives a nice depth. Adding fresh lime juice just before serving brightens the dish. Try topping it with avocado or cheese for extra creaminess. This blog post breaks down how to make a tasty Sweet & Spicy Pineapple Chili. We explored ingredients like black beans, fresh pineapple, and spices. I shared steps for cooking, simmering, and perfecting your chili. Don't forget the tips on adjustments and serving ideas. In summary, making chili is easy and fun. You can try new flavors and variations, too. Enjoy your cooking journey!
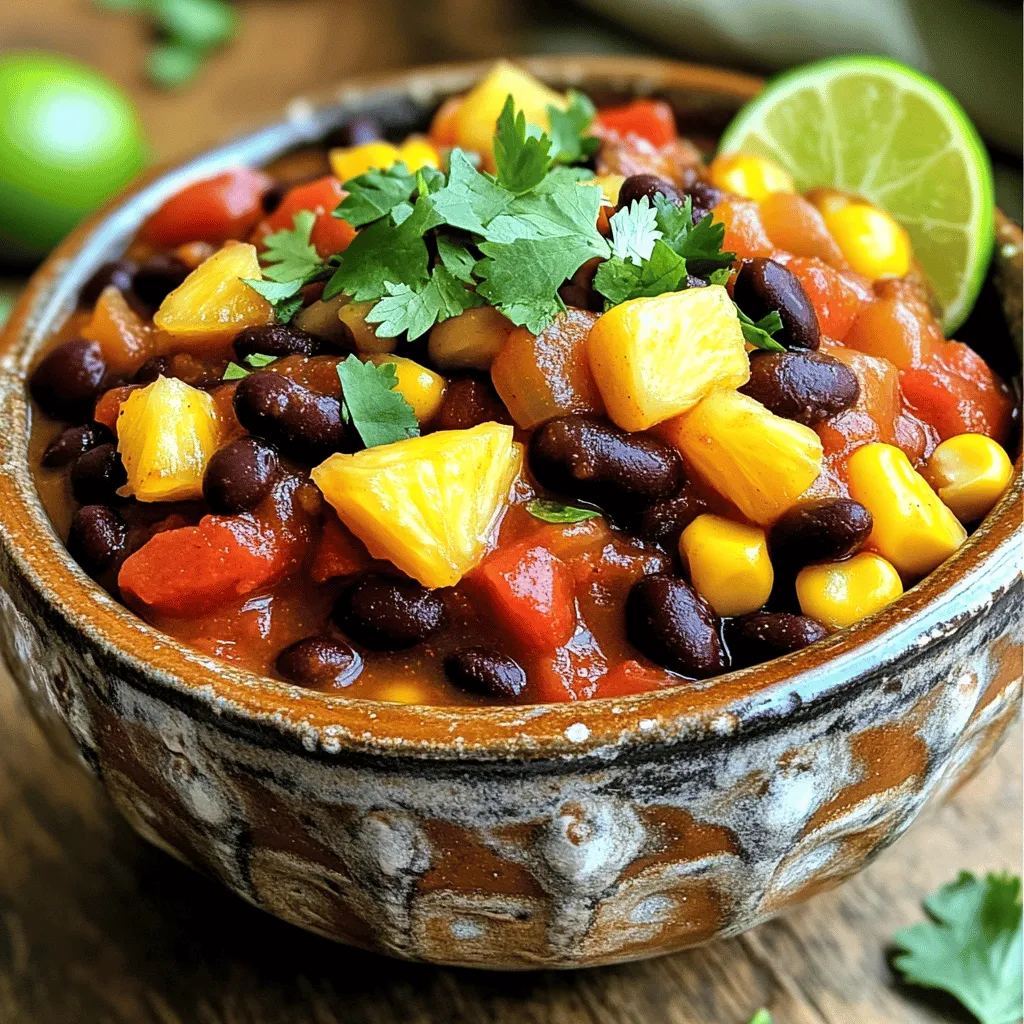
Sweet & Spicy Pineapple Chili Flavorful and Fun Dish
Are you ready to spice up your meal with a vibrant twist? Dive into my Sweet & Spicy Pineapple Chili, a dish bursting with flavor
- 10 corn tortillas - 2 cups shredded cheddar cheese - 1 cup shredded Monterey Jack cheese - 1 small onion, finely chopped - 2 cloves garlic, minced - 1 teaspoon ground cumin - 1 teaspoon smoked paprika - 2 cups enchilada sauce (store-bought or homemade) - 1 tablespoon olive oil - Salt and pepper to taste - Fresh cilantro, chopped (for garnish) To make cheese enchiladas with chili gravy, you need a few key ingredients. First, the corn tortillas are the base. They hold all the cheesy goodness inside. Then, we use cheddar and Monterey Jack cheese for that rich, melty taste. Next, we add some flavor with finely chopped onion and minced garlic. These boost the taste profile. Ground cumin and smoked paprika give it a warm, earthy flavor. For the sauce, you can use store-bought or homemade enchilada sauce. This is where the magic happens. The sauce ties everything together, making the dish moist and flavorful. You'll also need olive oil to cook the aromatics, along with salt and pepper for seasoning. Finally, fresh cilantro adds a bright touch when serving, making the dish pop visually and flavor-wise. For the full recipe, check out the detailed instructions on how to prepare this delicious meal! - Preheat the Oven: Set your oven to 375°F (190°C). This step is key for even cooking. - Sauté the Aromatics: In a skillet, heat the olive oil over medium heat. Once hot, add the chopped onion. Cook for 3-4 minutes until it turns translucent. Then, add the minced garlic and sauté for one more minute. - Add Garlic and Spices: Stir in the ground cumin and smoked paprika. Let them cook for a minute, mixing well. This adds great flavor to the filling. - Combine Cheese Mixture: In a large bowl, mix the shredded cheddar and Monterey Jack cheeses. Add half of the sautéed onion mix. Season with salt and pepper to taste. This creates a rich and creamy filling. - Assemble the Enchiladas: Pour half of the enchilada sauce into a shallow dish. Take a corn tortilla, scoop some cheese mixture into the center, and roll it up. Place it seam-side down in the dish. Repeat this with all tortillas. - Top with Sauce and Cheese: Pour the remaining enchilada sauce over the rolled tortillas. Make sure each one is covered. Sprinkle the leftover cheese mixture on top for extra cheesy goodness. - Bake to Perfection: Place the dish in your preheated oven. Bake for 20-25 minutes. You want the cheese to melt and bubble, with edges turning golden. These steps make the process easy and fun. For a full recipe with all details, check out the [Full Recipe]. To prevent tortillas from breaking, heat them briefly in a skillet. This makes them soft and pliable. You can also wrap them in a damp cloth and microwave for about 30 seconds. This helps keep them from cracking when you roll them. When choosing enchilada sauce, homemade sauce has a fresher taste. You can control the spice level and ingredients. Store-bought sauce is quick and still tasty. If you choose it, look for one with simple ingredients and no added sugars. Pair your enchiladas with sides like fluffy rice, seasoned beans, or a fresh salad. These sides balance the richness of the cheese. For the best look, serve enchiladas on a colorful plate. Drizzle extra sauce on top and add a sprig of cilantro for a pop of color. Use a 9x13-inch baking dish for even cooking. A non-stick dish helps with easy removal. A large skillet makes sautéing the onion and garlic simple. You will also need a mixing bowl for the cheese filling. A spatula is handy for assembly and serving. For easy rolling, have a plate ready to hold the filled tortillas. For the full recipe, check out the detailed instructions and ingredient list. {{image_4}} You can switch up the cheese in your enchiladas. Try using Oaxaca cheese for a melty texture. Pepper Jack adds a nice kick with its spice. If you want to change the protein, you can use chicken, beef, or even beans. They all work well and add flavor. For a healthier twist, consider using whole wheat tortillas. They have more fiber and nutrients than regular ones. You might also opt for gluten-free tortillas if you need a different option. Low-fat cheese is another great swap. It still melts well and cuts some calories. To give your enchiladas a new flavor, add spices like chili powder or cumin. This can change the taste and make it more exciting. You can also make vegetarian or vegan enchiladas. Just swap cheese for a plant-based option and use more veggies. These options still taste great and are fun to make. For the full recipe, be sure to check the earlier sections. To keep your cheese enchiladas fresh, store any leftovers in the fridge. Place them in an airtight container. This helps to lock in moisture and flavor. If you don’t have a container, wrap them tightly with plastic wrap. This method also works well. If you want to save enchiladas for later, freezing is a great option. First, let them cool completely. Then, wrap each enchilada in plastic wrap. After that, place them inside a freezer bag. Remove as much air as you can before sealing. For reheating, let them thaw overnight in the fridge. Heat them in the oven at 350°F (175°C) until hot. This keeps the texture nice and cheesy. Cheese enchiladas can last in the fridge for about 3 to 4 days. If you freeze them, they can last up to 3 months. Always check for signs of spoilage. If the cheese looks moldy or the sauce smells off, it’s best to toss them out. Enjoy your enchiladas while they’re fresh for the best taste! For the complete recipe, check the Full Recipe section. How to make cheese enchiladas with chili gravy from scratch? To make cheese enchiladas with chili gravy, you need to start with the tortillas. Use corn tortillas for the best flavor. Next, fill each tortilla with a mix of shredded cheddar and Monterey Jack cheese. Roll them up tight and place them in a baking dish. Pour chili gravy over the top. Bake at 375°F (190°C) for about 20-25 minutes until bubbly. For the full steps, check the Full Recipe. Can I make enchiladas ahead of time? Yes, you can prepare enchiladas ahead of time. Assemble them, cover them with sauce, and then store in the fridge. They can sit for up to 24 hours before baking. This saves time on busy nights. What’s the best way to reheat enchiladas? The best way to reheat enchiladas is in the oven. Preheat it to 350°F (175°C). Place the enchiladas in a baking dish and cover with foil. Heat for about 15-20 minutes. This keeps them soft and cheesy. What can I use instead of corn tortillas? If you can’t find corn tortillas, you can use flour tortillas. They will change the flavor and texture a bit, but they work well. You can also try gluten-free tortillas if needed. Can I substitute chicken broth for enchilada sauce? You can use chicken broth, but it will not give the same flavor. It can help moisten the enchiladas if you mix it with some spices. Consider adding chili powder or cumin for a better taste. Are cheese enchiladas gluten-free? Traditional cheese enchiladas are not gluten-free due to corn tortillas. However, you can use gluten-free tortillas to make them suitable for a gluten-free diet. Can I make this recipe low-carb? You can make low-carb enchiladas by using zucchini or cauliflower tortillas. You can also reduce the cheese or use a low-fat cheese to cut carbs. You now have a complete guide to making delicious cheese enchiladas. We covered the key ingredients, preparation steps, and tips for getting it just right. You learned how to get the flavors perfect and how to store leftovers too. Whether you want to make this dish simple or add your own twist, the options are endless. Enjoy creating a meal that’s fun, tasty, and sure to impress. Dive in and start cooking; your homemade enchiladas await!
Cheese Enchiladas with Chili Gravy Easy and Delicious
Are you ready to whip up a batch of cheese enchiladas with chili gravy that’ll take you straight to flavor town? This easy recipe combines
- 1 lb boneless, skinless chicken breast, cut into bite-sized pieces - 1/4 cup low-sodium soy sauce - 1/4 cup freshly squeezed orange juice - Zest of 1 orange - 2 tablespoons honey or maple syrup (for sweetness) - 1 tablespoon sesame oil (for depth of flavor) - 2 teaspoons cornstarch mixed with 2 teaspoons water (for thickening) - 1 tablespoon fresh ginger, minced (for warmth) - 2 garlic cloves, minced (for aromatic flavor) - 1 tablespoon sesame seeds (for crunch) - 2 green onions, thinly sliced (for garnish) - Salt and pepper to taste - 1 cup steamed broccoli (optional, for serving) In this recipe, I focus on fresh and simple ingredients. You need chicken breast as the main protein. It cooks quickly and stays juicy. The sauce combines low-sodium soy sauce and fresh orange juice. This mix gives a sweet and savory flavor. Adding orange zest brightens the dish. Honey or maple syrup adds a touch of sweetness. Sesame oil brings depth to the sauce. Minced ginger gives warmth, and garlic adds great aroma. For thickening, use cornstarch mixed with water. This keeps the sauce smooth. Sesame seeds add a nice crunch, while green onions provide a fresh garnish. Optional broccoli adds color and nutrients. It’s a great way to round out the meal. You can serve this dish over the broccoli for a healthy touch. If you love bright flavors, this recipe is for you! {{ingredient_image_2}} Start by whisking together the liquid ingredients. In a medium bowl, mix the low-sodium soy sauce, freshly squeezed orange juice, orange zest, honey or maple syrup, sesame oil, minced ginger, and minced garlic. Make sure everything blends well. This sauce will add a lot of flavor to your chicken. Set aside a small portion of the sauce. You will drizzle this over the dish when you serve it. Next, heat a large non-stick skillet or wok over medium-high heat. Wait until it is hot. Once ready, add the bite-sized pieces of chicken. Spread them out in one layer for even cooking. Season with salt and pepper to taste. Cook the chicken for about 5 to 7 minutes. Stir occasionally. You want the chicken to be fully cooked and golden brown on the outside. Now it’s time to combine everything. Carefully pour the prepared orange sauce over the cooked chicken in the skillet. Make sure to coat all the chicken pieces evenly. Bring the mixture to a gentle simmer. This helps the flavors meld together. Then, add the cornstarch mixture to the skillet. Stir continuously for about 1 to 2 minutes. This will thicken the sauce. Once thickened, remove the skillet from heat. Finally, gently stir in the sesame seeds and half of the sliced green onions into the chicken mixture. This adds a nice crunch and flavor. When serving, spoon the orange sesame chicken over a bed of steamed broccoli if you like. Drizzle the reserved orange sauce over the top and garnish with the rest of the green onions. Enjoy your meal! - Ensuring chicken is cooked evenly: Cut your chicken into small, even pieces. This helps them cook at the same rate. When cooking, spread the pieces out in the skillet. Avoid overcrowding. Stir occasionally to brown all sides well. Aim for an internal temperature of 165°F for safe eating. - Achieving the right sauce consistency: Start with your sauce mixture in a bowl. After cooking the chicken, add the sauce to the pan. Let it simmer gently. This allows the flavors to meld. When thickening, use the cornstarch mixture. Stir it in quickly and keep mixing for one to two minutes. The sauce should be glossy and cling to the chicken. - Suggested additions for flavor boost: Try adding crushed red pepper for heat. A splash of rice vinegar can add a nice tang. You can also toss in some bell peppers or snap peas for added crunch and color. - Alternative sweetener options: If you want a different sweetness, use agave nectar or coconut sugar. These can add unique flavors while keeping it healthy. Adjust the amount to suit your taste, starting with less and adding more if needed. Pro Tips Marinate for More Flavor: Allow the chicken to marinate in the sauce for at least 30 minutes before cooking. This enhances the flavor and tenderness of the chicken. Adjust Sweetness to Taste: Depending on your preference, you can increase or decrease the amount of honey or maple syrup in the sauce for a sweeter or less sweet dish. Add More Veggies: Feel free to incorporate additional vegetables like bell peppers or snap peas into the stir-fry for added nutrition and color. Serve with Rice or Quinoa: For a complete meal, serve the orange sesame chicken over brown rice or quinoa to provide a healthy grain option. {{image_4}} If you want to switch things up, you can try different proteins. Instead of chicken, use tofu or shrimp. Tofu works well because it absorbs flavors. Shrimp cooks quickly and adds a nice texture. You can also change the veggies. Broccoli is great, but you can add bell peppers, snap peas, or carrots. These add color and crunch. Feel free to mix and match based on what you like or have on hand. Pair this dish with whole grains for a balanced meal. Brown rice or quinoa works well. They soak up the sauce nicely and provide fiber. For a complete meal, add a fresh salad or steamed vegetables. This gives you extra vitamins and makes your plate look vibrant. Try a simple cucumber salad or a side of roasted sweet potatoes for a tasty twist. To store your Healthy Orange Sesame Chicken, let it cool down first. Once cool, place it in an airtight container. This helps keep the chicken fresh. You can refrigerate it for up to three days. If you want to keep it longer, freeze it. Use freezer-safe bags or containers for freezing. Just make sure to remove as much air as possible. This will help avoid freezer burn. When you're ready to eat the leftovers, you can reheat them easily. Use a microwave for quick reheating. Place the chicken in a microwave-safe dish and cover it. Heat it in short bursts, stirring in between. This helps heat evenly. You can also reheat in a skillet. Add a splash of water to keep it moist. Heat on medium-low until warmed through. Either method keeps the flavors and texture nice. Enjoy your meal! This dish is healthy because it uses lean chicken breast, which is low in fat and high in protein. The low-sodium soy sauce helps cut down on salt. Fresh orange juice adds vitamin C, while honey or maple syrup provides natural sweetness. Ginger and garlic not only boost flavor but also offer health benefits, like anti-inflammatory properties. Adding broccoli as a side gives you fiber and essential vitamins. Yes, you can easily make this dish gluten-free. Simply swap the low-sodium soy sauce with gluten-free soy sauce or tamari. Ensure that any additional sauces you use are also gluten-free. This way, you can enjoy the same great taste without gluten. To change the sweetness, start by using less honey or maple syrup. Taste the sauce after mixing it and add more if needed. You can also try adding a bit of orange zest for a sweet kick without extra sugar. Balancing flavors is key, so taste as you go! In this blog post, I covered how to make Orange Sesame Chicken from start to finish. We explored ingredients, step-by-step cooking, and tips for a great meal. Remember, you can make it your own with different ingredients and flavors. Storing leftovers and reheating properly helps save time. This dish is not only tasty but also healthy. I hope you try this recipe and enjoy the flavor and ease it brings to your table.
Healthy Orange Sesame Chicken Quick and Easy Recipe
Are you ready to impress your friends and family with a tasty yet healthy meal? This Healthy Orange Sesame Chicken recipe is quick, easy, and
To make these tasty treats, you need a few key ingredients: - 1 cup canned pure pumpkin (not pumpkin pie filling) - 1/2 cup rolled oats - 1/3 cup unsweetened peanut butter (ensure it's xylitol-free) - 1/2 teaspoon ground cinnamon (optional) - 1/4 cup ground flaxseed (optional) - 1 cup whole wheat flour (or oat flour for gluten-free) These ingredients work together to create a healthy and fun snack for your dog. The pumpkin gives a nice flavor and is good for digestion. The oats and peanut butter add texture and taste that dogs love. You can add a few ingredients to make these treats even better: - A dash of honey for sweetness - A tablespoon of mashed banana for extra flavor - A bit of coconut oil for healthy fats These additions are not necessary but can make the treats more appealing to your pup. Just remember to keep the amounts small. If you don’t have some ingredients on hand, here are some easy swaps: - Use almond butter if you run out of peanut butter. - Try pumpkin puree with sweet potato for a different taste. - Swap the whole wheat flour with oat flour if your dog has gluten issues. These substitutes keep the treats tasty and safe for your furry friend. You can find many options in your kitchen or store! For the full recipe, check out Easy Pumpkin No-Bake Treats for Dogs. First, gather your ingredients. You will need: - 1 cup canned pure pumpkin (not pumpkin pie filling) - 1/2 cup rolled oats - 1/3 cup unsweetened peanut butter (make sure it’s xylitol-free) - 1/2 teaspoon ground cinnamon (optional) - 1/4 cup ground flaxseed (optional) - 1 cup whole wheat flour (or oat flour for gluten-free) In a large bowl, mix the canned pumpkin, rolled oats, and peanut butter. Stir well until everything blends smoothly. If you want a little extra flavor, add the ground cinnamon and flaxseed. Mix again until it is evenly mixed. Next, add the whole wheat flour bit by bit. Keep stirring until you have a dough that is firm but not sticky. Now it’s time to form the treats. Turn the dough out onto a lightly floured surface. Knead it gently with your hands until it holds together well. Roll the dough out to about 1/4 inch thick. You can use cookie cutters to make fun shapes or roll small balls for easy treats. Once shaped, place the treats on a baking sheet lined with parchment paper. Allow the treats to sit at room temperature for 30 minutes. This helps them firm up nicely. After they have set, transfer them to an airtight container. You can store them in the fridge for up to one week. This way, your dog will always have a fresh snack ready to enjoy. You can find the full recipe above to guide you through this fun process! To make great treats, the dough must be just right. If it feels too sticky, add a bit more flour. If it’s too dry, mix in a touch of pumpkin or peanut butter. The dough should hold together without crumbling. It should not be too wet, or it won’t shape well. When serving these treats, think about your dog's size. Cut them into smaller pieces for tiny dogs. Larger dogs can enjoy bigger shapes. Always serve treats in a clean bowl. You can also mix them with your dog’s regular food for a fun surprise. To entice your dog even more, use fun shapes. Cookie cutters make the treats look exciting. You can add a sprinkle of oats on top. A small dollop of dog-friendly frosting can also make them special. These small touches will make your dog wag their tail with joy! {{image_4}} You can change up the flavor of these treats easily. Try using sweet potato instead of pumpkin. This adds a different taste while keeping it healthy. You can also mix in mashed bananas. Dogs love the sweetness of bananas! For a savory twist, consider adding plain yogurt. It makes the treats creamy and tasty. Some dogs have food allergies. If your dog is sensitive to wheat, use oat flour instead of whole wheat flour. This keeps the treats gluten-free. For peanut butter lovers, make sure to avoid brands with xylitol. You can swap peanut butter with almond butter or sunflower seed butter. Both options are safe and tasty for dogs. Think about seasonal flavors to keep things fun. In the fall, add some apple puree or a dash of nutmeg. These flavors match the autumn vibe perfectly. In the summer, try adding coconut flakes for a tropical twist. During the holidays, a hint of ginger can make your treats festive. Your dog will love these seasonal snacks! To keep your easy pumpkin no-bake treats fresh, store them in an airtight container. This helps to lock in moisture and flavor. Place the container in the refrigerator to maintain the treats' firmness. Avoid leaving them out at room temperature for too long, as they can dry out. When stored properly in the fridge, these treats last about one week. Make sure to check for any signs of spoilage, like a strange smell or mold. If they look good, your dog can enjoy them throughout the week! If you want to save some treats for later, freezing is a great option. Simply place the treats in a freezer-safe bag or container. They can last for up to three months in the freezer. When you're ready to serve, let them thaw in the fridge for a few hours or at room temperature for quicker serving. Enjoy your time making these delicious treats with your furry friend! Yes, you can use regular flour. Whole wheat flour adds more fiber. It is often better for your dog’s digestion. If you want a gluten-free option, oat flour works great too. Just make sure your dog has no allergies to oats. Yes, these treats are fine for puppies. They contain safe, natural ingredients. Just ensure your puppy is not allergic to any of them. Start with small amounts to see how they react. Always consult your vet if you have concerns. You can give these treats a few times a week. Moderation is key to keep your dog healthy. These treats should not replace a balanced diet. Treats are fun but should be a small part of your dog's meals. Follow your vet's advice for the best guidelines. For more details on making these treats, check out the Full Recipe. You now have all the details to create easy pumpkin no-bake treats for your pup. We covered key ingredients, step-by-step instructions, helpful tips, yummy variations, and storage methods. Remember, you can adjust flavors based on your dog's needs. Keep these treats fresh and fun for every season. With these simple recipes, your dog will enjoy tasty snacks that are good for them. Happy treating!
Easy Pumpkin No-Bake Treats for Dogs Delightful Snack
Looking for a fun way to spoil your furry friend? You’ve come to the right place! In this guide, I’ll show you how to make