Dinner

- 2 lbs boneless, skinless chicken thighs - 4 medium carrots, peeled and sliced into rounds - 3 medium potatoes, peeled and diced into 1-inch cubes - 1 cup butternut squash, peeled and cubed - 1 medium onion, finely chopped - 3 cloves garlic, minced - 4 cups low-sodium chicken broth - 1 teaspoon dried thyme - 1 teaspoon dried rosemary - 1 teaspoon smoked paprika - 1 bay leaf - Salt and pepper to taste - 2 tablespoons olive oil - 1 tablespoon apple cider vinegar - Fresh parsley, chopped, for garnish Gathering these ingredients is the first step to making a great stew. The chicken thighs are key for a tender bite. They soak up flavors well and stay juicy during cooking. I love using fresh veggies like carrots and potatoes. They add sweetness and heartiness to the dish. Butternut squash brings a lovely creaminess. It melts nicely into the stew, making it rich. Onions and garlic add depth, making the smell amazing as you cook. For broth, I prefer low-sodium chicken broth. It lets you control the saltiness better. The herbs—thyme and rosemary—bring a warm, earthy taste. Smoked paprika adds a hint of smokiness that really rounds out the flavor. Don't forget the apple cider vinegar! It adds a nice tang to balance the sweetness from the veggies. Finally, fresh parsley makes it pop with color and freshness when you serve. With this list, you are all set to create a cozy, comforting meal that warms you from the inside out. {{ingredient_image_2}} First, we start with the aromatics. Heat 2 tablespoons of olive oil in a large skillet over medium-high heat. Once hot, add 1 medium onion, finely chopped, and 3 cloves of minced garlic. Sauté these for about 3 to 4 minutes. You want the onion to turn translucent and fragrant. While the aromatics cook, prepare the chicken. In a bowl, take 2 lbs of boneless, skinless chicken thighs, cut into bite-sized chunks. Season the chicken with salt, pepper, 1 teaspoon of smoked paprika, 1 teaspoon of dried thyme, and 1 teaspoon of dried rosemary. When the onions are ready, add the seasoned chicken to the skillet. Sear the chicken on all sides for 5 to 7 minutes until it is lightly browned. This step really boosts the stew's flavor. Now, it’s time to layer the ingredients in the crockpot. Start by adding a layer of 4 medium carrots, peeled and sliced into rounds. Next, add 3 medium potatoes, peeled and diced into 1-inch cubes, followed by 1 cup of cubed butternut squash. Make sure the vegetables are spread evenly in the pot. Next, combine the chicken and aromatics. Place the seared chicken and the sautéed onion and garlic mixture on top of the layered vegetables in the crockpot. Now we add the liquid. Pour in 4 cups of low-sodium chicken broth and drizzle 1 tablespoon of apple cider vinegar over everything. Toss in 1 bay leaf for extra flavor. Cover the crockpot with its lid. Cook on low for 6 to 7 hours or on high for 4 hours. The stew is ready when the chicken is tender and the vegetables are cooked through. Before serving, carefully remove the bay leaf. Taste the stew and adjust the seasoning with more salt and pepper if needed. This step is key to enhancing the flavors. Serve the warm stew in bowls and garnish each serving with freshly chopped parsley for a vibrant finish. Enjoy your cozy fall chicken stew! To make your stew shine, use the right seasonings. I recommend smoked paprika for a warm, smoky note. Dried thyme and rosemary add earthiness. Don't forget salt and pepper! These enhance all the flavors. To ensure your chicken and vegetables are tender, avoid overcooking. Use fresh ingredients for the best taste. Cut the chicken into small chunks. This helps it cook evenly. For veggies, choose firm ones like carrots and potatoes. Crockpots are great for slow cooking. To get the best results, layer your ingredients. Start with hard vegetables like carrots and potatoes. Then, add the chicken and soft vegetables. This way, everything cooks perfectly. Also, avoid lifting the lid while it cooks. Every time you open it, you lose heat. Keep it closed to let the flavors meld. This hearty stew pairs well with crusty bread or fluffy rice. Both soak up the rich broth nicely. You can also serve it with a simple salad for freshness. For drinks, try a light white wine or warm apple cider. Both complement the stew's flavors. Enjoy your meal with family or friends for a cozy fall experience! Pro Tips Brown the Chicken: For a deeper flavor, make sure to sear the chicken until it's golden brown. This step adds a rich depth to the stew. Cut Evenly: Ensure your vegetables are cut into uniform sizes to promote even cooking and a pleasing presentation. Flavor Boost: Add a splash of white wine or a tablespoon of Dijon mustard for an extra layer of flavor in the broth. Storage Tips: This stew stores well. Refrigerate leftovers in an airtight container for up to 3 days, and it can be frozen for up to a month. {{image_4}} You can easily swap out chicken for turkey. Turkey thighs work well and add a nice flavor. If you prefer a vegetarian option, use chickpeas or lentils. Both add protein and texture. When it comes to veggies, feel free to get creative. You can use sweet potatoes instead of regular potatoes. Turnips or parsnips also make great choices. They provide unique tastes and a seasonal feel. To boost flavor, try adding spices like cumin or coriander. Fresh herbs like thyme or dill can also work wonders. You can even add a pinch of cayenne for heat. Using different broths can change the stew's taste too. Vegetable broth gives a lighter flavor, while beef broth adds richness. You could also use homemade stock for a fresh touch. For gluten-free options, ensure you choose gluten-free broth. Most broths are safe, but check the label. You can also thicken the stew with cornstarch instead of flour. If you're on a low-sodium diet, use salt-free broth. You can add fresh lemon juice to enhance flavors without extra salt. For paleo diets, skip the potatoes and add more veggies like zucchini or mushrooms. After you make your cozy fall chicken stew, let it cool to room temperature. Then, store it in the fridge. Use a glass or plastic container with a tight lid. This keeps the stew fresh and tasty. Your stew will last in the fridge for about three to four days. If you want to keep it longer, consider freezing it. For freezing, choose safe, freezer-friendly containers. Use airtight containers or freezer bags. Make sure to remove as much air as possible. This helps prevent freezer burn. Label your containers with the date and contents for easy tracking. When you are ready to enjoy leftovers, reheating is key. You can use the microwave or stove. For the microwave, place the stew in a bowl. Heat it for about 2-3 minutes, stirring halfway through. On the stove, pour the stew into a pot. Heat it over medium heat. Stir often until it's warm. For the best taste and texture, eat leftovers within three days. If they sit longer, the flavor may fade. Always check for any off smells before reheating. To freeze your chicken stew, do it within two days of cooking. This keeps the best flavor and texture. Portion it into smaller servings. This way, you can thaw only what you need later. For freezing, let the stew cool completely. Then, transfer it to your freezer container. When you are ready to use it, thaw the stew overnight in the fridge. This ensures even thawing. You can also use cold water for a quicker method. Just place the sealed bag in cold water for about an hour. After thawing, reheat on the stove or microwave before serving. Cooking this stew takes about 6-7 hours on low or 4 hours on high. The longer you cook it, the more flavors blend. The chicken should be tender, and the veggies soft. Yes, making this stew ahead of time is great! You can cook a large batch and store it. This helps the flavors develop even more. Plus, it saves you time during busy days. Just keep it in the fridge for up to three days or freeze it for longer storage. This chicken stew pairs well with many sides. Some popular choices include crusty bread, rice, or a fresh salad. You can also enjoy it with cornbread for extra comfort. Each option adds a nice touch to the hearty stew. In summary, we covered everything for making Crockpot Cozy Fall Chicken Stew. You learned the key ingredients, step-by-step cooking instructions, and helpful tips for the best flavor. We also explored variations and storage techniques to keep your stew fresh. This dish is hearty and perfect for fall. Enjoying it with bread or rice makes it even better. I hope you feel ready to create this cozy meal in your kitchen. Happy cooking!
Crockpot Cozy Fall Chicken Stew Hearty and Comforting
As the leaves turn and the air gets crisp, there’s nothing quite like a warm bowl of Crockpot Cozy Fall Chicken Stew. This hearty dish
- 12 oz spaghetti - 1 lb ground beef - 1 medium onion, diced - 2 cloves garlic, minced - 1 bell pepper, diced - 1 can (14 oz) diced tomatoes - 1 cup beef broth - 1 cup frozen corn - 1 can (15 oz) black beans, rinsed and drained - 2 tablespoons taco seasoning - 1 teaspoon smoked paprika - Salt and pepper to taste - 2 tablespoons olive oil - Shredded cheddar cheese for topping - Fresh cilantro for garnish The key to a great dish lies in the ingredients. You start with spaghetti as the base. It cooks right in the pot, soaking up all the flavors. Then, you need ground beef for a hearty protein. It gives the meal depth and richness. Next, add a medium onion and garlic. They provide a wonderful aroma and flavor. A bell pepper adds color and sweetness. Use any color you prefer; they all work well. Don't forget the diced tomatoes. They add moisture and tang. The beef broth enhances the meaty flavor and helps the spaghetti cook. Frozen corn gives a touch of sweetness and texture. For the beans, use black beans. They are nutritious and filling. Taco seasoning and smoked paprika bring warmth and spice. Adjust salt and pepper to your taste. Finally, drizzle in olive oil to keep everything moist. Top with shredded cheddar cheese for creaminess. Finish with fresh cilantro for a bright touch. Each ingredient plays a role in making this dish easy and flavorful! Start by heating olive oil in a large pot over medium heat. Once the oil is hot, add the diced onion. Sauté the onion for about three to four minutes. You want it soft and see-through. Next, stir in the minced garlic and diced bell pepper. Cook for another two minutes. This will make your kitchen smell great! Now it’s time to add the ground beef. Break it apart with a spoon as you add it to the pot. Cook the beef for about five to seven minutes. Stir it often until it turns brown and is no longer pink. If there's a lot of fat, drain it from the pot to keep things light. Once the beef is browned, sprinkle in the taco seasoning and smoked paprika. Don’t forget to add salt and pepper to taste. Mix it all well so the spices coat the meat. Cook for one more minute. This step adds a lot of flavor! Next, pour in the canned diced tomatoes, beef broth, frozen corn, and black beans. Then add the uncooked spaghetti. Make sure to stir everything well. Check that the spaghetti is fully submerged in the liquid. This helps it cook evenly. Bring the mixture to a rolling boil. Once it's boiling, reduce the heat to a gentle simmer. Cover the pot and let it simmer for about 12 to 15 minutes. Stir occasionally to prevent sticking. You’ll know it’s done when the spaghetti is tender. After cooking, take the pot off the heat. Let the dish rest for a few minutes to thicken up. For a cheesy finish, stir in half of the shredded cheddar cheese until it melts. This will give your cowboy spaghetti a creamy touch! To boost the taste of One-Pot Cowboy Spaghetti, add spices like cumin or chili powder. A pinch of cayenne will give it a kick. You can also mix in fresh herbs like oregano or thyme for more depth. After cooking, let the dish rest for a few minutes. This resting time helps all the flavors meld together, making each bite even better. When sautéing, keep the heat medium to avoid burning the onion and garlic. Stir often to cook them evenly. For perfect pasta texture, cook the spaghetti until it is al dente. This means it should be soft but still firm to the bite. Remember, the pasta will continue to cook a bit after you remove it from heat. Top your Cowboy Spaghetti with shredded cheddar cheese for creaminess. Fresh cilantro adds color and a burst of flavor. You can serve it with cornbread or a side salad for a complete meal. For a fun cowboy theme, consider adding cowboy beans or grilled corn on the cob. {{image_4}} You can easily switch the ground beef for ground turkey or chicken. Both options are leaner but still tasty. If you want a vegetarian dish, use lentils or mushrooms. They add great texture and flavor. If you're looking for a healthier choice, try whole wheat spaghetti. It gives more fiber and a nutty taste. For gluten-free options, use gluten-free spaghetti or any short pasta. Bowtie or penne works well in this dish, too, and is fun to eat. Feel free to add more veggies! Zucchini, spinach, or carrots can boost nutrition and flavor. You can also use seasonal produce like bell peppers in summer or squash in fall. This way, you can change it up and keep meals fresh and exciting. To store leftovers, let the spaghetti cool first. Then, transfer it to an airtight container. This helps keep it fresh. You can store it in the fridge for up to 3 days. After that, it might lose its taste and texture. To freeze One-Pot Cowboy Spaghetti, use a freezer-safe container. Make sure to leave some space at the top, as it will expand. The dish can stay good in the freezer for up to 3 months. When you’re ready to eat it, thaw it overnight in the fridge. You can reheat the spaghetti in two ways: the microwave or the stovetop. For the microwave, place it in a bowl and cover it. Heat in 1-minute bursts until hot. On the stovetop, gently warm it in a pan over low heat. Add a splash of beef broth or water to keep it moist. Stir often to prevent sticking. One-Pot Cowboy Spaghetti takes about 30 minutes to cook. You spend 10 minutes prepping the ingredients. Cooking takes about 20 minutes. This quick meal fits into a busy schedule. Yes, you can make this dish ahead of time. Cook the spaghetti and let it cool. Store it in an airtight container in the fridge for up to three days. To reheat, add a splash of broth to keep it moist. You can use ground turkey or chicken for a leaner choice. For a vegetarian option, try lentils or black beans. Both options keep the dish hearty and satisfying. To add heat, include diced jalapeños or crushed red pepper flakes. You can also use a spicier taco seasoning. Start with a little, then taste and adjust as needed. Yes, you can add more vegetables! Try zucchini, spinach, or mushrooms. Just chop them small and add them with the garlic and bell pepper. This adds flavor and nutrition. This blog post covered a tasty One-Pot Cowboy Spaghetti recipe. We explored the ingredients, cooking methods, tips, and storage info. You learned how to create a dish full of flavor and fun. Try different meats and veggies to make it your own. Remember to let it rest for better taste. Enjoy making this dish and impressing your friends. Cooking can be a joy, and this meal is an easy way to start. Now, grab your ingredients and get cooking!
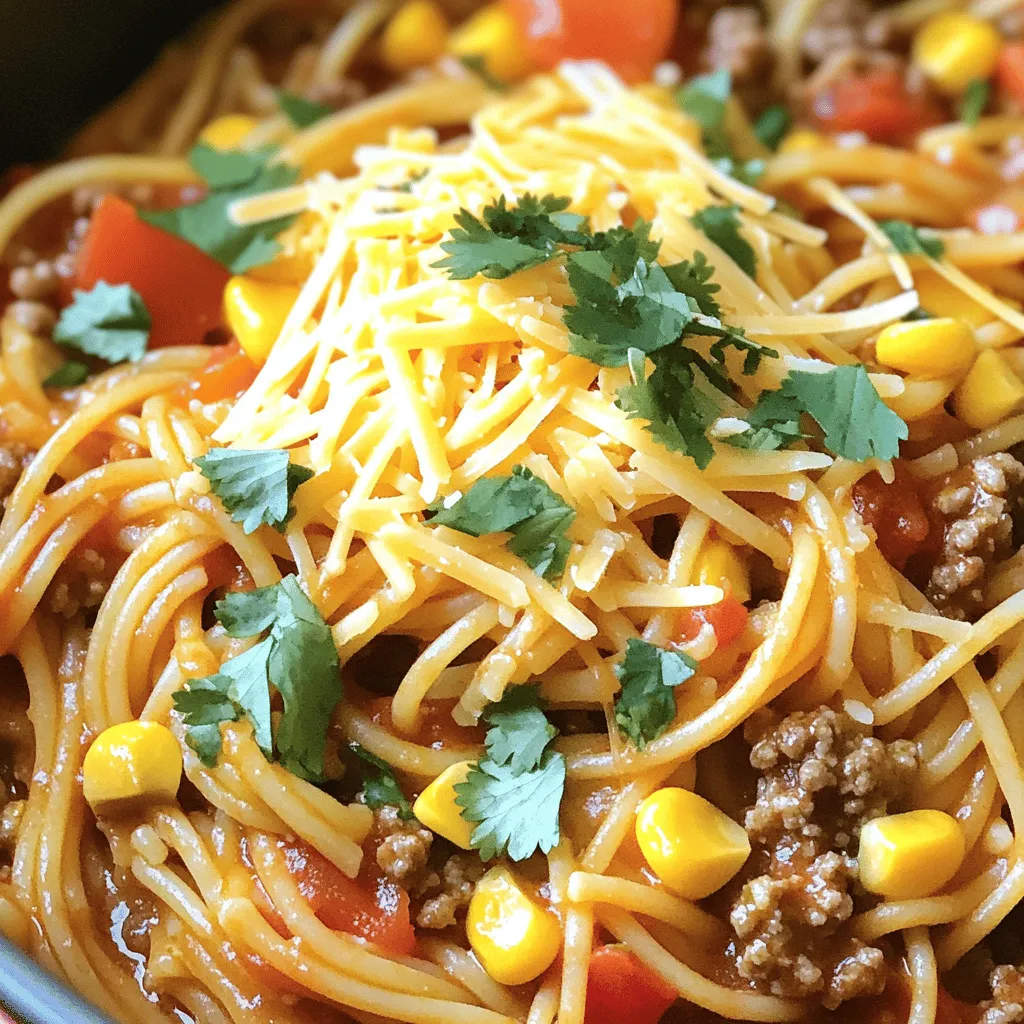
One-Pot Cowboy Spaghetti Easy and Flavorful Meal
Craving a hearty, easy meal? Look no further! One-Pot Cowboy Spaghetti is packed with flavor and can be made in just one pot. With simple
- 1 cup pumpkin purée - 1/2 cup granulated sugar - 1/2 cup packed brown sugar - 1/2 cup vegetable oil - 3 large eggs - 1 teaspoon vanilla extract - 1 ¾ cups all-purpose flour - 1 teaspoon baking soda - 1/2 teaspoon baking powder - 1/2 teaspoon salt - 1 teaspoon ground cinnamon - 1/2 teaspoon ground nutmeg - 1/4 teaspoon ground ginger - 1/4 teaspoon ground cloves - 8 oz cream cheese, softened at room temperature - 1/4 cup granulated sugar - 1/2 teaspoon vanilla extract - 1 large egg To make these muffins, I use simple yet flavorful ingredients. The pumpkin purée adds moisture and a rich taste. The sugars bring sweetness, and the vegetable oil keeps the muffins soft. Using three eggs helps bind the mixture. I always add vanilla extract for a hint of warmth. For the dry mix, I combine flour, baking soda, baking powder, salt, and spices. Spices like cinnamon, nutmeg, ginger, and cloves give the muffins a cozy flavor. They smell amazing as they bake. For the cream cheese swirl, I blend softened cream cheese with sugar, vanilla, and an egg. This mixture adds a creamy layer that pairs perfectly with the pumpkin base. Each ingredient plays a key role in creating a warm, comforting treat. 1. Preheat the oven and prepare muffin tin: First, set your oven to 350°F (175°C). While it heats, grab a muffin tin. You can line it with paper liners or lightly grease each cup with oil or spray. 2. Mix wet ingredients thoroughly: In a large bowl, mix 1 cup of pumpkin purée, 1/2 cup of granulated sugar, 1/2 cup of brown sugar, 1/2 cup of vegetable oil, 3 large eggs, and 1 teaspoon of vanilla extract. Whisk everything well until it’s smooth and blended. 3. Combine dry ingredients separately: In another bowl, sift together 1 ¾ cups of all-purpose flour, 1 teaspoon of baking soda, 1/2 teaspoon of baking powder, 1/2 teaspoon of salt, 1 teaspoon of cinnamon, 1/2 teaspoon of nutmeg, 1/4 teaspoon of ginger, and 1/4 teaspoon of cloves. Gradually add this dry mix to the pumpkin mixture. Fold gently with a spatula until just combined. Remember, don't overmix! 4. Beat cream cheese mixture until smooth: In a different bowl, combine 8 oz of softened cream cheese, 1/4 cup of granulated sugar, 1/2 teaspoon of vanilla extract, and 1 large egg. Beat this mixture until it’s creamy and smooth. Make sure there are no lumps. 5. Spoon pumpkin batter and cream cheese into muffin cups: Fill each muffin cup halfway with the pumpkin batter. Then, add a dollop of cream cheese mixture on top. Use a toothpick or knife to swirl the cream cheese into the pumpkin batter. This creates a beautiful marbled look. 6. Bake and cool the muffins: Place the muffin tin in the preheated oven. Bake for 18-22 minutes. The muffins are ready when a toothpick inserted in the center comes out clean. After baking, let them cool in the pan for about 5 minutes. Then, transfer the muffins to a wire rack to cool completely. Using room temperature ingredients is key. It helps your muffins rise better. Cold eggs or cream cheese can make the batter thick. Take them out of the fridge an hour before you bake. Overmixing is an easy mistake to make. When you combine the wet and dry ingredients, mix just until you see no flour. This keeps your muffins fluffy and light. If you mix too much, they can turn out dense. For a charming touch, serve your muffins warm. Dust them lightly with powdered sugar for sweetness. A sprinkle of cinnamon adds flavor and looks nice. You can also add pumpkin seeds on top for a crunchy twist. Pair your muffins with coffee or tea. They balance the sweet and creamy flavor. Enjoying them with a warm drink makes the experience even better. {{image_4}} You can easily tweak the flavor of your pumpkin cream cheese swirl muffins. Here are some ideas: - Adding chocolate chips or nuts: Mix in 1/2 cup of chocolate chips or chopped nuts. This adds a great texture and taste. Chocolate makes it sweeter, while nuts add a nice crunch. - Incorporating dried fruits: Try adding 1/2 cup of dried cranberries or raisins. They bring a chewy texture and a burst of sweetness. This can balance the spices in the muffins beautifully. Want to make your muffins more inclusive? Here are some simple swaps: - Gluten-free flour options: Use a 1:1 gluten-free flour blend instead of all-purpose flour. It keeps the muffins soft and moist. Just check that your blend has xanthan gum for better structure. - Vegan substitutions for eggs and cream cheese: Swap the eggs for 1/4 cup of unsweetened applesauce per egg. For cream cheese, use a vegan cream cheese alternative. This keeps the muffins creamy and delicious without dairy. These variations will help you create muffins that suit your taste and dietary needs. Enjoy experimenting! To keep your Pumpkin Cream Cheese Swirl Muffins fresh, store them at room temperature. Place them in an airtight container. This helps keep moisture in and prevents them from drying out. If you have leftover muffins, consume them within three days for the best taste and texture. Here are some additional tips: - Use a paper towel inside the container to absorb extra moisture. - Avoid stacking muffins directly on top of each other; this can cause them to squish. - Keep them away from direct sunlight or heat sources to maintain freshness. If you want to save muffins for longer, freezing is a great option. Make sure they are completely cool before freezing. Wrap each muffin tightly in plastic wrap or aluminum foil. Place the wrapped muffins in a freezer-safe bag or container. This method helps to prevent freezer burn. When you're ready to enjoy a muffin, simply remove it from the freezer. You can thaw it overnight in the fridge or heat it directly from frozen in the microwave for about 30 seconds. This way, your Pumpkin Cream Cheese Swirl Muffins will taste just as fresh as the day you baked them! You can use butternut squash purée or sweet potato purée. Both have a similar texture and taste. You can even make your own by roasting and blending these veggies. This gives a fresh twist to your muffins while keeping the pumpkin flavor. To keep muffins from sticking, use paper liners. They make for easy removal and cleanup. You can also grease the muffin tin with oil or non-stick spray. Make sure to coat each cup well. This ensures your muffins come out easily. Yes, you can prepare the batter ahead of time. Store it in the fridge for up to 24 hours. This saves time when you're ready to bake. Just be sure to mix it lightly before filling the muffin cups. This keeps the muffins fluffy and light. These pumpkin muffins blend warm spices and cream cheese for a tasty treat. We covered the key ingredients, step-by-step instructions, baking tips, variations, and storage methods. With room-temperature ingredients and no overmixing, you can bake perfect muffins. Try different flavors or dietary options to suit your needs. Remember to store them correctly to keep them fresh. Enjoy your cooking, and share these muffins with friends!
Pumpkin Cream Cheese Swirl Muffins Delightful Recipe
Welcome to your new favorite fall treat! This Pumpkin Cream Cheese Swirl Muffins recipe combines warm spices and creamy goodness for a delicious bite. Imagine
- 8 oz fettuccine pasta - 1 lb flank steak or sirloin, thinly sliced - 4 cloves garlic, minced - 1 cup cherry tomatoes, halved - 1 cup fresh spinach leaves - ½ cup heavy cream - ½ cup freshly grated Parmesan cheese - 2 tablespoons olive oil - 1 teaspoon crushed red pepper flakes - Salt and freshly ground black pepper to taste - Fresh basil leaves for garnish I love using fresh, quality ingredients for garlic steak pasta. The fettuccine is the perfect base for this dish. It holds the sauce well and gives you that nice bite. Flank steak or sirloin adds a rich flavor. Thin slices cook quickly and stay tender. Garlic is a key player here. It brings a warm aroma and deep taste. Cherry tomatoes add a pop of color and sweetness. They soften and burst, making the sauce more vibrant. Spinach adds a nice green touch and boosts nutrition. Heavy cream is essential for a creamy sauce. It helps blend all the flavors and makes it rich. Freshly grated Parmesan cheese adds a salty depth. A sprinkle of crushed red pepper flakes gives a slight kick. Don’t forget salt and pepper! They enhance every ingredient. Fresh basil leaves are the perfect garnish. They add fragrance and a touch of freshness. Using these ingredients will make your garlic steak pasta a true delight. - Step 1: Boiling and draining fettuccine Fill a large pot with water. Add a good amount of salt. Bring the water to a rolling boil. Add the fettuccine and cook as the package says, until it is al dente. When done, drain the pasta and save about ½ cup of the water. - Step 2: Reserving pasta water for sauce This starchy water helps make the sauce creamy. Set it aside for later. - Step 3: Heating oil and seasoning the steak While the pasta cooks, heat 1 tablespoon of olive oil in a large skillet. Season the sliced steak with salt and black pepper. - Step 4: Cooking the steak until golden brown When the oil shimmers, add the steak in one layer. Cook for about 2-3 minutes on one side. Flip the steak and cook for another 2-3 minutes. Remove it from the skillet and cover with foil to keep warm. - Step 5: Sautéing garlic and red pepper flakes In the same skillet, add the other tablespoon of olive oil. Add minced garlic and red pepper flakes. Sauté for about 30 seconds until the garlic smells great. - Step 6: Adding cherry tomatoes and spinach Next, add halved cherry tomatoes. Cook for 2-3 minutes until they soften. Stir in fresh spinach leaves until just wilted. - Step 7: Incorporating heavy cream and steak Turn the heat to medium-low. Pour in the heavy cream and mix well. Add the cooked steak back into the skillet. - Step 8: Merging pasta with sauce and adjusting consistency Now, add the cooked fettuccine and freshly grated Parmesan cheese. Toss everything together. If the sauce is too thick, add some reserved pasta water until it’s creamy. To cook the best al dente pasta, use a large pot of boiling salted water. Add the fettuccine and stir it well. Follow the package instructions, but test the pasta a minute early. It should be firm but not hard. Drain and save some pasta water for later. When cooking steak, aim for the right doneness. For medium-rare, cook flank steak for about 4-6 minutes total. A meat thermometer should read 130°F. Adjust cooking time for your preferred doneness. To boost flavor, add fresh herbs and spices. Basil, parsley, or oregano can make your dish more exciting. Experiment with garlic powder or even a dash of lemon zest for zing. For cheese variations, try using pecorino Romano or a sprinkle of feta. These cheeses add unique flavors and textures to your pasta. For a stunning plate, twirl the pasta using a fork before serving. This creates a beautiful nest of noodles. Place the steak slices on top for a nice display. Garnish your dish with fresh basil leaves and extra Parmesan. A little drizzle of olive oil can enhance the look and flavor too. Aim for a colorful plate that invites everyone to dig in. {{image_4}} You can change the protein in garlic steak pasta. If you prefer chicken, use thin slices of chicken breast. Simply sear it like the steak. For shrimp lovers, add peeled shrimp to the sauce. Cook them until they turn pink. If you want a vegetarian version, tofu is a great choice. Press and cube firm tofu, then sauté it until golden. Mushrooms also work well. Slice them and cook until they are tender and juicy. Fettuccine is a classic choice, but you can switch it up. Linguine or spaghetti are both tasty options. They will hold the sauce well, making every bite delicious. If gluten is a concern, choose gluten-free pasta. There are many great brands available. Just cook them according to package instructions for the best results. The creamy sauce is great, but you can play with it. Try different cream alternatives, like half-and-half or coconut cream. These options will add unique flavors to your dish. Adding vegetables can boost nutrition and taste. Bell peppers, zucchini, or broccoli make great additions. You can also spice things up. A pinch of paprika or a dash of lemon juice can elevate the flavor. Store your garlic steak pasta in the fridge. Use an airtight container. This keeps it fresh for up to three days. Make sure to let it cool before sealing. Avoid packing it too tightly. This helps to keep the pasta from clumping together. You can freeze garlic steak pasta for up to three months. To freeze, place it in a freezer-safe container. Leave some space at the top for expansion. When you're ready to eat, thaw it overnight in the fridge. Reheat it on the stove over low heat. Add a splash of water or cream to help it warm up. This keeps the flavors and texture nice. If you use the microwave, heat it in short bursts. Stir in between to keep it from drying out. Can I make garlic steak pasta in advance? Yes, you can make garlic steak pasta ahead of time. Cook the pasta and steak, then store them in separate containers. Keep the sauce in another container. When you're ready to eat, heat everything up together. Add a splash of water or cream to refresh the sauce. How do I prevent the steak from becoming tough? To keep the steak tender, slice it thinly against the grain. This helps break down the muscle fibers. Also, avoid overcooking it. Cook just until it’s browned and no longer pink. Let it rest before slicing to keep juices in. Is this recipe suitable for a gluten-free diet? No, but you can easily make it gluten-free. Use gluten-free pasta instead of regular fettuccine. Check the sauce ingredients for any hidden gluten. Most of the other ingredients are gluten-free, but always read labels. Can I make a dairy-free version of this dish? Yes, you can make it dairy-free. Swap heavy cream for coconut milk or a plant-based cream. Use nutritional yeast instead of Parmesan cheese for a cheesy flavor. This keeps the dish creamy and tasty without dairy. What sides pair well with garlic steak pasta? Garlic steak pasta pairs well with a simple green salad. Garlic bread also makes a great side. You can serve roasted vegetables for a healthy contrast. These sides will enhance the meal and add extra flavors. Can this dish be served as a meal prep option? Yes, garlic steak pasta is great for meal prep. Store servings in airtight containers. It keeps well in the fridge for 3 to 4 days. Reheat in the microwave or on the stove with a splash of water for moisture. In this blog post, we explored how to make delicious garlic steak pasta. We covered essential ingredients like fettuccine, steak, and spices. You learned step-by-step instructions for cooking, seasoning, and combining each element. We also shared tips for enhancing flavors and making variations. Remember, cooking is about creativity. Adjust the recipe to fit your tastes. With a few simple steps, you can create a tasty dish that impresses anyone. Enjoy your cooking adventure!
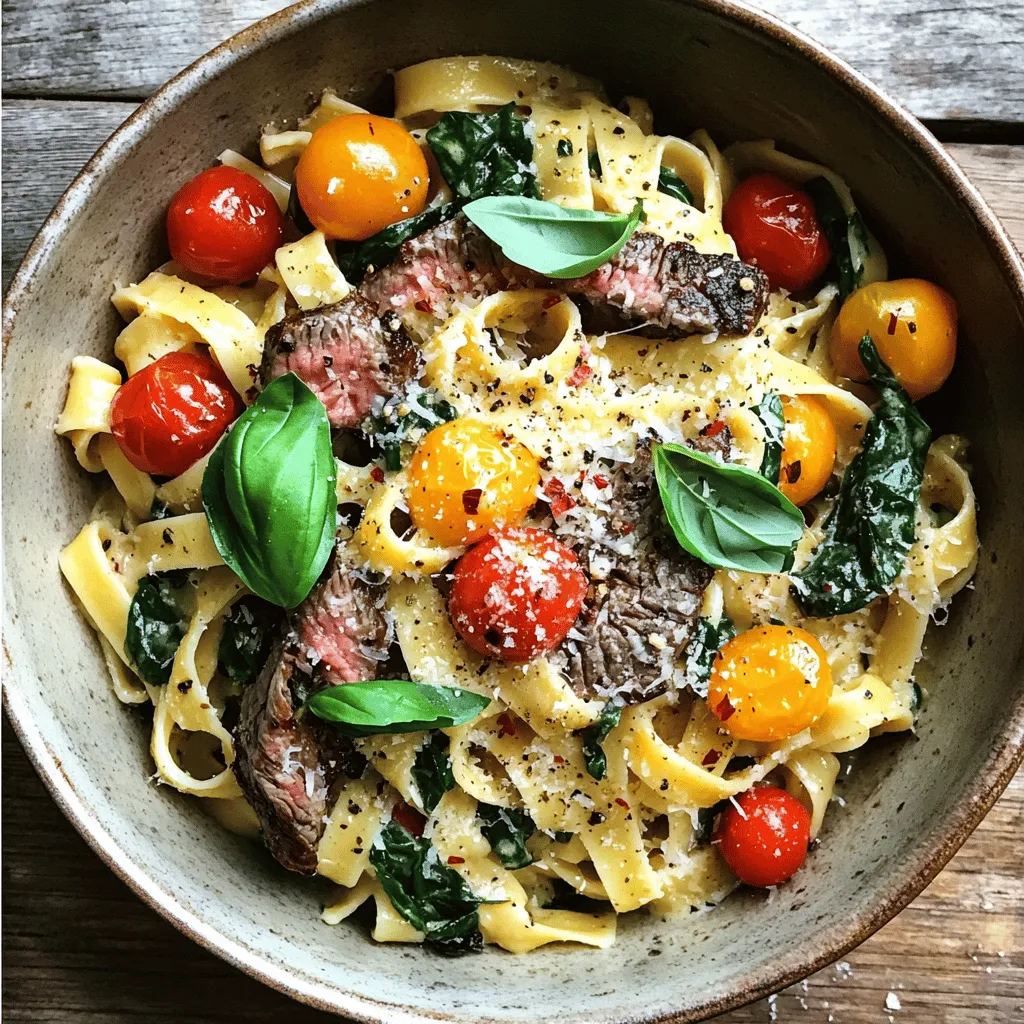
Garlic Steak Pasta Tasty and Simple Weeknight Meal
Looking for a quick and tasty dinner? Garlic Steak Pasta is your solution! This dish combines tender steak, fresh spinach, and rich cream for a
To make sweet pumpkin sourdough, you will need: - 2 cups active sourdough starter - 1 cup pumpkin puree (using either canned or fresh) - 1/2 cup warm water (around 110°F/43°C) - 1/4 cup packed brown sugar - 1/4 cup honey - 1 teaspoon ground cinnamon - 1/2 teaspoon ground nutmeg - 1/2 teaspoon ground ginger - 1 teaspoon salt - 4 cups bread flour (plus extra for dusting) - 1/4 cup chopped pecans or walnuts (optional for added texture) Pumpkin is not just tasty; it is good for you too. Here are some of its benefits: - Rich in Vitamins: Pumpkin is full of vitamin A, which helps your eyesight. - High in Fiber: It aids digestion and keeps you feeling full. - Low in Calories: A great option for healthy eating. - Antioxidants: Protects your body from harmful free radicals. Adding pumpkin puree to your sourdough not only adds flavor but boosts nutrition. You can customize this recipe with easy swaps: - Sourdough Starter: If you don’t have one, use a store-bought yeast. - Pumpkin Puree: Swap with apple sauce for a different taste. - Brown Sugar: Use white sugar or coconut sugar as alternatives. - Nuts: If you have nut allergies, leave them out. You can add seeds instead. These substitutions still let you enjoy a delicious sweet pumpkin sourdough. First, grab a large mixing bowl. Add 2 cups of active sourdough starter to the bowl. Next, spoon in 1 cup of pumpkin puree. You can use canned or fresh pumpkin. Then, pour in 1/2 cup of warm water. Make sure it's around 110°F, which is warm, but not too hot. Add 1/4 cup of packed brown sugar and 1/4 cup of honey. Stir all these ingredients together. Make sure the mixture is smooth and well blended. Now, it's time to add flavor. Sprinkle in 1 teaspoon of ground cinnamon, 1/2 teaspoon of ground nutmeg, and 1/2 teaspoon of ground ginger. Don’t forget to add 1 teaspoon of salt. Mix well to spread the spices evenly throughout the batter. This step is key for a tasty bread. After that, gradually add 4 cups of bread flour. Do this one cup at a time. Use a wooden spoon or your hands to mix until a shaggy dough forms. Next, it's kneading time. Turn the dough out onto a lightly floured surface. Knead for about 10 minutes. You want the dough to be smooth and elastic. If it sticks, add a bit more flour. Once kneaded, place the dough back in the bowl. Cover it with a damp cloth or plastic wrap. Let it rise in a warm spot for about 4-6 hours. The dough should double in size. - Shaping the Loaf After the first rise, gently punch down the dough. This releases extra air. Shape the dough into a round loaf or place it in a greased loaf pan. Make sure the surface is smooth. - Scoring the Dough and Baking Cover the shaped dough again. Let it rise for 1-2 more hours. It should puff up nicely. While it's rising, preheat your oven to 375°F (190°C). Just before baking, use a sharp knife to make slashes on top of the loaf. This helps the bread expand while baking. Place the loaf in the oven and bake for 30-35 minutes. The bread is ready when it’s golden brown and sounds hollow when tapped. After baking, cool the bread on a wire rack for at least 30 minutes before slicing. For the best rise, keep your dough warm. Aim for a spot around 75°F to 80°F. You can use your oven with the light on or a warm corner of your kitchen. Cover the dough with a damp cloth. This keeps moisture in and helps the dough rise. To get that perfect texture, knead the dough well. Knead for about 10 minutes until it feels smooth and elastic. If it sticks, sprinkle a little flour on your surface. This prevents it from becoming too dry. The dough should feel soft but not sticky when you finish kneading. If your bread doesn’t rise, check your starter first. It must be active and bubbly. If it’s too dense, you might have added too much flour. Always start with less and add more as needed. If the crust is too hard, try covering it with foil halfway through baking. This keeps moisture in and softens the crust. {{image_4}} You can make sweet pumpkin sourdough even better with spices. Besides cinnamon, nutmeg, and ginger, consider using allspice or cloves. These spices add warmth and depth. Try mixing in a pinch of cardamom for a unique twist. Adjust the amounts to match your taste. Just a little extra spice can change the whole loaf. Choosing between pecans and walnuts can change the texture of your bread. Pecans bring a sweet, buttery flavor. They add a nice crunch. Walnuts, on the other hand, have a more earthy taste. They can give a rich nutty flavor. If you want a softer bite, go for pecans. For a bolder taste, use walnuts. You can also skip nuts altogether if you prefer a smoother loaf. If you need a gluten-free option, try using gluten-free flour blends. Look for blends made from rice, almond, or oat flour. These can work well in this recipe. You may need to adjust the liquid amounts. Gluten-free dough can act differently than regular dough. Be ready to experiment to find the right balance. Consider adding xanthan gum to help with texture. To keep your sweet pumpkin sourdough fresh, wrap it in plastic wrap or foil. Place it in a bread box or a cool, dry area. This keeps moisture in and prevents it from drying out. If you have sliced the bread, store it in a resealable bag. This method helps to keep each slice soft and tasty. If you have extra bread, freezing is a great option. First, slice the sourdough into pieces. Then, wrap each slice in plastic wrap or foil. Place all wrapped slices in a freezer bag. This helps protect them from freezer burn. The bread can last up to three months in the freezer. When you are ready to enjoy it, just thaw it in the fridge or at room temperature. To reheat your sourdough, preheat your oven to 350°F (175°C). Place the bread directly on the oven rack for about 10-15 minutes. This method restores its crusty outside. If you prefer a softer crust, wrap the bread in foil before heating. For an even quicker option, you can use a toaster. Just pop in a slice until it’s warm and toasty. Enjoy the aroma as it fills your kitchen! Yes, you can use fresh pumpkin. Just cook and puree it first. Fresh pumpkin gives a nice flavor. It may be a bit moister than canned. Adjust the water if needed. Sweet pumpkin sourdough can last up to five days. Store it at room temperature in a bread bag. For longer storage, freeze it. Wrap it well in plastic wrap. Then place it in an airtight container. This bread pairs well with cream cheese or butter. You can top it with honey or jam. It also goes great with soups or salads. The sweet flavors complement savory dishes nicely. - Is it necessary to have a sourdough starter? Yes, a sourdough starter is key for this recipe. It helps the bread rise and adds flavor. You can make your own starter or buy one. Just make sure it’s active and bubbly. This blog post covered the key steps to make sweet pumpkin sourdough. We explored ingredients, mixing instructions, and tips for success. You learned about flavor variations and how to store leftovers. Remember, following these steps can help you bake amazing bread. Experiment with spices and nuts to find your perfect taste. Baking is fun. Happy sourdough making!
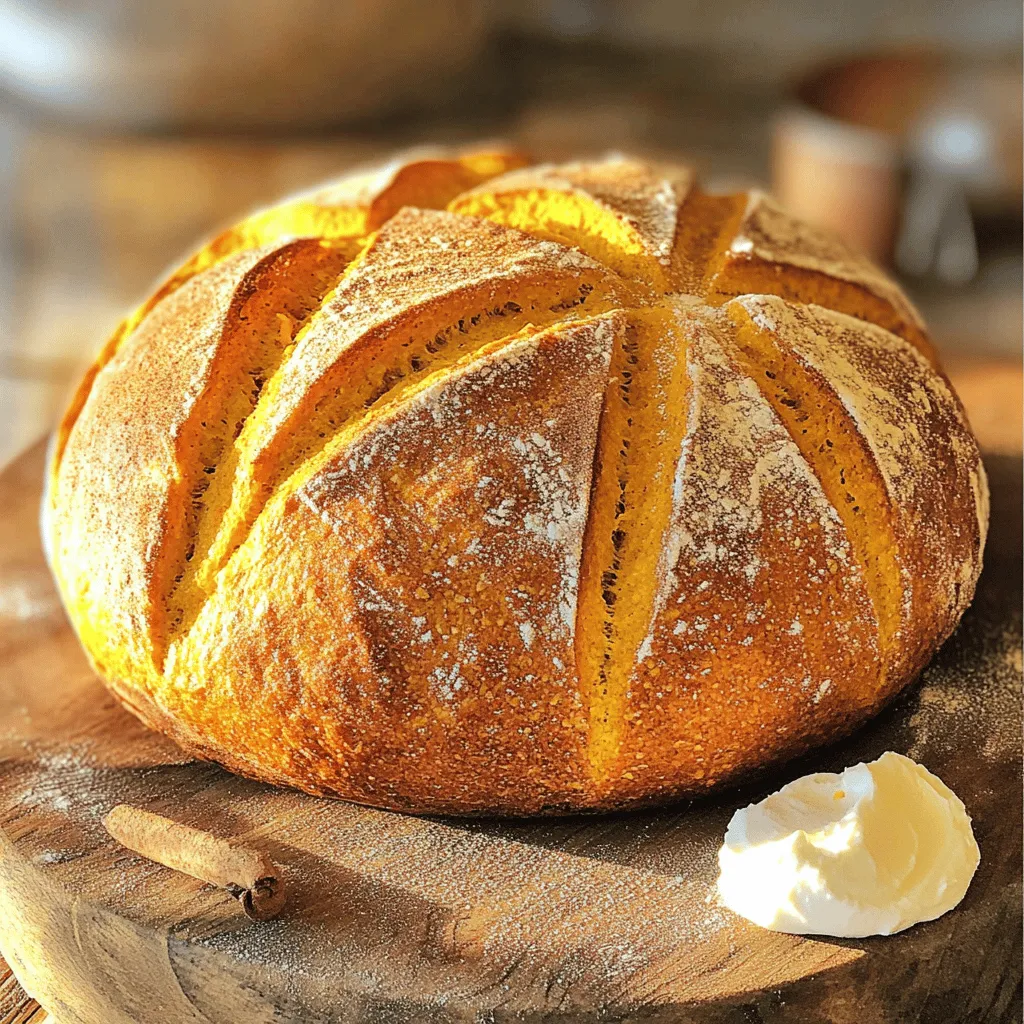
Sweet Pumpkin Sourdough Flavorful and Heartwarming Bread
Looking for a cozy and delicious bread recipe? You’ve found it! Sweet Pumpkin Sourdough combines the warm flavors of pumpkin with the tangy goodness of
To make this tasty dish, you need: - 1 pound boneless, skinless chicken breasts, cut into bite-sized pieces - 1 tablespoon extra virgin olive oil - 2 cloves garlic, minced - 1 teaspoon dried Italian herbs (a mix of oregano, thyme, and basil) - 1 cup cherry tomatoes, halved - 2 cups fresh baby spinach - 1 cup low-sodium chicken broth - 1 cup heavy cream - 1 pound gnocchi (store-bought or homemade) - 1/2 cup grated Parmesan cheese - Salt and freshly ground black pepper to taste - Fresh basil leaves for garnish (optional) This mix of ingredients creates a rich and creamy sauce that hugs each gnocchi perfectly. The chicken adds protein and the spinach gives a nice color, too. I always choose extra virgin olive oil for this recipe. It has a rich flavor that enhances the dish. It also stands up well to the heat when you brown the chicken. If you want a hint of spice, look for a peppery olive oil. It can add extra depth to your meal. Parmesan cheese is my go-to for this dish. It melts beautifully into the sauce and adds a salty kick. You can also try pecorino Romano or even a creamy goat cheese for a twist. Each cheese brings a unique taste that can change the dish’s vibe. So feel free to experiment! Start by heating the olive oil in a large pot over medium heat. Add the chicken pieces. Season them with salt, black pepper, and dried Italian herbs. Cook the chicken for about 5 to 7 minutes. Stir often until the chicken turns golden brown and is fully cooked. Once the chicken is ready, toss in the minced garlic. Sauté it for about 1 minute. You want the garlic to smell nice and turn a light golden color. Next, add the halved cherry tomatoes. Stir them in with the chicken and garlic. Cook for 2 to 3 minutes until the tomatoes soften and release their juices. Now it’s time for the sauce! Pour in the low-sodium chicken broth and heavy cream. Stir it well to mix everything. Bring the pot to a gentle simmer. This is where the flavors start to blend perfectly. After that, add the gnocchi, making sure they are covered by the creamy sauce. Cook for about 5 minutes. The gnocchi should be tender and the sauce creamy. Fold in the fresh baby spinach gently. Cook for another 1 to 2 minutes until the spinach wilts down. Remove the pot from the heat. Stir in the grated Parmesan cheese. Mix until the cheese melts and spreads throughout the dish. Taste it and add extra salt or pepper if you need to. Serve the warm gnocchi mixture right away. For a lovely touch, garnish with fresh basil leaves. This adds color and a great smell. Enjoy this one-pot meal with family or friends. To make your gnocchi just right, follow these steps: - Use fresh gnocchi for the best taste and texture. - Cook gnocchi in salted water for flavor. - Only add gnocchi to the sauce when it is simmering. - Stir gently to avoid breaking the gnocchi. - Taste the gnocchi for doneness; they should be soft but not mushy. You can add more flavor easily. Here are some ideas: - Use fresh herbs like basil or thyme for a burst of freshness. - Add a pinch of red pepper flakes for a spicy kick. - Substitute half-and-half for a lighter sauce. - Swap the chicken for shrimp or mushrooms for different tastes. - Try sun-dried tomatoes instead of fresh ones for a deeper flavor. One pot meals save time and effort. Follow these tips: - Gather all your ingredients before cooking to stay organized. - Use a large pot to avoid spills and allow for easy stirring. - Layer flavors by cooking ingredients in stages, like browning chicken first. - Make sure to scrape the bottom of the pot for extra flavor. - Let the dish sit for a few minutes before serving to enhance the taste. {{image_4}} You can easily make this dish vegetarian. Just skip the chicken. Use mushrooms or zucchini instead. These veggies add great flavor and texture. Cook them just like you would the chicken. Sauté them until they are tender. Then, follow the rest of the recipe as written. Feel free to add more veggies for color and taste. Bell peppers and asparagus work well. Chop them up and add them when you sauté the garlic. You can also toss in frozen peas or broccoli. Just add them near the end, so they stay bright and crisp. Parmesan cheese gives a nice salty kick. But you can switch it up! Try using mozzarella for a creamier finish. Feta cheese adds a tangy twist, too. Just sprinkle it on top before serving. Each cheese brings its own charm, so feel free to experiment. Once you finish your One Pot Tuscan Chicken Gnocchi, let it cool slightly. Transfer any leftovers to an airtight container. It will stay fresh in the fridge for about 3 days. Always check for any signs of spoilage before eating. If you want to store the dish longer, freezing is a great option. Place the cooled gnocchi mixture in a freezer-safe container. It can last for up to 3 months. When you are ready to eat, thaw it in the fridge overnight. Reheat it gently on the stove over low heat. Add a splash of chicken broth or cream to restore the sauce's creaminess. Use glass or BPA-free plastic containers for storage. Glass containers are great for keeping the flavors intact. Make sure they have tight-fitting lids. For freezing, use freezer bags or containers that resist freezer burn. Label each container with the date so you can keep track of freshness. Yes, you can use homemade gnocchi in this recipe. Homemade gnocchi often tastes better than store-bought. Just make sure they are cooked until tender. They should cook in the creamy sauce, just like store-bought gnocchi. You can check if the chicken is cooked through by cutting a piece in half. The inside should be white and no longer pink. Also, a food thermometer can help. The chicken should reach an internal temperature of 165°F (75°C) for safety. If you want a lighter option, you can use half-and-half or whole milk. Coconut cream can work for a dairy-free version. For a vegan alternative, try using cashew cream or a plant-based cream. Just remember, the sauce might be less thick with these substitutes. This blog post covered the ingredients and steps for making One Pot Tuscan Chicken Gnocchi. You learned about key ingredients, cooking methods, and various flavor tips. I shared ways to adapt the recipe for different diets and how to store leftovers effectively. In conclusion, this dish offers a simple yet flavorful meal, perfect for busy nights. Enjoy making your own variations, and don’t hesitate to experiment with different ingredients! Your kitchen can turn into a little slice of Tuscany.
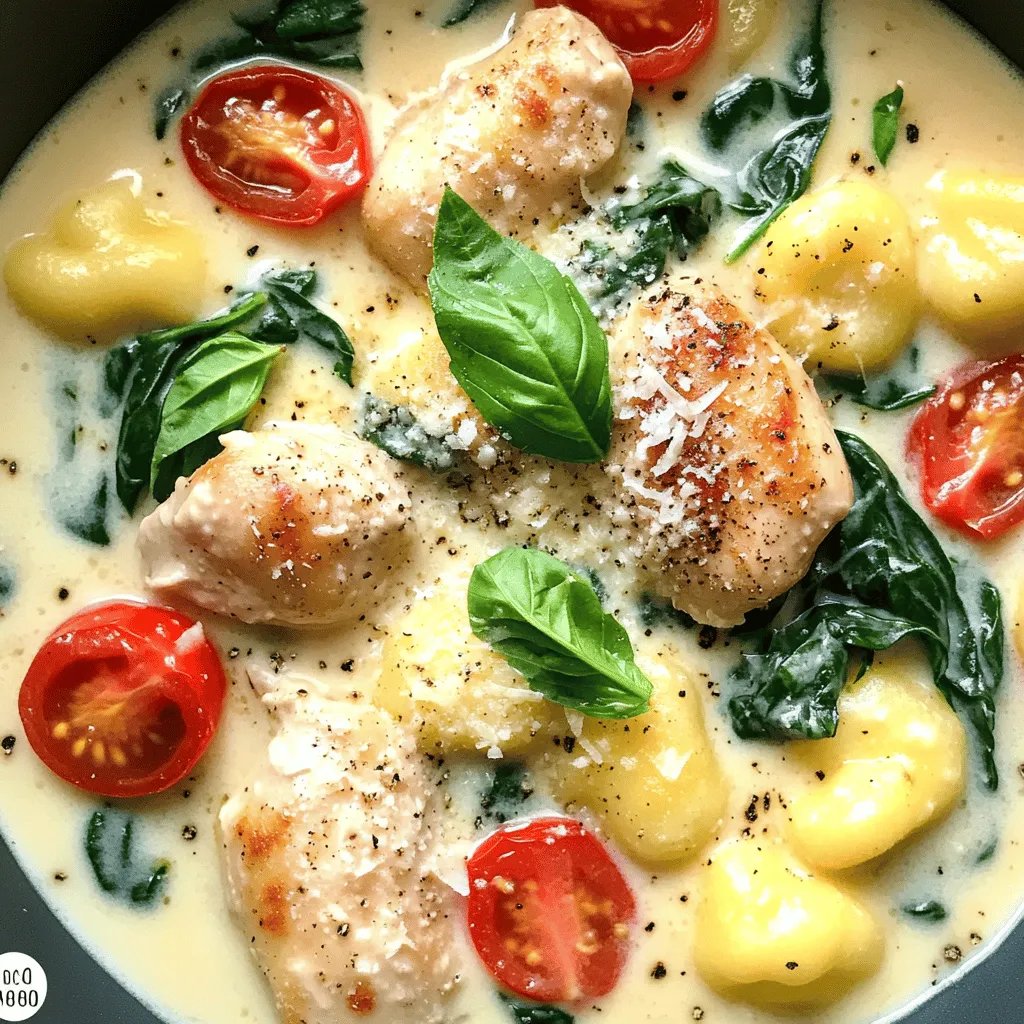
One Pot Tuscan Chicken Gnocchi Flavorful Dinner Delight
Looking for a quick and tasty meal? This One Pot Tuscan Chicken Gnocchi is your answer! You’ll make a creamy, flavorful dish using just one
- Chicken and Aromatics - 2 boneless, skinless chicken breasts - 1 tablespoon olive oil - 1 medium onion, finely diced - 2 cloves garlic, minced - Vegetables and Seasonings - 3 medium carrots, peeled and chopped - 2 celery stalks, chopped - 4 cups low-sodium chicken broth - 1 teaspoon dried thyme - 1 teaspoon dried basil - 1/2 teaspoon paprika - Salt and freshly ground black pepper, to taste - Dairy and Garnish - 1 cup heavy cream - Fresh parsley, chopped (for garnish) The ingredients for Creamy Marry Me Chicken Soup are simple yet full of flavor. The chicken gives the soup a rich base. I love using fresh herbs like thyme and basil. They really boost the taste. Onions and garlic are your aromatic stars. They bring warmth and depth to the dish. The carrots and celery add sweetness and crunch. They give the soup a nice texture. Heavy cream makes this soup creamy and rich. A sprinkle of parsley at the end adds color and freshness. You can also swap in some of your favorite herbs if you like. This soup is all about your taste! Heating the Olive Oil Start by pouring one tablespoon of olive oil into a large pot. Heat it over medium heat until it shimmers. This oil adds flavor and helps cook the onions. Cooking the Onion and Garlic Next, add one medium, finely diced onion. Sauté it for about three to four minutes. You want the onion to turn soft and translucent. Then, stir in two minced garlic cloves. Cook the garlic for one more minute. Make sure not to let it burn, as it can taste bitter. Incorporating Carrots and Celery After the garlic, toss in three chopped carrots and two chopped celery stalks. Cook these for about five minutes. Stir them occasionally until they start to soften. This mix adds a nice crunch and flavor. Seasoning and Combining Ingredients While cooking the veggies, season two boneless, skinless chicken breasts with salt, pepper, dried thyme, dried basil, and paprika. Make sure to coat both sides well. Once the vegetables are ready, add the seasoned chicken to the pot. Simmering to Perfection Pour in four cups of low-sodium chicken broth. Turn the heat up until it boils. Then lower the heat, cover the pot, and let it simmer for 15 to 20 minutes. This will cook the chicken until it's tender. Shredding the Chicken After the chicken is cooked, take it out of the pot. Place it on a cutting board and shred it into bite-sized pieces using two forks. Then return the shredded chicken back to the pot with the veggies. Adding Heavy Cream Now, stir in one cup of heavy cream. Make sure to mix it well with the broth. This cream makes the soup rich and smooth. Adjusting Seasoning Finally, taste the soup. Add more salt and black pepper if needed. This step helps balance the flavors. Serve the hot soup in bowls, and enjoy! - Recommended Seasoning Adjustments: Taste is key. I often add extra salt and pepper to balance flavors. You can also boost the taste by adding more thyme or basil. Fresh herbs can work wonders, too! - Cooking Times for Tender Chicken: For juicy chicken, simmer for 15 to 20 minutes. You want the chicken to be fully cooked but not dry. A meat thermometer can help; aim for 165°F. - Creaminess Tips: To get that rich creaminess, make sure to use heavy cream. It blends well and adds a velvety touch. If you want a lighter option, you can try half-and-half, but it won't be as rich. - How to Thicken the Soup: If your soup is too thin, try adding a cornstarch slurry. Mix one tablespoon of cornstarch with two tablespoons of cold water. Stir it into the soup and let it cook for a few minutes. - Ideal Side Dishes: This soup pairs well with warm crusty bread or a fresh salad. A simple green salad adds crunch and freshness. You can also serve it with rice for a heartier meal. - Presentation Tips: To make your soup look great, garnish it with fresh parsley. A drizzle of olive oil on top adds shine. Serve it in a nice bowl to make it feel special. {{image_4}} Alternative Proteins You can switch the chicken for turkey or tofu. Both options work well in this soup. Use firm tofu for a nice texture. If you want a different taste, use shrimp or fish. Just add them later in the cooking process. Vegetable Variations Feel free to add or swap vegetables. Try peas, corn, or green beans for extra color. You can also add spinach or kale for more greens. Just make sure to chop them small so they cook evenly. Adding Spices and Herbs To boost flavor, add spices like cumin or coriander. Fresh herbs like rosemary or dill can also make a difference. Just remember to add them in small amounts and taste as you go. Including Noodles or Rice Want a heartier meal? Add noodles or rice to the soup. Egg noodles cook quickly and soak up the broth. Cook rice separately and stir it in at the end for a filling touch. Making it Dairy-Free If you want a dairy-free option, use coconut milk instead of cream. It adds a nice flavor and keeps the soup creamy. You can also use a dairy-free cream product. Gluten-Free Options To make this soup gluten-free, check your chicken broth for gluten. Use gluten-free noodles if you add them. This way, everyone can enjoy the soup without worry. How long can you store leftovers? You can keep Creamy Marry Me Chicken Soup in the fridge for up to four days. Make sure to let it cool completely before you put it in a container. Use an airtight container to keep it fresh and tasty. What are the best practices for reheating? To reheat, pour the soup into a pot over medium heat. Stir it often to prevent sticking. If the soup thickens too much, add a splash of chicken broth or water. Heat until it's warm all the way through. How can you freeze the soup? Freezing is a great way to enjoy this soup later. Let the soup cool fully, then pour it into freezer-safe bags or containers. Leave some space at the top, as it will expand when frozen. Label the bags with the date for easy reference. What are the thawing recommendations? To thaw, place the soup in the fridge overnight. If you're in a hurry, you can use the microwave. Just be sure to heat it gently to avoid hot spots. Once thawed, reheat it on the stove and enjoy! Creamy Marry Me Chicken Soup stands out because of its rich flavors. The blend of chicken, veggies, and cream creates a warm hug in a bowl. The thyme and basil add a touch of earthiness. Each spoonful is smooth and comforting. It’s a dish that brings comfort and joy with every bite. Yes, you can make this soup ahead of time! This soup is perfect for meal prep. Just store it in the fridge for up to three days. When you reheat, the flavors deepen, making it even better. If you want to freeze it, do so before adding cream. This keeps the texture smooth. Thaw it overnight in the fridge before reheating. To spice up your soup, add crushed red pepper flakes or diced jalapeños. You can mix in hot sauce to the broth for extra heat. Start with a little and taste as you go. You can always add more, but you can’t take it out! A pinch of cayenne pepper also works great for a kick. This soup can be a nutritious option. The chicken provides lean protein, while the veggies add fiber and vitamins. Using low-sodium broth helps keep it heart-healthy. The heavy cream adds richness but can be swapped for lighter options like half-and-half or milk. Enjoying this soup can fit well in a balanced diet. This blog post guides you through making a delicious soup. We covered key ingredients, step-by-step cooking, and tips to boost flavor. I also shared variations for dietary needs and storage tips. Remember, you can tailor this dish to your taste. Enjoy experimenting with flavors and ingredients. With practice, you'll create a perfect bowl every time. This soup can warm both the body and spirit. Cooking should be fun, so keep it simple and enjoyable. Happy cooking!
Creamy Marry Me Chicken Soup Irresistible Comfort Food
Cozy up with a bowl of Creamy Marry Me Chicken Soup—comfort food at its finest! This rich and savory dish is not just a meal;
To make this dish, gather these key items: - 1 lb ground turkey (or beef) - 1 can (15 oz) black beans, drained and rinsed - 1 can (15 oz) corn, drained - 1 can (10 oz) diced tomatoes with green chilies - 1 packet taco seasoning - 1 cup salsa - 2 cups tortilla chips, crushed - 1 cup shredded cheddar cheese - 1 cup diced bell peppers (any color) - 1 small onion, finely chopped - 1 tablespoon olive oil - 1 tsp garlic powder - Salt and pepper to taste These toppings can enhance your casserole: - Sour cream - Sliced jalapeños - Chopped fresh cilantro To prepare this meal, use these simple tools: - A medium skillet for cooking - A large crockpot for slow cooking - A spatula for stirring - A cutting board and knife for chopping This combination of ingredients and tools helps create a hearty, flavorful meal that everyone will love. Start by washing your bell peppers. Cut them into small pieces. Chop one small onion finely. Heat one tablespoon of olive oil in a skillet over medium heat. Add the chopped onion and bell peppers to the skillet. Stir and cook for about five minutes. You want the onion to look clear and the peppers to soften. This step adds great flavor. Next, add one pound of ground turkey or beef to the skillet. Season the meat with salt, pepper, and one teaspoon of garlic powder. Cook the meat until it turns brown. Use a spatula to break it into small bits while cooking. This process helps mix the flavors well. Once browned, remove the skillet from heat. In a large crockpot, mix the cooked meat with one can of black beans, one can of corn, one can of diced tomatoes with green chilies, and one cup of salsa. Add one packet of taco seasoning and stir everything together. Now, create layers! First, sprinkle half of two cups of crushed tortilla chips over the meat mixture. Then, add half of one cup of shredded cheddar cheese on top. Repeat the layers with the rest of the chips and cheese. This creates a tasty texture. Cover the crockpot with its lid. Set it to cook on low for four to five hours or on high for two to three hours. Check if the cheese is melted and the casserole is heated through before serving. This waiting time allows the flavors to blend perfectly. When ready, serve hot and enjoy! Layering is key to a tasty dish. Start with the meat mixture at the bottom. This helps keep it moist. Next, add half of the crushed tortilla chips. This creates a nice texture. Then, sprinkle half of the cheese. Repeat these layers. Finish with cheese on top. This helps the cheese melt perfectly. For best results, use low heat for 4-5 hours. This allows flavors to meld. If you're short on time, use high heat for 2-3 hours. Both methods work well. Just make sure to check that the cheese is melted and bubbly before serving. Don’t skip the sautéing step. This brings out the flavors in the onion and bell peppers. Avoid overloading the crockpot. Too many ingredients can lead to uneven cooking. Lastly, don't rush the layering. Proper layering ensures even cooking and great taste. {{image_4}} You can switch the ground turkey for other meats. Ground beef works well for a richer taste. Chicken is another great option for a lighter dish. Just make sure to cook the chicken before adding it to the crockpot. Use shredded chicken for easy mixing. For a vegetarian taco casserole, skip the meat entirely. You can add extra beans or lentils for protein. Use black beans, pinto beans, or chickpeas. Add more veggies like zucchini or spinach for flavor and texture. This keeps the dish filling and nutritious. If you love heat, you can spice things up! Add diced jalapeños to the meat mixture for a kick. You can also use spicy salsa instead of regular. For even more flavor, mix in some chipotle peppers. This makes the casserole bold and exciting! After cooking, let the casserole cool. Transfer it to an airtight container. Store it in the fridge. Use it within three to four days for the best taste. Make sure to cover it well to avoid drying out. You can freeze the casserole for later use. Cut it into portions and place them in freezer-safe bags. Remove as much air as possible before sealing. It can last for up to three months in the freezer. To reheat, thaw it overnight in the fridge. Place it in the oven at 350°F until hot. You can also microwave it, but stir it halfway for even heating. Leftovers are great for quick meals. You can make tacos by wrapping the casserole in tortillas. Add fresh toppings to give it a new twist. Another option is to serve it over rice or as a dip with chips. Each way offers a fun new meal! The cooking time for Crockpot Taco Casserole varies. If you set your crockpot to low, it takes about 4 to 5 hours. For a quicker option, cooking on high takes around 2 to 3 hours. You want the casserole to be hot and the cheese melted well. Yes, you can make this recipe ahead of time. You can prepare the meat mixture and layer it in the crockpot. Just store it in the fridge until you're ready to cook. This way, you save time on busy days. If you don’t have taco seasoning, you can make your own mix. Combine chili powder, cumin, paprika, and a touch of garlic powder. Adjust the amounts to fit your taste. This gives you control over the flavors. Crockpot Taco Casserole can be gluten-free if you choose the right ingredients. Make sure the taco seasoning and salsa are gluten-free. Also, use gluten-free tortilla chips for a safe option. Always check labels to be sure. Crockpot Taco Casserole is easy and fun to make. You learned about its main ingredients, kitchen tools, and cooking steps. I shared tips to enhance flavor and avoid mistakes. We discussed variations like beef or vegetarian versions. Plus, I covered storage methods for leftovers. Now, you can enjoy this tasty dish without stress. Use the steps and tips to create your perfect taco casserole!
Crockpot Taco Casserole Hearty and Flavorful Meal
Are you craving a hearty meal that’s full of flavor with minimal effort? Look no further! My Crockpot Taco Casserole is your answer. This dish
- 1 pound ground turkey - 1 can (15 oz) pumpkin puree - 1 can (15 oz) kidney beans, rinsed and drained - 1 can (15 oz) black beans, rinsed and drained - 1 can (14.5 oz) diced tomatoes with green chilies - 1 medium onion, finely chopped - 3 cloves garlic, minced - 2 cups chicken broth The main ingredients in this creamy turkey pumpkin chili make it unique. Ground turkey adds lean protein while keeping it light. Pumpkin puree brings a wonderful creaminess and a hint of sweetness. The kidney and black beans make it filling and hearty. Diced tomatoes with green chilies give a nice kick. Onions and garlic add depth of flavor, making each bite enjoyable. - 1 tablespoon chili powder - 1 teaspoon ground cumin - 1 teaspoon smoked paprika - ½ teaspoon cayenne pepper (adjust according to spice preference) - Salt and freshly ground black pepper to taste - ½ cup heavy cream - Fresh cilantro, finely chopped, for garnish The spices in this dish truly elevate the flavor. Chili powder, cumin, and smoked paprika create a rich base. Cayenne pepper adds heat, which you can adjust to your taste. Heavy cream gives it a smooth finish, making it feel cozy. Fresh cilantro on top brightens the dish, adding color and a fresh taste. - 1 tablespoon olive oil - 2 cups chicken broth For cooking, you'll need some essentials. Olive oil helps sauté the onions and garlic, making them soft and fragrant. Chicken broth serves as the base of the chili, bringing all the flavors together. It helps create a deliciously creamy texture that you will love. By focusing on these ingredients, you set a great stage for a warm and hearty meal that is both satisfying and easy to make. Start by heating olive oil in a large pot over medium heat. When the oil is hot, add the finely chopped onion. Sauté the onion for about 3-4 minutes. You want it to turn soft and clear. Then, add the minced garlic to the pot. Cook it for another minute. The garlic should smell nice and be slightly golden. Next, add the ground turkey to the pot. Use a spatula to break it apart as it cooks. Brown the turkey for about 5-7 minutes. It should be fully cooked with no pink left. After the turkey is ready, stir in the pumpkin puree. Add the rinsed kidney and black beans, as well as the diced tomatoes and chicken broth. Mix everything well. Now, it’s time to season the chili. Sprinkle in the chili powder, ground cumin, smoked paprika, cayenne pepper, salt, and black pepper. Stir again to ensure even flavor. Increase the heat slightly to bring the chili to a gentle simmer. Lower the heat and let it cook for 20-25 minutes. Stir now and then to prevent sticking. After simmering, add the heavy cream. Mix it in gently. Let the chili heat for another 5 minutes. Taste and adjust seasoning if needed. Serve hot and top with fresh cilantro for a nice touch. Alternative dairy options To boost creaminess, you can try different dairy options. Coconut milk gives a rich flavor. You can also use sour cream or Greek yogurt. For a lighter touch, use half-and-half instead of heavy cream. Adjusting consistency If your chili is too thick, add more chicken broth. A splash of water works too. For a thicker chili, let it simmer longer to reduce liquid. Stir often to keep it from sticking. Tailoring heat levels Want more heat? Add extra cayenne pepper or chili powder. If it's too spicy, balance it with more pumpkin puree or cream. This will cool down the heat while keeping the flavor. Flavor balance tips Taste your chili as you cook. Add salt and pepper gradually. This ensures you hit the right balance of flavors. If it’s too bland, a splash of lime juice can brighten it up. Accompaniments for chili Serve your chili with crusty bread or cornbread. Rice or quinoa also makes a great side. For a fresh touch, pair it with a simple green salad. Ideal garnishing ideas Top your chili with fresh cilantro for color and flavor. Sour cream or avocado slices can add creaminess. Shredded cheese makes it extra hearty. {{image_4}} You can easily swap out ground turkey in this chili. Try ground chicken or lean beef for a different taste. If you want a lighter option, use ground turkey breast. For beans, kidney beans and black beans work well. You can switch them with pinto beans or chickpeas. Add more veggies too! Bell peppers, corn, or zucchini can add color and nutrition. Spice up your chili with unique flavors. Try adding smoked chipotle for a smoky kick. You could also mix in some cinnamon for warmth. Fresh herbs like thyme or oregano can brighten the dish. Seasonal ingredients are fun to add. In fall, throw in roasted butternut squash or sweet potatoes. In summer, fresh corn or diced tomatoes can make it fresh and vibrant. Making this chili gluten-free is easy! Just check that your broth and spices are gluten-free. Most canned goods are safe, but always read the labels. For vegetarian or vegan options, skip the turkey. Use more beans or lentils for protein. Replace heavy cream with coconut milk or cashew cream for a rich taste. This way, everyone can enjoy a cozy bowl of chili! You can store your creamy turkey pumpkin chili in the fridge for up to four days. To keep it fresh, place the chili in an airtight container. This helps prevent odors from mixing with other foods. Let it cool down before sealing it. This keeps the flavors nice and bright. If you want to save some chili for later, freezing is a great option. Divide the chili into single portions. Use freezer-safe containers or bags. Make sure to leave some space for expansion. You can freeze it for up to three months. When you are ready to eat it, thaw it overnight in the fridge. To reheat, warm it in a pot over low heat. You can also use the microwave. Stir it halfway through to heat evenly. Always check your chili before eating. If it smells off or has a strange color, it's best to toss it. If you see mold, do not eat it. Safety is key. When in doubt, throw it out. Enjoy your meals without worry! Yes, you can use fresh pumpkin instead of puree. Fresh pumpkin adds a nice texture and flavor to the chili. To prepare it, cut the pumpkin into chunks and remove the seeds. Boil or steam the pumpkin until tender, then mash it or blend it until smooth. You can use about 2 cups of fresh pumpkin for this recipe. The spice level of this chili can be tailored to your taste. The recipe includes cayenne pepper, which adds heat. If you like it milder, reduce the cayenne to ¼ teaspoon or omit it. You can also add more chili powder for flavor without too much spice. Taste as you cook to find your perfect heat level. This chili pairs well with many sides and drinks. Here are some options: - Cornbread or tortilla chips for dipping - A fresh green salad for a light side - Rice or quinoa for a hearty addition - A cold beer or a refreshing iced tea to drink These sides and drinks complement the rich flavors of the chili while keeping your meal balanced and enjoyable. In this article, we explored a warm and hearty Creamy Turkey Pumpkin Chili. We discussed its main ingredients, including ground turkey, pumpkin puree, and beans. You learned how to cook the chili step by step, from preparing the base to simmering it perfectly. We shared tips on enhancing creaminess and adjusting spice levels to suit your taste. You can also try fun variations and store leftovers safely. Remember, this dish is flexible, allowing you to make it your own. Enjoy cooking and savor the flavors!
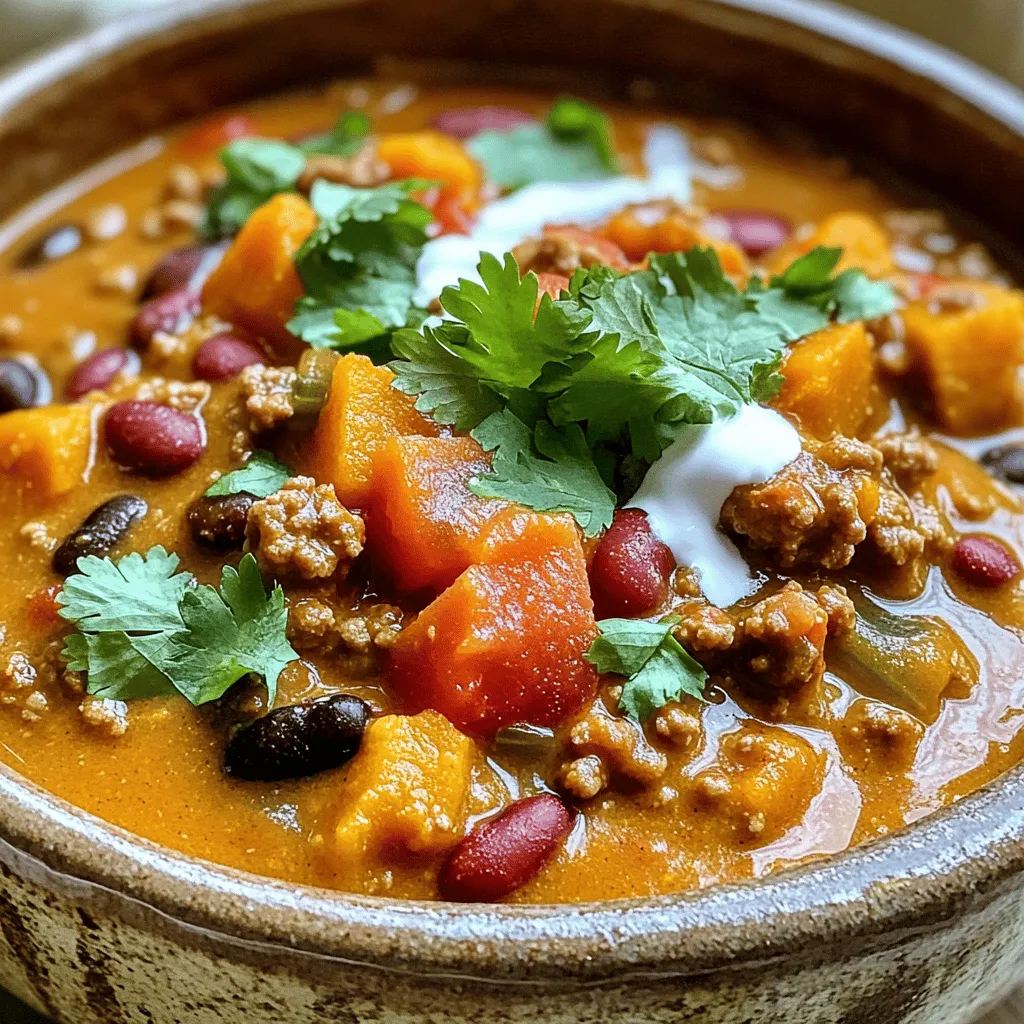
Creamy Turkey Pumpkin Chili Flavorful and Cozy Dish
Welcome to a cozy classic that combines the best of fall flavors: Creamy Turkey Pumpkin Chili! This dish is not only rich and creamy but
To make One-Pot Creamy Tuscan Chicken Pasta, you will need: - 2 boneless, skinless chicken breasts, diced into bite-sized pieces - 8 ounces pasta (penne or fettuccine recommended) - 2 tablespoons olive oil - 3 cloves garlic, minced - 1 cup cherry tomatoes, halved - 1 cup baby spinach - 1 cup heavy cream - 1/2 cup grated Parmesan cheese - 1 teaspoon Italian seasoning - Salt and freshly cracked pepper to taste - Fresh basil leaves, for garnish These ingredients create a rich and creamy dish. The chicken adds protein, while the pasta serves as a comforting base. The tomatoes and spinach bring freshness and color. You will need some basic tools to cook this meal: - A large pot or Dutch oven - A sharp knife for chopping - A cutting board - A wooden spoon or spatula for stirring - Measuring cups and spoons These tools help you cook efficiently and safely. A large pot ensures even heating and makes it easy to combine all ingredients. You can customize this dish based on your taste: - Use different pasta types, like bowtie or spaghetti. - Swap chicken for shrimp, sausage, or tofu for a twist. - Add vegetables like bell peppers or zucchini for extra flavor. Experimenting with different ingredients keeps the dish exciting. Each change can bring new flavors and textures to the table. Start by heating 2 tablespoons of olive oil in a large pot over medium heat. Once the oil is hot, add 2 diced chicken breasts. Sprinkle salt, pepper, and 1 teaspoon of Italian seasoning over the chicken. Cook for about 5-7 minutes, stirring often. You want the chicken to turn golden brown and be fully cooked. Once done, transfer the chicken to a plate and set it aside. In the same pot, lower the heat a little. Add 3 minced garlic cloves and sauté for 30 seconds. Stir constantly so the garlic does not burn. It should smell great! Next, toss in 1 cup of halved cherry tomatoes. Cook for 2-3 minutes. Stir occasionally to help the tomatoes soften and release their juices. Now, slowly pour in 1 cup of heavy cream while stirring. This will create a rich sauce. Bring the mixture to a gentle simmer. Stir well to blend all the flavors. Once it simmers, return the cooked chicken to the pot. Also add 1 cup of baby spinach and 8 ounces of cooked pasta. Gently fold everything together until the pasta, chicken, and spinach are well coated in the creamy sauce. Gradually sprinkle in 1/2 cup of grated Parmesan cheese. Stir continuously until the cheese melts into the sauce. Taste the dish and adjust the seasoning with more salt and pepper if needed. Remove the pot from the heat and let it sit for 2-3 minutes. This helps the sauce thicken. Serve the creamy pasta in deep bowls. Garnish with fresh basil leaves and extra Parmesan cheese for a lovely finish. Enjoy! To save time, prep all your ingredients before cooking. Chop the chicken and veggies ahead. Use pre-minced garlic for quick flavor. You can boil water faster by using a lid on the pot. This small trick helps keep the heat in. Make sure to have everything ready to go. It makes cooking much easier and faster. Cooking pasta takes just a few steps. Always use a large pot with plenty of water. Add a generous amount of salt to the water. This helps season the pasta as it cooks. Bring the water to a rolling boil before adding the pasta. Stir the pasta right away to prevent it from sticking. Follow package directions for timing, but taste it a minute early. Perfect pasta should be al dente, firm yet tender. Herbs and spices make your meal pop. Italian seasoning is a fantastic choice for this dish. It has a blend of herbs like basil and oregano. Fresh basil adds a bright, fresh flavor. You can use dried herbs too, but fresh is better. Try adding a pinch of red pepper flakes for a bit of heat. It’s all about balancing flavors to make your creamy sauce shine. {{image_4}} You can switch up the protein in this dish. If you want chicken, turkey works great too. Diced shrimp can add a nice twist, too. Cook them quickly so they stay tender. For a smoky flavor, try using diced pancetta or bacon. Each option brings a different taste, adding to the dish's richness. If you prefer a meatless meal, I have you covered. You can replace the chicken with hearty vegetables. Try using mushrooms, zucchini, or bell peppers. They add great texture and flavor. Adding extra spinach or kale will boost the nutrition. Tofu is another great option. Use firm tofu, sauté it until golden, and mix it in for protein. For those who avoid gluten, it's easy to adapt. Use gluten-free pasta made from rice or lentils. These options cook well and taste great in this dish. You can also add more veggies, like roasted cauliflower or carrots. This keeps the meal filling and delicious without the gluten. To keep your creamy Tuscan chicken pasta fresh, store it in an airtight container. Make sure the pasta has cooled down to room temperature. This helps avoid extra moisture. You can keep it in the fridge for up to three days. If you plan to eat it later, divide it into smaller portions. This makes it easy to grab and reheat. When it's time to enjoy your leftovers, reheating is simple. You can use the microwave or a stovetop. For the microwave, place the pasta in a bowl and cover it with a lid or a damp paper towel. Heat it in short bursts, stirring in between. If using the stovetop, add a splash of cream or broth to a pan. Heat gently over low heat, stirring often to avoid sticking. This keeps your pasta creamy and delicious. If you want to save some for later, freezing works well too. First, let the pasta cool completely. Then, portion it into freezer-safe bags or containers. Remove as much air as possible before sealing. Label the bags with the date. You can freeze it for up to three months. To reheat, let it thaw in the fridge overnight. Then, follow the reheating steps to enjoy it again! Yes, you can use many pasta types. Penne and fettuccine work well, but spaghetti or linguine are also great. The choice depends on your taste. Just remember to adjust the cooking time if needed. To lighten this dish, you can swap heavy cream for half-and-half or use a plant-based cream. You can also use less cheese or add more broth. Reducing the amount of pasta can help too. You can add bell peppers, zucchini, or mushrooms easily. Just chop them small and sauté them with the garlic. You can also add more spinach or use kale for a nice twist. Leftover pasta lasts about 3 to 4 days in the fridge. Store it in an airtight container. Reheat it on the stove or in the microwave until it's hot. In this blog post, we covered the key ingredients, step-by-step cooking, and useful tips for making creamy Tuscan chicken pasta. We also discussed variations for protein and dietary needs, along with best storage practices. Remember, you can customize this dish to fit your tastes. Experiment with herbs, spices, and pasta types. Enjoy trying different flavors and make it your own! With these guidelines, you can create a delicious meal everyone will love.
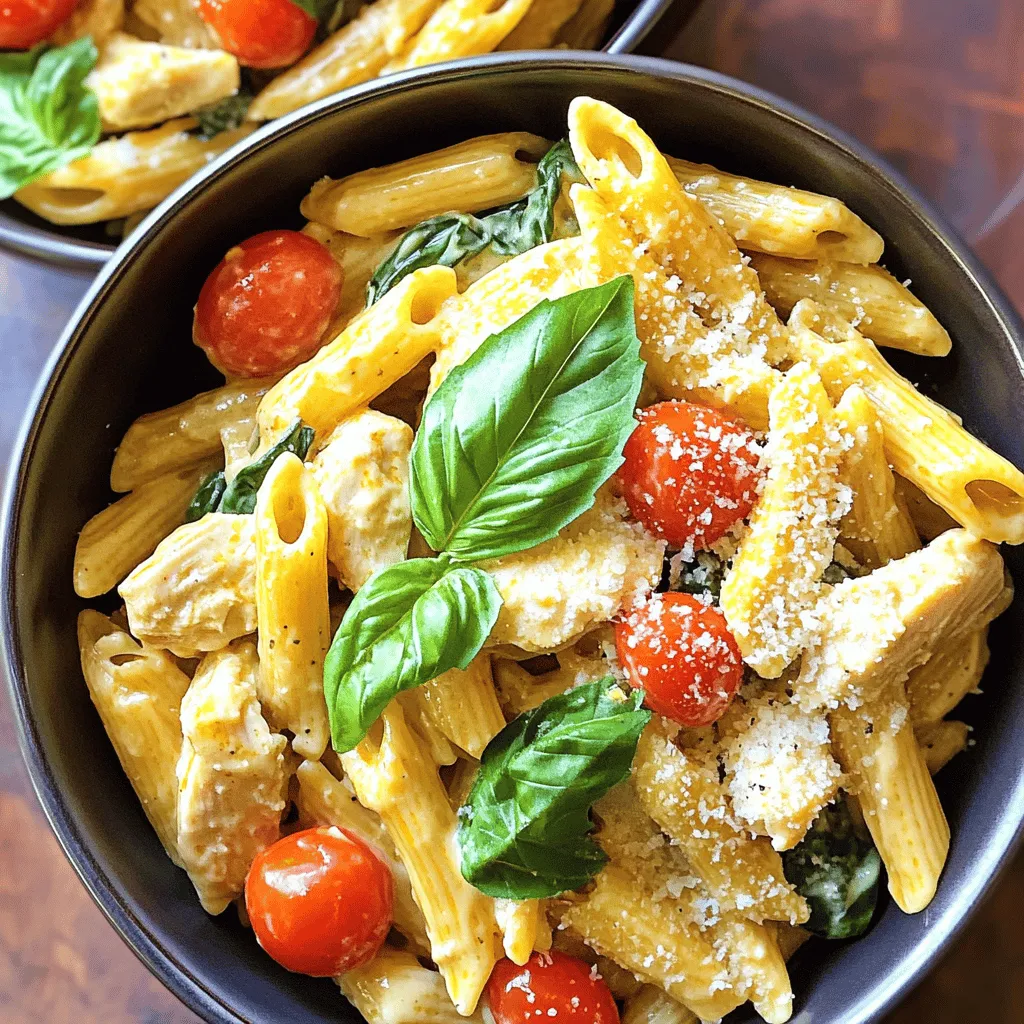
One-Pot Creamy Tuscan Chicken Pasta Simple and Rich
Are you ready for a meal that’s easy and full of flavor? One-Pot Creamy Tuscan Chicken Pasta is here to impress! In this dish, tender