Dinner

- 1 lb large shrimp, peeled and deveined - 2 tablespoons vegetable oil - 4 cloves garlic, minced - 2 tablespoons fresh ginger, grated - 1 red bell pepper, thinly sliced - 1 cup snap peas, trimmed - 1 medium carrot, julienned - 3 green onions, chopped (separate the white and green parts) - 2 tablespoons low-sodium soy sauce - 1 tablespoon oyster sauce (optional for depth of flavor) - 1 teaspoon sesame oil - Salt and pepper to taste - Cooked jasmine rice or noodles When you gather your ingredients, freshness matters. Choose large shrimp that are bright and firm. The garlic should smell strong and the ginger should be fragrant. For vegetables, pick a red bell pepper that feels heavy and has bright skin. Snap peas should be crisp with no brown spots. Carrots can be medium-sized; they should snap when bent. Each sauce adds a layer of flavor. Low-sodium soy sauce keeps it savory without being too salty. Oyster sauce deepens the taste, but you can skip it if you prefer. Sesame oil offers a nutty finish. For serving, jasmine rice is fluffy and fragrant. Noodles add a nice chew. Choose what you like best! - Heat 2 tablespoons of vegetable oil in your skillet over medium-high heat. Wait until the oil shimmers but does not smoke. - Add 4 cloves of minced garlic and 2 tablespoons of grated ginger to the hot oil. Sauté for about 30 seconds. Stir constantly until the mix is fragrant and golden. Be careful not to burn the garlic. - Add 1 pound of peeled and deveined shrimp to the skillet. Cook for 2-3 minutes. Stir often. - You’ll know the shrimp are cooked when they turn pink and opaque. Once cooked, take the shrimp out of the skillet and place them on a plate. - In the same skillet, toss in 1 thinly sliced red bell pepper, 1 cup of trimmed snap peas, and 1 julienned carrot. - Stir-fry these veggies for 3-4 minutes. You want them to be vibrant and tender, but still crisp. - Put the cooked shrimp back into the skillet with the vegetables. - Pour in 2 tablespoons of low-sodium soy sauce, 1 tablespoon of oyster sauce (optional), and 1 teaspoon of sesame oil. Stir well to coat everything. Cook for an extra 2 minutes until heated through. - Season your stir-fry with salt and pepper to taste. - Just before finishing, mix in the white parts of 3 chopped green onions for added freshness. - Serve the garlic ginger shrimp stir-fry over warm jasmine rice or noodles. Garnish with the green parts of the green onions for a pop of color. For a great stir-fry, you need the right tools. A large skillet or wok works best. These help heat the oil evenly. Use a spatula or wooden spoon to stir. This makes sure all the food cooks well. To cook evenly, keep everything moving in the pan. Add the shrimp in a single layer. This helps them cook fast. Make sure not to crowd the pan. If needed, cook in batches. If you don’t have oyster sauce, try hoisin or soy sauce. These can still make your dish tasty. You can also skip it altogether and add more soy sauce. Fresh shrimp is best for this dish. They taste sweeter and cook quickly. However, frozen shrimp work too. Just thaw them first and pat them dry. This helps avoid extra water in your stir-fry. For a lovely plate, use a large serving dish. Place the stir-fry in the center. Arrange the vegetables so the colors pop. Garnish with sliced green onions. You can also add sesame seeds or lime wedges. These add charm and make the meal more fun to eat. {{image_4}} You can switch up the shrimp for chicken, tofu, or beef. Each protein brings a new flavor. If you choose chicken, cut it into small pieces. Cook it until no pink shows, about 5-7 minutes. For tofu, use firm blocks. Cut it into cubes and pan-fry until golden. Beef should be sliced thin. Cook it quickly over high heat for just 2-3 minutes. Adjust these cooking times based on the protein you select. Feel free to change the veggies! Use seasonal options like zucchini, broccoli, or bell peppers. These add color and crunch. You can also toss in greens like spinach or bok choy. Add them at the end for a quick wilt. This boosts nutrition and flavor without much work. Want some heat? Add chili flakes or sriracha to your stir-fry. Start with a little, then taste. You can always add more if you want it spicier. For those who prefer milder dishes, skip the spice. Instead, focus on the fresh garlic and ginger for flavor. Adjusting spice levels can make this dish fit any palate. To store leftovers, place the stir-fry in an airtight container. This keeps it fresh and safe. Refrigerate it as soon as possible. It can last up to three days in the fridge. If you notice any off smells or changes in color, it's best to toss it. You can freeze the stir-fry if you want to save some for later. First, cool it completely. Then, place it in a freezer-safe bag or container. Remove as much air as you can. It can last up to three months in the freezer. To reheat, thaw it overnight in the fridge. Then, warm it up in a skillet over low heat. This helps keep the shrimp tender and the veggies crisp. For easy meal prep, you can chop veggies ahead of time. Slice your bell pepper, julienne the carrot, and trim the snap peas. Store them in separate containers. You can also peel and devein the shrimp in advance. This way, you save time when cooking. Make sure to keep the shrimp in the fridge until you are ready to use them. Yes, you can use frozen shrimp. Just make sure to thaw them first. To thaw, place the shrimp in a bowl of cold water for about 15-20 minutes. Change the water halfway through for best results. Once thawed, rinse them under cold water. This helps ensure they are clean and ready to cook. You can serve this dish with jasmine rice or noodles. Both options soak up the sauce well. For extra color and crunch, consider adding a side salad or some steamed broccoli. These sides complement the flavors nicely and add nutrition. To add heat, try adding red pepper flakes or sliced fresh chili peppers. You can also use sriracha or chili paste. Start with a small amount, then taste and adjust. This way, you can control the spice level to your liking. To make this dish gluten-free, use gluten-free soy sauce. Many brands offer tasty alternatives. You may also skip oyster sauce or find a gluten-free version. Always check labels to ensure they meet your dietary needs. Yes, leftovers can be reheated. The best way is to use a skillet over low heat. Add a little water or oil to avoid drying out. Stir frequently until heated through. You can also microwave it, but be careful not to overheat. This blog post covered how to create a tasty Garlic Ginger Shrimp Stir-Fry. You learned about the key ingredients, step-by-step cooking methods, and ways to enhance flavor and presentation. Remember, adjust vegetables, proteins, and spice levels to fit your taste. Store leftovers properly to keep them fresh. This dish is adaptable and perfect for any meal. Enjoy making it your own!
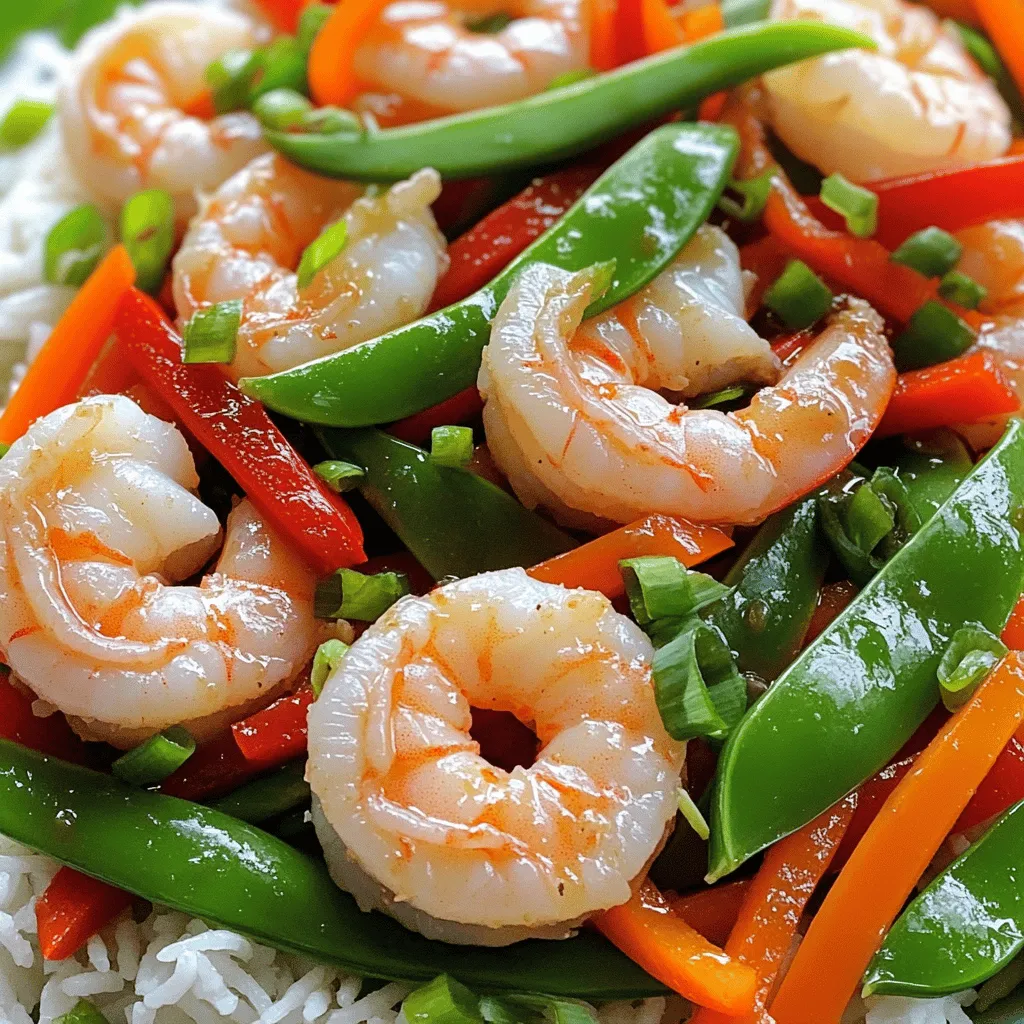
Garlic Ginger Shrimp Stir-Fry Quick and Easy Meal
Looking for a quick and tasty meal? Garlic Ginger Shrimp Stir-Fry is your answer! With just a few simple ingredients, you can whip up a
To make the Honey Mustard Chicken Veggie Skillet, you will need: - 2 boneless, skinless chicken breasts - 2 tablespoons honey - 2 tablespoons Dijon mustard - 1 tablespoon olive oil - 1 red bell pepper, sliced into strips - 1 yellow zucchini, diced into cubes - 1 cup broccoli florets - 1 teaspoon garlic powder - Salt and pepper, to taste - Fresh parsley, chopped (for garnish) These ingredients create a tasty and colorful dish that is easy to prepare. You can enhance the flavor of your skillet with some optional seasonings and garnishes, such as: - Paprika for a smoky taste - Italian herbs like basil or oregano - Lemon juice for a fresh twist - Crushed red pepper flakes for heat - Extra chopped herbs like chives or cilantro Feel free to mix and match these options to suit your taste. To prepare this dish, you’ll need some essential kitchen tools: - A large skillet for cooking - A small mixing bowl for combining the honey and mustard - A cutting board for chopping vegetables - A sharp knife for slicing and dicing - A meat thermometer to check chicken doneness Having the right tools will help make your cooking experience smoother and more enjoyable. To make the honey mustard sauce, grab a small bowl. Add 2 tablespoons of honey and 2 tablespoons of Dijon mustard. Mix them well until they are smooth. This sauce adds a sweet and tangy flavor to your chicken. Set it aside for later. Next, take 2 boneless, skinless chicken breasts. Season both sides with salt, pepper, and 1 teaspoon of garlic powder. This will give the chicken a nice taste. Heat 1 tablespoon of olive oil in a large skillet over medium-high heat. Once the oil is hot, carefully place the chicken in the skillet. Cook it for about 6-7 minutes. Don’t move the chicken. This helps form a golden brown crust. After that, flip the chicken over. Drizzle the honey mustard sauce on top. Lower the heat to medium and cover the skillet. Cook for another 6-7 minutes, or until the chicken reaches an internal temperature of 165°F. When the chicken is almost done, it’s time for the veggies. Add 1 sliced red bell pepper, 1 diced yellow zucchini, and 1 cup of broccoli florets to the skillet. Stir gently to mix everything together. Let the vegetables cook for about 5 minutes. You want them to be tender-crisp and colorful. This adds not just taste, but also a lovely look to your dish. Once done, sprinkle freshly chopped parsley on top for a fresh touch. Enjoy your Honey Mustard Chicken Veggie Skillet! To get that perfect chicken crust, season well. Use salt, pepper, and garlic powder. Press the chicken into the skillet firmly. This helps it sear better. Cook it without moving for 6-7 minutes. This time lets the crust form. Flip the chicken and add your honey mustard mix. The sauce will caramelize and add flavor. I love using fresh, colorful veggies in this dish. Red bell peppers add sweetness and crunch. Yellow zucchini brings a nice texture. Broccoli florets are great for color and nutrients. You can also try carrots, snap peas, or asparagus. Mix and match for your taste. Use what you have on hand. You can change the honey mustard sauce to suit your flavor. If you like it sweeter, add more honey. For a tangier taste, add extra Dijon mustard. Taste as you mix and adjust. You can even add a splash of lemon juice for brightness. This sauce is flexible, so make it your own! {{image_4}} If you want to switch things up, try using turkey or tofu. Both options add great flavor. Turkey remains juicy and tender when cooked right. Tofu absorbs the honey mustard sauce well. This makes it tasty and satisfying. You can even use shrimp for a quick cook option. Just be careful not to overcook the shrimp. You can mix and match your veggies too! Use bell peppers, carrots, or even snap peas. Each vegetable brings its own unique taste and crunch. Asparagus or green beans can also add a nice touch. Feel free to use frozen veggies if you are short on time. They cook quickly and taste great. If you like heat, consider adding red pepper flakes. A pinch can give your dish a nice kick. You can also include sliced jalapeños for a fresh, spicy flavor. For a different approach, try a dash of hot sauce in the honey mustard mix. This will create a sweet and spicy blend that excites the taste buds. To keep your Honey Mustard Chicken Veggie Skillet fresh, store it in an airtight container. Let it cool to room temperature first. This helps prevent moisture buildup, which can make the dish soggy. Place the container in the fridge. It will stay good for up to four days. When you are ready to eat leftovers, you can reheat them easily. Use the microwave for quick reheating. Place the portion on a microwave-safe plate and cover it. Heat in 30-second bursts until warm. Stir after each interval. You can also reheat in a skillet. Warm the skillet over medium heat and add a splash of water. Cover it to steam the dish. This keeps it moist. If you want to freeze your skillet, it’s simple. Let the dish cool completely. Then, divide it into portions and place them in freezer-safe bags or containers. Squeeze out the air before sealing. This helps prevent freezer burn. You can freeze the meal for up to three months. When you’re ready to eat, thaw it overnight in the fridge. Reheat as mentioned above for the best taste. Yes, you can make this dish ahead of time. Cook the chicken and veggies as directed. After cooking, let it cool down. Store it in an airtight container in the fridge. You can keep it for up to three days. When ready to eat, just reheat it on the stove or in the microwave until hot. You can try different sauces for this dish. Barbecue sauce adds a sweet and smoky flavor. Teriyaki sauce offers a tasty Asian twist. For a tangy option, use balsamic glaze. Each sauce changes the taste, so feel free to experiment. Make sure to adjust the salt and pepper to match the sauce's flavor. Yes, this recipe is great for meal prep. It cooks quickly and stores well. You can divide it into portions. Pack it in containers for lunch or dinner throughout the week. The mix of chicken and veggies makes a balanced meal. You'll enjoy a tasty dish ready to eat anytime. In this blog post, we explored making Honey Mustard Chicken Veggie Skillet. We covered the key ingredients, step-by-step cooking instructions, and helpful tips. I shared variations for different tastes and discussed storage options for leftovers. Overall, making this dish is simple and fun. You can try new flavors or stick to your favorites. I hope you feel confident to whip it up for any meal. Enjoy your cooking adventure!
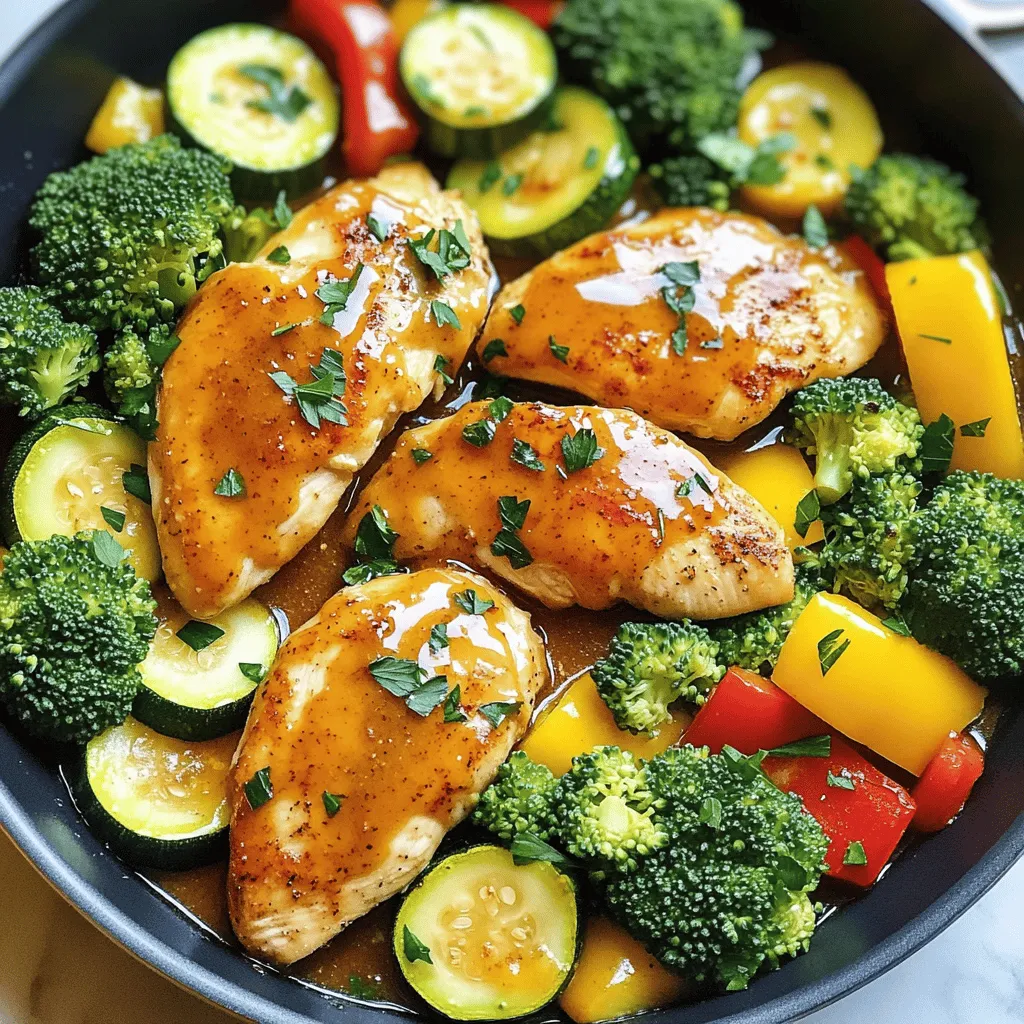
Honey Mustard Chicken Veggie Skillet Easy Dinner
Looking for an easy dinner that bursts with flavor? This Honey Mustard Chicken Veggie Skillet packs a tasty punch with juicy chicken and colorful veggies.
- 8 oz rice noodles - 1 cup coconut milk - 1/2 cup natural peanut butter - 2 tablespoons sesame oil - 1 red bell pepper, thinly sliced - 1 large carrot, peeled and julienned - 1 cup snap peas, trimmed - 3 green onions, chopped (white and green parts separated) - 3 tablespoons soy sauce (low-sodium recommended) - 2 tablespoons sriracha sauce - 1 tablespoon fresh lime juice - 1 teaspoon freshly grated ginger - 1 clove garlic, minced - Fresh cilantro and chopped peanuts for garnish - Lime wedges for serving Gathering the right ingredients is key to making these spicy Thai peanut noodles. You'll need rice noodles, coconut milk, and peanut butter as your base. The rice noodles offer a chewy texture. Coconut milk gives a creamy feel, while peanut butter adds nutty flavor. Next, add your vegetables for crunch and color. Red bell pepper and carrot bring sweetness. Snap peas add freshness, and green onions give a mild onion taste. For seasoning, soy sauce adds saltiness. Sriracha brings heat, but you can adjust it to your liking. Fresh lime juice brightens the dish, while ginger and garlic add warmth and depth. Finish with cilantro and peanuts for garnish. Lime wedges are perfect for an extra zing. All these ingredients come together in one pot for a delightful meal. - Boil water and cook the rice noodles. - Drain and set aside. Start by bringing a large pot of water to a boil. When the water bubbles, add the rice noodles. Cook them according to the package instructions. It's best to remove them just before they become fully tender. They will soften more later. After cooking, drain the noodles in a colander and set them aside. - Heat sesame oil in a large pot. - Add and sauté red bell pepper, carrot, green onions (white parts), and snap peas. In a large pot or deep skillet, pour in two tablespoons of sesame oil. Heat the oil over medium heat. When the oil shimmers, toss in the sliced red bell pepper, julienned carrot, the white parts of the green onions, and snap peas. Stir them for about 3 to 4 minutes. You want them to be tender-crisp and bright in color. - Combine coconut milk, peanut butter, soy sauce, sriracha, lime juice, ginger, and garlic in a bowl. - Whisk until smooth and uniform. Grab a mixing bowl. Add one cup of coconut milk, half a cup of peanut butter, three tablespoons of soy sauce, two tablespoons of sriracha, one tablespoon of fresh lime juice, one teaspoon of grated ginger, and one clove of minced garlic. Use a whisk to blend these ingredients well until the sauce is smooth and creamy. - Pour the peanut sauce into the sautéed vegetables. - Stir to coat the vegetables evenly. Now, pour the peanut sauce into the pot with the sautéed vegetables. Stir everything together carefully. You want to make sure the sauce coats all the veggies nicely. - Add drained noodles and gently toss together. - Heat on low for an additional 2-3 minutes. Next, add the drained noodles to the pot. Gently toss everything together, making sure the noodles soak up the sauce. Let the dish heat on low for about 2 to 3 minutes. This helps everything blend together perfectly. - Remove from heat and garnish with cilantro and peanuts. - Serve with lime wedges. Once everything is warm, take the pot off the heat. Serve the spicy Thai peanut noodles in bowls. Top each bowl with fresh chopped cilantro and crushed peanuts. Don’t forget to add lime wedges on the side. The lime adds a nice zing of freshness! - Cook rice noodles in boiling water for about five minutes. - Remove them before they are fully soft. - Rinse noodles under cold water to stop the cooking process. - This keeps them from getting mushy later. - Adjust sriracha based on your heat preference. - Use less sriracha for a milder taste. - Try sweet chili sauce for a different flavor. - Add fresh jalapeños for more heat if desired. - Serve in clear bowls to show off the colors. - Top each bowl with fresh cilantro and crushed peanuts. - Add an extra lime wedge on the side for fun. - These small touches make the dish pop visually. {{image_4}} You can easily add protein to your spicy Thai peanut noodles. Chicken, shrimp, or tofu are great choices. If you use chicken, cut it into small pieces and sauté it first. Cook until it is no longer pink. For shrimp, toss them in during the last few minutes of cooking. They cook quickly. If you prefer tofu, use firm tofu, diced into cubes. Sauté it with the veggies for a crispy texture. Adjust cooking times based on your choice. Chicken may need about 5-7 minutes, shrimp about 3-4 minutes, and tofu can cook for 4-5 minutes. Fresh veggies add color and nutrition. You can swap or add other vegetables such as bok choy, broccoli, or zucchini. These choices keep the dish vibrant and full of flavor. If you want more crunch, try adding cabbage or bean sprouts. Remember to cut them into small pieces for even cooking. Use what you have on hand to make this dish your own. If you need gluten-free options, choose gluten-free soy sauce like tamari. Many brands offer this tasty alternative. Rice noodles are naturally gluten-free, but always check the label. You can also try gluten-free pasta made from rice or quinoa. This way, everyone can enjoy the dish without worry. To store your spicy Thai peanut noodles, let them cool first. Place the noodles in an airtight container. This keeps them fresh and safe. You can enjoy leftovers for up to three days. Always check for any off smells before eating. For reheating, the best way is on the stove. Add a splash of water or broth to the pan. This helps the noodles stay moist. Heat them on low, stirring gently. You can also use the microwave. Place the noodles in a bowl and cover it. Heat for one minute, then stir. Repeat until hot, but don’t overheat. Yes, you can freeze this dish! But it’s best to freeze before adding fresh garnishes. Place cooled noodles in a freezer-safe container. They will stay good for about two months. When ready to eat, thaw in the fridge overnight. Reheat as usual, adding a splash of liquid if needed. It takes about 25 minutes to make these noodles. You spend 10 minutes prepping and 15 minutes cooking. This quick time makes it great for busy days. Yes, you can make this dish ahead. Cook it and let it cool before storing. Keep it in an airtight container in the fridge. It tastes great for two days after cooking. Reheat it on the stove or in the microwave. Store leftover peanut noodles in a sealed container. Make sure to put them in the fridge. They stay fresh for up to two days. If you want to keep them longer, freeze them. Use freezer-safe containers for best results. You can swap rice noodles for other types. Try whole wheat or soba noodles. Each noodle adds a different taste and texture. Just check the cooking time as it may change. To make this dish vegan, swap the honey for maple syrup. Use soy sauce or tamari for the sauce. Check that the peanut butter has no added ingredients. These simple swaps keep the flavors intact while meeting dietary needs. This recipe for Spicy Thai Peanut Noodles combines simple ingredients for a big flavor. You learned how to prepare the noodles, sauté veggies, and make a creamy peanut sauce. We also discussed storage tips and how to customize your dish. Enjoy this meal fresh, or save leftovers for later. With easy swaps, you can create variations that fit your taste. Get cooking and enjoy every delicious bite!
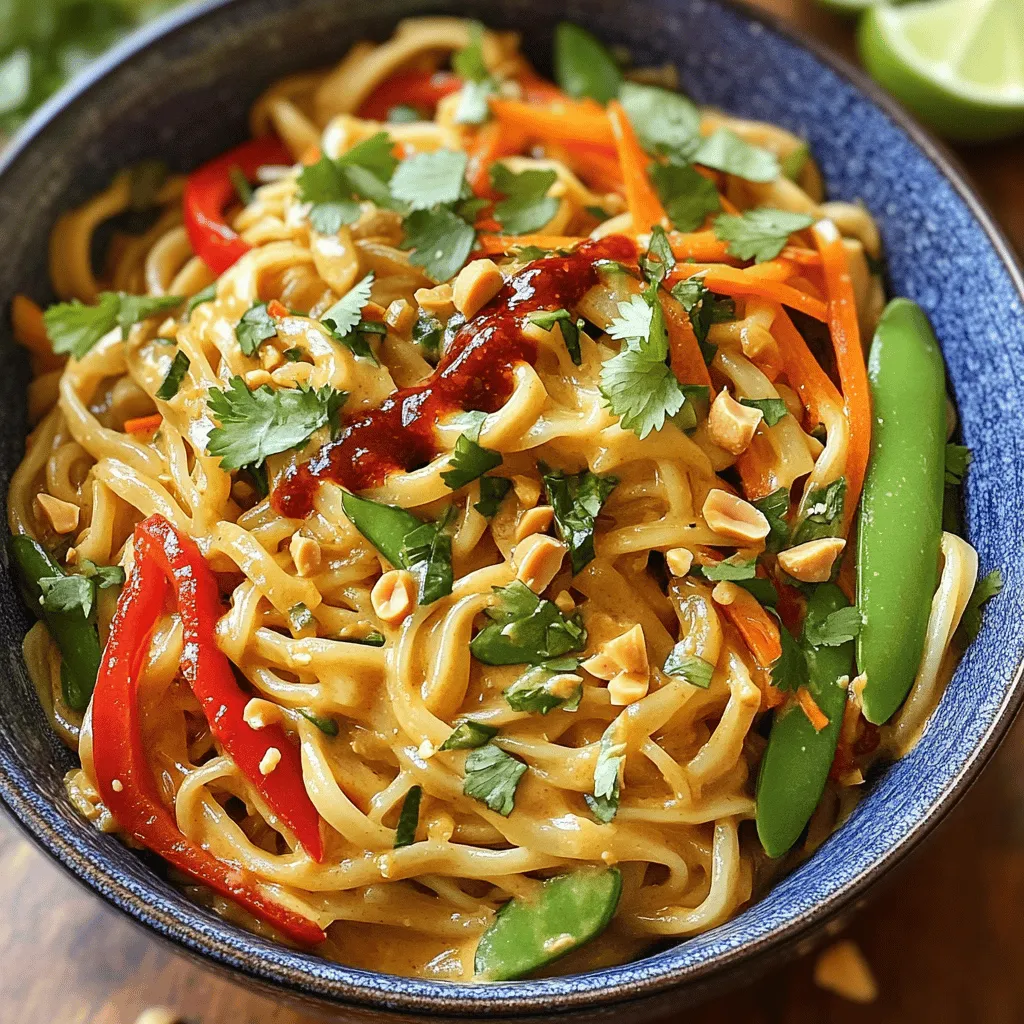
Spicy Thai Peanut Noodles One Pot Flavorful Delight
If you crave a quick and tasty meal, Spicy Thai Peanut Noodles One Pot is perfect for you. With creamy peanut butter, fresh veggies, and
- 2 lbs beef chuck roast, cut into 2-inch pieces - 2 cups diced tomatoes (canned or fresh) - 1/2 cup balsamic vinegar - 1 large onion, diced - 4 cloves garlic, minced - 2 teaspoons dried oregano - 1 teaspoon dried thyme - 1 tablespoon brown sugar - 1 package of pasta (like pappardelle or fettuccine) - Fresh basil leaves, for garnish - Grated Parmesan cheese, for serving To make this dish shine, start with high-quality beef chuck roast. This cut is perfect for slow cooking. It becomes soft and juicy as it cooks. You will love how the balsamic vinegar adds a tangy depth. Pair that with diced tomatoes for a rich sauce. Aromatics bring life to the dish. Use a large onion and fresh garlic. They add flavor and warmth. Don’t forget the spices! Oregano and thyme give it a lovely herbal note. A touch of brown sugar balances the tang of the vinegar well. Now, for the pasta! You can choose pappardelle or fettuccine. Both hold the sauce nicely. Finally, top your dish with fresh basil and grated Parmesan. They make a great finish. Enjoy every bite of this hearty dinner delight! Start by browning the beef. Pour a few tablespoons of olive oil into a large skillet. Heat it on medium-high. Season the beef chunks with salt and pepper. Work in batches, searing the beef until it’s brown on all sides. This should take about 5-7 minutes. Once browned, transfer the beef to the slow cooker. Next, use the same skillet for the onion. Add the diced onion and sauté for about 3-4 minutes. You want it to become soft and clear. Then, mix in the minced garlic and cook for another minute until it smells great. Pour this mixture into the slow cooker over the beef. Now, it’s time to mix in the rest of the ingredients. In your slow cooker, add the diced tomatoes, beef broth, balsamic vinegar, brown sugar, soy sauce, oregano, and thyme. Stir it well, so everything is evenly mixed. Put the lid on the slow cooker. Set it to low for 6-8 hours or high for 4-5 hours. The beef should become very tender. The flavors will blend together nicely during this time. About 20 minutes before you plan to serve, boil a large pot of salted water. Cook your pasta according to the package instructions. When done, drain the pasta and set it aside. After the slow cooking time ends, use two forks to shred the beef into smaller pieces. Stir the shredded beef back into the rich sauce in the slow cooker. This makes each bite full of flavor. Serve the beef ragu over a generous amount of pasta. Top it with fresh basil and a sprinkle of grated Parmesan cheese. Enjoy your hearty meal! To make your Balsamic Beef Ragu even tastier, adjust the spices. Try adding a pinch of red pepper flakes for heat. You can also use fresh herbs instead of dried. Fresh oregano or thyme can boost the taste. A splash of Worcestershire sauce adds depth too. Experiment with balsamic vinegar; a flavored one can change the dish nicely. Not all slow cookers cook the same way. If your cooker runs hot, use the low setting for about 5-6 hours. For cooler models, you might need up to 8 hours. Always check the beef. It should shred easily with a fork. If it’s not tender, let it cook longer. Serving is key to a great meal. Use deep bowls to hold the pasta and sauce. This way, the sauce pools nicely around the pasta. Add fresh basil on top for color. A sprinkle of grated Parmesan cheese makes it look gourmet. For extra flair, serve with crusty bread for dipping. Enjoy making your plate look inviting! {{image_4}} You can easily add more veggies to your ragu. Carrots add sweetness and color. Chop them small so they cook well. Mushrooms bring a nice earthy flavor. Use any type you like, such as button or cremini. Just sauté them briefly before adding to the slow cooker. If you want a lighter dish, try chicken or turkey. Use boneless, skinless thighs for best flavor. Cut the meat into pieces like the beef. Cook them in the same way as the beef. The ragu will still taste rich and satisfying. Swap pasta for grains for a different twist. Try using farro or quinoa instead. Both grains soak up the sauce well. Cook them according to package directions. They make a hearty base for the ragu. Plus, they add a nice texture to your meal. To store leftover ragu, let it cool first. Transfer it to an airtight container. Store it in the fridge for up to three days. If you want to keep it longer, freezing is a great option. Make sure the ragu is completely cool before freezing. This helps prevent ice crystals from forming. To freeze your ragu, portion it into freezer-safe bags. Squeeze out excess air before sealing. Label the bags with the date and content. The ragu can last in the freezer for up to three months. When you’re ready to enjoy it again, thaw it overnight in the fridge. Reheat it gently on the stove or in the microwave. When reheating, do it slowly to maintain flavor and texture. Add a splash of beef broth or water if it seems thick. Stir often while it warms. You want it hot but not boiling. This keeps the beef tender and the sauce rich. Serve with fresh pasta and a sprinkle of cheese for the best experience. Cooking times vary based on your slow cooker settings. On low, it takes about 6 to 8 hours. If you choose high, expect it to cook for about 4 to 5 hours. The longer it cooks, the more tender the beef becomes. Yes, you can use different cuts of beef for this dish. Chuck roast is great, but you can also try brisket, round, or short ribs. Each cut has its flavor and texture, which adds variety to your ragu. You can easily make this ragu ahead of time. Cook it as directed and cool it down before storing it in the fridge. When ready to eat, just reheat it on the stove or in the microwave. The flavors will meld even more! This ragu pairs well with many sides. You can serve it with pasta like pappardelle or fettuccine. Crusty bread is perfect for soaking up the sauce. A simple green salad also makes a great side dish. If you want fewer servings, reduce the beef and other ingredients. Cut the beef to 1 pound and adjust the other items by half. Cook time may remain the same. Just check the meat for tenderness as it cooks. Balsamic Beef Ragu blends rich ingredients, spices, and pasta into a tasty meal. You start by browning beef and adding fresh tomatoes, herbs, and a splash of balsamic vinegar. The slow cooker does the magic, turning simple foods into a delicious dish. Don’t forget to store leftovers properly or try fun variations. Cooking can be easy and fun with these tips. Enjoy your new dish, and share it with family or friends for a nice meal together.
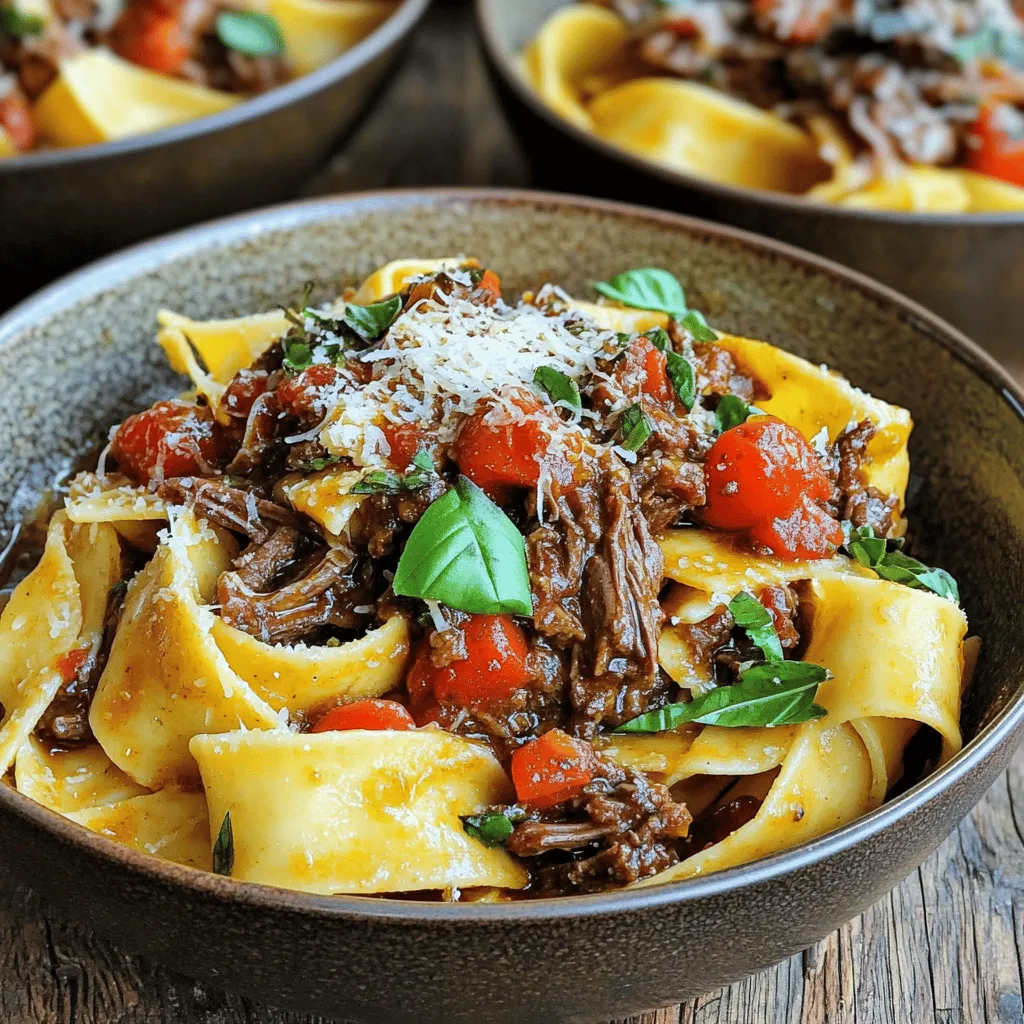
Balsamic Beef Ragu Slow Cooker Hearty Dinner Delight
Looking for a cozy meal that warms your soul? My Balsamic Beef Ragu Slow Cooker recipe is just what you need! With tender beef, rich
- Chicken and broth components: - 1 pound boneless, skinless chicken breasts, diced - 4 cups low-sodium chicken broth For the chicken, I prefer boneless and skinless breasts. They cook quickly and stay juicy. Dicing them into bite-sized pieces makes it easy to eat and helps them cook evenly. The low-sodium chicken broth adds rich flavor while keeping it light. - Vegetables and aromatics: - 1 tablespoon olive oil - 1 medium onion, finely chopped - 3 cloves garlic, minced - 1 medium carrot, diced - 2 ribs celery, diced - 1 cup fresh spinach, roughly chopped - 1 cup sun-dried tomatoes, chopped (oil-packed if possible) I use olive oil to sauté the vegetables. It adds a nice depth to the soup. Onions, garlic, carrots, and celery create a strong flavor base. Fresh spinach adds color and nutrition, while sun-dried tomatoes bring a sweet, tangy punch. - Cream and seasonings: - 1 cup heavy cream - 1 teaspoon dried thyme - 1 teaspoon dried oregano - Salt and black pepper, to taste - 1 tablespoon fresh lemon juice - Fresh basil leaves for garnish (optional) Heavy cream gives the soup its creamy texture. Thyme and oregano are classic herbs that work well together. Adjust the salt and pepper to your taste. A splash of lemon juice brightens the flavors, and fresh basil adds a lovely finishing touch. This combination of ingredients makes the soup hearty and comforting. I love how each part contributes to the overall taste. To start, heat one tablespoon of olive oil in a large pot over medium heat. Once the oil is hot, add one pound of diced chicken breasts. Season the chicken with salt and black pepper. Cook the chicken for 5-7 minutes. Stir occasionally, letting it get golden brown. The chicken is done when it is no longer pink in the center. Use a meat thermometer to check; it should be 165°F (74°C). Once cooked, remove the chicken from the pot and set it aside. In the same pot, add one chopped medium onion, one diced carrot, and two diced celery ribs. Sauté these vegetables for about 5 minutes. You want them to be tender and the onion to look clear. This step adds lots of flavor to your soup. Remember to cook in this order, as the onion needs more time to soften. Next, add three cloves of minced garlic, one teaspoon of dried thyme, and one teaspoon of dried oregano. Stir well for about one minute. This helps the spices release their wonderful aroma. Now, pour in four cups of low-sodium chicken broth. Increase the heat until the broth boils. Once it's boiling, reduce the heat to a gentle simmer and let it cook for 10 minutes. After that, return the cooked chicken to the pot. Then, add one cup of chopped sun-dried tomatoes and one cup of roughly chopped fresh spinach. Stir everything together and let it simmer for a few more minutes. Finally, gently stir in one cup of heavy cream. Let the soup warm through for an additional 5 minutes. Taste it, and adjust with more salt, black pepper, or fresh lemon juice if needed. Serve the soup hot, and enjoy the cozy flavors! To boost the taste of your soup, use fresh herbs. I love using thyme and oregano. Their smell brings joy to the kitchen. Fresh ingredients are key. They can make a huge difference. Try to choose bright, fresh spinach and sun-dried tomatoes packed in oil. This oil adds extra flavor to the soup. If you want a creamier soup, adjust the amount of heavy cream. You can add more or less based on your taste. For a lighter option, consider using half-and-half or coconut milk. They can still give you a nice texture without being too heavy. If you want to thicken your soup without cream, try using a cornstarch slurry. Mix equal parts of cornstarch and cold water, then stir it in as the soup simmers. Serve your soup in rustic bowls. This makes it feel homey and warm. Pair it with crusty bread for dipping. It adds a lovely touch. For garnishing, sprinkle fresh basil on top. You can also add a drizzle of olive oil. These small touches can make your dish look and taste even better. {{image_4}} You can switch the chicken for other meats. Try diced turkey or pork. Both add a unique taste. If you want a lighter option, use shrimp. Cook them quickly to keep them tender. For a vegetarian twist, use chickpeas or white beans. They add protein and texture. You can also use tofu for a hearty option. Just be sure to cook it until golden brown for flavor. To make the soup your own, think about regional flavors. Add Italian sausage for a spicy kick. You can use pesto instead of sun-dried tomatoes for a fresh twist. If you like heat, add red pepper flakes. Start with a small amount and increase to taste. You can also try fresh herbs like rosemary or parsley for extra flavor. If you're gluten-free, use gluten-free broth and check all your ingredients. Many brands offer gluten-free options. For dairy-free soup, swap heavy cream with coconut milk or cashew cream. Both give a rich texture and flavor. Just choose unsweetened versions to keep it savory. Store your Creamy Tuscan Chicken Soup in an airtight container. This helps keep it fresh and safe. Let the soup cool down to room temperature before sealing it. In the fridge, the soup lasts about 3 to 4 days. If you want it to last longer, consider freezing it. To freeze the soup, use freezer-safe containers. Leave some space at the top, as soup expands when frozen. This soup can stay good in the freezer for up to 3 months. When you’re ready to enjoy it, take it out of the freezer. Thaw it in the fridge overnight or use the microwave for a quick thaw. When reheating, do it gently on the stove. This way, you keep the flavors intact. Stir the soup often to heat it evenly. If it seems thick, add a splash of chicken broth or water. To freshen it up, add a handful of fresh spinach or basil just before serving. This gives the soup a vibrant touch. Creamy Tuscan Chicken Soup is a warm and hearty dish. It has tender chicken, fresh spinach, and sun-dried tomatoes. The heavy cream makes it rich and smooth. Each bite offers a mix of savory and creamy flavors. This soup draws inspiration from Tuscan cuisine in Italy. It combines simple, fresh ingredients. The bright, herbaceous notes come from thyme and oregano. The sun-dried tomatoes add a sweet-tart punch. Together, they create a comforting meal perfect for chilly days. Yes, you can make Creamy Tuscan Chicken Soup ahead of time. It actually tastes better after sitting a bit. To prep, follow the recipe and let it cool. Store the soup in airtight containers in the fridge. It stays fresh for up to three days. When you reheat, do it slowly on the stove. This helps keep the flavors intact. Stir frequently to prevent sticking. For best results, add a splash of cream while reheating. This revives its creamy texture nicely. This soup pairs well with several sides. Crusty bread is a must for dipping. A fresh baguette or garlic bread works wonderfully. You could also try a side salad to balance the meal. A simple green salad with a lemon vinaigrette adds freshness. The bright flavors complement the soup well. You can also serve it with a Caesar salad for a hearty option. These sides enhance the cozy experience of enjoying this delicious soup. This blog post covered how to make a tasty Creamy Tuscan Chicken Soup. You learned about the key ingredients like chicken, veggies, and cream. I shared steps for cooking, sautéing, and combining everything for the best flavor. You also discovered tips for enhancing taste and texture. Plus, we explored variations and storage methods to keep your soup fresh. With these insights, you can now create a wonderful meal. Enjoy making this soup for family and friends!
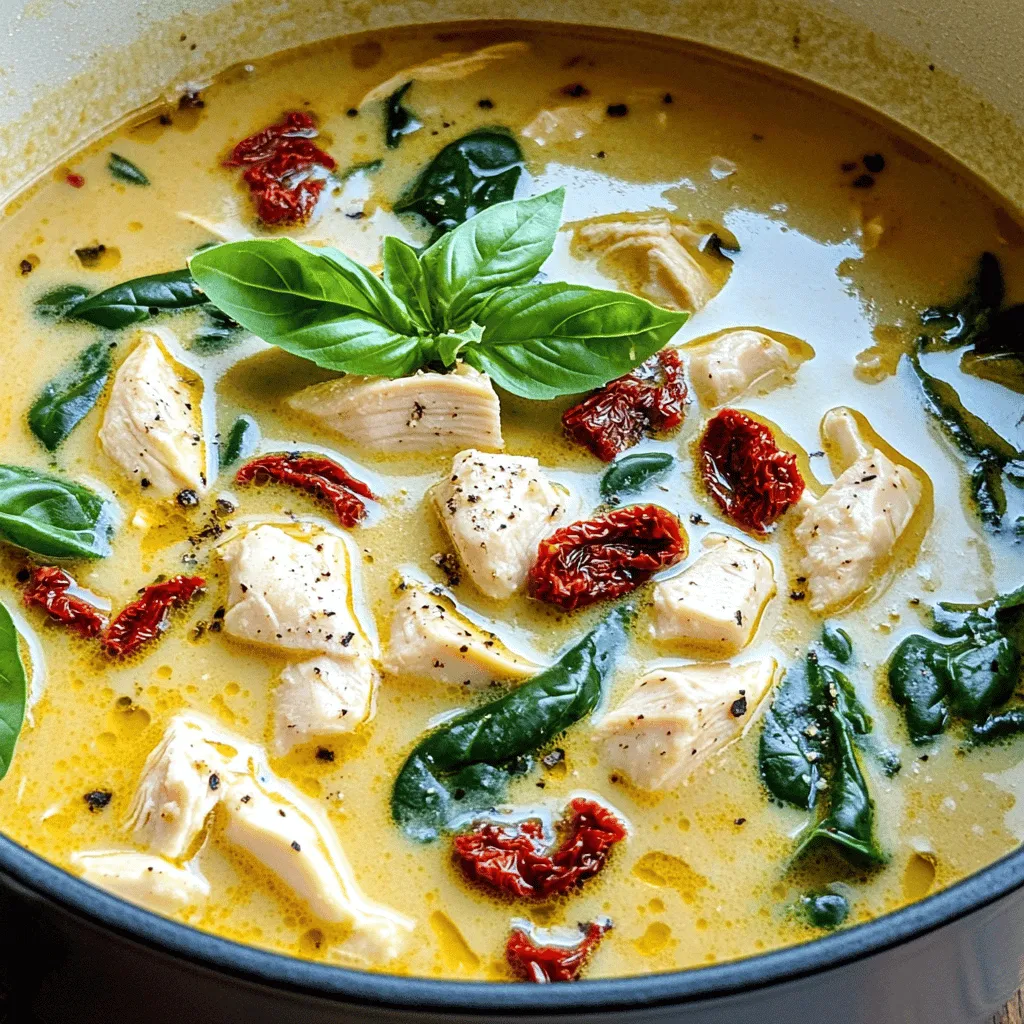
Creamy Tuscan Chicken Soup Ideal for Cozy Meals
When the weather turns brisk, a warm bowl of Creamy Tuscan Chicken Soup can be your best friend. This cozy meal combines tender chicken, fresh
- 1 lb ground beef or your favorite plant-based alternative - 1 medium onion, finely diced - 2 cloves garlic, minced - 1 bell pepper, diced (any color) - 1 can (14.5 oz) diced tomatoes with their juices - 1 can (15 oz) kidney beans, drained and rinsed - 1 can (15 oz) black beans, drained and rinsed - 1 can (8 oz) tomato sauce These main ingredients create a solid base for your chili. Ground beef adds richness, while the beans provide fiber and protein. The diced tomatoes bring acidity and sweetness, balancing the dish. - 2 tablespoons chili powder - 1 teaspoon ground cumin - 1 teaspoon smoked paprika - 1/2 teaspoon cayenne pepper (adjust to your taste) - Salt and freshly cracked black pepper to taste These spices are key to chili's bold flavor. Chili powder gives warmth, while cumin adds earthiness. Smoked paprika introduces a nice smokiness, and cayenne lets you control the heat. - Fresh cilantro, chopped, for garnish - Sour cream for topping (optional) - Shredded cheese for topping (optional) Garnishes add freshness and creaminess. Cilantro brightens up the dish, while sour cream and cheese provide a rich finish. Feel free to mix and match toppings based on your preference. Start by gathering your ingredients. Chop one medium onion into small pieces. Dice one bell pepper in your favorite color. Mince two cloves of garlic. These fresh items add great taste to your chili. In a large pot, heat two tablespoons of olive oil over medium heat. Once the oil is hot, add the diced onion and bell pepper. Sauté them for about five minutes. You want the onions to turn soft and clear. Then, add the minced garlic. Cook for one more minute until it smells good. Next, add one pound of ground beef. Use a spatula to break it into small pieces. Cook this mixture for six to eight minutes. Stir it often until the meat is brown. If there is too much fat, drain it away. Now it’s time to add more ingredients. Pour in one can of diced tomatoes with their juices. Also, add one can each of kidney beans and black beans, both drained and rinsed. Then, add one can of tomato sauce. Next, sprinkle in two tablespoons of chili powder, one teaspoon of ground cumin, one teaspoon of smoked paprika, and half a teaspoon of cayenne pepper. Add salt and black pepper to taste. Mix everything well so all the flavors blend. Turn the heat up slightly to bring the chili to a gentle simmer. Then lower the heat and cover the pot. Let it simmer for at least 30 minutes. If you can, let it go for up to an hour. This helps the flavors develop even more. Stir occasionally. Before serving, taste the chili and adjust the seasoning if needed. Ladle the chili into bowls. Garnish with fresh cilantro. You can add sour cream and shredded cheese on top if you like. Enjoy your hearty meal! To make your chili just right, adjust the spice levels to fit your taste. If you love heat, add more cayenne pepper. For a milder version, cut back on the chili powder. You can also play with beans. Try using pinto beans or even lentils for a twist. Different meats can change the dish too. Ground turkey or chicken can lighten things up, while beef adds heartiness. Sautéing is key to building flavor. Start with medium heat and add olive oil. Once it shimmers, toss in onions and bell peppers. Cook until soft and fragrant. Then add garlic. It cooks fast, so watch it closely. Simmering is where the magic happens. After you mix in all the ingredients, keep the heat low. Let it bubble gently for at least 30 minutes. The longer you simmer, the deeper the flavors will be. For serving, choose rustic bowls that keep the chili warm. A sprinkle of fresh cilantro on top adds a nice touch. Pair your chili with crusty bread or corn tortillas. They soak up the sauce well. You can also serve it with rice for a hearty meal. If you want extra flavor, add toppings like sour cream or shredded cheese. These give a creamy contrast to the spice. {{image_4}} You can easily make chili meat-free. Use a plant-based alternative, like lentils or tempeh. These ingredients add protein and texture. You can also boost flavor with mushrooms or walnuts. For beans, try a mix of varieties. Black beans, pinto beans, and chickpeas work great. They add different tastes and textures. Chili changes by region. Texas chili uses only meat and no beans. It’s rich and spicy, made with beef and a blend of spices. Cincinnati chili is sweeter and served over spaghetti. It has unique spices like chocolate and cinnamon. You can also add unique ingredients for fun. Consider sweet potatoes for sweetness or corn for crunch. Short on time? Try a quick chili recipe. Use canned beans and pre-diced veggies for speed. You can whip up a tasty meal in 30 minutes. Slow cookers are great for making chili too. Prepare your ingredients the night before. In the morning, set the cooker on low. By dinner, you’ll have a warm, hearty meal waiting for you! To keep your chili fresh, let it cool first. You don’t want to put hot chili in the fridge. After it cools, transfer it to an airtight container. This keeps it safe from bad smells. Store it in the fridge for up to five days. If you want it to last longer, freezing is a great option. When it’s time to enjoy leftovers, you have a few choices. The best way is on the stove. Pour the chili into a pot and warm it over medium heat. Stir often to heat evenly. You can also use the microwave. Place the chili in a microwave-safe bowl. Heat it for one minute, then stir and heat again if needed. Always check that it’s hot all the way through. To freeze chili, let it cool completely. Use freezer-safe containers or bags. Label them with the date. Freeze for up to three months. When you want to eat it, take it out and thaw it in the fridge overnight. You can also reheat it straight from the freezer. Just add some extra time when warming it on the stove or in the microwave. To make chili spicy, add cayenne pepper. Start with a little, then taste. You can also use fresh jalapeños or serranos for extra heat. Another option is to add hot sauce. Mix it in while the chili simmers. I suggest tasting often to find the right spice level for you. Yes, you can use different beans in chili. Black beans and pinto beans work great. Chickpeas add a unique twist, too. If you want more color, try red beans or navy beans. Each bean brings its own taste and texture, so feel free to mix! Popular toppings for chili include shredded cheese and sour cream. Fresh cilantro adds a nice touch. You can also try sliced green onions or diced avocado. For a fun twist, add crushed tortilla chips or jalapeños on top. These toppings make your chili even tastier! This blog covered making chili step-by-step. You learned about key ingredients like beef, beans, and spices. I shared tips for cooking and enhancing flavor. You can try different meats or make it vegan. Storage tips ensure your chili stays fresh. Chili can be simple or special. Customize it to match your taste. Enjoy making it, serving it, and sharing it!
Classic Chili Flavorful and Hearty Comfort Meal
Looking for a meal that’s both hearty and packed with flavor? You’re in the right place! My Classic Chili recipe is your go-to for a
Here are the key ingredients you'll need for Minute Protein Beef Pasta: - 8 oz whole wheat pasta (spaghetti or penne) - 1 lb lean ground beef - 1 cup cherry tomatoes, halved - 1 cup fresh spinach, roughly chopped - 1/2 cup low-sodium beef broth - 1/4 cup finely grated Parmesan cheese - 2 tablespoons olive oil - 2 cloves garlic, minced - 1 teaspoon Italian seasoning - Salt and pepper to taste - Fresh basil leaves for garnish Each ingredient plays a role in making this dish hearty and tasty. Whole wheat pasta gives you fiber. Lean ground beef adds protein and flavor. Cherry tomatoes bring a burst of sweetness. Fresh spinach adds color and nutrients. Low-sodium beef broth keeps it rich without too much salt. Grated Parmesan gives a creamy finish. Olive oil adds healthy fats. Garlic and Italian seasoning enhance the taste. Salt and pepper help balance all the flavors. Finally, fresh basil leaves make it look great and add a fresh kick. Make sure to gather all these ingredients before you start cooking. Having everything ready will make the process smooth and fun! Start by boiling salted water in a large pot. Use about 4 quarts of water for 8 oz of pasta. Bring the water to a rolling boil. Once boiling, add the whole wheat pasta. Cook it according to the package instructions until it’s al dente. This usually takes around 8-10 minutes. Al dente means the pasta is firm but not hard. Drain the pasta, but save about ½ cup of the pasta water for later. In a large skillet, heat 2 tablespoons of olive oil over medium heat. Add 2 cloves of minced garlic and sauté for about 30 seconds. The garlic should smell great but not burn. Next, add 1 pound of lean ground beef. Use a spatula to break up the meat. Cook for about 5-7 minutes until the beef is browned and fully cooked. Stir often for even cooking. Add 1 cup of halved cherry tomatoes and 1 teaspoon of Italian seasoning to the skillet. Stir well to mix everything together. Cook this mixture for another 3-4 minutes. You want the tomatoes to soften a bit. They will add sweetness and flavor to your dish. Now, pour in ½ cup of low-sodium beef broth. Mix well to combine all the flavors. Add the drained pasta and 1 cup of roughly chopped fresh spinach. Gently toss everything together. If the sauce looks too thick, add a little of the reserved pasta water. This will help create a nice, light sauce. Sprinkle in ¼ cup of finely grated Parmesan cheese. This adds a creamy richness to the dish. Taste your pasta and season with salt and pepper to your liking. Mix everything again and heat for another 2 minutes so the flavors blend well. Spoon the pasta into bowls. Garnish with fresh basil leaves and extra Parmesan if you like. This dish is not just tasty; it looks great too! Enjoy your hearty meal! - To ensure the pasta is al dente, boil salted water first. Then, follow the cooking time on the package. Taste a piece before draining. You want a slight bite to it. - Avoid overcooking the beef. Cook it just until brown, about 5-7 minutes. This keeps it tender and juicy. - Consider adding herbs like oregano or thyme for extra flavor. A pinch of red pepper flakes can add a nice kick. - For cheese variations, try mozzarella or feta. Both melt well and add a creamy texture. - To make ahead of time, cook the beef and pasta. Mix them with the sauce and store in the fridge. It stays fresh for about three days. - For quick reheating, use a microwave or stovetop. Add a splash of broth to keep it moist. Heat until warm, but avoid cooking too long to keep the pasta firm. {{image_4}} You can swap out the ground beef for ground turkey or chicken. These meats are lean and cook fast. They also soak up flavors well. If you want a vegetarian dish, use lentils or chickpeas. These options add protein and fiber. If you need gluten-free pasta, there are great choices. Try brown rice or quinoa pasta. They taste great and cook nicely. You can also use different shapes like fusilli or farfalle. This change makes the dish fun and unique. Want a creamier dish? Add a splash of cream or a cream sauce. This makes the pasta rich and smooth. You can also mix in fresh vegetables like bell peppers or zucchini. They add color and nutrients. Don't be afraid to experiment! To keep your Minute Protein Beef Pasta fresh, follow these steps. First, let the pasta cool before storing. Place it in an airtight container. This helps keep moisture out and prevents spoilage. You can store it in the fridge for up to three days. For best results, use glass or BPA-free plastic containers. These materials do not absorb odors, keeping your pasta tasting great. Make sure to label your containers with the date. This way, you know when to use them. Freezing your beef pasta is a great way to save it for later. To freeze, let the dish cool completely. Then, divide it into portions. Use freezer-safe bags or containers to store the portions. Squeeze out as much air as possible to prevent freezer burn. Your beef pasta can last up to three months in the freezer. For best taste, eat it within the first month. When you are ready to eat, thaw it overnight in the fridge. This helps maintain the texture and flavor. Reheating Minute Protein Beef Pasta is easy, but you want to do it right. The best method is using the stovetop. Heat a pan over low to medium heat. Add a splash of water or broth to help steam the pasta. Stir it often to heat evenly. You can also use the microwave. Place the pasta in a microwave-safe bowl and cover it. Heat it in short bursts, stirring in between. Avoid overheating, which can cause sogginess. This keeps your pasta delicious and ready to enjoy. Minute Protein Beef Pasta is quick to make. It takes about 10 minutes to prep and 20 minutes to cook. So, in just 30 minutes, you can have a tasty meal ready. Yes, you can make this dish gluten-free. Look for gluten-free pasta made from rice, quinoa, or lentils. These options work well and taste great in this recipe. You have many choices if you want to swap out ground beef. Ground turkey or chicken is a great choice. For a vegetarian option, use lentils or crumbled tofu. These options keep the meal hearty and tasty. Absolutely! You can add more veggies to boost nutrition. Try bell peppers, zucchini, or broccoli. You can also toss in frozen peas or carrots for extra color and crunch. To prepare this dish in advance, cook the pasta and beef as usual. Then, let them cool before storing. Use airtight containers for the fridge. This meal stays fresh for up to four days. When you're ready to eat, just reheat and enjoy! This blog post detailed a simple, tasty recipe for Minute Protein Beef Pasta. You learned the key ingredients, cooking steps, and useful tips. I shared ways to personalize your dish with different proteins and pasta shapes. Plus, I provided smart storage and reheating advice to keep leftovers fresh. Cooking is fun, and this dish proves you can create a nutritious meal easily. I hope you feel inspired to make this recipe your own!
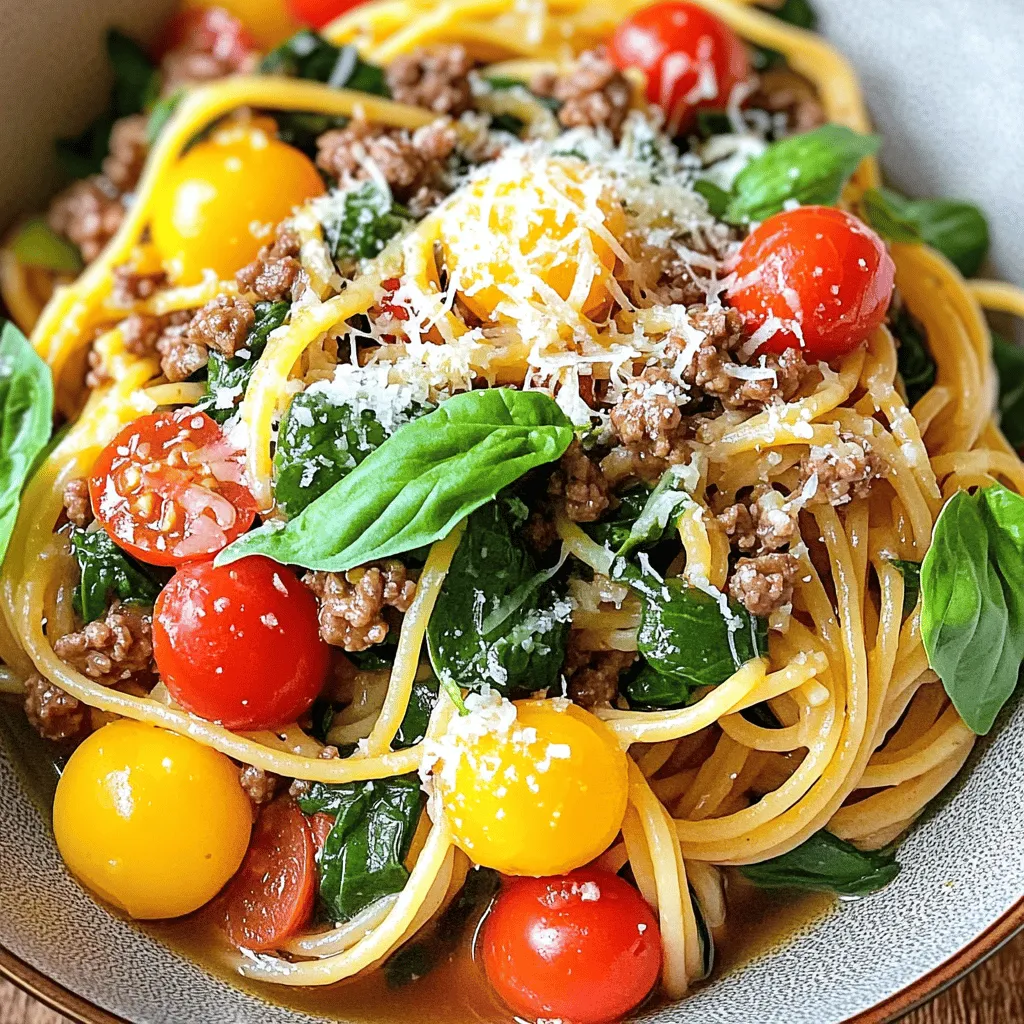
Minute Protein Beef Pasta Hearty and Simple Meal
Are you looking for a meal that’s both hearty and quick? Look no further! This Minute Protein Beef Pasta combines lean ground beef with whole
- 2 cups seitan, thinly sliced - 2 cups mushrooms (cremini or button), sliced - 1 cup coconut milk Seitan is a great meat substitute. It has a chewy texture that mimics meat. I prefer using thinly sliced seitan for this dish. It soaks up the flavors well and adds heartiness. Mushrooms provide a rich, earthy taste. You can use cremini or button mushrooms based on your preference. Coconut milk gives the sauce a creamy feel, making it rich and smooth. - 1 tablespoon extra virgin olive oil - 1 teaspoon dried thyme - 1 teaspoon smoked paprika - Sea salt and black pepper Olive oil is key for sautéing. It adds flavor and helps cook the onions and garlic. Dried thyme gives a nice herbal note. Smoked paprika adds warmth and depth to the dish. Don't forget sea salt and freshly cracked black pepper. They enhance all the flavors and make the dish pop. - Cooked pasta or rice - Fresh parsley for garnish This stroganoff pairs well with cooked pasta or rice. They soak up the creamy sauce nicely. I love to finish the dish with fresh parsley. It adds a pop of color and a fresh taste. Enjoy this meal warm, and share it with friends or family for a hearty dinner! - Preparing seitan and vegetables Start by slicing your seitan into thin strips. This helps it absorb flavors well. Next, finely dice one medium onion and mince three cloves of garlic. Slice two cups of mushrooms. You can use cremini or button mushrooms. - Making the cornstarch slurry In a small bowl, mix two tablespoons of cornstarch with two tablespoons of cold water. Stir until smooth. This will help thicken the sauce later. - Sautéing onions and garlic Heat one tablespoon of extra virgin olive oil in a spacious skillet over medium heat. Once the oil shimmers, add the diced onion. Sauté for about five minutes until the onion is soft and translucent. Then, add the minced garlic and cook for another minute until you smell its aroma. - Adding mushrooms and seitan Now, add the sliced mushrooms to the skillet. Sauté them for about five to seven minutes. You want them to turn golden brown and release their moisture. After that, introduce the thinly sliced seitan, one teaspoon of dried thyme, one teaspoon of smoked paprika, and one tablespoon of soy sauce. Cook this mixture for another five minutes, stirring occasionally. - Pouring in vegetable broth and coconut milk Pour in one cup of vegetable broth and stir well. Bring the mixture to a gentle simmer. Once simmering, reduce the heat slightly and add one cup of coconut milk. Stir to mix everything thoroughly. - Thickening the stroganoff Gradually pour the cornstarch slurry into the skillet while stirring. This will help thicken your sauce. Let the stroganoff simmer for another five minutes. Adjust the thickness to your liking. Season with sea salt and freshly cracked black pepper to taste. To make your vegan mushroom and seitan stroganoff shine, start with the mushrooms. Sauté them properly. Heat your oil until it shimmers. Add the sliced mushrooms and let them cook until they turn golden brown. This step brings out their natural flavor. Next, balance your seasonings. Use thyme and smoked paprika to add depth. These spices enhance the dish's richness. Taste as you go. Adjust salt and pepper to find your perfect balance. For the right thickness in your sauce, pay attention to the cornstarch slurry. Mix cornstarch with cold water until smooth. Gradually add it to the skillet while stirring. This helps thicken the sauce without lumps. If you prefer creaminess, consider your plant-based milk choice. Coconut milk makes the dish rich and smooth. You can also try almond or oat milk. Each will change the creaminess level, so experiment to find your favorite. Use a spacious skillet or a large pan for this recipe. A non-stick surface helps prevent sticking and makes cleanup easier. For stirring and serving, a wooden spoon works well. It won't scratch your pan and gives you good control. Use a ladle to serve the stroganoff over pasta or rice. This keeps your presentation neat and tidy. {{image_4}} You can easily swap ingredients in this dish. If you need gluten-free options, try using chickpea or lentil-based pasta instead of seitan. These alternatives offer great texture and protein. You can also use tempeh or portobello mushrooms for a hearty base. For plant-based cream, coconut milk works well, but try cashew cream or oat milk for a different flavor. Both options keep it creamy and rich. If you want a nut-free or soy-free dish, avoid using soy sauce. Instead, use coconut aminos, which add a similar umami flavor without soy. For a low-carb option, serve the stroganoff over zucchini noodles or cauliflower rice. This keeps the meal light while still satisfying. To make this stroganoff even better, add more vegetables. Carrots and bell peppers add color and crunch. You can also toss in spinach for extra nutrients. Experiment with different herbs and spices. Rosemary, basil, or even a pinch of cayenne can change the flavor profile. These additions can make your dish unique and exciting each time you cook it. To store your stroganoff, let it cool first. Then, place it in an airtight container. Keep it in the fridge for up to four days. Label the container with the date. This way, you can track how fresh it is. You can freeze stroganoff if you want to save some for later. Use a freezer-safe container and leave some space at the top. The sauce may expand when it freezes. It’s best to freeze it within two days of cooking. To thaw, move the container to the fridge overnight. You can also use the microwave for quick thawing. When reheating, use low heat on the stove. Add a splash of vegetable broth or water to loosen the sauce. In the fridge, vegan mushroom and seitan stroganoff lasts about four days. In the freezer, it can last up to three months. Always check for any off smells or changes in texture before eating. Enjoy your delicious meal! Yes, you can easily make this dish gluten-free. Instead of seitan, use jackfruit or mushrooms. Both add great texture and flavor. You can also find gluten-free seitan made from pea or rice protein. Just check the label before you buy! If you want a different taste, try almond milk or oat milk. These options work well and bring a unique flavor. For a creamier texture, use cashew cream or soy cream. Both will keep your stroganoff rich and delicious. Want a kick? Add chili flakes or cayenne pepper. Start with a small amount and taste as you go. You can also toss in some diced jalapeños for fresh heat. Experiment until you find your perfect spice level! This blog covered a delicious stroganoff recipe. We explored key ingredients like seitan, mushrooms, and coconut milk. I provided detailed steps for prepping and cooking, along with helpful tips for flavor and texture. You learned about ingredient swaps and dietary adjustments to suit your needs. Lastly, I shared important storage info to keep leftovers fresh. Remember, cooking is about creativity. Don’t be afraid to adjust and experiment. Enjoy making this dish and share your results!
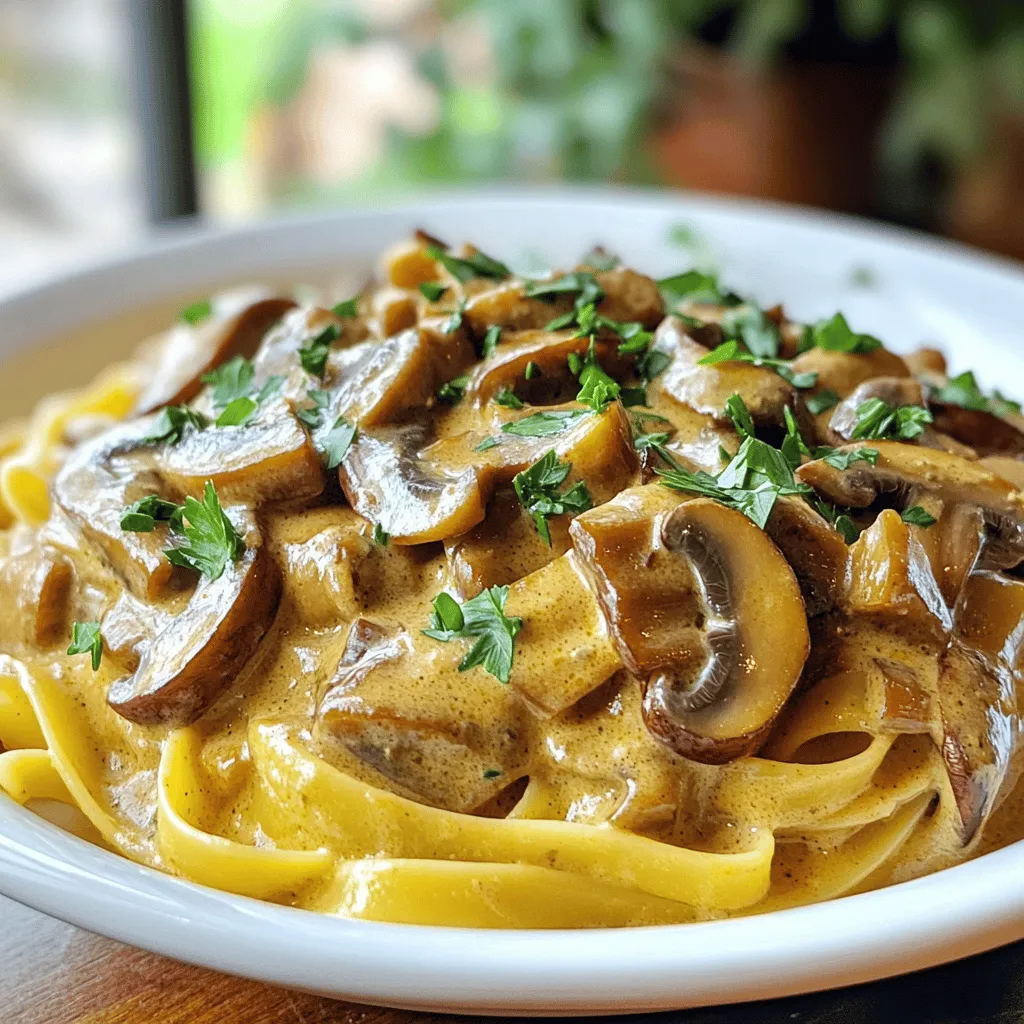
Vegan Mushroom & Seitan Stroganoff Rich and Hearty Dish
Are you ready to savor a rich and hearty meal that’s also vegan? This Vegan Mushroom & Seitan Stroganoff packs flavor and texture in every
- 1 lb boneless, skinless chicken thighs - 2 cans black beans - 1 can diced tomatoes - Fresh cilantro and lime wedges for garnish - Ancho chili powder - Ground cumin - Smoked paprika - Dried oregano - Onion - Garlic - Bell pepper - Jalapeño The core of this smoky ancho chicken chili lies in its rich and hearty ingredients. I start with boneless, skinless chicken thighs for their juiciness. They add great flavor when cooked. Then, I mix in black beans and diced tomatoes to create a base. These ingredients give the chili its creamy texture and depth. The spices are where the magic happens. Ancho chili powder brings a smoky heat, while ground cumin adds warmth. Smoked paprika gives a wonderful aroma, and dried oregano balances everything with its earthy notes. Don’t forget the veggies! Onions and garlic build a strong flavor foundation. Bell peppers add sweetness and color, while jalapeños bring a kick. You can adjust the number of jalapeños based on how spicy you like your chili. For garnishing, I use fresh cilantro and lime wedges. Cilantro adds freshness, while lime juice brightens the dish. Trust me, this combination makes each bite even better! First, we heat 2 tablespoons of olive oil in a large pot over medium heat. Wait until the oil shimmers. Then, add 1 pound of diced, boneless, skinless chicken thighs. Season the chicken with salt and pepper. Cook for about 5 to 7 minutes. Stir it occasionally until the chicken is browned and fully cooked. Once done, remove the chicken and set it aside on a plate. In the same pot, add 1 large, finely diced onion. Sauté for about 3 to 4 minutes until it becomes tender and clear. Next, stir in 2 minced garlic cloves. Cook for an additional minute until it smells great. Now, toss in 1 diced bell pepper and a fresh, minced jalapeño if you want some heat. Cook for another 3 to 5 minutes until the peppers soften. Now, it’s time to bring in the spices. Sprinkle in 2 tablespoons of ancho chili powder, 1 teaspoon of ground cumin, 1 teaspoon of smoked paprika, and 1 teaspoon of dried oregano. Stir well to coat the veggies with spices. Cook this for another minute to let the spices bloom. Return the cooked chicken to the pot. Add 2 cans of black beans, 1 can of diced tomatoes with their juices, and 1 cup of chicken broth. Mix everything together. Bring the chili to a gentle simmer. Reduce the heat to low, cover, and let it cook for 20 to 25 minutes. Stir occasionally to keep it from sticking. Taste it before serving and adjust the salt and pepper as needed. Serve the chili hot, garnished with fresh cilantro and lime wedges for a zesty finish. To make sure your chicken cooks well, use boneless, skinless thighs. Dice them into small pieces. Heat olive oil in a large pot over medium heat. Add the chicken and season with salt and pepper. Sauté for about 5 to 7 minutes until they are brown and fully cooked. For simmering, bring the chili to a gentle boil. After that, lower the heat and cover the pot. Let it simmer for 20 to 25 minutes. This helps the flavors mix well. Stir it occasionally to avoid sticking at the bottom. When serving chili, use deep, rustic bowls. This adds a cozy feel. Top each bowl with fresh cilantro for color and flavor. Don't forget lime wedges! They add a nice zesty touch when squeezed on top. To enhance the meal, serve with warm cornbread or crispy tortilla chips. The crunch pairs perfectly with the chili's rich flavors. If you want to change up the ingredients, feel free! You can add seasonal veggies. Try corn in summer or squash in fall. To change the heat level, add more jalapeño if you like it spicy. Start with a small amount, then taste before adding more. This way, you can find the right heat for you and your guests. {{image_4}} You can switch chicken for turkey in this chili. Turkey gives a leaner taste. It works well with the spices. You can also use beans instead of meat. Black beans or pinto beans add protein and fiber. This change makes it hearty and filling. To make a vegetarian or vegan version, skip the chicken. Use more beans or add lentils. Lentils cook quickly and add a nice texture. You can also use vegetable broth instead of chicken broth. This keeps the flavor rich and satisfying. For extra flavor, consider adding corn. Sweet corn balances the spice well. Cheese can also be a tasty topping. Melted cheese on top makes it creamy. Avocado slices add a fresh touch, too. They bring a cool creaminess that pairs nicely with the chili’s heat. To store leftovers properly, let the chili cool first. Then, place it in an airtight container. Make sure to seal it well. Store the chili in the fridge for up to four days. This keeps it fresh and tasty. For freezing chili, use a freezer-safe container. Leave some space at the top for expansion. You can also use freezer bags. Squeeze out the air before sealing. Chili can last in the freezer for up to three months. This is a great way to save extra portions for later. To reheat chili, use a pot on the stove over medium heat. Stir it gently to heat evenly. You can also use the microwave. Place the chili in a microwave-safe bowl and cover it loosely. Heat in short bursts, stirring in between, until it’s hot. Always check the temperature before serving. Enjoy your warm chili! Smoky Ancho Chicken Chili lasts about 3 to 4 days in the fridge. Store it in an airtight container. Always let it cool before sealing. If you want to keep it longer, freeze it instead. Yes, you can make Smoky Ancho Chicken Chili in a slow cooker. Start by sautéing the onions and garlic in a pan. Then, add everything to the slow cooker. Cook on low for 6 to 8 hours or high for 3 to 4 hours. This method makes the chili very tender and tasty. You can serve Smoky Ancho Chicken Chili with: - Warm cornbread - Crispy tortilla chips - A fresh salad - Sliced avocado - Sour cream or Greek yogurt These sides add great flavor and texture to the meal. Enjoy! This blog post covered a flavorful Smoky Ancho Chicken Chili. You gathered the right ingredients, from chicken thighs to black beans and vibrant spices. Each step, from sautéing to simmering, built layers of taste. I shared cooking tips for perfect chili and variations to suit your needs. Remember, you can always adjust flavors or try vegetarian options. Whether storing leftovers or reheating, keep the flavors strong. Enjoy creating your chili masterpiece and make it your own!
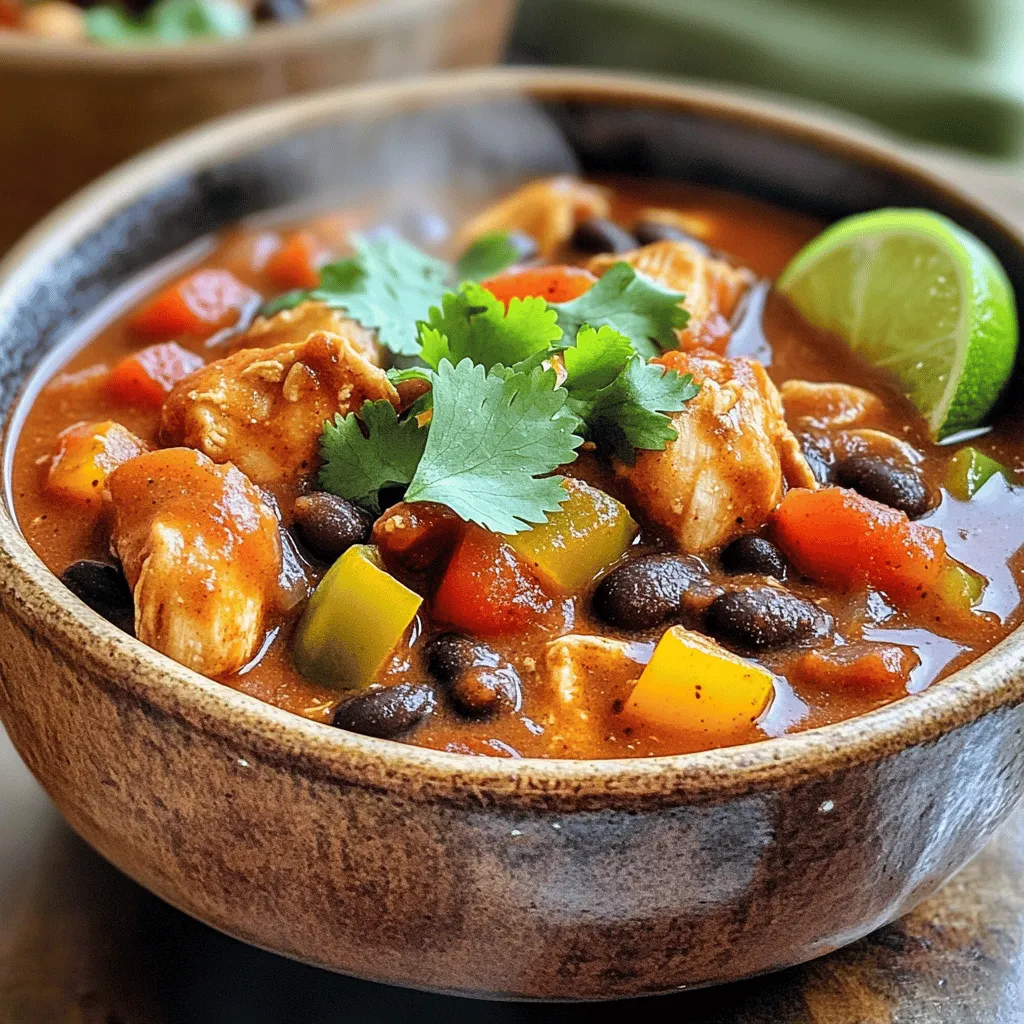
Smoky Ancho Chicken Chili Flavorful and Hearty Dish
If you crave a warm and hearty dish, you’ll love Smoky Ancho Chicken Chili. This recipe bursts with bold flavors, perfect for family dinners or
- 4 boneless, skinless chicken breasts - 1 cup seasoned breadcrumbs - 1/2 cup freshly grated Parmesan cheese - 1 cup rich marinara sauce - 1 1/2 cups shredded mozzarella cheese - 2 tablespoons extra virgin olive oil - 1 teaspoon garlic powder - 1 teaspoon Italian seasoning blend - Salt and freshly ground black pepper to taste - Fresh basil leaves for a fragrant garnish If you want to switch things up, here are some ideas: - Use panko breadcrumbs for extra crunch. - Swap regular Parmesan with Pecorino Romano for a sharper taste. - Try homemade marinara sauce for a fresh twist. - Use skin-on chicken for added richness. These options can make your dish unique while keeping it simple. - Calories: 400 - Protein: 35g - Carbohydrates: 20g - Fat: 20g - Fiber: 2g - Sodium: 600mg This meal packs flavor without too many calories. It’s a tasty way to enjoy chicken! 1. Start by preheating your oven to 375°F (190°C). This makes sure your chicken cooks evenly. 2. In a medium bowl, mix the seasoned breadcrumbs, Parmesan cheese, garlic powder, and Italian seasoning. Add salt and pepper too. Stir it well to blend all the flavors. 3. Take your chicken breasts and drizzle olive oil on them. Rub the oil in well. This adds moisture and taste. 4. Coat each chicken breast in the breadcrumb mix. Press down so the crumbs stick nicely. This gives your chicken a crispy coating. 5. Place the coated chicken on a greased baking sheet. Leave some space between the pieces. This helps them cook evenly. 6. Bake the chicken for about 20 minutes. Check if the juices run clear. This means the chicken is cooked all the way through. 7. Once cooked, take the chicken out of the oven. Spread marinara sauce on each piece. This adds a rich flavor. 8. Sprinkle mozzarella cheese over the sauced chicken. Make sure to cover it well. This will give you that gooey, cheesy goodness. 9. Put the chicken back in the oven for another 10 minutes. Wait for the cheese to melt and bubble. This creates a lovely golden crust. 10. After baking, let the chicken cool for a few minutes. This keeps the juices inside before you serve. - Use a meat thermometer if you have one. The chicken should reach an internal temperature of 165°F (75°C). - Look for clear juices when you cut into the chicken. If the juices are pink, it needs more time. - Always let the chicken rest for a few minutes after baking. This helps keep it juicy and tender. When making Easy Baked Chicken Parmesan, small errors can lead to big issues. Here are some common mistakes to avoid: - Skipping the seasoning: Don’t forget to season your breadcrumbs. It adds flavor. - Not pressing the breadcrumbs: Press the breadcrumbs onto the chicken firmly. This helps the coating stick. - Overcrowding the pan: Give each chicken piece space on the baking sheet. This ensures even cooking and crispiness. A crispy chicken Parmesan is a delight. Here are my tips to get that perfect crunch: - Use fresh breadcrumbs: Fresh breadcrumbs offer better texture and flavor. - Lightly coat with oil: A small amount of extra virgin olive oil helps the coating crisp up nicely. - Bake at the right temperature: Keep your oven at 375°F (190°C). This temperature allows for even cooking without drying out the chicken. Pairing your chicken Parmesan with the right side dishes can elevate your meal. Here are some great options: - Pasta: Serve over spaghetti or penne with extra marinara sauce. - Salad: A fresh garden salad adds a nice crunch and balances the meal. - Bread: Garlic bread or a warm baguette can soak up any leftover sauce. These tips ensure your Easy Baked Chicken Parmesan shines at the dinner table, making it a hit with family and friends. {{image_4}} You can swap chicken for turkey or pork. Both work well in this dish. Turkey cutlets are lean and cook fast. Pork chops are juicy and add flavor. Just adjust your cooking time based on thickness. If you need gluten-free, use gluten-free breadcrumbs. Many brands offer great taste. For low-carb meals, substitute breadcrumbs with crushed nuts or parmesan crisps. This keeps it crunchy without the carbs. Try eggplant or zucchini if you want a veggie version. Slice them thick, bread, and bake just like the chicken. This gives you a tasty, meat-free option. You can also use plant-based chicken for a similar taste. After enjoying your baked chicken Parmesan, you can store leftovers in the fridge. Place the chicken in an airtight container. This helps keep it fresh. It’s best to eat it within three days. Always let it cool before sealing. If you want to save leftovers for later, freezing is a great option. Wrap each piece in plastic wrap. Then place them in a freezer bag or container. Label the bag with the date. Frozen chicken Parmesan can last up to three months. When you're ready to eat, just thaw it in the fridge overnight. Reheating chicken Parmesan is easy. You can use the oven or microwave. For the oven, preheat to 350°F (175°C). Place the chicken on a baking sheet and cover it with foil. Heat for about 20 minutes until warm. If using a microwave, place a piece on a microwave-safe plate. Heat on medium power for 2-3 minutes. Check to ensure it’s hot throughout. Enjoy your tasty meal again! Yes, you can make Baked Chicken Parmesan ahead of time. After you bread the chicken, place it in a baking dish. You can cover it with plastic wrap or foil. Store it in the fridge for up to 24 hours. When ready to cook, just remove the cover and bake it. You may need to add a few extra minutes to the cooking time. This method is great for busy nights. If you don’t have breadcrumbs, don’t worry! You can use crushed crackers or cornflakes instead. Both options add a nice crunch. You can even use ground oats if you want a healthier choice. Just make sure to season them like you would breadcrumbs. This keeps the flavors bold and tasty. To know when your Chicken Parmesan is fully cooked, check the internal temperature. It should reach 165°F (75°C). You can use a meat thermometer for this. If you cut into the chicken and see clear juices, it is also a good sign. The chicken should not be pink in the middle. Always check to be safe, as undercooked chicken can be risky. This blog post covered everything you need to create Baked Chicken Parmesan. We explored ingredients, measurements, and nutrition. You learned step-by-step instructions for making the dish perfectly. I shared tips to avoid common mistakes and variations to suit different diets. You also received storage guidelines and answers to frequently asked questions. Now, with these tools, you can make a delicious meal. Enjoy experimenting in the kitchen!
Easy Baked Chicken Parmesan Quick and Tasty Dinner
If you’re looking for a quick and delicious dinner, try my Easy Baked Chicken Parmesan! This dish combines juicy chicken, zesty sauce, and gooey cheese