Desserts

- 2 cups unsweetened applesauce - 1 cup almond flour - 1/2 cup unsweetened cocoa powder - 1/2 cup sugar-free maple syrup or agave syrup - 1/2 cup chopped nuts (optional: walnuts or pecans) - 1 teaspoon pure vanilla extract - 1 teaspoon baking powder - 1/2 teaspoon ground cinnamon - 1/4 teaspoon sea salt - 1/2 cup dark chocolate chips (sugar-free, if preferred) I love using applesauce in my brownies. It adds natural sweetness and moisture. Almond flour gives a nice texture without gluten. Cocoa powder brings rich chocolate flavor. I often choose sugar-free maple syrup or agave syrup. These keep our brownies sweet but healthy. Nuts add crunch, while vanilla extract enhances the flavor. Baking powder helps the brownies rise. Cinnamon adds warmth and depth. A touch of sea salt balances the sweetness. Lastly, dark chocolate chips make every bite a treat! Each serving of these brownies has about 150 calories. They are low in carbs and sugar. Using apples in the recipe gives many health benefits. Apples are high in fiber and vitamins. They help with digestion and keep our hearts healthy. This recipe is great for anyone wanting a dessert without added sugar. It is simple, healthy, and so delicious! {{ingredient_image_2}} First, you need to preheat your oven. Set it to 350°F (175°C). While the oven heats, get your baking pan ready. Line an 8x8-inch pan with parchment paper. Make sure it hangs over the edges. This helps you lift the brownies out later. In a large bowl, mix the wet ingredients first. Add 2 cups of unsweetened applesauce, 1 cup of almond flour, and 1/2 cup of unsweetened cocoa powder. Then, pour in 1/2 cup of sugar-free maple syrup and 1 teaspoon of pure vanilla extract. Stir until the mixture is smooth. Next, add the dry ingredients. Sprinkle in 1 teaspoon of baking powder, 1/2 teaspoon of ground cinnamon, and 1/4 teaspoon of sea salt. Mix well until you see no dry bits left. If you want some crunch, fold in 1/2 cup of chopped nuts and 1/2 cup of dark chocolate chips. This adds extra flavor and texture. Pour the batter into your prepared pan. Smooth the top with a spatula. Now, put it in the oven and bake for 25 to 30 minutes. To check if they are done, insert a toothpick in the center. It should come out clean or with a few moist crumbs. After baking, take the pan out of the oven. Let the brownies cool in the pan for about 15 minutes. Use the parchment paper to lift them out. Place them on a wire rack to cool completely. Once cool, cut them into squares or rectangles, and they are ready to enjoy! You can use several sugar substitutes in your brownies. Here are some popular choices: - Sugar-free maple syrup - Agave syrup - Erythritol These sweeteners help keep the brownies tasty without added sugar. When using them, adjust the flavor and sweetness. Start with half the amount of sugar. Taste the batter and add more if needed. Each sweetener has a unique flavor, so experiment to find your favorite. To make your brownies even better, try adding nuts or chocolate chips. Nuts like walnuts and pecans give a nice crunch. Chop them into small pieces for even distribution. Dark chocolate chips add extra richness. Use sugar-free chips if you want to stay sugar-free. You can also enhance flavor with spices. Ground cinnamon adds warmth. Consider adding a pinch of nutmeg or vanilla powder for depth. These small additions can make a big difference in taste. Presentation makes your brownies even more tempting. Here are some fun ideas: - Dust the top with cocoa powder for a fancy look. - Cut the brownies into fun shapes with cookie cutters. Serving them with sugar-free whipped cream is a great touch. It adds creaminess and balances the flavors. Enjoy your beautiful, sugar-free apple brownies! Pro Tips Use Fresh Applesauce: For the best flavor, make your own unsweetened applesauce using fresh apples. This will enhance the taste and texture of your brownies. Experiment with Flours: Try substituting almond flour with coconut flour or a gluten-free blend for different flavor profiles and textures. Add Spices: Enhance the flavor by adding spices like nutmeg or ginger to the batter for a warm, cozy taste that complements the chocolate. Storage Tips: Store leftover brownies in an airtight container at room temperature for up to 3 days or refrigerate for longer freshness. {{image_4}} You can change the taste of your sugar-free apple brownies easily. Adding peanut butter or almond butter gives a rich, nutty flavor. Just mix in about 1/2 cup with your wet ingredients. This will add creaminess and healthy fats. You can also spice things up with seasonal flavors. Try adding nutmeg or pumpkin spice for a warm touch. Just a pinch can make a big difference. It’s a great way to match the season or your mood. Making these brownies gluten-free is simple. Use gluten-free almond flour instead of regular flour. This keeps the texture light and fluffy while staying true to the recipe. If you want dairy-free options, swap out the chocolate chips. Use dairy-free, sugar-free chocolate chips instead. This way, everyone can enjoy the brownies without worry. You can play with different flours and sweeteners. If almond flour is not your choice, try coconut flour or oat flour. Just remember to adjust the liquid in your recipe as needed. You can also mix in different nuts or fruits. Walnuts or pecans work well, but you can try hazelnuts or even dried cherries. Each will bring its own unique taste and texture to your brownies. To keep your sugar-free apple brownies fresh, use an airtight container. You can keep them at room temperature for a few days. If you want them to last longer, store them in the fridge. This helps keep the texture nice and moist. You can also freeze them. Wrap each brownie in plastic wrap and then place them in a freezer bag. This method works well for long-term storage. Sugar-free apple brownies taste best within a week. When stored properly, they can last up to two weeks in the fridge. If you freeze them, they can last for about three months. Always check for signs of spoilage. If the brownies smell off or have a strange texture, it's best to toss them out. Freshness is key for the best flavor! To reheat your brownies without drying them out, use a microwave. Place them on a microwave-safe plate and cover with a damp paper towel. Heat for about 10-15 seconds. This keeps them soft and moist. You can also warm them in the oven. Preheat the oven to 350°F (175°C) and bake for about 5-10 minutes. This method gives them a nice warm texture, perfect for serving with a scoop of sugar-free whipped cream. Using regular sugar adds sweetness but comes with downsides. Sugar can spike blood sugar levels. When you use sugar-free options, you lower calorie intake. This means you can enjoy treats without guilt. Sugar-free sweeteners often have fewer carbs, making them a better choice for many diets. They also keep the brownies moist and tasty, just like regular sugar. To check if your brownies are done, use a toothpick. Insert it into the center of the brownies. If it comes out clean or with a few moist crumbs, they are ready. Here’s a quick checklist: - The top should look set and slightly shiny. - The edges will pull away from the pan. - A toothpick test shows no wet batter. These signs mean you can take them out of the oven! Yes, you can swap applesauce with other ingredients. For example, mashed bananas work well too. They add natural sweetness and moisture. Yogurt can also be a good choice, making the brownies rich and creamy. Just remember, each swap changes the taste and texture. Applesauce keeps the brownies soft and adds a nice apple flavor. So, choose wisely based on what you want! These sugar-free apple brownies are simple and delicious. You learned the ingredients needed, how to mix and bake them, and tips for great results. Remember, you can customize these brownies to fit your taste. Keep them fresh by storing them properly. Enjoy experimenting with flavors and ingredients. This recipe not only satisfies your sweet tooth but also boosts health. So, get baking and treat yourself to a guilt-free dessert!
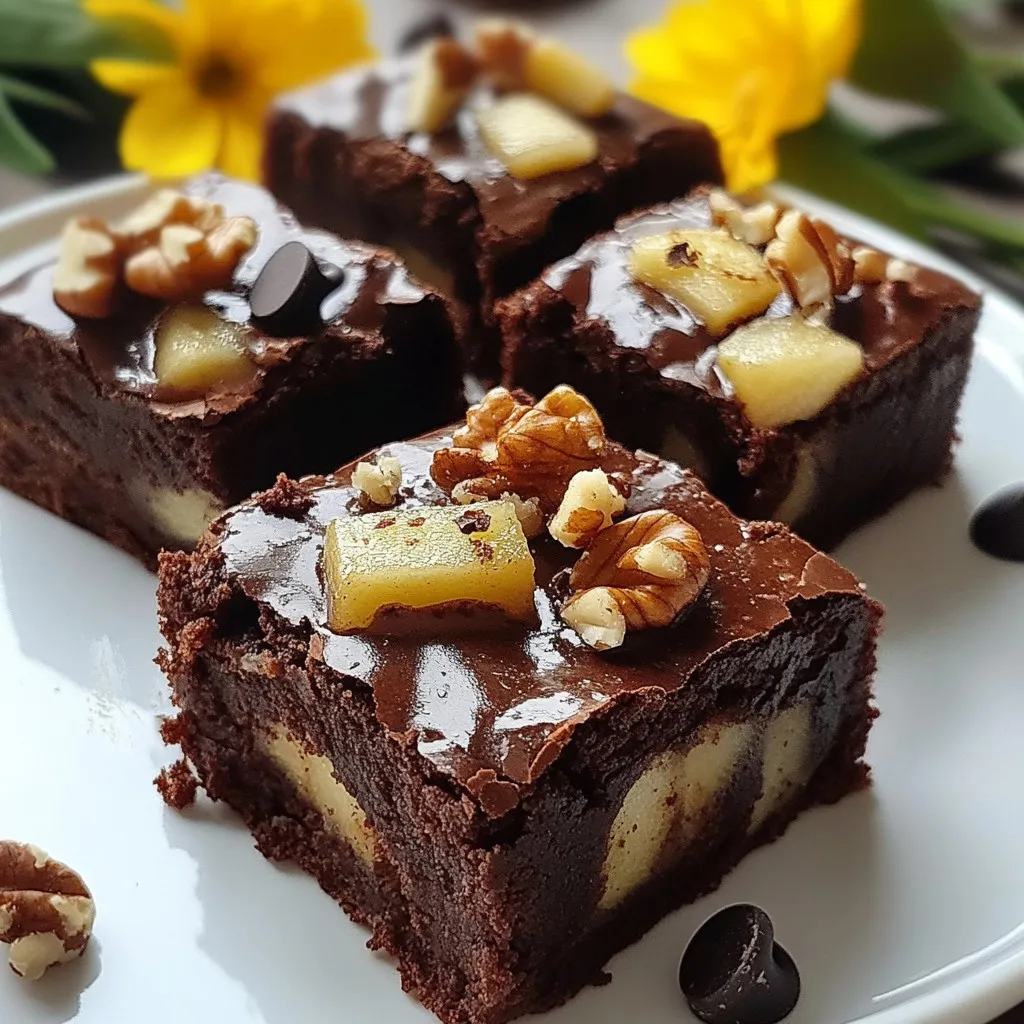
Sugar Free Apple Brownies Simple and Delicious Treat
Craving a sweet treat that won’t leave you guilty? Try my Sugar Free Apple Brownies! Packed with wholesome ingredients, these brownies are both simple to
To make the perfect Chocolate Chip Banana Bread Mug Cake, gather these simple ingredients: - 1 ripe banana, thoroughly mashed - 1/4 cup all-purpose flour - 2 tablespoons brown sugar - 1/4 teaspoon baking powder - 1/4 teaspoon baking soda - A pinch of salt - 2 tablespoons milk (any kind you prefer) - 1 tablespoon vegetable oil - 1/4 teaspoon pure vanilla extract - 2 tablespoons semi-sweet chocolate chips If you don't have an ingredient, no problem! Here are some easy swaps: - Use oat flour or almond flour instead of all-purpose flour. - Replace brown sugar with coconut sugar or regular white sugar. - Use yogurt or a dairy-free milk for the milk. - Canola oil or melted coconut oil can replace vegetable oil. - For vanilla extract, try almond extract for a different taste. Want to make it your own? Here are some fun add-ins: - Add chopped nuts like walnuts or pecans for crunch. - Toss in some dried fruit like raisins or cranberries for a sweet twist. - Mix in a spoonful of peanut butter or Nutella for added richness. - Sprinkle in spices like cinnamon or nutmeg for extra flavor. {{ingredient_image_2}} To start, grab a microwave-safe mug. First, take your ripe banana and mash it well with a fork. Make sure it is smooth and free of lumps. Next, add the all-purpose flour, brown sugar, baking powder, baking soda, and a pinch of salt to the mug. Mix gently until just combined. It's important not to overmix here. Now, pour in your choice of milk, vegetable oil, and pure vanilla extract. Stir until the batter is smooth and there are no dry bits left. Finally, fold in the semi-sweet chocolate chips. If you like a little crunch, add some chopped nuts. Place your mug in the microwave and cook on high for 1 minute and 30 seconds. Keep an eye on it after the first minute. The cake should rise and feel firm in the center. If it looks a bit wobbly, give it a few more seconds. Every microwave is different, so adjust the time if needed. Once the cake is cooked, let it cool for about one minute. This helps it firm up a bit. For a nice touch, you can sprinkle a few extra chocolate chips on top. A dollop of whipped cream is also a great choice. You can serve the mug cake right in the mug for a fun look. If you're feeling fancy, transfer it to a small plate. A dusting of powdered sugar or a drizzle of chocolate syrup can really make it pop! For a fluffy mug cake, mash the banana well. No lumps should remain. Mix the dry and wet ingredients just until combined. Overmixing makes it dense. Also, check your microwave wattage. Cooking time may vary slightly. You may need a few extra seconds for a large mug. Do not skip the baking powder or baking soda. They help the cake rise. Be careful with the microwave. Cooking it for too long makes it dry. If you want a gooey center, stop cooking when it feels soft but set. Avoid using cold ingredients; they can affect the batter's rise. Add a pinch of cinnamon for warmth. A splash of almond extract can add depth. You can swap half the chocolate chips for nuts. Walnuts or pecans give a nice crunch. For extra sweetness, consider drizzling honey or maple syrup on top after cooking. This adds a delightful finish to your treat. Pro Tips Use Overripe Bananas: The riper the banana, the sweeter and more flavorful your mug cake will be. Look for bananas with brown spots for the best results. Don’t Overmix: When combining the dry and wet ingredients, mix just until combined. Overmixing can lead to a dense and tough texture. Monitor Cooking Time: Microwave wattages vary, so keep an eye on your mug cake as it cooks. Check it after one minute to avoid overcooking. Customize Your Toppings: Feel free to get creative with toppings! Add a scoop of ice cream, a drizzle of caramel, or even some fresh fruit for extra flavor. {{image_4}} You can change the flavor of your mug cake easily. Instead of banana, try using applesauce. It gives a nice sweet taste. You can also mix in spices like cinnamon or nutmeg. For a tropical twist, add some crushed pineapple. If you love peanut butter, swirl a spoonful into the batter. Each choice makes a tasty treat. Making this mug cake fit your diet is simple. For a gluten-free option, swap all-purpose flour for almond or coconut flour. Use a gluten-free flour blend for best results. If you want a vegan mug cake, replace the milk with almond milk or oat milk. You can also use a flax egg instead of the oil. Mix one tablespoon of ground flaxseed with two and a half tablespoons of water. Let it sit for five minutes to thicken. Serve your mug cake right in the mug for a fun look. If you want to impress, plate it with a dusting of powdered sugar. A drizzle of chocolate syrup or caramel sauce adds a nice touch. Pair it with a scoop of vanilla ice cream for extra delight. You can also top it with berries for freshness. If you have any leftover mug cake, let it cool first. Then, cover it loosely with plastic wrap or place it in a small airtight container. Store it in the fridge for up to two days. The cake may become a bit denser, but it will still taste great. To reheat your mug cake, place it in the microwave. Heat for about 10 to 15 seconds. Check if it’s warm enough for your taste. If not, add a few more seconds. Be careful not to overheat, as this can dry it out. You can also freeze the mug cake. After it cools down, wrap it tightly in plastic wrap. Place it in a freezer-safe bag or container. It can stay in the freezer for up to one month. When you're ready to enjoy it, thaw it in the fridge overnight, then reheat. You can check if your mug cake is done by gently touching the center. If it feels firm and bounces back, it is ready. The cake should rise nicely while cooking. Keep an eye on it as it cooks. After one minute, check for doneness. If the center still feels wet, give it another few seconds. This mug cake is best made fresh. It only takes a few minutes. If you want to prepare ahead, you can mix the dry ingredients and store them. When ready to eat, add the wet ingredients and microwave. This keeps the flavor and texture great. If you don’t have a banana, try unsweetened applesauce. It adds moisture and sweetness. You can also use pureed pumpkin for a different twist. Both options work well and keep the cake soft. You now have a complete guide on making the perfect mug cake. We covered ingredients, substitutions, and optional add-ins. I shared step-by-step instructions for prep, cooking, and cooling. We also explored tips for texture and common mistakes to avoid. Don't forget the fun variations to suit any diet or taste. Plus, I included storage and reheating tips for leftovers. Enjoy experimenting and creating your perfect mug cake! Your kitchen adventure awaits.
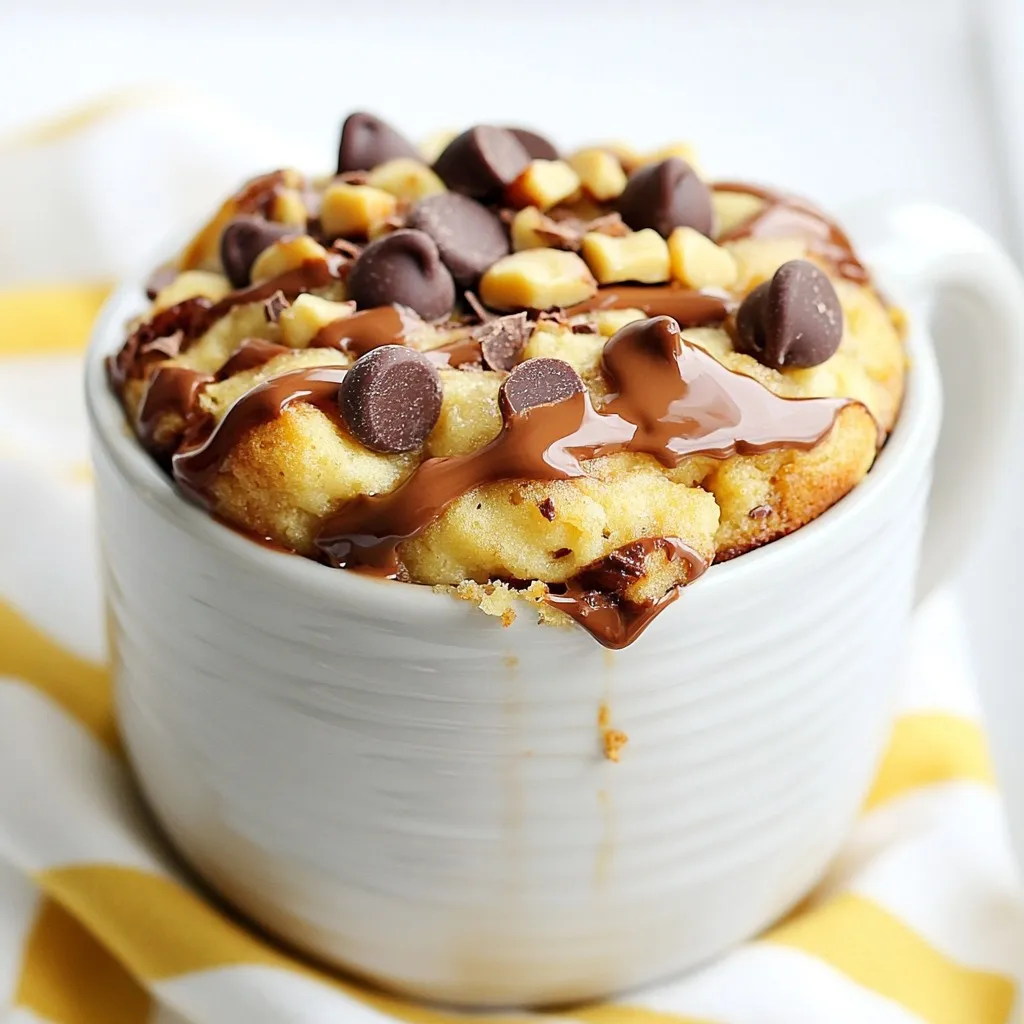
Chocolate Chip Banana Bread Mug Cake Delightful Treat
Are you craving something sweet and quick? This Chocolate Chip Banana Bread Mug Cake is your perfect solution! In just minutes, you can enjoy a
- 1 box of vanilla cake mix - 3 large eggs - 1/2 cup vegetable oil - 1 cup water - 1/2 cup frosting (store-bought or homemade) - 1 cup white chocolate chips - 1 tablespoon coconut oil (for melting chocolate) - Sprinkles (for decoration) - Lollipop sticks To make these tasty cake pops, you need just a few simple items. Start with a box of vanilla cake mix. This gives you a light and fluffy base. You will also need three large eggs, which help bind the cake together. Use half a cup of vegetable oil to keep the cake moist. One cup of water helps mix everything well. Next, frosting is key. You can use store-bought frosting or make your own if you prefer. Adding half a cup will give the cake pops their sweet flavor and sticky texture. For the coating, you’ll need one cup of white chocolate chips. These melt down for a smooth dip. To help with melting, add one tablespoon of coconut oil. It makes the chocolate smooth and easy to work with. Don’t forget sprinkles! They add fun colors and a festive look to your cake pops. Lastly, you'll need lollipop sticks to hold your treats. These simple ingredients come together to make a delightful snack that’s sure to impress! {{ingredient_image_2}} Set your oven to 350°F (175°C). Grease a 9x13 inch baking pan well. This step helps the cake not stick later. In a large bowl, mix together the cake mix, 3 large eggs, 1/2 cup of vegetable oil, and 1 cup of water. Use a whisk or electric mixer. Mix until smooth and blended. Pour the batter into your greased pan. Spread it evenly for even cooking. Bake for 25-30 minutes. Check with a toothpick; it should come out clean when done. After baking, take the cake out and let it cool completely in the pan. Once cool, crumble the cake into a large bowl. Use your fingers or a fork to break it apart. Add 1/2 cup of frosting to the crumbled cake. Mix well until you have a sticky texture. Using your hands helps blend it better. Scoop out small portions of the mixture. Roll them into balls about 1 inch in size. Place the cake balls on a lined baking sheet. Refrigerate the cake balls for about 30 minutes. This makes them firm and easier to dip later. In a microwave-safe bowl, combine 1 cup of white chocolate chips with 1 tablespoon of coconut oil. Melt in the microwave in 30-second bursts. Stir in between until smooth. Dip the end of each lollipop stick into the melted chocolate. Then insert the stick into the center of each cake ball. This helps the sticks stay put. Carefully dip each cake pop into the melted chocolate. Make sure to cover the whole ball. Let any extra chocolate drip off before setting it down. While the chocolate is still wet, add your toppings. Use sprinkles, edible glitter, or anything else you like. Place the decorated cake pops upright in a styrofoam block or cake pop stand. This helps the chocolate harden without smudging. Once the chocolate is hard, your cake pops are ready! Store extras in an airtight container at room temperature or in the fridge. To create the best cake pops, you need the right texture. After baking your cake, let it cool completely. Crumble it well; no big chunks should remain. Mix in frosting until it feels sticky. If it's too dry, add a little more frosting. If it's too wet, add more cake crumbs. Roll the mixture into small balls, about one inch wide. This helps them hold together. Chill the balls for about 30 minutes. This makes them firm and easier to dip. Melting chocolate can be tricky. To avoid clumping or burning, use a microwave-safe bowl. Combine your white chocolate chips and coconut oil. Melt the mixture in 30-second bursts. Stir after each round to check the progress. When it's smooth, it's ready to use. If it looks thick, add a tiny bit more coconut oil. This keeps the chocolate smooth and glossy for dipping. Decorating your cake pops should be fun and easy. After dipping each pop in chocolate, sprinkle your toppings right away. This helps the sprinkles stick well. Use a wide variety of colors for a bright look. If you want uniform decoration, try using a small sieve to shake sprinkles over the cake pops. This creates an even layer. Let the pops set upright until the chocolate hardens. Pro Tips Use Room Temperature Ingredients: Allow your eggs and frosting to come to room temperature before mixing. This helps create a smoother batter and better incorporation of ingredients. Experiment with Flavors: You can add different extracts, like almond or coconut, to the cake batter for a unique flavor twist. Just a teaspoon can elevate your cake pops! Keep the Chocolate Warm: If your melted chocolate starts to thicken while dipping, simply reheat it in the microwave for a few seconds. This ensures a smooth, even coating on your cake pops. Make Ahead: Cake balls can be made in advance and stored in the refrigerator for up to a week before dipping. This is a great time-saver for parties! {{image_4}} You can switch up the flavor of your cake pops. Try chocolate or red velvet. You can even use lemon or carrot cake for a fun twist. Each flavor brings a new taste to your treat. Frosting can change the whole cake pop vibe. Cream cheese frosting adds a rich taste. Chocolate frosting gives a sweet, bold flavor. You can also try peanut butter or funfetti frosting for variety. Each option makes each bite special. If you want a healthier treat, there are options. Use whole wheat cake mix instead of regular. You can swap the frosting with Greek yogurt for a lighter choice. Try using dark chocolate instead of white chocolate. These swaps keep the fun while making it a bit healthier. To keep your cake pops fresh, store them in an airtight container. This helps keep moisture out. You can use a cake pop stand if you have one. If not, place them upright in a cup or glass. Keep them at room temperature for short times. Freezing cake pops is easy. First, let them cool after you dip them in chocolate. Place them in a single layer on a baking sheet. Freeze them for about 2 hours. Once frozen, transfer them to a freezer bag. Squeeze out excess air before sealing. To reheat, simply let them thaw at room temperature for about 30 minutes. Cake pops last about 3 days at room temperature. If you store them in the fridge, they can last up to a week. Just make sure they stay in an airtight container. This keeps them from drying out. Always check for any signs of spoilage before eating. Yes, you can use a different flavor! Try chocolate, lemon, or red velvet. Each flavor brings a unique taste. Just follow the same steps in the recipe. You will still mix it with frosting for the right texture. This way, you can make cake pops that suit your taste! For dipping, I recommend white chocolate chips. They melt smoothly and give a sweet taste. You can also use milk chocolate or dark chocolate if you prefer. Just make sure to add a bit of coconut oil when melting. This helps the chocolate stay smooth and shiny. You can refrigerate the cake pops for up to one week. Make sure they are in an airtight container. This keeps them fresh and tasty. If you want to keep them longer, try freezing them. They last up to three months in the freezer. Yes, you can make cake pops without frosting. Instead, use cream cheese or melted chocolate to bind the cake. Just mix it well with the crumbled cake. This can make the pops taste richer and creamier. If your cake pops are falling off the sticks, try chilling them longer. Make sure they are firm before dipping. You can also dip the stick into melted chocolate before inserting it. This helps the stick stay put. If they still fall, the cake may be too moist. Add a bit more cake or let it dry a bit before rolling. You learned how to make delicious cake pops from scratch. We covered the simple ingredients, easy steps, and helpful tips. Remember, practice makes perfect, especially with melting chocolate and shaping balls. Try different flavors or frostings to make it your own. Store your cake pops carefully to keep them fresh. Enjoy sharing these tasty treats with friends and family! Cake pops are fun, tasty, and perfect for any occasion. You can create memories with every bite. Now, it's time to get baking and have fun!
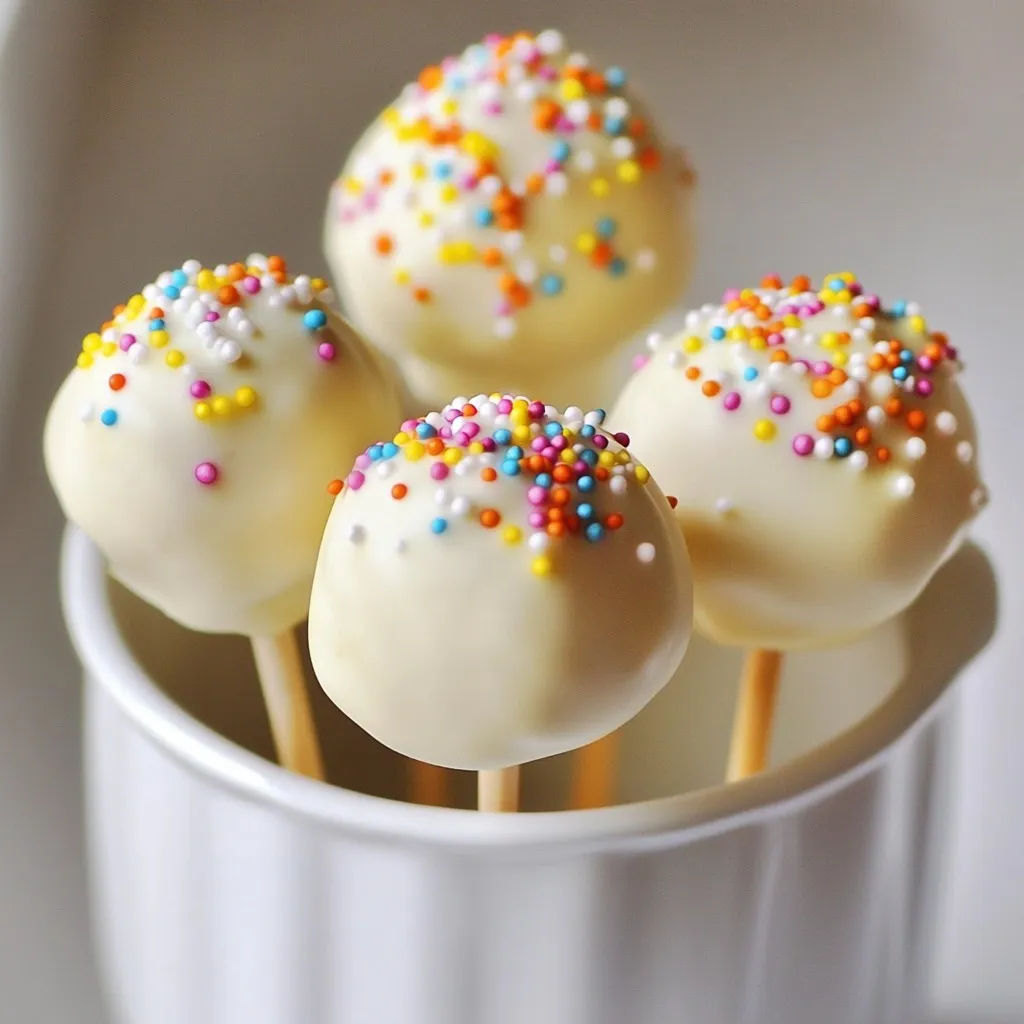
Copycat Starbucks Cake Pops Simple and Tasty Treat
Craving a sweet treat that brings the joy of your favorite coffee shop home? Look no further! These Copycat Starbucks Cake Pops are simple to
To make a tasty high-protein chocolate chia pudding, gather these items: - 1/2 cup chia seeds - 2 cups almond milk (or your favorite plant-based milk) - 1/3 cup unsweetened cocoa powder - 1/4 cup maple syrup (or honey for a non-vegan option) - 1 tablespoon pure vanilla extract - 1/4 teaspoon sea salt - 1/2 cup Greek yogurt (or dairy-free yogurt for a vegan adaptation) - Optional toppings: fresh berries, sliced bananas, a mix of nuts, or seeds These ingredients come together to create a rich, creamy, and protein-packed dessert. Chia seeds are great for fiber and protein. Almond milk keeps it light and adds flavor. Unsweetened cocoa powder gives that chocolatey taste without extra sugar. Maple syrup or honey adds a hint of sweetness. Vanilla extract and sea salt enhance all these flavors. Finally, Greek yogurt makes the pudding creamy and adds more protein. Feel free to customize with your favorite toppings. I love adding fresh berries or nuts for extra crunch. This pudding is not just a treat; it’s a fun and healthy way to enjoy chocolate! {{ingredient_image_2}} Start by adding the chia seeds, almond milk, and cocoa powder to a large bowl. Next, pour in the maple syrup, vanilla extract, and sea salt. Use a whisk to mix everything together. Make sure there are no clumps of cocoa powder. This step is vital for a smooth texture. Take your time and mix well. After mixing, let the mixture sit for about 5 minutes. This resting period is essential for the chia seeds to absorb the liquid. It also helps improve the pudding's texture. After 5 minutes, whisk it again to break up any clumps of chia seeds that may have formed. This ensures a nice, even consistency. Now, cover the bowl with plastic wrap or divide the mixture into jars with lids. Refrigerate for at least 4 hours, but overnight is best. This chilling time allows the chia seeds to expand and create that pudding-like texture we all love. Once your pudding has set, take it out of the fridge. Stir it well to make it smooth. Now, gently fold in the Greek yogurt. This step adds a rich creaminess and boosts the protein content. Mix until fully combined for the best flavor and texture. It's time to serve! Portion the pudding into bowls or jars. For a fun twist, add fresh berries, sliced bananas, or a mix of nuts on top. These toppings not only taste great but also add color and crunch. You can even layer the pudding and toppings in clear jars for a beautiful presentation. To get the best texture, soak the chia seeds well. The soaking time is key. I suggest letting the mixture sit for at least four hours or overnight. This allows the chia seeds to absorb the liquid fully. If you want a thicker pudding, add a little more chia seeds. If you prefer it thinner, reduce the seeds. Whisking is very important during mixing. It helps break up clumps and evenly distribute the cocoa powder. A good whisking ensures a smooth finish. When serving, layer the pudding in clear jars. This adds a nice touch to your dessert. It shows off the rich, dark chocolate color. You can also add fresh fruits or nuts in layers. This creates a beautiful contrast. Try to use bright berries or sliced bananas. The colors will pop and draw attention. You can also sprinkle some nuts or seeds on top for added crunch. A well-presented dish tastes even better! You can easily swap sweeteners in this recipe. If you want a lower-calorie option, use stevia or agave syrup. For a richer flavor, consider maple syrup or honey. You can also switch the yogurt. For a dairy-free version, use coconut yogurt or almond yogurt. These options still provide protein without dairy. Making these small changes keeps the recipe healthy and tasty. Pro Tips Soak Chia Seeds: For an extra creamy texture, soak the chia seeds in the almond milk for at least 30 minutes before adding the other ingredients. This helps them expand and absorb more liquid. Sweetness Adjustment: Taste the pudding before adding all the maple syrup. Depending on your preference and the toppings you choose, you may want to adjust the sweetness level. Flavor Variations: Experiment with different flavor extracts, such as almond or peppermint, to give your chocolate chia pudding a unique twist! Make Ahead: This pudding keeps well in the fridge for up to 5 days, making it a great option for meal prep. Just add toppings right before serving to keep them fresh. {{image_4}} Chia seeds are a great source of protein. Just two tablespoons of chia seeds pack about 4 grams of protein. They also have fiber and omega-3 fatty acids. These nutrients help keep you full and support heart health. Adding Greek yogurt increases the protein content even more. A half-cup of Greek yogurt provides around 10 grams of protein. This boost makes the pudding a filling snack or breakfast choice. Chia seeds are small but mighty. They are rich in antioxidants, which help fight free radicals in your body. They also provide calcium, magnesium, and iron, which are vital for strong bones and healthy blood. Using almond milk instead of regular milk has its perks too. Almond milk is lower in calories and often fortified with vitamins like E and D. It is a good option for those who are lactose intolerant or prefer plant-based diets. Plus, it has a light, nutty flavor that pairs well with chocolate. You can easily change the flavor of your chocolate chia pudding. Start by adding extracts like mint or orange. Just a few drops can make a big difference. You can also mix in spices like cinnamon or nutmeg. These add warmth and richness. If you want a vegan option, use dairy-free yogurt. Almond yogurt works great. It keeps the pudding creamy. You can also swap out maple syrup for other sweeteners, like agave or stevia. This keeps it sweet while fitting your diet. There are fun ways to serve your pudding! You can layer it in a parfait glass with fruits and nuts. This looks great and tastes amazing. Another idea is to blend it up for a chocolate chia smoothie. Just add ice and your favorite milk for a quick, tasty drink. To store leftover chia pudding, place it in an airtight container. This keeps it fresh and prevents odors from other foods in the fridge. You can also divide it into jars for easy grab-and-go snacks. Yes, you can make this pudding ahead of time! Prepare it the night before and let it chill. This way, the chia seeds can soak, and you will have a tasty treat ready for breakfast or dessert. Absolutely! This pudding is packed with nutrition. Chia seeds provide fiber and protein, while Greek yogurt adds calcium. Kids will love the rich chocolate taste, making it a fun way to get healthy nutrients. The pudding will last up to five days in the fridge. Just make sure it stays sealed in an airtight container. If you notice any changes in smell or texture, it’s best to toss it out. This blog post covered everything you need to make a delicious chocolate chia pudding. We reviewed the ingredients, mixing techniques, and chilling methods. I shared tips for perfecting texture and presentation, plus variations for flavor and dietary needs. In conclusion, this recipe is fun and easy to make. You can serve it in many ways. Enjoy creating your pudding and feel good knowing it’s healthy, too.
High-Protein Chocolate Chia Pudding Delight
Craving a sweet treat that fuels your body? Make my High-Protein Chocolate Chia Pudding Delight! Packed with nutritious ingredients like chia seeds and Greek yogurt,
- 1 cup unsalted butter - 1 cup granulated sugar - 1 cup packed brown sugar - 2 large eggs - 2 teaspoons pure vanilla extract - 3 cups all-purpose flour - 1 teaspoon baking soda - 1/2 teaspoon salt - 1 cup crushed chocolate sandwich cookies (like Oreos) - 1 cup white chocolate chips You can swap some ingredients based on your needs. Here are a few ideas: - Butter alternatives: Use coconut oil or vegan butter for a dairy-free option. - Sugar alternatives: Try coconut sugar or a sugar substitute like Stevia. - Egg replacements: Use flaxseed meal mixed with water or applesauce for a vegan option. These substitutions let you customize the cookies to fit your diet while keeping them tasty! {{ingredient_image_2}} First, preheat your oven to 350°F (175°C). This step makes sure your cookies bake evenly. While the oven heats, line a baking sheet with parchment paper. This helps prevent sticking and makes cleanup easy. In a large bowl, cream together the softened butter, granulated sugar, and brown sugar. Use an electric mixer on medium speed for about 3-4 minutes. The mix should be light and fluffy. Next, add the eggs one at a time. Mix well after each egg. Then, stir in 2 teaspoons of pure vanilla extract. Make sure it’s fully blended. In a separate bowl, whisk together 3 cups of all-purpose flour, 1 teaspoon of baking soda, and 1/2 teaspoon of salt. This mixture adds structure to your cookies. Gradually add this dry mix to the wet ingredients. Mix on low speed until everything is just combined. Be careful not to overmix, or your cookies may be tough. Now comes the fun part! Gently fold in 1 cup of crushed chocolate sandwich cookies and 1 cup of white chocolate chips. Use a spatula or a wooden spoon to ensure they are evenly spread throughout the dough. This adds a nice crunch and extra flavor. Using a tablespoon or cookie scoop, drop balls of dough onto your prepared baking sheet. Leave about 2 inches between each ball to allow for spreading. Bake in the preheated oven for 10-12 minutes. The edges should be light golden brown. The centers should look slightly soft. This will give you chewy cookies! After baking, let them cool on the sheet for 5 minutes. Then, transfer cookies to a wire rack to cool completely. To get soft cookies, bake them just a bit less. When the edges turn light brown, pull them out. The centers will look soft, but they will firm up as they cool. This helps keep them chewy and tasty. You can make these cookies even better! Try adding nuts or dark chocolate chips. They add a nice crunch and depth. You can also use different extracts like almond or mint. Each will give a new twist to your cookies. Make your cookies look great on a plate. Arrange them in a circle or stack them high. For a special touch, drizzle melted white chocolate on top. Sprinkle some crushed chocolate cookies on the drizzle for extra flair. This makes them look even more tempting! Pro Tips Chill the Dough: For thicker, chewier cookies, refrigerate the dough for at least 30 minutes before baking. This helps to prevent spreading and enhances the flavor. Use Room Temperature Ingredients: Ensure your eggs and butter are at room temperature for better emulsification, resulting in a smoother, fluffier cookie dough. Don’t Overbake: Cookies can continue to cook on the baking sheet after being removed from the oven. Pull them out while they are still slightly underbaked for a perfect chewy texture. Experiment with Mix-Ins: Feel free to customize your cookies by adding nuts, dried fruits, or different types of chocolate chips for a unique twist on the classic recipe. {{image_4}} You can switch up your cookies and cream cookies by trying different sandwich cookies. Use flavors like peanut butter or mint. This change can really spice things up! You can also add your favorite ice cream flavors into the mix. Think of cookies that taste like cookie dough or even cookies and cream ice cream. These variations keep your cookies fun and exciting. If you need gluten-free cookies, swap regular flour for gluten-free flour. Make sure it has a good binding agent. You can also create vegan cookies by replacing eggs with flaxseed meal or applesauce. Use coconut oil or vegan butter instead of regular butter. These swaps let everyone enjoy these tasty treats. Make your cookies fit the season! For holidays, add peppermint extract for a winter taste or pumpkin spice for fall. You can also use colorful sprinkles to match celebrations like birthdays or holidays. These fun touches make your cookies eye-catching and delightful to eat. Store your cookies in an airtight container. This keeps them fresh and soft. You can keep them at room temperature for up to a week. Make sure the container is cool and dry. For longer storage, freeze your cookies. Place them in a freezer-safe bag, and remove as much air as possible. Write the date on the bag to track freshness. You can freeze cookies for up to three months. Just thaw them at room temperature before enjoying. Cookies last about one week at room temperature. If you store them in the freezer, they last three months. Check for signs of spoilage. Look for a change in color or texture. If they smell off, it's best to toss them. A fresh cookie should feel soft and smell sweet. Enjoy your cookies while they're at their best! Yes, you can use dark or milk chocolate chips. Dark chocolate adds a rich taste. Milk chocolate brings a sweeter flavor. Try both to find your favorite! To make your cookies flatter, add less flour. You can also chill the dough for a shorter time. Another tip is to flatten the dough balls before baking. Yes, you can make the dough ahead of time. Store it in the fridge for up to 3 days. You can also freeze it for up to 3 months. Just thaw it before baking. If your cookies are dry, check your flour amount. Too much flour can cause dryness. Add a touch of milk or butter to the dough. Bake them for a shorter time next time. In this blog post, we explored how to make delicious cookies using simple ingredients. We covered ingredient substitutions, step-by-step instructions, and tips for perfect cookies. You learned about variations, storage methods, and answered common questions. Baking cookies can be fun and rewarding. With these tips and tricks, you will make tasty treats every time. So grab your ingredients, start baking, and enjoy every bite!
Cookies and Cream Cookies Tasty and Easy Recipe
Get ready to indulge in a delightful treat: Cookies and Cream Cookies! This simple recipe brings together the rich flavors of chocolate sandwich cookies and
To make Cannoli Cookie Squares, you need these simple ingredients: - 1 cup all-purpose flour - 1/2 cup unsweetened cocoa powder - 1/2 cup granulated sugar - 1/2 teaspoon baking powder - 1/4 teaspoon salt - 1/2 cup unsalted butter, softened - 1 large egg - 1 teaspoon vanilla extract (for dough) - 1 cup ricotta cheese - 1/4 cup powdered sugar - 1 teaspoon vanilla extract (for filling) - 1/4 cup mini chocolate chips - Zest of 1 orange (optional) - 1/4 teaspoon ground cinnamon (optional) Each ingredient plays a key role. The flour gives the base structure. Cocoa powder adds rich flavor. Sugar adds sweetness, while baking powder helps the squares rise. Salt enhances all the flavors. Butter makes the dough creamy. The egg binds everything together. For the filling, ricotta cheese adds a creamy texture. Powdered sugar sweetens it up. The second vanilla extract keeps the flavors bright. Mini chocolate chips bring bursts of chocolate. The optional orange zest adds a fresh note, and cinnamon adds warmth. Gather these items before you start. It makes cooking smooth and fun! {{ingredient_image_2}} - Step 1: Preheat the oven and prepare the baking pan Start by preheating your oven to 350°F (175°C). Grease a 9x9-inch baking pan with butter or line it with parchment paper. This helps the squares come out easily. - Step 2: Make the cookie base In a large bowl, mix together 1 cup of all-purpose flour, 1/2 cup of cocoa powder, 1/2 cup of granulated sugar, 1/2 teaspoon of baking powder, and 1/4 teaspoon of salt. Whisk these dry ingredients together until they are well combined. - Step 3: Cream the butter and mix wet ingredients In another bowl, beat 1/2 cup of softened butter until creamy. Add 1 large egg and 1 teaspoon of vanilla extract. Mix well until smooth and combined. - Step 4: Combine mixtures into a cohesive dough Slowly add the dry mixture to the wet mixture. Stir with a spatula or mix on low speed. Continue until a soft dough forms. - Step 5: Spread the dough in the baking pan Take about two-thirds of the dough and press it evenly into the bottom of your prepared pan. This will be the cookie base. - Step 6: Prepare the ricotta filling In a separate bowl, mix together 1 cup of ricotta cheese, 1/4 cup of powdered sugar, 1 teaspoon of vanilla extract, and 1/4 cup of mini chocolate chips. If you want, add the zest of 1 orange for some brightness. - Step 7: Spread the filling over the base Carefully spread the ricotta mixture over the cookie base in the pan. Make sure to cover it evenly for the best flavor. - Step 8: Top with remaining dough Crumble the leftover dough over the ricotta filling. This will create a nice topping that bakes beautifully. - Step 9: Bake the assembled Cannoli Cookie Squares Place the pan in your preheated oven. Bake for about 25-30 minutes. The top should feel set when it’s done. - Step 10: Cool and slice for serving Once baked, let the squares cool in the pan for about 10 minutes. Then, move them to a wire rack to cool completely. Slice into squares and enjoy! To make these Cannoli Cookie Squares shine, start with room temperature ingredients. When your butter and egg are at room temp, they blend better. This makes your dough smooth and creamy. You want your dough to be easy to work with. If it sticks, try dusting your work surface with a little flour. This keeps the dough from clinging and makes it fun to mold. Dusting the top with powdered sugar is a must! It gives a lovely snowy look. Use a fine sieve to sprinkle it evenly, making it look neat. Serve your cookie squares on a pretty plate. Add fresh berries on the side for color and freshness. The tartness of berries pairs well with the sweet squares. Enjoy the delightful contrast on your plate! Pro Tips Chill Your Dough: For easier handling, refrigerate the cookie dough for about 30 minutes before pressing it into the pan. This helps prevent sticking and makes it easier to create an even base. Use Quality Ricotta: Choose a high-quality, creamy ricotta cheese for the filling. This will enhance the flavor and texture of your Cannoli Cookie Squares. Experiment with Flavors: Feel free to add different flavorings to the ricotta filling, such as almond extract or a splash of espresso, for a unique twist on the classic cannoli taste. Storage Tips: Store leftover squares in an airtight container in the refrigerator. They will keep well for up to 3 days, but are best enjoyed fresh! {{image_4}} You can change the taste of Cannoli Cookie Squares in fun ways. Start by trying different types of chocolate. Use dark chocolate chips for a richer flavor or white chocolate for a sweeter touch. Mixing in flavored chocolate can add a nice twist. If you want to switch up the ricotta cheese, consider using mascarpone. This cheese has a smooth texture and adds creamy richness. You can also try cottage cheese for a lighter filling. Just blend it well for a smooth consistency. For those who need gluten-free options, swap the all-purpose flour for a gluten-free blend. Many brands offer great alternatives that work well in baking. Just make sure to check labels for safety. If you follow a vegan diet, you can replace the butter and eggs. Use coconut oil or vegan butter for a similar taste. For the egg, try a flaxseed meal mixed with water. This will help bind the ingredients. To keep your Cannoli Cookie Squares fresh, store leftovers in an airtight container. This helps avoid drying out. Place wax paper between layers to prevent sticking. I recommend using a glass or plastic container with a tight seal. This protects the squares and keeps them tasty for days. You can freeze Cannoli Cookie Squares for longer storage. Cut them into squares and wrap each piece in plastic wrap. Then, place the wrapped squares in a freezer bag or container. This keeps them fresh and prevents freezer burn. When you’re ready to enjoy them, thaw the squares in the fridge overnight. For the best flavor, let them sit at room temperature for a bit before serving. Enjoy your sweet treat anytime! Can I make these Cannoli Cookie Squares ahead of time? Yes, you can make these cookie squares a day before. Just store them in an airtight container. This keeps them fresh and tasty. What can I substitute for ricotta cheese if I don’t have any? You can use cottage cheese or mascarpone cheese instead of ricotta. Blend them well for a smooth filling. How long do leftovers last? Leftovers last for about 3-4 days in the fridge. Make sure to keep them in a sealed container. Can I use a different pan size? You can use a larger pan, but the squares may bake faster. Keep an eye on them as they cook. Is it okay to add nuts or fruits to the recipe? Yes! You can add chopped nuts or dried fruits. They will give extra texture and flavor to the squares. You now know how to make Cannoli Cookie Squares with a simple recipe. We covered all the ingredients needed, step-by-step instructions, and helpful tips for success. You can also try different flavors and storage methods for your treats. Enjoy making these delicious cookie squares for any occasion! Your family and friends will love them, and they’re easy to share and customize. Get creative and have fun in the kitchen!
Cannoli Cookie Squares Delicious Dessert Delight
Are you ready to indulge in a dessert that combines the best of cannoli and cookies? Cannoli Cookie Squares offer a rich, creamy filling nestled
- 1 cup almond flour - 1/4 cup rolled oats - 1/4 cup maple syrup or honey - 1/4 cup almond butter - 1/2 teaspoon pure vanilla extract - 1/4 teaspoon fine sea salt - 1/4 cup dark chocolate chips - 2 tablespoons chia seeds (optional) You need simple ingredients to make edible protein cookie dough. Almond flour gives it a nutty flavor and thick texture. Rolled oats add fiber and a chewy bite. Maple syrup or honey sweetens the dough just right. Almond butter brings creaminess and healthy fats. Pure vanilla extract adds a lovely aroma. A pinch of fine sea salt balances the sweetness. Dark chocolate chips create rich pockets of flavor. Chia seeds are optional, but they boost nutrition and add crunch. - Calories per serving: 210 - Protein content: 6 grams - Dietary considerations: This recipe is gluten-free and can be made vegan by using maple syrup and almond butter. Each serving packs about 210 calories, making it a satisfying snack. With 6 grams of protein, it helps keep you full. The ingredients are gluten-free, so many can enjoy it. Plus, you can swap the honey for maple syrup to make it vegan. This cookie dough is healthy and perfect for a quick energy boost. {{ingredient_image_2}} First, gather your ingredients. You will need almond flour, rolled oats, almond butter, maple syrup, vanilla extract, sea salt, and chocolate chips. 1. Mixing dry ingredients: In a medium bowl, add 1 cup of almond flour and 1/4 cup of rolled oats. Use a spatula or spoon to mix them well. This ensures even distribution. 2. Combining wet ingredients: Next, add 1/4 cup of almond butter, 1/4 cup of maple syrup, 1/2 teaspoon of vanilla extract, and 1/4 teaspoon of fine sea salt to the bowl. Mix vigorously until you form a smooth cookie dough. Now, it’s time to make your cookie dough even better. 1. Incorporating chia seeds: If you want added nutrition, fold in 2 tablespoons of chia seeds. They add a nice crunch and boost your snack. 2. Stirring in chocolate chips: After that, gently stir in 1/4 cup of dark chocolate chips. This will create sweet chocolate bursts in every bite. You can enjoy this snack in different ways. 1. Enjoy immediately or chill: You can eat your cookie dough right away. If you prefer it firmer, chill it in the fridge for about 30 minutes. 2. Presentation tips for serving: To serve, scoop the dough into small bowls or ramekins. Drizzle a little extra almond butter on top and sprinkle with more chocolate chips for a fun touch. Enjoy it with a spoon and share the joy! To get the best flavor, adjust the sweetness. Start with 1/4 cup of maple syrup. If you want it sweeter, add more. Mix well after each addition. Texture matters too. If your dough feels too dry, mix in a bit more almond butter. If it’s too sticky, add a little almond flour. Chilling the dough helps it firm up nicely. You can swap almond butter for other nut butters. Peanut butter or cashew butter works well. This change can give your dough a new twist. For sweeteners, try agave syrup or coconut sugar. Each sweetener will change the flavor a bit. Experiment to find your favorite. Customizing flavors is fun! Add a pinch of cinnamon or nutmeg for warmth. You can also try a splash of almond extract for extra depth. Pair your cookie dough with sliced fruit, like apples or bananas. You can even serve it with Greek yogurt for a creamy mix. This adds protein and makes a great snack! Pro Tips Adjust Sweetness: Feel free to customize the sweetness of your cookie dough by adding more maple syrup or honey based on your preference. Texture Variation: For a different texture, try adding in some crushed nuts or seeds along with the chocolate chips for added crunch. Chill for Firmness: If you prefer a firmer consistency, chilling the dough in the refrigerator for about 30 minutes will help solidify it. Serving Suggestions: Serve the cookie dough with fresh fruit slices or on top of yogurt for a delightful and nutritious treat. {{image_4}} You can change the flavor of your cookie dough easily. Here are two tasty ideas: - Peanut butter protein cookie dough: Swap almond butter for peanut butter. This adds a rich, nutty taste. You can use crunchy peanut butter for more texture. - Cookie dough with dried fruits: Mix in chopped dried fruits, like cranberries or apricots. This adds sweetness and chewiness. Boosting nutrition in your cookie dough is simple. Here are some options: - Adding protein powder: Stir in a scoop of your favorite protein powder. This makes the snack more filling and supports muscle health. - Incorporating nuts or seeds: Add chopped nuts or seeds. Almonds, walnuts, or pumpkin seeds give extra crunch and nutrition. Change your cookie dough with seasonal flavors. Here are two fun ideas: - Pumpkin spice edible cookie dough: Mix in pumpkin puree and spices like cinnamon and nutmeg. This gives a cozy fall flavor. - Chocolate mint holiday variant: Add peppermint extract and mini chocolate chips. This creates a refreshing holiday treat that’s perfect for winter. These variations add fun and health to your edible protein cookie dough. Enjoy mixing and matching to find your favorite! To keep your edible protein cookie dough fresh, store it in an airtight container. Place it in the refrigerator for up to one week. This helps maintain its flavor and texture. If you want to keep it longer, freezing is a great option. Use a freezer-safe container or a zip-lock bag. Make sure to press out all the air before sealing. This can last for up to three months. When you’re ready to enjoy it again, thaw it in the fridge overnight. How long can it be stored? In the fridge, expect about a week of freshness. In the freezer, you can enjoy it for three months. Signs of spoilage include a sour smell or any discoloration. If you notice these changes, it's best to toss it. Always check before indulging! Got leftover cookie dough? You can use it in many fun ways! Mix it into your morning yogurt for a sweet twist. You can also bake mini cookies with it. Just scoop out small amounts and bake at 350°F for 8-10 minutes. Another idea is to add it to smoothies for a creamy texture. The possibilities are endless! Yes, Edible Protein Cookie Dough is safe to eat raw. The main ingredient is almond flour. Almond flour is pasteurized, so it poses no threat. Just make sure to use fresh ingredients. Avoid using regular flour, as it can contain harmful bacteria. You can store this cookie dough in the fridge for up to five days. Keep it in an airtight container. For longer storage, freeze it for up to three months. Just thaw it in the fridge before eating. Absolutely! To make it dairy-free, use maple syrup instead of honey. You can also swap the almond butter with any nut or seed butter. This keeps it vegan and delicious. Serve your cookie dough in small bowls for a fun treat. You can drizzle extra almond butter on top. Sprinkle more chocolate chips for added sweetness. Try pairing it with fresh fruit or yogurt for a balanced snack. This blog post covered how to make tasty edible protein cookie dough. We explored the key ingredients, helpful tips, and fun variations. You learned about storage methods to keep your cookie dough fresh. Remember, this treat is not only delicious but can be adjusted for dietary needs. I hope you feel inspired to create your own cookie dough. Enjoy making and sharing this delightful recipe with others!
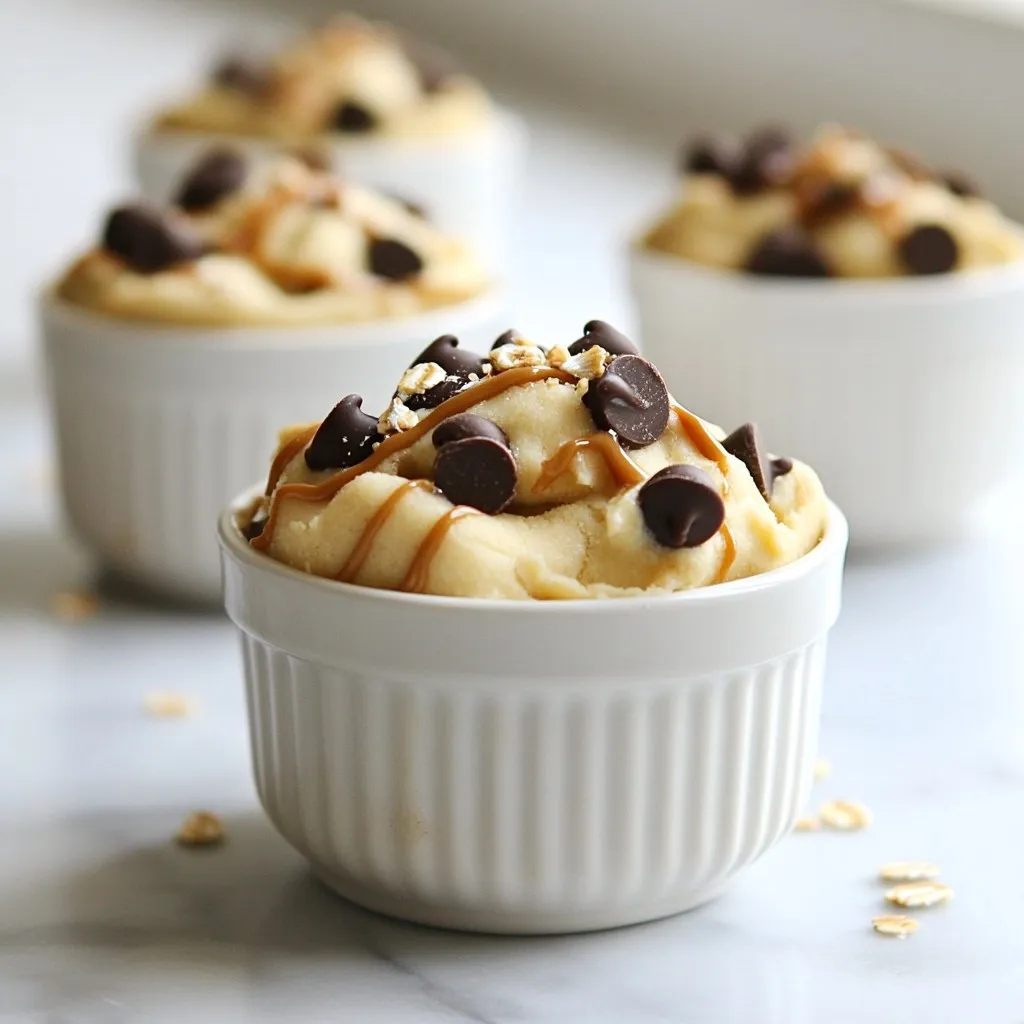
Edible Protein Cookie Dough Easy and Healthy Snack
Craving a delicious snack that’s both tasty and nutritious? You’re in the right place! Edible protein cookie dough offers a fun twist on traditional treats.
- 2 ¼ cups all-purpose flour - 1 teaspoon baking soda - ½ teaspoon fine sea salt - 1 cup unsalted butter, softened - ¾ cup granulated sugar - ¾ cup packed brown sugar - 1 teaspoon pure vanilla extract - 2 large eggs, at room temperature These ingredients create the base for your cookies. The all-purpose flour gives structure. Baking soda helps them rise, while sea salt enhances flavor. The unsalted butter adds richness, and the mix of sugars brings sweetness. - 2 cups semi-sweet chocolate chips - 1 cup chopped nuts (walnuts or pecans) Semi-sweet chocolate chips add that classic chocolate flavor. You can also add nuts for crunch and texture. Both options make these cookies even better. - 2 tablespoons cornstarch Cornstarch plays a key role here. It helps keep cookies soft and chewy. Adding it to the flour mix creates a tender texture. This is what makes these cookies truly special! {{ingredient_image_2}} Start by preheating your oven to 350°F (175°C). This temperature gives you the perfect chewy cookie. As the oven warms, prepare two baking sheets by lining them with parchment paper. This step stops the cookies from sticking. In a medium bowl, combine 2 ¼ cups of all-purpose flour, 1 teaspoon of baking soda, ½ teaspoon of fine sea salt, and 2 tablespoons of cornstarch. Whisk these ingredients well until they blend. This mixture enhances the chewiness of your cookies. In a large bowl, use an electric mixer to beat 1 cup of softened unsalted butter with ¾ cup of granulated sugar and ¾ cup of brown sugar. Mix on medium speed for 3 to 4 minutes. The goal is a light and fluffy texture. This creamy base is key to a great cookie. Next, add 1 teaspoon of pure vanilla extract to your butter mixture. Then, add 2 large eggs, one at a time. Mix well after each egg. This step ensures a smooth mix. Be careful not to overmix; this keeps your cookies tender. Now, slowly introduce the dry mixture into the wet ingredients. Use low speed to combine them, mixing just until blended. Then, carefully fold in 2 cups of semi-sweet chocolate chips and 1 cup of chopped nuts if you like. This adds crunch and flavor to your cookies. Scoop rounded balls of dough onto your prepared sheets, leaving space between each cookie. Bake them for 10 to 12 minutes. Look for golden brown edges with soft centers. Once baked, let the cookies cool on the sheets for 5 minutes before transferring them to wire racks to cool completely. Enjoy the warm, chewy goodness! To get the best chewiness in your cookies, butter temperature matters. Use softened butter, not melted or cold. Softened butter blends better with sugars, creating a fluffy mixture. Mix on medium speed for about 3-4 minutes. This time ensures air gets in, making the cookies rise and stay chewy. Adding cornstarch is another key trick. It holds moisture and gives a soft texture. Use 2 tablespoons in your dry mix. This little change makes a big difference! Every oven is a bit different. Some run hot, while others are cooler. Start with the baking time of 10-12 minutes, but keep an eye on your cookies. Look for golden brown edges and soft centers. If your cookies look too doughy, give them another minute or two. Use an oven thermometer if you can. This tool helps you know your oven's true temperature. Adjust as needed for the best results. Serving your cookies right can elevate the experience. Enjoy them warm, paired with a cold glass of milk. This classic combo is a favorite. Arrange the cookies on a pretty plate. For a gourmet touch, sprinkle a tiny bit of sea salt on top. This adds a nice flavor contrast and makes them look fancy. Sharing these cookies will surely impress your friends and family! Pro Tips Chill the Dough: For even chewier cookies, refrigerate the dough for at least 30 minutes before baking. This helps to enhance the flavors and prevents spreading. Use Quality Chocolate: Opt for high-quality semi-sweet chocolate chips for a richer flavor. You can also mix in dark chocolate for a more intense taste. Don’t Overbake: Keep an eye on your cookies while baking. They should look slightly undercooked in the center when you take them out, as they will continue to firm up while cooling. Experiment with Add-ins: Feel free to get creative! Add-ins like dried fruit, coconut flakes, or different types of nuts can add unique flavors and textures to your cookies. {{image_4}} You can have fun with chocolate in these cookies. Instead of semi-sweet chocolate chips, try dark chocolate or milk chocolate. Each type gives a different taste. You can even mix them! If you want something extra special, use white chocolate chips. They add sweetness and a creamy flavor. Want a twist? Add some peppermint chips around the holidays for a festive touch. If you need gluten-free cookies, swap out the all-purpose flour for a gluten-free blend. Make sure it has xanthan gum for the right texture. For a vegan version, use coconut oil instead of butter. You can replace the eggs with flaxseed meal or applesauce. Both options keep the cookies moist and tasty. These swaps let everyone enjoy these chewy delights. Get creative with seasonal ingredients! In the fall, add pumpkin spice or chopped apples for a cozy vibe. During summer, toss in some fresh berries for a burst of flavor. You can also make themed cookies for holidays. Use red and green sprinkles at Christmas or heart-shaped cookies for Valentine’s Day. These ideas make your cookie baking even more fun! For short-term storage, keep your cookies in an airtight container. This helps lock in moisture and keep them soft. If you want to save cookies for longer, use the freezer. You can store them in a zip-top bag. Label the bag with the date. This way, you can enjoy them later without losing flavor. To maintain flavor and texture over time, avoid exposing cookies to air. If they start to dry out, add a slice of bread to the container. The bread will help keep the cookies moist. Make sure to check the container every few days. Remove the bread if it becomes stale to avoid any off-flavors. Freezing cookie dough is a great way to enjoy fresh cookies anytime. To freeze, scoop the dough into balls and place them on a baking sheet. Freeze for about an hour until firm. Then, transfer the dough balls into a zip-top bag. To bake, thaw the dough overnight in the fridge. Bake as normal, adjusting the time if the dough is cold. Enjoy fresh cookies right from your oven! Chewy cookies come from the right mix of ingredients and baking methods. Here’s how it works: - Butter: Softened butter adds moisture. It helps cookies stay soft. - Brown Sugar: This sugar has more moisture than white sugar. It gives cookies a chewy texture. - Cornstarch: Adding cornstarch keeps cookies tender. It traps moisture and adds chewiness. - Baking Time: Underbaking the cookies a bit leaves the center soft. This chewy center is key! Mix these together, and you get a perfect chewy cookie! Yes, you can make some swaps! Here are common substitutions: - Butter: Use margarine for a dairy-free option. It may change the flavor slightly. - Sugars: You can use all granulated sugar. This makes cookies less chewy but still tasty. - Nuts: Skip nuts if you have nut allergies or don’t like them. The cookies stay chewy without them. - Chocolate Chips: Swap semi-sweet chips for milk or dark chocolate chips. This changes the taste but keeps it delicious. Each swap may change the texture a bit, but you’ll still enjoy great cookies! Fresh cookies keep well for about 1 week. Here’s how to store them: - Room Temperature: Keep cookies in an airtight container. They stay soft and chewy. - Freezing: For longer storage, freeze cookies. They last up to 3 months in the freezer. When you want to eat them, just thaw at room temperature. They’ll taste fresh again! Bake your cookies at 350°F (175°C). This temperature is perfect for chewy cookies. - Baking too hot: If the oven is too hot, cookies may bake too fast. This leads to a hard texture. - Baking too cool: If the oven is too cool, cookies may not spread well. They won’t be as chewy. Keep an eye on them while baking. Look for golden edges and soft centers! This blog post covered the essential ingredients for chewy cookies and the step-by-step process. You learned how to mix dry and wet ingredients and the special role of cornstarch. I shared tips to ensure your cookies turn out perfect every time. Remember, you can adjust flavors and even make dietary swaps. Keep your cookies fresh with proper storage. Now, you’re ready to bake delicious, chewy cookies anyone will love! Enjoy the process and have fun experimenting with new flavors!
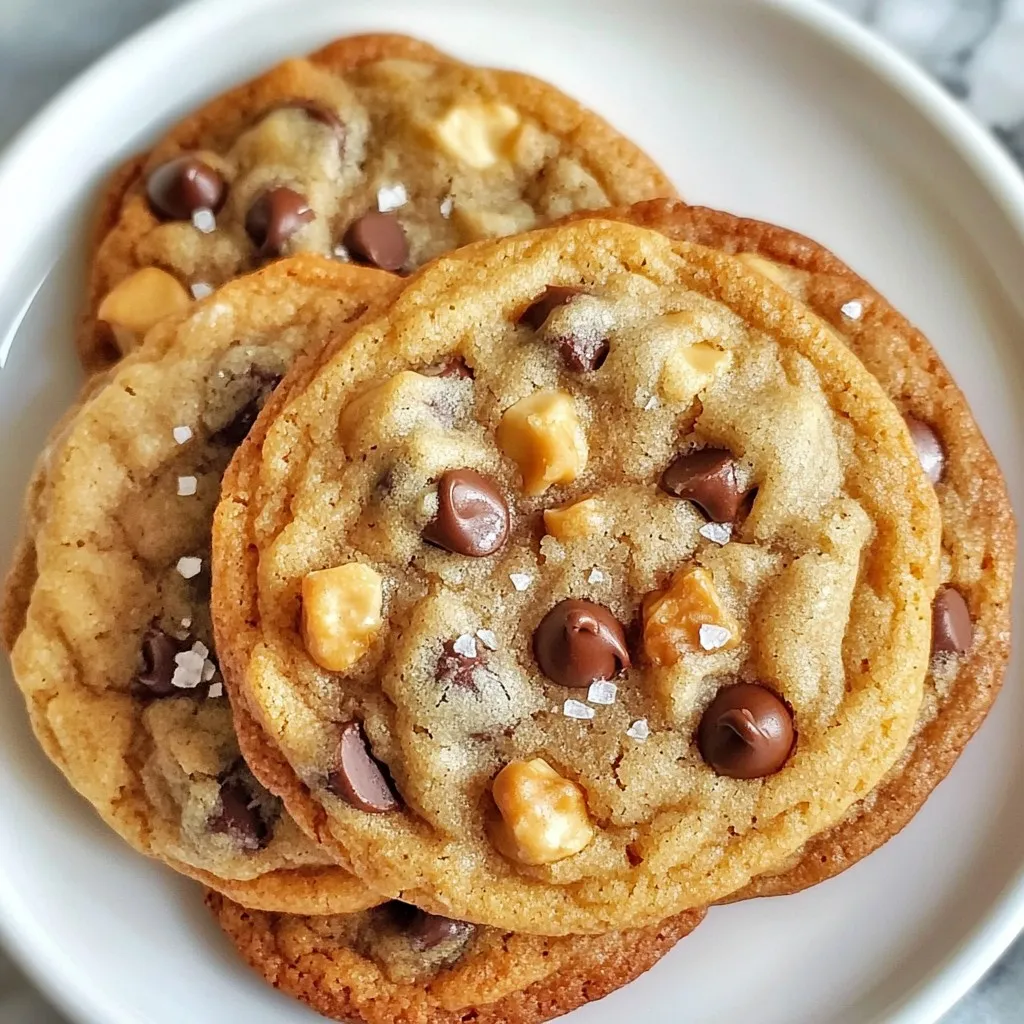
Best Chewy Chocolate Chip Cookies Simple and Tasty
If you crave a cookie that’s soft, chewy, and packed with chocolate, you’re in for a treat! In this guide, I’ll show you how to
- 1 cup Greek yogurt - 2 scoops chocolate protein powder - 1 tablespoon unsweetened cocoa powder To make Fluffy Chocolate Protein Fluff, I start with Greek yogurt. It gives a creamy base full of protein. I add chocolate protein powder for flavor and extra protein. Unsweetened cocoa powder adds a rich chocolate taste without extra sugar. - 2 tablespoons honey or maple syrup - Adjust based on sweetness preference For sweetness, I use honey or maple syrup. You can change the amount based on how sweet you want it. Start with two tablespoons and taste it. If you want more sweetness, add a little more. - 1 teaspoon vanilla extract - 1/4 teaspoon sea salt - 1/4 cup almond milk (or alternative milk) - Optional toppings: dark chocolate shavings, fresh berries, crushed nuts Next, I mix in vanilla extract for flavor and sea salt to enhance the taste. Almond milk is important for making the fluff light and airy. You can use any milk you like. For extra fun, add toppings like dark chocolate shavings, fresh berries, or crushed nuts. These add texture and make the dish look great! {{ingredient_image_2}} To start, grab a large mixing bowl. Add 1 cup of Greek yogurt. Next, add 2 scoops of chocolate protein powder. Then, mix in 1 tablespoon of unsweetened cocoa powder. Pour in 2 tablespoons of honey or maple syrup, based on how sweet you want it. Don't forget 1 teaspoon of vanilla extract and 1/4 teaspoon of sea salt. Stir everything together until it looks combined and smooth. Now comes the fun part! Use a handheld mixer or a whisk to beat the mixture. Do this for about 1-2 minutes. You want it creamy, with no lumps left. This step helps add air to the fluff, making it light and fluffy. Slowly pour in 1/4 cup of almond milk while you keep mixing. This is key to getting that fluffy, mousse-like texture. Keep mixing until everything is well blended and airy. Once it feels light, taste it. If you want it sweeter, add more honey or maple syrup. Now, you’re ready to serve! You can make the fluff sweeter if you like. After mixing, taste it. If you want more sweetness, add honey or maple syrup. Start with a little, then mix again. This way, you can find your perfect level of sweetness. To serve the fluff, spoon it into small bowls. This makes it look great. You can use clear glasses to show off the layers. It makes the dessert feel fun and fancy. Add some toppings to make your fluff even better. Dark chocolate shavings add rich flavor. Fresh berries give a nice burst of freshness. Crushed nuts add a crunchy texture. Mix and match these toppings for a fun twist! Pro Tips Use Cold Ingredients: Ensure your Greek yogurt and milk are chilled for a fluffier texture. Cold ingredients whip up better, resulting in a light mousse-like consistency. Experiment with Sweeteners: Feel free to substitute honey or maple syrup with stevia, agave, or any preferred sweetener to cater to dietary needs while keeping the flavor intact. Adjusting Consistency: If your fluff is too thick, gradually add a little more almond milk until you reach your desired consistency without compromising the fluffiness. Layering for Presentation: For an eye-catching display, layer the fluff with toppings in a clear glass, allowing guests to see the beautiful chocolate and berry contrasts. {{image_4}} You can change the flavor of your Fluffy Chocolate Protein Fluff by using different protein powders. Try vanilla protein powder for a sweet twist. Strawberry protein powder adds a fruity flair. Each option gives a new taste while keeping it healthy. Mix and match to find your favorite flavor. If you're looking for a dairy-free version, coconut yogurt works great. It keeps the fluff's creamy texture and adds a hint of coconut flavor. This change makes it suitable for those avoiding dairy but still wanting a tasty treat. For a low-carb twist, swap honey or maple syrup with a sugar alternative. Stevia or erythritol can work well. These substitutes keep the sweetness without the carbs. Adjust the amount to your taste for the best results. Store your Fluffy Chocolate Protein Fluff in airtight containers. This keeps it fresh and tasty. Make sure the lid seals well to avoid air exposure. Your fluff stays good for up to 3 days in the fridge. After that, it may lose texture and flavor. Always check for any changes before enjoying it again. You can freeze Fluffy Chocolate Protein Fluff if you want to save some for later. Scoop it into ice cube trays or small containers. To thaw, place it in the fridge overnight. Stir well before serving to regain its fluffy texture. Fluffy Chocolate Protein Fluff is a tasty dessert packed with protein. It combines Greek yogurt and chocolate protein powder, making it both creamy and nutritious. This treat is low in sugar and high in protein, which helps with muscle recovery and keeps you full. The cocoa powder gives it a rich chocolate flavor without extra calories. Overall, it’s a guilt-free delight you can enjoy anytime! Yes, you can use other sweeteners. If you want to keep it healthy, try these options: - Stevia: Use 1 teaspoon to start. - Agave nectar: Use 1 tablespoon as a swap for honey. - Coconut sugar: Use 1 tablespoon for a caramel-like taste. Test the sweetness and adjust to your liking! To make Fluffy Chocolate Protein Fluff vegan, swap the Greek yogurt for coconut yogurt. Use plant-based protein powder, like pea or brown rice protein. Replace honey with maple syrup for sweetness. These changes keep the fluff creamy and delicious while making it vegan-friendly. Enjoy your tasty treat! This blog post covered a delicious recipe for fluffy chocolate protein fluff. You learned about the key ingredients, like Greek yogurt and chocolate protein powder, and how to mix them for the right texture. I shared tips for adjusting sweetness and garnishing ideas for extra flavor. You can even make variations with different protein flavors or dairy-free options. Remember, store this treat in airtight containers and enjoy it within three days. Try this recipe for a tasty boost in your day!
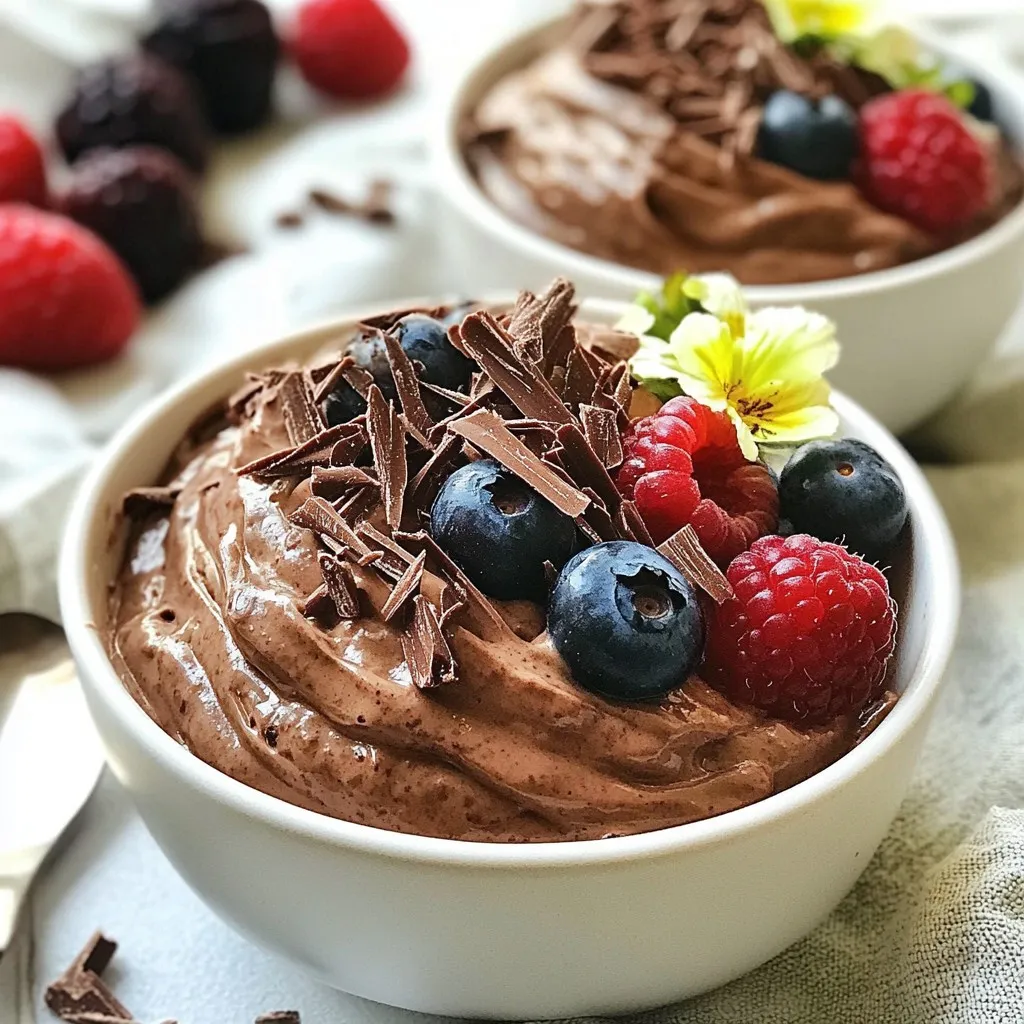
Fluffy Chocolate Protein Fluff Easy and Delicious Treat
Are you ready to indulge in a treat that’s both sweet and packed with protein? My Fluffy Chocolate Protein Fluff is the perfect snack to
- 2 medium apples (Granny Smith or Honeycrisp) - 1 cup all-purpose flour - 1/2 cup granulated sugar (divided) - 1 teaspoon baking powder - 1/2 teaspoon ground cinnamon (plus extra for dusting) - 1/4 teaspoon ground nutmeg - 1/4 teaspoon fine salt - 1/2 cup milk - 1 large egg (lightly beaten) - 1 teaspoon pure vanilla extract - Vegetable oil (for frying) - Optional: powdered sugar for dusting Gathering these ingredients is simple. Start by picking two medium apples. I recommend using Granny Smith or Honeycrisp for their crispness and tartness. Next, measure one cup of all-purpose flour and set it aside. You will also need half a cup of granulated sugar. Remember to divide this sugar; you will use some for the apples. Next, grab your baking powder and spices. You’ll need one teaspoon of baking powder, half a teaspoon of ground cinnamon, a quarter teaspoon of ground nutmeg, and a quarter teaspoon of fine salt. These spices add warmth and depth to your fritters. For the wet ingredients, measure half a cup of milk, and beat one large egg lightly. Don't forget to add one teaspoon of pure vanilla extract for that lovely aroma. Lastly, you will need vegetable oil for frying. If you like, you can have powdered sugar ready for dusting. This will add a sweet touch at the end. Once you have everything, you’re ready to make these delightful apple fritter bites! {{ingredient_image_2}} - First, peel and finely dice the apples. Use 2 medium apples, like Granny Smith or Honeycrisp. - In a medium bowl, combine the diced apples with 1 tablespoon of sugar and a light sprinkle of cinnamon. Let this sit for about 10 minutes. This helps the apples release their juices. - While waiting, grab a large bowl. Whisk together 1 cup of flour, 1/2 cup of sugar, 1 teaspoon of baking powder, 1/2 teaspoon of cinnamon, 1/4 teaspoon of nutmeg, and 1/4 teaspoon of salt. Make sure it’s well mixed. - In another bowl, mix 1/2 cup of milk, 1 large beaten egg, and 1 teaspoon of vanilla extract until smooth. - Next, pour enough vegetable oil into a deep pan to reach about 2 inches deep. Heat the oil to 350°F (175°C). You can check if it’s ready by dropping a bit of batter in. If it sizzles, you’re good to go! - Carefully drop spoonfuls of the batter into the hot oil using a spoon or small cookie scoop. Don’t overcrowd the pan. - Fry the bites for about 2-3 minutes on each side. They should turn a nice golden brown and be cooked through. - Once fried, move the fritter bites to a plate lined with paper towels. This helps absorb any excess oil. - If you want an extra sweet treat, dust them with powdered sugar before serving. Enjoy your warm apple fritter bites! Choosing the right apples makes a big difference. I recommend using Granny Smith or Honeycrisp apples. These apples balance sweetness and tartness well. They also hold their shape during cooking. Avoid soft apples like Red Delicious. Next, let’s talk about the batter. You want it to be thick but not dry. Start by mixing the dry ingredients well. Then, add the wet ingredients slowly. Stir gently until just combined. A few lumps in the batter are okay. Overmixing can make the fritters tough. Frying at the right temperature is key. Heat your oil to 350°F (175°C). Use a deep skillet or saucepan for best results. If the oil is too cold, the fritters will absorb too much oil. If it’s too hot, they will burn outside but stay raw inside. Fry the fritters in small batches. This helps keep the oil temperature steady. Overcrowding the pan can lead to soggy fritters. Each batch should fry for about 2-3 minutes per side until golden brown. Use a slotted spoon to remove them, and let them drain on paper towels. Pro Tips Choose the Right Apples: For the best flavor and texture, opt for tart apples like Granny Smith or Honeycrisp. They provide a perfect balance of sweetness and acidity. Don’t Overmix the Batter: To achieve light and airy fritters, mix the batter just until combined. A few lumps are okay; overmixing can lead to dense fritters. Maintain Oil Temperature: Keeping the oil at a steady 350°F (175°C) is crucial for crispy fritters. If the temperature drops too low, the fritters will absorb excess oil and become greasy. Experiment with Spices: Feel free to add other spices like allspice or ginger for a unique flavor twist. A pinch of nutmeg can also enhance the warmth of the cinnamon. {{image_4}} You can change the flavor of your apple fritter bites in fun ways. Try adding spices like ginger or allspice. These spices add warmth and depth to the sweet apple flavor. You can also use different kinds of apples. While Granny Smith and Honeycrisp work great, consider using Fuji or Pink Lady apples. Each type of apple brings its own sweetness and tartness, giving you a unique twist on this treat. Toppings can make your fritter bites even better. Drizzle warm caramel or honey on top for a sweet finish. If you want something creamy, serve them with ice cream or whipped cream. The cold creaminess pairs well with the warm bites. You can even sprinkle some extra cinnamon on top for added flavor. These simple additions make your dessert special and more enjoyable. To keep your apple fritter bites fresh, store them in an airtight container. Line the container with paper towels to absorb moisture. Place the fritter bites in a single layer. If you have more, add another layer of paper towels and fritters. This helps them stay crisp. Store them in the fridge for up to three days. To reheat, preheat your oven to 350°F (175°C). Place the fritter bites on a baking sheet. Heat them for about 10 minutes. This keeps them warm and crispy. You can also use a toaster oven for this. Yes, you can freeze apple fritter bites! They freeze well and last up to two months. To freeze, let the fritter bites cool completely. Arrange them in a single layer on a baking sheet. Place the sheet in the freezer for about an hour. This prevents them from sticking together. Once frozen, transfer them to a freezer-safe bag or container. To thaw, place the frozen fritter bites in the fridge overnight. For a quick option, microwave them in short intervals. Heat in 15-second bursts until warm. Reheat in the oven for added crispiness. How do I know when my apple fritter bites are done? Your apple fritter bites are done when they turn a nice golden brown. This usually takes about 2-3 minutes on each side. You should also check that they feel firm and not soft in the center. If they float to the top and sizzle in the oil, that’s a good sign too! Can I bake these instead of frying? Yes, you can bake apple fritter bites. Preheat your oven to 375°F (190°C). Place the fritter bites on a lined baking sheet. Bake for about 15-20 minutes, flipping halfway through. They won’t be as crispy, but they will still taste great. What dipping sauces go well with apple fritters? Apple fritters pair well with many dips. Try caramel sauce for a sweet touch. Honey also adds a nice flavor. For something tangy, serve them with a yogurt-based dip. Chocolate sauce is another fun option! How long do homemade apple fritter bites last? Homemade apple fritter bites last for about 2-3 days at room temperature. Keep them in an airtight container to keep them fresh. If you want to keep them longer, freeze them. They can last for about a month in the freezer. Just reheat them when you’re ready to enjoy! In this post, we explored how to make tasty apple fritter bites. We discussed the key ingredients, simple steps for preparation, and cooking. I shared useful tips to perfect your fritters and suggested fun variations. Remember to store leftovers properly and consider freezing them for later. These bites can be a fun treat or dessert. Enjoy experimenting with flavors and toppings, making each batch unique. Happy cooking!
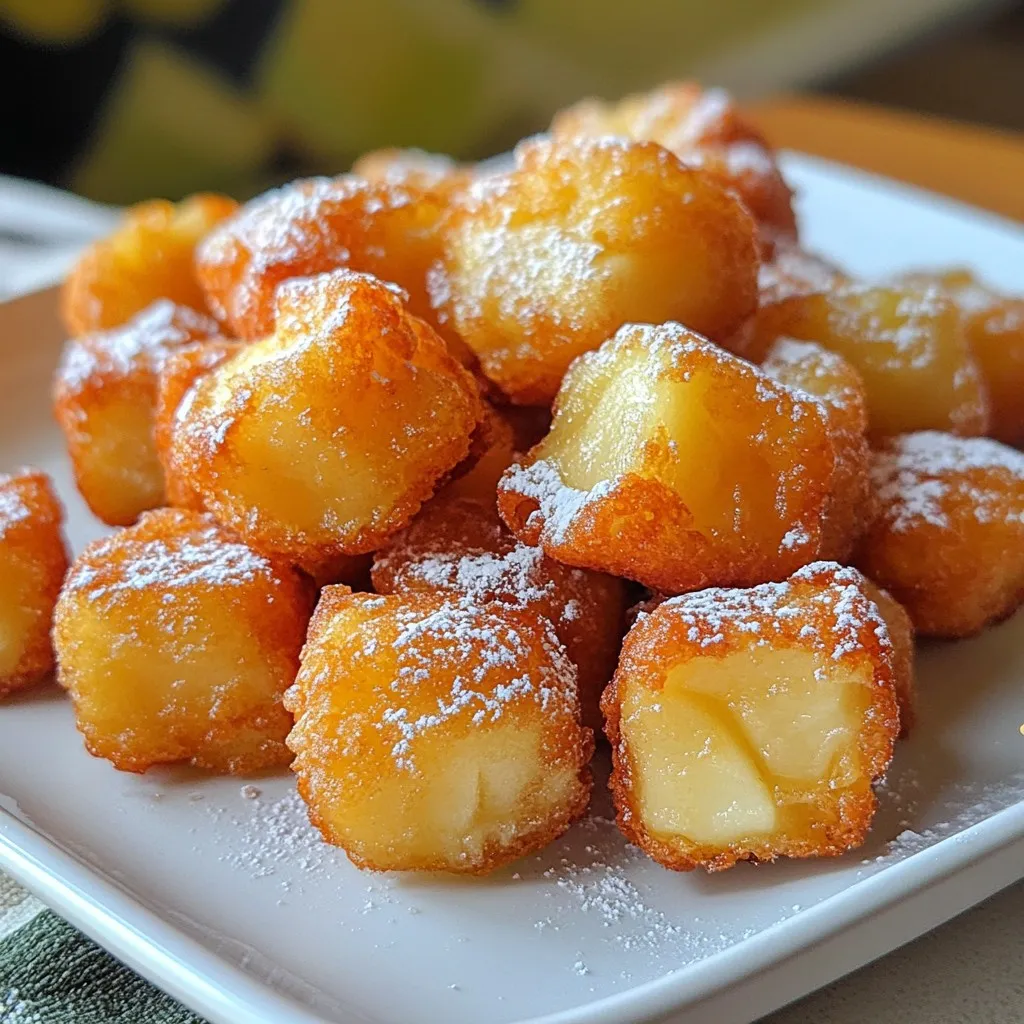
Apple Fritter Bites Irresistible Easy Dessert Treat
If you love sweet treats, you’ll fall for these Apple Fritter Bites! These easy bites are crispy on the outside and soft on the inside.