Desserts

To make this rich dessert, you will need some key ingredients. Here’s the list: - 2 cups chocolate cookie crumbs - 1/2 cup unsalted butter, melted - 1 cup granulated sugar - 4 packages (8 oz each) cream cheese, softened to room temperature - 1 cup sour cream - 1 teaspoon pure vanilla extract - 4 large eggs, at room temperature - 1 cup semi-sweet chocolate chips, melted and slightly cooled - 1/4 cup unsweetened cocoa powder These ingredients create a creamy, chocolatey delight. Each item plays a role in giving the cheesecake its rich flavor and texture. You can add some fun touches to your cheesecake. Here are some ideas: - Whipped cream (for topping) - Chocolate shavings or curls (for garnish) These extras not only make the cheesecake look fancy but also add to the taste. Whipped cream offers a light contrast, while chocolate shavings deepen the chocolate flavor. Using high-quality ingredients matters. Here are some tips: - Choose real butter for the crust. It makes a difference in flavor. - Use full-fat cream cheese for a creamy texture. Low-fat versions can alter the taste and consistency. - Always opt for pure vanilla extract over imitation. It gives a better flavor. By choosing quality ingredients, you ensure your cheesecake shines with flavor and texture. For the full recipe, you can refer to the earlier section. Start by preheating your oven to 325°F (160°C). In a mixing bowl, combine 2 cups of chocolate cookie crumbs with 1/2 cup of melted unsalted butter. Stir until the mixture looks like wet sand. Press this mix into the bottom of a 9-inch springform pan. Make sure it’s even and firm. Bake the crust for 10 minutes. When done, take it out and let it cool while you make the filling. In a large bowl, beat 4 packages of softened cream cheese with an electric mixer. Mix until it’s creamy and fluffy, which takes about 2-3 minutes. Gradually add 1 cup of granulated sugar while mixing until smooth. Next, add 1 cup of sour cream and 1 teaspoon of pure vanilla extract. Mix until combined, scraping the sides of the bowl as needed. Now, add 4 large eggs one at a time. Beat on low speed just until each egg is mixed in. Be careful not to overmix, or the texture will suffer. Finally, fold in 1 cup of melted semi-sweet chocolate and 1/4 cup of unsweetened cocoa powder. Use a spatula to mix until there are no lumps. Pour the cheesecake filling over your cooled crust in the springform pan. Bake in the oven for 60-70 minutes. Watch for the center to set but still jiggle a little. Once it’s done, turn off the oven and crack the door open. Let the cheesecake cool in the oven for about an hour. This helps prevent cracks. After that, transfer it to the fridge to chill for at least 4 hours, or overnight for the best taste and texture. After chilling, run a knife around the edge of the pan before releasing the springform. Top with whipped cream and add chocolate shavings or curls for a stunning finish. For the full recipe, refer to the earlier section. To prevent cracks, keep the oven door closed. After baking, let the cheesecake cool slowly. I recommend leaving the oven door slightly open for an hour. This helps the temperature drop gently. Cracking often happens when the cheesecake cools too fast. It’s also wise to use room temperature ingredients. Cold cream cheese and eggs can cause issues, too. For a creamy texture, beat the cream cheese well. It should be smooth and fluffy. Mix in sugar gradually to avoid lumps. Incorporate eggs one at a time, mixing gently after each. Overmixing can lead to a dense cheesecake. Also, be sure to fold in the melted chocolate carefully. This keeps the mixture light and airy. Store your cheesecake in the fridge. Cover it tightly with plastic wrap or foil. This keeps it fresh and prevents it from drying out. If you want to keep it longer, freeze it. Slice it first for easy serving later. When you are ready to eat, let it thaw in the fridge overnight. This keeps the texture nice and creamy. For more tips, check the Full Recipe. {{image_4}} You can make your Death by Chocolate Cheesecake even more special. Adding espresso gives it a rich coffee flavor. This twist enhances the chocolate taste. Just add 1 tablespoon of espresso powder to the filling. Mix it well for a deeper flavor. If you prefer mint, add 1 teaspoon of mint extract. This gives a cool, refreshing taste. You can enjoy these flavor changes while keeping the base the same. The crust is key to a great cheesecake. While chocolate cookie crumbs work well, you can try other options. Graham crackers make a lighter crust. You can mix them with cocoa powder for a chocolatey touch. For a nutty flavor, use crushed almonds or pecans. Just combine them with melted butter and press it into the pan. Each crust choice adds its own unique flavor to your dessert. Toppings can take your cheesecake to the next level. Whipped cream is classic and always a hit. You can also use fresh berries like strawberries or raspberries. Their tartness balances the rich cheesecake. For a fancy touch, drizzle chocolate sauce on top. You can even sprinkle sea salt for a sweet-salty mix. Get creative, and choose toppings that you love. Make sure they match your flavor choices. To keep your cheesecake fresh, cover it tightly. You can use plastic wrap or foil. Store it in the fridge for up to 5 days. Make sure to keep it in an airtight container. This helps maintain its rich flavor and creamy texture. If you have leftovers, slice the cheesecake before storing. This makes it easy to serve later. If you want to save the cheesecake for later, freezing works well. First, let the cheesecake cool completely. Then, wrap it in plastic wrap. Next, place it in a freezer-safe container or a heavy-duty freezer bag. It can last up to 3 months in the freezer. For best results, avoid freezing the toppings. When you’re ready to enjoy your frozen cheesecake, thaw it slowly. Move it from the freezer to the fridge. Let it thaw overnight for the best taste and texture. Avoid using a microwave, as this can change the texture. Once thawed, feel free to add fresh toppings or whipped cream before serving. For the full recipe, check out the detailed steps to make your own Death by Chocolate Cheesecake. Death by Chocolate Cheesecake stays fresh for about 5 to 7 days in the fridge. Keep it covered with plastic wrap or in an airtight container. This helps to lock in moisture and flavor. After a week, the taste may change. Enjoy it while it's fresh! Yes, you can use low-fat cream cheese in this recipe. However, the texture might not be as rich and creamy. Low-fat options can lead to a lighter cheesecake. If you prefer a denser texture, stick with regular cream cheese. The choice is yours! If your cheesecake cracks, don’t worry! It can still taste great. Here are a few tips to prevent this from happening next time: - Bake at a lower temperature. - Avoid overmixing the batter. - Cool it slowly in the oven. If you have a crack, you can cover it with whipped cream or chocolate shavings. It will still look beautiful! The Death by Chocolate Cheesecake is a rich treat full of flavor. We covered key ingredients, easy steps, and helpful tips to make it perfect. You learned about good quality ingredients and ways to avoid cracks during baking. We even explored fun variations and storage tips for leftovers. Now, you can impress your friends with this dessert. Enjoy making it and share your results!
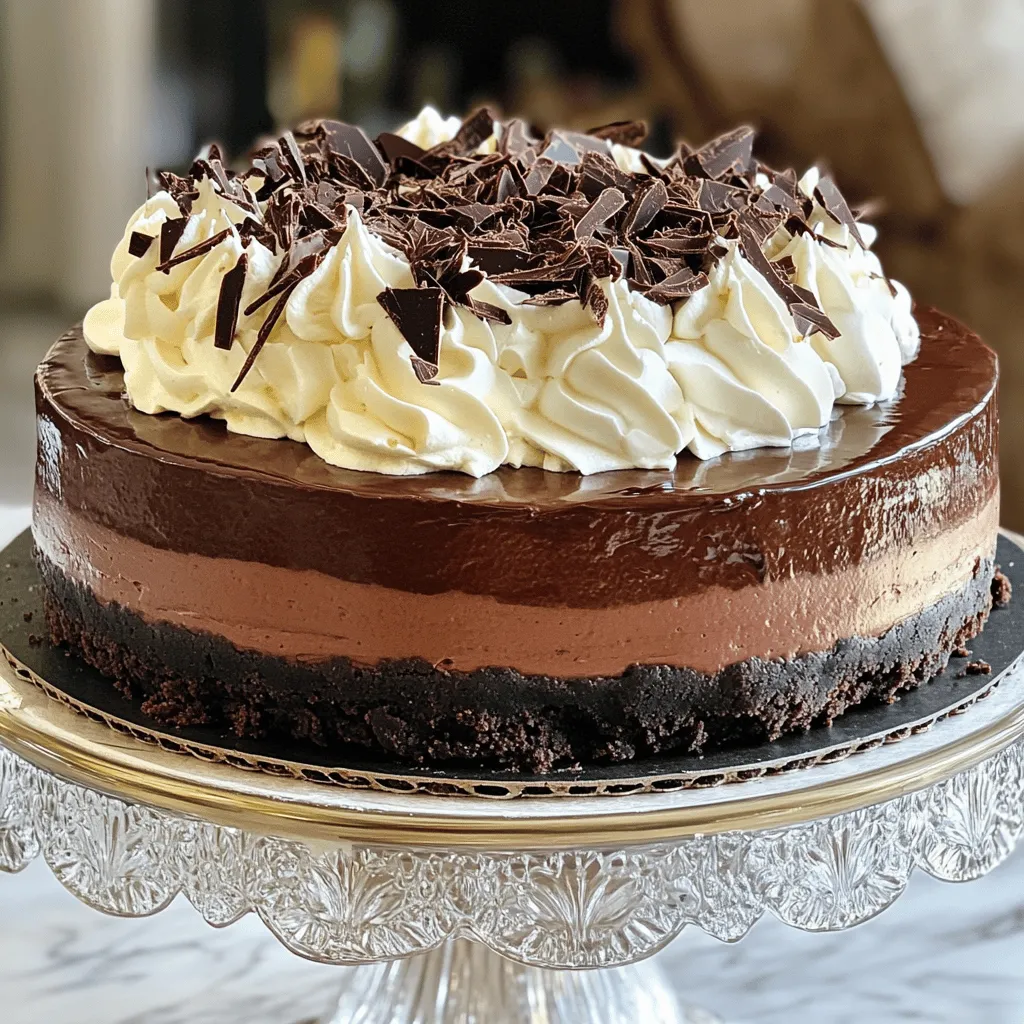
Death by Chocolate Cheesecake Rich and Decadent Treat
Do you love rich desserts? If so, Death by Chocolate Cheesecake will thrill your taste buds! This nice cheesecake is a treat for chocolate lovers.
- 2 cups all-purpose flour - 1 cup granulated sugar - 1 tablespoon baking powder - 1/2 teaspoon salt - 1/2 cup unsalted butter, softened at room temperature - 1 cup whole milk - 2 large eggs, at room temperature - 1 tablespoon pure vanilla extract - 1 tablespoon ground cinnamon - 1/2 cup brown sugar, tightly packed - 1/2 cup powdered sugar (for glaze) - 1-2 tablespoons milk (for glaze) - Mixing bowls - Hand mixer or whisk - 9x13 inch baking pan Gathering the right ingredients is key. For the cake base, you need flour, sugar, baking powder, and salt. These will create a soft and fluffy texture. Don’t forget to grab unsalted butter, whole milk, eggs, and vanilla for extra flavor. For the swirl, ground cinnamon and brown sugar add that warm, sweet touch. Lastly, you will want powdered sugar and milk for a smooth glaze that makes the cake shine. This easy cinnamon roll coffee cake recipe is simple. It’s a delight to make and share. You can find the full recipe [here]. - Preheat oven to 350°F (175°C). - In a large bowl, mix 2 cups of all-purpose flour, 1 cup of granulated sugar, 1 tablespoon of baking powder, and 1/2 teaspoon of salt. This helps create a fluffy cake. - In another bowl, cream together 1/2 cup of softened butter, 1 cup of whole milk, 2 large eggs, and 1 tablespoon of vanilla extract. Beat until smooth. - Gradually fold the wet mixture into the dry ingredients. Mix gently until just combined. A few lumps are fine and will bake out. - In a small bowl, blend 1 tablespoon of ground cinnamon with 1/2 cup of packed brown sugar. This makes the sweet cinnamon swirl. - Pour half of the cake batter into a greased 9x13 inch baking pan. Spread it evenly. Sprinkle half of the cinnamon mixture on top. - Add the rest of the batter over this layer. Spread it gently. Then sprinkle the remaining cinnamon mix on top. Use a knife to swirl the cinnamon through the batter. - Place the pan in the preheated oven. Bake for 30-35 minutes. To check if it's done, insert a toothpick into the center. It should come out clean or with a few moist crumbs. - While the cake cools for about 10 minutes, mix 1/2 cup of powdered sugar with 1 to 2 tablespoons of milk. Stir until smooth. - Once the cake cools, drizzle the glaze over the top, letting it flow down the sides. This adds a sweet touch to your cake. For the full recipe, you can refer back to the beginning of this article. - Avoid overmixing the batter: Mix just until combined. Lumps are okay. Overmixing can make your cake tough. - Use room temperature ingredients: This helps your batter blend easily. Cold butter or eggs can lead to uneven baking. - Adjusting baking time for altitude: If you live at a high altitude, bake a bit longer. Check your cake often. - Checking for doneness: Insert a toothpick in the center. It should come out clean or with a few moist crumbs. - Best time to enjoy the cake: This cake shines as a breakfast treat or a sweet snack. Serve it warm for the best taste. - Pairing with beverages like coffee: A hot cup of coffee enhances the cake's cinnamon flavor. Try it with milk or tea for a cozy touch. For the full recipe, make sure to check the detailed steps above! {{image_4}} You can easily change the flavor of your cake. Adding nuts like pecans or walnuts gives a nice crunch. Chop them finely and sprinkle them into the batter or on top. You can also mix in chocolate chips for a sweet twist. Just fold them into the batter before baking. If you need gluten-free options, try using almond flour or oat flour. Both work well and keep the cake tasty. For those who need dairy-free choices, use almond milk or coconut milk instead of regular milk. You can replace butter with coconut oil or a dairy-free spread. You can make this cake fit the seasons too. For fall, add pumpkin puree or chopped apples for a cozy flavor. Stir them into the batter for a warm touch. For a fresh taste in spring, try adding citrus zest from lemons or oranges. This brightens up the cake and makes it refreshing. For the full recipe, check the details above. Store your Easy Cinnamon Roll Coffee Cake at room temperature for up to three days. Use an airtight container to keep it fresh. If you want to keep it longer, refrigerate it for up to a week. Wrap the cake in plastic wrap before placing it in the fridge. This helps maintain its soft texture. You can freeze this cake to enjoy later. Cut it into portions and wrap each piece tightly in plastic wrap. Then, place the wrapped pieces in a freezer bag or container. This keeps them safe from freezer burn. When you want a slice, take it out and let it thaw in the fridge overnight. For a quick thaw, leave it at room temperature for a couple of hours. Enjoy your cake at its best texture! This coffee cake stays fresh for about 2 to 3 days at room temperature. Store it in an airtight container to keep it moist. If you want to keep it longer, move it to the fridge. In the fridge, it can last up to a week. Just remember to let it come back to room temperature before serving for the best taste. Yes, you can prepare this cake ahead of time. Make the batter and store it in the fridge for up to 24 hours. When you’re ready, just pour it into the pan and bake. This way, you can enjoy fresh coffee cake without much hassle. This cake pairs well with many drinks. A hot cup of coffee is a classic choice. You can also serve it with tea or hot chocolate. For a side dish, try fresh fruit or yogurt. Both add a nice balance to the sweet cake. Enjoy your delightful treat! In this blog post, we covered how to make an Easy Cinnamon Roll Coffee Cake. We listed the key ingredients and equipment you need to start baking. I shared step-by-step instructions and helpful tips for the best results. You can even try fun variations and learn how to store leftovers. Remember, baking is fun, so don’t stress! Use this guide to make a delicious cake that you can enjoy with family and friends. Happy baking!
Easy Cinnamon Roll Coffee Cake Delightful and Simple Recipe
Are you ready to indulge in a delicious treat? This Easy Cinnamon Roll Coffee Cake combines the comforting taste of cinnamon rolls with the ease
To make these delicious bars, gather the following ingredients: - 1 ½ cups almond flour - ½ cup unsalted butter, melted - ¼ cup honey or maple syrup - 1 teaspoon vanilla extract - 1 teaspoon baking powder - ½ teaspoon salt - 1 cup fresh blackberries - ½ cup shelled pistachios, roughly chopped - 1 tablespoon lemon juice - 1 tablespoon cornstarch You can swap ingredients if needed. Here are some ideas: - Almond flour: Use oat flour or coconut flour. - Unsalted butter: Try coconut oil or vegan butter. - Honey: Maple syrup or agave syrup works too. - Fresh blackberries: Raspberries or blueberries can replace them. - Pistachios: Walnuts or almonds will add a nice crunch. If you follow a specific diet, you can easily modify this recipe: - Gluten-free: Use certified gluten-free almond flour. - Vegan: Replace butter with coconut oil and honey with maple syrup. - Nut-free: Use sunflower seed flour in place of almond flour. These tips make your cooking more flexible and fun. You can enjoy Blackberry Pistachio Dream Bars your way! For the full recipe, check the details above. To start, heat your oven to 350°F (175°C). This helps the crust bake evenly. Next, grease a 9x9-inch baking dish or line it with parchment paper. This makes it easy to remove the bars later. In a large bowl, mix together these ingredients: - 1 ½ cups almond flour - ½ cup unsalted butter, melted - ¼ cup honey or maple syrup - 1 teaspoon vanilla extract - 1 teaspoon baking powder - ½ teaspoon salt Whisk until the mixture is smooth and well blended. After that, press the dough evenly into the bottom of your prepared baking dish. Use your fingers or a spatula to create a stable crust. Now, let’s make the blackberry filling. In a separate bowl, place 1 cup of fresh blackberries. Gently toss them with: - 1 tablespoon lemon juice - 1 tablespoon cornstarch This coating will help thicken the filling. Be careful not to mash the berries. You want to keep them whole for texture. Spread the blackberry mixture on top of the crust in the baking dish. After that, sprinkle ½ cup of roughly chopped pistachios over the blackberries. This adds a nice crunch. Bake for 25-30 minutes until the edges are golden brown and the center feels firm. Let the bars cool completely in the dish on a wire rack. Only then, cut them into squares. For a lovely touch, serve the bars on a wooden platter, dusted with powdered sugar, and garnished with a mint sprig. Enjoy your Blackberry Pistachio Dream Bars! For the full recipe, check the earlier section. To get the best texture for your Blackberry Pistachio Dream Bars, focus on the crust. Use almond flour for a soft yet firm base. Press it down well in the pan. This helps create a strong foundation. Bake until the edges turn golden brown. This step ensures the crust holds its shape. One common mistake is using too much liquid. Be careful when adding the lemon juice to the berries. Too much liquid can make the bars soggy. Also, avoid overbaking. Check for doneness around the 25-minute mark. You want the center to be set, not hard. Add-ins can boost the flavor of your bars. Consider mixing in a bit of orange zest for a fresh taste. You can also swap pistachios for walnuts or almonds for a different crunch. For a sweet twist, sprinkle a hint of cinnamon into the crust. These small changes can make a big impact. {{image_4}} You can swap blackberries for other fruits. Raspberries add a tangy flavor. Blueberries bring sweetness. Sliced strawberries give a fresh twist. Each fruit changes the taste and look. Feel free to mix and match your favorites. Pistachios shine, but other nuts work too. Chopped almonds or walnuts add crunch. Sunflower seeds give a nut-free option. Try pumpkin seeds for a fun twist. Each choice adds its unique taste and texture. To make these bars vegan, use coconut oil instead of butter. Maple syrup is a great sweetener too. For gluten-free options, almond flour is perfect. Make sure to check labels for any hidden gluten. These changes keep the bars tasty for everyone. For the full recipe, check out the details above! To keep your Blackberry Pistachio Dream Bars fresh, store them in an airtight container. This helps prevent them from drying out. Place a piece of parchment paper between layers to avoid sticking. You can also wrap them in plastic wrap for extra protection. Keep the bars at room temperature for short-term storage. However, if you need to keep them longer, refrigeration is best. Freezing these bars is simple and works well. Cut the bars into squares and wrap each piece tightly in plastic wrap. Then, place the wrapped bars in a freezer-safe bag. They can stay in the freezer for up to three months. When you’re ready to enjoy them, remove the bars from the freezer and let them thaw in the fridge overnight. For a quick thaw, leave them at room temperature for an hour. Blackberry Pistachio Dream Bars last about five days in the fridge. If you notice any mold or an off smell, it’s best to discard them. The bars should be soft and moist but not sticky. If they feel hard or dry, they may be past their prime. Always trust your senses when it comes to food safety! Blackberry Pistachio Dream Bars can last up to five days. Store them in an airtight container. Keep them in the fridge for the best taste and freshness. If they sit out, they may lose their texture. Yes, you can make these bars ahead of time! I often bake them a day before I need them. Just let them cool completely before wrapping. This helps the flavors blend well. Serve the bars chilled for a refreshing treat. I like to sprinkle powdered sugar on top. Add a mint leaf for color and taste. You can also pair them with a scoop of vanilla ice cream for extra delight. For the full recipe, follow the steps carefully! Blackberry Pistachio Dream Bars offer a delicious treat with easy steps. We covered the key ingredients, substitution options, and dietary adaptations. I shared a clear guide on preparing, baking, and storing the bars. Plus, I provided tips to improve texture and flavor and ways to customize your recipe. Remember, these bars can be made ahead and are perfect for sharing. Enjoy making this tasty dessert that everyone will love!
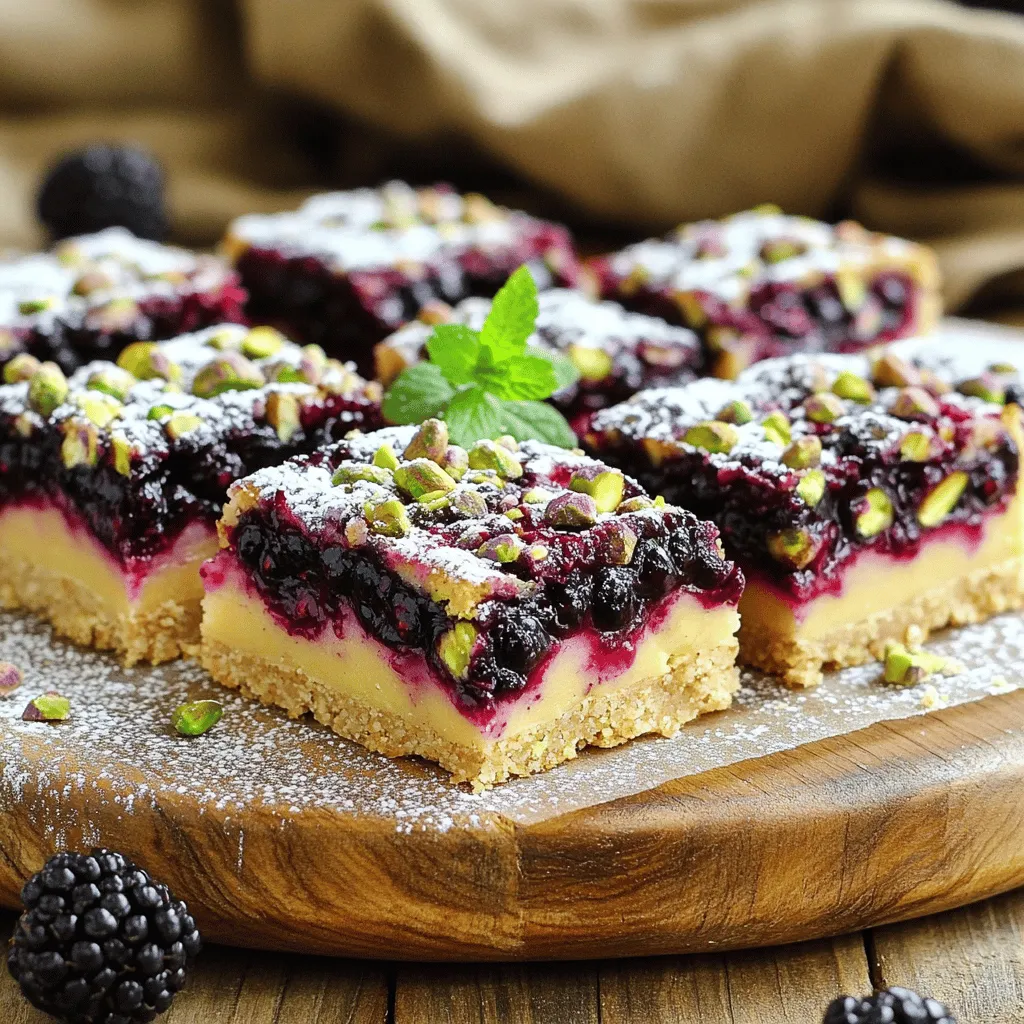
Blackberry Pistachio Dream Bars Irresistible Delight
If you’re looking for a treat that combines sweet blackberries and crunchy pistachios, you’re in for a real treat. These Blackberry Pistachio Dream Bars are
- Rice Krispie cereal: 4 cups - Mini marshmallows: 1 cup - Unsalted butter: 1/2 cup - Vanilla extract: 1/2 teaspoon - Instant banana pudding mix: 1 box (3.4 oz) - Milk: 1 cup - Fresh sliced bananas: 1 cup - Whipped cream (optional for garnish): 1/2 cup - Crushed vanilla wafers (for topping): 1/4 cup To make these treats, you will need simple ingredients. Rice Krispie cereal gives the treats their crisp and crunchy base. Mini marshmallows add sweetness and a soft texture. Unsalted butter helps bind everything together. A touch of vanilla extract gives a warm flavor. The star of this recipe is the instant banana pudding mix. It brings that rich banana flavor we all love. You'll also use milk to mix with the pudding. Fresh sliced bananas add a burst of fruitiness. For a fun presentation, you can add whipped cream and crushed vanilla wafers on top. You can find the full recipe for these delicious Banana Pudding Rice Krispie Treats. Let’s gather these ingredients and get ready to create a tasty treat! 1. Start by greasing a 9x13 inch baking dish. Use a small amount of butter. This helps prevent sticking. 2. In a large saucepan, melt the butter over low heat. Once melted, add the mini marshmallows. Stir until smooth. 3. Remove from heat and mix in the vanilla extract. This adds a lovely flavor. 1. Gradually add the Rice Krispie cereal to the marshmallow mix. Stir gently until all cereal is coated. 2. In a separate bowl, mix the instant banana pudding with the milk. Whisk for two minutes until it thickens. 3. Fold in the fresh sliced bananas. Be careful not to mash them. You want nice chunks of banana. 1. Let the Rice Krispie mix cool a bit. Then, press half into the greased baking dish. This forms the first layer. 2. Spoon the banana pudding mix over the Rice Krispie layer. Spread it out evenly. 3. Crumble the rest of the Rice Krispie mixture on top. Press it down gently to hold the layers together. You can find the full recipe with detailed steps and tips to make your treats shine! To get the best texture for Banana Pudding Rice Krispie Treats, let the mixture cool slightly before you press it into the pan. This step helps keep the treats fluffy and light. If the mixture is too hot, it can flatten out and lose that perfect bite. Make sure to evenly distribute the bananas when you mix them in. This way, each bite gets a taste of banana. You want those sweet bits in every square. When serving these treats, use a nice platter. It makes them look more inviting. You can add a drizzle of chocolate syrup on top for a fun twist. Slices of fresh banana on each piece add color and freshness, too. For a special touch, try adding dollops of whipped cream on top. It gives a creamy finish that everyone loves. A common mistake is overheating the butter and marshmallows. If you cook them too much, the treats may become too hard. Keep the heat low and stir until just melted. Another mistake is not letting the mixture set properly. If you slice them too soon, they may fall apart. Chill the treats in the fridge for at least an hour before cutting. This makes them easier to handle and helps keep their shape. For the full recipe, check out the section above! {{image_4}} Chocolate Banana Pudding Rice Krispie Treats To add a twist, mix in cocoa powder. Use 1/4 cup of cocoa with the Rice Krispie cereal. This gives your treats a rich chocolate taste. Top with chocolate shavings for a fun finish. Nutty Banana Pudding Variants If you love nuts, add chopped walnuts or pecans. Mix in 1/2 cup of nuts into the Rice Krispie layer. This adds a nice crunch and a nutty flavor. You can also sprinkle some on top for extra flair. Gluten-free options To make these treats gluten-free, use gluten-free Rice Krispie cereal. Check labels to ensure all ingredients are safe. This way, everyone can enjoy the fun without worries. Dairy-free substitutions If you need dairy-free treats, swap the butter with coconut oil. Use a non-dairy milk like almond or oat milk in the pudding mix. This keeps the taste delicious while meeting dietary needs. Individual servings in cups For a fun twist, serve the treats in small cups. Layer the Rice Krispie mixture and pudding in clear cups. Kids will love their own little dessert cups, and it looks great too! Layering in dessert jars You can also use mason jars for a trendy look. Layer the Rice Krispie mix, pudding, and bananas in jars. This makes for a beautiful presentation and is perfect for parties. For the full recipe, check out the earlier section! Store your Banana Pudding Rice Krispie Treats in an airtight container. This keeps them fresh and moist. I recommend using a glass or plastic container with a tight lid. Place a piece of parchment paper between layers to avoid sticking. Keep them at room temperature for the best taste. Do not expose them to heat or direct sunlight. A cool, dry spot works best for storage. These treats last about 3 to 5 days. After this time, they may start to lose their texture and flavor. Look for changes in smell or a hard texture. If they feel tough or dry, it's time to toss them. Yes, you can freeze these treats! Wrap them tightly in plastic wrap, then place them in a freezer bag. This way, they stay fresh for up to 2 months. For thawing, take them out and let them sit at room temperature for about 30 minutes. This helps keep their texture nice and soft. Enjoy your treats anytime you crave a sweet bite! For the full recipe, check out the detailed instructions above. Yes, you can make these treats ahead of time. To do this, follow these tips for best results: - Make the treats and allow them to cool completely. - Once cooled, slice them into squares. - Store them in an airtight container. - Keep them in the fridge for up to three days. Making them ahead of time helps the flavors meld nicely. Just remember to let them sit at room temperature for a few minutes before serving for the best texture. If you do not have Rice Krispie cereal, there are great alternatives. Here are a few options: - Cornflakes: These work well and add a nice crunch. - Puffed rice: A lighter option that maintains the texture. - Cheerios: These offer a different flavor but still hold up well. - Granola: A sweet and crunchy twist that adds a unique flavor. Feel free to experiment! Each cereal will give your treats a different taste and texture. To keep your Banana Pudding Rice Krispie Treats fresh, follow these storage tips: - Place them in an airtight container to prevent them from drying out. - Store them in the fridge for up to three days. - For longer storage, wrap them in plastic wrap and put them in the freezer. To enjoy them later, simply thaw them in the fridge overnight. This way, you can savor the deliciousness whenever you want! This blog post covered how to make delicious Banana Pudding Rice Krispie Treats. We listed the simple ingredients and provided easy steps to create this tasty dessert. Don’t forget the tips for the best texture and serving ideas. Variations can add fun twists to your treats, and storage tips help keep them fresh. Enjoy making these treats that everyone will love. Each bite will remind you of classic banana pudding. Let's get creating!
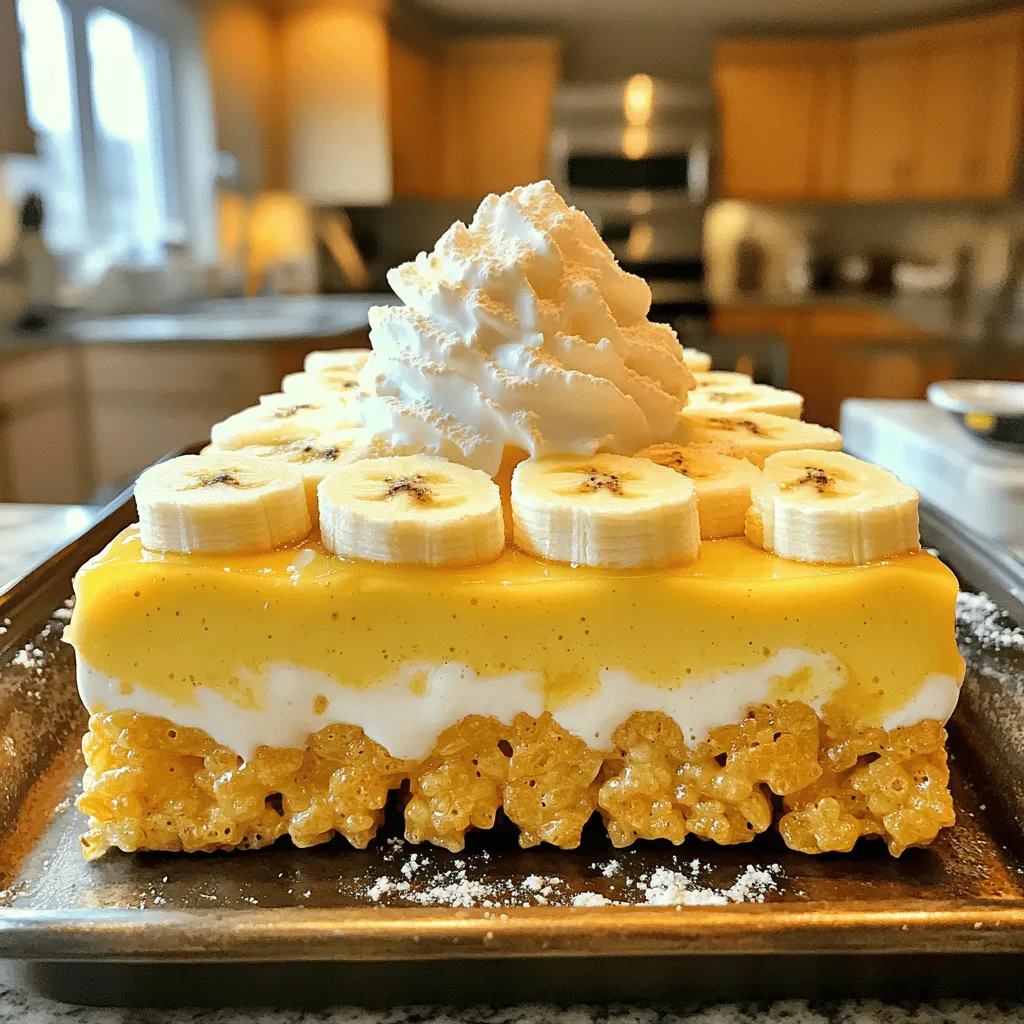
Decadent Banana Pudding Rice Krispie Treats Delight
Do you love sweet, creamy treats? Then you’ll adore these Decadent Banana Pudding Rice Krispie Treats! Combining the crunch of Rice Krispies with the smoothness
- 2 ripe bananas, mashed - 1/2 cup unsweetened applesauce - 1/3 cup packed brown sugar - 1/4 cup honey or maple syrup - 1 teaspoon pure vanilla extract - 1 teaspoon baking soda - 1/2 teaspoon sea salt - 1 teaspoon ground cinnamon - 1 1/2 cups whole wheat flour - 1/2 cup semi-sweet chocolate chips - 1/4 cup chopped walnuts (optional) The key to making chewy chocolate chip banana bars lies in the right ingredients. You need ripe bananas for natural sweetness. Applesauce adds moisture without fat. Brown sugar gives a rich taste. Honey or maple syrup brings a lovely flavor. Make sure to use pure vanilla extract for that warm aroma. Baking soda acts as a leavening agent, keeping the bars fluffy. Sea salt enhances all the flavors. Ground cinnamon adds warmth and spice. Whole wheat flour gives a hearty base. Finally, semi-sweet chocolate chips bring joy. If you love nuts, add walnuts for crunch. These ingredients work together to create a sweet treat you will love. {{ingredient_image_2}} - Preheat the oven to 350°F (175°C). - Grease a 9x9-inch baking pan lightly with oil or butter, or line it with parchment paper. First, you want to make sure your oven is nice and hot. Preheating helps the bars bake evenly. Greasing the pan or using parchment paper makes it easy to lift the bars out later. - Combine mashed bananas, applesauce, brown sugar, honey or syrup, and vanilla. In a big bowl, mash the ripe bananas until smooth. Then, add the applesauce, brown sugar, honey or syrup, and vanilla extract. Mix these with a fork or whisk until everything is well blended. This mixture provides sweetness and moisture to the bars. - Add baking soda, sea salt, and cinnamon to the wet mixture. - Gradually mix in whole wheat flour and fold in chocolate chips and walnuts. Now, sprinkle the baking soda, sea salt, and cinnamon over your banana mix. Stir gently to combine. Next, slowly add the whole wheat flour. Use a spatula or wooden spoon to mix until just combined. It’s key not to overmix here. Finally, fold in the chocolate chips and walnuts, if you like. This adds crunch and extra flavor. - Pour the batter into the pan and spread evenly. - Bake for 25-30 minutes and check for doneness. Pour the batter into your prepared baking pan. Use a spatula to spread it evenly. Place the pan in the oven and bake for 25 to 30 minutes. To check if they are done, insert a toothpick into the center. It should come out clean or with a few moist crumbs. - Allow to cool and cut into squares for serving. Once baked, take the pan out and let it cool for about 10 minutes. If you used parchment paper, lift the bars out carefully. Place them on a wire rack to cool completely. Once cool, cut them into squares. Enjoy these chewy treats with a cup of tea or coffee! To keep your bars chewy, do not overmix the batter. When you mix the flour in, do it gently. Stir just until you see no dry flour. Overmixing can make the bars tough. You want them soft and chewy, not dense. You can add extra flavor to your bars with spices. Try a pinch of nutmeg or a bit of ginger for warmth. You could also add a tablespoon of cocoa powder for a rich taste. If you love nuts, add more walnuts or try pecans. These add crunch and flavor. For a beautiful finish, cut the bars into even squares. Arrange them on a bright platter. Drizzle melted chocolate over the top for a fancy touch. Serve with a cup of tea or coffee. This makes for a delightful snack or dessert that looks as good as it tastes. Pro Tips Use Ripe Bananas: The riper the bananas, the sweeter and more flavorful your bars will be. Look for bananas with plenty of brown spots for the best results. Adjust Sweetness: Feel free to adjust the amount of honey or maple syrup based on your personal preference for sweetness, especially if your bananas are very ripe. Experiment with Mix-ins: Try adding different mix-ins like dried fruits, coconut flakes, or even peanut butter for a unique twist on the classic recipe. Storage Tips: Store leftover bars in an airtight container at room temperature for up to 3 days or in the refrigerator for up to a week to maintain their chewiness. {{image_4}} You can easily adjust this recipe for different diets. If you need a gluten-free option, swap the whole wheat flour for almond flour or coconut flour. Both options work well and still keep the bars chewy. If you want to make these bars vegan, replace the honey with maple syrup. For the eggs, you can use a flax egg. Just mix one tablespoon of ground flaxseed with three tablespoons of water and let it sit for a few minutes. Feel free to get creative with add-ins! You can add different nuts like pecans or almonds for a nice crunch. Dried fruits such as cranberries or raisins also add a sweet touch. If you like a bit of spice, try adding chopped fresh ginger or a dash of nutmeg for extra flavor. If you prefer, you can switch the semi-sweet chocolate chips for dark chocolate or white chocolate chips. Dark chocolate gives a richer taste, while white chocolate adds a sweet creaminess. Both options make for a tasty twist on the classic recipe! To store your Chewy Chocolate Chip Banana Bars at room temperature, first let them cool completely. Once cool, cut the bars into squares. Place them in an airtight container. This helps keep them soft and fresh. You can also add parchment paper between layers to prevent sticking. Keep the container in a cool, dry spot. If you want to save bars for later, refrigerate or freeze them. For refrigeration, place the bars in an airtight container. They will stay fresh for up to a week. For freezing, wrap each bar in plastic wrap. Then put them in a freezer-safe bag. They can last up to three months in the freezer. When ready to eat, just thaw them at room temperature. The shelf life of these bars is great! At room temperature, they stay fresh for about four days. When refrigerated, they can last up to a week. If frozen, they can keep their taste for about three months. Always check for signs of spoilage before eating, like an off smell or change in texture. Enjoy your delicious treats! You can make these bars healthier by cutting down on sugar. Use less brown sugar or honey. You can also swap in a sugar substitute like stevia. Adding protein is easy too! Mix in some protein powder or Greek yogurt. This boosts the nutrition without changing the taste much. Yes, you can use other flours like almond or oat flour. Each flour gives a different texture. Almond flour makes the bars moist and dense. Oat flour can make them a bit crumbly. Experiment to find what you like best! If your bars turn out dry, try adding more wet ingredients. A splash of milk or an extra mashed banana can help. You can also mix in some yogurt for creaminess. Adjusting baking time can also help keep them moist. To check if your bars are done, insert a toothpick in the center. It should come out clean or with a few moist crumbs. The edges will look set and slightly golden. If the center wobbles, give it a few more minutes. These banana chocolate bars are easy to make and taste great. We mixed ripe bananas, applesauce, and spices for flavor. Remember to avoid overmixing to keep a chewy texture. You can also modify the recipe for dietary needs or personal taste. Store leftovers at room temperature or freeze them for later. Enjoy your baking and the tasty treats you create!
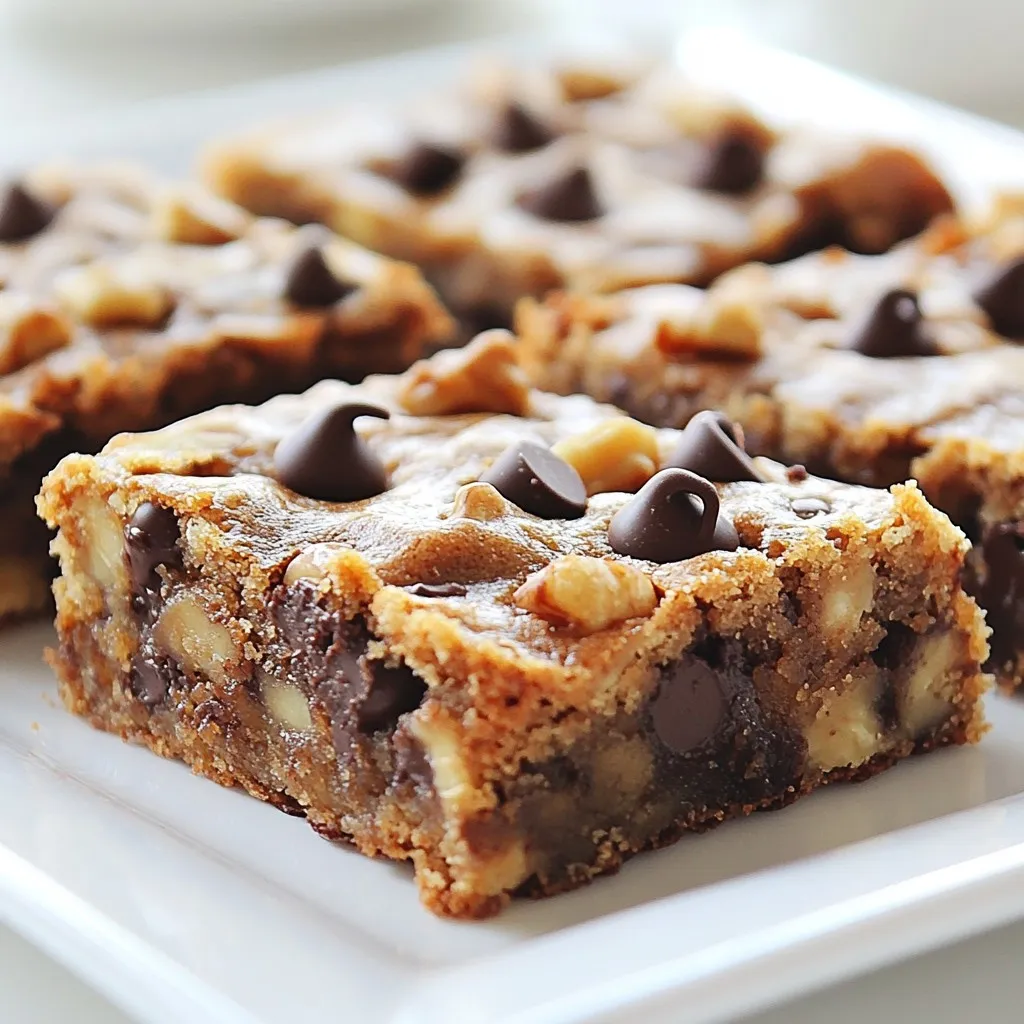
Chewy Chocolate Chip Banana Bars Simple Sweet Treat
Craving a sweet snack that’s both chewy and delicious? Look no further! My Chewy Chocolate Chip Banana Bars are the perfect blend of flavor and
- 2 cups rolled oats - 1 cup almond milk - 1/2 cup almond butter Rolled oats form the base of these bars. They give a hearty texture that fills you up. Almond milk adds creaminess without dairy. It keeps the bars moist. Almond butter brings a nutty flavor and healthy fats. - 1/4 cup maple syrup - 1/2 teaspoon pure vanilla extract - 1/2 teaspoon ground cinnamon Maple syrup sweetens the bars naturally. It offers a rich flavor that pairs well with oats. Pure vanilla extract adds a warm aroma and taste. Ground cinnamon spices things up just right, making each bite delightful. - 1 cup mixed berries - 1/4 cup vegan chocolate chips - 1/4 cup chopped nuts Mixed berries can be fresh or frozen. They add pops of flavor and color. Vegan chocolate chips give a sweet surprise in every bite. Chopped nuts add crunch and more nutrients. Use any combo you love to make these bars your own! {{ingredient_image_2}} 1. Preheat your oven to 350°F (175°C). This temperature helps the bars bake evenly. 2. Prepare an 8x8 inch baking dish. Line it with parchment paper, letting some hang over the edges. This will help you lift the bars out later. 3. In a large mixing bowl, combine the following dry ingredients: - 2 cups rolled oats - 1 teaspoon baking powder - 1/2 teaspoon ground cinnamon - A pinch of salt Mix these dry ingredients well. 1. In another bowl, whisk these wet ingredients until smooth: - 1 cup almond milk - 1/2 cup almond butter - 1/4 cup maple syrup - 1/2 teaspoon pure vanilla extract 2. Pour the wet mixture into the bowl with the dry ingredients. Stir gently until just combined. Be careful not to over-mix! 3. Now, fold in 1 cup mixed berries. You can use fresh or frozen berries. If you like, add 1/4 cup vegan chocolate chips or chopped nuts for extra texture. 1. Transfer the mixture to the prepared baking dish. Use a spatula to spread it evenly. Press down firmly so it holds together while baking. 2. Place the baking dish in the preheated oven. Bake for 25-30 minutes. Watch for the edges to turn lightly golden brown. Check with a toothpick; it should come out clean when done. 3. When finished, let the bars cool in the pan for about 10 minutes. Use the parchment paper to lift them out and place them on a wire rack to cool completely. 4. After cooling, cut the bars into squares or rectangles. Store them in an airtight container in the fridge. They will stay fresh for up to 5 days, making them a great snack! To ensure even baking, spread the mixture evenly in the dish. Press it down firmly with a spatula. This helps the bars cook uniformly. Check for doneness by looking for golden edges. Insert a toothpick into the center. If it comes out clean, your bars are ready! Avoiding over-mixing is key for texture. Mix the wet and dry ingredients just until combined. This keeps the bars soft and chewy. When folding in berries, do it gently. Too much stirring can break the berries apart. For serving, arrange the bars on a rustic wooden board. This gives a nice, homey feel. You can garnish with fresh berries or a drizzle of almond butter. This adds a pop of color and flavor to your dish! Pro Tips Use Fresh Berries: Fresh berries will provide the best flavor and texture. If using frozen, ensure they are thawed and drained to avoid excess moisture. Mix It Up: Feel free to experiment with different nut butters or add-ins like coconut flakes or seeds to customize your bars. Check for Doneness: Baking times may vary based on your oven. Start checking at the 25-minute mark to avoid overbaking. Storage Tips: Store the bars in an airtight container in the fridge for optimal freshness. These bars also freeze well for longer storage. {{image_4}} You can switch up the berries in your vegan berry oatmeal bars. Here are some tasty ideas: - Blueberries: These tiny bursts of flavor are sweet and juicy. - Strawberries: Slice them for a fresh, fruity taste. - Raspberries: Their tartness adds a nice contrast. - Blackberries: These add a deep, rich flavor. You can also try different nut or seed butters. Instead of almond butter, you might use: - Peanut butter: For a classic, nutty flavor. - Sunflower seed butter: A great option for nut-free needs. - Cashew butter: For a creamy, smooth texture. If you need gluten-free options, use certified gluten-free rolled oats. This keeps the bars tasty while meeting dietary needs. For sweeteners, consider sugar-free options like: - Stevia: A natural sweetener with no calories. - Erythritol: A low-calorie sugar substitute that works well. You can boost the nutrition with add-ins. Try these seeds and spices: - Chia seeds: Add fiber and omega-3 fatty acids. - Flaxseeds: Great for more fiber and healthy fats. - Pumpkin spice: This gives a warm, cozy flavor. If you want more protein, consider adding: - Pea protein powder: A plant-based protein that mixes well. - Hemp protein: Packed with nutrients and a nutty taste. To keep your vegan berry oatmeal bars fresh, use an airtight container. This will help keep moisture out. Store the bars in the refrigerator for up to five days. They will stay tasty and ready for snacks! You can freeze the bars for longer storage. First, cut them into squares. Wrap each piece in plastic wrap or foil. Then, place them in a freezer bag. To thaw, leave them in the fridge overnight. This keeps them from getting soggy. To keep your bars fresh, avoid cutting them too early. Let them cool completely before you cut them. This helps maintain their shape. Keep them away from moisture to avoid sogginess. Enjoy your delicious bars anytime! How can I make this recipe nut-free? You can easily make these bars nut-free. Just swap almond butter for sunflower seed butter. This keeps the texture and taste close to the original. You can also use soy or oat milk instead of almond milk. Can I substitute the maple syrup? Yes, you can use agave syrup or brown rice syrup. Both work well and keep the bars sweet. You can also use mashed bananas for a natural sweetener. Just remember that this may change the texture a bit. What’s the serving size per bar? Each recipe yields 12 bars. A single bar is a great snack. It keeps you full without being too heavy. Nutritional breakdown of the bars Each bar contains about 150 calories. They have healthy fats, fiber, and protein. Here's a quick breakdown: - Calories: 150 - Protein: 4g - Carbs: 25g - Fat: 5g - Fiber: 3g How long do they last at room temperature? These bars last about 2 days at room temperature. Keep them in a cool, dry place. If you need them to last longer, store them in the fridge. Can I freeze leftovers? Yes, you can freeze these bars. Wrap each bar in plastic wrap and place them in a freezer bag. They last up to 3 months in the freezer. Just thaw them overnight in the fridge before eating. You now have a complete guide to make delicious bars. You learned about core ingredients like oats and almond milk. Sweeteners and optional add-ins, such as berries or chocolate chips, enhance flavor. The step-by-step instructions ensure a smooth baking process. Remember to follow tips for perfect baking and mixing. You can even explore variations for different diets. Store them properly to keep them fresh. With this knowledge, you are ready to enjoy and share your tasty creations.
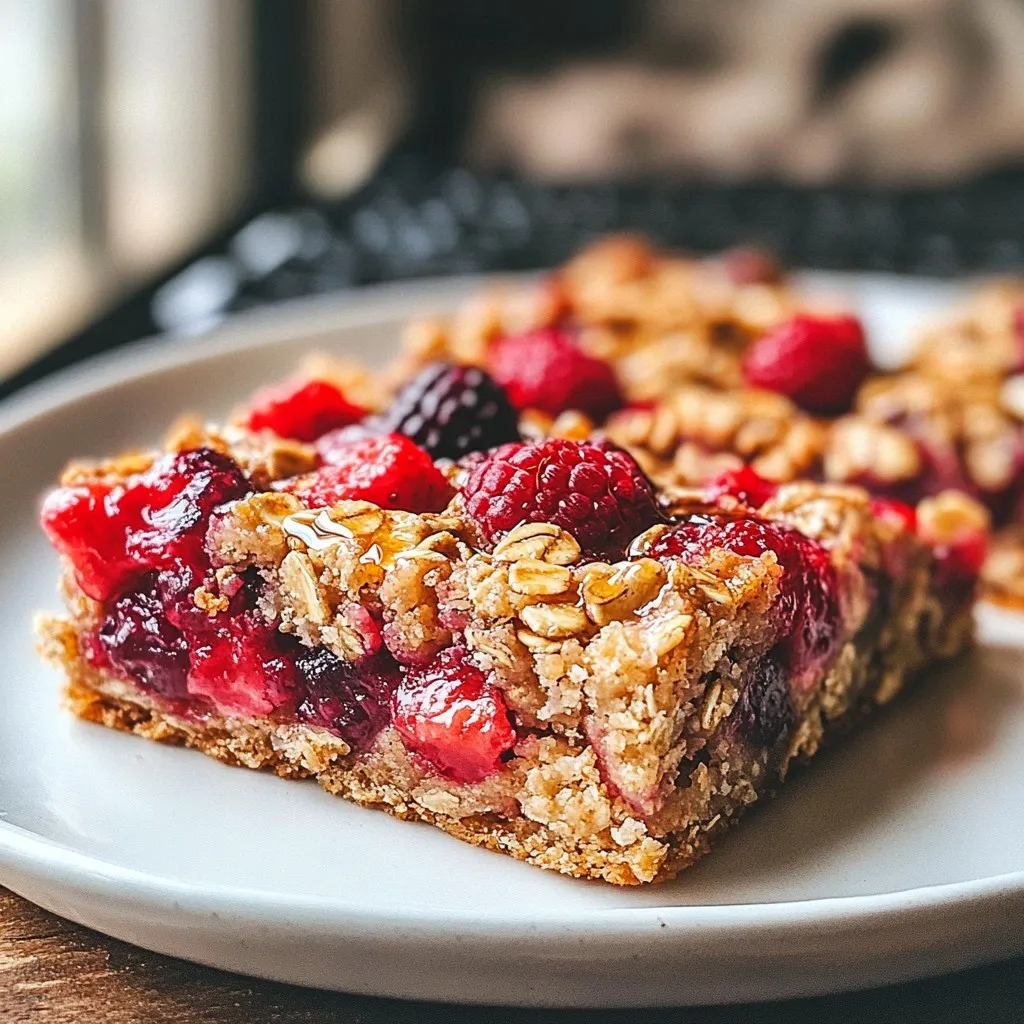
Vegan Berry Oatmeal Bars Tasty and Healthy Snack
Looking for a delicious, healthy snack? My Vegan Berry Oatmeal Bars are just what you need! Packed with wholesome oats, berries, and simple ingredients, these
- 1 cup graham cracker crumbs - 4 tablespoons unsalted butter, melted - 2 cups cream cheese, softened - 1/2 cup powdered sugar - 1 teaspoon pure vanilla extract - 1 cup heavy whipping cream - 1 cup fresh strawberries, hulled and sliced - 2 tablespoons granulated sugar (for macerating strawberries) - Fresh mint leaves for garnish (optional) The graham cracker crumbs form the crust. They add a sweet and crunchy base. The melted butter helps bind the crumbs together. Cream cheese provides a rich and creamy texture. It is the star of our cheesecake. Powdered sugar sweetens the mix without grittiness. Heavy whipping cream adds a light and fluffy feel. The strawberries bring freshness and a burst of flavor. They also add a lovely color to the cups. Finally, mint leaves offer a pop of green for garnish. If you lack graham crackers, try digestive biscuits or cookies. For gluten-free options, use gluten-free graham crackers. You can swap cream cheese for a dairy-free cream cheese. If you want a different flavor, use flavored yogurt instead. Greek yogurt works well but may change the texture. For less sweetness, cut back on powdered sugar. Adjust the sugar in strawberries to taste. If you want a fruity twist, try adding blueberries or raspberries. {{ingredient_image_2}} To start, grab a medium bowl. Add 1 cup of graham cracker crumbs. Then, pour in 4 tablespoons of melted unsalted butter. Mix well until the crumbs feel like wet sand. This makes a great base for our cheesecake. Next, take serving cups and fill them with the crumb mixture. Press down firmly to form a solid crust. Make sure it’s compact. Set these cups aside; we will fill them soon. Now, let’s make the creamy filling. In a large bowl, beat 2 cups of softened cream cheese. Use an electric mixer until it turns smooth and creamy. There should be no lumps. Gradually, add in 1/2 cup of powdered sugar and 1 teaspoon of pure vanilla extract. Keep mixing until everything is well blended. In a separate bowl, pour in 1 cup of heavy whipping cream. Whip it until you see stiff peaks. This makes the cheesecake light and fluffy. Carefully fold the whipped cream into the cream cheese mixture. Use a spatula to combine gently. Be careful not to deflate the whipped cream; it should remain airy. Next, we will prepare the strawberries. Take 1 cup of fresh strawberries and hull them. Slice them and toss them in a bowl with 2 tablespoons of granulated sugar. Let them sit for about 10 minutes. This process is called macerating and brings out their sweet juice. Now, it’s time to layer the cups. Spoon the cream cheese mixture into each cup over the graham cracker crust. Next, top each cup with a generous amount of macerated strawberries. Let some of the juice drizzle onto the cheesecake for extra flavor. Cover the cups and place them in the refrigerator. Chill them for at least 2 hours or overnight. This helps the flavors meld beautifully. Before serving, you can add fresh mint leaves for a pop of color. Enjoy your delicious no-bake strawberry cheesecake cups! To make the best whipped cream, start with cold heavy cream. Use a clean bowl and beaters. I prefer using an electric mixer for speed. Whip the cream until it forms stiff peaks. This means it holds its shape well. Be careful not to over-whip, or it will turn grainy. Fold the whipped cream gently into the cream cheese mixture. This keeps it light and fluffy. Layering is key to a beautiful cheesecake cup. Begin with the graham cracker crust at the bottom. Press it down firmly to avoid crumbling. Then, add a smooth layer of cream cheese mixture. Use a spoon or spatula to spread it evenly. Next, spoon the macerated strawberries on top. Try to let some juice flow onto the cream layer. This creates a lovely look and adds flavor. Presentation matters when serving these cheesecake cups. Use clear cups to show off the layers. A decorative platter makes a great display. For extra flair, add fresh mint leaves on top. You can also sprinkle some crushed graham crackers for texture. Keep the cups chilled until serving. This ensures they stay fresh and tasty! Pro Tips Use Room Temperature Cream Cheese: Allow your cream cheese to come to room temperature before mixing. This ensures a smoother and creamier texture without lumps in your cheesecake mixture. Chill the Cups: For an extra refreshing dessert, chill your serving cups in the refrigerator before assembling the cheesecake. This keeps the dessert cool and enhances the overall experience. Experiment with Flavors: Feel free to add flavorings such as lemon zest or almond extract to the cream cheese mixture for a unique twist on the classic cheesecake flavor. Make Ahead: These cheesecake cups can be prepared a day in advance. Allowing them to chill overnight helps the flavors to meld beautifully, making for an even tastier dessert. {{image_4}} You can switch up the fruit on top. While strawberries are great, try using blueberries, raspberries, or sliced peaches. Each fruit adds its own flavor. You can even mix fruits for a fun twist. Just remember to macerate them, like we did with the strawberries, to bring out their sweetness. If you want a dairy-free option, you can use vegan cream cheese. Look for brands that are rich and creamy. For the whipped cream, coconut cream works well. Just chill a can of coconut milk, scoop out the cream, and whip it. This keeps the dessert light and tasty while being dairy-free. Add some extra flavor to your cream cheese mix. A tablespoon of lemon juice or zest brightens the taste. For a chocolate twist, mix in cocoa powder. You can also try adding a splash of almond extract for a nutty flavor. These simple changes make your cheesecake unique and fun! To keep your leftover cheesecake cups fresh, cover them tightly with plastic wrap. You can also use an airtight container. This keeps moisture in and prevents the cheesecake from drying out. Store the cups in the refrigerator. They will stay tasty for up to three days. If you want to save some for later, you can freeze them. First, let the cheesecake cups chill in the fridge for at least two hours. After that, cover each cup with plastic wrap, then aluminum foil. This extra layer protects against freezer burn. You can freeze them for up to a month. When you are ready to eat, thaw them in the fridge overnight. The cheesecake cups taste best within three days if stored in the fridge. After three days, the flavors may fade. If frozen, enjoy them within a month for the best taste and texture. Remember, the fresher, the better! Yes, you can make these cheesecake cups ahead of time. Prepare them a day before your event. This lets the flavors blend well. Just cover them tightly and store in the fridge. They taste even better after chilling overnight. If you need a substitute for graham crackers, try digestive biscuits or vanilla wafers. You can also use crushed cookies like Oreos for a chocolate twist. All these options will give you a tasty crust. Chill the cheesecake cups for at least 2 hours. This helps the filling set nicely. For best results, let them chill overnight. The longer they sit, the better the flavors meld together. In this article, I covered the essential ingredients and step-by-step instructions for making cheesecake cups. You learned about ingredient substitutions and tips for perfecting your whipped cream. We explored fun variations, including fruit toppings and dairy-free options. Lastly, I shared how to store leftovers and answered common questions. Enjoy creating your cheesecake cups. They are easy, tasty, and perfect for sharing.
No-Bake Strawberry Cheesecake Cups Simple Delight
Craving a sweet treat that’s easy to whip up? No-Bake Strawberry Cheesecake Cups are your answer! With just a handful of simple ingredients, you can
- 1 sheet of frozen puff pastry, fully thawed - 8 oz cream cheese, brought to room temperature - 1/4 cup powdered sugar, sifted - 1 tsp pure vanilla extract - 1/2 tsp fresh lemon zest - 1 egg, beaten (for egg wash) - 1 tbsp milk (for egg wash) - Optional toppings: a handful of fresh berries, extra powdered sugar for dusting, or a drizzle of honey To make the Easy Puff Pastry Cheese Danish, gather your ingredients first. Start with frozen puff pastry. This gives the pastry its light and flaky texture. Make sure it is fully thawed before using. Next, you will need cream cheese. It must be at room temperature to blend well. Now, for the filling, we add powdered sugar. This sugar adds sweetness to balance the tang of the cream cheese. Pure vanilla extract brings a lovely aroma and flavor. A bit of fresh lemon zest adds brightness. For the egg wash, mix one beaten egg with a tablespoon of milk. This wash will give your pastries a golden look when baked. Finally, consider optional toppings. Fresh berries add color and flavor. A dusting of powdered sugar gives a nice finish. Honey drizzled on top adds extra sweetness. Having all these ingredients ready makes the process smooth and fun! {{ingredient_image_2}} First, preheat your oven to 400°F (200°C). This step is key for a nice, golden crust. Next, take your thawed puff pastry and lightly flour your work surface. Roll it out a bit to smooth any creases. Cut it into 4 squares, each about 6 inches on each side. In a medium bowl, blend the cream cheese, powdered sugar, vanilla extract, and lemon zest. Use a hand mixer or fork. Mix until it’s smooth and creamy, with no lumps. Now, take 1-2 tablespoons of the cream cheese mixture. Place it in the center of each puff pastry square. Carefully fold each corner of the square toward the center. Pinch the corners together to seal the filling inside. In a small bowl, whisk together the beaten egg and milk. Use a pastry brush to apply this egg wash evenly on each pastry. This gives them that beautiful golden color. Arrange your pastries on a baking sheet lined with parchment paper. Bake them for 15-20 minutes. Look for a puffed, golden brown finish. After baking, let them cool for a few minutes on a wire rack. You can serve them with fresh berries, a dusting of powdered sugar, or a drizzle of honey for added sweetness. Enjoy your delightful pastries! To get the best puff pastry, follow these tips. First, always thaw the pastry overnight in the fridge. This keeps it cold and easy to handle. When rolling, use flour to prevent sticking. Roll gently to keep those layers intact. Never stretch the dough too much; it needs to rise during baking. You can change the cream cheese filling to suit your taste. Try adding a bit of lemon juice for extra zest. Mix in some chopped herbs for a savory twist. You can also fold in chocolate chips or fresh fruit for a sweet touch. Each option adds a new flavor to your Danish. Many home cooks make a few common mistakes. One mistake is not sealing the pastry well, which lets the filling leak out. Make sure to pinch the corners tightly. Another error is skipping the egg wash. This step gives the pastry a lovely golden color. Lastly, do not overcrowd the baking sheet. Give each pastry space to puff up nicely. Pro Tips Keep the Puff Pastry Cold: Make sure your puff pastry remains cold until you are ready to bake. This ensures it puffs up beautifully in the oven. Experiment with Fillings: Don't hesitate to get creative with the filling! Try adding chocolate chips, fruit preserves, or nuts to the cream cheese mixture for extra flavor. Use Quality Ingredients: Since the recipe is simple, using high-quality cream cheese and pure vanilla extract will make a noticeable difference in flavor. Watch the Baking Time: Keep an eye on your pastries as they bake; they can go from perfectly golden to burnt quickly. Remove them once they reach a golden brown color. {{image_4}} You can easily make fruit-filled cheese Danishes. Just add fresh fruit to the cream cheese mix. Berries like raspberries, blueberries, or sliced strawberries work well. You can also use peaches or cherries. Simply chop the fruit and fold it into the cream cheese mixture. This adds a sweet and juicy burst of flavor. For a nutty twist, try adding nuts to your filling. Chopped almonds, walnuts, or pecans bring great texture. Mix them into the cream cheese filling for a richer taste. You could even sprinkle some crushed nuts on top before baking. This adds a nice crunch and looks beautiful. If you like savory flavors, you can change the filling. Add herbs like chives or dill to the cream cheese. You can also mix in cooked bacon or sautéed spinach. These options make the Danishes perfect for brunch or a snack. They are great for those who prefer less sweetness in their treats. You can store leftover cheese Danishes in an airtight container. Make sure they cool completely first. Keep them in the fridge for up to three days. If you want to keep them fresh longer, consider freezing them. To reheat your cheese Danishes, preheat the oven to 350°F (175°C). Place the pastries on a baking sheet. Heat them for about 10-15 minutes. This will help them regain their crispiness. You can also use a microwave, but this may make them a bit soft. Heat on medium power for 15-20 seconds. Freezing cheese Danishes is easy and fun. After baking, let them cool completely. Wrap each Danish in plastic wrap and then in foil. This helps prevent freezer burn. Label the packages with the date. You can freeze them for up to three months. When you're ready to eat, thaw them in the fridge overnight. Reheat as mentioned above for the best results. Yes, you can use phyllo dough. Phyllo will be thinner and crispier. Layer several sheets for a thicker result. Look for a golden brown color. The pastries should puff up nicely. A nice aroma will fill your kitchen too! Yes! You can prepare the filling and pastry ahead. Store them separately in the fridge. Just bake when you’re ready. You can use ricotta or mascarpone. Both will give you a rich, creamy filling. You can add a bit of lemon juice for tang. Yes, some brands offer gluten-free puff pastry. Just check your local store. Make sure to follow the package instructions for best results. In this blog post, we covered everything you need to make delicious cheese danishes. We explored the key ingredients, from frozen puff pastry to cream cheese fillings. I shared step-by-step instructions for perfect results, along with tips and tricks to avoid mistakes. Try the variations for fun twists, and remember to store leftovers properly. Making cheese danishes can be easy and fun. Enjoy creating new flavors and share them with friends! Trust me, you’ll impress everyone with these treats.
Easy Puff Pastry Cheese Danish Simple and Delicious Recipe
Ready to impress your friends and family with a tasty treat? This Easy Puff Pastry Cheese Danish recipe is the answer! With simple ingredients and
To make these peanut butter oat cups, you need: - 1 cup rolled oats - 1/2 cup natural creamy peanut butter - 1/3 cup honey or maple syrup - 1/4 cup mini chocolate chips - 1/4 cup chopped nuts - 1/2 teaspoon vanilla extract - A pinch of salt These ingredients come together to create a tasty treat that is easy to make. You can swap some ingredients if you want to change the flavor or make it fit your diet: - Use almond butter instead of peanut butter for a nut-free taste. - Choose agave syrup or brown sugar if you want a different sweetener. - For a nut-free option, skip the chopped nuts or use seeds like sunflower seeds. - Dark chocolate chips can replace milk chocolate chips for a richer taste. These swaps let you personalize your oat cups to suit your taste. These oat cups are not just tasty, but they also pack some good nutrients: - Calories: About 150 per cup - Protein: 5 grams - Fat: 8 grams - Carbohydrates: 15 grams - Fiber: 2 grams - Sugar: 5 grams This treat offers a balance of carbs, protein, and healthy fats. They make a great snack or quick breakfast option. Enjoy every bite knowing you are treating yourself well! {{ingredient_image_2}} Start with a large mixing bowl. Add 1 cup of rolled oats. Next, scoop in 1/2 cup of natural creamy peanut butter. Drizzle in 1/3 cup of honey or maple syrup. Then, add 1/2 teaspoon of vanilla extract and a pinch of salt. Stir these ingredients well. You want a sticky mixture that holds together. Now, fold in 1/4 cup of mini chocolate chips. Add 1/4 cup of chopped nuts, like almonds or walnuts. Mix gently to keep some texture. Get your muffin tin ready. You can use paper liners or spray each cup with cooking spray. This helps with easy removal later. Take a tablespoon and scoop the oat mixture into each muffin cup. Press down firmly with the back of a spoon. Make sure it is compact and even. This will help the cups hold their shape. Place the muffin tin in the fridge. Let the oat cups set for at least 1 to 2 hours. This time helps them firm up nicely. After they are set, remove the cups from the tin. If you used liners, peel them off gently. Store any leftovers in an airtight container in the fridge. Enjoy their delightful taste! To get the best texture, use rolled oats. They provide a nice chew. Creamy peanut butter is key for binding. It helps hold everything together. Make sure to mix well until it’s sticky. The chocolate chips and nuts add a fun crunch. Don’t overmix after adding them. This keeps your oat cups from being too dense. These oat cups are perfect for snacks or breakfast. You can serve them plain or dress them up. Try drizzling more peanut butter on top. A sprinkle of extra chocolate chips looks great too. Serve them on a colorful platter for fun. You could even add some fresh fruit on the side. Sliced bananas or berries pair nicely with the flavors. To keep your oat cups fresh, store them in an airtight container. Place them in the fridge to extend their shelf life. They will last up to a week this way. If you want to keep them longer, consider freezing them. Simply wrap each cup in plastic wrap, then place them in a freezer bag. They can last up to three months in the freezer. Pro Tips Choose Your Sweetener: Experiment with honey, maple syrup, or agave nectar to find the perfect sweetness that suits your taste. Mix and Match Nuts: Substitute or combine different nuts like pecans or hazelnuts for a unique flavor and texture in each batch. Chocolate Choices: Use dark chocolate for a richer taste or white chocolate for a sweeter option—both will enhance your oat cups. Perfect Storage: Keep the oat cups in an airtight container in the refrigerator for up to a week to ensure they stay fresh and delicious. {{image_4}} You can swap honey or maple syrup for other sweeteners. Agave syrup works well and keeps the flavor light. You can also use date syrup for a rich taste. If you want less sugar, try stevia or monk fruit sweetener. Just adjust the amount to your taste. These swaps keep your cups sweet and tasty. If you need nut-free oat cups, just skip the peanut butter. You can use sun butter or soy nut butter instead. Both options give a creamy texture without nuts. Make sure to check labels for any allergens. This way, everyone can enjoy these treats safely. To make your oat cups even better, add spices or dried fruits. Cinnamon or nutmeg gives a warm flavor. You can also mix in raisins or dried cranberries for sweetness. For a fun twist, add mini marshmallows or shredded coconut. Experiment with your favorites to create new flavors! To keep your peanut butter oat cups fresh, use an airtight container. This method helps seal in moisture and flavor. Place the cups in a single layer. You can stack them if you use parchment paper between layers. You can freeze these oat cups, too! Wrap each cup in plastic wrap or foil. Then, place them in a freezer-safe bag. They stay fresh for about three months in the freezer. When you want one, just take it out and let it thaw in the fridge. These oat cups last about five days in the fridge. After that, they may lose their texture and flavor. Always check for any off smells or changes in texture before eating them. Yes, you can use crunchy peanut butter. It adds a fun texture. The oat cups will still hold together well. Just make sure to mix it thoroughly with the oats. The flavor will be rich and nutty, which I really enjoy. You can use agave syrup or brown rice syrup as substitutes. Both will keep the oat cups sweet. If you want a thicker texture, try using molasses. It will give a different flavor but still taste great. These oat cups can last up to one week in the fridge. Just store them in an airtight container. If you freeze them, they can last for about three months. Thaw them in the fridge overnight when you want a quick snack. In this blog post, we covered essential ingredients for tasty oat cups. We provided step-by-step instructions for making them and shared helpful tips for texture and storage. You can explore variations to suit your taste and answered common questions about substitutes and shelf life. These oat cups are fun to make and easy to adapt. Enjoy experimenting with flavors and ingredients!
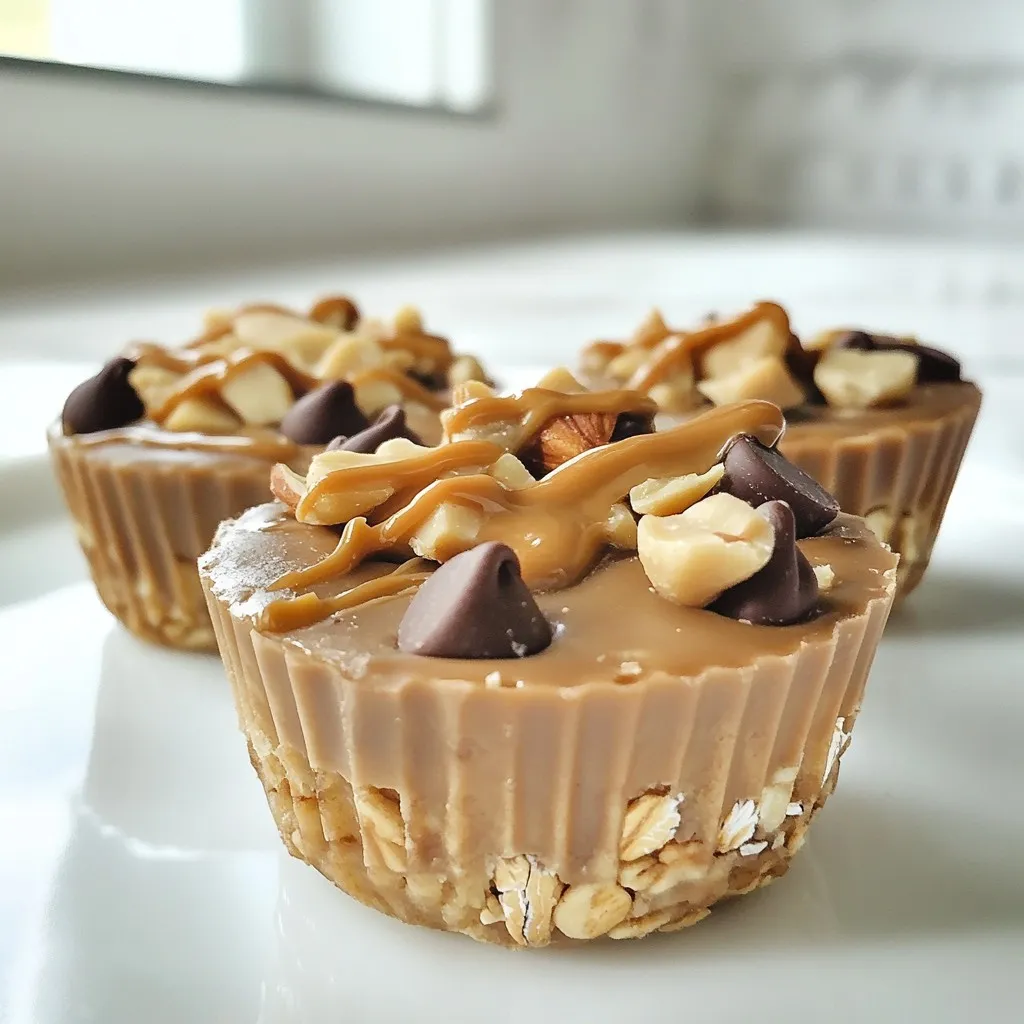
Ingredient No Bake Peanut Butter Oat Cups Delight
Are you ready to whip up a tasty treat without turning on your oven? In this post, I’ll share my favorite recipe for Ingredient No
- 1 cup almond flour - 1/2 cup vanilla protein powder - 1/4 cup almond butter - 1/4 cup honey or maple syrup - 1/2 teaspoon vanilla extract - 1/4 teaspoon sea salt - 1/2 cup dark chocolate chips (optional) - 2 tablespoons chia seeds (optional) To make Protein Cookie Dough Bites, you need simple yet effective ingredients. The base is almond flour, which gives a nutty taste and a good texture. Vanilla protein powder adds protein and sweetness. Almond butter is a great fat source and also brings creaminess. You can use honey or maple syrup as a sweetener. Both work well, but they give different flavors. The vanilla extract adds warmth to the bites, while sea salt enhances all the flavors. If you like chocolate, dark chocolate chips are a tasty choice. They make the bites feel special. Chia seeds are optional, but they add fiber and a nice crunch. They also help with nutrition. Gather these ingredients before starting. This way, you can enjoy the making process without any breaks. With these simple ingredients, you can create a healthy snack that satisfies your sweet tooth and fuels your day. {{ingredient_image_2}} - First, combine 1 cup of almond flour and 1/2 cup of vanilla protein powder in a large bowl. - Use a whisk or fork to blend them until there are no clumps. - Next, add 1/4 cup of almond butter, 1/4 cup of honey or maple syrup, 1/2 teaspoon of vanilla extract, and 1/4 teaspoon of sea salt. - Mix everything together with a spatula or your hands. Keep mixing until a smooth and cohesive dough forms. - Now, gently fold in 1/2 cup of dark chocolate chips and 2 tablespoons of chia seeds if you want added texture. - Be sure to mix evenly, but avoid over-mixing. You want to keep the dough nice and smooth. - Take small portions of dough and roll them into bite-sized balls, about 1 inch in diameter. - Place each ball on a parchment-lined baking sheet, leaving some space between them. - Finally, refrigerate the bites for at least 30 minutes. This step firms them up and makes them easy to enjoy later! Chilling the dough is very important. It helps the bites hold their shape. If you skip this step, they may turn too soft. I recommend refrigerating for at least 30 minutes. This makes them easier to roll and eat. For the right consistency, you want a smooth dough. If it feels too sticky, add a little more almond flour. If it’s too dry, mix in a touch more almond butter. Adjusting this will help you get that perfect bite. Serve your cookie dough bites on a rustic wooden platter. This adds a nice touch to any table. You can dust them lightly with cocoa powder for a classy look. Sprinkling chia seeds on top also enhances the visual appeal. It adds a fun crunch and extra nutrition. These small details make your snack look gourmet! Enjoy sharing these tasty bites at your next gathering. Pro Tips Chill for Best Texture: Refrigerating the cookie dough bites for at least 30 minutes allows them to firm up, making them easier to handle and enhancing their overall texture. Mix with Care: When folding in chocolate chips and chia seeds, be gentle to avoid over-mixing, which can lead to a dense dough. Sweetness Balance: Adjust the amount of honey or maple syrup based on your personal preference for sweetness, keeping in mind that the chocolate chips also add some sweetness. Storage Tips: Store any leftovers in an airtight container in the refrigerator for up to a week, or freeze them for longer storage, ensuring you always have a healthy snack on hand! {{image_4}} You can easily change the flavor of your protein cookie dough bites. Using different protein powder flavors adds a fun twist. Try chocolate or strawberry protein powder for a new taste. Each flavor brings its own unique flair to the mix. You can also swap almond butter for peanut or cashew butter. This simple change will alter the taste and texture. Peanut butter gives a rich, nutty flavor. Cashew butter adds a creamy, smooth touch. Both are delicious! Sweeteners are key in this recipe. You can use agave syrup or coconut sugar instead of honey. Each sweetener offers a different level of sweetness. Agave is mild and smooth, while coconut sugar gives a caramel-like flavor. Consider adding dried fruits or nuts for more variety. Chopped dates or raisins can add sweetness and chewiness. Walnuts or almonds provide a nice crunch. Mix and match to find your favorite combinations! To keep your protein cookie dough bites fresh, store them in an airtight container. They will last for up to a week in the fridge. Make sure the container is well-sealed to prevent moisture from getting in. This helps maintain their texture and flavor. If you notice any moisture, it’s best to eat them sooner. If you want to save your cookie dough bites for later, freezing is a great option. To freeze them, place the bites on a baking sheet in a single layer. After they freeze solid, transfer them to a freezer-safe bag or container. They can last for about three months in the freezer. When you want to enjoy them again, thaw the bites in the fridge overnight. You can also pop them in the microwave for a few seconds if you're in a hurry. They taste great straight from the fridge or after a quick warm-up! To make these tasty bites, follow these steps: 1. In a large bowl, mix 1 cup almond flour and 1/2 cup vanilla protein powder. Use a fork to break up clumps. 2. Add 1/4 cup almond butter, 1/4 cup honey or maple syrup, 1/2 teaspoon vanilla extract, and 1/4 teaspoon sea salt. Mix until smooth. 3. If you like, fold in 1/2 cup dark chocolate chips and 2 tablespoons chia seeds. 4. Roll the dough into 1-inch balls and place them on a parchment-lined sheet. 5. Chill the bites in the fridge for at least 30 minutes to firm them up. 6. Store leftovers in an airtight container in the fridge for a week or freeze them. Yes, these bites are healthy! Here’s why: - Almond flour is high in healthy fats and fiber. - Vanilla protein powder gives you a protein boost. - Almond butter adds more healthy fats and protein. - Honey or maple syrup provides natural sweetness. - Dark chocolate chips add antioxidants. - Chia seeds offer omega-3 fatty acids and fiber. Absolutely! You can try different protein powders. Here are some options: - Whey protein gives a creamy texture and great flavor. - Plant-based protein powders like pea or rice are good for a vegan option. - Flavored protein powders can add fun tastes, like chocolate or cookies and cream. Just remember that each powder may change the taste and texture slightly. For serving, here are some tips: - Use a rustic wooden platter or a small bowl for a nice look. - Dust with cocoa powder or sprinkle extra chia seeds for flair. - Pair with fresh fruit or nut butter for a more filling snack. Enjoy these bites anytime you need a tasty protein boost! These protein cookie dough bites are easy and fun to make. We covered the ingredients, step-by-step methods, and helpful tips to get it just right. You can even try different flavors and add-ins to suit your taste. In the end, these bites are a great snack for anyone. Store them properly and enjoy them any time. With this guide, you can make delicious, healthy treats with confidence. Your journey to tasty snacks starts here!
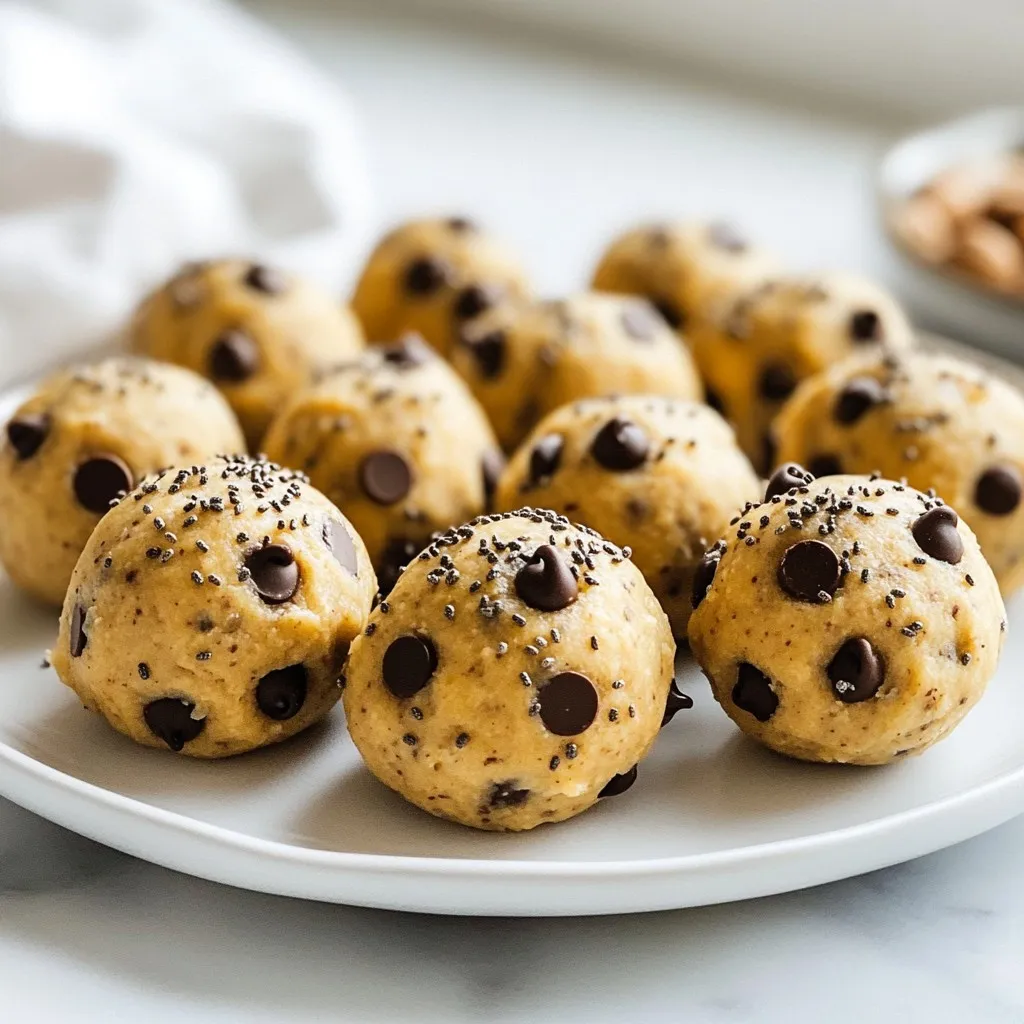
Protein Cookie Dough Bites Tasty Snack Idea
Craving a sweet treat that’s also good for you? Meet my Protein Cookie Dough Bites! These tasty snacks blend simple ingredients like almond flour and