Desserts

- 2 ripe bananas - 1 cup rolled oats - 1/2 cup almond flour These main ingredients bring the heart of the recipe. Ripe bananas add natural sweetness and moisture. Rolled oats give the cookies their chewy texture. Almond flour adds a nutty flavor and keeps them gluten-free. - 1/4 cup honey or maple syrup - 1/4 cup peanut butter - 1 teaspoon pure vanilla extract For sweetness, choose honey or maple syrup. Both work well in this recipe. Peanut butter adds creaminess and a rich taste. Vanilla extract brings out the flavors and makes the cookies smell great. - 1/2 teaspoon baking powder - 1/2 teaspoon ground cinnamon - A pinch of salt Baking powder helps the cookies rise. Ground cinnamon adds warmth and spice. A pinch of salt balances the sweetness and enhances all the flavors. - 1/3 cup dark chocolate chips - 1/4 cup chopped walnuts or pecans If you want to jazz up your cookies, add dark chocolate chips for a sweet bite. Nuts give a crunchy texture and extra flavor. These add-ins make your cookies even more fun! Check out the Full Recipe for more details. - Preheat oven to 350°F (175°C) - Line a baking sheet with parchment paper First, I set my oven to 350°F (175°C). This temperature helps the cookies bake nicely. Then, I take a baking sheet and line it with parchment paper. This step prevents the cookies from sticking, making cleanup easy. - Mash the bananas thoroughly - Combine all ingredients in a mixing bowl Next, I grab two ripe bananas. I mash them well using a fork. The smoother, the better! In a large mixing bowl, I add the mashed bananas along with rolled oats, almond flour, honey or maple syrup, peanut butter, vanilla extract, baking powder, ground cinnamon, and a pinch of salt. I mix everything until it’s all blended together. If I want, I can fold in dark chocolate chips or nuts for extra flavor. - Drop spoonfuls of batter onto the baking sheet - Flatten each cookie mound and bake Now, I use a spoon or cookie scoop to drop generous spoonfuls of the cookie batter onto my baking sheet. I make sure to leave about 2 inches between each scoop. This space allows them to spread while baking. Then, I gently flatten each mound with my fingers or the back of a spoon. I place the baking sheet in the oven and bake for about 12-15 minutes. I watch for the edges to turn golden brown. - Cool on a baking sheet for 5 minutes - Transfer to a wire rack to cool completely Once they’re baked, I take the cookies out and let them cool on the baking sheet for 5 minutes. This helps them firm up a bit. After that, I carefully transfer them to a wire rack to cool completely. Now they are ready to enjoy! For a full recipe, check out the details above. To get the best cookies, start with ripe bananas. Ripe bananas add natural sweetness and flavor. They also make your dough smooth and easy to mix. Next, remember not to overmix the batter. A gentle mix keeps the cookies soft and chewy. If you mix too much, they can turn out tough. These cookies taste amazing when warm, especially with almond milk. The milk adds creaminess and balances the sweetness. They also make great snacks for busy days. Pack them in your lunch or keep them in your bag for a quick bite. You can switch things up if you want! Use oat flour instead of almond flour for a different taste. Oat flour keeps the cookies gluten-free and adds a nice texture. You can also change the nut butter. Try using almond or cashew butter based on what you enjoy. This lets you customize the flavor to suit your taste. For the full recipe, check out the details above. {{image_4}} You can make small changes to this recipe for a healthier option. - Swap honey for agave syrup. Agave syrup has a lower glycemic index. - Use sugar-free chocolate chips. This swap cuts down on added sugars. Adding new flavors can make these cookies even better. - Add dried fruits like raisins or cranberries. They give a sweet surprise with every bite. - Include spices like nutmeg or ginger. A pinch can really enhance the taste. Switching out nuts can change the cookie's flavor and feel. - Replace peanut butter with almond or cashew butter. Each offers a unique taste. - Use mixed nuts instead of walnuts or pecans. This gives a fun crunch and variety. These little changes can make your cookies special and fit your tastes. For the full recipe, check out the instructions above! To keep your banana oatmeal cookies fresh, store them in an airtight container. This helps lock in moisture and flavor. You can keep them at room temperature for up to five days. If you want to extend their life, refrigerate them. Just remember to let them come to room temp before enjoying. If you want to save some cookies for later, freezing is a great option. First, let the cookies cool completely. Then, place them in a single layer on a baking sheet. Freeze them for about an hour. After that, transfer the cookies to a freezer-safe bag or container. This keeps them from sticking together. When you’re ready to eat them, take out the desired number of cookies and let them thaw. For the best texture, you can warm them in the oven or microwave for a few seconds. Enjoy your delicious banana oatmeal cookies anytime! Banana oatmeal cookies can last about 3 to 5 days at room temperature. Store them in an airtight container to keep them fresh. If you put them in the fridge, they can last up to a week. The cold can help them stay good longer. Yes, you can use quick oats instead of rolled oats. However, quick oats will change the cookie's texture. They may become softer and less chewy. You also might need to reduce the baking time by a minute or two to avoid overbaking. Yes, the ingredients in banana oatmeal cookies can be gluten-free. Use certified gluten-free oats and flour to ensure no gluten is present. Always check labels, as some oats may be processed in facilities that handle gluten. Yes, you can add protein powder to boost nutrition. Start with 1-2 tablespoons and mix it in with the dry ingredients. This will add protein without changing the cookie's flavor much. Adjust the liquid slightly if the dough gets too dry. If you don't have bananas, you can use applesauce or pureed pumpkin. They provide moisture, but you may need to adjust the sweetness. About 1/2 cup of applesauce or pumpkin will work well in this recipe. You now know how to make delicious banana oatmeal cookies. We covered the key ingredients, step-by-step instructions, and great tips to make them perfect. Don't forget that you can mix in optional add-ins for extra flavor. Experimenting with different nuts or sweeteners can change the taste too. Store your cookies well, so they last longer. With these easy guidelines, you can bake tasty treats that everyone will enjoy!
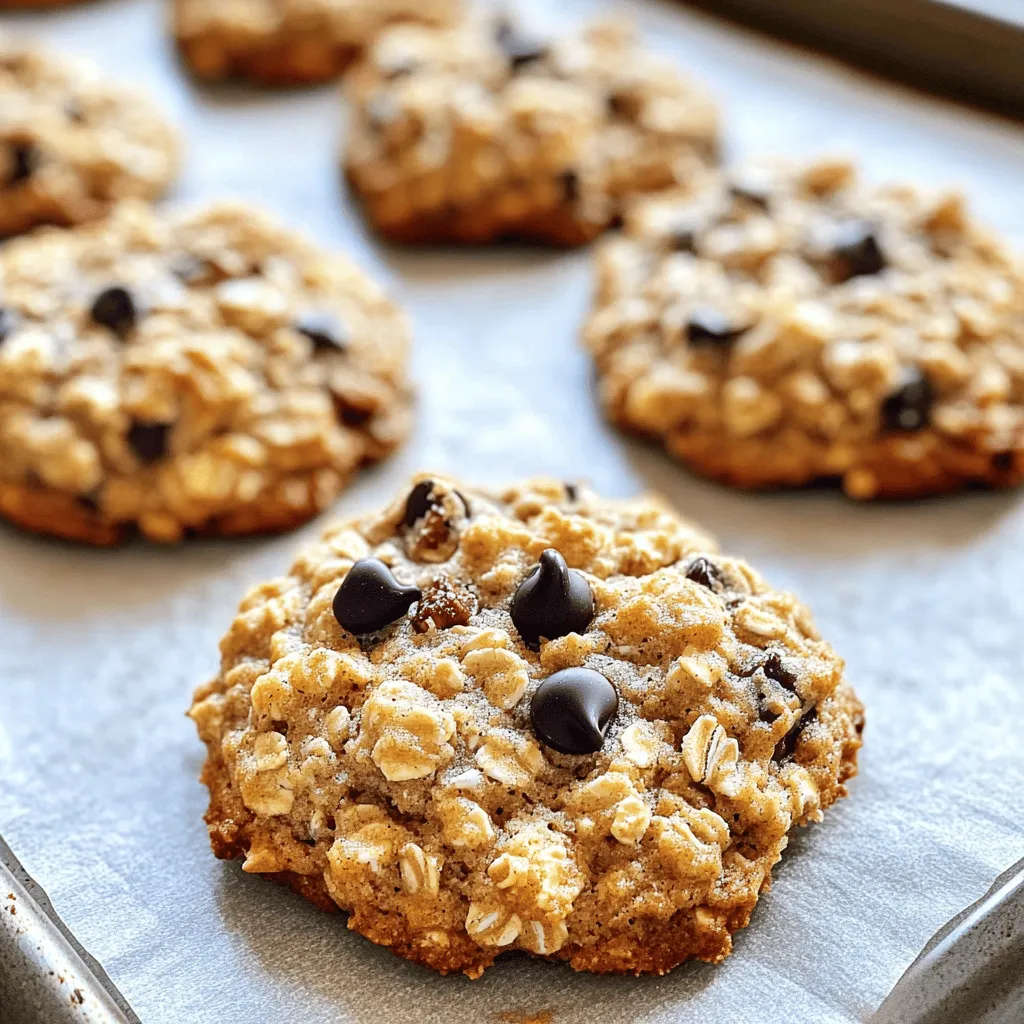
Delicious Banana Oatmeal Cookies Easy to Make Treat
Looking for a tasty treat that’s easy to make? These delicious banana oatmeal cookies are just what you need! Packed with ripe bananas and wholesome
- 3 ripe bananas, sliced into 1/2-inch thick rounds - 1/4 cup all-purpose flour - 1/4 cup cornmeal - 1 tablespoon granulated sugar - 1 teaspoon ground cinnamon - 1/4 teaspoon salt - 1/2 cup milk (or plant-based milk) - 1/4 cup vegetable oil (for frying) - Optional: powdered sugar for dusting When I make Fried Cinnamon Bananas, I always start with ripe bananas. Ripe bananas are sweeter and softer, which makes them perfect for this dish. You want to slice them into rounds that are about half an inch thick. Next, I mix the dry ingredients. In a bowl, I combine all-purpose flour, cornmeal, granulated sugar, ground cinnamon, and salt. This mix gives the bananas a nice crunch. The cornmeal adds a special texture that I love. Then, I slowly pour in the milk. I keep whisking until the batter is smooth. It should be thick but not lumpy. This helps the bananas get a nice, even coat when I dip them. I heat the vegetable oil in a large skillet. To check if it's hot enough, I drop a small spoonful of batter in. If it sizzles, I know I'm ready to fry. Now comes the fun part! I dip each banana slice into the batter. I make sure each piece is well-coated. Then, I carefully place them in the hot oil. I always fry in batches. This way, I avoid crowding the pan, which helps them crisp up better. Once they are golden brown, I take them out and let them rest on a plate with paper towels. This helps soak up any extra oil. While they are still warm, I sprinkle a cinnamon-sugar mix on top. It’s a simple blend of sugar and cinnamon that makes each bite delightful. If I want an extra touch, I might dust them with powdered sugar before serving. For the full experience, I love serving these fried bananas with a scoop of vanilla ice cream. The hot, crispy bananas paired with the cool ice cream is just perfect! Start by making the batter. In a medium bowl, combine these dry ingredients: - 1/4 cup all-purpose flour - 1/4 cup cornmeal - 1 tablespoon granulated sugar - 1 teaspoon ground cinnamon - 1/4 teaspoon salt Mix them well with a whisk. This ensures a smooth blend. Next, slowly add 1/2 cup of milk to the dry mix. Whisk continuously until the batter is smooth and thick, with no lumps. This batter will coat the bananas nicely. Now, it's time to fry. In a large skillet, heat 1/4 cup of vegetable oil over medium heat. To test if the oil is ready, drop a small spoonful of the batter into the oil. If it sizzles right away, you’re good to go! Take your banana slices and dip each one into the batter. Make sure each piece is fully coated. Carefully place the banana slices into the hot oil. Fry them in batches to avoid crowding the pan. Cook for about 2 to 3 minutes on each side. Look for that nice golden brown color and crispy texture. Once done, use a slotted spoon to remove the bananas. Place them on a plate lined with paper towels to soak up extra oil. While the bananas are still warm, it's time for some magic. Sprinkle them with a mix of cinnamon sugar. You can make this by combining 1 tablespoon of granulated sugar with 1/2 teaspoon of ground cinnamon. Want a sweet touch? Dust them lightly with powdered sugar too. Your fried cinnamon bananas are now ready to shine! For the full recipe, check the details above. To get the best fried cinnamon bananas, oil temperature matters. Heat your vegetable oil to about 350°F. You can check the oil by dropping a bit of batter in it. If it sizzles, it’s ready! Avoid overcrowding the skillet. Fry in small batches. This way, each slice has space to cook evenly. If you crowd the pan, the bananas steam instead of frying, and they won’t get that crispy finish you want. Serving your fried bananas is part of the fun! Enjoy them hot with a scoop of vanilla ice cream or whipped cream. The cool creaminess pairs well with the warm, crispy bananas. Garnish them with fresh mint leaves for a pop of color. A sprinkle of extra cinnamon adds a lovely touch too. Presentation makes your dish look even more appealing. If you want the full recipe, check it out in the article above. {{image_4}} You can make this dish your own with simple swaps. Try using whole wheat flour instead of all-purpose flour. Whole wheat flour adds a nutty taste and a bit more fiber. Gluten-free flour is another great choice if you need to avoid gluten. Just make sure it’s a blend suitable for frying. For milk, you have options too. Use almond milk, oat milk, or coconut milk. These plant-based milk alternatives work well and keep the dish tasty. Want to jazz up your fried bananas? Add a pinch of nutmeg or a splash of vanilla extract to the batter. Nutmeg gives a warm spice that blends perfectly with cinnamon. Vanilla adds a sweet aroma that makes the dish even more inviting. You can also experiment with different sugars. Try brown sugar instead of granulated sugar for a deeper flavor. Coconut sugar is another fun option that adds a hint of caramel. These small changes can take your fried cinnamon bananas to a new level of yum. To keep your fried bananas crispy, store them in a single layer. Use a paper towel-lined plate. This helps absorb moisture. Cover them loosely with foil or wax paper. Do not use plastic wrap, as it traps steam. Store in the fridge for up to two days. Reheat your fried bananas in an oven or skillet. For the oven, preheat it to 350°F (175°C). Place the bananas on a baking sheet. Heat for about 10 minutes. For the skillet, use medium heat. Add a little oil to the pan. Cook for 2-3 minutes on each side. This method restores their crispy texture. Enjoy them warm for the best taste! To get your Fried Cinnamon Bananas crispy, the right batter consistency is key. You want your batter to be smooth but thick enough to coat the banana slices well. Here’s how to achieve that: - Combine all dry ingredients first: flour, cornmeal, sugar, cinnamon, and salt. - Slowly add milk while whisking. This helps avoid lumps and gives a nice texture. - If the batter feels too runny, add a little more flour. If too thick, add more milk. Make sure your oil is hot enough before frying. A good test is to drop a small spoonful of batter into the oil; if it sizzles, you’re ready! You can use frozen bananas, but they may change the texture and taste. Frozen bananas often become mushy once thawed. This can lead to a less crispy finish when fried. If you do use frozen bananas, here are some tips: - Let them thaw completely and drain any excess moisture. - Pat them dry with a paper towel before dipping them in the batter. This helps maintain some texture, but fresh ripe bananas will always yield the best results. Fried Cinnamon Bananas are great on their own, but pairing them with other dishes can enhance your meal. Here are some ideas: - Serve with a scoop of vanilla ice cream for a delightful contrast. - A dollop of whipped cream adds a creamy touch. - Try them alongside pancakes or waffles for a fun brunch. - Add fresh fruit like strawberries or blueberries for a colorful plate. For more delicious ideas, check out the Full Recipe for Fried Cinnamon Bananas! Fried Cinnamon Bananas are simple and fun to make. You learned about the key ingredients, step-by-step frying methods, and storage tips. I shared how to make them crispy and suggested many ways to enjoy this treat. Don't forget to experiment with flavors and serve them with ice cream or whipped cream. These bananas are a tasty dessert to share with family and friends. Try making them your own, and enjoy every bite!
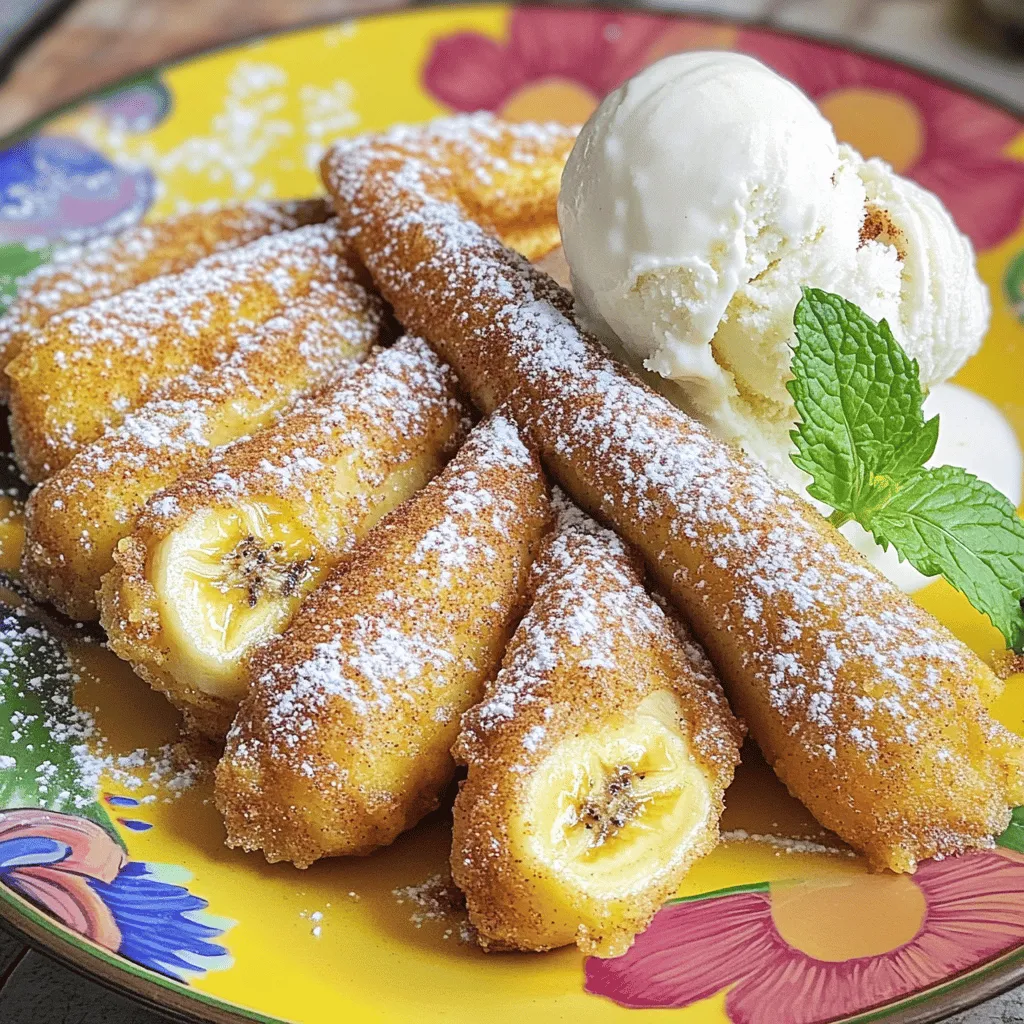
Fried Cinnamon Bananas Crispy and Sweet Delight
If you’re craving something sweet and crispy, Fried Cinnamon Bananas are a must-try! These golden treats combine ripe bananas’ natural sweetness with a crunchy coating
To make these delightful raspberry swirl cupcakes, gather these main ingredients: - 1 ½ cups all-purpose flour - 1 cup granulated sugar - ½ cup unsalted butter, softened - 2 large eggs - 1 teaspoon pure vanilla extract - ½ cup whole milk - 2 teaspoons baking powder - ½ teaspoon salt - 1 cup fresh raspberries - 2 tablespoons raspberry jam These ingredients help create a soft and fluffy cupcake that bursts with flavor. For the frosting and a lovely touch, you will need: - 1 cup powdered sugar (for frosting) - 4 tablespoons unsalted butter, softened (for frosting) - 1 tablespoon whole milk (for frosting) - Additional fresh raspberries (for garnish) This frosting adds sweetness and creaminess, making the cupcakes even more irresistible. When picking fresh raspberries, consider these tips: - Look for bright red berries with no mold. - Choose firm berries; they should not be mushy. - Smell for a sweet aroma; this indicates freshness. - Buy organic when possible to avoid pesticides. Fresh raspberries enhance flavor and add a beautiful swirl. Be sure to pick the best ones for your cupcakes! Start by preheating your oven to 350°F (175°C). This step is vital for even baking. Line a standard cupcake pan with paper cupcake liners. This will help you easily remove the cupcakes later. In a large bowl, cream together ½ cup of softened butter and 1 cup of granulated sugar. Use an electric mixer for about 3-4 minutes. The mix should look light and fluffy, which means it’s ready. Next, add 2 large eggs, one at a time. Make sure to beat well after each addition. Now, pour in 1 teaspoon of pure vanilla extract and mix it in. Slowly add ½ cup of whole milk and stir until everything is smooth. In another bowl, whisk together 1 ½ cups of all-purpose flour, 2 teaspoons of baking powder, and ½ teaspoon of salt. Gently fold this dry mix into your wet ingredients. Remember, mix just until combined to keep the cupcakes light. In a small bowl, gently crush 1 cup of fresh raspberries with a fork. You want to break them apart but keep some texture. Stir in 2 tablespoons of raspberry jam to create a colorful sauce. Now, fill each cupcake liner about 1/3 full with batter. Add about a teaspoon of your raspberry mixture on top. Then, add more batter until each liner is about 2/3 full. To create the swirl, use a toothpick or skewer. Gently swirl the raspberry mixture through the cupcake batter. This gives each cupcake a lovely marbled look. For the full recipe and details, check the [Full Recipe]. To get that lovely swirl in your raspberry cupcakes, work carefully. Start by filling each cupcake liner with batter. Then, add a spoonful of your raspberry mixture. Use a toothpick to swirl it gently. Avoid over-mixing to keep the swirl effect. Each swirl should look unique and inviting. Moisture makes a cupcake great. Use fresh ingredients for the best results. Make sure your butter is soft, but not melted. Cream the butter and sugar well; this adds air. Don't overmix your batter after adding flour. This will keep your cupcakes light and fluffy. Having the right tools helps a lot. Here’s what you’ll need: - Mixing bowls - Electric mixer - Cupcake pan - Cupcake liners - Toothpick or skewer - Measuring cups and spoons These tools make your baking easier and more fun. With them, you can create perfect raspberry swirl cupcakes every time. For more details, check the Full Recipe. {{image_4}} You can easily swap raspberries for other fruits. Strawberry and blueberry work great. For strawberry, use fresh or pureed berries. Add them just like raspberries for a yummy swirl. Blueberries can be crushed lightly, too. They create a sweet and tangy flavor. Each fruit brings its unique taste and color to your cupcakes, making them fun and fresh. You can make these cupcakes gluten-free. Just use gluten-free flour instead of all-purpose flour. For a vegan version, switch eggs with flaxseed meal. Mix one tablespoon of flaxseed with three tablespoons of water for each egg. Use plant-based butter and milk, too. These changes keep the taste great while meeting dietary needs. The frosting can change the cupcake's whole vibe. Try lemon or cream cheese frosting for a fresh twist. Chocolate frosting adds richness and depth. You can even mix flavors by swirling two frostings together. Each option gives a new taste and makes your cupcakes more exciting. Explore these variations to find your favorite. For the basic recipe, check the Full Recipe for guidance. To keep your Raspberry Swirl Cupcakes fresh, store them in an airtight container. Place parchment paper between layers if stacking. This prevents sticking and keeps the frosting intact. Store the cupcakes at room temperature for up to two days. If you want them to last longer, refrigerate them. Cupcakes stay fresh for about a week in the fridge. Freezing is a great way to save extras. First, let the cupcakes cool completely. Once cooled, wrap each cupcake in plastic wrap. Then, place them in a freezer-safe bag or container. Make sure to remove as much air as possible. You can freeze them for up to three months. When ready to eat, thaw them in the fridge overnight. For quick thawing, leave them at room temperature for a few hours. Raspberry Swirl Cupcakes last up to two days at room temperature. In the fridge, they last about a week. If you freeze them, they can last for three months. To reheat, place a cupcake in the microwave for about 10-15 seconds. This warms it up without drying it out. Enjoy your cupcakes at their best! For the full recipe, check out the detailed instructions above. To stop the raspberries from sinking, coat them in a bit of flour before mixing. This light dusting helps them stay suspended in the batter. Another trick is to add the raspberries just before baking. Swirl them in gently after putting the batter in the liners. This keeps them near the top. You can use many fruits instead of raspberries. Strawberries, blueberries, or blackberries work well. Each fruit gives a unique taste. You can also experiment with fruit jams. Just make sure to adjust the sweetness in the batter if the jam is very sweet. Yes, you can make the batter in advance. Mix it and store it in the fridge for up to two days. When you're ready, simply scoop it into the liners and bake. This makes it easy to prepare for a last-minute gathering. For the best results, don’t wait too long before baking. Always use the batter fresh for the best taste and texture. For the full recipe, check the ingredients and steps outlined earlier. Raspberry swirl cupcakes are a fun and tasty treat. We discussed key ingredients, including tips for choosing fresh raspberries. I shared step-by-step instructions to help you create that beautiful swirl. To make the cupcakes more enjoyable, we explored useful tips, variations, and storage options. Baking can be simple and rewarding. With these insights, you're ready to make delicious cupcakes that everyone will love. Enjoy baking!
Raspberry Swirl Cupcakes Irresistible Delight Recipe
Get ready to indulge in something sweet! My recipe for Raspberry Swirl Cupcakes is a true delight. These cupcakes combine moist batter with a stunning
- 1 box of vanilla cake mix - 3 large eggs - 1/2 cup vegetable oil - 1 cup water - 1/2 cup frosting - 12 mini ice cream cones - 1 cup white chocolate chips - 2 tablespoons coconut oil - Optional: sprinkles for decoration When you make Ice Cream Cone Cake Pops, you need simple ingredients. First, grab a box of vanilla cake mix. This mix gives a sweet base. Next, add three large eggs to bind everything. A half cup of vegetable oil keeps the cake moist. For hydration, use one cup of water. Frosting is key for flavor. I suggest a half cup of vanilla frosting. You'll also need twelve mini ice cream cones. These cones serve as fun holders for your cake pops. For the coating, gather one cup of white chocolate chips. To make it smooth, add two tablespoons of coconut oil. If you want to jazz them up, sprinkles make a great decoration. You can find all these items at your local store. Having everything ready makes cooking more fun! - Step 1: Preheat your oven to 350°F (175°C). Line a muffin tin with paper liners. - Step 2: In a large bowl, combine the vanilla cake mix, eggs, vegetable oil, and water. Mix until smooth. - Step 3: Pour the batter into the lined muffin cups, filling them halfway. Bake for 15-18 minutes. Cool the cupcakes in the pan for 5 minutes before moving them to a wire rack. - Step 4: Once the cupcakes cool, crumble them into a large mixing bowl. Break them down until they are fine crumbs. - Step 5: Add the frosting to the crumbled cupcakes. Mix well until the frosting is evenly spread and moist. - Step 6: Roll the mixture into 1-inch balls. Place them on a baking sheet lined with parchment paper. Freeze for 30 minutes. - Step 7: While the cake balls freeze, melt the white chocolate chips in a microwave-safe bowl. Heat in 20-second intervals, stirring in between. - Step 8: After freezing, gently insert a mini ice cream cone into each cake ball. Dip the cake pops into the melted chocolate. - Step 9: Allow any excess chocolate to drip off. Sprinkle colorful sprinkles on top before the chocolate hardens. Place the cake pops upright in a block of floral foam or a tall glass until set. For the complete recipe, check out the [Full Recipe]. Cooling your cupcakes is key. If you skip this step, they may crumble too much. After baking, let them cool for about 5 minutes in the tin. Then move them to a wire rack. This helps them cool completely. When they are cool, you can crumble them evenly. For best results, break them into small pieces. Use your hands or a fork to get fine crumbs. This makes mixing easier. Melting chocolate can be tricky. To avoid burning, use a microwave-safe bowl. Heat the chocolate chips in 20-second intervals. Stir after each interval until it’s smooth. For a shiny finish, add coconut oil. It helps the chocolate coat better and makes it glossy. If you don’t have coconut oil, use shortening. Both will help you get that perfect dip. Get creative with your sprinkles! Use different colors and shapes. You can mix and match them for fun designs. If you want to use white chocolate, you can add food coloring. Dip the cake pops in white chocolate first, before adding sprinkles. This way, the colors will stick better. Let your imagination run wild with your cake pop designs! {{image_4}} You can change up the flavor of your cake pops easily. Instead of vanilla, try using chocolate cake mix. This adds a rich and delightful taste. You can also switch up the frosting flavors. Think about using chocolate, strawberry, or cream cheese for a unique twist. Each flavor adds its own charm and fun. Coating your cake pops doesn’t have to be plain white chocolate. Colored candy melts make your pops pop! They come in many colors. You can mix and match for a beautiful look. Sprinkles and nuts are great alternatives too. They add crunch and color, making each bite exciting. Presentation can make your cake pops shine at any event. Try arranging them in a fun display. Use a cute cup filled with colorful edible rocks or sprinkles. This makes a great centerpiece for parties. You can also theme them for seasons. For Halloween, use orange and black sprinkles. For Christmas, think red and green. The options are endless! Be sure to check out the Full Recipe for specific instructions! You can store your cake pops at room temperature. Keep them in an airtight container. This helps keep them fresh for a few days. If you want them to last longer, place them in the fridge. Just make sure they are in a sealed container to avoid drying out. These cake pops can stay fresh for about five days at room temperature. In the fridge, they can last up to a week. If you want to freeze them, wrap each cake pop in plastic wrap. Then, place them in a freezer bag. When ready to eat, let them thaw at room temperature. If your cake pops need a refresh, you can warm them slightly. Use a microwave for about 10 seconds. This helps soften the chocolate. Avoid melting it completely. Be careful not to overheat them as this can ruin their shape. Enjoy your tasty treats! Yes, you can use a gluten-free cake mix. This makes the recipe accessible to those with gluten sensitivities. Just choose a brand you like, and follow the same steps as the regular cake mix. It will taste just as great! You can make these ice cream cone cake pops two days ahead of time. Store them in an airtight container at room temperature. This allows the flavors to meld, making them even more tasty when served. Yes, kids can help with this fun recipe! They can mix the cake batter and roll the cake balls. Just keep an eye on them when using the oven and the melting chocolate. Safety first! To transport cake pops, place them in a sturdy box. Use a piece of foam or a small container to hold them upright. This keeps them from tipping over. You want them to stay looking cute for your event! In this post, I covered how to make fun cake pops using simple ingredients. You learned to prepare the cake base and form, coat, and assemble the pops. I shared helpful tips for texture and melting chocolate. You also discovered variations and storage tips to keep your treats fresh. Making cake pops is a fun way to get creative in the kitchen. Enjoy your baking!
Ice Cream Cone Cake Pops Fun and Tasty Treats
Looking for a fun and tasty treat? Ice cream cone cake pops are the perfect snack! These mini delights combine the joy of cake with
- 1 cup creamy or crunchy peanut butter - 1 cup granulated sugar - 2 cups semi-sweet chocolate chips - 3 cups chow mein noodles - 1 teaspoon pure vanilla extract - Pinch of sea salt Choosing between creamy vs. crunchy peanut butter You can use either creamy or crunchy peanut butter. Creamy gives a smooth texture. Crunchy adds fun bites of peanuts. Choose based on your taste! Best chocolate chip options for melting Semi-sweet chocolate chips work best for this recipe. They melt smoothly and add rich flavor. You can also try dark chocolate for a bolder taste. Alternatives for chow mein noodles: gluten-free and more If you need gluten-free options, look for rice noodles or gluten-free chow mein noodles. You can also use pretzel sticks for a different crunch. To start, we combine the peanut butter and sugar in a medium saucepan. Use low heat to keep it gentle. Stir continuously for about 2-3 minutes. This step helps the sugar dissolve fully. You want a smooth texture, so be patient. Once it is smooth, remove the saucepan from the heat. Now, we add the vanilla extract and a pinch of sea salt. Stir well to blend these flavors in. Next, fold in the chow mein noodles with a spatula. Be gentle to keep the noodles intact. Mix until every noodle is coated in that creamy peanut butter mixture. This part is key for taste and texture. For the chocolate, use a microwave-safe bowl. Melt the semi-sweet chocolate chips in 30-second intervals. Stir well in between each interval until it is smooth. This method avoids scorching the chocolate. Once melted, pour it over the peanut butter-coated noodle mixture. Stir gently until everything is well combined. You want a rich, chocolatey coating on every piece. Follow these steps, and you’re on your way to making delightful no-bake peanut butter haystacks. For the full recipe, check the complete guide. When you melt peanut butter, always use low heat. This keeps the peanut butter smooth and creamy. Stir it constantly for 2 to 3 minutes. This step is key to avoid burning the peanut butter. Once it’s smooth, mix in the sugar well. This makes for a sweet treat. To fold in the chow mein noodles, use a spatula. Gently mix without breaking the noodles. This keeps the texture nice. If you mix too hard, you might crush the noodles. You want to keep them crunchy for the best haystacks. Serving your haystacks can be fun! Try using a tiered dessert stand for height. This adds a nice touch to your table. You can also drizzle extra melted chocolate over the top. It makes them look fancy and delicious. Adding crushed peanuts on top gives a great visual appeal. It adds texture too! You can use mini chocolate chips or colorful sprinkles as well. These small touches make your haystacks stand out. Sometimes chocolate can overheat. If your chocolate gets too thick, add a little vegetable oil. This helps it melt smoothly again. Stir it well to combine. If your mixture is too dry, add a bit more peanut butter. If it’s too sticky, add more chow mein noodles. Adjusting the consistency is easy. Just keep mixing until you find the right balance. Enjoy making these treats! {{image_4}} You can easily change the taste of your haystacks. Adding a pinch of cinnamon gives a warm, sweet flavor. You might also try cocoa powder for a rich chocolate taste. These small changes can make a big difference. For extra texture, think about adding nuts or dried fruit. Chopped walnuts or almonds add crunch. Dried cranberries or raisins offer a chewy bite. Mix and match until you find your favorite combination. If you follow a vegan diet, you have options. Use maple syrup instead of sugar. Swap out the chocolate chips for dairy-free ones. These simple swaps keep your haystacks tasty and vegan-friendly. For those who need gluten-free options, choose gluten-free chow mein noodles. Many brands offer these, so you can still enjoy this treat. Always check the label to ensure they meet your needs. Make your haystacks festive by adding colored chocolate. During holidays, you can find chocolate melts in red and green. This makes your treats fun for parties and events. You can also add special toppings for celebrations. Sprinkles or edible glitter can make them shine. Use mini marshmallows or coconut flakes for a unique twist. Your haystacks will be the star of any dessert table! To keep your peanut butter haystacks fresh, store them in an airtight container. This helps maintain their flavor and texture. I suggest placing a layer of parchment paper between the layers of haystacks. This prevents them from sticking together. Keep the container at room temperature, away from direct sunlight or heat sources. Peanut butter haystacks last about one week at room temperature. If you want to enjoy them longer, freezing is the way to go. Place the haystacks in a freezer-safe container. They can last up to three months in the freezer. When you're ready to eat them, just let them thaw at room temperature. You can also pop them in the fridge for a quicker option. For more details, check the Full Recipe. Can I make these ahead of time? Yes, you can make these haystacks ahead of time. They store well in the fridge. I often prepare them a day in advance. This way, they get nice and firm. Just keep them in an airtight container. What can I substitute for chow mein noodles? If you can’t find chow mein noodles, try using pretzel sticks or rice noodles. Both options give a nice crunch. You can also try cornflakes for a different texture. Is it possible to use almond butter or other nut butters? Absolutely! You can use almond butter or even cashew butter. Each nut butter adds a unique flavor. Just make sure it's creamy for the best result. What should I do if my chocolate isn’t melting properly? If your chocolate isn’t melting, you may be heating it too fast. Try using lower heat or melting in shorter bursts. Stir it often to help it melt evenly. How can I fix a mixture that's too crumbly? If your mixture is too crumbly, add a bit more peanut butter. This will help bind it together. A touch of melted chocolate can also help make it stick. Can I double the recipe, and if so, how should I adjust the process? Yes, you can double the recipe! Just make sure you have a big enough pot. You might need to melt the chocolate in two batches if your bowl is small. Keep an eye on the mixing to ensure everything blends well. For the full recipe, check the instructions above. Enjoy creating these tasty treats! We covered how to make delicious no-bake peanut butter haystacks. The right ingredients, like peanut butter and chocolate, are key. I shared tips for smooth mixing and fun presentations. You also saw options to change flavors and meet dietary needs. Lastly, I outlined best storage practices to keep your treats fresh. These tasty snacks are easy to make and fun to share. Enjoy creating your own version!
Best Easy No-Bake Peanut Butter Haystacks Delight
If you’re craving a sweet treat that requires no baking, you’ve come to the right place! The Best Easy No-Bake Peanut Butter Haystacks Delight offers
To make these amazing cookies, gather the following ingredients: - 1 cup unsalted butter, softened to room temperature - 1 cup granulated sugar - 1/2 cup packed brown sugar - 1 large egg, at room temperature - 1 teaspoon pure vanilla extract - 2 cups all-purpose flour - 1 teaspoon baking powder - 1/2 teaspoon baking soda - 1/4 teaspoon salt - 1 cup cream cheese, softened - 1 cup fresh strawberries, hulled and diced - 1/2 cup white chocolate chips (optional) - 1/2 cup crushed graham crackers (for topping) These ingredients work together to create a soft and chewy cookie that bursts with strawberry flavor. You can add some fun twists to your cookies. Here are some optional ingredients you might enjoy: - White chocolate chips for a sweet touch - Crushed graham crackers for extra crunch - Chopped nuts like pecans or walnuts for added texture - A splash of lemon juice for a zesty kick Feel free to mix and match based on your taste! Choosing the right ingredients is key for great cookies. Here are my tips: - Use fresh strawberries. Look for firm, plump berries with bright color. - Select high-quality butter. It enhances the flavor of your cookies. - Choose real vanilla extract over imitation for the best taste. - Pick full-fat cream cheese for a rich, creamy texture. When you use fresh, quality ingredients, your cookies will shine! For the full recipe, follow the steps in the earlier sections. First, gather all your ingredients. You will need butter, sugars, an egg, vanilla, flour, baking powder, baking soda, salt, cream cheese, strawberries, and optional white chocolate chips. Start by preheating your oven to 350°F (175°C). Line a baking sheet with parchment paper. In a large bowl, cream the softened butter with the granulated and brown sugars. Mix until light and fluffy, about 2-3 minutes. Then, add the egg and vanilla. Mix well until everything is combined. In another bowl, whisk the flour, baking powder, baking soda, and salt together. Gradually add this dry mix to the butter mixture. Stir gently until just combined. Avoid overmixing, as this can make the cookies tough. Next, fold in the softened cream cheese. Make sure it mixes evenly. Then, add the diced strawberries and white chocolate chips if you want. Mix until everything is well combined. Using a cookie scoop, portion out dough balls. Place them on the baking sheet, leaving about 2 inches apart. Lightly sprinkle crushed graham crackers on top. This adds a nice cheesecake touch. Now it’s time to bake! Place the baking sheet in the preheated oven. Bake the cookies for 10-12 minutes. Watch them closely. The edges should look golden, but the centers might seem a bit soft. This is perfect, as they will firm up while cooling. Once baked, remove the sheet from the oven and let the cookies cool for about 5 minutes. This will help them set before moving. After cooling on the sheet, transfer the cookies to a wire rack. Let them cool completely for the best texture. For serving, arrange the cookies on a nice plate. Dust with powdered sugar for a special touch. You can also add whole strawberries on the side. This makes a beautiful and fresh presentation. For the full recipe, check out the detailed instructions above. Enjoy your delicious strawberry cheesecake cookies! One common mistake is overmixing the dough. This can make your cookies tough. Mix just until the ingredients combine. Another mistake is not measuring flour correctly. Too much flour can lead to dry cookies. Always spoon flour into your measuring cup, then level it off with a knife. To get that creamy texture, use room temperature cream cheese. It blends better with the butter and sugars. Make sure your butter is also soft. If it’s too cold, the dough won’t mix well. For chewy cookies, don’t bake them too long. They should look slightly underbaked in the center when you pull them out. Store your cookies in an airtight container. This keeps them soft and fresh. You can add a slice of bread to help keep them moist. If you need to keep them longer, freeze them. Place baked cookies in a freezer bag, and they will last for up to three months. For the Full Recipe, check above and enjoy making your own batch! {{image_4}} You can change up the fruit in these cookies. Instead of strawberries, try blueberries, raspberries, or even peaches. Each fruit brings a unique taste. For example, blueberries add a burst of sweetness, while raspberries bring a nice tartness. Just chop the fruit into small pieces, so they mix well into the dough. This keeps the texture light and fluffy. Toppings can enhance your cookies. Instead of crushed graham crackers, consider using crushed nuts or coconut flakes. Both options add crunch and flavor. You can also drizzle melted chocolate on top for an extra sweet touch. Try adding a dollop of whipped cream or yogurt when serving. These toppings make your cookies even more special. You can easily make these cookies gluten-free. Just swap the all-purpose flour for a gluten-free blend. Many options are available today that work great in baking. For a low-sugar version, reduce the sugar in the recipe. You can also use a sugar substitute like stevia or monk fruit. These adjustments keep your cookies healthy without losing flavor. For the full recipe, check out the details above. Enjoy experimenting with these ideas to find your perfect cookie! To keep your strawberry cheesecake cookies fresh, place them in an airtight container. Make sure they are completely cool before you store them. This helps prevent sogginess. Layer parchment paper between the cookies to avoid sticking. Store them at room temperature for the best taste. You can freeze these cookies to enjoy later. First, let them cool completely. Once cool, place the cookies in a single layer on a baking sheet. Freeze them for about an hour. This keeps them from sticking together. After that, transfer the cookies to a freezer-safe bag or container. They can last up to three months in the freezer. Strawberry cheesecake cookies taste best within the first week. After that, they may lose some of their flavor. If stored properly, they can last up to ten days at room temperature. For the best experience, enjoy them fresh or within a week. If you freeze them, remember to thaw them at room temperature before eating. This ensures they regain their soft texture. For the full recipe, refer to the earlier section. Yes, you can use frozen strawberries. Thaw them first and drain excess juice. This helps keep your cookie dough from getting too wet. Frozen strawberries work well when you want that fruity flavor. Just chop them into small pieces to mix in easily. You can substitute cream cheese with Greek yogurt. Use the same amount for a creamy texture. This change keeps the cookies soft and adds a nice tang. You can also use ricotta cheese as another option. It gives a different flavor but still works well. Serve these cookies warm or at room temperature. They taste great with a glass of milk or a scoop of ice cream. For a fun touch, dust them with powdered sugar. You can also plate them with fresh strawberries for a lovely display. Check out the Full Recipe for more serving ideas! Strawberry cheesecake cookies are fun to make and share. We’ve covered key ingredients, step-by-step baking, and useful tips to avoid mistakes. Remember to explore variations that suit your taste. Proper storage keeps cookies fresh for longer. Don’t hesitate to try different fruits or toppings for unique flavors. With these insights, you can enjoy delicious cookies every time. Happy baking, and may your treats impress everyone who tastes them!
Irresistible Strawberry Cheesecake Cookies Delight
Get ready to indulge in a sweet treat that combines two favorites: strawberries and cheesecake! In today’s post, I’ll guide you through making irresistible strawberry
To make Easy Boston Cream Pie Cookie Bites, gather these key ingredients: - 1 cup all-purpose flour - 1/2 teaspoon baking powder - 1/4 teaspoon salt - 1/2 cup unsalted butter, softened to room temperature - 1/2 cup granulated sugar - 1 large egg - 1 teaspoon pure vanilla extract - 1/2 cup pastry cream (can be store-bought or homemade for an extra touch) - 1 cup semi-sweet chocolate chips - 2 tablespoons heavy cream To take your cookie bites to the next level, consider adding: - A pinch of nutmeg for warmth - A splash of almond extract for depth - A dollop of whipped cream for extra richness Using quality ingredients makes a big difference. Here’s why: - Fresh Eggs: Fresh eggs provide better flavor and texture. Choose large eggs for best results. - Good Quality Chocolate: Using high-quality chocolate chips enhances the taste of your ganache. Look for brands with high cocoa content. - Unsalted Butter: This allows you to control the salt level, ensuring balanced flavor. Always use room-temperature butter for easy mixing. By focusing on these ingredients, you can create a treat that’s not only delicious but also memorable. For the full recipe, check out the detailed steps to bring these cookie bites to life. First, gather all your ingredients. You need flour, baking powder, salt, unsalted butter, sugar, an egg, and vanilla extract. In a small bowl, mix the flour, baking powder, and salt. This blend will help the cookies rise nicely. Set this bowl aside. Now, in a larger bowl, cream the softened butter and sugar together. Use an electric mixer for about 2-3 minutes. It should look light and fluffy. Add the egg and vanilla. Mix until smooth. Gradually add the dry ingredients. Blend until no flour streaks are visible. Be careful not to overmix. Preheat your oven to 350°F (175°C). Line a baking sheet with parchment paper. This helps with easy removal later. Use a tablespoon to scoop dough and drop it onto the sheet. Space them about 2 inches apart. Bake for 10-12 minutes. Look for lightly golden edges. Once done, take them out and let them cool on a wire rack. Once your cookies are cool, it’s time to fill them. Use a small knife to hollow out the center of each cookie. You can also use a piping bag for this. Fill each hollow with pastry cream, a lovely surprise in every bite. For the chocolate ganache, mix chocolate chips and heavy cream in a microwave-safe bowl. Heat in 30-second intervals, stirring in between. Once melted and smooth, drizzle this rich ganache over your filled cookies. Let it set for a few minutes before serving. Your Easy Boston Cream Pie Cookie Bites are now ready to impress! To get the best texture for your cookie bites, follow these tips: - Use room temperature butter. This helps create a light and fluffy mix. - Don’t overmix the dough. Mix until no flour streaks show. This keeps the cookies soft. - Chill the dough. If it's too soft, chill it for 10-15 minutes. This makes it easier to scoop. You can make your pastry cream unique with these ideas: - Add flavors. Stir in some lemon zest or almond extract for a twist. - Try different milks. Use whole milk or even coconut milk for a different taste. - Make it thicker. Add more cornstarch if you want a firmer cream. Melting chocolate can be tricky. Here are some tips: - Use a microwave-safe bowl. This avoids spills and mess. - Heat in short bursts. Microwave for 30 seconds, then stir. Repeat until melted. - Add heavy cream. This helps the chocolate become smooth and glossy. These tips will make your Easy Boston Cream Pie Cookie Bites even better! Check the Full Recipe for more detailed steps. {{image_4}} You can change the flavor of the pastry cream easily. Try adding lemon zest for a bright touch. A hint of almond extract can give a nutty flavor. For chocolate lovers, mix cocoa powder into the cream. You can even fold in fresh fruit puree, like strawberry or raspberry, for a fruity twist. Each variation brings a new taste to your cookie bites. The ganache can also be varied to match your taste. Use dark chocolate for a rich flavor. If you like milk chocolate, swap it in for a sweeter treat. White chocolate provides a creamy option that pairs well with berry fillings. You can even add a splash of flavored liqueur, like coffee or orange, for a fun kick. These changes keep the bites fresh and exciting. Creating vegan or gluten-free cookie bites is simple. For a vegan option, use plant-based butter and a flax egg instead of a regular egg. Replace the heavy cream with coconut cream to keep the ganache rich. For gluten-free bites, swap all-purpose flour with a gluten-free blend. Make sure the chocolate chips are dairy-free if you're going vegan. These adjustments keep your treats delicious and friendly for all diets. Check the Full Recipe for more details! To keep your Boston cream pie cookie bites fresh, store them in an airtight container. This will help retain their moist texture and rich flavor. You can place a layer of parchment paper between layers of cookie bites. This prevents them from sticking together. Never store them in the fridge unless it's very hot, as the cold can dry them out. These cookie bites stay fresh for about 3 to 5 days at room temperature. If you store them properly, they'll maintain their taste and texture. After a few days, they might lose some moisture but will still taste good. To freeze your cookie bites, place them in a single layer on a baking sheet. Freeze them for about an hour. Once they are firm, transfer them to a freezer-safe bag. They can last up to 3 months in the freezer. When you're ready to enjoy them, simply thaw at room temperature for a few hours. You can even warm them in the microwave for a few seconds for that fresh-baked taste. To make Boston cream pie cookie bites from scratch, start by mixing your dry ingredients. Combine 1 cup of all-purpose flour, 1/2 teaspoon of baking powder, and 1/4 teaspoon of salt in a bowl. Then, cream 1/2 cup of softened unsalted butter with 1/2 cup of granulated sugar until fluffy. Add in 1 large egg and 1 teaspoon of pure vanilla extract. Gradually mix in the dry ingredients. Scoop the dough onto a baking sheet and bake at 350°F for 10-12 minutes. Once cooled, hollow out the centers, fill with 1/2 cup of pastry cream, and drizzle with chocolate ganache made from 1 cup of chocolate chips and 2 tablespoons of heavy cream. For the full recipe, check the earlier section. Yes, using store-bought cookie dough is a great time-saver! Just scoop the dough onto your baking sheet and bake as directed. Make sure to let the cookies cool before you fill them. This option still allows you to enjoy the delicious pastry cream and chocolate ganache. The best way to fill the cookies is by using a piping bag. If you don’t have one, a small knife works well, too. Hollow out the center of each cookie gently. Then, fill each hollow with the pastry cream. Ensure you fill each cookie generously so every bite is a delightful treat! You can make the cookie bites ahead of time easily! Prepare the cookies and let them cool. Fill them with pastry cream and drizzle with chocolate ganache. Store the filled cookies in an airtight container in the fridge. They stay fresh for up to three days. You can also freeze the unfilled cookies for longer storage if needed. We explored how to create delicious Boston cream pie cookie bites. You learned about the essential and optional ingredients for great flavor. I shared step-by-step instructions to help you prepare, bake, fill, and decorate these treats. We discussed tips for perfect texture and customization options, plus storage best practices. Now, you can impress friends and family with these treats. Enjoy experimenting with flavors and make them your own. Happy baking!
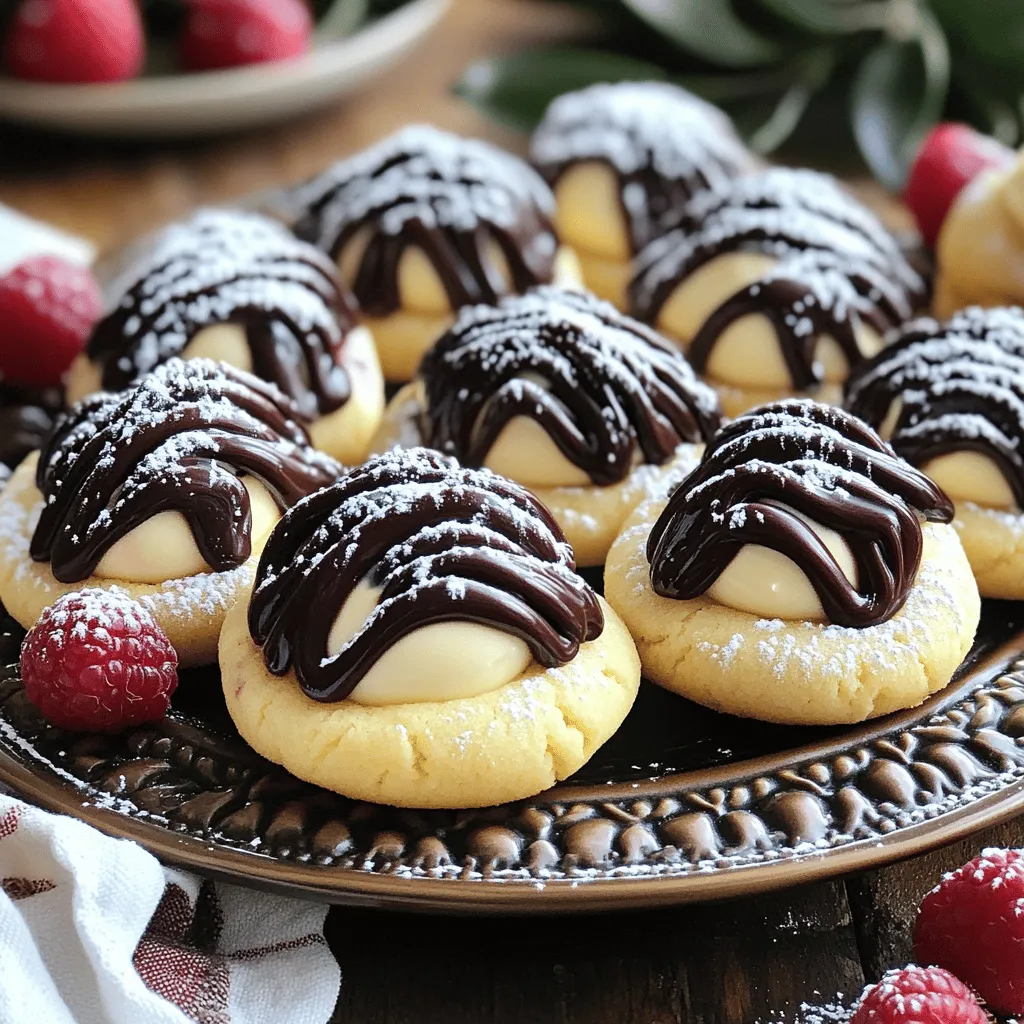
Easy Boston Cream Pie Cookie Bites Irresistible Treat
Are you ready to indulge in a sweet treat that combines the joy of cookies with the classic flavor of Boston cream pie? In this
- 200g digestive biscuits, crushed - 100g unsalted butter, melted - 400g cream cheese, softened - 200g sour cream - 150g powdered sugar - 2 teaspoons vanilla extract - 3 large eggs - 100g honeycomb pieces, chopped - 50g dark chocolate, grated (for garnish) - Additional honeycomb pieces (for decoration) The ingredients are simple but make a big impact. I love using digestive biscuits for the crust. They add a great crunch and balance well with the creamy filling. Mixing them with melted butter creates a solid base. Cream cheese adds richness to the cheesecake. It gives that smooth, creamy texture we all adore. Sour cream enhances the flavor and makes it extra creamy. I always use powdered sugar for sweetness. It blends well and keeps the filling smooth. The vanilla extract adds a nice aroma and flavor. Eggs bind everything together. They create the perfect creamy consistency. Honeycomb pieces add a delightful crunch and sweetness. For decoration, dark chocolate grated on top is a must. It gives a nice contrast to the dessert. Using extra honeycomb pieces makes it look stunning. You can find the full recipe linked above. Enjoy creating this delightful treat! - Preheat your oven to 160°C (320°F). - Prepare a 9-inch springform pan with parchment paper. - In a bowl, mix 200g of crushed digestive biscuits with 100g of melted butter. - Press this mixture firmly into the bottom of the pan. - Beat 400g of cream cheese in a bowl until smooth. - Add 200g of sour cream, 150g of powdered sugar, and 2 teaspoons of vanilla extract. - Mix until well combined. - Add 3 large eggs one at a time, mixing gently after each addition. - Pour the filling over the cooled crust. - Bake in the oven for 50-60 minutes until the edges are firm. - After baking, turn off the oven and let the cheesecake cool for one hour inside. To get that crunchy texture in your cheesecake, mixing is key. Start by blending your digestives with melted butter well. This creates a strong base. When adding eggs, mix gently. Overmixing can make the filling dense. For the honeycomb, fold it in carefully. This keeps the pieces intact and adds great bites of flavor. Baking time can vary based on your oven. Keep an eye on the edges; they should be set while the center wobbles slightly. After baking, let the cheesecake cool in the oven with the door ajar. This step helps prevent cracks. Once cooled, chill it in the fridge for at least four hours. Chilling is very important for the best texture. A great way to make your cheesecake look stunning is by garnishing it with dark chocolate. Shave the chocolate and sprinkle it on top. Adding honeycomb pieces on the surface gives a beautiful finish. For the best experience, serve slices with extra honeycomb on the side. This will delight your guests and elevate the dessert! You can find the full recipe for this Crunchy Honeycomb Cheesecake online. {{image_4}} You can change the taste of your Crunchy Honeycomb Cheesecake easily. Here are some fun ideas: - Adding fruit purees: Blend berries or mangoes into a puree. Swirl this into the cheesecake for a fruity twist. - Experimenting with different extracts: Use almond or lemon extract instead of vanilla. This adds a unique flavor that surprises your taste buds. - Alternative toppings: Top with fresh fruits or a drizzle of caramel sauce. You can also use crushed cookies for extra crunch. If you need to change some ingredients, here are some options: - Gluten-free options for the crust: Use gluten-free cookies instead of digestive biscuits. This makes the recipe safe for gluten-free diets. - Non-dairy creams and cheeses: Swap cream cheese for a non-dairy cream cheese. Coconut cream is a great choice for a rich texture. - Sugar alternatives: Try using honey or maple syrup instead of powdered sugar. These sweeteners give a nice flavor while being more natural. Make your cheesecake fit the season with these ideas: - Holiday-inspired flavors: Add spices like cinnamon or nutmeg for a festive taste. You can also make a pumpkin version for fall. - Summer fruit additions: Mix in fresh strawberries or peaches for a light and refreshing dessert. These fruits brighten up the cheesecake. - Themed decorations: Use edible flowers or colored sprinkles for fun, festive looks. This makes your cheesecake stand out at any gathering. For the full recipe, check the details above. Enjoy exploring these variations! After you enjoy your Crunchy Honeycomb Cheesecake, store leftovers in the fridge. Wrap the cheesecake tightly in plastic wrap or place it in an airtight container. This keeps it fresh. Enjoy your cheesecake within 3 to 5 days for the best taste and texture. Want to save some cheesecake for later? You can freeze it! First, slice the cheesecake into portions. Wrap each piece in plastic wrap, then place them in a freezer-safe bag. This helps keep the flavor. You can freeze it for up to 3 months. When you're ready to eat, take out a slice. Let it thaw in the fridge for 4 to 6 hours or overnight for best results. If you want to serve it warm, you can gently reheat the cheesecake. Place a slice on a microwave-safe plate. Heat it for about 10 to 15 seconds. Check often to avoid melting the texture. You want it warm, not hot. This keeps the cheesecake smooth and creamy. Enjoy your delicious dessert! For the complete recipe, check out the Full Recipe for Crunchy Honeycomb Cheesecake. Crunchy honeycomb cheesecake is a delightful dessert. It has a smooth, creamy filling with honeycomb pieces. The crust is made from crushed digestive biscuits and butter. This cheesecake combines rich cream cheese, sour cream, and sweet honey. Topping it with dark chocolate makes it extra special. You get a mix of creamy and crunchy textures in every bite. Yes, you can make this cheesecake ahead of time. It tastes even better after chilling. Prepare it a day before serving for best results. After baking, let it cool completely. Then, refrigerate it for at least four hours or overnight. This helps the flavors meld together. You can find honeycomb at many local grocery stores. Look in the baking aisle or near the honey. Specialty food stores often carry it too. If you cannot find it locally, try online shops. Websites like Amazon or specialty food retailers offer honeycomb. You can use store-bought cheesecake, but it has pros and cons. A store-bought cheesecake saves time. It might not have the same texture or flavor as homemade. If you want to save effort, it’s a good option. However, making it yourself gives you control over taste and texture. Check the edges of the cheesecake during baking. They should look firm while the center remains slightly wobbly. This means it is done but not overcooked. After baking, let it cool in the oven for an hour. This helps avoid cracks. Always chill it properly before serving. This blog post shared how to make a delicious Crunchy Honeycomb Cheesecake. I covered essential ingredients, step-by-step instructions, and tips for a perfect texture. You learned about variations, storage, and even FAQs to guide you. Baking can be fun and rewarding, especially with unique recipes like this one. Give it a try, and enjoy a treat that impresses everyone! The effort will be worth it when you serve this delightful dessert.
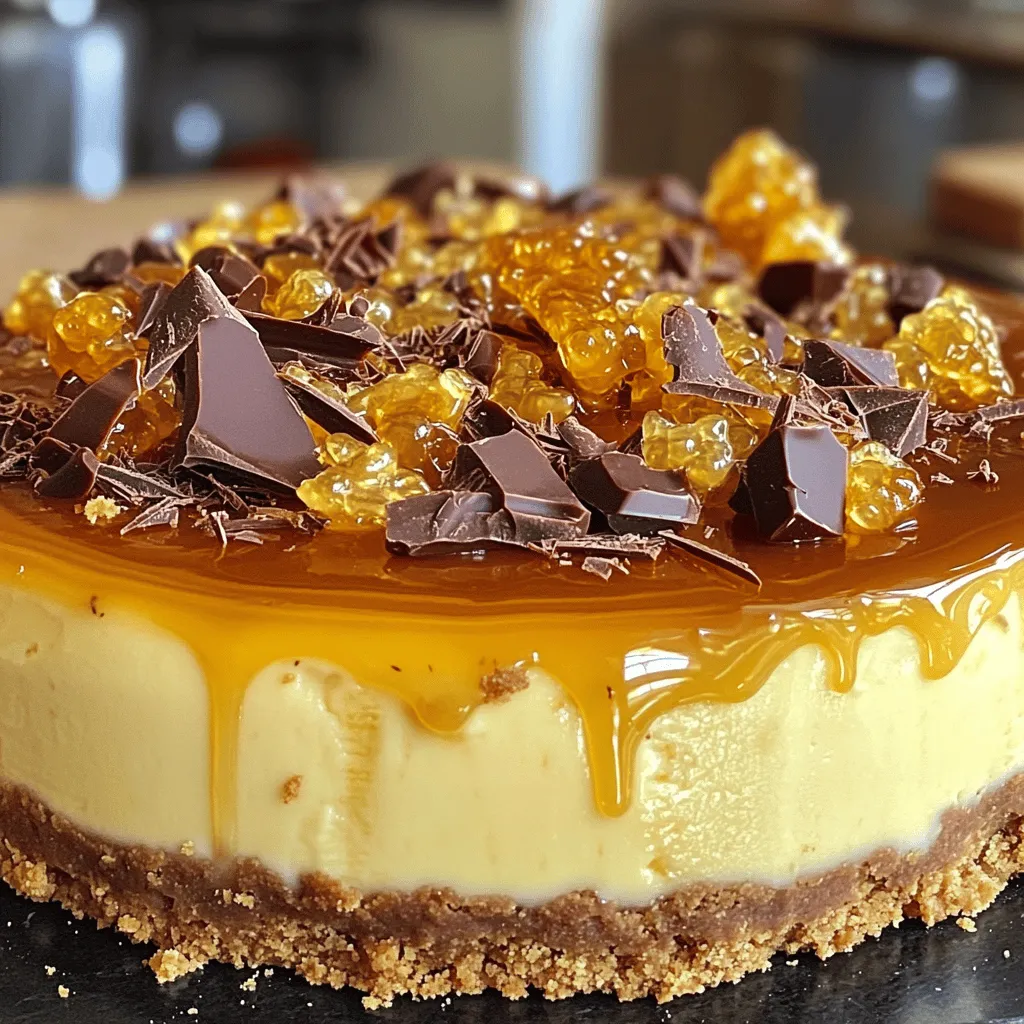
Crunchy Honeycomb Cheesecake Tempting Dessert Recipe
Are you ready to indulge in a dessert that perfectly blends creamy goodness with crunchy texture? This Crunchy Honeycomb Cheesecake is a delight for your
- 1 cup Greek yogurt (plain or vanilla) - 1 cup fresh blueberries - 2 tablespoons honey or maple syrup - Dark chocolate chips - 1 teaspoon vanilla extract - A pinch of salt These ingredients come together to create a tasty snack. Greek yogurt gives a creamy base. You can choose plain or vanilla based on your taste. Fresh blueberries add a burst of flavor and nutrition. Honey or maple syrup sweetens the mix. You might want to drizzle dark chocolate on top, which adds a rich touch. Vanilla extract enhances flavor, while a pinch of salt brings out the sweetness. All these ingredients work together to make each bite delightful. This snack is easy to prepare. You can have fun mixing and coating the blueberries. Plus, you can adjust the sweetness to fit your taste. If you want to make them vegan, choose a dairy-free yogurt and a plant-based sweetener. {{ingredient_image_2}} 1. In a medium bowl, combine the Greek yogurt, honey, vanilla extract, and a pinch of salt. Mix well until smooth. 2. Line a baking sheet with parchment paper. This makes it easy to remove the bites later. 1. Take a fresh blueberry and dip it in the yogurt mixture. Ensure it gets fully coated. 2. Use a fork or skewer for easy dipping. Place the coated blueberry on the lined baking sheet. 3. Repeat for all the blueberries until they are all covered. 1. For extra flavor, melt some dark chocolate chips in the microwave. Heat in short bursts of 15-20 seconds until smooth. 2. Drizzle the melted chocolate over the yogurt-covered blueberries if you like. 3. Place the baking sheet in the freezer. Let the blueberry bites freeze for at least 2-3 hours until solid. 4. After freezing, transfer the bites to an airtight container or zip-top bag for easy snacking later. To make the best frozen blueberry bites, you need to coat each blueberry well. A thorough coating adds great flavor. Use a fork or skewer to dip the blueberries. This makes dipping simpler and keeps your hands clean. You can also use a spoon if you prefer. Just make sure each blueberry is well-covered in yogurt. For an eye-catching presentation, consider garnishing your blueberry bites. Adding fresh mint leaves or extra blueberries makes them pop. You can also use a stylish platter to serve these tasty treats. This adds flair to your snack or dessert table. If you’re hosting a party, you can arrange them in a fun design. Your guests will love the colorful display! Pro Tips Use Frozen Blueberries: For a quicker preparation, consider using frozen blueberries. They will still taste great once coated and frozen, saving you time during the prep phase. Experiment with Flavors: Feel free to add spices like cinnamon or nutmeg to the Greek yogurt mixture for a unique twist on flavor that complements the blueberries beautifully. Mix Up the Sweeteners: If you want to reduce sugar, try using a natural sweetener like stevia or monk fruit instead of honey or maple syrup for a lower-calorie option. Presentation Matters: When serving, arrange the blueberry bites on a decorative plate and add fresh mint leaves for a pop of color and an aromatic touch. {{image_4}} You can use plain or vanilla Greek yogurt for your blueberry bites. Plain yogurt gives a tangy flavor. Vanilla yogurt adds a sweet touch. Both options work well, so pick your favorite! If you're dairy-free, there are great yogurt alternatives. Look for almond, coconut, or soy yogurt. These options taste good and keep the recipe creamy. Choose a brand with a thick texture for the best results. You can switch up the sweetener in this recipe. Honey and maple syrup are both great choices. But if you want a low-calorie option, try agave syrup or sugar substitutes. Adjust the sweetness to fit your taste. Start with less sweetener if you prefer a light flavor. You can always add more as you mix! Want to spice things up? Add a dash of cinnamon or nutmeg to the yogurt mix. These spices bring warmth and depth to your bites. You can also use different fruits for more variety. Try strawberries, raspberries, or even kiwi. Each fruit adds a unique twist and makes your treats even more fun! Proper storage helps keep your Frozen Greek Yogurt Blueberry Bites fresh. After making them, place the bites on a baking sheet and freeze them for 2-3 hours. Once they are solid, transfer them to an airtight container or a zip-top bag. This keeps out air and prevents freezer burn. These tasty bites can last in the freezer for up to two months. They will still taste great even after that time. Just make sure to label your container with the date you made them. This way, you can enjoy them at their best. You do not need to reheat these bites. They are best enjoyed frozen. If you want to serve them quickly, take them out of the freezer and let them sit for about five minutes. This makes them easier to eat but still cold and refreshing. For a quick treat, you can also dip them in hot water for a few seconds before serving. This helps soften them just a bit. Enjoy the creamy texture and fresh taste! Can I use frozen blueberries instead? Yes, you can use frozen blueberries. However, they may not hold their shape as well when coated. Fresh blueberries give a better texture and flavor. How can I make these bites vegan? To make these bites vegan, use dairy-free yogurt and replace honey with maple syrup or agave syrup. This keeps the taste great without animal products. Caloric content per serving Each serving has about 100 calories. This can vary based on the yogurt and sweetener you choose. Health benefits of Greek yogurt and blueberries Greek yogurt is high in protein and probiotics. Blueberries are rich in antioxidants and vitamins. Together, they make a nutritious snack that supports health. What to do if the yogurt mixture is too runny? If your yogurt mixture is too runny, add a bit more yogurt to thicken it. You can also chill it in the fridge for a few minutes before dipping. How to prevent blueberries from freezing together? To stop blueberries from sticking, lay them on the baking sheet in a single layer. This way, they freeze separately and stay easy to grab later. In this post, we explored how to make tasty blueberry bites using Greek yogurt. We covered the main ingredients, like yogurt and fresh blueberries, and optional extras for added flavor. I shared step-by-step instructions to prepare and freeze your treats, plus tips for serving. Don't forget to try different yogurts and sweeteners for variety. These bites are simple to make and great for snacking. Enjoy them fresh or frozen; they are a healthy treat for any time!
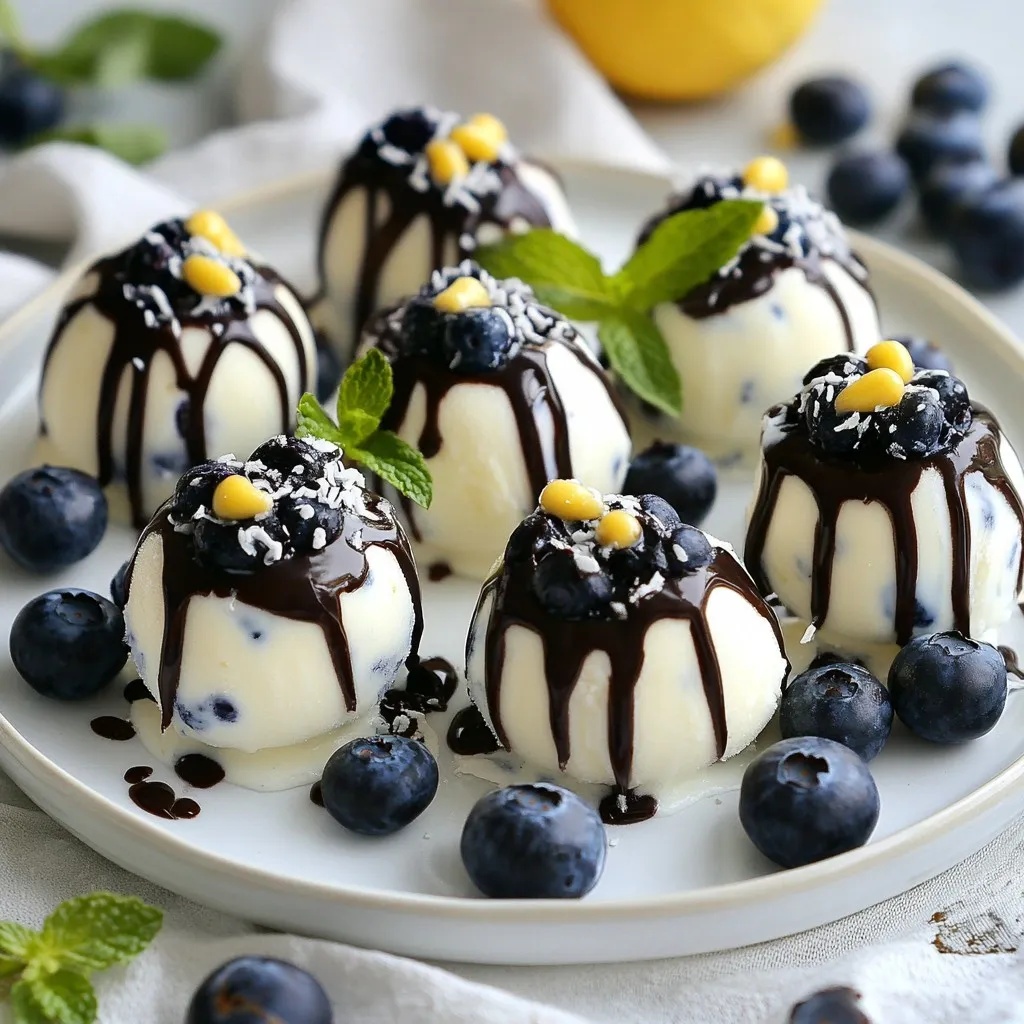
Frozen Greek Yogurt Blueberry Bites Easy Refreshing Snack
Looking for a fun, healthy snack? Try my Frozen Greek Yogurt Blueberry Bites! These tasty treats combine creamy yogurt, fresh blueberries, and a hint of
- 1 cup creamy peanut butter - 1/2 cup unsweetened applesauce - 1/2 cup packed brown sugar - 1/4 cup honey - 1 teaspoon pure vanilla extract - 1 cup rolled oats - 1/2 cup all-purpose flour - 1/2 teaspoon baking powder - 1/4 teaspoon salt - 1/4 cup mini chocolate chips (plus extra for topping) Gather these ingredients before you start. Each one plays a key role in making these bars a hit. The creamy peanut butter gives a rich taste. Unsweetened applesauce adds moisture without too much sugar. Brown sugar brings a deep, sweet flavor. Honey adds a nice lift of sweetness, while vanilla extract enhances the overall taste. Rolled oats add texture and heartiness. The all-purpose flour helps bind everything together. Baking powder gives the bars a bit of lift, making them soft. A pinch of salt balances the sweetness. Lastly, mini chocolate chips add a fun burst of chocolate in every bite. These ingredients come together to create a simple yet tasty snack. Don’t forget to grab extra chocolate chips for the top! {{ingredient_image_2}} - Preheat Your Oven: Start by preheating your oven to 350°F (175°C). Grease a 9x9 inch baking pan or line it with parchment paper. This helps with easy removal later. - Mix Wet Ingredients: In a large bowl, mix 1 cup of creamy peanut butter, 1/2 cup of unsweetened applesauce, 1/2 cup of packed brown sugar, 1/4 cup of honey, and 1 teaspoon of pure vanilla extract. Blend until smooth. - Combine Dry Ingredients: In another bowl, whisk together 1 cup of rolled oats, 1/2 cup of all-purpose flour, 1/2 teaspoon of baking powder, and 1/4 teaspoon of salt until well mixed. - Incorporate Dry Into Wet: Slowly add the dry mix into the wet ingredients. Stir gently until just combined. A few lumps are okay, so don’t overmix. - Add Chocolate Chips: Fold in 1/4 cup of mini chocolate chips. Make sure they spread evenly in the batter. - Prepare for Baking: Pour the mixture into the prepared pan. Use a spatula to spread it evenly. For a fun touch, add a few extra chocolate chips on top. - Bake: Place the pan in the oven and bake for 20-25 minutes. The edges should turn lightly golden. A toothpick inserted in the center should come out clean. - Cool the Bars: Once baked, take the pan out of the oven. Let it cool in the pan for 10 minutes. Then, move the bars to a wire rack to cool completely. - Slice and Serve: After cooling, slice the bars into squares or rectangles. Enjoy your tasty homemade treat! - Avoid Overmixing: Mix the wet and dry ingredients just until combined. Overmixing can make the bars tough. A few lumps are okay! - Baking Pan Options: Use a 9x9 inch pan for thick bars. You can also try an 8x8 inch pan for a more chewy texture. Just watch the baking time! - Cooling Techniques: Let the bars cool in the pan for 10 minutes. Then, transfer them to a wire rack. This helps them cool evenly and prevents sogginess. - Serving Suggestions: Serve these bars on a rustic wooden platter. They look great and are easy to grab. Perfect for parties or after-school snacks! - Garnishing Ideas: Sprinkle crushed nuts or drizzle honey on top. This adds a nice touch and makes the bars even tastier. Pro Tips Storage Tips: Keep your peanut butter bars fresh by storing them in an airtight container at room temperature for up to a week, or in the refrigerator for longer shelf life. Variations: Try adding different mix-ins like chopped nuts, dried fruits, or coconut flakes to customize the flavor and texture of your bars. Gluten-Free Option: Substitute the all-purpose flour with a gluten-free flour blend to make these bars suitable for a gluten-free diet. Serving Suggestions: These bars pair wonderfully with a glass of milk or a scoop of vanilla ice cream for a delicious dessert experience. {{image_4}} You can change the nuts in this recipe. If you want a twist, try almond butter or cashew butter. Each nut brings its own taste. You can even mix two kinds for a unique flavor. Just keep the amount the same for a smooth mix. You can swap out the sweeteners too. Instead of brown sugar, use maple syrup or agave syrup. Each sweetener gives a different taste. Honey is great, but you can try coconut sugar for a richer flavor. Adjust the amount based on your taste. You can make these bars gluten-free easily. Swap out regular flour for almond flour or oat flour. Both options work well and keep the bars soft. Always check that your oats are gluten-free if you choose to use them. To make vegan bars, replace honey with maple syrup. Use a plant-based butter instead of peanut butter. You can also use flaxseed meal mixed with water as an egg substitute. This keeps the bars tasty and plant-based. To keep Grandma's Peanut Butter Bars fresh, follow these simple tips: - Cool Completely: Always let the bars cool fully before storing. - Wrap Well: Use plastic wrap or aluminum foil for wrapping. This keeps them moist. - Room Temperature: Store them at room temperature for up to one week. - Refrigerate: For longer freshness, place them in the fridge. They can last up to two weeks there. If you want to save some for later, freezing is a great option. Here’s how: - Steps to Freeze: Cut the bars into squares. Place them in a single layer on a baking sheet. Freeze for about an hour. Then, transfer them to a freezer bag or container. - Thawing Tips: To enjoy, take one out and let it sit at room temperature. It will thaw in about 15-20 minutes. You can also microwave it for a few seconds for a warm treat! Can I use natural peanut butter instead? Yes, you can use natural peanut butter. It may change the texture slightly. Natural peanut butter has less sugar and more oil. This can make the bars a bit drier or crumbly. You may want to add a little extra applesauce to help with moisture. How long do the bars last? The bars last about five days when stored properly. Keep them in an airtight container at room temperature. If you want them to last longer, consider freezing them. They can stay fresh in the freezer for up to three months. Can I substitute another type of flour? Yes, you can substitute other flours. For a gluten-free option, try almond or coconut flour. These flours may change the taste and texture, so adjust the amount. Start with less than the recipe calls for and add more as needed. What’s the best way to cut these bars? The best way to cut the bars is to let them cool fully. Use a sharp knife for clean cuts. If you want neat squares, mark the cuts lightly with the knife first. This helps guide your cuts and keeps edges clean. Grandma's Peanut Butter Bars are easy and fun to make. We covered the key ingredients and steps, plus helpful tips for the best results. You can also try different flavors and dietary options to fit your needs. Proper storage keeps them fresh longer. Whether you're sharing these bars or enjoying them yourself, they offer sweet satisfaction. I hope you feel inspired to bake and create your own delicious treat!
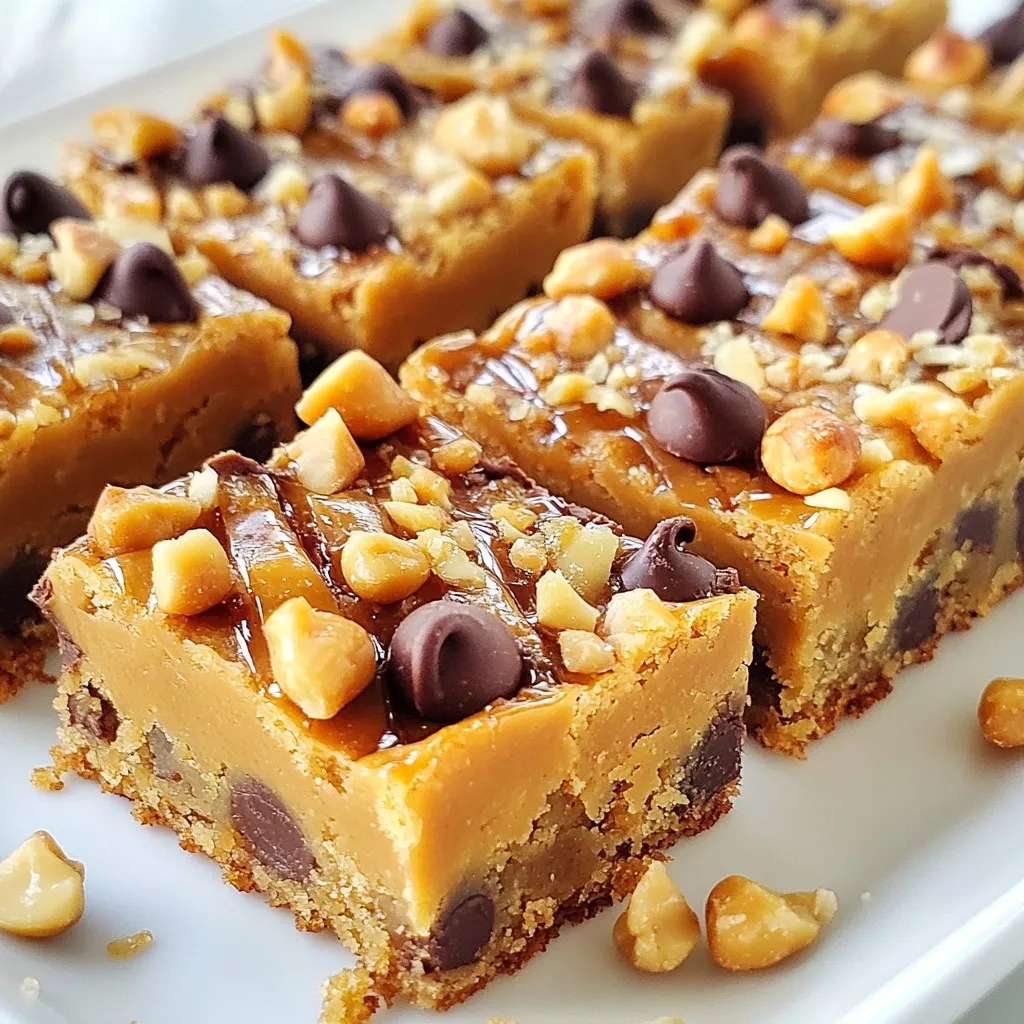
Grandma’s Peanut Butter Bars Easy and Tasty Snack
Are you looking for a quick and tasty snack? Grandma’s Peanut Butter Bars are a simple treat you can make in no time. Packed with