Desserts
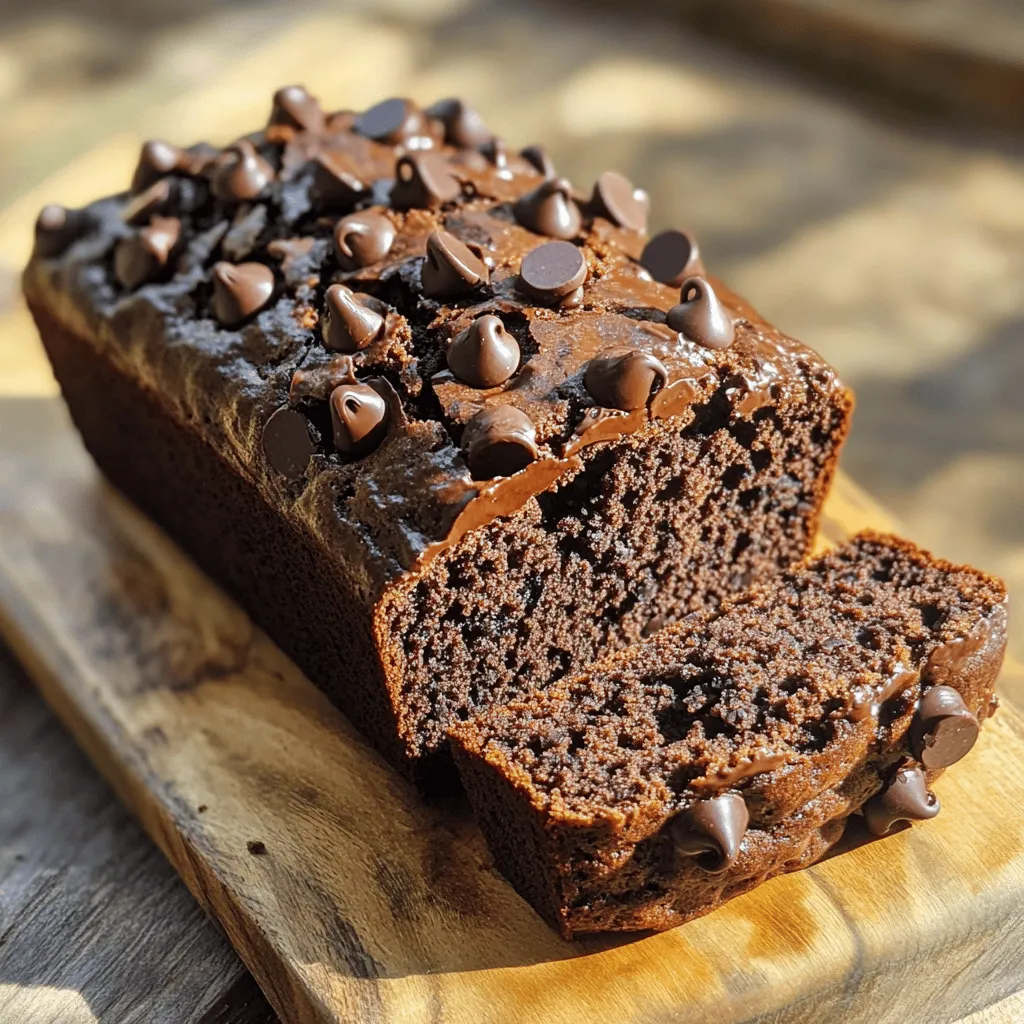
High Protein Chocolate Banana Bread Easy and Tasty Recipe
If you’re craving a sweet treat that packs a protein punch, you’re in luck! This High Protein Chocolate Banana Bread recipe is not only easy
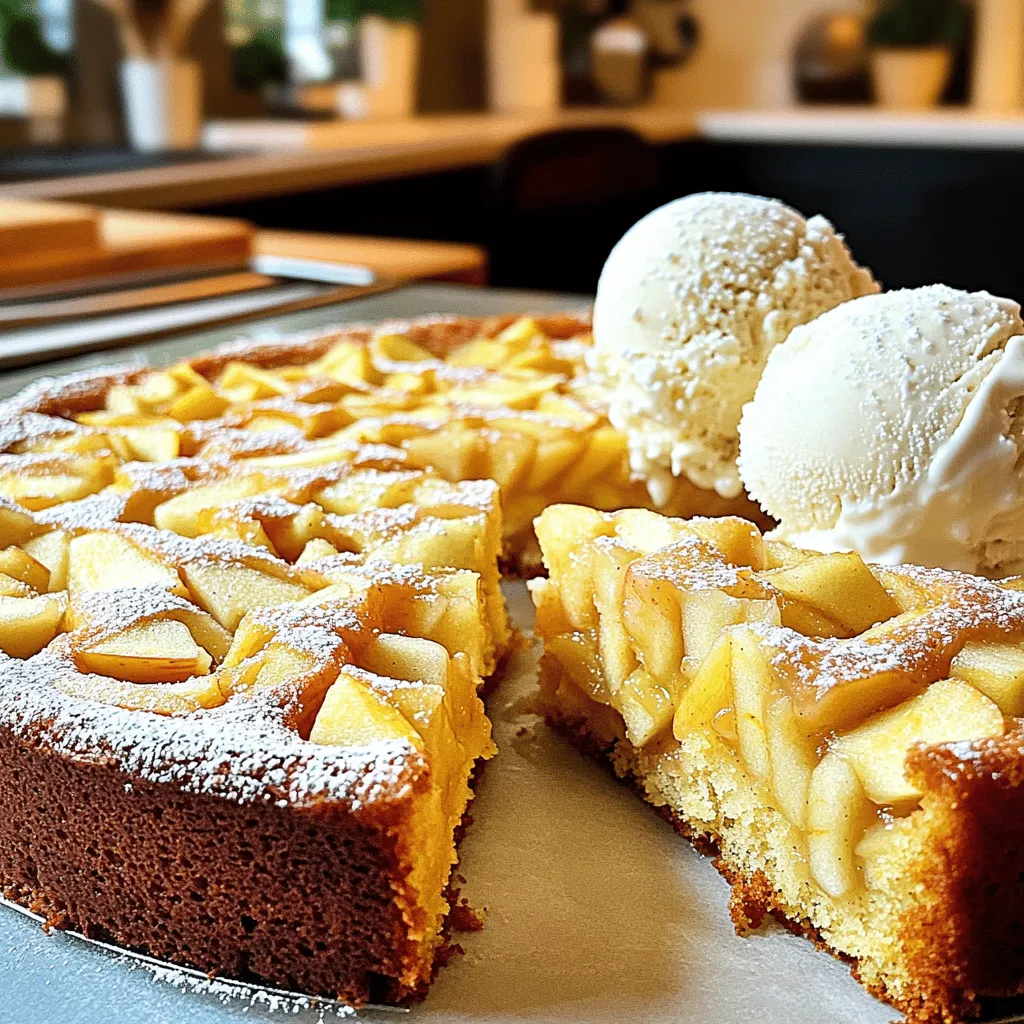
Delicious 3 Ingredient Apple Cake Simple and Sweet Treat
Are you ready to bake a sweet treat with just three simple ingredients? This 3 Ingredient Apple Cake is easy, quick, and delicious! You’ll learn
![When making Amish Applesauce Cake, you need fresh and simple ingredients. Here’s what you will need: - 2 cups unsweetened applesauce - 1 cup granulated sugar - 1/2 cup packed brown sugar - 1/2 cup vegetable oil - 2 large eggs - 2 cups all-purpose flour - 1 teaspoon baking soda - 1 teaspoon baking powder - 1 teaspoon ground cinnamon - 1/2 teaspoon ground nutmeg - 1/2 teaspoon salt - 1 teaspoon vanilla extract - 1 cup chopped walnuts (optional) - 1/2 cup raisins (optional) These ingredients come together to create a moist and flavorful cake. The applesauce adds sweetness and moisture, while the sugars give it a rich taste. The spices, like cinnamon and nutmeg, bring warmth. If you enjoy nuts or dried fruit, the walnuts and raisins add great texture. This recipe is simple and perfect for any occasion. You can find the [Full Recipe] to guide you through the steps. Enjoy baking! - Preheat oven to 350°F (175°C) - Prepare baking pan Start by preheating your oven to 350°F (175°C). This step ensures your cake bakes evenly. Next, grab a 9x13-inch baking pan. You can grease it with butter or non-stick spray. Alternatively, line it with parchment paper for easy removal later. - Combine applesauce, sugars, oil, and eggs In a large mixing bowl, mix the unsweetened applesauce, granulated sugar, and packed brown sugar. Add the vegetable oil and crack in the two large eggs. Use a whisk or electric mixer to blend everything together. You want a smooth and well-mixed batter. - Whisk together dry components - Mix wet and dry ingredients In a separate bowl, whisk together the all-purpose flour, baking soda, baking powder, ground cinnamon, ground nutmeg, and salt. This step helps the leavening agents spread evenly. Next, gently mix the dry ingredients into the wet mixture. Use a spatula or wooden spoon and stop mixing when no dry streaks are left. - Add vanilla and optional mix-ins - Pour batter into the pan Now, fold in the vanilla extract. If you want to add a twist, include walnuts or raisins. Make sure they are spread evenly throughout the batter. Pour the batter into your prepared pan. Use a spatula to spread it evenly, reaching all corners. - Bake for 30-35 minutes - Conduct toothpick test for doneness Place the pan in your preheated oven. Bake for 30-35 minutes. To check if it’s done, insert a toothpick into the center. If it comes out clean, your cake is ready! Keep an eye on it near the end to avoid over-baking. - Let cool in the pan, then wire rack Once baked, take the pan out of the oven. Let the cake cool in the pan for about 10 minutes. Then, transfer it to a wire rack. This step cools the cake evenly, ensuring a perfect slice later. You can find the [Full Recipe] for this delicious Amish Applesauce Cake online! To keep your Amish applesauce cake fresh, store it in an airtight container. This helps keep the cake moist. You can keep it at room temperature for up to three days. For longer storage, place it in the fridge for about a week. When serving, this cake is best warm or at room temperature. A light dusting of powdered sugar adds a nice touch. You can also serve it with whipped cream or vanilla ice cream for extra joy. One common mistake is overmixing the batter. Overmixing can make the cake dense and tough. Mix until just combined; it’s okay if a few lumps remain. Another mistake is not measuring ingredients accurately. Use a kitchen scale for precise measurements, especially for flour. This ensures the right texture and flavor in your cake. To boost the flavor, consider adding spices like ginger or allspice. You can also increase the cinnamon for a warm, cozy taste. If you like nuts, fold in walnuts or raisins. Add them right after mixing in the vanilla extract. This way, every slice has a bit of crunch and sweetness. {{image_4}} You can change up the sugars in this cake. Instead of granulated sugar, try coconut sugar. It adds a nice flavor and is less processed. For a gluten-free option, use almond flour or a gluten-free blend. These swaps keep the cake moist and yummy. Adding nuts or dried fruits can change the taste. You can use pecans, almonds, or even hazelnuts. Dried fruits like cranberries or apricots also work well. Want a sweet twist? Add chocolate chips! They melt and give a rich flavor with each bite. Seasonal spices can really elevate this cake. Try adding pumpkin spice in the fall. It gives a warm, cozy taste that feels like a hug. In summer, serve it with fresh berries or sliced peaches. This brings a bright and fruity touch to your dessert. To keep your Amish Applesauce Cake fresh, refrigerate it. First, let the cake cool completely at room temperature. Then, wrap it tightly in plastic wrap or place it in an airtight container. This method locks in moisture and flavor. Your cake can stay good in the fridge for up to a week. If you want to save some cake for later, freezing is great. First, cool the cake completely. Then, cut it into slices for convenience. Wrap each slice in plastic wrap, and then in aluminum foil. This double wrapping helps prevent freezer burn. Store the slices in a freezer-safe bag or container. The cake can last up to three months in the freezer. The shelf life of your Amish Applesauce Cake depends on how you store it. In the fridge, it lasts about a week. If you freeze it, you can enjoy it up to three months later. Just remember to thaw it in the fridge overnight before serving. This way, it stays moist and delicious. Yes, you can use sweetened applesauce. Just reduce the added sugar. Sweetened applesauce adds extra flavor. It may also make the cake a bit sweeter. Adjust the sugar to fit your taste. The cake is done when a toothpick comes out clean from the center. Check it around 30 minutes. If the toothpick has wet batter, bake a bit longer. Overbaking can dry out the cake, so keep an eye on it. You can serve this cake with whipped cream or ice cream. A sprinkle of powdered sugar on top looks nice, too. Fresh fruits or a scoop of vanilla ice cream pair well. It makes a perfect dessert for any meal. This recipe is not vegan due to the eggs. You can replace the eggs with flax eggs or applesauce. Use 1/4 cup of applesauce for each egg. This helps keep the cake moist and fluffy. Absolutely! Just double all the ingredients. Use a larger baking pan to fit the extra batter. Keep an eye on the baking time, as it may take longer. At high altitudes, reduce sugar by 1-2 tablespoons. Add an extra tablespoon of flour. You may need to increase the baking time slightly. This helps your cake rise and stay moist. When I think of comfort food, Amish applesauce cake comes to mind. This cake is moist, sweet, and full of flavor. It is simple enough for anyone to make, yet it feels special. Applesauce is a star in this recipe. It adds natural sweetness and moisture. You can cut back on oil since applesauce keeps the cake soft. Using unsweetened applesauce helps control the sugar level. Start by mixing the wet ingredients. You will blend applesauce, sugars, oil, and eggs until smooth. This step is key. A well-mixed batter leads to a lighter cake. Next, whisk the dry ingredients in a separate bowl. Combine flour, baking soda, baking powder, cinnamon, nutmeg, and salt. This method ensures the leaveners mix well. Add the dry mix to the wet mix slowly. Stir just until combined. Overmixing can make the cake dense. You can add a twist by folding in walnuts or raisins. They give texture and extra flavor to each bite. If you prefer, try other nuts or even chocolate chips. The flavor can change based on what you like! Be sure to preheat your oven to 350°F (175°C). Pour the batter into a greased pan. Bake for 30-35 minutes. To check for doneness, insert a toothpick in the center. If it comes out clean, your cake is ready! Once baked, let the cake cool in the pan for about ten minutes. Then, transfer it to a wire rack. You can serve it warm or at room temperature. A light dusting of powdered sugar makes it pretty. Pair it with whipped cream or ice cream for a treat! This cake is great for gatherings. It makes twelve slices, perfect for sharing. You will love how easy it is to make and enjoy. For the complete recipe, check out the [Full Recipe]. This blog post covered the essential steps to make Amish Applesauce Cake. We listed key ingredients, described mixing and baking, and offered tips for success. Remember, precision matters in baking, so measure carefully. Feel free to get creative with spices, nuts, and fruits. You can even customize storage to keep your cake fresh longer. Enjoy the flavors and make this cake a favorite in your kitchen. Happy baking!](https://meltedrecipes.com/wp-content/uploads/2025/07/04818ac0-1a01-4420-9f91-108bcb252bd5.webp)
Amish Applesauce Cake Moist and Flavorful Delight
Welcome to the world of Amish Applesauce Cake! This moist and flavorful delight brings warmth to your kitchen. Packed with applesauce and spices, it’s a
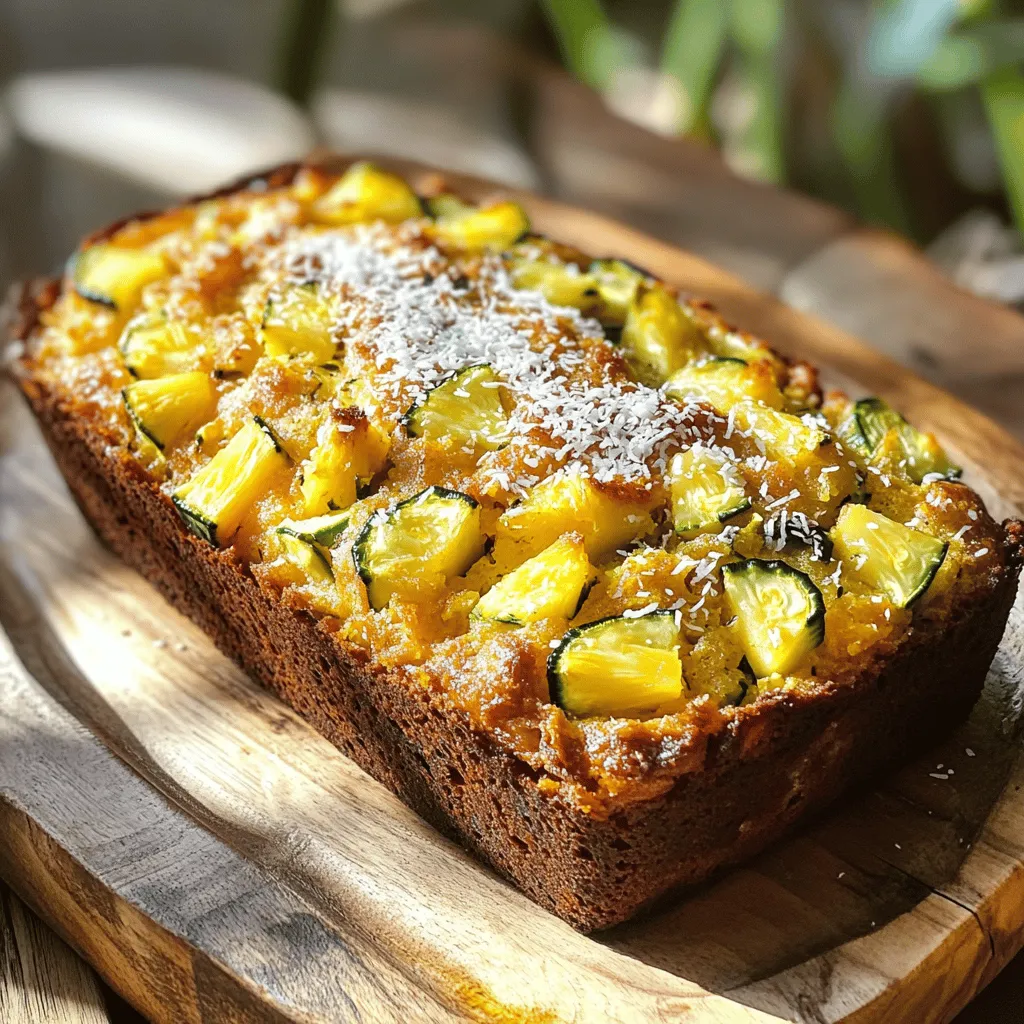
Pineapple & Zucchini Loaf Fresh and Flavorful Recipe
Are you ready to enjoy a treat that’s both fresh and healthy? My Pineapple & Zucchini Loaf recipe offers a delightful mix of flavors and
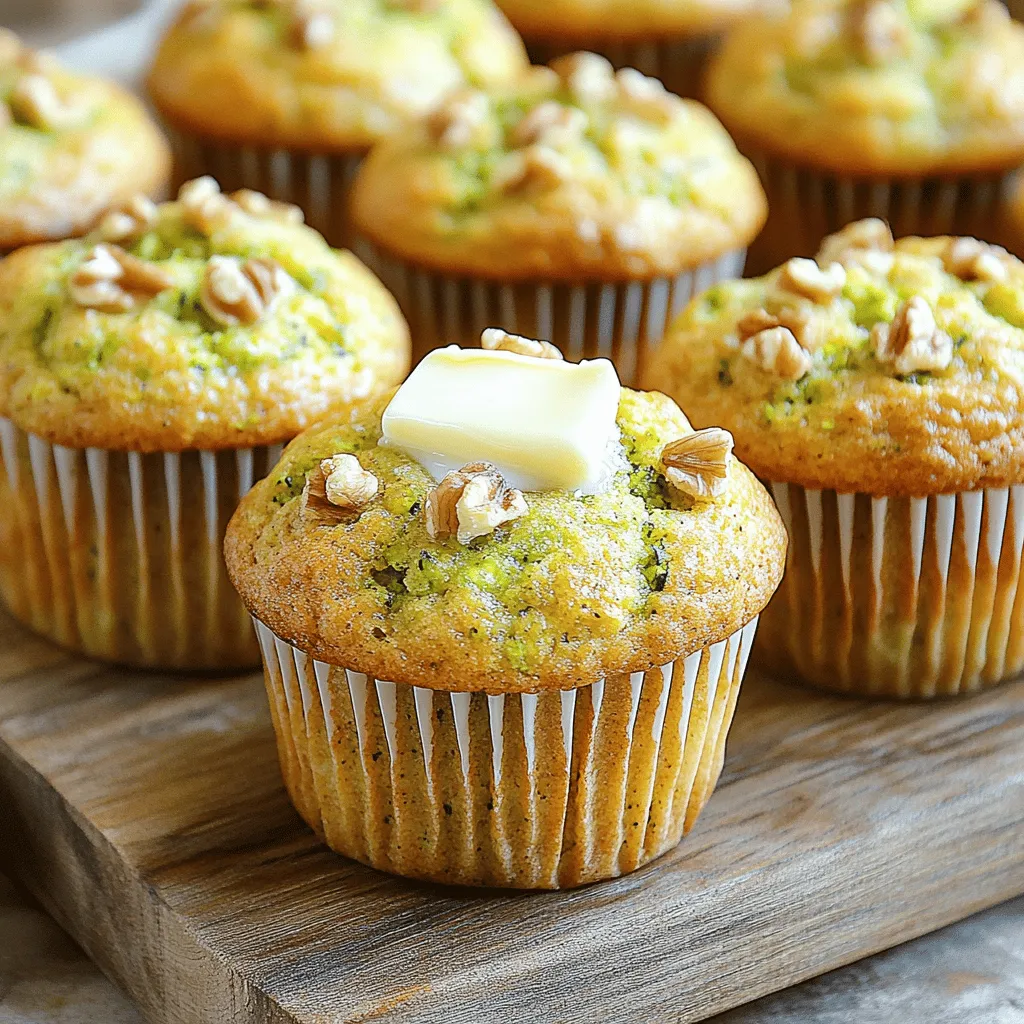
Simply Zucchini Muffins Moist and Tasty Recipe
Are you ready to bake something delicious? My Simply Zucchini Muffins are moist, tasty, and easy to make! These muffins are packed with flavor and
![- 2 cups grated zucchini - 1 ½ cups all-purpose flour - 1 cup granulated sugar - ½ cup packed brown sugar - ½ cup vegetable oil - 3 large eggs - 1 teaspoon vanilla extract - 1 teaspoon baking powder - 1 teaspoon baking soda - 1 teaspoon ground cinnamon - ½ teaspoon salt - ½ cup chopped walnuts or pecans - ½ cup powdered sugar (for icing) - 1 tablespoon milk (for icing) When making this Cinnamon Zucchini Coffee Cake, I love using fresh, grated zucchini. It adds moisture and a subtle flavor. You only need about two medium zucchinis for the recipe. The all-purpose flour and sugars create a sweet base that pairs well with the cinnamon. I often use both granulated and brown sugar. The brown sugar gives a deeper flavor and moisture. Vegetable oil keeps the cake soft. I prefer using it over butter for a lighter texture. You can’t forget the eggs! They bind everything together. The vanilla extract adds a warm, sweet aroma. Baking powder and baking soda help the cake rise. Ground cinnamon is the star of this cake, giving it that cozy taste. A pinch of salt balances the sweetness. If you want to add a crunchy texture, toss in some chopped walnuts or pecans. They complement the zucchini perfectly. For those who enjoy a sweet finish, make a simple icing with powdered sugar and milk. It’s optional but gives an extra layer of delight. You can find the Full Recipe for all the steps and tips to make this cake perfect! - Preheat the oven to 350°F (175°C). - Grease a 9x13 inch baking dish with butter or cooking spray. This helps the cake not to stick. - Combine grated zucchini, granulated sugar, brown sugar, vegetable oil, eggs, and vanilla extract in a bowl. - Use a whisk to blend them until smooth. The zucchini gives the cake moisture and flavor. - In another bowl, whisk together all-purpose flour, baking powder, baking soda, ground cinnamon, and salt. - This step helps distribute the leavening agents evenly. It ensures a nice rise in the cake. - Gradually add the dry mix to the wet mix. Stir gently until just combined. - If you want, fold in chopped walnuts or pecans for some crunch. But this step is optional. - Pour the batter into your greased baking dish. Spread it evenly with a spatula. - Bake for 30-35 minutes. To check if it's done, insert a toothpick into the center. It should come out clean. - While the cake bakes, prepare the icing if you want to use it. - Whisk together powdered sugar and milk until smooth. Adjust the thickness if needed. You can find the full recipe above to guide you through this process. - Ensure zucchini is well-drained for the best texture. This step helps keep the cake moist but not soggy. - Avoid overmixing the batter for a tender cake. Mix until just combined to keep it light and fluffy. - Experiment with spices like nutmeg or vanilla. These can add a warm depth to your cake. - Add chocolate chips for a richer flavor. They melt and create delightful pockets of sweetness. - Serve slices with garnishes like mint or a cinnamon dusting. This adds a fresh and vibrant look. - Use decorative plates for an appealing display. A nice plate can make your cake look even more inviting. For the full recipe, check the [Full Recipe]. {{image_4}} You can easily adapt this cake to fit your needs. For a gluten-free version, substitute the all-purpose flour with a gluten-free blend. This swap keeps the cake moist and tasty. If you want a vegan version, use applesauce instead of eggs. This will help bind the cake while adding a nice flavor. Want to switch things up? Try a chocolate cinnamon zucchini cake! Just add a bit of cocoa powder to the batter. This twist gives the cake a rich, deep flavor. For a fresh touch, you can also add lemon or orange zest. This citrus-infused version brightens the cake and adds a fun zing. This coffee cake shines when served with a dollop of whipped cream or a scoop of ice cream. The creaminess balances the spices well. Pair it with a hot cup of coffee or tea for a delightful afternoon treat. Enjoy it warm or at room temperature; it's great either way. For the full recipe, check out the [Full Recipe]. Keep the cake in an airtight container at room temperature for up to 3 days. This keeps it fresh and tasty. If you have leftovers, make sure to seal them well. A simple container works great for this. You can refrigerate the cake for up to a week. Just place it in an airtight container to keep it moist. If you want to store it longer, freeze the slices for up to 3 months. This is a great way to save some for later. To enjoy your frozen cake, thaw the slices overnight in the refrigerator. This helps the cake regain its texture and taste. Plus, it’s ready to eat the next day! Yes, but make sure to thaw and drain excess moisture. Frozen zucchini can work well in this recipe. When using frozen zucchini, always squeeze out the extra water. This keeps your cake from becoming too wet and helps it bake evenly. Insert a toothpick; it should come out clean or with a few moist crumbs. This simple test is your best friend in baking. If the toothpick comes out wet, give the cake a few more minutes. Be patient; it’s worth the wait! It pairs beautifully with coffee, tea, or a dollop of cream. The warm spices in the cake match perfectly with a hot drink. A drizzle of cream adds a nice touch, too. It makes for a cozy snack or a lovely breakfast treat. Reduce the sugar by a quarter cup for a less sweet version. You can easily adjust the sweetness to suit your taste. This way, you get all the flavor without it being too sugary. Don't forget, balancing flavors is key! For the full recipe, check out [Full Recipe]. This blog post highlights easy steps to make delicious Cinnamon Zucchini Coffee Cake. You learned about essential and optional ingredients, mixing methods, and baking tips. Variations allow for personal touches, and storage options keep your cake fresh. In my view, experimenting with flavors adds fun to baking. Enjoying this cake can brighten any day, whether for a gathering or a quiet moment. Embrace your creativity in the kitchen and share this tasty treat with others!](https://meltedrecipes.com/wp-content/uploads/2025/07/0ab64b40-9e93-478f-a98b-f3e8a081ac0a.webp)
Cinnamon Zucchini Coffee Cake Delightful and Easy Recipe
Ready to elevate your coffee break? This Cinnamon Zucchini Coffee Cake is a delicious way to use up that extra zucchini. With its perfect blend
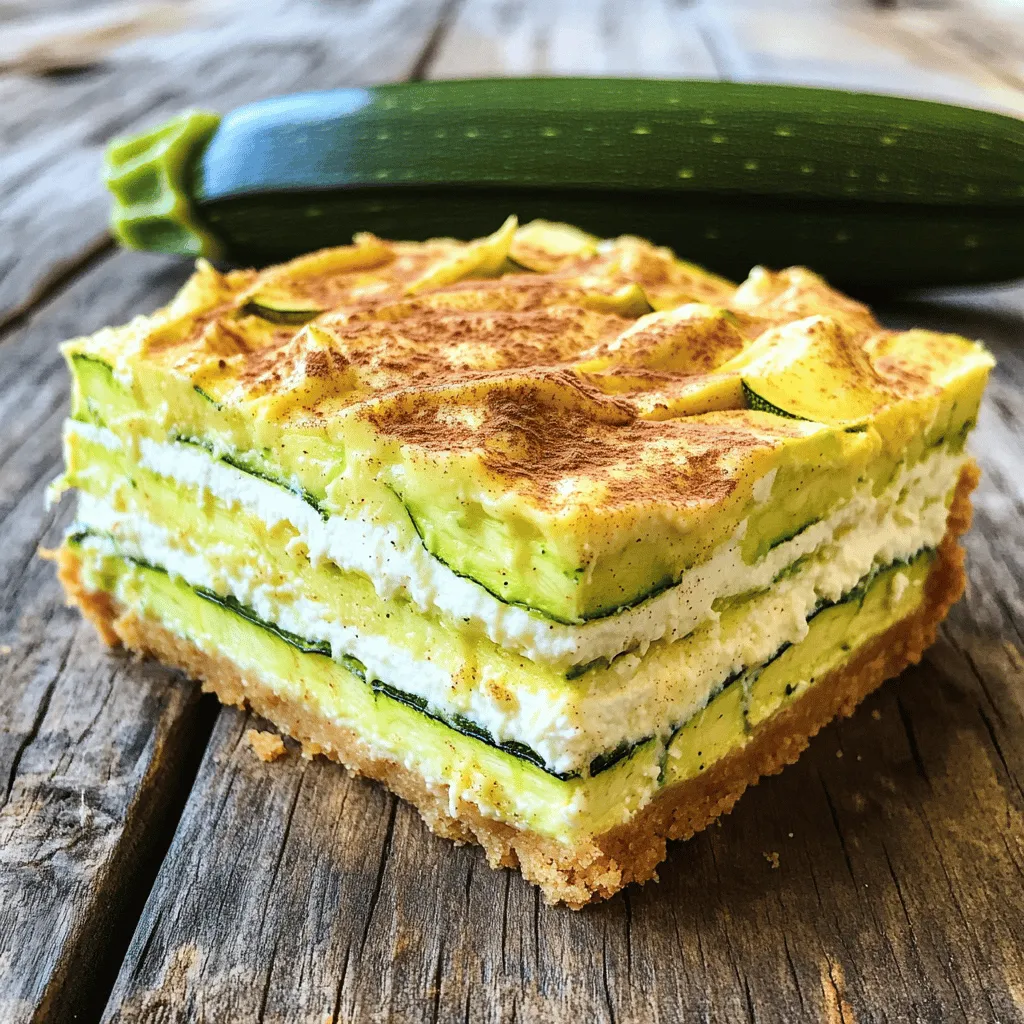
Keto Zucchini Ricotta Cheesecake Delightful Low-Carb Treat
Craving a dessert that is both delicious and keto-friendly? Let me introduce you to the Keto Zucchini Ricotta Cheesecake. This low-carb treat is a game
![- 1 cup finely grated zucchini (about 1 medium-sized zucchini) - 1/2 cup unsalted butter, melted and slightly cooled - 1 cup packed brown sugar - 1/4 cup granulated sugar - 1 large egg, at room temperature - 1 teaspoon pure vanilla extract - 1 1/2 cups all-purpose flour - 1/2 teaspoon baking powder - 1/2 teaspoon baking soda - 1/4 teaspoon fine sea salt - 1 cup butterscotch chips Each ingredient in this recipe plays a key role. The zucchini adds moisture and keeps the blondies soft. Butter gives rich flavor and helps them have a nice chewy texture. Brown sugar adds depth with its caramel notes, while granulated sugar brings sweetness. The egg binds everything together, creating a perfect blend. Vanilla extract enhances the overall flavor. Flour is the base that gives structure. Baking powder and baking soda help the blondies rise. Sea salt balances the sweetness and brings out the flavors. Finally, butterscotch chips add sweetness and a delightful chewy bite. You can boost the flavor with a few optional ingredients. Consider adding: - Chopped nuts like walnuts or pecans for crunch. - A sprinkle of cinnamon for warmth. - A dash of espresso powder to enhance the butterscotch flavor. These additions can make your blondies even more special. For the full recipe, check out the detailed instructions. Happy baking! Start by preheating your oven to 350°F (175°C). Take an 8x8-inch square baking pan. You can grease it lightly with butter or line it with parchment paper. Lining helps later when you want to remove the blondies easily. In a large mixing bowl, combine the melted butter, packed brown sugar, and granulated sugar. Use a whisk or spatula to mix until smooth. Then, add the large egg and pure vanilla extract. Whisk until the egg blends in well. This will give a creamy texture to your batter. Next, gently fold in the finely grated zucchini. This step adds moisture and keeps the blondies chewy. In a separate bowl, sift together the all-purpose flour, baking powder, baking soda, and fine sea salt. Gradually add this dry mix to the wet ingredients. Stir with a spatula until just combined. Be careful not to overmix. Overmixing can make the blondies tough. Finally, fold in the butterscotch chips, spreading them evenly throughout the batter. This step ensures each bite is sweet and tasty. Now, you are ready to pour the batter into the prepared baking pan. For the full recipe, refer to the section above. To make your butterscotch zucchini blondies chewy, focus on mixing. Avoid overmixing the batter. Overmixing adds air and can make them dry. Mix until just combined. Using melted butter also helps keep them moist. For even more chewiness, add an extra egg yolk. This brings richness and a softer texture. Watch out for a few common mistakes. First, don’t skip grating the zucchini finely. Large pieces can make the blondies uneven. Also, always measure your flour correctly. Too much flour can lead to dry blondies. It's best to spoon flour into the measuring cup and level it off. Lastly, make sure your oven is at the right temperature. An oven thermometer can help with this. To boost the flavor of your blondies, use high-quality butterscotch chips. They add sweetness and richness. You can also add a pinch of cinnamon or nutmeg for warmth. If you enjoy nuts, consider adding chopped walnuts or pecans. These add crunch and contrast to the soft texture. For a twist, try a splash of almond extract along with the vanilla. Each of these tips will make your blondies even more delightful. For the full recipe, visit the [Full Recipe]. {{image_4}} You can make these chewy butterscotch zucchini blondies gluten-free. To do this, swap the all-purpose flour for a gluten-free blend. Many brands work well in baking. Just check that your mix is designed for one-to-one substitution. This way, you still enjoy that delightful texture. For added crunch, try adding nuts like walnuts or pecans. Chop them finely and fold them in with the butterscotch chips. You can also experiment with coconut flakes or dried fruit like raisins. These additions not only enhance flavor but also provide more texture. Feel free to switch out the butterscotch chips for chocolate chips if you prefer. Dark or milk chocolate works great. You can even add spices like cinnamon or nutmeg to give your blondies a warm twist. A teaspoon of espresso powder could add a rich depth to the flavor too. For the full recipe details, check the [Full Recipe]. After baking the Chewy Butterscotch Zucchini Blondies, let them cool completely. Once cooled, cut them into squares. Store the blondies in an airtight container. This keeps them fresh and chewy. You can place parchment paper between layers to avoid sticking. Keep the container at room temperature for the best texture. When stored correctly, the blondies can last up to five days. If you notice any changes in texture or smell, it’s best to toss them out. For longer storage, consider freezing them, which can extend their life considerably. To freeze the blondies, wait until they are fully cooled. Wrap each square tightly in plastic wrap. Then, place them in a freezer-safe bag or container. Label the bag with the date. The blondies can stay good for up to three months in the freezer. When you’re ready to enjoy them, thaw them in the fridge or at room temperature. They may lose a bit of chewiness, but they will still taste delicious! For the full recipe, check out the earlier section. Yes, you can use frozen zucchini. Just make sure to thaw and drain it well. This helps remove excess moisture. If you skip this step, your blondies may become too soggy. Using frozen zucchini is a great way to save time and enjoy these blondies year-round. Blondies and brownies are both delicious treats. The main difference is in the flavor and ingredients. Blondies use brown sugar and vanilla, which gives them a sweet, caramel-like taste. Brownies usually have cocoa powder or melted chocolate, making them rich and chocolatey. Both are chewy, but blondies have a lighter color. You can tell when the blondies are done by checking the edges. They should be golden brown and slightly pull away from the pan. Insert a toothpick into the center; it should come out clean or with a few moist crumbs. This shows they are baked through but still soft and chewy. In this article, we explored the key ingredients for the perfect blondies. We detailed each ingredient's role and provided helpful tips for mixing and baking. I shared common mistakes to avoid and ways to add flavor through variations. Storing your blondies properly can keep them fresh longer. Remember, you can easily adapt this recipe to fit your tastes, whether you go gluten-free or add tasty mix-ins. Enjoy your baking, and have fun experimenting!](https://meltedrecipes.com/wp-content/uploads/2025/06/aabca3a3-955d-427c-b746-0033e02102e3.webp)
Chewy Butterscotch Zucchini Blondies Simple Recipe
Craving a sweet treat that’s both chewy and unique? Try my Chewy Butterscotch Zucchini Blondies! This simple recipe makes use of fresh zucchini, blending it
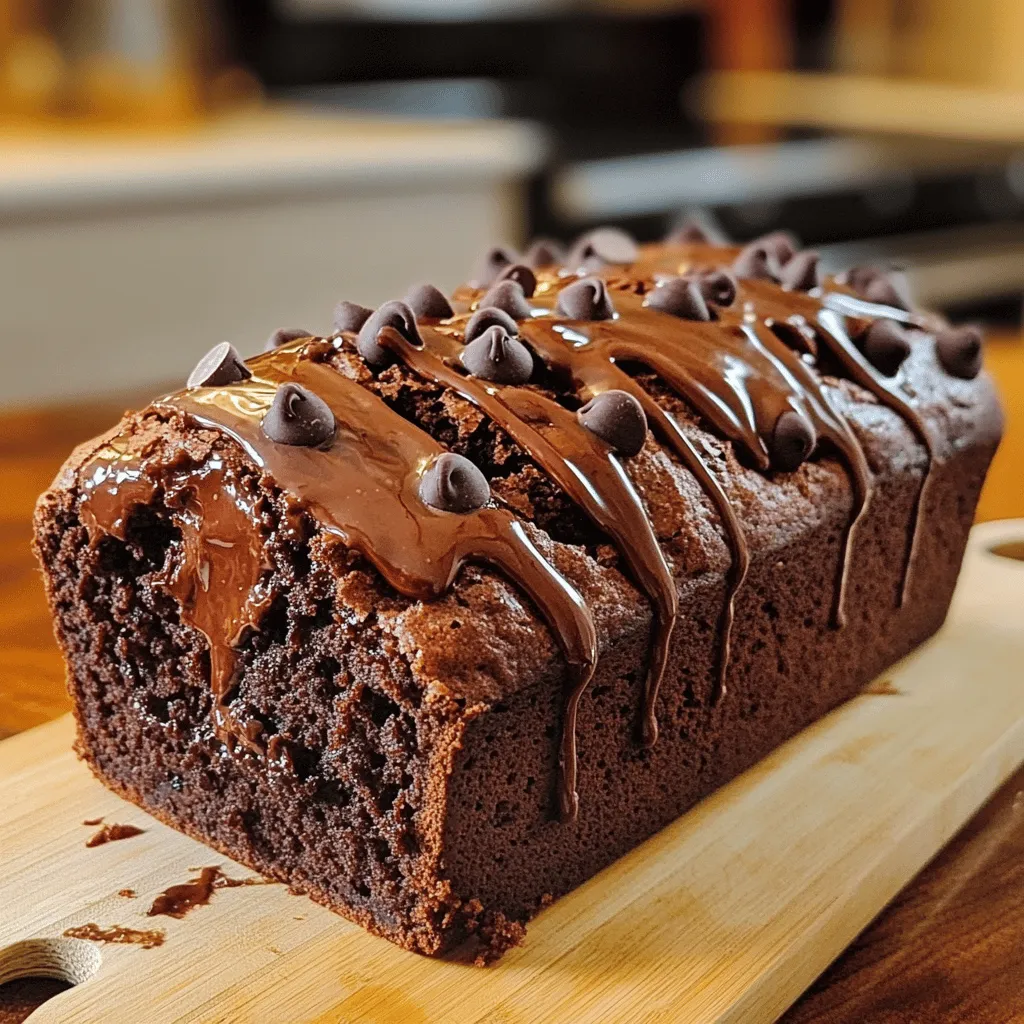
Hot Fudge Brownie Bread Irresistible Chocolate Delight
Are you ready for a chocolate adventure? Hot Fudge Brownie Bread is a treat you will crave! This moist bread combines rich cocoa flavors with
![To make these yummy cookies, gather these main ingredients: - 1 medium zucchini, finely grated and excess moisture thoroughly squeezed out - 1 cup all-purpose flour - 1/2 cup rolled oats - 1/2 teaspoon baking soda - 1/2 teaspoon baking powder - 1/4 teaspoon salt - 1/2 teaspoon ground cinnamon - 1/2 cup packed brown sugar - 1/4 cup granulated sugar - 1/2 cup unsalted butter, softened to room temperature - 1 large egg - 1 teaspoon pure vanilla extract - 1/2 cup semi-sweet chocolate chips These key items create a soft and chewy cookie. The zucchini adds moisture and a hint of nutrition without changing the flavor too much. You can also use these optional ingredients to make your cookies even better: - 1/4 cup chopped walnuts - A pinch of nutmeg or a splash of almond extract These additions can give your cookies a lovely crunch or a unique twist on flavor. Zucchini is not just for salads; it brings great health benefits to cookies: - Low in calories and high in water content - Packed with vitamins A and C - Adds fiber, which helps digestion Using zucchini makes these cookies a bit healthier, allowing you to enjoy them guilt-free. You can find the full recipe for these delightful cookies here: [Full Recipe]. First, preheat your oven to 350°F (175°C). This temperature is perfect for baking cookies. While the oven heats, get a baking sheet ready. Line it with parchment paper. This makes it easy to take off the cookies later. In a medium bowl, grab your flour, oats, baking soda, baking powder, salt, and cinnamon. Use a whisk to mix these together. Make sure they are fully combined. This step is important for even flavors in your cookies. Now, take a large bowl. Add the softened butter, brown sugar, and granulated sugar. Use an electric mixer on medium speed. Beat this mixture for about 2-3 minutes. It should turn light and fluffy. This helps give your cookies a nice texture. Next, add the egg and vanilla extract to the butter mixture. Beat until they mix well. After that, slowly add your dry ingredient mix. Stir on low speed until just combined. Be careful not to mix too much; otherwise, your cookies might be tough. It’s time to fold in the grated zucchini and chocolate chips. If you want, add chopped walnuts, too. The dough will feel thick and a bit sticky. This is a good sign that you have the right texture. Using a standard tablespoon, scoop the dough. Place it on the baking sheet, leaving about 2 inches between each scoop. This space lets the cookies spread. Bake them in the oven for 12-15 minutes. They should be lightly golden on the edges but still soft in the middle. After baking, let them cool on the sheet for 5 minutes before moving them to a wire rack. This helps them set nicely. For more details, check the Full Recipe. To start, choose a medium zucchini. Wash it well and cut off the ends. Use a box grater or a food processor to finely grate the zucchini. After grating, place the zucchini in a clean kitchen towel. Squeeze the towel tightly to remove excess moisture. This step is crucial. Too much water will make the cookies soggy. Aim for a dry mixture that still has a bit of moisture for flavor. When you mix the dough, use room temperature butter. This helps it cream better with the sugars. Beat the butter and sugars until light and fluffy. This step adds air and makes the cookies soft. Add the egg and vanilla next, mixing until smooth. Gradually add the dry ingredients, mixing on low speed. Overmixing can lead to tough cookies. Finally, gently fold in the zucchini and chocolate chips. This keeps the dough light and airy. Oven temperatures can vary. If your oven runs hot, check the cookies a minute or two early. For cooler ovens, you may need to add a minute or two. Look for lightly golden edges and a soft center. If using a dark baking sheet, reduce the temperature by 25°F. This helps prevent burning. Always trust your eyes and nose. The smell of fresh cookies is a good sign! For extra flavor, try adding spices like nutmeg or cloves. You can also mix in chopped nuts or dried fruit for a delightful twist. Adding rolled oats improves texture and gives the cookies a nice chew. For a richer taste, use dark chocolate chips. Experiment with these options to find your favorite combination. Remember, cooking is all about fun and creativity! {{image_4}} You can make gluten-free zucchini chocolate chip cookies easily. Use gluten-free flour instead of all-purpose flour. Brands like almond flour or coconut flour work well. Just note that these flours can change the cookie texture. You may need to add more liquid to keep the dough moist. To make vegan zucchini chocolate chip cookies, swap the egg for a flax egg. Mix 1 tablespoon of ground flaxseed with 2.5 tablespoons of water. Let it sit for a few minutes to thicken. Use dairy-free butter and vegan chocolate chips. These changes keep the cookies tasty and plant-based. Spice up your cookies with extra flavor! Adding a pinch of nutmeg or ginger can give a warm twist. Consider mixing in nuts like pecans or hazelnuts for crunch. Dried fruits, like raisins or cranberries, also work well. These additions make the cookies unique and fun. For the full recipe, check out the detailed cooking steps above! After baking, let the cookies cool on a wire rack. Once cool, place them in an airtight container. This keeps them soft and fresh for up to five days. You can also layer parchment paper between the cookies to prevent sticking. If you prefer, wrap them in plastic wrap before putting them in the container. To freeze your cookies, first let them cool completely. Then, place them in a single layer on a baking sheet. Freeze for about one hour until firm. After that, transfer the cookies to a freezer-safe bag or container. They can stay frozen for up to three months. When you're ready to enjoy, just thaw at room temperature. To reheat cookies, preheat your oven to 350°F (175°C). Place the cookies on a baking sheet and heat for about five to seven minutes. This warms them up and brings back their soft texture. You can also use the microwave. Heat for 10 to 15 seconds for a warm treat. Enjoy your cookies just like they were fresh out of the oven! For the full recipe, check the section above. Yes, you can use whole wheat flour or almond flour. Whole wheat gives a nutty taste. Almond flour adds moisture and is gluten-free. Just note that using different flours may change the cookie's texture. To prevent spreading, chill the dough before baking. You can also add extra flour if the dough seems too soft. Make sure your butter is softened, not melted. This helps the cookies keep their shape. These cookies stay fresh for about a week when stored in an airtight container. They stay soft and tasty if you keep them at room temperature. You can also freeze them for up to three months. Yes, frozen zucchini works well. Just make sure to thaw it and squeeze out excess water. This keeps your cookie dough from getting too wet. You can use dried fruits, nuts, or white chocolate chips. Peanut butter chips work great too! Each choice adds a unique flavor twist to the cookies. No, you don’t need to peel the zucchini. The skin adds nutrients and color. Just wash it well before grating. This way, you get all the benefits without extra work. For the full recipe, check out the details above. Zucchini chocolate chip cookies mix fun and healthy ingredients. We explored key components and optional add-ins. I shared simple steps to bake these tasty treats. You learned tips on grating zucchini and mixing dough right. Variations let you try gluten-free or vegan options. Finally, I covered how to store leftovers for later enjoyment. These cookies are easy to make and great for everyone. Enjoy your baking!](https://meltedrecipes.com/wp-content/uploads/2025/06/85ba3d98-f5be-481a-b993-6c51c8450cbe.webp)
Zucchini Chocolate Chip Cookies Easy and Tasty Treat
Looking for a fun twist on a classic dessert? You’ve found it! Zucchini chocolate chip cookies are both easy to make and full of flavor.