Desserts
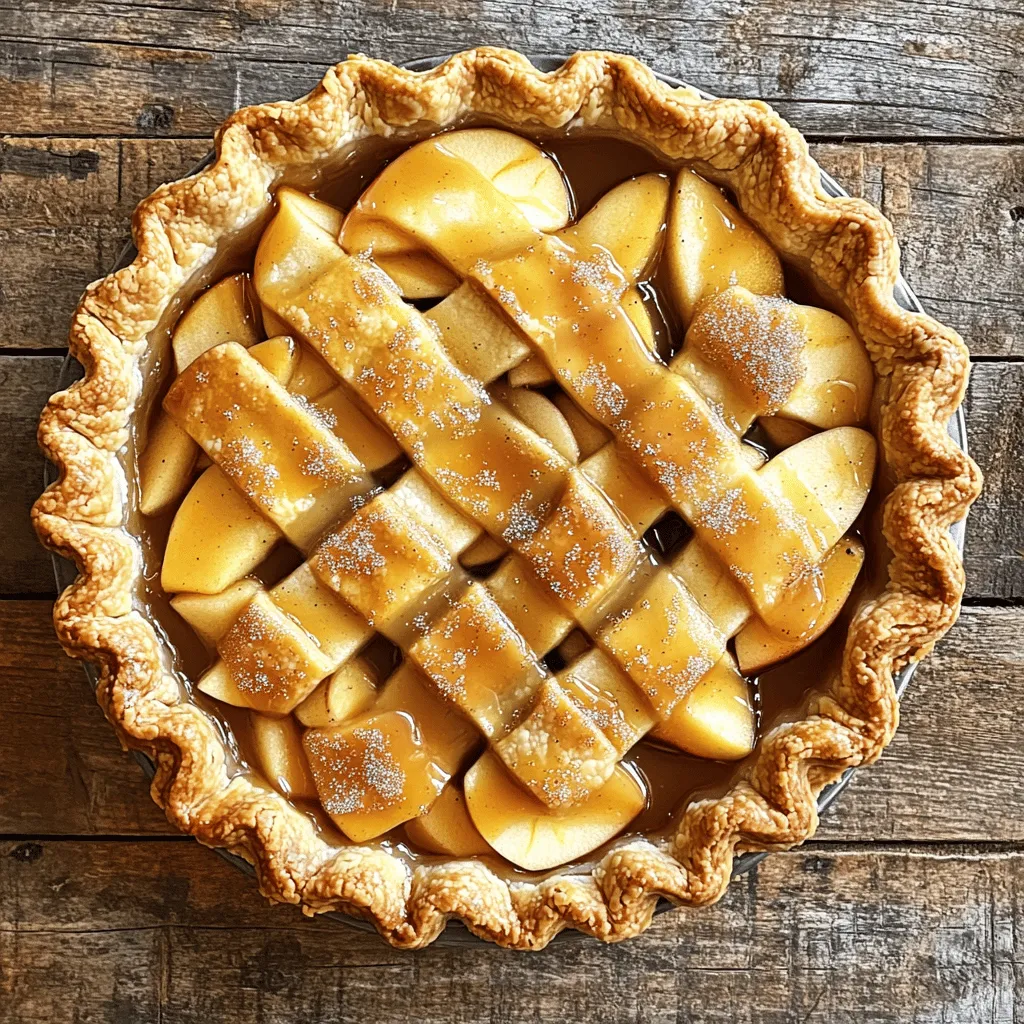
Toffee Apple Pie Delightful and Tasty Treat Recipe
Are you ready to dive into a sweet treat that combines the best of toffee and apple pie? My Toffee Apple Pie is a delightful
![- 2 cups all-purpose flour - 1/4 cup granulated sugar - 1 tablespoon baking powder - 1/2 teaspoon baking soda - 1 teaspoon ground cinnamon - 1/2 teaspoon ground ginger - 1/4 teaspoon ground cardamom - 1/4 teaspoon ground cloves - 1/4 teaspoon salt - 1/2 cup unsalted butter, cold and cubed - 3/4 cup buttermilk - 1/4 cup brewed chai tea, cooled - 1 teaspoon vanilla extract - 1 egg, lightly beaten (for brushing) - 1 cup powdered sugar - 2 tablespoons brewed chai tea, cooled - 1 tablespoon maple syrup - Pinch of cinnamon To make these homemade chai scones, you need basic ingredients from your kitchen. The all-purpose flour gives the scones structure. Sugar adds sweetness, while baking powder and baking soda help them rise. The chai tea and spices infuse the scones with warm, cozy flavors. Butter is key. Use cold, cubed butter for flakiness. Buttermilk adds moisture and a slight tang. The vanilla extract enhances the flavor. Don't forget the egg, which gives the scones a lovely golden finish. For the glaze, use powdered sugar for sweetness. Brewed chai tea adds flavor, while maple syrup brings a rich, sweet touch. A pinch of cinnamon ties everything together. You can find the full recipe [here]. 1. Preheat your oven to 400°F (200°C). Line a baking sheet with parchment paper. 2. In a large bowl, mix the all-purpose flour, sugar, baking powder, baking soda, cinnamon, ginger, cardamom, cloves, and salt. Whisk until smooth. 3. Add the cold, cubed butter to the flour mixture. Use a pastry cutter or your fingers to mix the butter into the flour. You want it to look like coarse crumbs. This step is key for flaky scones. 1. In another bowl, mix the buttermilk, cooled brewed chai tea, and vanilla extract. Gradually add the wet mix to the dry mix. Fold gently until just combined. Don't over-knead; we want light scones. 2. Dust a clean surface with flour. Take the dough and shape it into a ball. Pat it down into a disc about 1 inch thick. 3. Cut the disc into 8 equal wedges. Place the wedges on the baking sheet, leaving space between them. Brush the tops with the beaten egg for a golden finish. 1. Bake the scones for 15-18 minutes. They should turn golden brown. Insert a toothpick in the center to check; it should come out clean. 2. While the scones bake, make the Maple Chai Glaze. In a small bowl, whisk together powdered sugar, cooled chai tea, maple syrup, and a pinch of cinnamon until smooth. 3. Once the scones are out of the oven, let them cool for a few minutes. Drizzle the glaze over the warm scones. Enjoy the sweet, spicy flavor! For the complete recipe, check out the Full Recipe section. To make scones that are light and flaky, you must use cold butter. Cold butter creates steam when baking, which helps the scones rise and become airy. If your butter is warm or melted, your scones will turn out dense. Another key tip is to avoid over-kneading the dough. When you mix the wet and dry ingredients, fold them gently. Mix just until you see no dry flour. Overworking the dough can lead to tough scones. When making the Maple Chai Glaze, adjust the sweetness to suit your taste. If you like it sweeter, add more powdered sugar. For a stronger chai flavor, add more brewed chai tea. You can also play with different flavors in your glaze. Try adding a splash of vanilla or a hint of nutmeg for a twist. If you want to try a different glaze, consider using a lemon glaze or a simple icing made with milk and powdered sugar. Both will add a unique flavor to your scones. For serving, arrange the warm scones on a pretty platter. Drizzle the glaze over each scone for a beautiful look. A light dusting of powdered sugar or a sprinkle of cinnamon can add an extra touch. Pair these scones with a hot cup of chai or coffee. The flavors blend perfectly, making every bite delightful. Enjoy your homemade chai scones with maple chai glaze! For more details, check out the Full Recipe. {{image_4}} You can easily change the flavor of your scones. Adding nuts or dried fruits gives a nice crunch and sweetness. Try chopped walnuts, almonds, or dried cranberries for an extra twist. These flavors pair well with chai spices. Infusing other spices can also create unique scones. Consider adding cardamom or nutmeg for a different taste. You can mix and match spices to find your favorite blend. It’s fun to experiment and discover new flavors. If you need a gluten-free version, you can use almond flour or a gluten-free blend. These options work well and keep the scones fluffy. Just remember to adjust wet ingredients. You may need a bit more liquid, as gluten-free flours absorb more moisture. For a vegan choice, swap out dairy with plant-based ingredients. Use coconut oil or vegan butter instead of regular butter. You can replace buttermilk with almond milk mixed with vinegar. This creates a similar tangy flavor. To make the egg wash, you can use a mixture of plant milk and a bit of maple syrup. This gives the scones a nice glaze without using eggs. To keep your homemade chai scones fresh, store them in an airtight container. This helps to lock in moisture and flavor. Place a piece of parchment paper between layers if stacking. This prevents them from sticking together. Keep the container in a cool, dry place. Avoid direct sunlight or heat, as this can dry them out. To enjoy warm scones again, you can reheat them in the oven. Preheat your oven to 350°F (175°C). Place the scones on a baking sheet and cover them loosely with aluminum foil. Heat for about 5 to 10 minutes. This method restores their freshness. Avoid heating in the microwave. It can make the scones tough and dry. Homemade chai scones stay good for about 2 to 3 days at room temperature. If you want to keep them longer, freezing is a great option. Wrap each scone tightly in plastic wrap and then place them in a freezer bag. They can last up to 3 months in the freezer. To thaw, leave them in the fridge overnight or let them sit at room temperature for a few hours. Enjoy these delightful scones by following the full recipe. To make scones fluffy, start with cold ingredients. Always use cold butter. This keeps the butter solid in the dough. When baking, the butter melts and creates steam, which helps the scones rise. Mix the dough gently. Overworking it can lead to tough scones. Aim for a light touch when combining wet and dry ingredients. - Use cold butter - Mix gently - Avoid over-kneading You can use regular tea, but the flavor will change. Chai offers rich spices like cinnamon and cardamom. If you use black tea, add spices to mimic chai's taste. This can enhance your scones' flavor profile. Try adding a pinch of cinnamon or ginger for a boost. - Regular tea lacks chai's spices - Add spices to black tea - Adjust to taste If you don’t have buttermilk, don't worry! You can make your own with simple ingredients. Mix milk with vinegar or lemon juice. Let it sit for about 5 minutes. This creates a tangy substitute. You can also use plain yogurt or sour cream. Both will work well in this recipe. - Mix milk with vinegar or lemon juice - Use plain yogurt - Try sour cream as an alternative You learned how to make tasty scones using simple ingredients. We covered the steps from mixing dough to adding a sweet glaze. Remember to keep your butter cold for flaky scones. You can also try different flavors or make them vegan. Store scones properly to keep them fresh. With these tips, you can create delicious scones for any occasion. Enjoy baking and sharing them with friends and family!](https://meltedrecipes.com/wp-content/uploads/2025/07/d5c23176-015a-499e-ae84-2db2dc72db46.webp)
Homemade Chai Scones with Maple Chai Glaze Delight
Get ready to elevate your baking game with my recipe for Homemade Chai Scones with Maple Chai Glaze! These warm, spiced scones are soft and
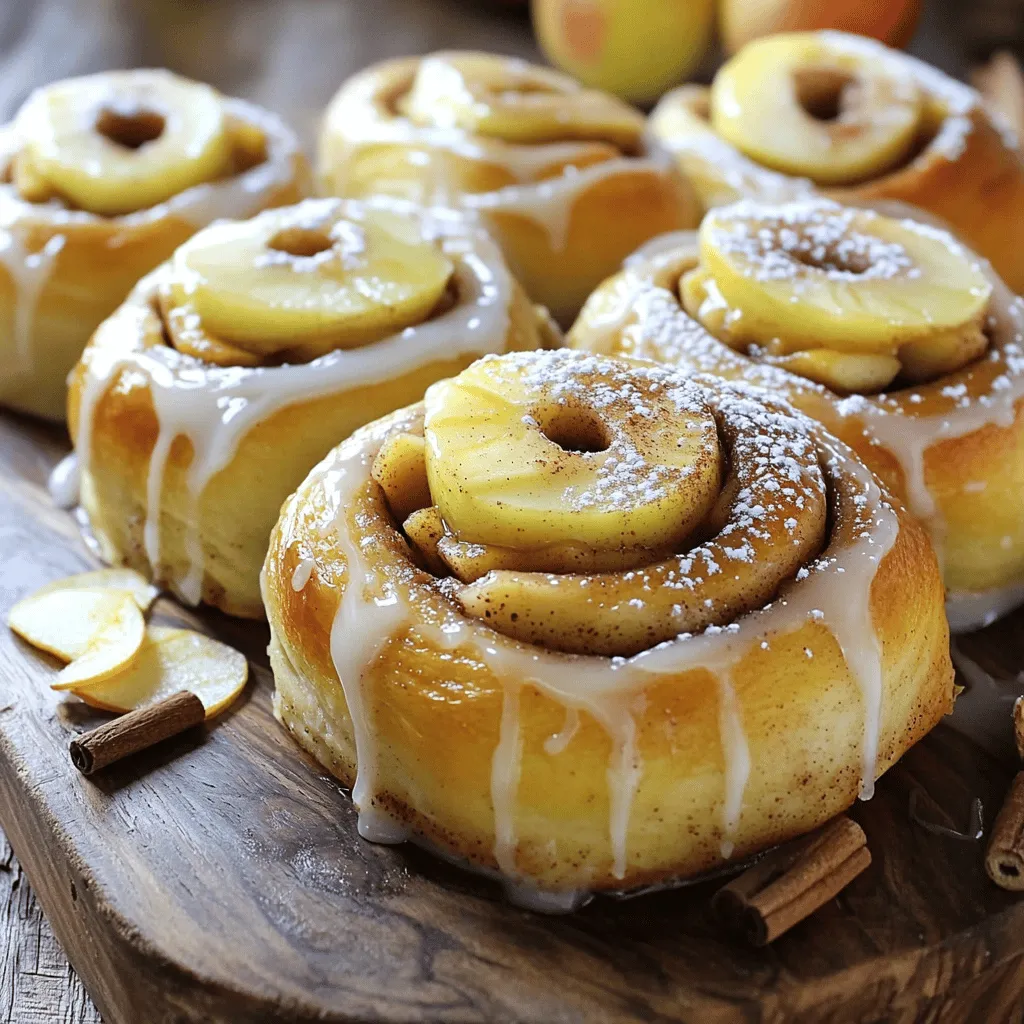
Irresistible Apple Cinnamon Rolls Simple and Tasty Recipe
Get ready to indulge in warm, gooey, and oh-so-delicious Apple Cinnamon Rolls! This simple recipe combines sweet apples and rich cinnamon, making every bite a
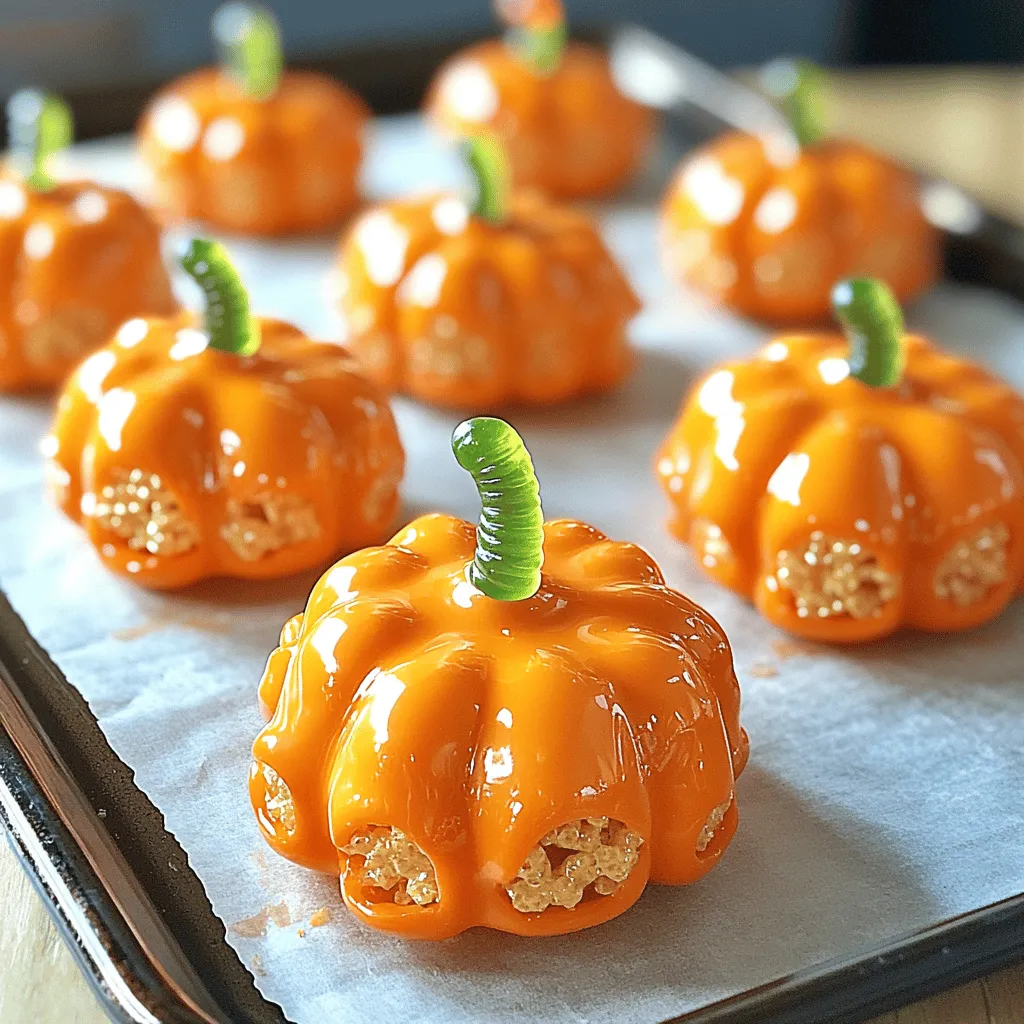
Rice Krispie Treat Pumpkins Fun and Easy Recipe
Rice Krispie Treat Pumpkins are a fun twist on a classic snack! They’re simple to make and perfect for Halloween parties. In this post, I’ll
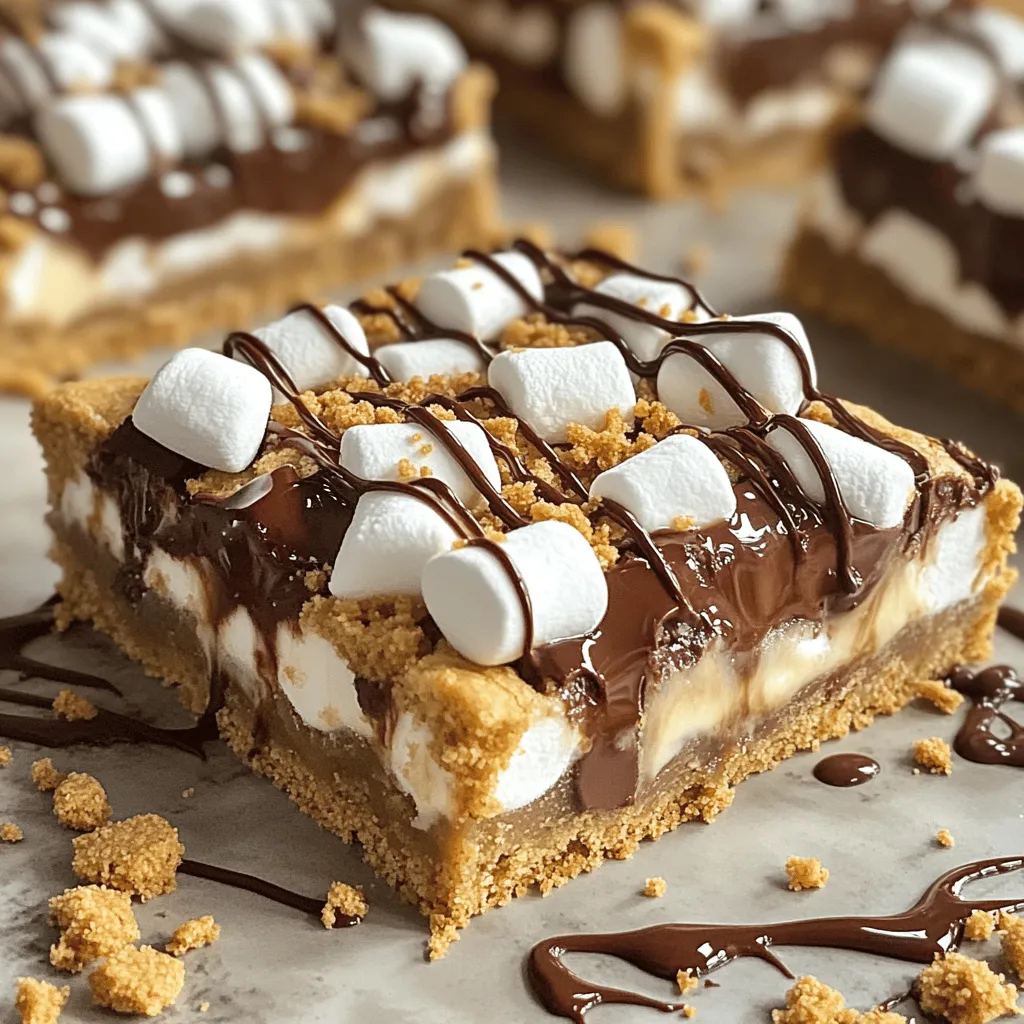
S’mores Cookie Bars Irresistible and Easy Recipe
Who doesn’t love the classic taste of s’mores? Now, imagine that iconic flavor transformed into warm, gooey cookie bars! In this easy recipe, I’ll guide

Maple Brown Sugar Cookies Soft and Chewy Delight
Imagine sinking your teeth into a warm, soft cookie that melts in your mouth. Welcome to the world of Maple Brown Sugar Cookies! In this
![- 2 medium apples, peeled and diced - 1 teaspoon ground cinnamon - 2 tablespoons packed brown sugar - 1 tablespoon fresh lemon juice - 1 package refrigerated biscuit dough (8 biscuits) - 1 tablespoon unsalted butter, melted - 1 tablespoon granulated sugar - ½ teaspoon pure vanilla extract - Cooking spray for greasing The best apples for apple pie bombs are firm and crisp varieties. I recommend using Granny Smith or Honeycrisp apples. They give a nice balance of sweet and tart flavors. When you pick apples, look for these signs of freshness: - Bright, vibrant color - Firmness when squeezed - No bruises or soft spots If you want to use alternative sweeteners, try honey or maple syrup. These options add unique flavors. For gluten-free needs, choose gluten-free biscuit dough. Many stores offer good choices that work well in this recipe. To make the filling, take two medium apples and peel them. Dice them into small cubes. In a medium bowl, mix the apples with one teaspoon of ground cinnamon, two tablespoons of brown sugar, and one tablespoon of fresh lemon juice. Stir it well. Let the apples sit for about ten minutes. This helps the flavors blend nicely. Now it’s time to assemble. Take the package of refrigerated biscuit dough. On a lightly floured surface, flatten each dough round into a circle. You can use your fingers or a rolling pin. Spoon a generous tablespoon of the apple filling into the center of each dough circle. Be careful not to overfill. Fold the dough over the filling and pinch the edges tightly. This keeps the filling inside as they cook. First, preheat your air fryer to 350°F (175°C). While it heats, brush the bombs with melted butter. Mix one tablespoon of granulated sugar with half a teaspoon of vanilla extract. Sprinkle this mixture on top of the bombs. Lightly coat the air fryer basket with cooking spray. Place the bombs in a single layer, allowing some space between them. Cook for 8 to 10 minutes, flipping them halfway through. They should look golden brown and puffed when done. To get the best texture, dough thickness matters. Aim for about a quarter-inch thickness. This will help the bombs cook evenly and puff nicely. If the dough is too thick, the insides may not cook well. Avoid overfilling the bombs. One tablespoon of filling is enough. If you add too much, the filling will spill out during cooking. This can make a mess and ruin the shape of your bombs. You can boost flavor by adding nuts or caramel to the filling. Chopped walnuts or pecans add a nice crunch. Drizzling caramel sauce inside brings a sweet twist. Experiment with spices, too. A dash of nutmeg or allspice can elevate the taste. These spices pair well with apples and add warmth to each bite. For a festive look, arrange the warm apple pie bombs on a nice platter. Dust the tops with powdered sugar for a touch of sweet charm. Complement your bombs with sides like vanilla ice cream or caramel sauce. These pairings will make your dessert even more delightful. You can also serve them with a scoop of whipped cream for added creaminess. For the full recipe, check out the detailed instructions above. Enjoy your cooking! {{image_4}} You can change the apple filling for other fruits. Try using pears or peaches. They have a sweet flavor and a soft texture. Just chop them like you did with the apples. You can also mix in berries for a fun twist. Blueberries or raspberries add a tart taste. They make your pie bombs colorful and tasty. You don’t have to use biscuit dough. You can try crescent roll dough instead. It gives a flakier texture. If you want to go homemade, use pastry dough. This option lets you control the flavor and texture. Roll it out thin for best results. If you want vegan options, replace butter with coconut oil. It gives a nice flavor and stays dairy-free. Use plant-based cream alternatives if you need cream. For biscuit dough, choose an egg-free option. You can find many brands that offer this, making it easy to enjoy these treats. For more delicious ideas, check out the Full Recipe. To keep your apple pie bombs fresh, store them in the fridge. Place them in an airtight container. This helps prevent them from drying out. Enjoy them within three days for the best taste. When you want to reheat, use your air fryer. Heat them at 350°F for about 3-5 minutes. This method keeps them crispy and tasty. You can freeze apple pie bombs before or after cooking. If you freeze them before cooking, wrap each bomb in plastic wrap. Place them in a freezer bag, and they can last for up to three months. When you want to cook them, no need to thaw. Just add a few extra minutes to the cooking time. If you freeze them after cooking, let them cool first. Then, store them in an airtight container. To reheat, use the air fryer at 350°F for 5-8 minutes until hot. This keeps the outside nice and crispy. In the fridge, apple pie bombs last about three days. If they sit longer, it's best to check them. Look for signs of spoilage, such as a change in smell or texture. If they smell off or feel slimy, it's time to throw them out. Always trust your senses to keep your food safe. Yes, you can prepare apple pie bombs ahead of time. Here are some tips for pre-preparation: - Prepare the Filling: Make the apple filling a day before. Store it in an airtight container in the fridge. - Dough Preparation: You can flatten the biscuit dough and keep it covered in the fridge. This keeps it fresh for later use. - Assembly: Assemble the bombs before cooking. Place them on a lined baking sheet and cover them with plastic wrap. This keeps them from drying out. - Freezing: You can freeze the assembled bombs before cooking. Just make sure to freeze them flat. When ready, cook from frozen, adding a few extra minutes to the time. The best air fryer temperature for cooking apple pie bombs is 350°F (175°C). Cooking times may vary based on your air fryer model. Most air fryers cook these bombs in 8-10 minutes. Here are some variations based on different air fryer models: - Smaller Air Fryers: May cook faster. Check around 6-8 minutes. - Larger Air Fryers: Might need the full 10 minutes. Always check for golden brown color. - Check for Doneness: Flip the bombs halfway through. This helps them cook evenly. Yes, air fryer apple pie bombs are generally healthier than traditional fried versions. Here’s a quick comparison: - Less Oil: Air frying uses less oil, cutting down on fat and calories. Traditional frying soaks food in oil. - Lower Calories: Each apple pie bomb has fewer calories than those fried in oil. - Faster Cooking: Air frying cooks quickly, which helps retain nutrients in the filling. - Nutritional Benefits: Using fresh apples adds vitamins and fiber that fried options lack. For a full recipe, please refer to the [Full Recipe]. The apple pie bombs are a fun treat, full of flavor and easy to make. Start with fresh apples and the right spices. Use our tips to choose the best ingredients and tricks for perfect texture. Remember, you can customize this recipe with different fruits or doughs. Store leftovers properly to enjoy them later. With these guidelines, you can create a delicious dessert every time. Enjoy baking and sharing your tasty creations!](https://meltedrecipes.com/wp-content/uploads/2025/07/eca89487-e4aa-4a61-ad00-0345f3568836.webp)
Air Fryer Apple Pie Bombs Tasty and Easy Recipe
Craving a sweet treat that’s quick and fun to make? Try these Air Fryer Apple Pie Bombs! This tasty recipe transforms simple ingredients into a
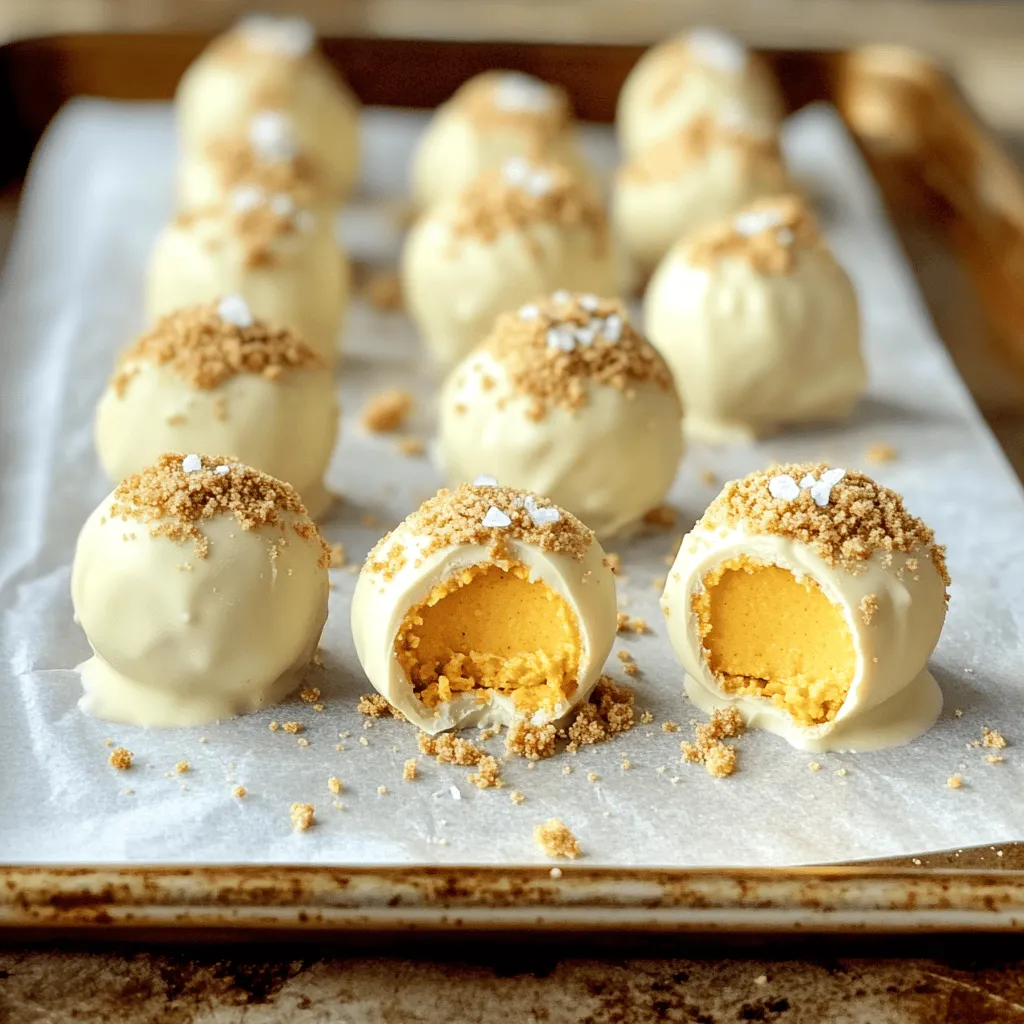
Pumpkin Cheesecake Truffles Irresistible Dessert Treat
Craving a sweet treat that screams fall? Look no further than Pumpkin Cheesecake Truffles! These bite-sized delights combine creamy pumpkin, rich cream cheese, and a
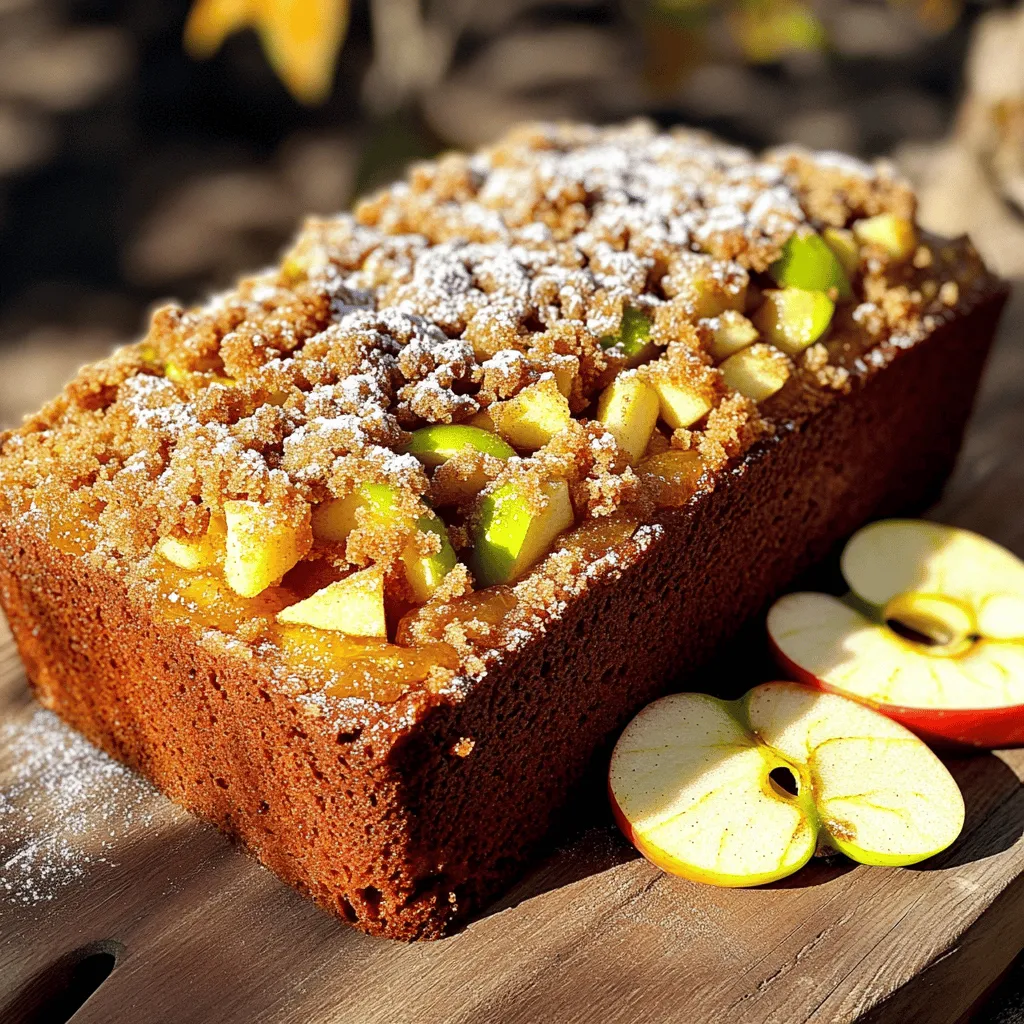
Moist Apple Cider Doughnut Loaf Cake Delight Recipe
Are you ready to enjoy a cozy treat this fall? My Moist Apple Cider Doughnut Loaf Cake will fill your kitchen with warm, sweet scents.
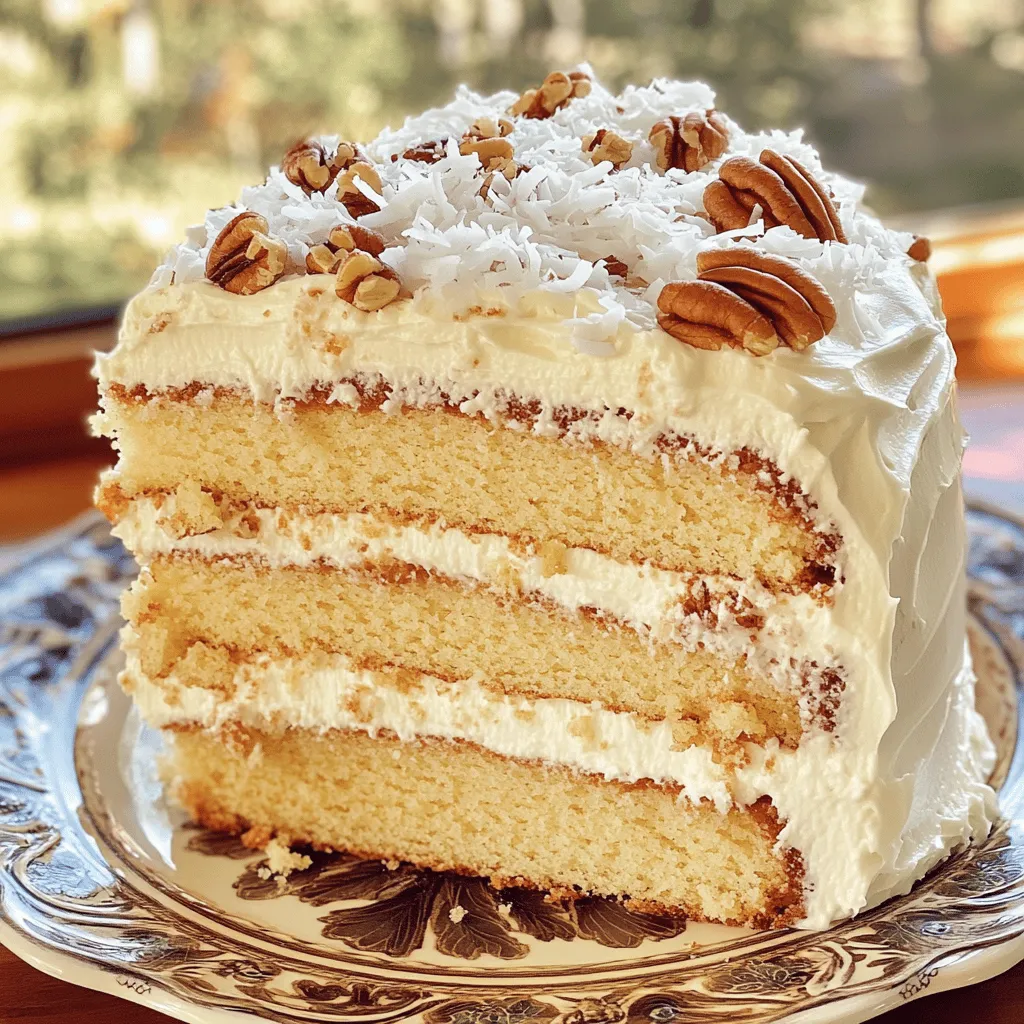
Amazing Italian Cream Cake Delightful and Simple Recipe
Are you ready to indulge in a slice of heaven? This Amazing Italian Cream Cake combines rich flavors and textures with a simple recipe that