Desserts
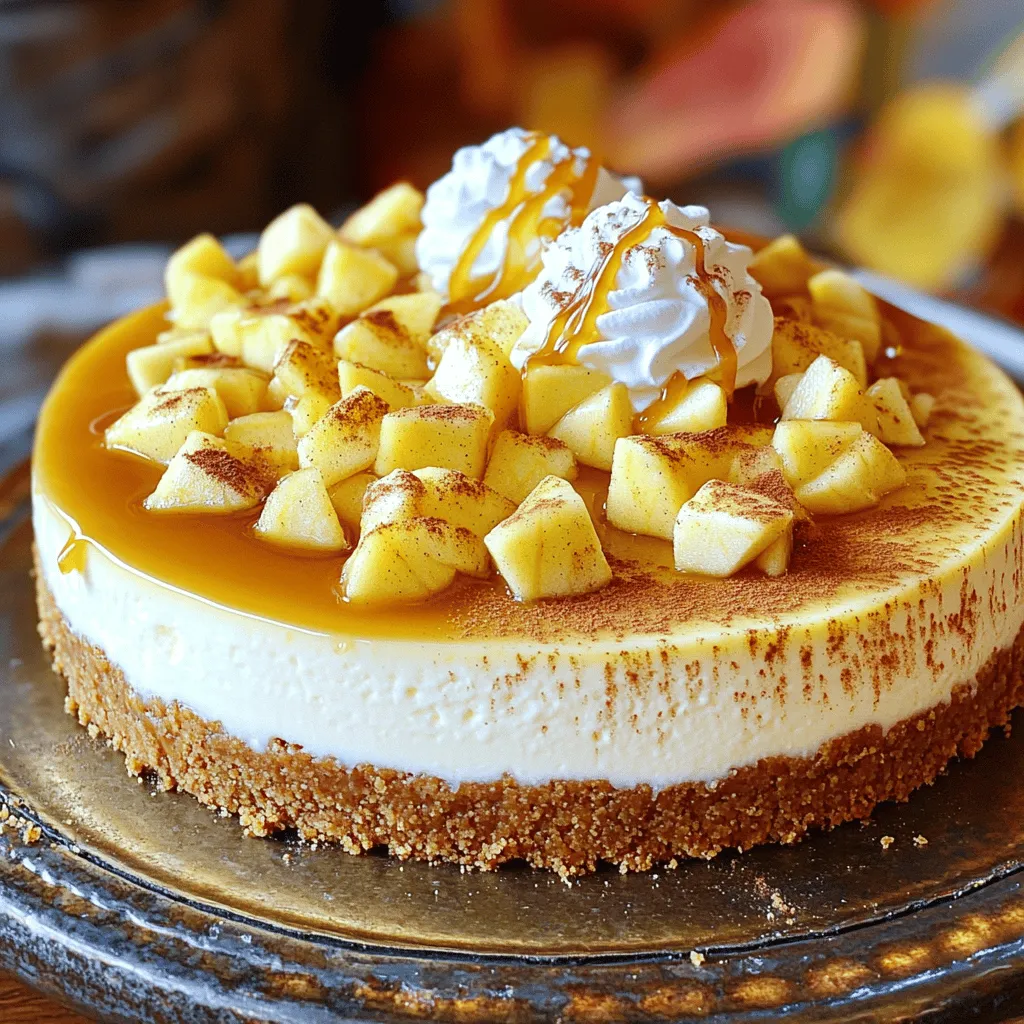
Apple Cider Cheesecake Rich and Flavorful Delight
Are you ready for a dessert that captures fall’s essence? This Apple Cider Cheesecake is rich and flavorful, perfect for any gathering. You’ll learn how
![To make these tasty apple muffins, gather the following ingredients: - 1 ½ cups all-purpose flour - ½ cup granulated sugar - ½ cup brown sugar, packed - 1 tablespoon baking powder - ½ teaspoon baking soda - ½ teaspoon ground cinnamon - ¼ teaspoon salt - 1 large egg - ½ cup milk (preferably whole for richness) - ⅓ cup vegetable oil (or melted coconut oil for a unique flavor) - 1 teaspoon vanilla extract - 1 ½ cups apples, peeled and diced (approximately 2 medium-sized apples) For the crumb topping, you will need: - ½ cup all-purpose flour - ¼ cup brown sugar, packed - ¼ teaspoon ground cinnamon - 4 tablespoons cold butter, cut into small cubes You can customize your muffins! Here are some options: - Use whole wheat flour for added fiber. - Swap out granulated sugar with coconut sugar for a caramel flavor. - Try Greek yogurt instead of milk for creaminess. - Add nuts like walnuts or pecans for extra crunch. - Substitute apples with pears or berries for a twist. For the full recipe, check out the complete instructions! To start, preheat your oven to 350°F (175°C). This ensures even baking. Next, prepare your muffin tin. You can use paper liners or grease it lightly with non-stick spray. This step helps with easy muffin removal later. In a large bowl, combine the dry ingredients. Add 1 ½ cups of all-purpose flour, ½ cup of granulated sugar, ½ cup of packed brown sugar, 1 tablespoon of baking powder, ½ teaspoon of baking soda, ½ teaspoon of ground cinnamon, and ¼ teaspoon of salt. Whisk everything together until well mixed. This helps to avoid lumps in your batter. In a separate bowl, whisk 1 large egg until frothy. Then, add ½ cup of milk, ⅓ cup of vegetable oil (or melted coconut oil), and 1 teaspoon of vanilla extract. Mix until smooth. Pour this wet mixture into the bowl of dry ingredients. Gently stir with a spatula until combined, but don’t overmix. A few lumps are okay. Now, fold in 1 ½ cups of peeled and diced apples. Make sure the apples are evenly distributed for great flavor in every bite. For the full recipe, you can check the details above. To get the best crumb topping, use cold butter. Cold butter creates a nice crunch. Cut it into small cubes, then mix it with flour and brown sugar. Use your fingers to blend until it looks like coarse crumbs. This method adds texture and flavor. You want to see little bits of butter in the mix. Avoid overmixing the batter. This leads to tough muffins. Stir gently when combining wet and dry ingredients. It’s okay if the batter is lumpy. Don’t skip the cooling step. If you remove muffins too soon, they may fall apart. Let them cool in the tin for five minutes before moving them. Serve warm muffins with a pat of butter for extra flavor. You can also add a sprinkle of powdered sugar for a sweet touch. Pair these muffins with a cup of coffee or tea for a cozy snack. They also make a great breakfast. Try adding a scoop of yogurt on the side for a fresh twist. For the full recipe, check here: [Full Recipe]. {{image_4}} You can make these muffins gluten-free by using a 1:1 gluten-free flour blend. Brands like Bob's Red Mill or King Arthur Flour work well. Just swap out the all-purpose flour in the recipe. The rest of the ingredients stay the same. You might find the muffins just as soft and tasty. To add some crunch, mix in ½ cup of chopped nuts like walnuts or pecans. They add a nice texture. You can also try adding dried fruits like raisins or cranberries for extra sweetness. If you want a twist, swap some apples for ripe bananas or pears. Each fruit brings a new flavor. You can make these muffins healthier by using whole wheat flour instead of all-purpose flour. This adds fiber. Replace half the sugar with unsweetened applesauce for a natural sweetness. You can even use Greek yogurt instead of oil for moistness and protein. These simple swaps keep the taste while making them a bit better for you. For the full recipe, check out the Crunchy Apple Muffins with Delightful Crumb Topping. To keep your apple muffins fresh, store them in an airtight container. This helps maintain moisture and flavor. You can place a piece of bread in the container to absorb excess moisture. Store the muffins at room temperature if you plan to eat them within a couple of days. Freezing is a great way to save your muffins for later. First, let them cool completely. Wrap each muffin tightly in plastic wrap. Then, place the wrapped muffins in a freezer bag. This will keep them fresh for up to three months. When you’re ready to enjoy them, just take out what you need. To reheat, you can use a microwave or an oven. For the microwave, heat each muffin for about 15-20 seconds. For the oven, preheat to 350°F (175°C) and warm them for 10 minutes. This will make them taste fresh and soft again. Enjoy your muffins just like they were baked today! Check out the Full Recipe for more tips. To check if your muffins are ready, use a toothpick. Insert it into the center of a muffin. If it comes out clean or with just a few moist crumbs, your muffins are done. If there’s wet batter on the toothpick, bake them a few more minutes. Keep an eye on them, as oven times can vary. Yes, you can use many fruits! Blueberries, raspberries, or chopped peaches work well. Just make sure the fruit is ripe and cut into small pieces. You may need to adjust the sugar based on the sweetness of the fruit you choose. To keep muffins moist, store them in an airtight container. You can also add a slice of bread to the container. The bread helps to keep the muffins soft. For longer storage, freeze them. Just wrap each muffin tightly in plastic wrap and place them in a freezer bag. You learned about making delicious apple muffins. We covered the key ingredients, step-by-step instructions, and helpful tips. Remember to try the variations, like gluten-free options or adding nuts. Proper storage helps keep muffins fresh. Now you can confidently bake apple muffins at home. Enjoy the process and share your tasty results with friends and family. Happy baking!](https://meltedrecipes.com/wp-content/uploads/2025/07/ec9a0329-edfe-4932-8173-ab750b1255ef.webp)
Apple Muffins with Crumb Topping Tasty and Easy Recipe
Are you ready to create the perfect treat? Today, I’ll share my easy recipe for apple muffins with a crumb topping that will delight your
![- 1 cup unsalted butter - 1 cup brown sugar, firmly packed - 1/2 cup granulated sugar - 1/2 cup pure pumpkin puree - 1 large egg - 1 teaspoon pure vanilla extract - 2 cups rolled oats - 1 1/2 cups all-purpose flour - 1 teaspoon baking soda - 1 teaspoon ground cinnamon - 1/2 teaspoon ground nutmeg - 1/4 teaspoon ground ginger - 1/2 teaspoon fine salt - Optional add-ins: 1 cup semi-sweet chocolate chips & 1/2 cup chopped nuts If you need to adjust the recipe, here are some tips. For a smaller batch, you can halve the amounts. If you want to make more, simply double everything. When using other measurements, remember that 1 cup equals 16 tablespoons. This helps when you need precise amounts for your cookies. You will need some basic tools for this recipe. Grab mixing bowls for combining ingredients. A whisk works well for blending. A cookie scoop makes shaping cookies easy. Baking sheets lined with parchment paper are great for even baking. Having these tools ready will make your baking process smooth and fun! Start by melting one cup of unsalted butter in a medium saucepan. Use medium heat and stir constantly. You'll see foam forming on top. Keep stirring until the butter turns a rich golden brown. This should take about 5 to 7 minutes. You'll know it's ready when you smell a nutty aroma. Once it’s browned, remove it from the heat and let it cool for a few minutes. In a large mixing bowl, combine the cooled browned butter, brown sugar, and granulated sugar. Use a hand mixer or whisk to beat the mixture until it’s smooth and creamy. Then, add in half a cup of pure pumpkin puree, one large egg, and one teaspoon of pure vanilla extract. Mix everything until it’s well blended. In a separate bowl, whisk together the two cups of rolled oats, one and a half cups of all-purpose flour, one teaspoon of baking soda, one teaspoon of ground cinnamon, half a teaspoon of ground nutmeg, a quarter teaspoon of ground ginger, and half a teaspoon of fine salt. Make sure these dry ingredients are mixed well to ensure even flavor in your cookies. Now, slowly add the dry mixture into the wet mixture. Stir gently until just combined. Be careful not to overmix the dough. If you want some extra flavor and texture, fold in one cup of semi-sweet chocolate chips and/or half a cup of chopped nuts, like walnuts or pecans. Cover the bowl with plastic wrap or a lid. Place the cookie dough in the fridge for at least 30 minutes. This step is important. Chilling the dough helps it firm up, making it easier to shape the cookies. While the dough chills, preheat your oven to 350°F (175°C). Line your baking sheets with parchment paper. After chilling, use a cookie scoop or tablespoon to drop dough rounds onto the sheets. Space them about 2 inches apart. Bake for 10 to 12 minutes. The edges should be lightly golden brown, while the centers stay soft. This gives you that perfect chewy texture. To make soft, chewy cookies, follow these tips: - Use brown butter: It adds rich flavor and moisture. - Chill the dough: This helps the cookies stay thick. - Don't overmix: Stir just until combined to keep them soft. - Check baking time: Remove cookies when the edges are golden. Watch out for these common pitfalls: - Skipping the chilling step: This leads to flat cookies. - Overbaking: It makes cookies hard rather than chewy. - Not measuring flour correctly: Too much flour makes them dry. - Using old baking soda: It can affect the rise and texture. Add a creative touch to your cookies with these ideas: - Sprinkle sea salt: It contrasts nicely with sweet flavors. - Add spices: A pinch of cardamom or allspice for warmth. - Include dried fruit: Cranberries or raisins can add sweetness. - Top with nuts: Walnuts or pecans give a nice crunch. For the complete guide, check the Full Recipe of Brown Butter Pumpkin Oatmeal Cookies. {{image_4}} You can enjoy these cookies without gluten. Use almond flour or oat flour instead of all-purpose flour. You might need to add a bit more liquid to keep the dough moist. Also, look for gluten-free oats to ensure every bite is safe for you. Remember to check labels for hidden gluten in your ingredients. To make these cookies vegan, swap the egg for a flax egg. Mix one tablespoon of ground flaxseed with three tablespoons of water. Let it sit for a few minutes until it thickens. Use coconut oil or vegan butter in place of the unsalted butter. This change keeps the cookies rich and tasty without dairy. Want to mix it up? Add more spices like cloves or allspice for a deeper flavor. Chopped nuts like pecans or walnuts add a nice crunch. You can also toss in dried fruits such as cranberries or raisins for a sweet twist. Each of these adds a new layer to your oatmeal cookies, making them even more delightful. To keep your cookies fresh, use an airtight container. Place a piece of bread in the container. This helps to absorb moisture and keeps cookies soft. If you prefer a crispier cookie, store them in a container without bread. You can freeze both unbaked and baked cookies. For unbaked cookies, scoop the dough onto a baking sheet. Freeze for about an hour, then transfer the dough balls to a freezer bag. For baked cookies, cool them completely. Then, layer them with parchment paper in a freezer-safe container. At room temperature, these cookies last about one week. If you store them in the fridge, they can last up to two weeks. Make sure they are in an airtight container to maintain freshness. Using pumpkin pie filling is not the best choice. Pumpkin pie filling has added spices and sugar. This can change the taste and texture of your cookies. If you want to use it, cut down on the sugar and spices in the recipe. I recommend sticking with pure pumpkin puree for the best results. Sticky dough can happen for a few reasons. First, you may have added too much liquid. Check your measurements, especially for the pumpkin puree. Second, the flour could be packed too tightly. Lightly spoon the flour into the measuring cup for accuracy. If your dough is still too sticky, add a little more flour until it’s manageable. You’ll know your cookies are done when the edges turn golden brown. The centers should look slightly soft and puffy. They will firm up as they cool. A good tip is to take them out when they look a bit underdone. This gives you that soft, chewy texture. You can use other sugars, but it may change the flavor. Brown sugar gives a rich taste and moisture. White sugar will make them crisper. Coconut sugar is a good option for a deeper flavor. Just remember, each sugar has different properties and may affect your cookie texture. If you need a quick fix, use regular melted butter. It won’t have that nutty flavor, but it will work. You could also try using vegan butter or ghee. Each option will change the taste a bit, but they will still make tasty cookies. For the complete recipe, check out the [Full Recipe]. This blog post detailed how to make delicious Brown Butter Pumpkin Oatmeal Cookies. We covered essential ingredients, step-by-step instructions, and helpful tips to perfect your baking. Remember to chill your dough for the best texture and shape. Also, consider fun variations for gluten-free and vegan options. With these insights, you can enjoy cookies that are soft, chewy, and bursting with flavor. Happy baking!](https://meltedrecipes.com/wp-content/uploads/2025/07/83d283ea-1f88-4c16-8f3a-79ecc8409b00.webp)
Brown Butter Pumpkin Oatmeal Cookies Delightful Treat
Welcome to your new favorite cookie recipe! Brown Butter Pumpkin Oatmeal Cookies are the perfect treat for autumn. With rich, nutty flavors from browned butter
![The Vanilla Chai Pumpkin Spice Latte Cupcakes need simple yet flavorful ingredients. Here’s what you’ll need: - 1 ½ cups all-purpose flour - 1 cup granulated sugar - ½ cup light brown sugar, packed - 1 teaspoon baking powder - ½ teaspoon baking soda - ½ teaspoon salt - 1 teaspoon ground cinnamon - ½ teaspoon ground ginger - ¼ teaspoon ground nutmeg - ¼ teaspoon ground cloves - 2 large eggs - ½ cup vegetable oil - ¾ cup pumpkin puree - ½ cup brewed chai tea, cooled - 2 teaspoons vanilla extract - 1 cup powdered sugar (for frosting) - 4 ounces cream cheese, softened (for frosting) - 2 tablespoons brewed chai tea (for frosting) - Ground cinnamon, for garnish These ingredients bring delightful flavors. The pumpkin adds moisture and a rich taste. Chai tea gives warm spice notes, while cinnamon and ginger create a cozy feel. The cream cheese frosting adds a tangy twist, balancing the sweetness perfectly. You need some tools to bake these cupcakes. Here’s a list of what you’ll need: - Muffin tin - Cupcake liners - Mixing bowls - Whisk - Spatula or wooden spoon - Electric mixer for frosting - Toothpick for testing doneness When choosing ingredients, always look for quality. Fresh spices have the best flavor. Use pure vanilla extract for a rich taste. Select pumpkin puree that is smooth and thick for the best texture. These small details make a big difference in your cupcakes. If you follow these tips, you'll create a delicious treat that everyone will love! First, start by preheating your oven to 350°F (175°C). This helps the cupcakes bake evenly. While the oven heats, line a standard muffin tin with cupcake liners. This keeps the cupcakes from sticking. Make sure you have enough liners for all twelve cupcakes. Now it’s time to mix the batter. In a large bowl, combine the following dry ingredients: - 1 ½ cups all-purpose flour - 1 cup granulated sugar - ½ cup light brown sugar, packed - 1 teaspoon baking powder - ½ teaspoon baking soda - ½ teaspoon salt - 1 teaspoon ground cinnamon - ½ teaspoon ground ginger - ¼ teaspoon ground nutmeg - ¼ teaspoon ground cloves Whisk these ingredients together until they blend well. This removes any lumps and ensures even flavor. In another bowl, whisk together the wet ingredients: - 2 large eggs - ½ cup vegetable oil - ¾ cup pumpkin puree - ½ cup brewed chai tea, cooled - 2 teaspoons vanilla extract Make sure this mixture is smooth. Then, gently pour the wet mixture into the dry bowl. Stir carefully using a spatula or wooden spoon. Mix until just combined. Do not overmix, as this makes the cupcakes tough. Next, use a spoon or an ice cream scoop to fill each cupcake liner. Fill them about 2/3 full. This allows room for the cupcakes to rise nicely. Now, place the muffin tin in the oven. Bake for 18-20 minutes. To check for doneness, insert a toothpick in the center of a cupcake. If it comes out clean, they are ready. Once baked, let the cupcakes cool in the pan for about 5 minutes. This helps them firm up. After that, transfer them to a wire rack to cool completely. This step keeps the texture light and fluffy. For the full recipe, you can refer to the details given above. Enjoy the process of baking these delightful cupcakes! To make your cupcakes light and fluffy, follow these tips: - Use Room Temperature Ingredients: Eggs and pumpkin should be at room temp. This helps them mix well. - Don’t Overmix: When you combine wet and dry ingredients, mix gently. Overmixing can make cupcakes dense. - Fold, Don’t Stir: Use a spatula to fold the batter. This keeps air in, giving you a lighter cupcake. - Check Your Oven Temperature: An oven thermometer can help ensure it bakes evenly. Frosting cupcakes can be fun and creative. Here are some ways to do it: - Use a Piping Bag: Fill a piping bag and use different tips for designs. This adds a nice touch. - Create Swirls: Start in the center and swirl outwards. This makes a lovely pattern. - Add Extra Flavor: Mix spices into your frosting for a flavor boost. A pinch of cinnamon works great! - Garnish Wisely: A sprinkle of ground cinnamon on top looks nice and adds flavor. Pair these cupcakes with tasty drinks for a perfect treat. Here are some ideas: - Coffee or Tea: A warm cup of chai or coffee complements the flavors well. - Milk or Nut Milk: Serve with cold milk for a classic pairing. - Spiced Lattes: A pumpkin spice latte makes for a cozy addition. - Share with Friends: These cupcakes are great for gatherings or cozy evenings. Enjoy! {{image_4}} You can change the flavor of these cupcakes easily. For a sweeter touch, add more sugar. If you want a spicier kick, increase the cinnamon or add cardamom. You can also play with different types of tea. Try using matcha or Earl Grey for a unique twist. If you love chocolate, you can mix cocoa powder into the batter. This creates a rich, chocolatey flavor that pairs well with spices. If you need vegan cupcakes, swap the eggs for flaxseed meal. Mix one tablespoon of flaxseed with three tablespoons of water. Let it sit until it thickens, then use it in your recipe. For a gluten-free option, replace all-purpose flour with a gluten-free blend. Check the blend for a good rise. This will keep your cupcakes light and tasty. Garnishing makes your cupcakes pop! Consider adding whipped coconut cream on top for a fluffy look. You can also drizzle caramel or chocolate sauce for flair. To add a seasonal touch, place small candy pumpkins or fall leaves on each cupcake. Sprinkling edible glitter can also make them festive and fun. These ideas will impress your guests and make your cupcakes stand out. For the full recipe, check out the detailed steps and ingredients list! To keep your Vanilla Chai Pumpkin Spice Latte Cupcakes fresh, store them in an airtight container. This will keep them moist and tasty. You can place them at room temperature for up to three days. If you want to keep them longer, consider refrigerating them. Just remember to let them sit at room temperature before serving. This helps regain their soft texture. Freezing these cupcakes is a great way to save them for later. First, let the cupcakes cool completely. Then, wrap each cupcake tightly in plastic wrap. Place the wrapped cupcakes in a freezer bag or airtight container. They can stay in the freezer for up to three months. When you’re ready to enjoy them, take them out of the freezer. Leave them in the fridge overnight to thaw. If you want them warm, you can pop them in the microwave for a few seconds after they thaw. This keeps the flavor and texture just right. For the best taste, frost the cupcakes after thawing. This way, the frosting stays fresh and delicious. Check the [Full Recipe] for more tips on making these cupcakes truly delightful! Yes, you can make these cupcakes ahead of time. To keep them fresh, store them in an airtight container. If you frost them, wait until just before serving to add the frosting. This helps keep the frosting from getting too soft. You can make the cupcakes up to two days in advance. If you don’t have chai tea, you can use regular black tea. Add a mix of warm milk and spices like cinnamon, ginger, and cardamom to mimic chai flavor. You can also use pumpkin spice coffee for a fun twist. These cupcakes last about three days at room temperature. Keep them in a cool, dry place. You can store them in the fridge for up to a week. Just make sure they are in an airtight container to keep them moist. In this blog post, I shared how to make Vanilla Chai Pumpkin Spice Latte Cupcakes. We covered essential ingredients, key tools, and step-by-step instructions for baking. I included tips for perfect texture and beautiful frosting. I also suggested flavor variations and dietary options, plus storage tips to keep your cupcakes fresh. Remember, these cupcakes can impress your friends. Enjoy experimenting with flavors and have fun baking!](https://meltedrecipes.com/wp-content/uploads/2025/07/947cce49-48cd-4b82-99b4-2d9cfaca563e.webp)
Vanilla Chai Pumpkin Spice Latte Cupcakes Delight
Get ready to dive into the cozy flavors of fall with my Vanilla Chai Pumpkin Spice Latte Cupcakes! These delightful treats blend sweet vanilla, spicy
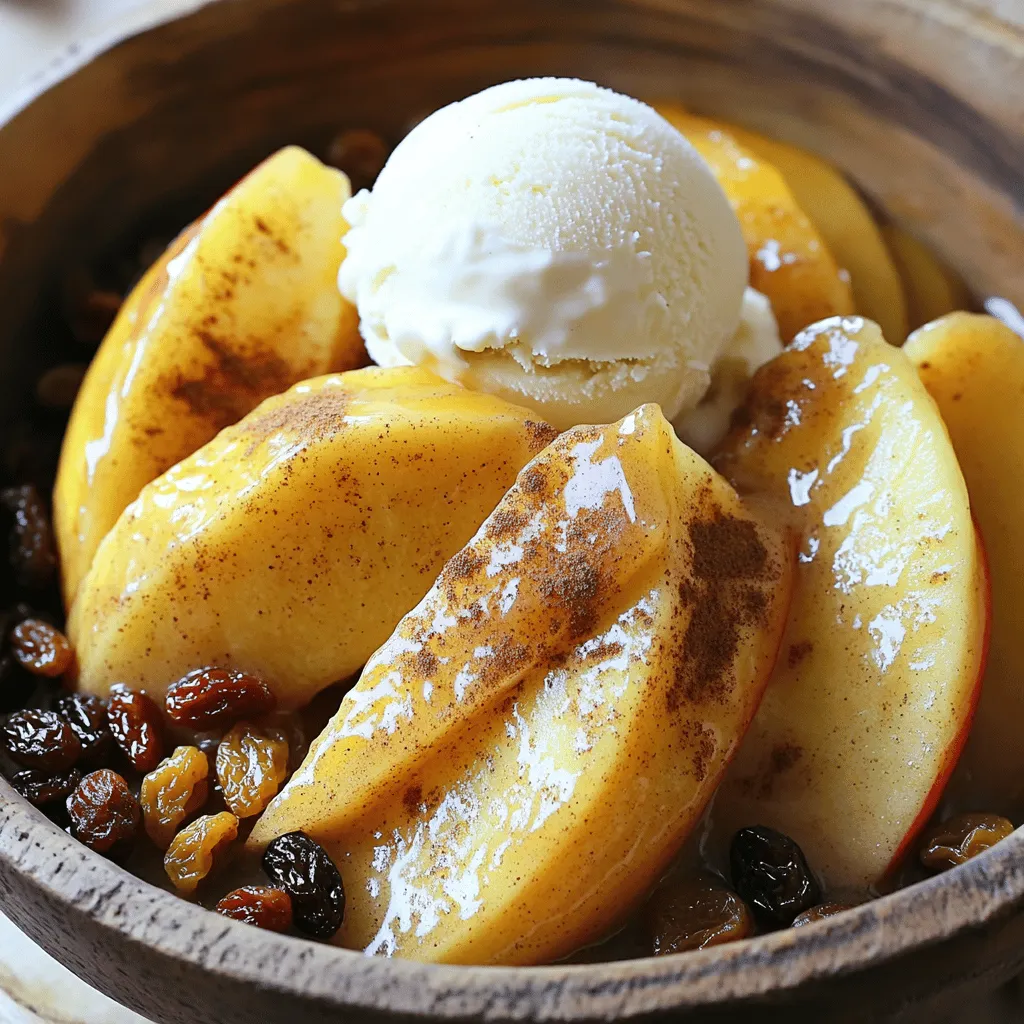
Instant Pot Cinnamon Apples Simple and Quick Recipe
Are you craving a quick and easy dessert that warms your soul? Let me introduce you to Instant Pot Cinnamon Apples! With just a handful
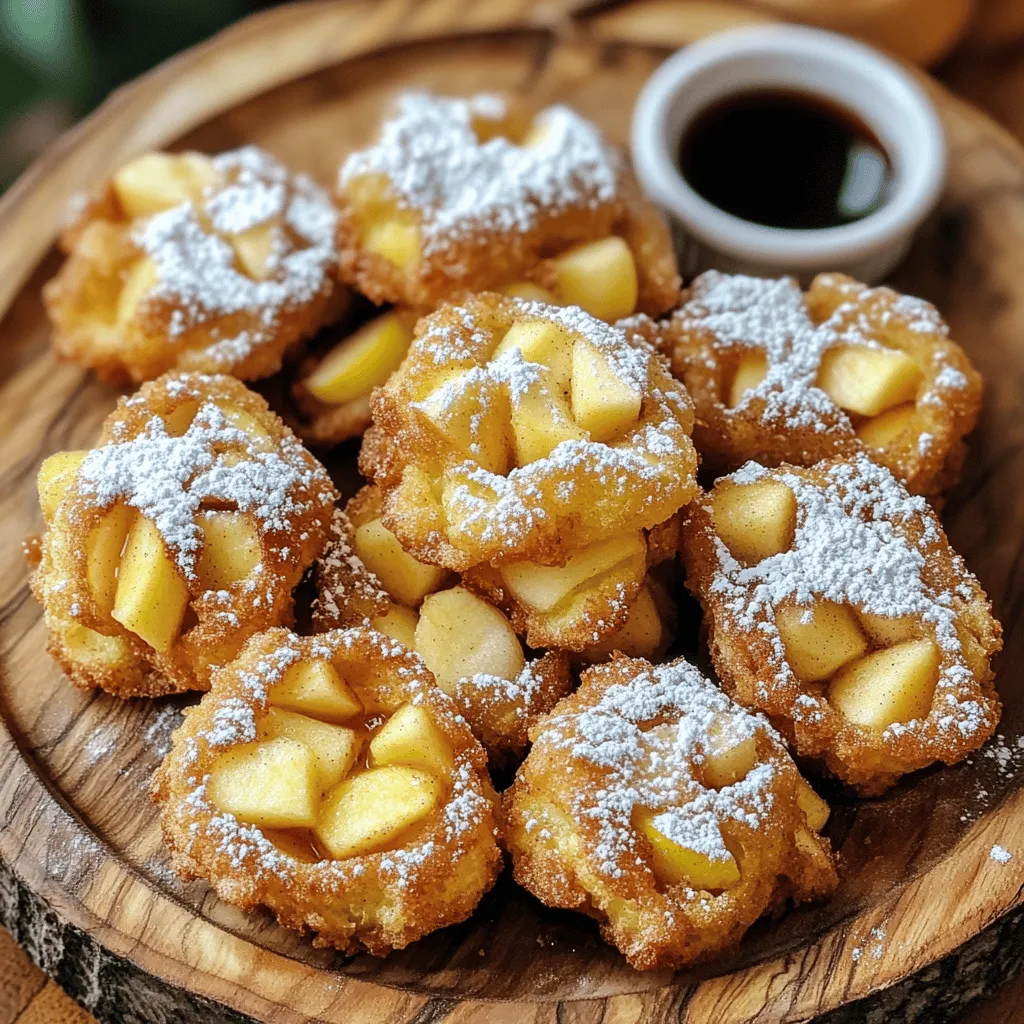
Gluten-Free Air Fryer Apple Fritters Simple Delight
Are you ready to enjoy a warm, sweet treat that’s gluten-free? In this post, I’ll show you how to make delightful air fryer apple fritters.
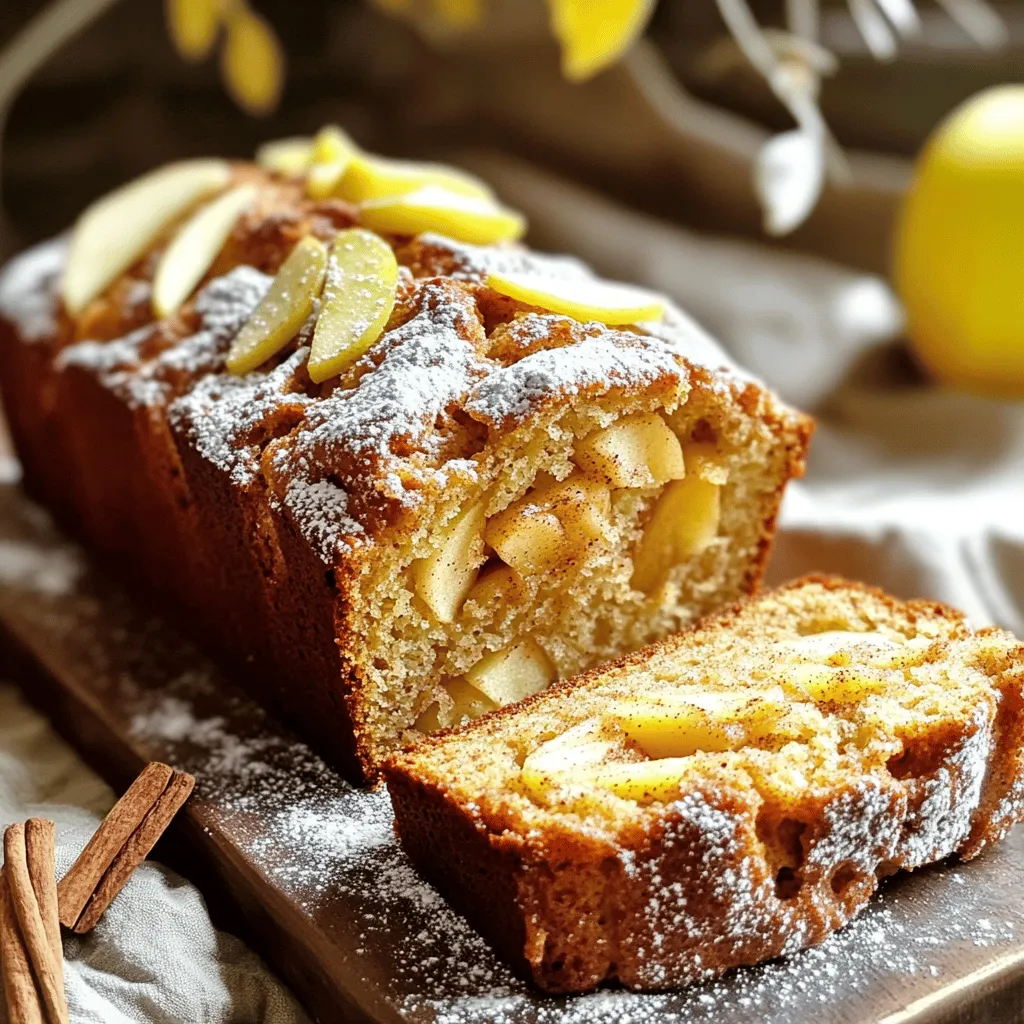
Cinnamon Applesauce Bread Simple and Delightful Recipe
Are you ready to fill your kitchen with the warm, inviting aroma of fresh-baked bread? This Cinnamon Applesauce Bread is simple, delightful, and perfect for
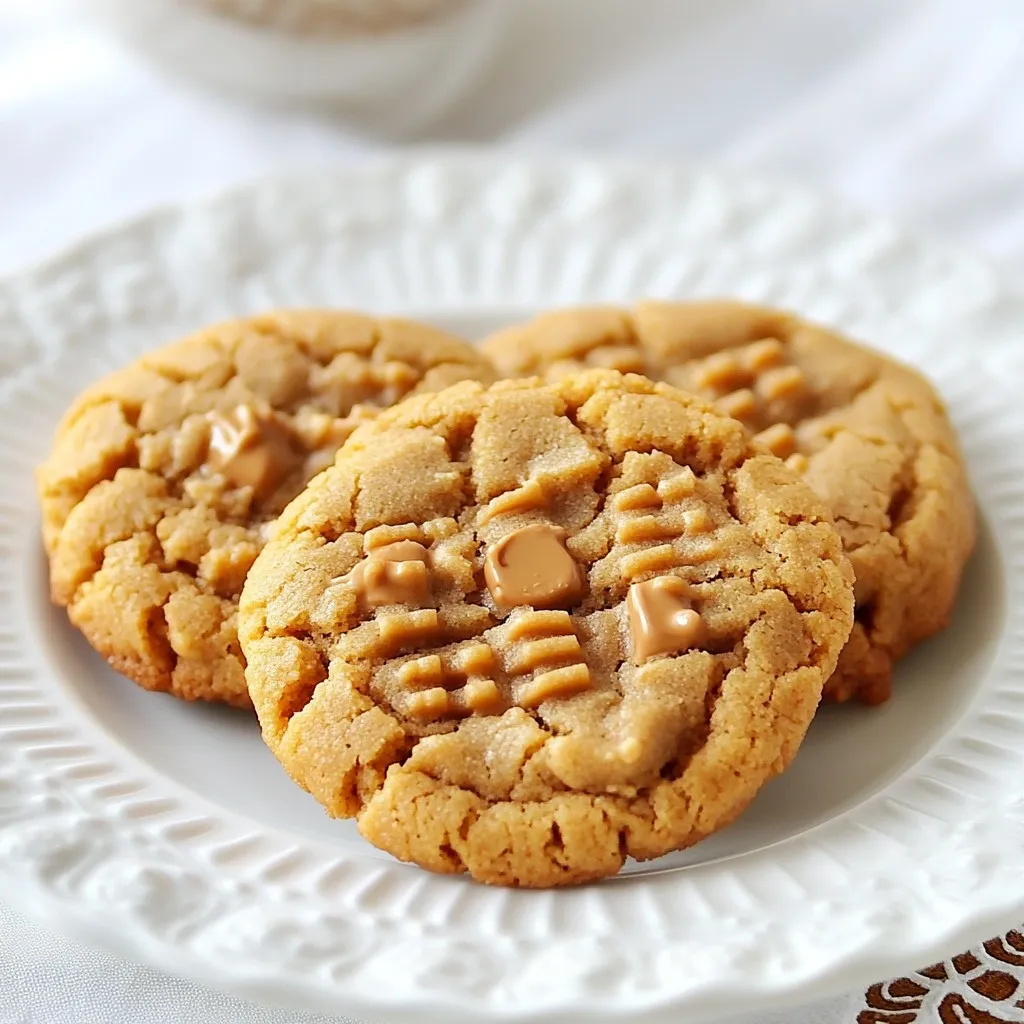
Gluten-Free Chewy Peanut Butter Cookies Delightful Treat
Are you craving a sweet treat that’s both chewy and gluten-free? Look no further! In this blog post, I’ll show you how to make delightful
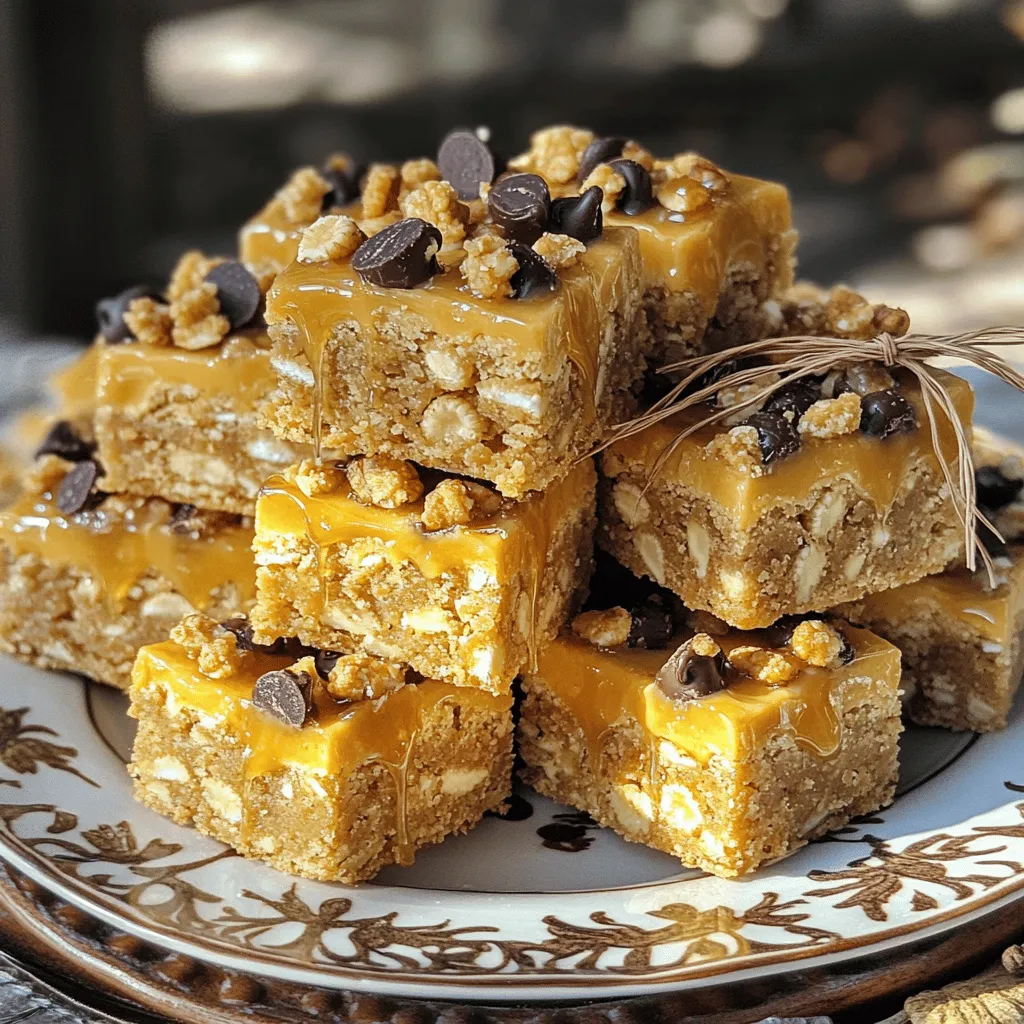
Easy No-Bake Cheerio and Peanut Butter Bars Recipe
Are you looking for a quick, tasty treat? These Easy No-Bake Cheerio and Peanut Butter Bars are your answer! With just a few simple ingredients
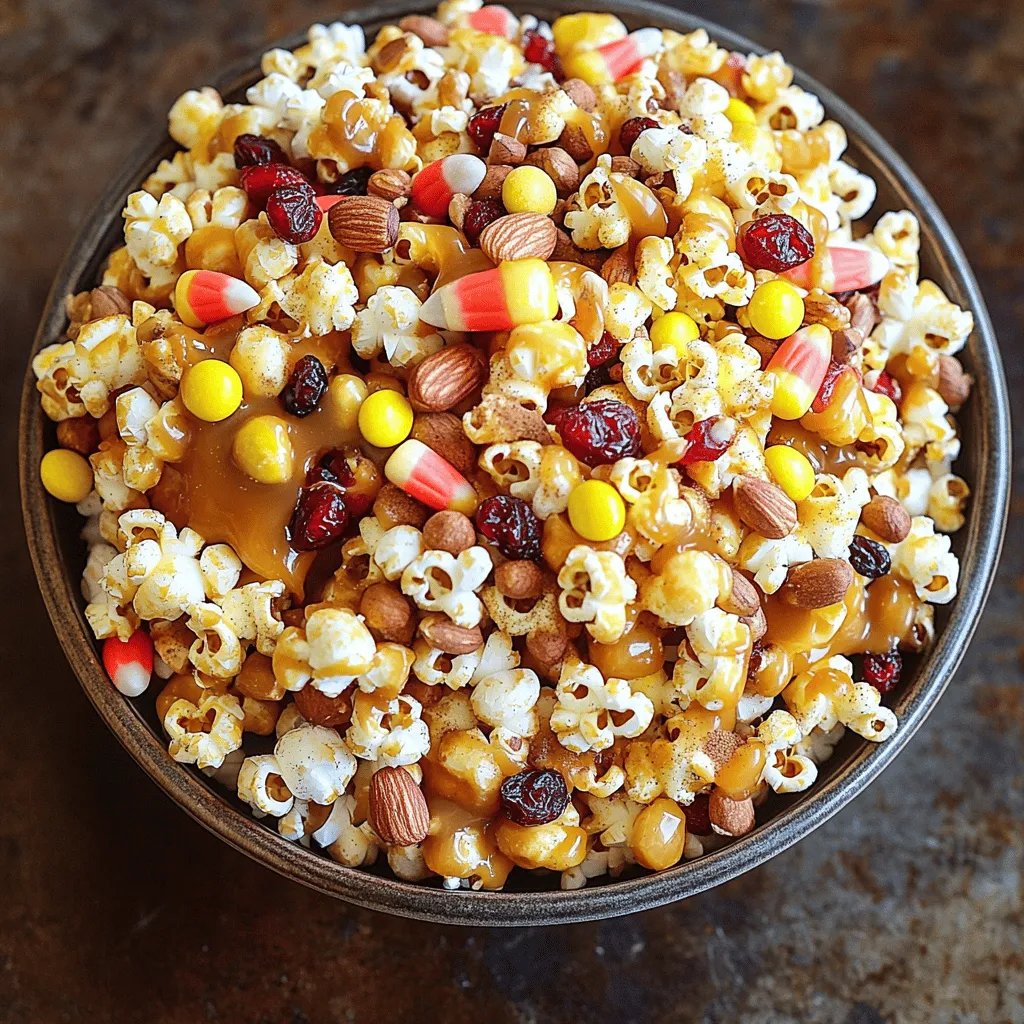
Fall Harvest Caramel Corn Mix Delightful Snack Ideas
Get ready to celebrate fall with a tasty treat! My Fall Harvest Caramel Corn Mix combines popcorn, nuts, and sweet spices for an irresistible snack.