Desserts
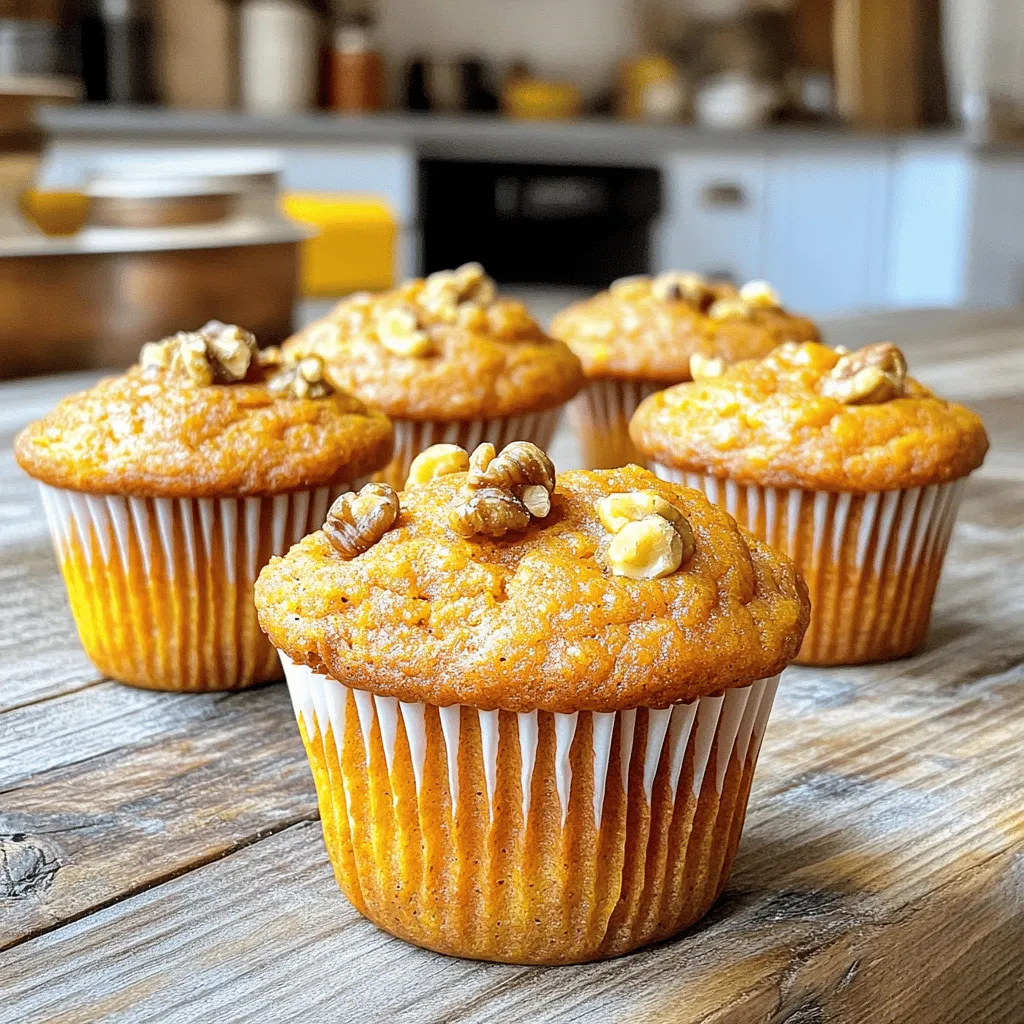
Sweet Potato Muffins Delightful and Healthy Recipe
Are you ready to enjoy a tasty treat that’s good for you? Sweet potato muffins are not just delicious; they’re packed with nutrients too! In
![- 2 large apples, peeled, cored, and diced - 1 cup all-purpose flour - 1 teaspoon baking powder - 1 teaspoon ground cinnamon - ¼ teaspoon ground nutmeg - ¼ teaspoon salt - ½ cup granulated sugar - 1 large egg - ½ cup milk - 2 tablespoons unsalted butter, melted - 1 teaspoon pure vanilla extract - 1 tablespoon fresh lemon juice - Optional: powdered sugar for dusting To make your fritters unique, feel free to add nuts or dried fruits. You can also try a glaze or drizzle to enhance flavor. For the best taste, I recommend using Honeycrisp or Granny Smith apples. Honeycrisp adds a nice sweetness, while Granny Smith gives a tangy kick. Both types hold their shape well during baking. Choosing the right apple affects the flavor and texture. Honeycrisp provides a juicy bite, while Granny Smith offers a crisp, tart taste. Mixing both can give your fritters a well-rounded flavor profile. If you need dairy-free options, you can use almond milk or oat milk instead of regular milk. For butter, try coconut oil or vegan butter. For a gluten-free version, substitute all-purpose flour with a 1:1 gluten-free baking mix. Make sure it includes xanthan gum for the right texture. These swaps allow everyone to enjoy warm baked apple fritters! For the full recipe, check [Full Recipe]. To make great apple fritters, start with the apples. You need two large apples. I like to use Honeycrisp or Granny Smith. Their sweetness and tartness work well. First, peel and core them, then dice into small pieces. Next, put the diced apples in a medium bowl. Squeeze fresh lemon juice over them. This keeps the apples from browning and adds a nice flavor. Add some sugar and cinnamon to the apples. Mix well and let them sit for about 10 minutes. This helps the flavors blend. When measuring your ingredients, keep things tidy. Use separate bowls for dry and wet items. This helps you stay organized. It makes mixing much easier later on. Now it's time to mix the batter. In a large bowl, whisk together the dry ingredients. Combine flour, baking powder, cinnamon, nutmeg, and salt. Make sure everything is well blended. In another bowl, take your egg and whisk it. Then add milk, melted butter, and vanilla extract. Mix until it's smooth. Pour the wet mix into the dry bowl. Use a spatula to gently combine them. Be careful here; you want to avoid overmixing. If you mix too much, the fritters can turn out dense. Just mix until you don’t see any dry flour. Now for the fun part: baking! Use a spoon or cookie scoop to drop batter onto a lined baking sheet. Space them about two inches apart. This allows room to spread as they bake. Preheat your oven to 375°F (190°C). Place the baking sheet in the oven and set a timer for 15 to 20 minutes. Keep an eye on them. The fritters are done when they’re golden brown. You can test them by inserting a toothpick. If it comes out clean, it’s time to take them out. Let them cool for a few minutes before serving. If you want, dust them with powdered sugar for a sweet finish. Enjoy your warm baked apple fritters! To make your fritters light and fluffy, focus on mixing. Combine the wet and dry mix gently. Overmixing can lead to dense fritters. Letting your fritters cool for a few minutes before serving is key. This small step helps them set and keeps them soft inside. Want to boost the flavor? Try adding a pinch of ginger or cloves. These spices can add depth to your fritters. You can also mix in chopped nuts or raisins for added texture. Pair your warm fritters with caramel or vanilla sauce for a sweet touch. A dollop of whipped cream can also make them special. Presentation matters! Serve your warm baked apple fritters on a nice plate. Dust them lightly with powdered sugar for a classic look. You can also add a scoop of ice cream beside them. For drinks, a hot cup of cider or a spiced tea pairs beautifully. These combinations can make your treat even more enjoyable. {{image_4}} You can easily make warm baked apple fritters even sweeter. Adding nuts like walnuts or pecans gives a nice crunch. Dried fruits like raisins or cranberries can add a chewy texture and extra sweetness. You might also try drizzling caramel or chocolate glaze on top. This will take the flavor up a notch. If you want a light finish, dust the fritters with powdered sugar. Each of these sweet options can transform your fritters into a special treat. If you crave something different, try savory options. You can swap out sugar for herbs like rosemary or thyme. Adding cheese, such as sharp cheddar, can create a tasty twist. These fritters work well for brunch or breakfast. Pair them with eggs or a salad for a full meal. You can also serve them with a tangy dipping sauce to bring out the flavors. Making mini fritters is a fun way to serve them at parties. Just use a smaller scoop to drop the batter. They bake quickly and are great for sharing. You can also try air frying the fritters. This method gives you a crispy texture without using much oil. Experimenting with size and cooking methods keeps things exciting and fun. For the full recipe, check out the details above. To keep your leftover fritters fresh, place them in the fridge. Use an airtight container. This helps to lock in moisture and flavor. If you don’t have a container, wrap them tightly in plastic wrap. Let them cool completely before storing. This avoids steam buildup and keeps them crispy. When reheating, you want your fritters to stay crispy. The oven is best for this. Preheat it to 350°F (175°C). Place the fritters on a baking sheet. Heat for about 10 minutes or until warm. If you use a microwave, they might get soggy. If you must use it, heat on low for about 30 seconds. You can freeze fritters for later use. First, let them cool completely. Then, arrange them on a baking sheet without touching. Freeze for 1-2 hours. Once frozen, transfer them to a zip-top bag. Remove as much air as possible to prevent freezer burn. They can last up to three months in the freezer. To thaw, leave them in the fridge overnight before reheating. Yes, you can make these fritters ahead of time. Here are some best practices for meal prep and storage: - Bake and Cool: After baking, let the fritters cool completely. - Store in Airtight Containers: Place them in an airtight container to keep them fresh. - Refrigerate: Store in the fridge for up to three days. - Reheat Before Serving: Warm them in the oven for a few minutes before enjoying. These fritters are great on their own, but you can enhance your experience. Here are some popular accompaniments and dips: - Caramel Sauce: A sweet dip that pairs well with apple flavors. - Vanilla Ice Cream: The creaminess balances the warm fritters. - Maple Syrup: A classic choice that adds a rich flavor. - Whipped Cream: Light and fluffy, it complements the fritters nicely. Customizing the fritters for dietary needs is easy. Consider these alternatives for allergies or lifestyle choices: - Dairy-Free: Use almond milk or oat milk instead of whole milk. Substitute vegan butter for regular butter. - Gluten-Free: Replace all-purpose flour with a gluten-free blend. Make sure the baking powder is gluten-free as well. - Sugar Alternatives: Use coconut sugar or a sugar substitute for a healthier option. Even baking is key for perfect fritters. Here are tips for oven placement and monitoring baking time: - Center the Rack: Place the baking sheet in the center of the oven. This allows heat to circulate evenly. - Leave Space: Make sure to leave enough space between fritters for air flow. - Check for Doneness: Start checking at 15 minutes. The fritters should be golden brown and firm to the touch. - Rotate the Pan: Halfway through baking, rotate the pan for uniform browning. For more details on making these delicious treats, check the Full Recipe. Warm baked apple fritters are a treat that blends sweet apples with soft, fluffy dough. With the right ingredients, you can customize them to your liking. We covered ideal apples, how to prep, and baking tips for success. Remember to let them cool for the best texture. Whether you enjoy sweet or savory, these fritters can adapt. Store leftovers properly and easily reheat them. Now, get creative in your kitchen, and enjoy warm apple fritters!](https://meltedrecipes.com/wp-content/uploads/2025/07/e88f3f7b-5b1c-4d18-9505-627c88edb040.webp)
Warm Baked Apple Fritters Comforting Treat Recipe
There’s nothing quite like the smell of Warm Baked Apple Fritters filling your kitchen. This cozy treat brings comfort and joy, making it perfect for
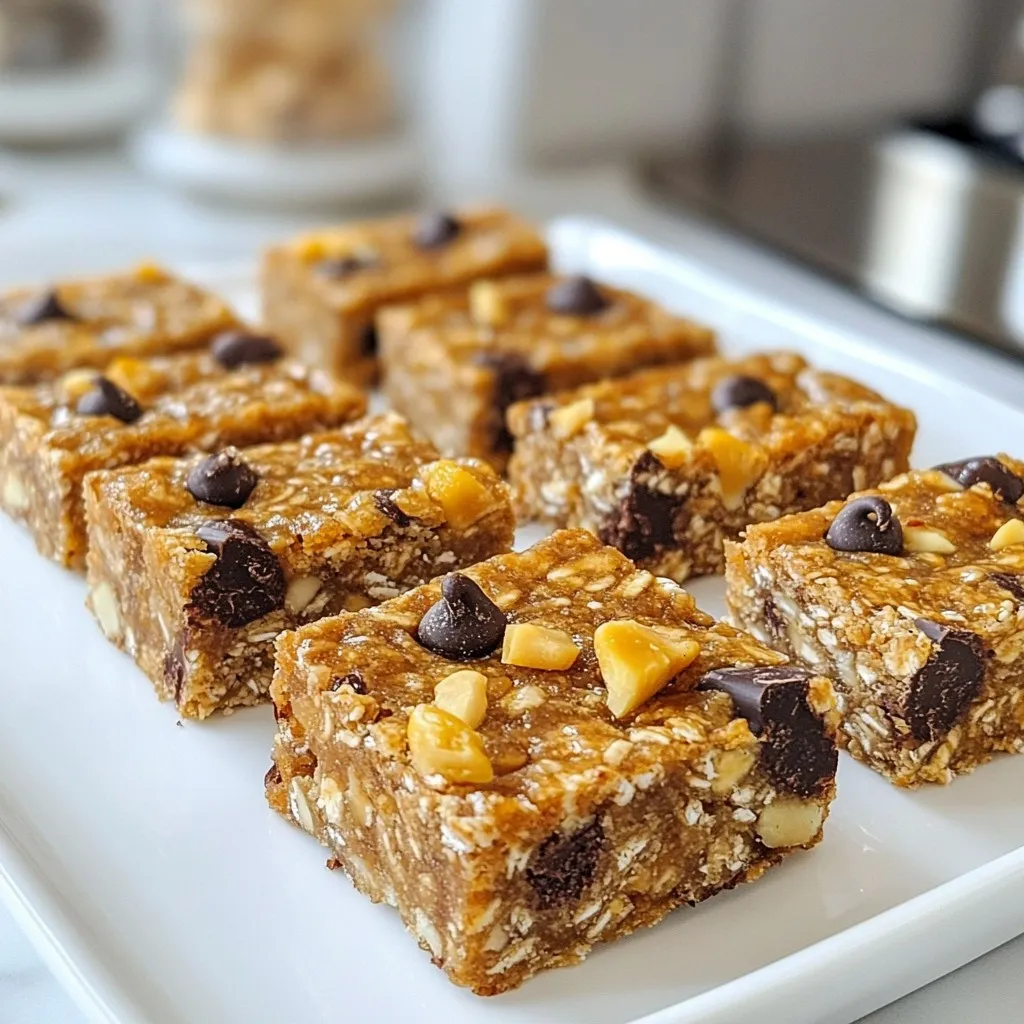
Banana Oatmeal Energy Bars Simple and Healthy Snack
Looking for a quick, healthy snack that packs a punch? You’re in the right place! Banana Oatmeal Energy Bars combine simple ingredients for a tasty
![- 2 cups all-purpose flour - 1/4 cup solid coconut oil - 1/4 cup pure maple syrup - 1/2 teaspoon salt - 3-4 tablespoons cold water - 1 cup fresh or frozen blueberries - 2 tablespoons cornstarch - 1 tablespoon lemon juice - 1 teaspoon vanilla extract - Powdered sugar (for dusting) - Black food coloring (optional, for ghost eyes and mouth) Each ingredient plays a special role in making these hand pies. The all-purpose flour forms the dough base. Coconut oil adds richness and makes the crust flaky. Maple syrup sweetens the dough without refined sugar. Salt enhances flavors and balances sweetness. Cold water helps bind the dough. Blueberries are the star of the filling. They bring natural sweetness and a burst of flavor. Cornstarch thickens the filling, keeping it from being too runny. Lemon juice adds brightness and a slight tang. Vanilla extract deepens the sweet notes. Finally, powdered sugar gives a spooky touch when dusted on top. If you need to replace an ingredient, here are some ideas. Use vegan butter instead of coconut oil for a different taste. For a gluten-free option, swap all-purpose flour with a gluten-free blend. Maple syrup can be replaced with agave nectar if needed. If you want a nut-free version, make sure your ingredients are certified nut-free. Check for allergens in store-bought items, especially if using powdered sugar. With these simple swaps, you can still enjoy these spooky treats! To start, gather your ingredients. You will need flour, salt, coconut oil, maple syrup, and water. In a big bowl, mix the flour and salt well. Add solid coconut oil. Use a pastry cutter or your hands to mix until it looks like coarse crumbs. Now, pour in the maple syrup. Add cold water, one tablespoon at a time. Mix until the dough forms a ball. Wrap it in plastic and chill in the fridge for 30 minutes. For the filling, combine blueberries, cornstarch, lemon juice, and vanilla extract in a small pot. Cook this mix over medium heat. Stir gently until the blueberries burst and it thickens. This should take about 5-7 minutes. Once done, remove it from the heat and let it cool down to room temperature. Next, lightly flour a clean surface. Roll out the dough until it’s about 1/8-inch thick. Use a round cutter, about 4 inches wide, to cut out circles. You need enough to make 8 hand pies. Place about one tablespoon of blueberry filling in the center of half the circles. Lightly brush the edges with cold water. Place the other circles on top and press gently to seal. Use a fork to crimp the edges so the filling does not leak out. Now, it’s baking time! Preheat your oven to 350°F (175°C). Line a baking sheet with parchment paper and place the hand pies on it. Make sure to leave space between each pie. Bake for 20-25 minutes until they turn golden brown and the edges are a bit crisp. Once baked, move them to a wire rack to cool completely. Dust them with powdered sugar before serving for a ghostly touch. For the complete recipe, check out the Full Recipe section. Enjoy your spooky treats! To seal your hand pies well, start with cold dough. When you roll it out, keep it chilled. After cutting your dough into circles, place a spoonful of filling in the center. Brush the edges with cold water to help them stick. Gently fold the dough over the filling and press down on the edges. Use a fork to crimp the edges tightly. This keeps the filling from leaking during baking. Adding a spooky touch to your ghost hand pies is easy. After sealing, use black food coloring to make ghostly faces. Dip a toothpick into the coloring and draw eyes and a mouth on each pie. This fun touch makes your pies look great for Halloween. You can also dust them with powdered sugar for a ghostly effect. If you want to change the sweetness, you can add more maple syrup. Just remember, too much can make the dough sticky. For a tart flavor, add more lemon juice to the filling. You could also spice it up with a pinch of cinnamon or nutmeg. Taste your filling before sealing the pies. You can adjust the flavor to your liking, making it just right for you. For the full recipe, check the [Full Recipe]. {{image_4}} You can switch up the filling in these hand pies. For a fall twist, try pumpkin. Mix canned pumpkin with spices like cinnamon and nutmeg. This will give a warm, cozy flavor. If you prefer something fruity, choose apples. Cook diced apples with sugar and cinnamon until soft. This makes a sweet and tangy filling. Both options are easy and fun. If you need a gluten-free version, replace the flour with a gluten-free blend. Look for one that works well for baking. Make sure it has xanthan gum for structure. You can also use almond flour or oat flour. Adjust the liquid in your dough as gluten-free flour may absorb more moisture. Make these hand pies pop with fun presentation ideas. Use a spooky plate with Halloween designs. Arrange the pies like a ghostly gathering. Consider adding fresh fruits or spooky decorations. You can dust them with powdered sugar for a ghostly look. You might even add edible glitter for some shine. Get creative and make them visually appealing! For the full recipe, check out the detailed instructions above! After enjoying your spooky treats, store any leftover hand pies in an airtight container. This keeps them fresh and tasty. Place a piece of parchment paper between layers to avoid sticking. Store them in the fridge for up to three days. Freezing your hand pies is a great way to save some for later. First, let them cool completely. Then, wrap each hand pie tightly in plastic wrap. Place them in a freezer-safe bag or container. They can stay frozen for up to three months. When you're ready to eat, just thaw them in the fridge overnight. Reheat your hand pies to enjoy their warm, flaky goodness. Preheat your oven to 350°F (175°C). Place the hand pies on a baking sheet and heat for about 10-15 minutes. This makes them crispy again. You can also use a microwave, but the texture may not be as nice. Enjoy your spooky delights! Don’t forget to check the full recipe for more tips! Yes, you can make these hand pies ahead of time. Prepare the dough and filling in advance. Store the dough in the fridge for up to 2 days. You can keep the filling in an airtight container for the same time. Just remember to assemble and bake them when you are ready to serve. If you want to skip coconut oil, you can use vegan butter. It gives a nice flavor and helps the dough stay soft. You can also try other oils like sunflower or canola oil, but the texture may change slightly. To make the filling thicker, simply add more cornstarch. Start with an extra teaspoon and stir it well as you cook the blueberries. The heat will help it thicken. If you want a fruitier taste, you can also mash some of the blueberries. Yes, you can use frozen blueberries! They work well in this recipe. Just keep in mind they may release more juice while cooking. This can make the filling a bit runnier. Use a little more cornstarch to help thicken the mixture if needed. In this post, we covered how to make tasty vegan blueberry ghost hand pies. I shared the ingredients you need, their roles, and some clever substitutions. You learned the step-by-step process, from dough to baking, plus tips for sealing and decorating. I also offered fun variations and storage advice. Remember, cooking is about experimenting and having fun. Enjoy making these spooky treats!](https://meltedrecipes.com/wp-content/uploads/2025/07/37782324-dd36-453e-a913-d3bc51efaec0.webp)
Vegan Blueberry Ghost Hand Pies Perfectly Spooky Treat
Get ready for a spooky treat that everyone will love! These Vegan Blueberry Ghost Hand Pies are not just cute; they’re delicious and easy to
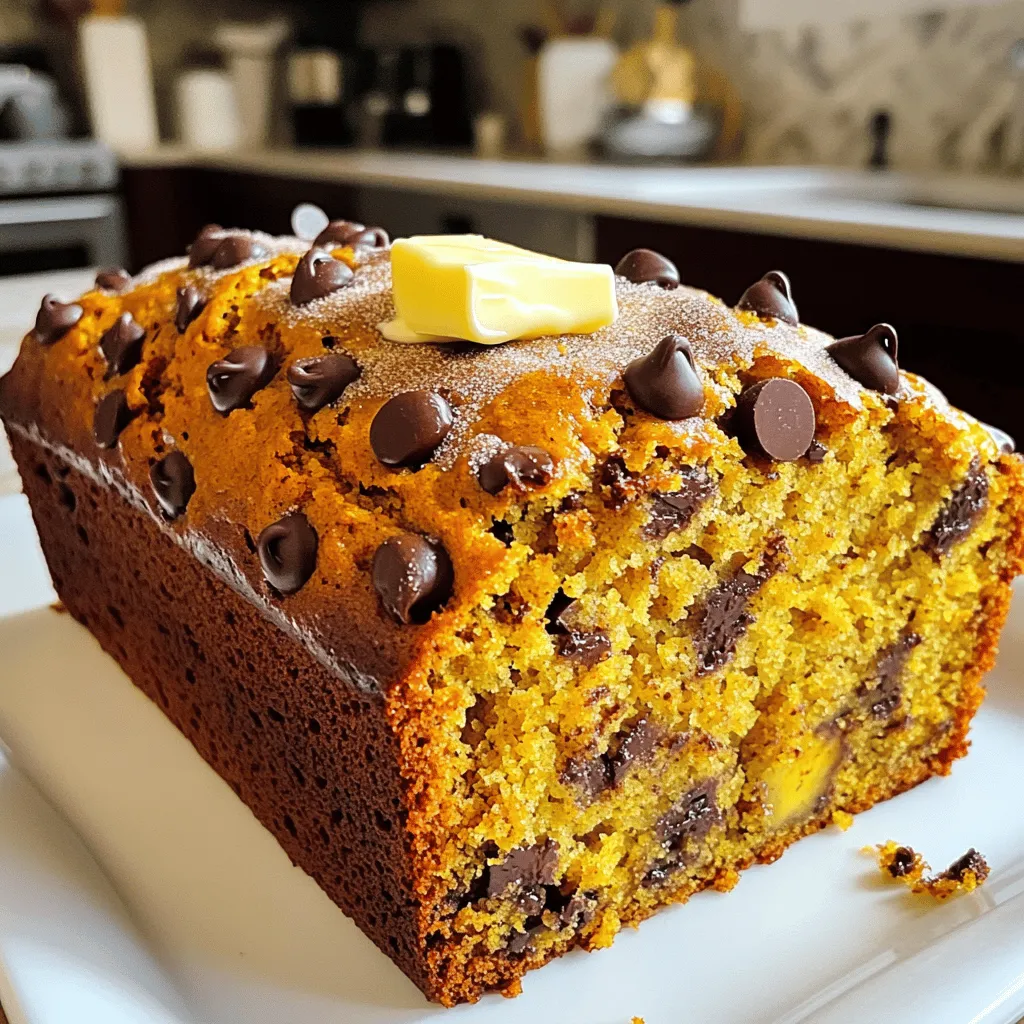
Pumpkin Chip Banana Bread Irresistible Flavor Fix
Do you love the warm, cozy flavors of fall? Then you’ll adore my Pumpkin Chip Banana Bread! This tasty treat blends ripe bananas with pumpkin

Bloomin’ Grilled Apples Flavorful and Fun Treat
Get ready to impress your family and friends with Bloomin’ Grilled Apples! This fun and flavorful treat takes simple ingredients and turns them into a
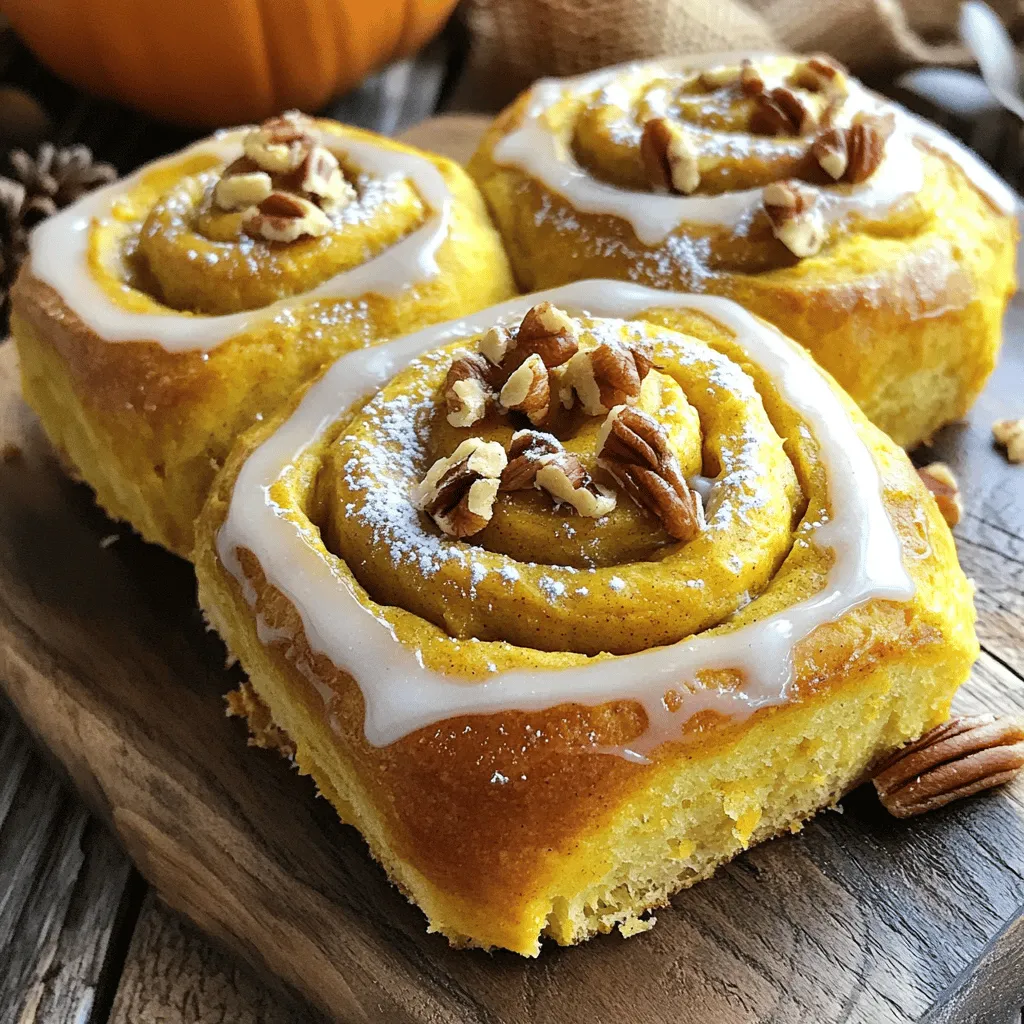
Pumpkin Rolls Delightful and Easy Baking Recipe
Are you ready to enjoy a warm, sweet treat this fall? My delightful pumpkin rolls recipe is easy to follow and perfect for any occasion.
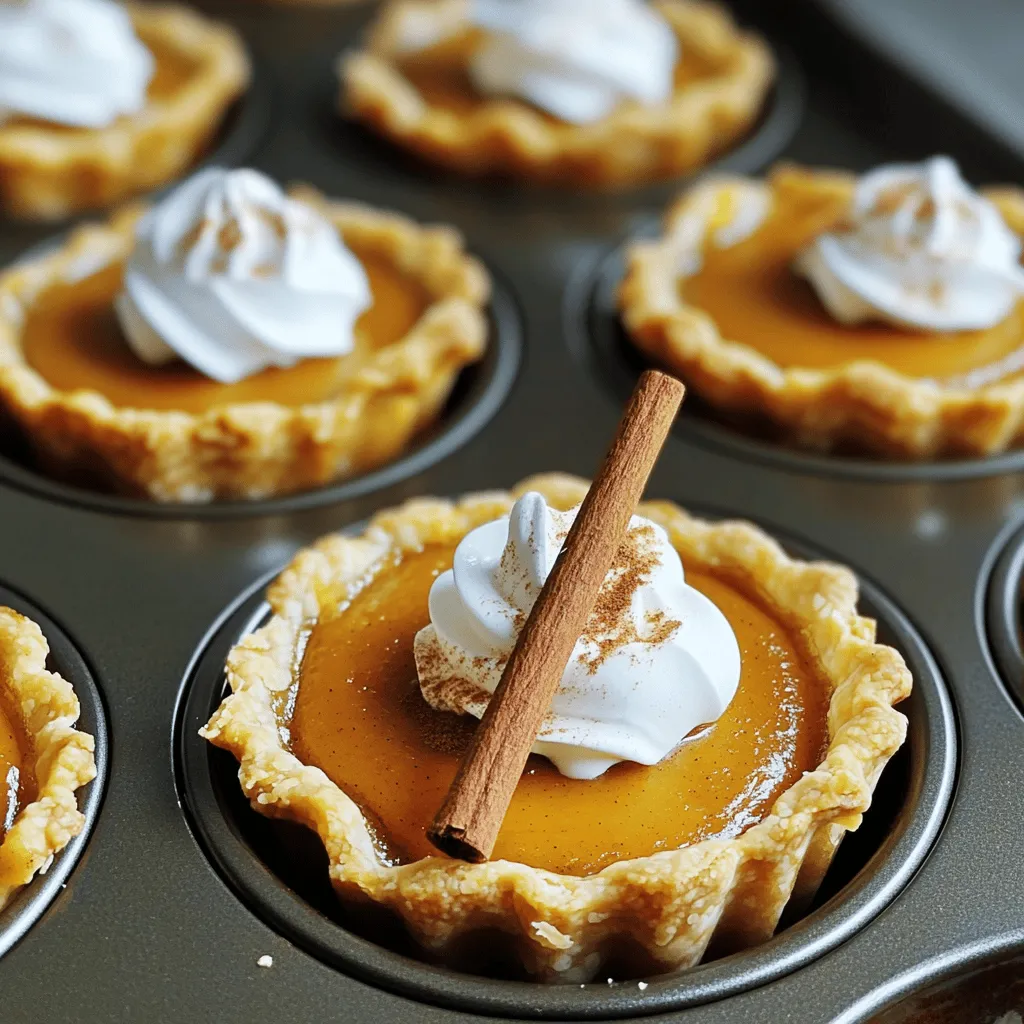
Mini Pumpkin Pie Cups Tasty and Simple Dessert Recipe
Looking for a sweet treat that’s easy to make? These Mini Pumpkin Pie Cups are perfect! You’ll enjoy a creamy pumpkin filling in a flaky
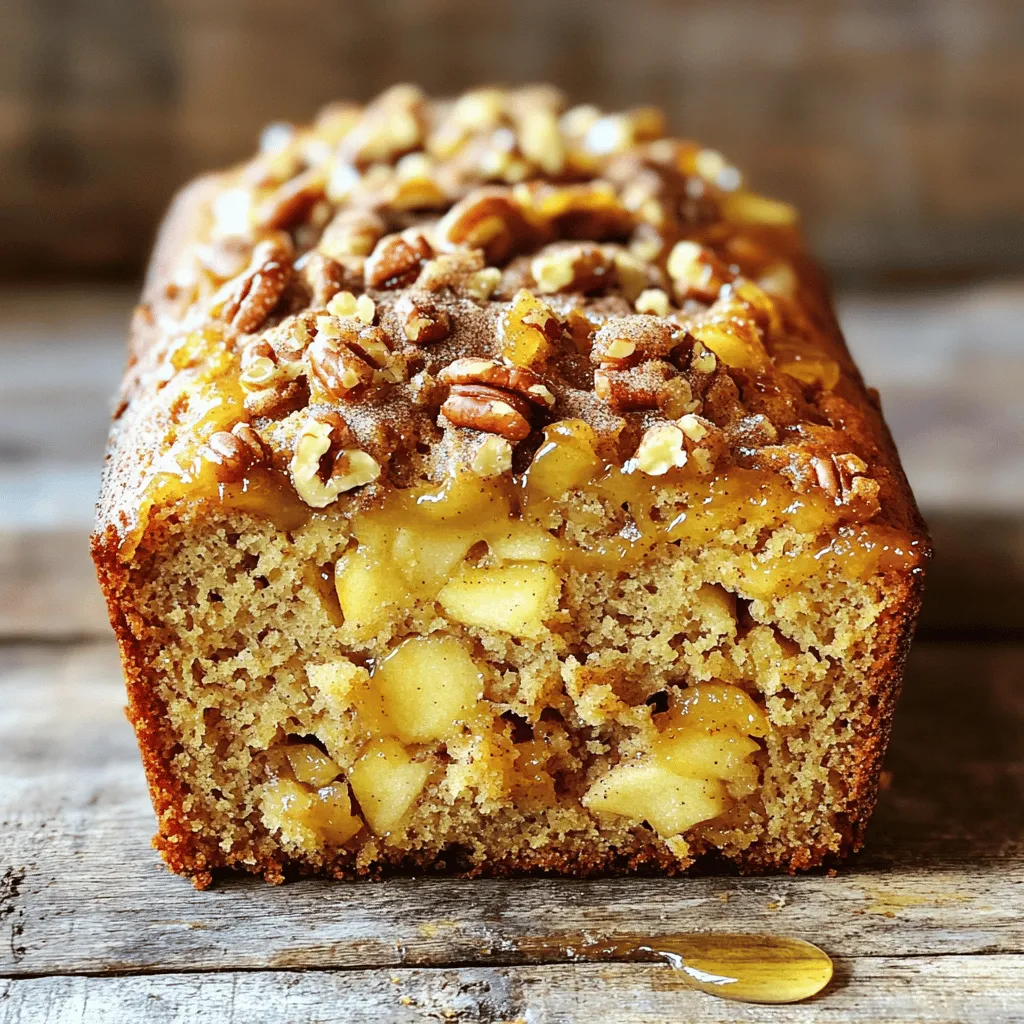
Apple Bread with Cinnamon Pecan Crunch Delightful Recipe
If you love warm, comforting flavors, you’re in for a treat! This Apple Bread with Cinnamon Pecan Crunch recipe combines sweet apples, warm spice, and
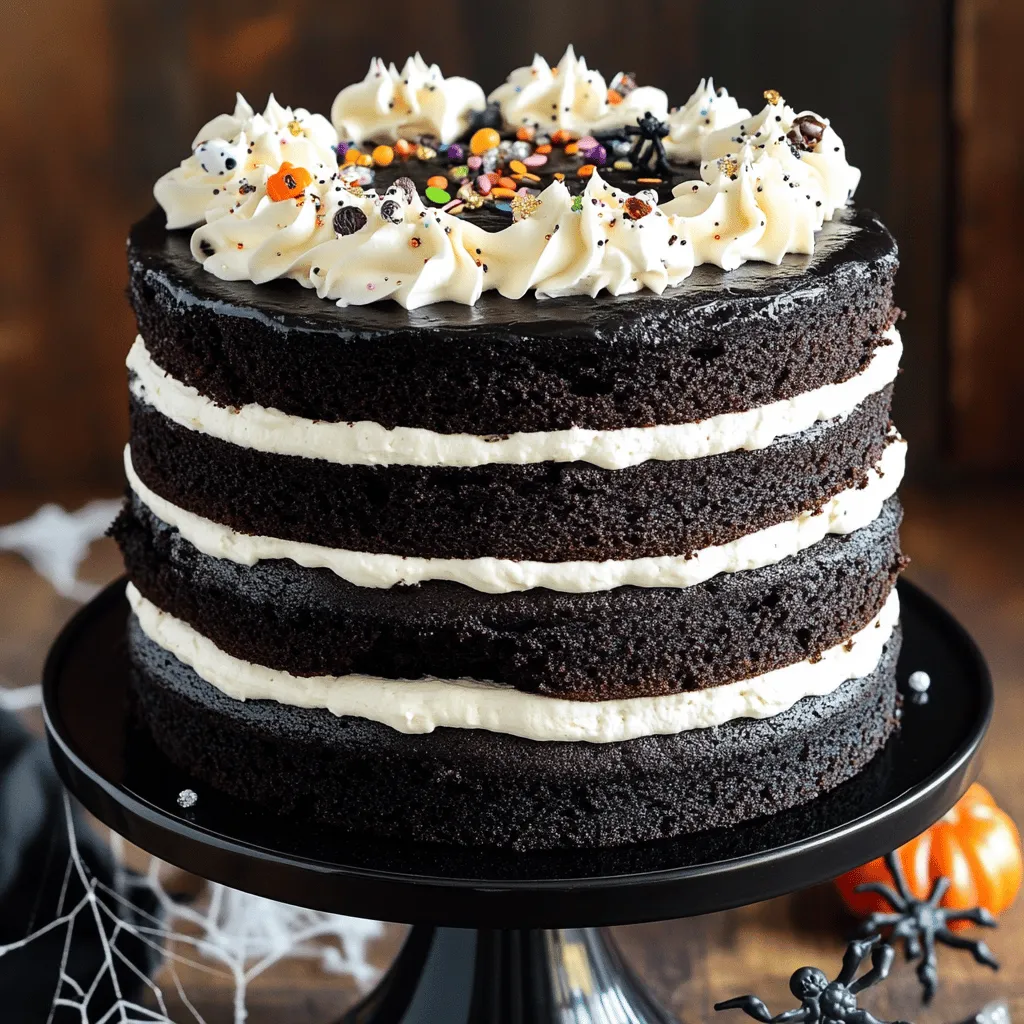
Black Velvet Halloween Cake Rich and Spooky Delight
Get ready to impress at your Halloween party with the spooktacular Black Velvet Halloween Cake! This rich and dark treat sets the perfect spooky mood