Desserts

Creating Pumpkin Cheesecake Snickerdoodles requires a mix of simple and special ingredients. Here’s what you need: Dry Ingredients: - 1 cup all-purpose flour - 1/2 teaspoon baking soda - 1/2 teaspoon baking powder - 1/2 teaspoon ground cinnamon - 1/4 teaspoon ground nutmeg - 1/4 teaspoon salt Wet Ingredients: - 1/2 cup unsalted butter, softened - 1/2 cup granulated sugar - 1/4 cup brown sugar, packed - 1 large egg - 1 teaspoon pure vanilla extract - 1/2 cup canned pumpkin puree Special Ingredients for Cheesecake Filling: - 1/4 cup cream cheese, softened - 2 tablespoons powdered sugar - 1 teaspoon pumpkin spice (or a mix of cinnamon, ginger, and nutmeg) - 1 tablespoon granulated sugar (for rolling) - 1 teaspoon ground cinnamon (for rolling) These ingredients blend to create a cookie that is both soft and creamy. The pumpkin puree adds moisture and flavor, while the spices give it a warm, cozy taste. The cream cheese filling makes each bite a delightful surprise. Check the Full Recipe for detailed instructions on how to bring these ingredients together. First, you need to preheat your oven to 350°F (175°C). This step is crucial for even baking. While the oven heats, line a baking sheet with parchment paper. This helps the cookies not to stick and makes cleanup easy. In a medium mixing bowl, combine the dry ingredients. Start with 1 cup of all-purpose flour. Add 1/2 teaspoon of baking soda, 1/2 teaspoon of baking powder, 1/2 teaspoon of ground cinnamon, 1/4 teaspoon of ground nutmeg, and 1/4 teaspoon of salt. Use a whisk to blend them well. Set this mixture aside for later. In a large mixing bowl, take 1/2 cup of softened unsalted butter. Add 1/2 cup of granulated sugar and 1/4 cup of brown sugar. Use a hand mixer to beat them together. Mix for about 3 to 4 minutes. The mixture should become light and fluffy, which helps create soft cookies. Next, add in 1 large egg, 1 teaspoon of pure vanilla extract, and 1/2 cup of canned pumpkin puree. Beat this mixture well until it is smooth and all the ingredients blend together. This step adds flavor and moisture to your cookies. Now, scoop about 1 tablespoon of the cookie dough into your hand. Lightly flatten it. Place a small dollop of the cream cheese filling in the center. Carefully fold the dough around the filling to form a smooth ball. Repeat this with all the dough and filling. Place the cookie dough balls on the prepared baking sheet. Make sure to leave space between them. Bake your cookies in the oven for 10 to 12 minutes. Look for edges that are set and tops that start to crack. This shows they are ready to come out. For the full recipe, you can refer to the instructions above. To prevent sticking, always use a well-floured surface. Sprinkle flour on your hands too. If the dough gets too sticky, chill it for about 30 minutes in the fridge. This helps firm it up. Never skip this step if you want neat cookies. Avoid overmixing your dough. Mix just until the dry ingredients blend with the wet. Overmixing can make your cookies tough. A light hand keeps your snickerdoodles soft and chewy. For a smooth consistency in the cheesecake filling, start with softened cream cheese. Cold cream cheese makes lumps that are hard to mix out. Beat the cream cheese first, then gradually add powdered sugar. This method helps create a creamy texture. Add pumpkin spice last for even distribution. Garnishing makes your cookies look even better. Stack the cooled snickerdoodles on a pretty plate. Lightly dust them with powdered sugar or cinnamon for a sweet touch. For an extra treat, serve them with whipped cream on the side. This adds a delightful flair and enhances the flavor! For the full recipe, check out the [Full Recipe]. {{image_4}} You can change the spices in these cookies for new flavors. Instead of using just cinnamon, try adding ginger for a kick. You might also swap nutmeg with allspice for a different taste. If you want to add some crunch, consider mixing in chopped nuts or chocolate chips. These small changes can make your pumpkin cheesecake snickerdoodles even more fun! If you need gluten-free snickerdoodles, use a gluten-free flour blend. Make sure the blend has a good rise. This will keep your cookies soft and tasty. For a vegan option, replace the egg with a flax egg. Just mix one tablespoon of ground flaxseed with three tablespoons of water, and let it sit for a bit. You can also use vegan cream cheese for the filling. These cookies go great with many drinks. Enjoy them with a warm cup of chai or a glass of cold milk. You could also serve them with coffee for a cozy treat. For a festive touch, try adding a scoop of vanilla ice cream on the side. This combo makes a lovely dessert for gatherings or a fun night in. For short-term storage, keep your pumpkin cheesecake snickerdoodles in an airtight container. Store them at room temperature for up to three days. If you want to enjoy them longer, freezing is a great option. To freeze, wrap each cookie tightly in plastic wrap. Place them in a freezer-safe bag or container. They’ll stay fresh for up to three months. These snickerdoodles stay fresh for about three days at room temperature. If you freeze them, they can last for three months. Just remember to thaw them before serving. They taste best when they are soft and warm. Enjoy your treats at their best! For the full recipe, check back to the section above. Yes, you can prepare the dough in advance. To do this, follow these steps: - Make the cookie dough as usual. - Form the dough into balls. - Place the balls on a lined baking sheet. - Freeze them for about 1-2 hours. - Once frozen, transfer the dough balls to a zip-top bag. - Store them in the freezer for up to three months. When you're ready to bake, just take them out and bake them straight from the freezer. Add a minute or two to the baking time. If you don't have pumpkin puree, here are some great substitutes: - Butternut squash puree - Sweet potato puree - Applesauce (for a sweeter cookie) These alternatives will keep your snickerdoodles moist and tasty. To check if your snickerdoodles are done, look for these signs: - Edges should be set and slightly golden. - Tops will show small cracks. - The cookies will look soft but not wet. Let them cool on the sheet for a few minutes before moving them. Yes! You can use other cheeses if you prefer. Here are some options: - Mascarpone cheese for a sweeter taste - Ricotta cheese for a lighter texture - Neufchâtel cheese as a lower-fat option These alternatives will change the flavor but still keep your filling creamy and delicious. For the full recipe, check out the detailed instructions. In this post, we covered the key ingredients for snickerdoodles and cheesecake filling. You learned how to prep, mix, and bake these tasty treats. We also discussed tips for the best dough and presentation, plus variations for dietary needs. Remember to store your cookies properly to keep them fresh. With this guide, you can create delicious snickerdoodles with ease. Now, it's time to try these recipes and enjoy every bite!
Pumpkin Cheesecake Snickerdoodles That Delight
If you love cookies and want to elevate your baking game, get ready for Pumpkin Cheesecake Snickerdoodles that delight! These sweet treats blend the rich
To create a delightful Apple Butter Cheesecake, gather these essential ingredients: - 1 ½ cups graham cracker crumbs - ½ cup unsalted butter, melted - 1 cup cream cheese, softened at room temperature - ½ cup granulated sugar - ½ cup apple butter (preferably homemade or artisanal) - 2 large eggs, at room temperature - 1 teaspoon pure vanilla extract - ½ teaspoon ground cinnamon - ¼ teaspoon ground nutmeg - 1 cup sour cream at room temperature - 2 tablespoons packed brown sugar - Caramel sauce, for drizzling (optional) - Fresh apple slices, for garnish You can choose homemade apple butter to enhance the flavor. Making your own is easy. Just cook down apples with sugar and spices until thick. This adds a personal touch to your cheesecake. For those with dietary restrictions, there are options. Use gluten-free graham crackers for the crust. You can swap cream cheese with a vegan alternative like cashew cream. This keeps the taste while being friendly for different diets. Check out the Full Recipe to see the complete steps. To start, I set my oven to 350°F (175°C). This step is key for a great bake. While the oven warms up, I gather my ingredients. The crust needs to be perfect. I mix 1 ½ cups of graham cracker crumbs with ½ cup of melted unsalted butter. I make sure all crumbs are coated well. Then, I press this mixture into a 9-inch springform pan. It must be firm and even. I bake the crust for 10 minutes. After that, I let it cool completely. Next, I prepare the cream cheese for the filling. I use 1 cup of cream cheese, softened at room temperature. This helps it blend smoothly. I beat it in a large bowl with an electric mixer. I mix it for about 2 to 3 minutes until creamy. Now, it’s time to make the filling. I add ½ cup of granulated sugar and ½ cup of apple butter to the cream cheese. I mix until it’s silky and well combined. Then, I add the eggs one at a time. I keep the mixer on low speed. Each egg needs to be mixed in well before adding the next. I also include 1 teaspoon of pure vanilla extract, ½ teaspoon of ground cinnamon, and ¼ teaspoon of ground nutmeg. This makes the flavor pop! After the eggs and spices are mixed in, I gently fold in 1 cup of sour cream. I use a spatula, being careful not to overmix. The filling should be smooth and creamy. I pour this mixture over the cooled crust. I spread it evenly with a spatula. I place the cheesecake in the oven and bake for 50 to 60 minutes. I check for doneness by gently shaking the pan. The center should be set but still slightly wobbly. When it looks just right, I turn off the oven. I leave the cheesecake inside for an hour to cool gradually. This step helps prevent cracks. After cooling in the oven, I take the cheesecake out. I let it cool at room temperature completely. Then, I cover it with plastic wrap and refrigerate it for at least 4 hours, or better yet, overnight. This chilling time helps the flavors meld. For the full recipe, check the section above. To make the best apple butter cheesecake, you want a smooth top. To avoid cracks, remember these tips: - Use room temperature ingredients: This helps your mixture blend well. Cold ingredients can cause lumps. - Don’t overmix: Overmixing adds air, which can lead to cracks. Mix just until combined. - Bake in a water bath: This helps keep a steady temperature. It also adds moisture to your cheesecake. For the right texture and flavor, follow these steps: - Preheat your oven: Always ensure your oven is at the right temperature. This avoids under or overcooking. - Check doneness carefully: The center should be set but still jiggle a little. It firms up as it cools. - Cool it slowly: Let the cheesecake cool in the oven. This prevents sudden temperature changes that cause cracks. Slicing your cheesecake can be tricky. Here’s how to do it right: - Use a hot knife: Dip your knife in hot water, then wipe it dry. This makes clean slices. - Chill before cutting: Cold cheesecake is easier to slice. Let it cool in the fridge for at least four hours. For a lovely presentation: - Garnish with fresh apple slices: This adds color and freshness. - Drizzle with caramel sauce: A little caramel adds sweetness and looks nice. Pair your cheesecake with drinks like: - Spiced cider: This warms up the flavors of the cheesecake. - Coffee: The bitterness balances the sweetness of the dessert. For the full recipe, check out [Full Recipe]. Enjoy making this holiday hit! {{image_4}} You can give your apple butter cheesecake a creative spin. Adding spices like ginger or cloves can enhance the flavor. A pinch of fresh ginger adds warmth and zest. Cloves bring a fragrant note that pairs well with apple. Another way to mix it up is by swirling in chocolate or caramel. This adds a rich, decadent touch. Simply drizzle melted chocolate or caramel into the cheesecake batter before baking. Use a knife to swirl it gently. This creates a beautiful marbled effect while adding depth to the flavor. If you need a gluten-free option, swap the graham cracker crust for a nut-based crust. Almond flour or crushed gluten-free cookies work well. Mix with melted butter and press into the pan as you would with the original crust. For a vegan version, replace the cream cheese with a plant-based alternative. Use silken tofu blended until smooth. Substitute eggs with flax eggs or applesauce. This keeps the cheesecake creamy without dairy. You can also use coconut cream for a rich texture. These changes make this dessert friendly for everyone. These variations keep the spirit of the dish while catering to different tastes and diets. Try them out to find your favorite twist! For the full recipe, check out the [Full Recipe]. To keep your apple butter cheesecake fresh, cover it well. Use plastic wrap or foil to seal it tightly. This helps prevent it from drying out and keeps it tasty. Place it in the fridge where it can stay good for about five days. If you want to save it for longer, freezing is a great option. For freezing, slice the cheesecake first. Wrap each slice in plastic wrap, then place them in a freezer-safe bag. This way, you can grab a piece anytime. Frozen cheesecake lasts about two to three months. Just make sure to label the bag with the date. If you want to revive your cheesecake after freezing, thaw it in the fridge overnight. This keeps the texture smooth. You can also let it sit at room temperature for about 30 minutes before serving. When serving, enjoy it chilled for a refreshing bite. If you prefer a softer texture, let it warm up slightly. This cheesecake shines at any temperature, so choose what you love best. For more delicious options, check out the Full Recipe. How long can I store the cheesecake? You can store your apple butter cheesecake in the fridge for about five days. Make sure to cover it well with plastic wrap. This keeps it fresh and tasty. If you want to keep it longer, you can freeze it for up to two months. Just wrap it tightly to prevent freezer burn. Can I make this cheesecake in advance for holidays? Yes, you can make this cheesecake a day or two ahead of time. This actually helps the flavors shine! Just make sure to chill it well in the fridge. When you’re ready to serve, add your toppings for a fresh look. What to do if the cheesecake cracks? If your cheesecake cracks, don’t worry. This can happen to anyone. You can cover the cracks with toppings like caramel or whipped cream. If you catch it early, you can also try baking it at a lower temperature next time to help prevent this. Why is my cheesecake not setting properly? If your cheesecake isn’t setting, it may need more time in the oven. The center should be a little wobbly when done. After baking, let it cool in the oven to avoid sudden temperature changes. This helps it set nicely. Apple Butter Cheesecake is a delightful treat that combines rich flavors and textures. We covered essential ingredients, tips for baking, and ways to avoid common issues. Consider flavor twists or dietary variations to make it your own. Remember to store your cheesecake properly and refresh it when needed. Enjoying every bite is key, and with these tips, you're set for success. Happy baking!
Irresistible Apple Butter Cheesecake is a holiday hit!
If you’re searching for the perfect dessert to impress this holiday season, look no further! My Irresistible Apple Butter Cheesecake features rich flavors and a
To make pumpkin spice monkey bread, you need the following items: - 2 cans of refrigerator biscuits (16 oz each) - 1 cup pumpkin puree - 1 cup packed brown sugar - 2 teaspoons pumpkin pie spice - 1/2 teaspoon ground cinnamon - 1/2 cup unsalted butter, melted - 1/4 cup granulated sugar - 1/2 cup chopped pecans or walnuts (optional) - Cream cheese icing (optional, for drizzling) Measuring is key for this recipe. You need: - 2 cans of refrigerator biscuits (16 oz each) - 1 cup of pumpkin puree - 1 cup of packed brown sugar - 2 teaspoons of pumpkin pie spice - 1/2 teaspoon of ground cinnamon - 1/2 cup of unsalted butter, melted - 1/4 cup of granulated sugar - 1/2 cup of chopped pecans or walnuts (optional) - Cream cheese icing for drizzling (optional) You can change this recipe to fit your taste. Here are some ideas: - Use different nuts like almonds or hazelnuts. - Swap the pumpkin puree for apple or sweet potato puree. - Add chocolate chips for a sweet twist. - Make it vegan by using dairy-free butter and no cream cheese icing. - Try cinnamon sugar instead of the pumpkin spice. These options let you customize your pumpkin spice monkey bread to your liking! Check the Full Recipe for steps on how to put it all together. 1. Preheat and Prepare: Start by preheating your oven to 350°F (175°C). Lightly grease a bundt pan with cooking spray or butter. This helps the monkey bread come out easily after baking. 2. Mix Sugars and Spices: In a medium bowl, combine 1 cup of packed brown sugar, 2 teaspoons of pumpkin pie spice, and 1/2 teaspoon of ground cinnamon. Whisk them together until mixed well. Set this bowl aside. 3. Prepare the Biscuits: Open the cans of refrigerated biscuits. Using a sharp knife, cut each biscuit into quarters. This creates bite-sized pieces that will soak up all the flavors. 4. Coat the Biscuits: In another bowl, toss the biscuit quarters with 1/4 cup of granulated sugar and half of your brown sugar-spice mix. Make sure each piece is coated evenly for the best taste. 5. Layer the Biscuit Pieces: Place half of the coated biscuit pieces at the bottom of your greased bundt pan. This forms a nice base. If you like, sprinkle half of the chopped pecans or walnuts over this first layer. 6. Add Pumpkin Layer: Spoon the pumpkin puree gently over the biscuit pieces. Spread it out lightly to keep the layer intact. 7. Complete the Layers: Add the rest of the biscuit pieces on top of the pumpkin layer. Then, sprinkle the remaining brown sugar-spice mix and any leftover nuts if you are using them. 8. Drizzle with Butter: Pour the melted butter evenly over the entire mixture in the bundt pan. This adds moisture and flavor. 9. Bake: Place the bundt pan in your preheated oven. Bake for 30 to 35 minutes. The monkey bread should turn golden brown. To check if it’s done, insert a toothpick into the center. It should come out clean. 10. Cool and Serve: After baking, let the monkey bread cool in the pan for about 10 minutes. Then, carefully flip the bundt pan onto a serving plate to release the bread. For a sweet touch, drizzle cream cheese icing over the warm monkey bread. Serve it hot for the best taste and soft, gooey texture. Enjoy this cozy fall treat! One big mistake is not greasing the bundt pan well. This can cause the bread to stick. Another issue is overbaking. Keep an eye on the time. Check for doneness early, as ovens vary. Also, don’t skip the sugar coating. This adds flavor and sweetness. For a soft and gooey texture, coat each biscuit piece well with the sugar mixture. This helps create that lovely caramelized crust. Layer the biscuit pieces loosely in the pan. This allows the heat to flow and bake them evenly. You want each piece to rise and stay soft. To boost flavor, try adding a pinch of nutmeg or ginger. These spices pair well with pumpkin. You can also mix in chocolate chips for a sweet twist. If you love nuts, use walnuts or pecans for crunch. Drizzling cream cheese icing on top adds a rich sweetness, too. For the full recipe, check out the details above. {{image_4}} You can switch up the spices in your pumpkin spice monkey bread. Try using apple pie spice for a fruity twist. You can also mix in a bit of nutmeg or allspice for a warm flavor. If you love ginger, add some ground ginger for a zesty kick. Play with the spices to find your favorite blend. Add fruits or nuts to your monkey bread for extra texture. Chopped apples or pears can bring fresh sweetness. You might choose dried cranberries or raisins for a chewy bite. For nuts, walnuts and pecans work great. They add crunch and richness. You can even sprinkle in some chocolate chips for a sweet surprise. You can make this recipe vegan by using dairy-free butter and non-dairy milk. For the biscuits, look for vegan brands or make your own with flour, baking powder, and plant-based milk. If you need it gluten-free, choose gluten-free biscuit dough or make your own with gluten-free flour. This way, everyone can enjoy pumpkin spice monkey bread. For the Full Recipe, check out the detailed steps to make this cozy fall treat! After enjoying your pumpkin spice monkey bread, store any leftovers in an airtight container. This keeps the bread fresh and moist. You can place it at room temperature for one day. For longer storage, move it to the fridge. It will stay good there for about three days. To enjoy your monkey bread warm again, preheat your oven to 350°F (175°C). Place the leftover pieces in a baking dish. Cover them with foil to prevent drying out. Heat for about 10 to 15 minutes. You can also microwave individual pieces for about 20 to 30 seconds. Just make sure not to overheat, or they might get tough. If you want to save some for later, freezing is a great option. Wrap the monkey bread tightly in plastic wrap, then place it in a freezer bag. It can last up to three months in the freezer. To eat, thaw it in the fridge overnight. Reheat it in the oven or microwave to bring back that cozy warmth. For the full recipe, check out the details above! Pumpkin spice monkey bread stays fresh for about 2 to 3 days when stored properly. To keep it tasty, wrap it tightly in plastic wrap or place it in an airtight container. You can also store it in the fridge for up to 5 days. Just remember, it tastes best when fresh! Yes, you can use homemade biscuits instead of refrigerated ones. Just make sure they are soft and fluffy. Homemade biscuits may add a nice touch of flavor and freshness. If you go this route, prepare your dough and cut it into pieces like the refrigerated biscuits. Pumpkin spice monkey bread pairs well with warm drinks. Serve it with coffee, tea, or hot cider for a cozy treat. You can also drizzle cream cheese icing on top for extra sweetness. Fresh fruits like apples or pears make a great side too. Enjoy this treat any time you want a warm, comforting dessert! In this post, we covered every part of making pumpkin spice monkey bread. We listed essential ingredients and measurements, along with optional changes. You learned the steps to prepare, bake, cool, and serve your dish. We highlighted common mistakes and shared tips for a great texture and flavor. You also saw fun variations and how to store leftovers. I hope these insights help you create a delicious treat. Enjoy your baking journey!
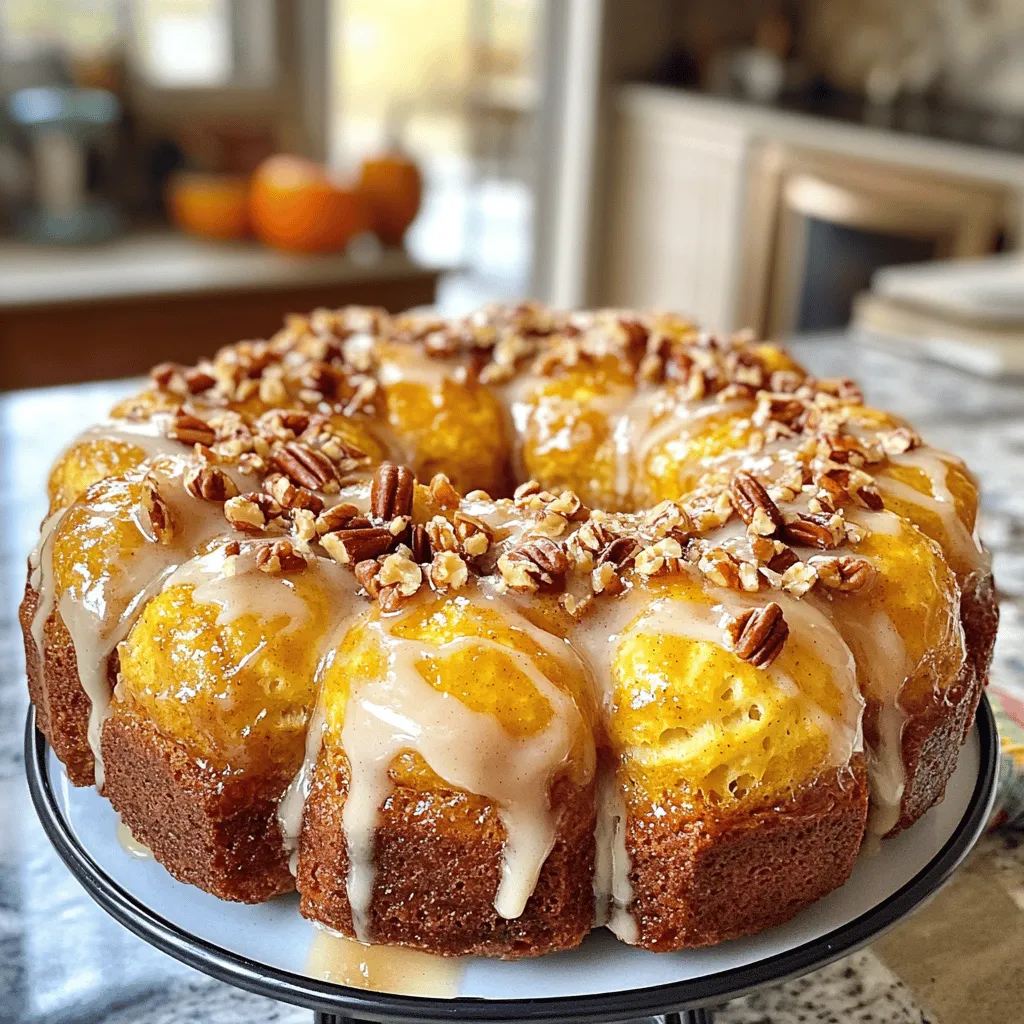
Pumpkin Spice Monkey Bread Recipe Cozy Fall Treat
Fall is here, and it’s time for the warm flavor of pumpkin spice! This Pumpkin Spice Monkey Bread Recipe is your new go-to cozy treat.
To make the perfect Iced Pumpkin Cream Chai Tea, gather your ingredients first. This drink combines the warm flavors of chai with the rich taste of pumpkin. Here's what you'll need: - 2 chai tea bags - 1 cup pumpkin puree - 1 cup milk (dairy or non-dairy) - 1/4 cup maple syrup - 1 teaspoon vanilla extract - 1/2 teaspoon pumpkin spice blend - Ice cubes - Whipped cream - Optional: Cinnamon stick, nutmeg, or pumpkin seeds for garnish Each ingredient plays a special role in bringing this drink to life. The chai tea bags provide a comforting spice, while pumpkin puree adds creaminess and flavor. Milk helps bind everything together, and maple syrup gives it a sweet touch. The vanilla extract enhances all these lovely flavors, making each sip enjoyable. Don't forget the pumpkin spice blend! It captures the essence of fall. Lastly, ice cubes keep your drink chilled, and whipped cream adds that luscious finish. You can customize your drink with optional garnishes like a cinnamon stick or a sprinkle of nutmeg for added flair. For the complete directions on how to mix these tasty ingredients, check out the Full Recipe. To start, steep the chai tea bags in two cups of boiling water. I like to use a heatproof container for this step. Let the tea steep for about five minutes. This allows the flavors to blend well. After steeping, carefully remove the tea bags. Let the tea cool to room temperature. Once it's cool, put it in the fridge to chill for a while. Next, it's time to make the pumpkin cream. In a medium mixing bowl, combine the pumpkin puree, milk, maple syrup, vanilla extract, and pumpkin spice blend. I whisk these ingredients together until they’re smooth and well mixed. The texture is very important. You want it to be creamy but not too thick. This will make it easy to layer on top of the chai tea later. Now, let’s put it all together! Take two tall glasses and fill each with ice cubes, about halfway. Carefully pour the cooled chai tea over the ice in each glass. Fill them about halfway full. To create a beautiful layered effect, gently spoon the pumpkin cream mixture over the chai. This will let it float on top. For a lovely touch, finish each drink with a generous dollop of whipped cream. If you want, sprinkle a pinch of cinnamon on top to enhance the flavor and look. For an extra fun touch, add a cinnamon stick to each glass. This makes it easy to stir the drink before sipping. Enjoy your delightful creation! If you want the full recipe, check out the details above. Adjust the sweetness of your Iced Pumpkin Cream Chai Tea with maple syrup. Start with 1/4 cup and taste. Add more if you want it sweeter. This syrup gives a warm flavor that pairs well with pumpkin. You can also customize the spices. Try adding more pumpkin spice or even a dash of nutmeg. If you love cinnamon, sprinkle some in the pumpkin cream. This will enhance the drink's flavor and aroma. Use tall, clear glasses for serving this drink. The layers of chai and pumpkin cream look stunning in clear glass. This adds to the fun of drinking it. For a special touch, decorate the whipped cream. You can sprinkle cinnamon or nutmeg on top. Consider adding pumpkin seeds for extra texture. This makes your drink look as good as it tastes. Pair your drink with light snacks or desserts. Cookies, scones, or pumpkin bread work well. They complement the chai flavors and make a perfect treat. This drink is great for fall gatherings. Serve it at brunch or during cozy evenings. It brings warmth and joy, making any moment feel special. {{image_4}} You can easily make Iced Pumpkin Cream Chai Tea dairy-free. I recommend using almond milk, oat milk, or coconut milk. Each option brings a unique taste to the drink. - Almond milk offers a nutty flavor. - Oat milk is creamy and adds a hint of sweetness. - Coconut milk gives a tropical vibe. These options work well and keep the drink light and refreshing. If you want to change the sweetness level, try using honey or agave syrup instead of maple syrup. Both options add a different flavor profile. - Honey has a floral note. - Agave syrup is more neutral and sweet. You can also reduce the amount of sweetener to suit your taste. For a fun twist, consider adding a splash of vanilla or caramel syrup for extra depth. To make your drink even more exciting, try adding different spices. You can mix in nutmeg, ginger, or even cardamom for a unique flavor. - Nutmeg brings warmth. - Ginger adds a zesty kick. - Cardamom introduces a sweet, spicy hint. You can also include seasonal fruits like apple slices or pear slices. They add a fresh touch and enhance the fall theme. If you want to explore the full recipe, check out the Iced Pumpkin Cream Chai Tea recipe. To keep your pumpkin cream fresh, store it in a sealed container. Place the container in the fridge. This method helps maintain its rich flavor and creamy texture. The pumpkin cream lasts up to five days in the fridge. Always check for any signs of spoilage before using it. Can you freeze the drink? Yes, you can freeze the pumpkin cream chai tea. Pour the drink into an airtight container, leaving some space at the top. The liquid will expand as it freezes. To thaw, move the container to the fridge overnight. Stir the drink well before serving. Spices and ingredients have a shelf life. Most ground spices last about two to three years if stored in a cool, dark place. Check for freshness before using. For pumpkin puree, keep it in the fridge after opening. It stays good for about a week. Maple syrup can last for a long time if stored in the fridge. Always keep it sealed tight to maintain freshness. To reduce sweetness, cut back on the maple syrup. Start by using only 2 tablespoons instead of 1/4 cup. You can always add more if needed. Another option is to replace maple syrup with a sugar-free sweetener. This keeps the flavor while lowering the sugar content. Yes, you can switch out chai tea for another tea. Earl Grey or black tea can work nicely. Each option brings its own flavor. Use the same steeping method for these teas. Adjust the steeping time based on the tea you choose. To serve a crowd, double or triple the recipe. Prepare the chai tea and pumpkin cream in advance. You can keep the chai chilled in a pitcher. Then, set up a serving station. Let guests assemble their drinks for a fun experience. Chai tea has spices like ginger and cinnamon. These can help digestion and boost immunity. Pumpkin is rich in vitamins A and C. It also has fiber, which is good for gut health. This drink is not just tasty but also has nutrients. If pumpkin puree is hard to find, check online. Many stores sell it via their websites. You can also make your own. Simply roast fresh pumpkin, scoop out the flesh, and blend it until smooth. This way, you get fresh flavor and control over the ingredients. For the full recipe, check the main article. This blog post covered how to make delicious Iced Pumpkin Cream Chai Tea. We explored key ingredients like chai tea bags and pumpkin puree, plus steps for brewing and mixing. I shared tips for perfecting the flavor and presentation. Remember, you can adjust sweetness and try different spices or milk options for variety. This drink pairs well with snacks and makes a great seasonal treat. Enjoy your homemade creation, and share it with friends!
Iced Pumpkin Cream Chai Tea Delightful Fall Drink
Fall is here, and what better way to celebrate than with a refreshing Iced Pumpkin Cream Chai Tea? This delightful drink combines spiced chai, creamy
To make sweet churro donut bites, gather these key ingredients: - 1 cup all-purpose flour - 1/4 cup granulated sugar (for dough) - 1 teaspoon baking powder - 1/4 teaspoon salt - 1/2 teaspoon ground cinnamon (plus more for coating) - 1/2 cup whole milk - 1 large egg - 2 tablespoons unsalted butter, melted - 1/2 cup granulated sugar (for coating) - Vegetable oil (for frying) These ingredients blend to create a soft dough that fries into delightful bites. You can enhance the flavor with a few optional ingredients: - Vanilla extract for a sweet aroma - Nutmeg for a warm spice note - Orange zest for a citrus twist Adding these can elevate your churro bites to new heights. You will need some basic kitchen tools: - Mixing bowls for combining ingredients - Whisk for blending dry and wet mixtures - Deep frying pan to fry the bites - Slotted spoon to remove churro bites from the oil - Paper towels for draining excess oil Having these tools ready will make your cooking experience smooth and enjoyable. For the full recipe, check the details above. To start, gather your ingredients. You will need flour, sugar, baking powder, salt, cinnamon, milk, egg, butter, and oil. First, mix the dry ingredients in a bowl. Combine 1 cup of flour, 1/4 cup sugar, baking powder, salt, and 1/2 teaspoon cinnamon. Use a whisk to blend them well. In a second bowl, combine 1/2 cup milk, 1 egg, and 2 tablespoons melted butter. Whisk until smooth. Now, pour the wet mix into the dry mix. Stir gently with a spatula. Remember, it’s okay if the dough has some lumps! Next, get your frying pan. Heat vegetable oil over medium heat. Aim for a temperature of 350°F (175°C). To check the oil, drop a tiny piece of dough in. If it floats and bubbles, it's ready! Using a small scoop or spoon, drop dough balls into the hot oil. Fry them in batches, leaving space in the pan. Cook each side for about 2-3 minutes. You want them golden brown. Timing is key to perfect churro bites. Keep an eye on the color while frying. If they brown too fast, your oil might be too hot. If they don’t brown, the oil may be too cool. Use a thermometer for accuracy if you have one. After frying, place churro bites on a paper towel-lined plate. This helps soak up extra oil. While they are still warm, roll them in a sugar and cinnamon mix for that classic churro taste. For the full recipe, check out the details above. When making sweet churro donut bites, avoid overmixing the dough. This can make the bites tough. Mix just until the ingredients combine. Also, ensure your oil is hot enough before frying. If it's too cool, your bites will absorb oil and become greasy. Use a thermometer to check the oil temperature. Fry in small batches to keep them crisp. The right dough consistency is key. It should be thick but not dry. If it's too runny, add a bit more flour. If it’s too dry, add a splash of milk. The dough should hold together but still be soft enough to scoop easily. This will help your churro bites puff up nicely while frying. To make your churro bites even better, serve them warm with a chocolate dipping sauce. You can also try dulce de leche for a rich flavor. For fun, arrange them in a cone or on a colorful platter. Sprinkle some extra cinnamon sugar on top for that wow factor. These simple touches make your dessert look and taste amazing! For the complete recipe, check out the Full Recipe section. {{image_4}} You can easily change up the flavor of your churro bites. Try adding 1/2 cup of chocolate chips to the dough for a rich twist. Or mix in some zest from an orange or lemon for a fresh kick. If you want a nutty flavor, add 1/4 cup of finely chopped nuts like pecans or almonds. You can also swap the whole milk for almond milk or oat milk. This keeps the churro bites tasty and creamy. If you want a different sweetener, use brown sugar instead of granulated sugar. It adds a deep flavor that pairs well with cinnamon. While cinnamon sugar is classic, you can try other coatings. For a sweet and salty mix, roll the churro bites in crushed pretzels or toffee bits. This gives a crunchy texture and a fun taste. If you love chocolate, dip the warm churro bites in melted chocolate. You can even sprinkle crushed nuts on top for extra crunch. For a spicier kick, use a mix of sugar and cayenne pepper. Just a pinch adds warmth without overpowering the sweetness. You could also roll them in powdered sugar for a light and fluffy finish. If you want a healthier option, baking is a great choice. Preheat your oven to 375°F (190°C). Line a baking sheet with parchment paper. Use a cookie scoop to drop the dough onto the sheet, leaving space between each bite. Bake for 10-12 minutes until they are golden brown. While baked churro bites won't be as crispy as fried ones, they will still be tasty. Brush them with melted butter right after baking, then roll them in cinnamon sugar. This gives a similar flavor and texture to the fried version, making it a smart swap. For the full recipe, check out the details above. Enjoy experimenting with these variations! To keep your churro donut bites fresh, store them in an airtight container. Make sure they cool completely before sealing. If left out, they can get soggy or hard. You can keep them at room temperature for up to two days. If you want to store them longer, refrigeration is a good option for about a week. However, this may change their texture slightly. When you're ready to enjoy your leftover churro bites, you can reheat them in a few ways. The best method is to use an oven. Preheat it to 350°F (175°C). Place the churro bites on a baking sheet and heat for about 5-7 minutes. This method keeps them crispy. You can also use a microwave, but they may turn soft. Heat them in short bursts of 10-15 seconds until warm. If you want to save churro bites for later, freezing is easy! First, let them cool completely. Then, place them in a single layer on a baking sheet. Freeze them for a couple of hours until firm. After that, transfer them to a freezer-safe bag or container. They can last for up to three months. When you're ready to eat, thaw them in the fridge overnight and reheat as mentioned. Enjoy your sweet churro donut bites anytime! For the full recipe, check out the earlier sections. To make your churro donut bites healthier, consider a few easy swaps. Use whole wheat flour instead of all-purpose flour. This adds fiber and nutrients. You can also cut down on sugar. Try using a sugar substitute or reduce the amount in the dough. Instead of frying, bake them at 375°F for about 10-12 minutes. This keeps the flavor and cuts down on fat. Dipping sauces bring extra joy to churro bites. A rich chocolate sauce is a classic choice. It adds a smooth, sweet contrast. You might also enjoy creamy dulce de leche, which gives a caramel flavor. For a fruity twist, try a berry sauce or warm vanilla custard. Each option brings its own flair. Yes, you can prepare churro bites ahead of time. Make the dough and refrigerate it for up to 24 hours. When you’re ready, just scoop and fry them. If you have leftovers, store them in an airtight container. Reheat them in the oven to keep them crispy. Enjoy them warm for the best taste! For the full recipe, check out the detailed steps and ingredients. In this blog post, we explored the key ingredients and step-by-step instructions to make churros. We highlighted essential tools, shared tips for perfect frying, and discussed common mistakes to avoid. You learned about flavor variations and storage tips to enjoy leftovers. To wrap up, these insights can help you create delicious churros that impress. With practice, you’ll become a churro-making expert, able to explore your own twists on this classic treat. Keep experimenting, and enjoy every bite!
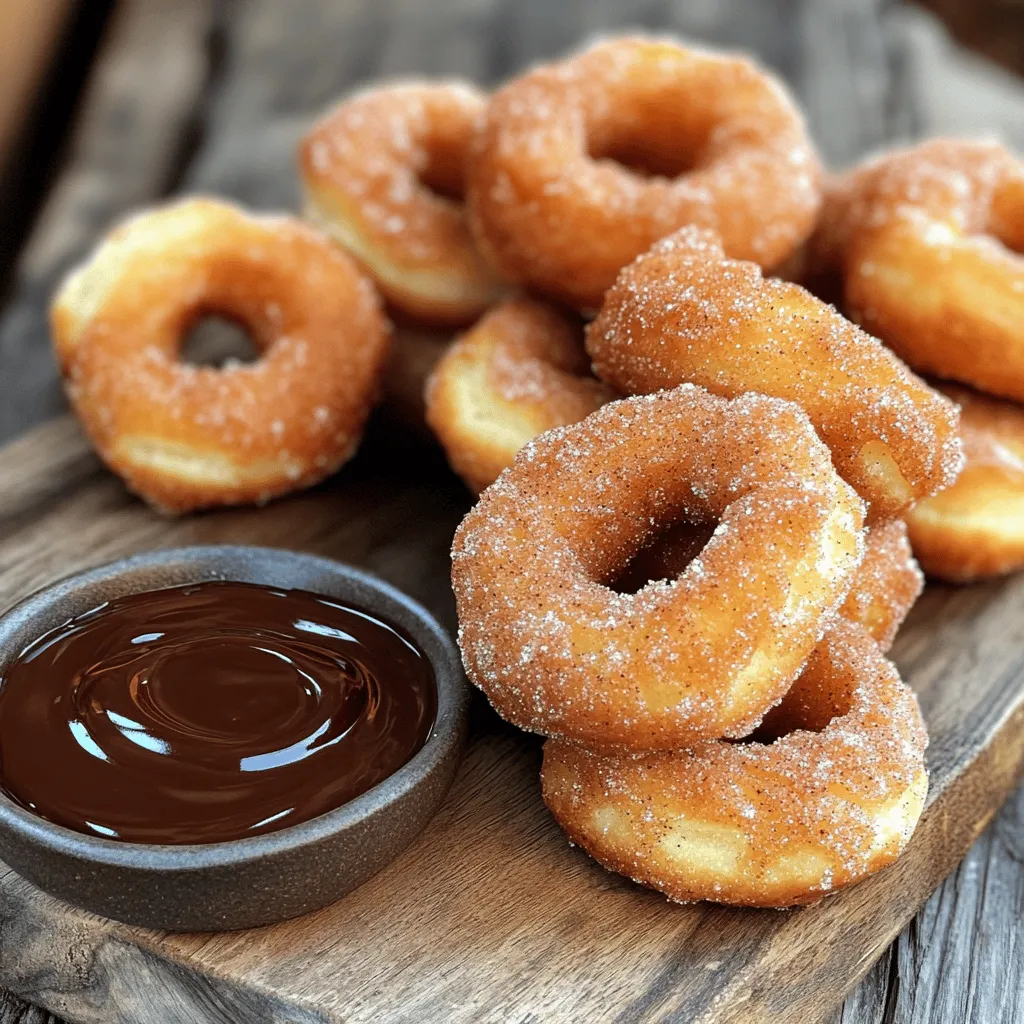
Sweet Churro Donut Bites Flavorful Delight to Savor
Are you ready to indulge in a sweet treat that combines two favorites? Sweet Churro Donut Bites offer a flavorful delight you won’t forget. With
To make the best blueberry muffins, you will need these key ingredients: - 2 cups all-purpose flour - 1 cup granulated sugar - 1 tablespoon baking powder - 1/2 teaspoon baking soda - 1/2 teaspoon salt - 1/2 cup unsalted butter, melted and slightly cooled - 2 large eggs, at room temperature - 1 teaspoon pure vanilla extract - 1 cup buttermilk (or 1 cup milk mixed with 1 tablespoon vinegar) - 2 cups fresh blueberries (or thawed, well-drained frozen blueberries) - Zest of 1 lemon (optional) For flour, I prefer using a brand like King Arthur Flour for its quality. If you can, choose organic blueberries for better taste and health benefits. If you have dietary needs, there are easy swaps you can make: - For a gluten-free option, use a gluten-free flour blend. - To make it dairy-free, try almond milk mixed with vinegar instead of buttermilk. You can also add fun flavors or textures: - Mix in chopped nuts like walnuts or pecans for crunch. - Try adding spices like cinnamon or nutmeg for warmth. - A little citrus zest, like orange or lime, can brighten the flavor. These changes keep the muffins exciting and cater to different tastes! 1. Preheat the oven to 375°F (190°C). This step helps the muffins rise nicely. 2. Prepare the muffin tin by lining it with paper liners. This keeps the muffins from sticking. 3. Sift the dry ingredients together in a bowl. Combine flour, sugar, baking powder, baking soda, and salt. This step ensures even mixing and adds air, which helps with fluffiness. 4. Mix the wet ingredients in another bowl. Whisk together melted butter, eggs, vanilla, and buttermilk. Make sure the butter cools slightly before adding it. This keeps the eggs from cooking. 5. Combine the wet and dry mixes. Pour the wet mixture into the dry mixture. Gently fold them together using a spatula. Stop mixing when you still see lumps. Overmixing leads to dense muffins. 6. Add the blueberries carefully. Mix them in softly to avoid mashing. Blueberries give flavor and moisture to your muffins. 7. Fill the muffin cups about two-thirds full. This gives the muffins space to rise without overflowing. 8. Bake the muffins for 18-20 minutes. Check doneness with a toothpick. It should come out clean, and the tops should be golden brown. 9. Cool the muffins for 5 minutes in the pan, then move them to a wire rack. Cooling lets them set and keeps them from getting soggy. - Measure ingredients correctly. Use dry measuring cups for flour and sugar. Spoon the flour into the cup and level it off with a knife. This prevents packed flour, which can make muffins heavy. - Mix gently to keep the batter light. Use a folding motion instead of stirring. This keeps air in the batter, making it fluffy. - Use room temperature eggs. They blend better and help the batter mix smoothly. - Don’t open the oven door while baking. This can cause the muffins to sink. Wait until the baking time is almost up before checking. For more details, check the Full Recipe. Enjoy your baking! To make the best blueberry muffins, avoid common mistakes. Overmixing the batter can lead to dense muffins. Mix just until you see no dry flour. Use a light hand when folding in the blueberries. This keeps them whole and juicy. For the perfect dome shape, fill each muffin cup about two-thirds full. This allows space for the muffins to rise. Another trick is to bake the muffins at a high temperature, then lower it. Start at 425°F (220°C) for the first 5 minutes, then reduce to 375°F (190°C). This helps achieve a nice dome. Warm blueberry muffins taste best. Serve them fresh out of the oven, dusted with powdered sugar. You can also add a dollop of whipped cream for a special treat. For a lovely display, arrange the muffins on a nice plate. Scatter fresh blueberries around them for color and charm. To keep your muffins fresh, store them in an airtight container. This keeps them soft and moist. You can also freeze them. Place cooled muffins in a freezer bag, removing as much air as possible. When you want one, just reheat it in the oven for a few minutes. This way, they taste like fresh-baked muffins again! {{image_4}} You can easily change the classic blueberry muffin recipe for fun. A popular twist is the lemon blueberry muffin. Just add the zest of one lemon to the batter. This adds a bright flavor that pairs well with blueberries. Another fun option is almond blueberry muffins. Add almond extract instead of vanilla. You can also mix in sliced almonds for extra crunch. For seasonal fun, try using different fruits. In summer, you can add ripe strawberries or peaches. In fall, consider using apples or cranberries. Each fruit offers its own unique taste and texture. If you want to make a healthier muffin, you can reduce the sugar. Try cutting the sugar by a third. The muffins will still taste great and be less sweet. You can also use whole wheat flour instead of all-purpose flour. This adds fiber and nutrients to your muffins. The flavor will be nutty, giving your muffins a nice depth. Adding superfoods is another great idea. You can mix in chia seeds or flaxseeds for a protein boost. These tiny seeds pack a lot of nutrition and help keep you full longer. For a richer texture, try Greek yogurt instead of buttermilk. It also adds protein and moisture, making your muffins fluffier. By exploring these variations, you make the best blueberry muffins even better. You can find the full recipe to get started! To keep your blueberry muffins fresh, store them in an airtight container. This will help seal in moisture and keep them soft. If you don’t have an airtight container, you can use a zip-top bag. Just squeeze out as much air as you can. Here are some tips for best practices: - Allow muffins to cool completely before storing. - Place parchment paper between layers to prevent sticking. - Store muffins at room temperature for up to three days. - For longer storage, keep them in the fridge. Freezing muffins is easy and great for long-term storage. Here’s a step-by-step guide: 1. Cool Completely: Make sure your muffins are completely cool before freezing. This helps prevent ice crystals. 2. Wrap Individually: Wrap each muffin in plastic wrap, then place them in a freezer bag. This extra layer protects against freezer burn. 3. Label and Date: Write the date on the bag. This helps you remember when to use them. To reheat muffins after freezing: - Preheat your oven to 350°F (175°C). - Unwrap the muffins and place them on a baking sheet. - Bake for about 10-15 minutes until warm. This method gives you a fresh, fluffy muffin every time. Enjoy your muffins any time you like with this easy storage method. For the full recipe, check out the Ultimate Blueberry Muffins Experience. You can use milk mixed with vinegar or lemon juice. Mix 1 cup of milk with 1 tablespoon of vinegar. Let it sit for 5 minutes. This makes a good buttermilk substitute. It helps keep muffins moist and adds a slight tang. You can also use plain yogurt or sour cream. These options work well, too, but may change the flavor a bit. Bake your muffins at 375°F (190°C) for 18-20 minutes. Start checking at 18 minutes. Insert a toothpick into the center of a muffin. If it comes out clean, your muffins are done. The tops should look golden brown. If the muffins are not ready, bake for another 2-3 minutes. Keep an eye on them to avoid overbaking. Flat muffins can happen for a few reasons. First, check your baking powder and baking soda; they should be fresh. Old leavening agents can cause muffins to stay flat. Also, avoid overmixing the batter. This can make muffins dense. Lastly, make sure your oven is at the right temperature. An oven thermometer can help confirm this. Yes, you can use frozen blueberries! Thaw them first and drain any excess juice. This prevents the batter from turning blue. Toss the blueberries in a little flour before adding them. This helps them stay suspended in the batter. This way, you get bursts of blueberry flavor in every bite. Look for a golden brown top, which is a good sign. You can also gently press the top; it should spring back. Another way is to use a toothpick. Insert it into the center; it should come out clean. If there’s wet batter, give them a few more minutes in the oven. These tips help ensure you enjoy perfectly baked blueberry muffins. Baking the best blueberry muffins requires the right ingredients and careful steps. We covered essential ingredients and tasty substitutions to fit any diet. Following my detailed instructions will help you achieve the perfect muffin texture and flavor. I shared tips to avoid common mistakes and keep your muffins fresh. With these insights, you can bake delicious blueberry muffins every time. Enjoy experimenting with flavors or healthier options. Happy baking!
Best Blueberry Muffins Delightfully Fluffy Treat
Are you ready to bake the most delightful blueberry muffins? In this article, I’ll share the secrets behind achieving that fluffy texture and burst of
To make these tasty pumpkin cinnamon rolls, gather these simple ingredients: - 1 cup all-purpose flour - 1/4 cup canned pumpkin puree - 1/4 cup milk - 2 tablespoons granulated sugar - 1 tablespoon unsalted butter, melted - 1/2 teaspoon baking powder - 1/4 teaspoon baking soda - 1/4 teaspoon salt - 1 teaspoon ground cinnamon - 1/4 teaspoon ground nutmeg - 1 tablespoon brown sugar (for the filling) - 1 tablespoon unsalted butter, softened (for the filling) - 1/2 cup powdered sugar (for the frosting) - 1 tablespoon milk (for the frosting) - 1/2 teaspoon vanilla extract (for the frosting) If you need to convert measurements, here are some quick tips: - 1 cup = 8 fluid ounces - 1 tablespoon = 3 teaspoons - 1/4 cup = 4 tablespoons - 1/2 teaspoon = 2.5 milliliters For those using metric, remember: - 1 cup of flour is about 120 grams. - 1/4 cup of pumpkin puree is roughly 60 grams. You can easily swap ingredients based on what you have at home: - Flour: Use whole wheat flour for a nuttier flavor. - Milk: Almond or oat milk works well. - Pumpkin Puree: Use homemade pumpkin puree if you prefer. - Butter: Coconut oil can replace butter for a dairy-free option. - Sugar: Substitute with honey or maple syrup for a different sweetness. These substitutions help you make these rolls your own while keeping them soft and tasty. For the full recipe, check out the details provided. Enjoy baking! Start by gathering your dry ingredients. In a medium bowl, add 1 cup of all-purpose flour. Next, whisk in 1/2 teaspoon of baking powder, 1/4 teaspoon of baking soda, and 1/4 teaspoon of salt. Then, add in 1 teaspoon of ground cinnamon and 1/4 teaspoon of ground nutmeg. This step is key; it ensures the spices and leavening agents mix well with the flour. Whisk these together until they are fully blended. In another bowl, combine 1/4 cup of canned pumpkin puree, 1/4 cup of milk, and 2 tablespoons of granulated sugar. Add 1 tablespoon of melted unsalted butter. Mix these until the mixture is smooth and creamy. This pumpkin mixture gives the rolls their rich flavor. Now it's time to combine the two mixtures. Gradually add the dry ingredients to the pumpkin mix. Stir gently until a dough forms. If the dough feels sticky, sprinkle in a bit more flour. Transfer the dough to a floured surface. Roll it out into a rectangle about 1/4 inch thick. Spread 1 tablespoon of softened butter over the dough, then sprinkle 1 tablespoon of brown sugar and a pinch of cinnamon on top. Next, tightly roll the dough from one edge to the other to form a log. Pinch the seam to seal it well. Slice the log into 4-6 equal pieces and place them in a greased baking dish. Preheat your oven to 350°F (175°C). Bake the rolls for 15-18 minutes. They should turn a light golden brown when ready. While they bake, you can prepare the frosting. Mix 1/2 cup of powdered sugar, 1 tablespoon of milk, and 1/2 teaspoon of vanilla extract in a small bowl until smooth. After baking, let the rolls cool for about 5 minutes. Drizzle the frosting generously over the warm rolls, allowing it to melt into the crevices. Enjoy these small batch pumpkin cinnamon rolls fresh and warm! For the full recipe, check out the detailed instructions above. Mistakes can happen, but you can easily avoid them. Here are some key points: - Not measuring ingredients: Always use the right tools. This ensures your rolls rise well. - Skipping the resting time: Allow your dough to rest. This helps develop flavor and texture. - Overmixing the dough: Mix just until combined. Overmixing makes the rolls tough. - Using the wrong oven temperature: Always preheat your oven. A hot oven helps the rolls bake evenly. Getting the dough right is key to soft rolls. Follow these tips: - Use the right flour: All-purpose flour works best. It gives the right structure. - Check the moisture: The dough should be slightly sticky but not wet. Add flour as needed. - Knead gently: Knead just enough to bring the dough together. This keeps it light and airy. - Use a light touch when rolling out: Roll the dough evenly. This helps with even baking. Frosting makes your rolls even better. Here are some tips: - Make it fresh: Always prepare the frosting right before using it. This keeps it smooth. - Use room temperature ingredients: This helps the frosting blend easily. Cold ingredients can make it lumpy. - Drizzle it on warm rolls: Frosting melts into the rolls. It adds flavor and moisture. - Add a pinch of spice: A dash of cinnamon on top adds a nice touch. It looks great and tastes good! For the full recipe, check out the [Full Recipe]. Enjoy your baking! {{image_4}} You can make your pumpkin cinnamon rolls even better. Adding nuts like walnuts or pecans gives a nice crunch. Simply chop the nuts and sprinkle them on top of the filling. If you love chocolate, chocolate chips are a great choice too. Just mix them into the filling or sprinkle them on top before rolling. This little twist adds fun flavors that you will enjoy. While the vanilla frosting is sweet and creamy, consider using cream cheese frosting. The tangy flavor of cream cheese pairs well with pumpkin. To make cream cheese frosting, mix softened cream cheese with powdered sugar, milk, and a splash of vanilla. This rich frosting makes your rolls taste even more special. You can choose what you like best for your rolls. You can easily modify the recipe for different diets. For a vegan option, replace the butter with coconut oil and use a plant-based milk. Make sure the powdered sugar is vegan too. For a gluten-free version, swap the all-purpose flour with a gluten-free flour blend. Just check that the other ingredients are gluten-free as well. These changes allow everyone to enjoy delicious pumpkin cinnamon rolls! To keep your small batch pumpkin cinnamon rolls fresh, store them in an airtight container. This helps maintain their soft texture. Place parchment paper between layers if you stack them. The rolls taste best within two days, but they can last up to four days in the fridge. When you’re ready to enjoy your cinnamon rolls again, reheating is key. Preheat your oven to 350°F (175°C). Place the rolls on a baking sheet and cover them with foil. Heat for about 10-15 minutes. This warms the rolls evenly without drying them out. You can also reheat them in the microwave for 15-20 seconds. Just be careful not to overheat them, or they will become tough. If you want to save your rolls for later, freezing is a great option. Allow the rolls to cool completely. Wrap each roll tightly in plastic wrap, then place them in a freezer bag. They can stay frozen for up to three months. To eat, thaw them in the fridge overnight. Then, reheat as mentioned above for a fresh taste. Enjoy every bite of your small batch pumpkin cinnamon rolls! For the full recipe, check out the details above. To make these rolls ahead, prepare the dough and filling first. After rolling the dough, slice it into pieces. Place the rolls in a greased pan, cover them, and refrigerate overnight. When ready to bake, let them come to room temperature. Preheat your oven and bake as directed. This method saves time and gives you warm rolls in the morning. If your dough is sticky, add a little more flour. Start with one tablespoon and mix well. If it feels dry, add milk, one teaspoon at a time. The goal is to have a soft and manageable dough. Remember, a little extra flour helps, but too much makes the rolls tough. Yes, you can use fresh pumpkin. Cook and puree it until smooth. Make sure to drain any excess water. This helps keep the dough from becoming too wet. Fresh pumpkin adds a great flavor, but canned pumpkin is easier and more consistent. These cinnamon rolls last about 2-3 days when stored in an airtight container. Keep them at room temperature for best taste. If you want to keep them longer, consider freezing them. They can last up to three months in the freezer. Just thaw and reheat before serving for the best flavor. In this post, we explored making small batch pumpkin cinnamon rolls. We covered ingredients, step-by-step instructions, and common mistakes to avoid. You learned about tasty variations and best storage tips. Remember, your rolls can be vegan or gluten-free. Baking is fun, so don't be afraid to try new flavors or frostings. Enjoy the process and savor each bite of your homemade goodness. Happy baking!
Small Batch Pumpkin Cinnamon Rolls Soft and Tasty Treat
Craving a cozy treat that warms your soul? Try these Small Batch Pumpkin Cinnamon Rolls! They are soft, sweet, and packed with fall flavor. In
- 200g medjool dates, pitted and finely chopped - 50g unsalted butter, softened to room temperature - 150g brown sugar (light or dark as per preference) - 150g all-purpose flour, sifted - 150g brown sugar (light or dark based on taste) - 120ml heavy cream, preferably at room temperature - 50g unsalted butter - 1 teaspoon pure vanilla extract - Baking dish - Blender or food processor - Mixing bowls and electric mixer I love using Medjool dates in my sticky toffee pudding. These dates are sweet and soft, making them perfect for this dessert. They add a rich taste and a moist texture. The unsalted butter is key. It adds creaminess to the pudding. Brown sugar is another star ingredient. It gives a deep, caramel flavor that pairs well with the dates. Lastly, all-purpose flour helps bind everything together, creating that classic pudding texture. For the toffee sauce, I use heavy cream. It makes the sauce rich and smooth. Vanilla extract adds warmth and extra flavor. You can choose light or dark brown sugar based on your taste. Dark sugar gives a richer taste, while light is milder. You will need a baking dish to hold the pudding while it bakes. A blender or food processor helps turn the dates into a smooth purée. Mixing bowls are essential for preparing the batter and sauce. An electric mixer makes creaming the butter and sugar easy and quick. For the full recipe, you can check detailed steps to make this delightful dish. - Soaking the dates: Start by adding 200g of chopped medjool dates to a bowl. Sprinkle 1 teaspoon of baking soda over them. Next, pour 300ml of boiling water on top. Let this mix sit for about 10 minutes. This soaking helps the dates become soft and sweet. - Blending for purée: After soaking, transfer the date mixture to a blender. Blend it until smooth. This will create a rich date purée. Set it aside to cool a bit before using. - Creaming butter and sugar: In a large bowl, take 50g of softened unsalted butter and 150g of brown sugar. Use an electric mixer to beat them together on medium speed. Mix until the mixture is light and creamy. This usually takes 2-3 minutes. - Incorporating eggs and vanilla: Now, add 2 large eggs one at a time. Mix well after each egg. Then, stir in 1 teaspoon of pure vanilla extract until it blends nicely. - Pouring batter into the dish: Gradually fold in 150g of sifted all-purpose flour, 1 teaspoon of baking powder, and a pinch of salt. Alternate this with the cooled date purée. Be gentle; it’s okay if some lumps remain. Once mixed, pour the batter into a greased 9-inch square baking dish. - Baking guidelines and testing for doneness: Bake in a preheated oven at 180°C (350°F) for 30-35 minutes. To check if it’s ready, insert a toothpick into the center. It should come out clean or with a few moist crumbs. This means your pudding is perfectly baked! To avoid tough pudding, mix the batter gently. Overmixing can make it dense. When you add the flour and date purée, fold the mixture slowly. It’s okay if some lumps remain. This keeps the pudding light and fluffy. Cool the pudding for at least five minutes after baking. This brief cooling lets the flavors blend well. It also helps the toffee sauce soak in better, adding to the taste. Choosing the right brown sugar is key. Light brown sugar gives a mild flavor. Dark brown sugar adds a richer taste. Feel free to mix both for a balanced flavor. Use whole ingredients when possible. Whole eggs and real vanilla extract give the best taste. They enhance the pudding’s flavor and make it more delicious. Serve your sticky toffee pudding warm. For a nice touch, drizzle extra toffee sauce on top. A scoop of vanilla ice cream makes it even better. When plating, use elegant dessert plates. Garnish with chopped nuts or a sprig of mint for color. This simple trick makes your dessert look fancy and inviting. {{image_4}} You can switch out sugar for honey or maple syrup. These options add a unique flavor. For honey, use a little less than brown sugar. Maple syrup can work too, but adjust the liquid in the recipe slightly. This helps match the right texture. This way, you cater to dietary preferences. You still get a sweet taste without white sugar. Adding nuts or dried fruit can make your pudding special. Chopped walnuts or pecans add a nice crunch. Dried fruits like raisins or cranberries can give a burst of flavor. You can also enhance the toffee taste with spices. A pinch of cinnamon or nutmeg can elevate the dish. Just be careful not to overdo it; you want to keep the focus on the toffee. When serving, think beyond just the pudding. Pair it with a scoop of ice cream for cold creaminess. Vanilla ice cream works best, but feel free to experiment. You can also turn the pudding into a trifle or parfait. Layer it with whipped cream and fruit for a fun twist. Each bite will be a new surprise! If you want to try the full recipe, check it out! To keep your sticky toffee pudding fresh, cover it well. Use plastic wrap or foil. Place it in the fridge. This way, it stays good for up to three days. For best results, use an airtight container. This helps keep the pudding moist and tasty. You can freeze sticky toffee pudding too! Cut it into pieces first. Wrap each piece in plastic wrap. Then, place them in a freezer bag. This way, you can store it for up to three months. To thaw, take it out and leave it in the fridge overnight. This keeps it moist and soft. When you're ready to enjoy your pudding again, heat it up gently. The best way is to use the microwave. Place a piece on a plate and cover it with a damp paper towel. Heat for about 20 seconds. If you want, you can also use the oven. Preheat it to 170°C (340°F) and warm the pudding for about 10 minutes. This method keeps the texture just right. Enjoy your warm, sweet treat! Sticky Toffee Pudding comes from England. Some say it started in the Lake District. This dessert gained fame in the 20th century. It became a staple in British pubs. The dish has rich flavors and a warm, comforting feel. People love its sweet toffee sauce. It holds a special place in British culture, often served at celebrations. Yes, you can prepare Sticky Toffee Pudding in advance. You can bake it a day before. Just let it cool, then wrap it well. Store it in the fridge. When ready to serve, warm it slightly in the oven. This will keep the texture nice. The flavors also deepen over time, making it even better. Yes, you can make a gluten-free Sticky Toffee Pudding. Use gluten-free flour instead of all-purpose flour. Almond flour or coconut flour can work well. Just make sure to adjust the liquid as needed. Always check your baking soda and baking powder for gluten. These small changes will help you enjoy the same great taste. To check if your pudding is done, insert a toothpick in the center. If it comes out clean, your pudding is ready. A few moist crumbs are okay, but no wet batter. The top should look firm and slightly springy. Let it cool for a few minutes before serving. Yes, you can use other dates if needed. Medjool dates add a rich sweetness. Deglet Noor dates are also popular, but they are less sweet. Each type affects the pudding's flavor and texture. Experiment with what you have on hand. Just remember that different dates may change the taste. To sum up, making Sticky Toffee Pudding is simple and rewarding. You start with key ingredients like Medjool dates and unsalted butter. The toffee sauce adds that rich flavor. Use the right kitchen tools for best results, from mixing bowls to a blender. With tips to achieve perfect texture and creative variations, you can truly make this dish your own. Store it well for later enjoyment, and feel free to adapt it to fit your needs. Baking this classic dessert opens new doors to deliciousness. Enjoy your pudding adventures!
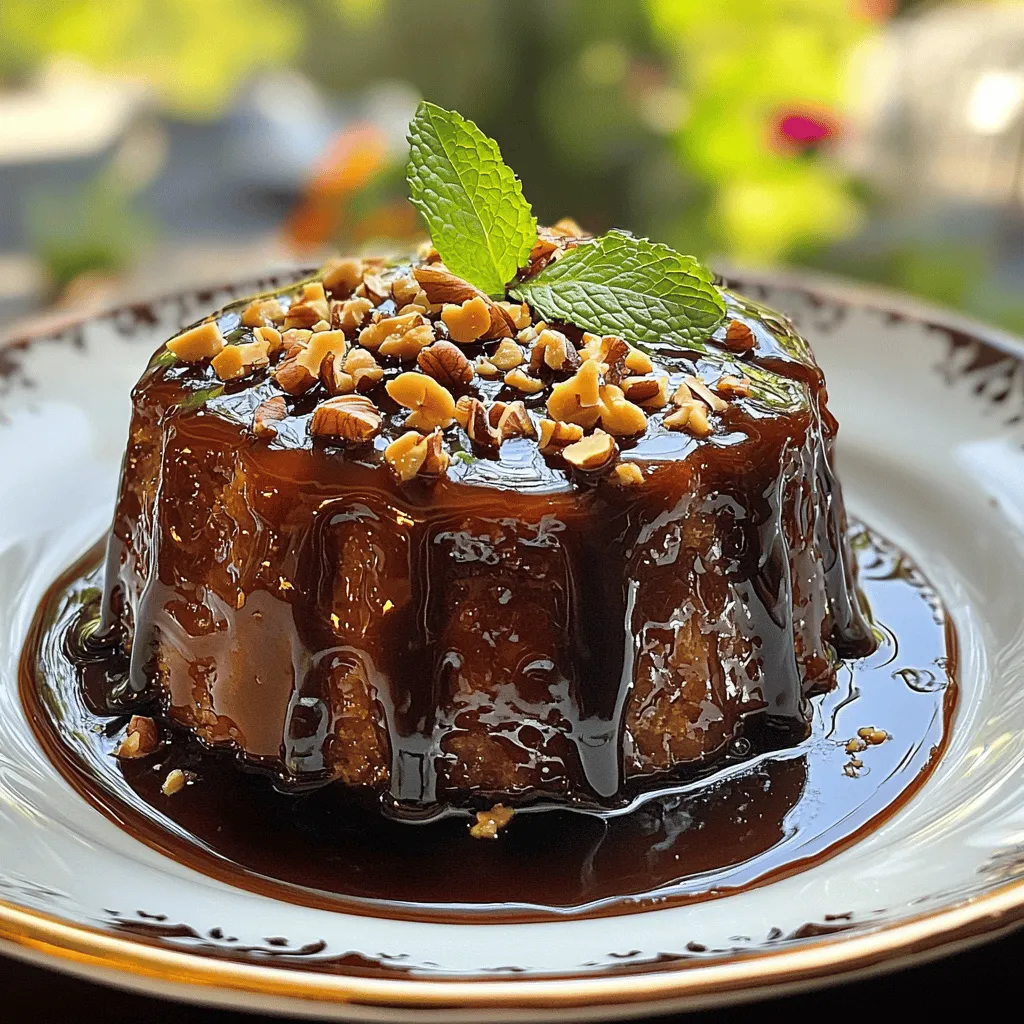
Delicious Sticky Toffee Pudding Simple and Sweet Treat
If you’ve got a sweet tooth, you’re in for a treat! Sticky toffee pudding is a classic dessert that melts in your mouth. In this
- 6 medium apples (Granny Smith or Honeycrisp recommended) - 1/2 cup water - 1/4 cup brown sugar - 1 teaspoon ground cinnamon (optional) - 1 tablespoon freshly squeezed lemon juice You will need a few key ingredients to make frozen applesauce. Start with six medium apples. I like to use Granny Smith or Honeycrisp. These apples give the right mix of tartness and sweetness. You will also need half a cup of water. This helps the apples cook down nicely. Next, grab a quarter cup of brown sugar. You can adjust this based on how sweet you want your applesauce. If you enjoy warm flavors, add in one teaspoon of ground cinnamon. It’s optional, but it really enhances the taste. Finally, you will need one tablespoon of freshly squeezed lemon juice. This brightens the flavor and keeps the apples from browning. - Large, heavy-bottomed pot - Potato masher or immersion blender - Freezer-safe containers or bags To make this applesauce, you will need a few tools. A large, heavy-bottomed pot works best. This pot helps cook the apples evenly without burning them. You will also need a potato masher or an immersion blender. These tools help you achieve your desired texture. Don’t forget freezer-safe containers or bags. These are perfect for storing your applesauce. Make sure they seal tightly. That way, your applesauce stays fresh in the freezer. For the full recipe, check out the details above! First, peel and chop the apples into small pieces. I love using Granny Smith or Honeycrisp apples for their great taste. Next, combine the chopped apples with 1/2 cup of water in a large pot. This will help the apples cook evenly and create a nice sauce. Set the pot over medium heat. Cover it with a lid and let the apples simmer for about 15 to 20 minutes. Remember to stir occasionally. You want the apples to become tender and soft so they mash easily. Once the apples are soft, take the pot off the heat. Let it cool for a minute. Now, you can puree the apples using a potato masher for a chunky texture or an immersion blender for a smooth finish. After blending, stir in 1/4 cup of brown sugar. You can add more if you like it sweeter. If you want, sprinkle in some ground cinnamon for extra flavor. Enjoy your applesauce! You can find the [Full Recipe] for more details. To get the right texture, think about your blending method. Use a potato masher for a chunky and rustic applesauce. It keeps the applesauce thick and hearty. If you want it smooth, an immersion blender works best. It gives a creamy finish with no lumps. After blending, taste your applesauce. You can always adjust the texture by blending a bit more. Spice up your applesauce with a touch of nutmeg or vanilla. Just a pinch can make a big difference. Nutmeg adds warmth, while vanilla gives a sweet aroma. You can also try different sweeteners. Honey or maple syrup can replace brown sugar. These options can give your applesauce a unique twist. Cooling your applesauce quickly helps preserve its color and taste. Stir it every few minutes to speed up the cooling process. To avoid browning, add a tablespoon of lemon juice as soon as you cook the apples. The acidity keeps the applesauce looking fresh. For even faster cooling, place the pot in a sink filled with ice water. This method cools down the applesauce while you prepare other dishes. {{image_4}} You can easily change the flavor of your applesauce. Try adding fruits like pears or berries. These fruits can bring new tastes and colors to your dish. For a unique twist, experiment with flavorings like vanilla or nutmeg. Just a pinch of nutmeg can make your applesauce warm and cozy. Adding a splash of vanilla can create a sweet aroma that everyone loves. If you want a healthier option, consider using honey or maple syrup. These natural sweeteners can enhance the flavor without adding too much sugar. You can also adjust the sweetness based on the apple variety you use. Some apples, like Honeycrisp, are sweeter than others, so you might need less sweetener. Always taste your applesauce before deciding how much to add. There are many fun ways to enjoy your applesauce. You can eat it as a snack on its own. It pairs wonderfully with breakfast items like pancakes or oatmeal. You can also use it in desserts, like cakes or muffins, to add moisture and flavor. Serve it chilled or warm; both options are delicious! To freeze your applesauce, use freezer-safe containers or bags. Make sure you leave space at the top. This space lets the applesauce expand as it freezes. Seal the containers tightly to keep air out. This will help prevent freezer burn. You can freeze applesauce for up to six months. After that, the flavor may fade. When you want to enjoy your applesauce, thaw it in the fridge overnight. This method keeps the applesauce cool and safe. You can also thaw it in a bowl of warm water for a quick option. When reheating, use a pot on low heat. Stir often to avoid hot spots. If you want a smooth texture, use a blender after reheating. Homemade applesauce can last three to four days in the fridge once thawed. To tell if your applesauce is spoiled, check for off smells or strange colors. If you see mold, throw it away. Always store applesauce in a clean, airtight container. This helps keep it fresh longer. To make frozen applesauce, follow these steps: 1. Peel and chop 6 medium apples. 2. Combine the apples with 1/2 cup water in a large pot. 3. Heat on medium and cover the pot. 4. Simmer for 15-20 minutes, stirring until apples are soft. 5. Remove from heat and let sit for 1 minute. 6. Use a potato masher or immersion blender to puree the apples. 7. Stir in 1/4 cup brown sugar, 1 teaspoon cinnamon, and 1 tablespoon lemon juice. 8. Let the mixture cool to room temperature. 9. Transfer to freezer-safe containers, leaving space at the top. 10. Seal, label, and freeze. This simple method yields about 4 cups of delicious applesauce. You can find the full recipe for more details. Yes, you can use many types of apples. However, some varieties work better. - Granny Smith: These apples are tart and add great flavor. - Honeycrisp: They are sweet and juicy, making the applesauce tasty. - Fuji: Sweet and firm, they also blend well. Mixing different apples can give you a unique flavor. You can use natural sweeteners to make sugar-free applesauce. Here are some options: - Honey: A natural sweetener, use it in small amounts. - Maple syrup: This adds a lovely flavor; use sparingly. - Stevia: A zero-calorie option, just a little goes a long way. For sugar-free applesauce, taste as you go. Adjust sweetness based on the apple variety. The sweeter the apple, the less sweetener you need. In this blog post, we explored how to make delicious applesauce from scratch. You learned about essential ingredients and the tools needed to create it. We discussed step-by-step instructions, tips for the best texture, and ways to enhance its flavor. You can experiment with different apple varieties and sweeteners. Remember to store your applesauce properly for long-lasting enjoyment. Enjoy your homemade treat as a snack or dessert! Each step brings you closer to a tasty reward that’s worth the effort.
Super Easy Frozen Applesauce Recipe for Family Fun
If you’re looking for a fun, easy way to enjoy homemade applesauce, you’ve come to the right place! This Super Easy Frozen Applesauce Recipe for
- 2 cups all-purpose flour - 1 teaspoon baking soda - 1/2 teaspoon salt - 1 teaspoon ground cinnamon - 1/2 cup unsalted butter - 1 cup packed brown sugar - 1/2 cup granulated sugar - 1 large egg - 1 teaspoon pure vanilla extract - 1 cup diced apple - 1/2 cup caramel bits - 1/2 cup chopped walnuts or pecans (optional) For a great cookie, select quality ingredients. Fresh apples give the best flavor. I like using Granny Smith for a tart bite. You can also mix in other apple varieties for added flavor. - Gluten-free flour alternatives: Use almond flour or a gluten-free blend. - Dairy-free butter options: Coconut oil or vegan butter can work well. - Sugar alternatives for healthier cookies: Try using coconut sugar or stevia. When you make these swaps, remember that textures may change a bit. Always check your dough as you mix. You want it to be soft but not too sticky. For the full recipe, check the details above. Happy baking! - Preheat your oven to 350°F (175°C). - Line a baking sheet with parchment paper. This helps cookies not stick. - In a bowl, combine 2 cups of all-purpose flour, 1 teaspoon of baking soda, 1/2 teaspoon of salt, and 1 teaspoon of ground cinnamon. - Whisk these together until they are mixed well and set aside. - Take another bowl and cream together 1/2 cup of softened unsalted butter, 1 cup of packed brown sugar, and 1/2 cup of granulated sugar. - Mix until the blend is light and fluffy, which takes about 2-3 minutes. - Next, add in 1 large egg and 1 teaspoon of pure vanilla extract. Mix until smooth. - Gradually add the dry mix to the wet mix. Stir on low speed until just combined. - It's alright if you see a few flour streaks. - Now, gently fold in 1 cup of diced apple and 1/2 cup of caramel bits. If you want, add 1/2 cup of chopped walnuts or pecans for crunch. - Use a cookie scoop or tablespoon to drop dough onto the prepared baking sheet. - Space each cookie about 2 inches apart. - Bake in the oven for 12-15 minutes. Look for golden edges and slightly soft centers. - The cookies will firm up as they cool. Following these steps will lead you to delicious homemade caramel apple cookies. For the complete recipe, check out the Full Recipe section. For the best cookie texture, you may need to adjust the baking time. Start checking your cookies at 12 minutes. If the edges are golden brown, they are ready. The centers will look a bit soft, but they will firm up as they cool. Using room temperature ingredients is key. When butter and eggs are at room temperature, they mix better. This helps create a light and fluffy dough. Softened butter blends easily with sugars, adding air to your mix. To boost flavor, consider adding spices or extracts. A pinch of nutmeg can make a great addition. You can also use almond extract for a unique twist. Different types of apples can change the taste too. Tart apples like Granny Smith add a nice contrast to the sweet caramel. Sweeter apples, such as Fuji or Honeycrisp, will give a different balance. Try mixing different apples for a fun flavor profile. For a beautiful presentation, serve these cookies warm on a rustic wooden board. This adds charm and makes them inviting. Drizzling warm caramel sauce over the cookies can elevate your dish even more. It adds shine and extra sweetness. Garnish with a few slices of fresh apple for color and freshness. This makes your cookies look as good as they taste! {{image_4}} You can make your caramel apple cookies even better with some fun add-ins. Try adding dried fruits like raisins or cranberries for a chewy bite. They bring a nice contrast to the sweet caramel and apple. You can also mix in chocolate chips for extra sweetness. The rich taste of chocolate pairs well with the apples, making every bite a treat. Let’s spice things up! Adding a pinch of nutmeg or allspice can bring a warm flavor. These spices work well with the apple and caramel. You can also add citrus zest, like lemon or orange. A little zest gives your cookies a bright, fresh taste. It makes them stand out and adds a lovely aroma. Want to change things for your diet? You can make a vegan version of these cookies. Swap the butter for coconut oil and use a flax egg instead. This keeps the cookie moist while being plant-based. If you are into health, you can try low-sugar options. Use a sugar substitute, like stevia or monk fruit, to cut down on sugar. These changes help you enjoy cookies while sticking to your dietary goals. For the full recipe, check out the Caramel Apple Delights section. To keep your caramel apple cookies fresh, store them in an airtight container. This will help prevent them from drying out. You can also use plastic wrap or a resealable bag. Make sure to press out as much air as possible before sealing. Store your cookies at room temperature for up to one week. If you want to keep them longer, consider freezing them. You can freeze both the cookie dough and the baked cookies. If you freeze the dough, scoop it into balls and place them on a baking sheet. Freeze them for a few hours, then transfer to a bag. This way, you can bake fresh cookies anytime. To freeze baked cookies, let them cool completely. Then, wrap them tightly in plastic wrap or foil. Place the wrapped cookies in a freezer-safe container. They will stay good for up to three months. When you are ready to enjoy your frozen cookies, thaw them in the fridge for a few hours. You can also warm them in the oven for a few minutes to regain their fresh-baked taste. For the best texture, avoid microwaving them. For these cookies, I recommend using sweet and tart apples. Good choices include: - Granny Smith - Honeycrisp - Fuji - Gala These apples add a nice crunch and balance the sweet caramel. Granny Smith gives a tartness that pairs well with the sweet cookie dough. Honeycrisp adds a juicy sweetness. Yes, you can make these cookies ahead of time. Here’s how: - Dough Storage: You can keep the cookie dough in your fridge for up to 3 days. Just wrap it tightly. - Baked Cookies: Store baked cookies in an airtight container at room temperature for up to a week. For the best taste, I suggest baking them fresh. But if you need to plan ahead, dough or cookies will work fine. You can tell when the cookies are done by looking for these signs: - The edges should be golden brown. - The centers may look slightly soft, which is okay. To test doneness, gently touch the center of a cookie. If it springs back, it's ready. If it leaves an indent, give it a minute more in the oven. Perfectly baked cookies will be warm and chewy! These cookies combine simple ingredients for maximum flavor and texture. We explored basic steps to make them, added tasty variations, and shared storage tips. You can also adjust for dietary needs or preferences. Remember, the best cookies come from experimenting and having fun. Use this guide to create your perfect batch. Enjoy the warmth and delight these cookies bring to any gathering!
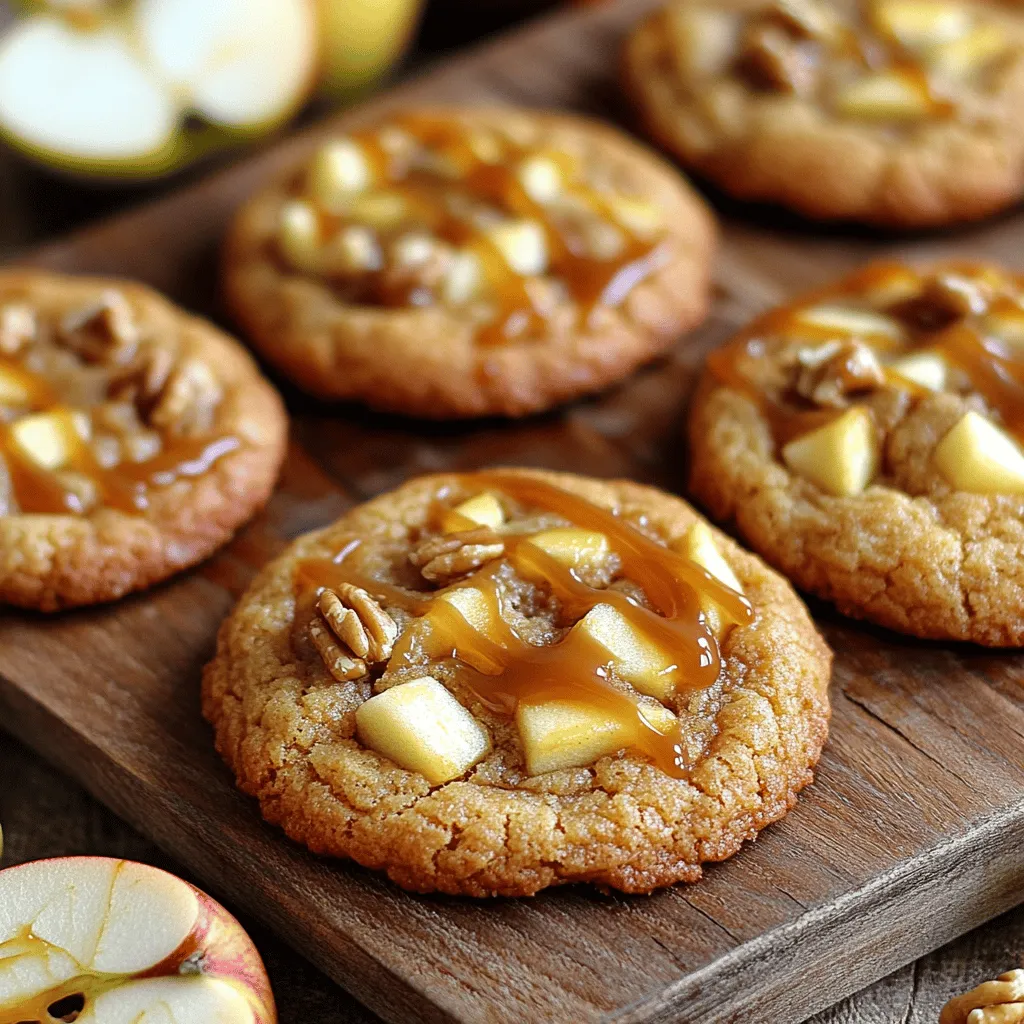
Caramel Apple Cookies from Scratch Easy and Delicious
Looking for a sweet treat that combines the flavors of autumn with the joy of baking? You’re in for a treat! My Caramel Apple Cookies