Desserts

To make these tasty cookies, you will need: - 1 cup unsalted butter, softened - 1 cup brown sugar, tightly packed - 1/2 cup granulated sugar - 2 large eggs, at room temperature - 1 teaspoon pure vanilla extract - 2 1/2 cups all-purpose flour - 1 teaspoon baking powder - 1/2 teaspoon baking soda - 1/2 teaspoon salt - 1 tablespoon ground cinnamon These ingredients create a rich and flavorful base for the cookies. The butter adds creaminess, while the sugars bring sweetness. The eggs help bind everything together. The cinnamon gives that warm, cozy flavor we all love. The streusel topping adds a delightful crunch. Here’s what you’ll need: - 1/2 cup all-purpose flour - 1/2 cup brown sugar, tightly packed - 1/4 cup unsalted butter, cold and cut into small cubes - 1 teaspoon ground cinnamon Mixing these ingredients creates a crumbly texture. This topping is the star that makes these cookies shine. The cold butter helps it become crisp when baked. Sometimes, you may need to swap out ingredients. Here are some options: - Butter: You can use margarine or coconut oil. - Eggs: Replace with flax eggs or applesauce for a vegan option. - Flour: Whole wheat flour can be used for a nuttier taste. - Sugars: Coconut sugar works as a healthier choice. These substitutions can change the flavor and texture slightly, but they still work well. Feel free to experiment and find what you love! {{ingredient_image_2}} First, preheat your oven to 350°F (175°C). This step is key for even baking. Next, line a baking sheet with parchment paper. This helps prevent the cookies from sticking. In a large bowl, cream together 1 cup of softened butter, 1 cup of brown sugar, and 1/2 cup of granulated sugar. Use an electric mixer on medium speed. Mix for about 3 to 4 minutes until the mixture is light and fluffy. This step adds air, making your cookies soft. Add 2 large eggs to the creamed mixture, one at a time. Make sure to mix well after each egg. Then add 1 teaspoon of pure vanilla extract. Continue mixing until everything is smooth and well blended. In a separate bowl, whisk together 2 1/2 cups of all-purpose flour, 1 teaspoon of baking powder, 1/2 teaspoon of baking soda, 1/2 teaspoon of salt, and 1 tablespoon of ground cinnamon. Whisk until there are no lumps. This ensures your cookies rise well and have great flavor. Carefully add the dry mixture to the wet mixture. Use low speed on your mixer and mix just until combined. Be careful not to overmix. This keeps your cookies tender and chewy. In a small bowl, combine 1/2 cup of all-purpose flour, 1/2 cup of brown sugar, and 1 teaspoon of ground cinnamon. Add 1/4 cup of cold, cubed butter. Use your fingers or a pastry cutter to mix until it looks like coarse crumbs. This will give your cookies a beautiful topping. Use a cookie scoop or a spoon to portion out the dough on the prepared baking sheet. Leave about 2 inches between each dough ball. This space allows them to spread while baking. Bake in your preheated oven for 10 to 12 minutes. Look for lightly golden edges; the centers may still be soft. After baking, let the cookies cool on the baking sheet for about 5 minutes. Then, transfer them to a wire rack to cool completely. Enjoy the warm, inviting smell as they cool! To make soft cookies, start with room temperature butter. This step helps it blend well with sugars. Use an electric mixer to cream the butter and sugars until fluffy. Mix for about 3-4 minutes. Add eggs one at a time, mixing well after each. This keeps the texture light. Be careful not to overmix the dough when you combine wet and dry ingredients. Just mix until you see no flour. This small step helps keep your cookies soft and chewy. For the best streusel, use cold butter. Cut it into small cubes before mixing. Combine flour, brown sugar, and cinnamon with the cold butter. Use your fingers or a pastry cutter. This gives you that crumbly texture we want. Don’t rush this step. The streusel should look like coarse crumbs. When you sprinkle it on the dough, press lightly. This helps it stick during baking, making your cookies even tastier. Even baking is key to perfect cookies. Make sure to preheat your oven to 350°F (175°C). This lets the cookies rise and spread evenly. When placing cookie dough on the baking sheet, leave space between each ball. Aim for about 2 inches apart. This room allows them to spread without touching. Check your cookies towards the end of baking. Look for lightly golden edges. The centers may still seem soft. This means they are ready to come out. Let them cool on the baking sheet for a few minutes before moving them. Pro Tips Softened Butter is Key: Make sure your butter is truly softened to room temperature for optimal creaming with the sugars, which will help create a light and fluffy cookie texture. Room Temperature Eggs: Using eggs that are at room temperature helps them incorporate more smoothly into the batter, resulting in better overall texture. Don’t Overmix: When combining the wet and dry ingredients, mix just until combined to prevent the cookies from becoming tough. Streusel Texture: For the best streusel topping, ensure the butter is cold and cubed. This will create a crumbly texture that adds a delightful crunch to your cookies. {{image_4}} You can make these cookies even better! Try adding nuts or chocolate chips. Walnuts or pecans give a nice crunch. Just chop them up and mix in about 1 cup. If you love chocolate, add 1 cup of chocolate chips instead. Both options add flavor and texture. Want to make this recipe gluten-free? It’s easy! Just swap the all-purpose flour for a gluten-free blend. Make sure to pick a blend that has xanthan gum. This will help the cookies hold together well. Follow the recipe as written, and enjoy your tasty treat! You can get creative with the toppings! Instead of streusel, try a glaze. Mix powdered sugar with milk to create a drizzle. You can also add sprinkles for a fun touch. Another idea is to top with a scoop of ice cream. This makes a great dessert for any occasion! To keep your cookies fresh, store them in an airtight container. Place parchment paper between layers to avoid sticking. These cookies stay tasty for up to a week at room temperature. Keep them away from sunlight for best results. You can freeze these cookies for later. First, let them cool completely. Then, wrap each cookie in plastic wrap. Place them in a freezer bag or airtight container. They can last up to three months in the freezer. When you're ready, just thaw them at room temperature. To reheat your cookies, preheat your oven to 350°F (175°C). Place the cookies on a baking sheet. Heat them for about 5 to 7 minutes. This method keeps them soft and warm. Enjoy them fresh out of the oven with your favorite drink! Yes, you can use margarine instead of butter. The cookies may taste slightly different, but they will still be soft and tasty. Just make sure the margarine is softened. This change can also help if you're looking for a dairy-free option. These cookies can last about 5 days when stored in an airtight container. If you want them to stay fresh longer, keep them in the fridge. They can last up to a week in the fridge, but the taste may change slightly over time. You sure can! Use a dairy-free butter substitute. Look for one made from plant oils. Also, check the vanilla extract to ensure it’s dairy-free. With these swaps, you can enjoy these cookies without dairy. These cookies go great with coffee or tea. A warm cup of chai or a latte complements the cinnamon flavor. For a sweeter option, serve with hot chocolate. The warm drinks balance the sweetness of the cookies and enhance their flavor. Cinnamon Streusel Coffee Cake Cookies are a delight. We covered key ingredients and steps to make them. You learned tips for perfect cookies and ways to customize them. Don’t forget storage tips to keep your cookies fresh. Enjoy baking these tasty treats, and share them with friends. You’ll impress everyone with your skills. Baking can be fun and rewarding, and these cookies are a great way to start. Try different variations to find your favorite!
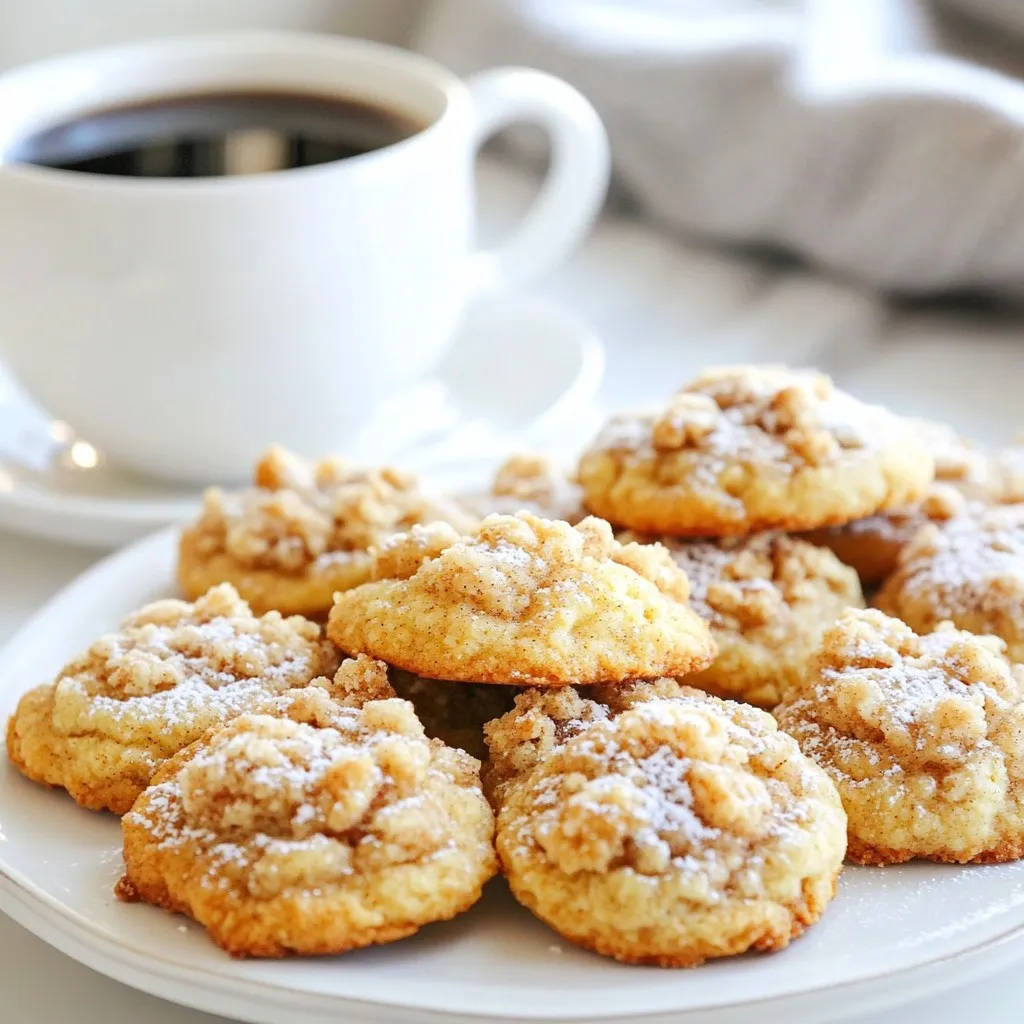
Cinnamon Streusel Coffee Cake Cookies Delightful Treat
Get ready to treat yourself with my Cinnamon Streusel Coffee Cake Cookies! These cookies combine the best flavors of coffee cake and a delightful streusel
- 1 cup all-purpose flour - 1 cup whole wheat flour - 1 teaspoon baking powder - 1 teaspoon baking soda - 1 teaspoon ground cinnamon - 1/2 teaspoon ground nutmeg - 1/2 teaspoon ground ginger - 1/2 teaspoon salt - 1 cup pumpkin puree - 1/2 cup granulated sugar - 1/2 cup packed brown sugar - 2 large eggs - 1/2 cup vegetable oil - 1 teaspoon pure vanilla extract - 4 oz cream cheese - 1/4 cup powdered sugar - 1 tablespoon milk Gathering fresh ingredients is the first step to making these muffins shine. The mix of all-purpose and whole wheat flour gives a nice balance. The baking powder and baking soda help the muffins rise. Spices like cinnamon, nutmeg, and ginger bring warmth and flavor. Don’t forget the salt; it makes everything taste better. Now, for the wet ingredients, pumpkin puree adds moisture and flavor. The mix of granulated and brown sugar gives sweetness and depth. Eggs bind everything together, while vegetable oil keeps the muffins tender. A splash of vanilla extract brightens up the taste. The cream cheese filling is the star. Softened cream cheese adds a rich, tangy flavor. Mixing in powdered sugar makes it sweet. A bit of milk helps create a smooth texture. This filling adds a special surprise to each bite. By using quality ingredients, you ensure a delicious result every time. {{ingredient_image_2}} First, set your oven to 350°F (175°C). This is the perfect temperature for baking. Next, grab a 12-cup muffin pan. You can use paper liners or lightly grease the cups with cooking spray. This helps the muffins come out easily. In a big bowl, mix the dry items. Combine 1 cup of all-purpose flour, 1 cup of whole wheat flour, 1 teaspoon of baking powder, and 1 teaspoon of baking soda. Add 1 teaspoon of ground cinnamon, 1/2 teaspoon of ground nutmeg, 1/2 teaspoon of ground ginger, and 1/2 teaspoon of salt. Whisk these together until they blend well. In another bowl, combine the wet ingredients. Use 1 cup of pumpkin puree, 1/2 cup of granulated sugar, and 1/2 cup of packed brown sugar. Add 2 large eggs, 1/2 cup of vegetable oil, and 1 teaspoon of pure vanilla extract. Stir well until the mix is smooth and lump-free. Now it’s time to mix the dry and wet ingredients. Gradually add the dry mix to the wet mix. Stir gently until just combined. It's okay if some lumps remain. Avoid overmixing; this keeps the muffins soft and tender. For the filling, take a small bowl. Beat 4 oz of softened cream cheese with 1/4 cup of powdered sugar and 1 tablespoon of milk. Use a hand mixer or a fork. Keep mixing until it’s creamy and smooth. This will be the tasty center of your muffins. Spoon about 2/3 of the pumpkin batter into each muffin cup. Fill them three-quarters full. Then, add a tablespoon of the cream cheese mixture into the center of each muffin. Press it down gently. Cover the cream cheese with a small dollop of pumpkin batter. Put the muffin pan into the preheated oven. Bake for 20 to 25 minutes. To check for doneness, insert a toothpick into a muffin but avoid the cream cheese. If it comes out clean, your muffins are ready. Let them cool for 5 minutes in the pan before moving them to a wire rack. To bake moist muffins, avoid overmixing the batter. Mixing too much makes muffins tough. Stir the wet and dry ingredients until just combined. Some lumps are okay. Using room temperature ingredients is key. It helps the batter blend better. This simple step makes a big difference in texture. Want to boost the flavor? Try adding more spices. A dash of allspice or cloves can add warmth. You can also mix in chocolate chips or nuts for extra crunch. Dried cranberries or apples can add a nice twist too. Presentation matters! After cooling, dust your muffins with powdered sugar. This adds a lovely touch. You can also drizzle maple syrup on top. For a cozy look, add a few cinnamon sticks beside the muffins. This makes them look even more inviting! Pro Tips Use Fresh Spices: For the best flavor, opt for freshly ground spices instead of pre-ground ones. This enhances the aroma and taste of your muffins. Check Muffin Doneness: Insert a toothpick into the center of a muffin; it should come out clean. Avoid touching the cream cheese filling to get an accurate reading. Cool Completely: Allow muffins to cool on a wire rack to prevent them from becoming soggy. This helps maintain their texture and flavor. Experiment with Toppings: Feel free to add toppings like chopped nuts or a sprinkle of oats before baking for an extra crunch and flavor boost. {{image_4}} If you want a gluten-free version of these muffins, try using almond flour or oat flour. Both flours work well and keep the muffins light. You can also mix in some gluten-free all-purpose flour. Just make sure your baking powder is gluten-free. For a vegan twist, replace the eggs with flaxseed meal. Mix one tablespoon of flaxseed meal with three tablespoons of water and let it sit for a few minutes. For the cream cheese, use a vegan cream cheese alternative. You can also swap the milk with almond or soy milk. You can change the flavor by adding different spices. Try cardamom or cloves for an extra kick. You can also mix in nuts like walnuts or pecans for a crunch. Dried fruit, such as cranberries or raisins, adds a nice sweetness too. Experiment and find your favorite combination! To keep your muffins fresh, store them in an airtight container. This keeps moisture in and prevents them from drying out. You can also wrap them in plastic wrap to add another layer of protection. Place the container in a cool, dry spot on your kitchen counter. Avoid direct sunlight. For best taste, eat them within a few days. Freezing is a great way to enjoy muffins later. First, let them cool completely. Wrap each muffin tightly in plastic wrap. Then, place them in a freezer-safe bag or container. Use a marker to note the date. To reheat, remove a muffin from the freezer and let it thaw at room temperature. You can also heat it in the microwave for about 20-30 seconds. At room temperature, these muffins last about 3-4 days. If you keep them in the fridge, they can stay fresh for about a week. However, the texture might change slightly in the fridge. For the best taste and softness, enjoy them fresh or frozen. Yes, you can use homemade pumpkin puree. It adds a fresh taste. For the best blend, make sure it's smooth. Strain it if it's too watery. This helps keep your muffins from being soggy. Use the same amount as canned puree. If you need a substitute for cream cheese, try using Greek yogurt. It gives a nice tang. You can also use mascarpone for a richer filling. Silken tofu is another option for a dairy-free choice. Blend it until smooth for the best texture. To check if your muffins are done, insert a toothpick in the center. It should come out clean, without wet batter. The tops should look golden brown and spring back when touched. If the tops are still wet, bake a few more minutes. Yes, you can make mini muffins! Fill the mini cups halfway. Bake them for about 12 to 15 minutes. Check for doneness with a toothpick, just like regular muffins. You can make about 24 mini muffins with this recipe. This blog post covered the key ingredients and steps to make delicious pumpkin cream cheese muffins. We began with the right dry and wet ingredients and learned how to mix them. You also discovered tips for keeping your muffins moist and tasty. Try different variations for a twist. Remember, storing them correctly will keep them fresh longer. Enjoy baking these delightful treats and impress your friends and family with your skills. You now have everything you need to create a tasty batch!
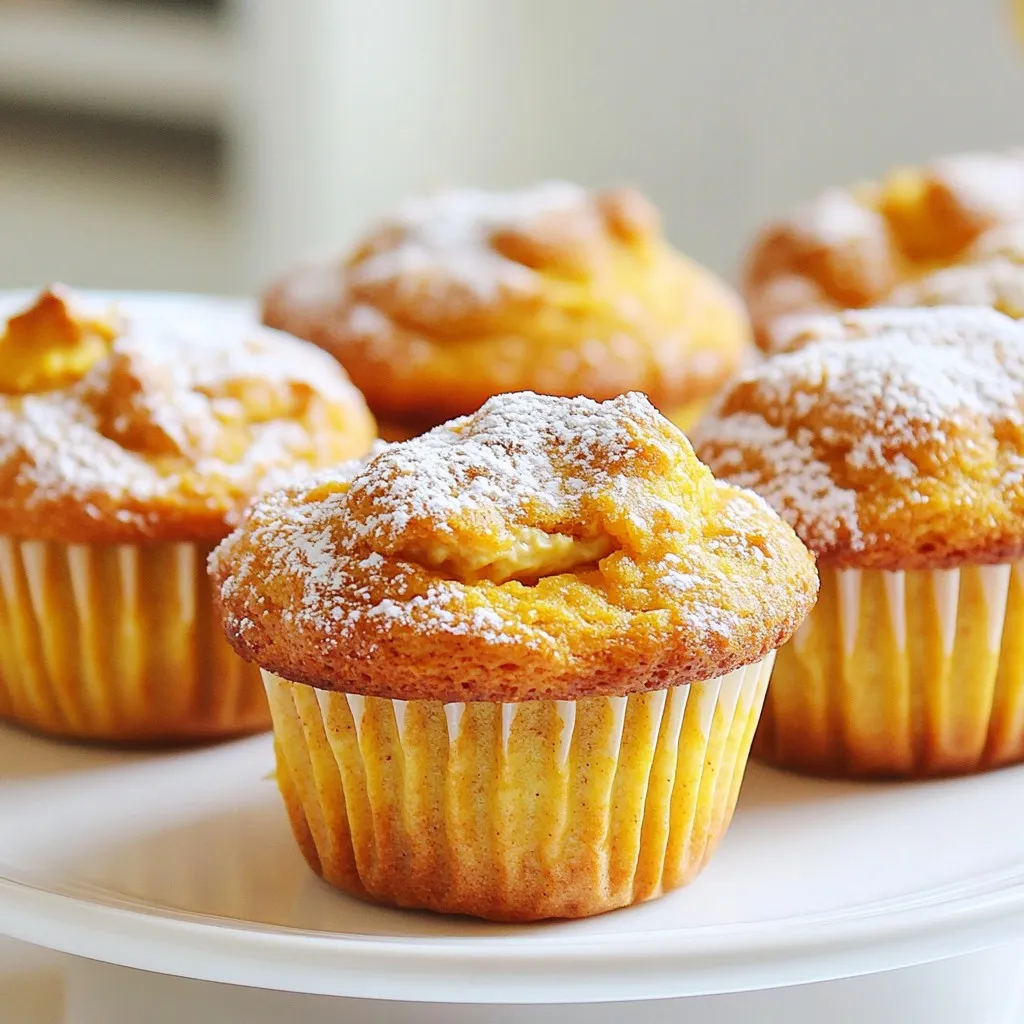
Pumpkin Spice Cream Cheese Muffins Simple Recipe
If you love fall flavors, you’re in for a treat with my Pumpkin Spice Cream Cheese Muffins! This simple recipe combines the warmth of spices
- 16 Oreo cookies, finely crushed - 2 tablespoons unsalted butter, melted - 1 (8 oz) package cream cheese, softened - 1/2 cup powdered sugar - 1 teaspoon pure vanilla extract - 1 cup heavy cream, chilled - 1/2 cup sour cream - Pinch of salt - Extra Oreo cookies for garnish To make No Bake Oreo Cheesecake Cups, you need simple yet tasty ingredients. I love using Oreo cookies for the crust. They add a rich flavor that blends well with the creamy filling. The butter helps the crumbs stick together, making a perfect base. For the filling, I use cream cheese as it gives a smooth texture. Powdered sugar adds sweetness, while vanilla extract enhances the flavor. Heavy cream is key for a light, fluffy texture. Chilling the cream keeps it perfect for whipping. Sour cream adds a slight tang that balances the sweetness. Lastly, a pinch of salt brightens the overall taste. You can use extra Oreo cookies to top each cup. It not only looks great but also adds a crunchy texture. These ingredients come together quickly, making it easy to whip up a delightful treat. - First, take 16 Oreo cookies and crush them finely. You can use a food processor or put them in a bag and crush them with a rolling pin. - Next, melt 2 tablespoons of unsalted butter. Combine the crushed cookies with the melted butter in a medium-sized mixing bowl. Stir until all crumbs are coated. - Now, take a small spoon and measure about 1.5 tablespoons of this mixture. Press it firmly into the bottom of each serving cup. Make sure it is packed well to create a solid crust. - In a large mixing bowl, beat 1 package of softened cream cheese until it is smooth. Use a hand mixer for about 2 minutes to remove any lumps. - Gradually add 1/2 cup of powdered sugar, 1 teaspoon of pure vanilla extract, and a pinch of salt. Mix on low speed until everything is well blended. - In a separate chilled bowl, whip 1 cup of heavy cream on high speed until stiff peaks form. This step should take 2-3 minutes. - Gently fold the whipped cream into the cream cheese mixture. Use a spatula and be careful to keep the mixture light and airy. - Once mixed, add in 1/2 cup of sour cream and stir until just blended. Avoid overmixing to keep the filling fluffy. - Spoon this creamy filling into each cup over the crusts. Smooth the tops with a spatula for a nice look. - Place your cups in the refrigerator to chill for at least 4 hours. For best flavor, let them sit overnight. Just before serving, add extra crushed Oreo cookies on top for a tasty garnish. To get a great crust, press firmly when you place the Oreo mixture in the cups. A compact crust holds together well. I like using a cookie scoop to get even amounts in each cup. This way, all the cups look nice and neat. Whipping the cream is key to a fluffy filling. Start with chilled cream and use high speed. Beat it until you see stiff peaks. When you mix the whipped cream into the cream cheese, use a gentle folding motion. This keeps the airy texture. Avoid stirring too hard, or the filling will lose its lightness. For serving, I love using decorative trays. Arrange the cheesecake cups nicely and add mini spoons. It makes dessert feel more special. You can also garnish with extra crushed Oreo cookies on top. For an extra touch, place a whole Oreo on each cup. It adds charm and a tasty bite. {{image_4}} You can easily change the flavor of your No Bake Oreo Cheesecake Cups. Just add different flavored extracts. Try almond or chocolate extract for a unique twist. You can also mix in other types of cookies. Chocolate chip or mint cookies work great too. These small changes make the dessert feel new and exciting. Toppings can really change the vibe of your cheesecake cups. Fresh fruits like strawberries or blueberries add a nice touch. Whipped cream is another delicious option. For a more decadent treat, pour chocolate ganache or sauce over the top. These toppings make every bite special. If you need to make dietary changes, this recipe is flexible. Use gluten-free cookies for a gluten-free option. There are also dairy-free creams available. These swaps let everyone enjoy the dessert without worry. You can still achieve great taste while meeting dietary needs. To keep your No Bake Oreo Cheesecake Cups fresh, refrigerate them right away. Use airtight containers to store any leftovers. This keeps moisture out and helps maintain the texture. I recommend placing a piece of plastic wrap directly on top of the cups before sealing the container. This extra step helps prevent the cheesecake from drying out. These cheesecake cups stay fresh for about 3 to 5 days in the fridge. Look for signs of spoilage like a sour smell or a change in texture. If the filling appears watery or the crust feels hard, it’s best to throw it away. Enjoy your sweet treat while it's at its best! Yes, you can make this recipe ahead of time. I recommend chilling the cheesecake cups for at least four hours. For the best taste, chill them overnight. This helps the flavors blend well. Plus, it makes serving easy when guests arrive. You can use light cream cheese if you want fewer calories. It will change the texture slightly. Whipped topping can replace heavy cream but will not give the same rich taste. If you choose these options, keep in mind that the flavor may be less creamy. The cheesecake cups last for about 3 to 5 days in the fridge. Store them in an airtight container to keep them fresh. Always check for any signs of spoilage before eating. If they look or smell off, it’s best to throw them away. Yes, you can freeze these cheesecake cups. To do this, cover them tightly with plastic wrap or foil. They will last about 2 months in the freezer. When you’re ready to eat them, thaw in the fridge overnight. Avoid refreezing after thawing to keep the texture nice. You now have an easy way to make no-bake Oreo cheesecake cups. We covered the ingredients, step-by-step instructions, and tips for perfect results. You learned how to vary flavors and store leftovers safely. Remember to use firm pressure for the crust and whip cream correctly for a fluffy filling. With these simple steps, you can impress anyone with your dessert skills. Enjoy making these delicious treats and let your creativity shine!
No Bake Oreo Cheesecake Cups Quick and Easy Delight
Indulge in a sweet treat that requires no baking – No Bake Oreo Cheesecake Cups! This handy dessert combines creamy cheesecake with crunchy Oreo crusts,
- Refrigerated pizza dough - Baking soda - Large egg for egg wash - Coarse sea salt for topping - Granulated sugar - Ground cinnamon - Unsalted butter for brushing To make these tasty cinnamon sugar pretzel bites, gather your ingredients. You will need one package of refrigerated pizza dough. This is the base for your bites. Next, grab half a cup of baking soda. This is key for that pretzel texture. You will also need one large egg, beaten, to brush on top for color. Don’t forget a tablespoon of coarse sea salt for that salty kick. For the sweet part, have half a cup of granulated sugar and two teaspoons of ground cinnamon ready. Finally, you will need a quarter cup of unsalted butter, melted, to brush on the warm pretzel bites. These ingredients come together to create a snack that is both soft and crunchy. Each item plays a role in achieving the perfect blend of flavors. With these ingredients, you will be on your way to making a delicious treat everyone will love! - Preheat your oven to 425°F (220°C). - Line a baking sheet with parchment paper to prevent sticking. - Lightly flour a clean surface and roll out the pizza dough. Aim for a rectangle about 1/2 inch thick. - Use a sharp knife or pizza cutter to slice the dough into strips that are about 1 inch wide. Then cut each strip into 1-inch squares for bite-sized pieces. - In a large pot, bring 4 cups of water to a boil. - Carefully add 1/2 cup of baking soda to the boiling water. This step can cause bubbling, so watch out! - Boil the pretzel bites in small batches. Each batch should cook for 30 seconds. - Use a slotted spoon to remove the bites and place them on the prepared baking sheet. - Brush each pretzel bite with the beaten egg. This will make them golden as they bake. - Sprinkle a pinch of coarse sea salt on top of each bite for flavor. - Place the baking sheet in the oven and bake for 8-10 minutes. Check for a puffed and golden brown look. - While the pretzels bake, mix 1/2 cup of granulated sugar and 2 teaspoons of ground cinnamon in a medium bowl. - Once baked, take the pretzel bites out of the oven. Brush each one with melted butter for extra flavor. - Toss the warm pretzel bites in the cinnamon-sugar mixture. Make sure they are evenly coated for the perfect sweet touch. To get the right texture, keep the dough about 1/2 inch thick. If it's too thin, the bites may burn. If it's too thick, they will not cook well inside. Boiling time matters too. Boil each batch for 30 seconds. This step gives the pretzels a nice chewy texture. If you boil them too long, they can become tough. Serve pretzel bites warm. They taste great with dips. A cream cheese dip or chocolate sauce works well. For a fun look, arrange them on a wooden board. Sprinkle extra cinnamon sugar on top. This makes them look inviting and delicious. One mistake is overcooking the bites. Keep an eye on them while baking. They should be golden brown, not dark. Undercooking is another issue. If they are too soft, they won't have that pretzel texture you want. Also, be careful when boiling. Adding too much baking soda at once can create a mess. Do it slowly to avoid bubbling over. {{image_4}} You can easily change up the flavor of your cinnamon sugar pretzel bites. - For a sweet twist, try chocolate-covered cinnamon sugar pretzel bites. Dip the warm bites in melted chocolate after coating them with cinnamon sugar. This adds a rich, sweet layer that kids and adults love. - If you want a fall flavor, make pumpkin spice variation. Mix pumpkin spice into the cinnamon sugar for a cozy taste. This works great for autumn gatherings or holiday snacks. If you need a gluten-free option, you can substitute the pizza dough. Use gluten-free pizza dough available at most stores. You can also make your own using gluten-free flour blends. This way, everyone can enjoy delicious pretzel bites! Not every pretzel bite has to be sweet. You can make savory versions too! - Cheese-stuffed pretzel bites are a great choice. Simply add small pieces of your favorite cheese inside the dough before boiling. When baked, the cheese melts and creates a gooey center. - For a garlic kick, try garlic butter pretzel bites. Brush the hot bites with melted garlic butter after baking. Sprinkle with a bit of salt for extra flavor. These bites are perfect for a movie night or game day! To keep your cinnamon sugar pretzel bites fresh, place them in an airtight container. This helps keep them soft and tasty. You can also wrap them in plastic wrap if you don’t have a container. They stay fresh for about 2 to 3 days at room temperature. If you want them to last longer, store them in the fridge. In the fridge, they can last about a week. When it's time to enjoy your pretzel bites again, you can use either the oven or the microwave. The oven is better for keeping them crispy. Preheat your oven to 350°F (175°C) and heat the bites for about 5 to 7 minutes. If you use the microwave, heat them for about 15 to 20 seconds. But be careful! Microwaving too long can make them chewy, not crispy. So, the oven is the best choice to keep them warm and delicious. Cinnamon sugar pretzel bites last about 2 to 3 days when stored properly. Keep them in an airtight container to keep them fresh. If you want them to last longer, you can freeze them. Just place them in a freezer bag. They will stay good for up to 2 months in the freezer. Absolutely! You can use homemade pizza dough for these pretzel bites. Just make sure the dough is soft and easy to roll. The key is to handle it gently. This way, you get nice and fluffy bites. There are many tasty dipping sauces you can try! Here are a few ideas: - Cream cheese dip - Chocolate sauce - Caramel sauce - Creamy vanilla icing These sauces add a fun twist to your pretzel bites and make them even more enjoyable. Yes, boiling the pretzel bites is key to getting that classic pretzel texture. The baking soda in the water helps create a shiny crust. It also gives the pretzel bites a nice chew. Skipping this step might lead to softer bites without that pretzel flavor. You now have a simple guide to make delicious cinnamon sugar pretzel bites. We covered ingredients, step-by-step instructions, and tips to ensure great texture. You learned how to store leftovers and reheat them for the best taste. Remember, boiling the bites is key to that classic pretzel flavor. Don’t forget to explore flavor variations to keep things exciting. Enjoy the process and share these tasty treats with friends and family!
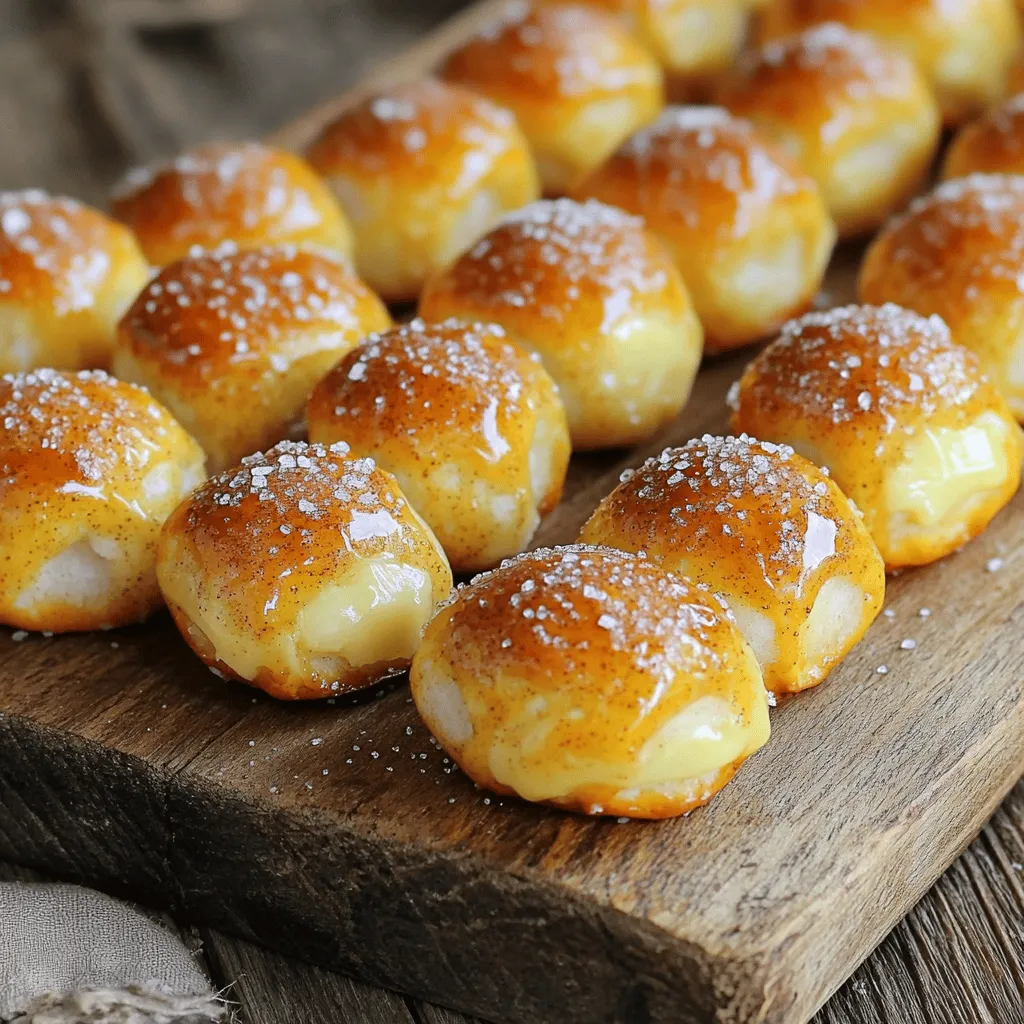
Cinnamon Sugar Pretzel Bites Easy and Delicious Snack
Craving a sweet and salty snack? Let’s whip up some Cinnamon Sugar Pretzel Bites! They’re easy to make and perfect for any occasion. With just
- 2 cups all-purpose flour - 1 cup granulated sugar - ½ cup light brown sugar, lightly packed - 1 tablespoon baking powder - ½ teaspoon baking soda - ½ teaspoon salt - 1 cup buttermilk (or substitute with 1 cup milk mixed with 1 tablespoon vinegar) - 2 large eggs - ½ cup unsalted butter, melted and allowed to cool slightly - 2 teaspoons pure vanilla extract - 1 ½ cups semisweet chocolate chips - Optional: coarse sugar for topping Gather these ingredients before you start. This makes the process smooth. Measure everything accurately. This helps your muffins rise perfectly and taste amazing. Use fresh baking powder and soda for the best results. When mixing wet and dry ingredients, use separate bowls. This ensures everything blends well. The buttermilk gives a nice tang. If you use the vinegar and milk mix, let it sit for five minutes. This creates a good substitute for buttermilk. For the chocolate chips, I recommend using high-quality semisweet chips. They melt beautifully and add rich flavor. You can also reserve some for the top of the muffins. This will make them look more appealing. If you want a crunchy top, sprinkle some coarse sugar on the muffins before baking. It adds texture and sweetness. These simple ingredients come together to create a delightful treat you’ll love! 1. First, preheat your oven to 400°F (200°C). This makes sure the muffins bake evenly and rise nicely. 2. Next, prepare your muffin tin. You can line it with paper liners or spray it with cooking spray. This helps the muffins come out easily. 3. In a large bowl, mix 2 cups of all-purpose flour, 1 cup of granulated sugar, ½ cup of brown sugar, 1 tablespoon of baking powder, ½ teaspoon of baking soda, and ½ teaspoon of salt. Whisk these dry ingredients well. Make sure there are no lumps. 4. In another bowl, whisk together 1 cup of buttermilk (or your milk and vinegar mix), 2 large eggs, ½ cup of melted unsalted butter, and 2 teaspoons of vanilla extract. Mix until everything is smooth. 1. Make a well in the center of your dry mix. Pour the wet mixture into this well. 2. Use a spatula or wooden spoon to stir gently. Mix just until everything is combined. It’s okay if there are a few lumps. This helps keep the muffins fluffy. 3. Carefully fold in 1 ½ cups of semisweet chocolate chips. Save a handful to top the muffins later. 1. Use a cookie scoop or measuring cup to fill each muffin liner almost to the top. 2. Sprinkle the saved chocolate chips on top. If you want, add a pinch of coarse sugar for a sweet crunch. 3. Place the muffin tin in your preheated oven. Bake for 18-22 minutes. Check for doneness by inserting a toothpick into the center. It should come out clean or with a few moist crumbs. 4. After baking, let the muffins cool in the pan for about 5 minutes. Then, move them to a wire rack to cool completely. To get those perfect bakery-style muffins, avoid overmixing the batter. When you mix too much, the muffins can become tough. Stir gently until the wet and dry ingredients blend. You want some lumps. They help keep the muffins soft. Measuring ingredients accurately is key. Use dry measuring cups for flour and sugar. Spoon flour into the cup, then level it off with a knife. This method ensures you don’t pack in too much flour. Accurate measuring leads to the best muffin texture. Using high-quality chocolate chips can make a big difference. Choose semisweet or dark chocolate chips for a rich flavor. Good chocolate melts beautifully and adds a lovely texture. You can also mix in milk chocolate for a sweeter muffin. Optional toppings can add extra crunch. A sprinkle of coarse sugar on top before baking gives a sweet, sparkly finish. It adds a nice contrast to the soft muffin. You can also try adding nuts or oats for a different texture. Serve the muffins warm for the best experience. Warm muffins taste fresh and inviting. You can dust them with powdered sugar for a fun touch, too. This simple step makes them look fancy. For a creative display, arrange muffins on a rustic wooden board. Let colorful paper liners peek out to catch the eye. You can even use a cake stand to elevate the muffins. This makes your treats feel special and adds to the bakery-style charm. {{image_4}} You can make your muffins even more fun! Adding nuts or dried fruit gives a nice crunch and flavor. Try walnuts, pecans, or raisins. Each bite will surprise you. For a twist, swap chocolate chips for white chocolate or butterscotch. This change can make the muffins taste sweeter and different. If you want gluten-free muffins, use a gluten-free flour blend. Many blends work well in baking. You can also make these muffins vegan. Use flax eggs instead of regular eggs. Just mix one tablespoon of ground flaxseed with three tablespoons of water. Let it sit for five minutes to thicken. For the buttermilk, use plant-based milk with vinegar. This keeps your muffins soft and tasty. Each season brings new flavors to enjoy. In fall, add pumpkin spice to the batter for a warm flavor. Just a teaspoon will do! In summer, try adding seasonal fruits like blueberries or chopped peaches. They add freshness and sweetness. These twists keep your muffins exciting all year long! To keep your bakery-style chocolate chip muffins fresh, store them at room temperature. Place them in an airtight container for up to three days. This way, they stay soft and tasty. If you want to keep them longer, consider refrigerating or freezing. For freezing, wrap each muffin tightly in plastic wrap. Then, place them in a freezer-safe bag. They can last up to three months in the freezer. When it's time to enjoy your muffins again, you can reheat them in two ways. The microwave is quick. Heat each muffin for about 15-20 seconds. If you want a crispier top, use the oven. Preheat it to 350°F (175°C) and bake for about 5-10 minutes. To revive muffins after storage, sprinkle a few drops of water on them before reheating. This adds moisture back into the muffin. Fresh muffins usually last about three days at room temperature. If stored properly in the fridge, they can stay good for about a week. Watch for signs of spoilage. If you see mold or if they smell off, it’s best to toss them. Fresh muffins should feel soft and springy to the touch. If they feel hard or dry, it’s time to say goodbye. Yes, you can use regular milk. Just mix 1 cup of milk with 1 tablespoon of vinegar. Let it sit for 5 minutes to sour. This gives you a great substitute for buttermilk. It helps keep the muffins moist and fluffy. To stop muffins from sticking, use good-quality liners. Lightly spray them with cooking spray for extra protection. You can also grease the muffin tin with butter or oil before adding the liners. This adds a nice touch and makes it easier to remove the muffins. You can prepare the muffin batter ahead of time. Store it in the fridge for up to 2 hours. However, I recommend baking the muffins fresh for the best taste. If you wait too long, muffins may become dense, and they may not rise well. Dense muffins can happen for a few reasons. Overmixing the batter is a common mistake. It develops the gluten too much. Also, make sure to measure your flour correctly. Too much flour can make muffins heavy. Use a spoon to scoop flour into a measuring cup, then level it off. In this post, we explored the key ingredients for muffins and detailed each step of the process. I shared helpful tips on achieving bakery-quality muffins and suggested fun variations to try. Remember, using the right ingredients and techniques brings out the best flavor and texture. Store your muffins properly to keep them fresh. With these insights, you can confidently create delightful muffins at home. Enjoy the joy of baking and sharing your tasty treats!
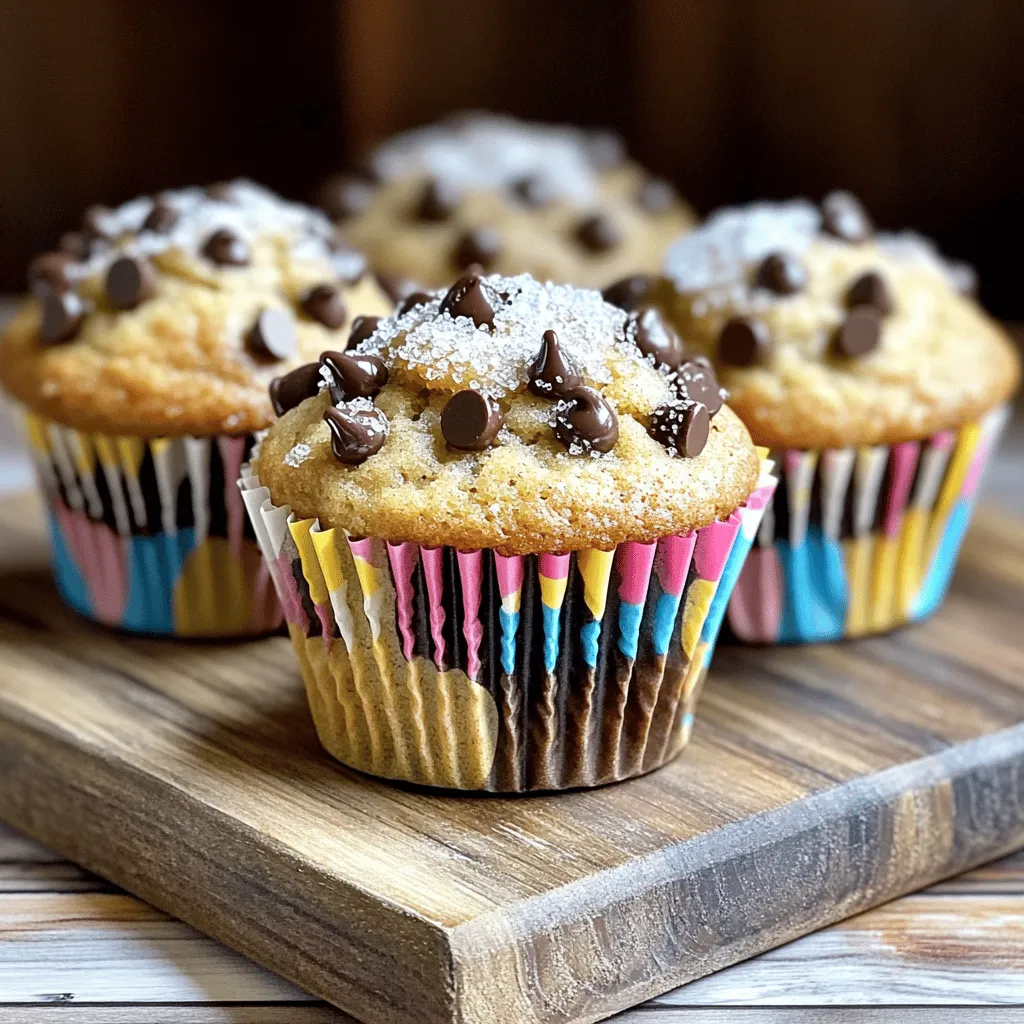
Bakery Style Chocolate Chip Muffins Simple Recipe
Are you ready to bake up some delicious Bakery Style Chocolate Chip Muffins? This simple recipe brings that warm, cozy bakery feel right to your
- 2 ½ cups all-purpose flour - ¼ cup granulated sugar - 1 packet (2 ¼ tsp) instant yeast - 1 tsp ground cinnamon - ½ tsp ground nutmeg These ingredients form the base of your pumpkin cinnamon rolls. All-purpose flour gives the dough structure. Granulated sugar adds sweetness. Instant yeast makes the rolls rise and become fluffy. Ground cinnamon and nutmeg bring in warm, cozy flavors that scream fall. - ¼ cup brown sugar - 1 tbsp ground cinnamon - ¼ cup unsalted butter, softened - ½ cup chopped pecans (optional) The filling makes these rolls special. Brown sugar adds a deep, caramel taste. Ground cinnamon enhances the spice profile. Unsalted butter keeps the filling rich and creamy. If you like, add chopped pecans for crunch and flavor. - 1 cup powdered sugar - 2 tbsp cream cheese, softened - 1-2 tbsp milk - ¼ tsp vanilla extract The glaze brings everything together. Powdered sugar provides sweetness. Cream cheese adds richness. Milk helps achieve the right consistency. Vanilla extract gives a lovely aroma that pairs well with the rolls. Each ingredient plays a key role. They combine to create a warm, inviting treat perfect for any fall gathering. 1. Combine dry ingredients: In a large bowl, mix 2 ½ cups of all-purpose flour, ¼ cup of granulated sugar, 1 packet of instant yeast, 1 tsp of ground cinnamon, ½ tsp of ground nutmeg, and ½ tsp of salt. This mix helps the dough rise well. 2. Mix wet ingredients: In another bowl, whisk together ½ cup of warmed milk, ¼ cup of melted unsalted butter, ½ cup of pumpkin puree, 1 large egg, and ¼ tsp of vanilla extract. This makes your dough rich and tasty. 3. Combine mixtures and form dough: Gradually pour the wet mix into the dry mix. Stir until combined, then add the remaining ½ cup of flour. Keep mixing until a soft dough forms. 1. Knead the dough: Place the dough on a floured surface. Knead for about 5-7 minutes. The dough should feel smooth and elastic. This step is key for a great texture. 2. First rise: Put the dough in a greased bowl. Cover it with a kitchen cloth and let it rise in a warm spot for about 1 hour. It should double in size. 1. Prepare the filling: In a small bowl, blend ¼ cup of brown sugar, 1 tbsp of ground cinnamon, ¼ cup of softened unsalted butter, and ½ cup of chopped pecans (if using). This creates a delicious filling. 2. Roll the dough and form rolls: After the first rise, punch the dough down gently. Roll it into a 12x18-inch rectangle on a floured surface. Spread the filling evenly over the dough, reaching all the edges. Starting from one long edge, roll it tightly into a log. Slice the log into 12 equal pieces. Place these slices in a greased baking dish, close together. 1. Second rise: Cover the dish with a cloth. Let the rolls rise again for 30-40 minutes. They should look puffy and expanded. 2. Bake the rolls: Preheat your oven to 350°F (175°C). Bake the rolls for 25-30 minutes until golden brown on top. They should feel slightly firm when touched. 1. Prepare the glaze: In a medium bowl, whisk together 1 cup of powdered sugar, 2 tbsp of softened cream cheese, 1-2 tbsp of milk, and ¼ tsp of vanilla extract. Adjust the milk for your desired glaze thickness. 2. Drizzle glaze over rolls: Once the rolls cool for about 5 minutes, drizzle the glaze generously over them. This adds the final touch to your warm cinnamon rolls. - To ensure proper rising, keep the dough in a warm area. Yeast loves warmth. - For perfect golden rolls, bake them at 350°F for 25-30 minutes. Check for a firm touch. - Adding spices like ginger or cloves can boost the flavor. Experiment to find your favorite mix. - Warm ingredients are key. Warm milk and butter help the dough rise better. - Serve the warm cinnamon rolls on a rustic wooden platter. It adds charm. - Drizzle extra glaze over the top for a shiny finish. It draws the eye. - Garnish with ground cinnamon and chopped pecans. This enhances the look and taste. {{image_4}} To make gluten-free pumpkin cinnamon rolls, you need to substitute the all-purpose flour. Use a good gluten-free blend. Look for one that includes xanthan gum, as this helps with texture. You may also need to adjust the liquid in the recipe. Gluten-free flour can absorb more moisture. Start with the same amounts of milk and pumpkin puree. If the dough seems too dry, add a bit more milk until it feels right. For vegan pumpkin cinnamon rolls, swap out the egg and dairy ingredients. Use a flaxseed egg. To make it, mix 1 tablespoon of ground flaxseed with 2.5 tablespoons of water. Let it sit for a few minutes to thicken. Instead of milk and butter, use almond milk and coconut oil. They work well in this recipe. Make sure the coconut oil is melted but not hot. This keeps the dough from cooking the flaxseed egg. To make your rolls extra special, you can add chocolate chips. Mix in half a cup of your favorite chips when spreading the filling. Another fun way to change the flavor is to mix in other spices. Try adding cardamom or ginger for a warm twist. Just a pinch can make a big difference! To keep your pumpkin cinnamon rolls fresh, store them at room temperature. Use an airtight container to prevent them from drying out. If you have leftover rolls, place a piece of parchment paper between layers to avoid sticking. For best texture, eat them within two days. The rolls are soft and delightful when fresh, but they can still be tasty for a short time. If you want to keep your rolls longer, freezing is a great option. First, allow the baked rolls to cool completely. Then, wrap each roll tightly in plastic wrap. Place them in a freezer-safe bag or container. They can last up to three months in the freezer. To reheat, you can take them out and let them thaw in the fridge overnight. When ready, warm them in the oven at 350°F (175°C) for about 10 minutes. This method helps restore their soft, fluffy texture. You can also microwave them for about 15-20 seconds, but be careful not to overdo it. Enjoy the warm flavors again, just like when they were fresh! To make your cinnamon rolls fluffier, focus on the dough. Use warm milk, around 110°F (43°C), to activate the yeast. Knead the dough well for 5-7 minutes. This builds gluten, which helps the rolls rise. Let the dough rise in a warm place until it doubles in size. This step is crucial for a light texture. Yes, you can prepare the dough in advance. After kneading, place it in a greased bowl and cover it. Refrigerate the covered bowl overnight. In the morning, let the dough sit at room temperature for about 30 minutes before rolling it out. This makes it easier to handle and keeps your rolls fresh. You can use either fresh or canned pumpkin puree. Canned pumpkin is convenient and has a smooth texture. It also saves time. Fresh pumpkin can give a richer flavor but requires cooking and pureeing. If you choose fresh, select a sugar pumpkin for the best taste and sweetness. To restore freshness, reheat your leftover rolls. Preheat your oven to 350°F (175°C). Place the rolls in a baking dish and cover with foil. Heat for about 10-15 minutes until warm. You can also microwave individual rolls for 20-30 seconds. This softens them and makes them taste fresh again. This blog post covered how to make delicious pumpkin cinnamon rolls. You learned about key ingredients, step-by-step instructions, and helpful tips for baking. We also explored variations and storage methods. These rolls can make any meal special. With practice, you'll impress friends and family with your baking. Remember, the joy of sharing what you make is the best part. Keep experimenting and enjoy your baking journey!
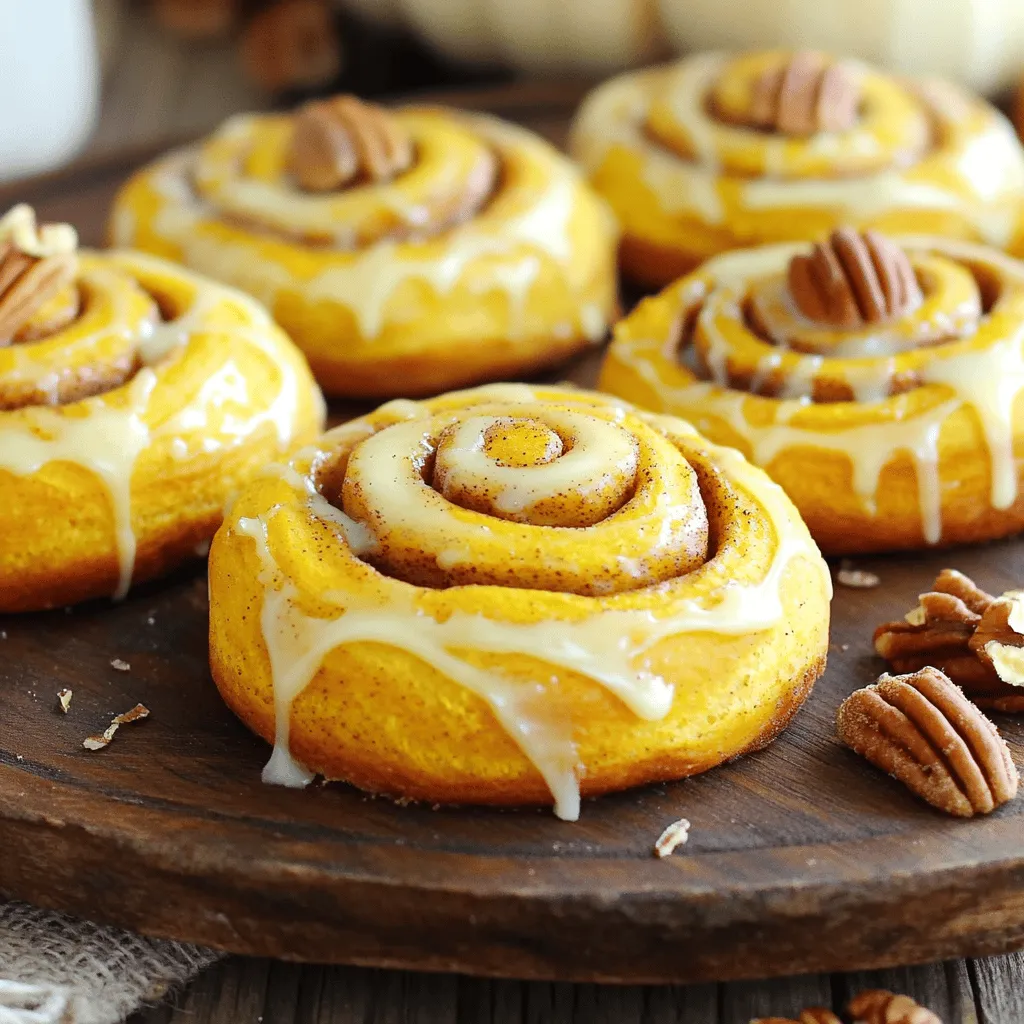
Pumpkin Cinnamon Rolls Irresistible Fall Treats
Fall is here, and it’s time to indulge in a warm, cinnamon-scented delight! Imagine sinking your teeth into soft, fluffy Pumpkin Cinnamon Rolls, perfectly spiced
To make super soft lemon cookies, you will need the following ingredients: - 2 ½ cups all-purpose flour - 1 teaspoon baking soda - ½ teaspoon baking powder - ½ teaspoon salt - ½ cup unsalted butter, softened - 1 cup granulated sugar - 1 large egg - 2 tablespoons lemon zest - 1 tablespoon lemon juice - 1 teaspoon vanilla extract - ½ cup powdered sugar Each ingredient plays a key role. The flour gives structure, while the baking soda and baking powder help the cookies rise. Salt enhances flavor and balances sweetness. Softened butter mixes well with sugar, creating a fluffy base. The egg adds moisture and binds everything together. Fresh lemon zest and juice bring that bright, zesty flavor that makes these cookies special. Lastly, vanilla extract rounds out the taste. When you dust the finished cookies with powdered sugar, it adds a sweet touch that makes them look and taste delightful. This combination of ingredients creates a treat that's hard to resist! - Preheat oven to 350°F (175°C). - Prepare baking sheets with parchment. - First, combine the dry ingredients. In a bowl, whisk together 2 ½ cups of all-purpose flour, 1 teaspoon of baking soda, ½ teaspoon of baking powder, and ½ teaspoon of salt. This mix is important for texture. - Next, beat ½ cup of softened unsalted butter with 1 cup of granulated sugar until fluffy. Use an electric mixer for best results. This step takes about 3-4 minutes. - Add 1 large egg, 2 tablespoons of lemon zest, 1 tablespoon of lemon juice, and 1 teaspoon of vanilla extract to the butter-sugar mix. Blend until smooth and all ingredients are mixed well. - Gradually incorporate the dry mixture into the wet mixture. Mix gently until just blended. It's fine if some flour streaks remain. - Using a cookie scoop or two tablespoons, portion out the dough onto the baking sheets. Leave about 2 inches of space between each cookie. - Lightly flatten the tops of the cookies. Use the back of a glass or your palm. These cookies won’t spread much when baking. - Place the baking sheets in the oven and bake for 10-12 minutes. The cookies should be lightly golden around the edges but soft in the center. - After baking, remove the sheets from the oven. Let the cookies cool on the sheets for about 5 minutes. This helps them firm up. - Gently transfer the cookies to a wire rack. Allow them to cool completely. Once cool, dust with powdered sugar for a sweet finish. These steps ensure you create soft, tasty lemon cookies that everyone will love. To get your cookies super soft, use room temperature ingredients. This means your butter and egg should not be cold. Soft butter mixes better, making a fluffy dough. When mixing your dough, be gentle. Overmixing can make cookies tough. Stop mixing as soon as you see no flour streaks. It’s okay if the dough looks a bit lumpy. For a lovely finish, dust your cookies with powdered sugar. This adds a sweet touch. Use a fine sieve to sprinkle it on evenly. You can also garnish your cookies. Add thin slices of fresh lemon on the side. A few mint leaves can make it pop. This makes your cookies look fancy and inviting. One common mistake is not measuring flour correctly. Too much flour can make cookies dry. Use a kitchen scale or scoop flour lightly into your measuring cup. Another mistake is overbaking. Keep an eye on your cookies while they bake. They should be lightly golden around the edges. The centers should feel set but soft. If they look too brown, they may be overbaked. {{image_4}} You can add poppy seeds for a fun crunch. Just mix in 2 tablespoons of poppy seeds with the dry ingredients. This small change adds great texture. You can also try different citrus zest. Lime or orange zest gives a new twist. Each option brings its own unique flavor to the cookie. If you need gluten-free cookies, use a gluten-free flour blend. Look for blends made for baking, as they work best. For egg replacements, you can use applesauce. A quarter cup of unsweetened applesauce works well. You can also use flaxseed meal mixed with water. This gives a similar texture and binds the dough. For the holidays, add spices like cinnamon or nutmeg. Just a pinch can make these cookies festive. In summer, mix in fresh berries. Blueberries or raspberries blend well with lemon. They add color and a juicy burst of flavor. These seasonal changes keep the recipe fun and fresh. To keep your super soft lemon cookies fresh, store them in an airtight container. This helps maintain their chewy texture. Place a piece of bread inside the container. The bread will help keep the cookies moist. You can also put wax paper between layers of cookies to prevent sticking. For best results, store your cookies at room temperature. Avoid keeping them in the fridge, as cold can make them dry. You can freeze cookie dough to bake later. Scoop the dough into balls and place them on a baking sheet. Freeze them for about one hour until firm. Then, transfer the frozen dough balls into a freezer bag. They can stay fresh for up to three months. When you're ready to bake, take out the dough. Let it thaw in the fridge overnight before baking. This helps the cookies bake evenly. You can also bake from frozen. Just add an extra minute or two to the baking time. At room temperature, your lemon cookies last about five days. Keep them in an airtight container for the best quality. Watch for signs of spoilage. If the cookies smell off or look hard, it’s time to toss them. Fresh cookies should be soft and inviting, so enjoy them while they last! Soft cookies come from a mix of key ingredients. The butter gives moisture. The egg adds richness and helps bind. Flour type matters too. Using all-purpose flour creates a tender texture. Baking soda helps them rise but keep the soft feel. Yes, you can use lemon extract. However, the flavor is stronger. Extract gives a more concentrated taste. Juice offers fresh notes that brighten the cookie. If you use extract, use less than the juice amount. Start with 1 teaspoon and adjust to taste. Yes, lemon cookies freeze well. To freeze, let them cool completely. Place cookies in a single layer in an airtight container. Separate layers with parchment paper. For thawing, simply leave them at room temperature. They'll taste fresh and soft, just like when baked! To make lemon cookies, we combined simple ingredients and followed easy steps. Proper techniques help create the perfect texture and flavor. Remember to measure your flour right to avoid common mistakes. You can even add fun twists with seasonal flavors or dietary swaps. Store your cookies well to keep them fresh for longer. Enjoy baking these delightful treats for yourself or share them with friends. With these tips, you're ready to create delicious lemon cookies that everyone will love!
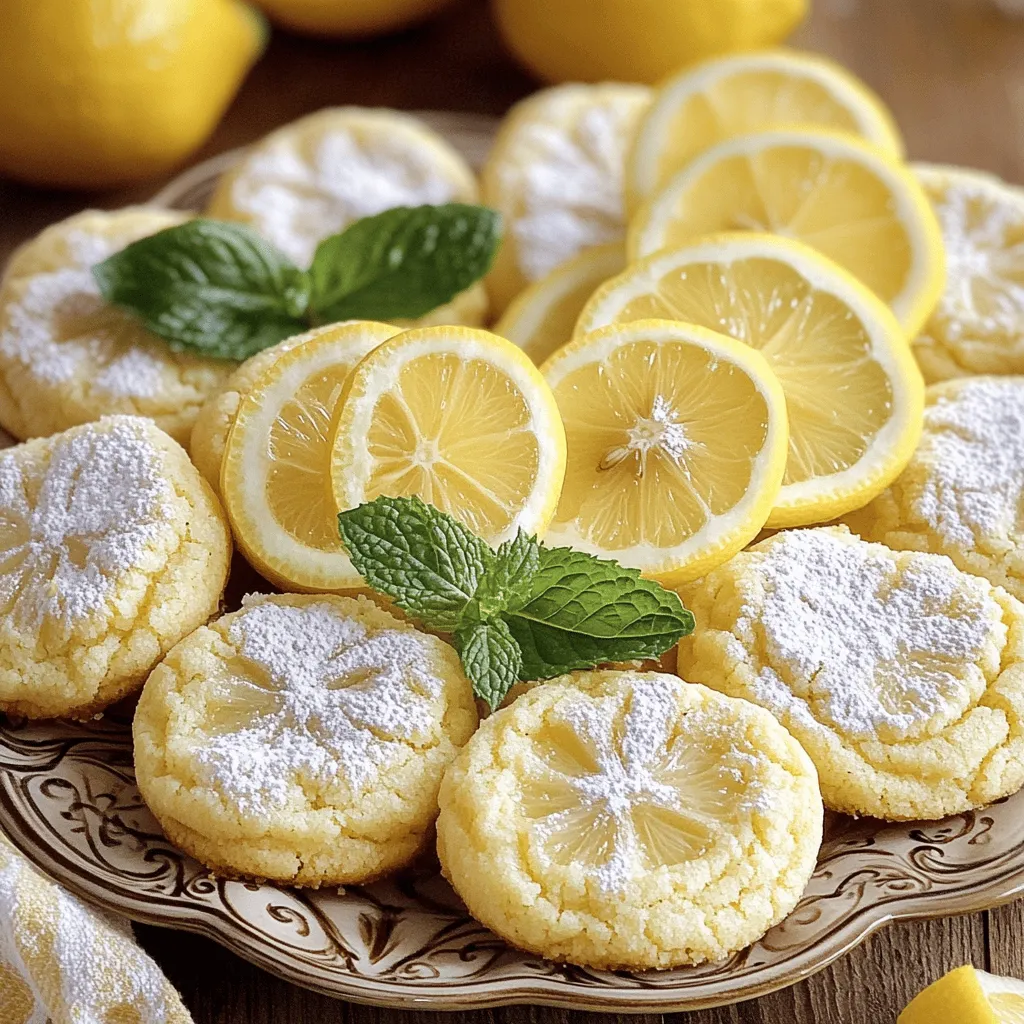
Super Soft Lemon Cookies Irresistible Treat Recipe
If you crave a sweet treat that bursts with flavor, you need these Super Soft Lemon Cookies. With a fluffy texture and bright lemon taste,
- 1 ½ cups apple cider - 2 cups all-purpose flour - 1 teaspoon baking powder - 1 teaspoon baking soda - ½ teaspoon ground cinnamon - ¼ teaspoon ground nutmeg - ½ teaspoon salt - ½ cup packed brown sugar - ½ cup granulated sugar - 2 large eggs - ½ cup unsweetened applesauce - ¼ cup melted unsalted butter - 1 teaspoon vanilla extract - ½ cup cinnamon sugar (for coating) Each ingredient plays a key role in making these baked apple cider donuts a delight. Apple cider adds a sweet and tangy flavor that reminds me of fall. The all-purpose flour gives the donuts structure, while the baking powder and baking soda ensure they rise well. Ground cinnamon and nutmeg bring warmth and spice to the mix. Brown sugar adds moisture and a rich flavor, while granulated sugar balances the sweetness. Eggs help bind everything together, and unsweetened applesauce keeps the donuts moist. The melted butter adds richness, and vanilla extract enhances the overall flavor. Finally, cinnamon sugar coats the donuts for a sweet and crunchy finish. Using fresh, high-quality apple cider makes a noticeable difference. It's best to avoid cider with added sugars or preservatives. You want pure apple flavor to shine through. When you gather these ingredients, you set the stage for a perfect fall treat. Preheat your oven to 350°F (175°C). Grease your donut pan with cooking spray. You can also use softened butter. This step helps the donuts come out easily after baking. Pour 1 ½ cups of apple cider into a medium saucepan. Bring it to a gentle boil over medium heat. Then, reduce the heat to low and let it simmer. You want it to reduce in volume to about ¾ cup. This should take 10 to 15 minutes. After that, remove it from heat and let it cool slightly. In a large bowl, mix the dry ingredients. Combine 2 cups of all-purpose flour, 1 teaspoon of baking powder, 1 teaspoon of baking soda, ½ teaspoon of ground cinnamon, ¼ teaspoon of ground nutmeg, and ½ teaspoon of salt. Whisk these until they're even. In another bowl, whisk together ½ cup of packed brown sugar, ½ cup of granulated sugar, and 2 large eggs until smooth. Add ½ cup of unsweetened applesauce, ¼ cup of melted unsalted butter, 1 teaspoon of vanilla extract, and the cooled apple cider. Mix everything well. Now, pour the wet mix into the dry mix. Gently fold them together with a spatula. Don’t overmix; this keeps the donuts light. Transfer the batter to a piping bag or a zip-top bag. Cut off a small corner. Pipe the batter into each cavity of the greased donut pan, filling them about ¾ full. This allows room for the donuts to rise. Place the pan in the oven and bake for 12 to 15 minutes. They are done when they spring back when touched lightly. A toothpick should come out clean when inserted in the center. Let the donuts cool in the pan for about 5 minutes. After that, gently transfer them to a wire rack to cool completely. Once they are cool, toss each donut in ½ cup of cinnamon sugar. Make sure they are well coated for that sweet and spicy finish. Enjoy your delicious fall treat! To get soft and fluffy donuts, mix the batter gently. When you combine wet and dry ingredients, use a spatula. Fold them together until just combined. If you overmix, the donuts may turn out tough. You want a light texture, so be careful. Adding spices can make your donuts even better. Try a pinch of ground ginger for warmth. A little allspice can add depth. You can also mix in some lemon zest for a fresh twist. These small tweaks can boost the flavor profile. Greasing the donut pan is key. Use cooking spray or softened butter for easy release. After baking, let the donuts cool in the pan for a few minutes. Then, transfer them to a wire rack. Clean the pan with warm soapy water to keep it in good shape. {{image_4}} You can add a sweet glaze to your donuts. To make the glaze, mix powdered sugar with apple cider. Start with 1 cup of powdered sugar and add 2-3 tablespoons of apple cider. Stir until smooth. Dip each cooled donut into the glaze, letting any extra drip off. This glaze adds a nice shine and extra sweetness. If you want vegan donuts, replace eggs with flax eggs. Mix 1 tablespoon of ground flaxseed with 2.5 tablespoons of water. Let it sit for 5 minutes to thicken. For gluten-free donuts, swap all-purpose flour with a 1:1 gluten-free flour blend. The texture stays light and fluffy, just like the original. Stuffing donuts can make them even more fun! Consider using cream cheese filling or apple pie filling. To fill, use a piping bag. Insert the tip into the donut and squeeze gently to add your chosen filling. You can also try jam or chocolate ganache for a delightful surprise. To keep your baked apple cider donuts fresh, store them in an airtight container. This helps lock in moisture and keeps them soft. Place a paper towel at the bottom of the container to absorb extra moisture. Store them at room temperature for up to three days. If you want to keep them longer, the fridge is not the best place as it can dry them out. You can freeze your donuts for later enjoyment. If they are uncoated, let them cool completely. Place them in a single layer on a baking sheet and freeze for about an hour. Once they are firm, transfer them to a freezer bag. Squeeze out the air and seal tightly. You can freeze coated donuts too, but they might lose some of their crunch. They will stay good for up to three months. When you're ready to enjoy frozen donuts, let them thaw in the fridge overnight. For a warm treat, you can reheat them in the oven. Preheat your oven to 350°F (175°C). Place the donuts on a baking sheet and heat for about 5 to 8 minutes. This keeps them soft and brings back that fresh-baked taste. You can also use a microwave for quick reheating, but they may become a bit chewy. Enjoy your delicious donuts warm! Yes, you can use store-bought apple cider. Look for fresh, unfiltered cider for the best taste. You can also try spiced cider for extra flavor. Both options work well in this recipe. If you have homemade cider, that's even better! To check if the donuts are done, lightly touch the top. They should spring back. You can also insert a toothpick into the center. If it comes out clean, the donuts are ready. Keep an eye on them; they usually bake for 12-15 minutes. These donuts are great on their own. You can serve them with caramel sauce for dipping. A cream cheese drizzle adds a nice touch too. Arrange them on a pretty plate and sprinkle more cinnamon sugar on top. Enjoy them with hot cider or coffee! In this blog post, we covered a delightful apple cider donut recipe, including ingredients, step-by-step instructions, and helpful tips. I shared how to prepare the dough, achieve the perfect texture, and explore tasty variations. Remember, small changes can lead to big flavors. Whether you bake for yourself or share with others, homemade donuts bring joy. Store them well, and enjoy fresh flavors over time. Dive into baking these treats and make great memories in the kitchen!
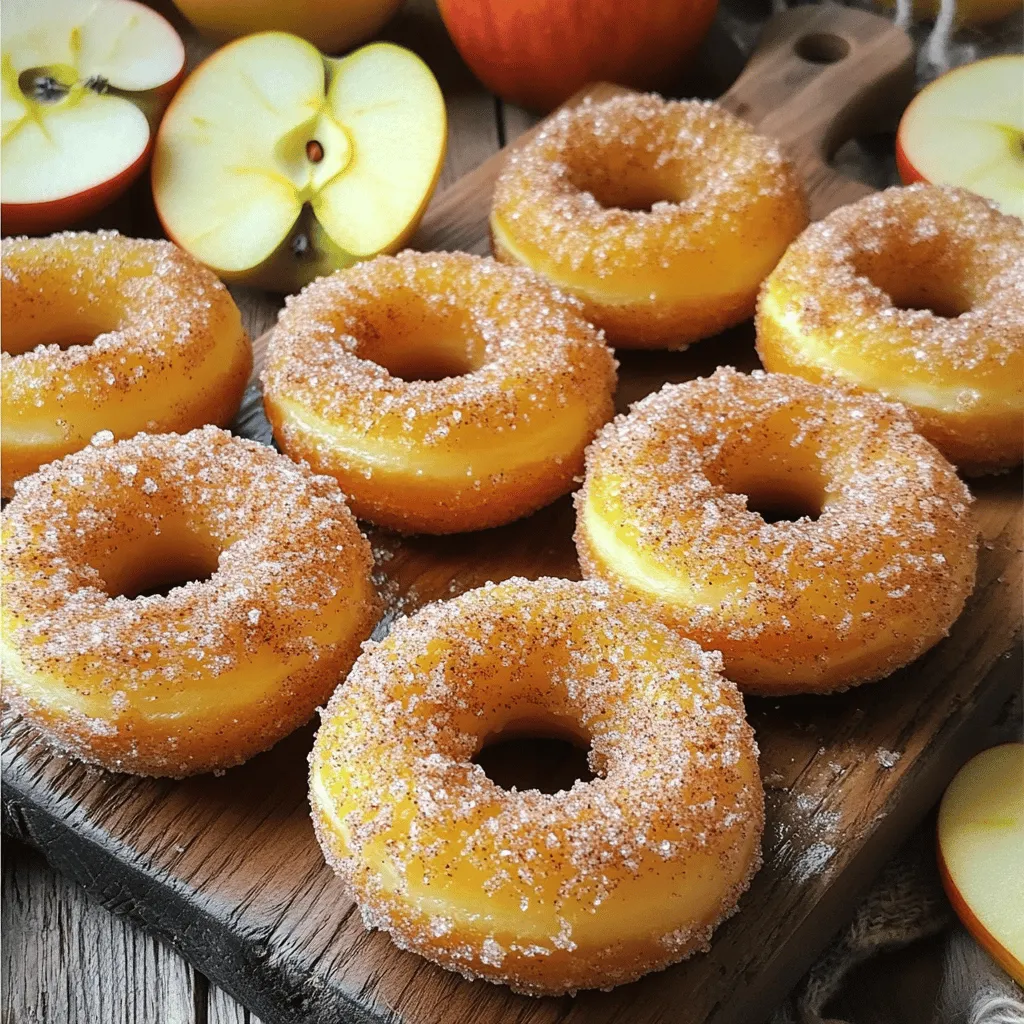
Baked Apple Cider Donuts Delightful Fall Treat
Fall is here, and that means it’s time for cozy treats! If you love apple cider, you’ll adore these Baked Apple Cider Donuts. They offer
- 2 cups all-purpose flour - 2 teaspoons baking powder - 1 teaspoon baking soda - 1 teaspoon ground cinnamon - 1/2 teaspoon ground nutmeg - 1/2 teaspoon ground ginger - 1/2 teaspoon salt - 1 cup granulated sugar - 1 cup packed brown sugar - 1 cup vegetable oil - 4 large eggs - 2 cups canned pumpkin puree - 1 teaspoon vanilla extract For this pumpkin layer cake, I use a mix of spices for warmth and flavor. The blend of cinnamon, nutmeg, and ginger really brings out that cozy fall vibe. The canned pumpkin puree adds moisture and richness. Together, these ingredients create a soft and flavorful cake that everyone loves. - 8 oz cream cheese, softened - 1/2 cup unsalted butter, softened - 4 cups powdered sugar - 1 teaspoon vanilla extract - 1-2 tablespoons milk (for consistency) - Optional: Crushed pecans or walnuts for garnish The cream cheese frosting is smooth and creamy. It perfectly balances the sweetness of the cake. I often add a splash of milk to get the right texture. You can also use crushed nuts for a crunchy topping if you like. This combination makes the cake not just tasty, but also beautiful. - Preheat the oven to 350°F (175°C). - Grease and flour three 8-inch round cake pans. Start by preheating your oven. This step is key for a good rise. Grease each cake pan with butter. Dust them lightly with flour. This helps the cakes come out easily after baking. - Combine dry ingredients and set aside. - Blend sugars and oil, then incorporate eggs and pumpkin. In a medium bowl, mix the dry ingredients. This includes flour, baking powder, baking soda, cinnamon, nutmeg, ginger, and salt. Set this bowl aside. In a large bowl, whisk the granulated sugar, brown sugar, and vegetable oil until fluffy. Next, add the eggs one at a time. Mix in the pumpkin and vanilla extract. Ensure everything blends well. - Add dry mixture to wet, being careful not to overmix. - Divide batter and bake in prepared pans. - Cool cakes before frosting. Now, slowly mix the dry ingredients into the wet mixture. Stir gently. A few lumps are fine; don't overmix. Divide the batter evenly among the three cake pans. Bake for 25-30 minutes. Check doneness with a toothpick. It should come out clean. Once baked, let the cakes cool in the pans for about 10 minutes. Carefully remove them and place on a wire rack to cool completely. To ensure even layer baking, I recommend using an oven thermometer. Ovens can vary in temperature. You want to bake at 350°F (175°C). This helps your cakes rise evenly. When you mix your batter, divide it evenly among the pans. This makes sure each layer is the same size. Avoiding overmixing is key for a fluffy cake. When you add the dry ingredients, stir gently. Mix just until combined. A few lumps are okay. Overmixing can lead to a dense cake, and we want light and airy layers. To achieve the perfect cream cheese frosting consistency, start with softened cream cheese and butter. Beat them together until smooth. Slowly add powdered sugar. Mix well after each addition. If the frosting is too thick, add milk a little at a time. This helps you find the right texture. For spreading frosting evenly between layers, use a spatula. Place a generous amount of frosting on the first layer. Spread it from the center outwards. This keeps the frosting even and prevents it from sliding. For elegant decorating ideas, consider using crushed pecans or walnuts. They add a nice crunch on top of the cake. You can also use edible gold leaves for a fancy touch. Enhancing flavors with garnishes is simple. A dollop of whipped cream on each slice adds richness. You can also sprinkle a little cinnamon on top for extra flavor. {{image_4}} You can make your pumpkin layer cake even tastier with some simple changes. Adding spices like allspice or cloves gives a warm kick. These spices add depth and a cozy feel to each bite. You can also try using alternative sweeteners. If you want a lower sugar option, consider using honey or maple syrup. Each sweetener will change the flavor slightly, so choose what you love. Frosting can change the whole vibe of your cake. While cream cheese frosting is classic, you can try different frostings too. Vanilla buttercream adds a sweet, light touch. Chocolate ganache brings a rich, decadent flavor that pairs well with pumpkin. You can also incorporate flavor extracts. Maple extract adds a warm, sweet note, while almond extract offers a unique twist. If you're looking for dietary options, you can adapt this cake. For a gluten-free cake, swap regular flour for a gluten-free blend. This keeps the texture light and fluffy. If you want a vegan version, replace eggs with flax eggs. Use a plant-based milk and a vegan butter for the frosting. These modifications let everyone enjoy a slice of deliciousness! To keep your pumpkin layer cake fresh, store it in the fridge. Place slices in an airtight container or cover the whole cake with plastic wrap. This keeps moisture in and flavors strong. The cake stays good for about 5 days in the fridge. If you want to save the cake for later, you can freeze it. Wrap each layer in plastic wrap, then place them in a freezer bag. This keeps the cake fresh for up to 3 months. For the frosting, store it in a separate container in the freezer. When you want to enjoy the cake, thaw the layers in the fridge overnight. This helps the cake keep a nice texture. Pumpkin layer cake pairs well with warm drinks. Try it with spiced chai or hot cocoa. It also goes great with a scoop of vanilla ice cream. Perfect for fall gatherings or Thanksgiving. Serve it at birthday parties for a fun twist! Can I use fresh pumpkin instead of canned? Yes, you can use fresh pumpkin. First, cook the pumpkin until soft. Then, puree it until smooth. Measure two cups for your recipe. This will give your cake a fresh flavor. How do I know when the cake is done baking? To check if the cake is done, use a toothpick. Insert it into the center of the cake. If it comes out clean or with a few moist crumbs, your cake is ready. This usually takes 25-30 minutes in the oven. What should I do if my cake sinks in the middle? If your cake sinks, it may be undercooked or overmixed. To fix this, make sure to bake it longer. Also, avoid overmixing the batter. Mixing too much can add air, causing the cake to collapse. Can I make the cake ahead of time? How long can I store it? Yes, you can make the cake ahead of time. Store it in the fridge for up to four days. Wrap the cake in plastic wrap to keep it fresh. You can also freeze it for up to three months. Is it normal for the frosting to be runny? How can I fix it? Yes, frosting can be runny if it has too much milk or sugar. If it’s runny, add more powdered sugar. Mix it in slowly. This will thicken the frosting. If it's too thick, add a little milk at a time until it reaches the right consistency. You now have all the tools to create a tasty pumpkin layer cake. We covered the key ingredients and step-by-step instructions to make it perfect. Baking tips helped you avoid common mistakes, while frosting tricks ensured a smooth finish. Don’t forget the variations for unique flavors and dietary needs. With proper storage, your cake will stay fresh longer. Enjoy sharing this treat with friends and family at your next gathering! Baking can be fun and rewarding, so get started today with confidence!
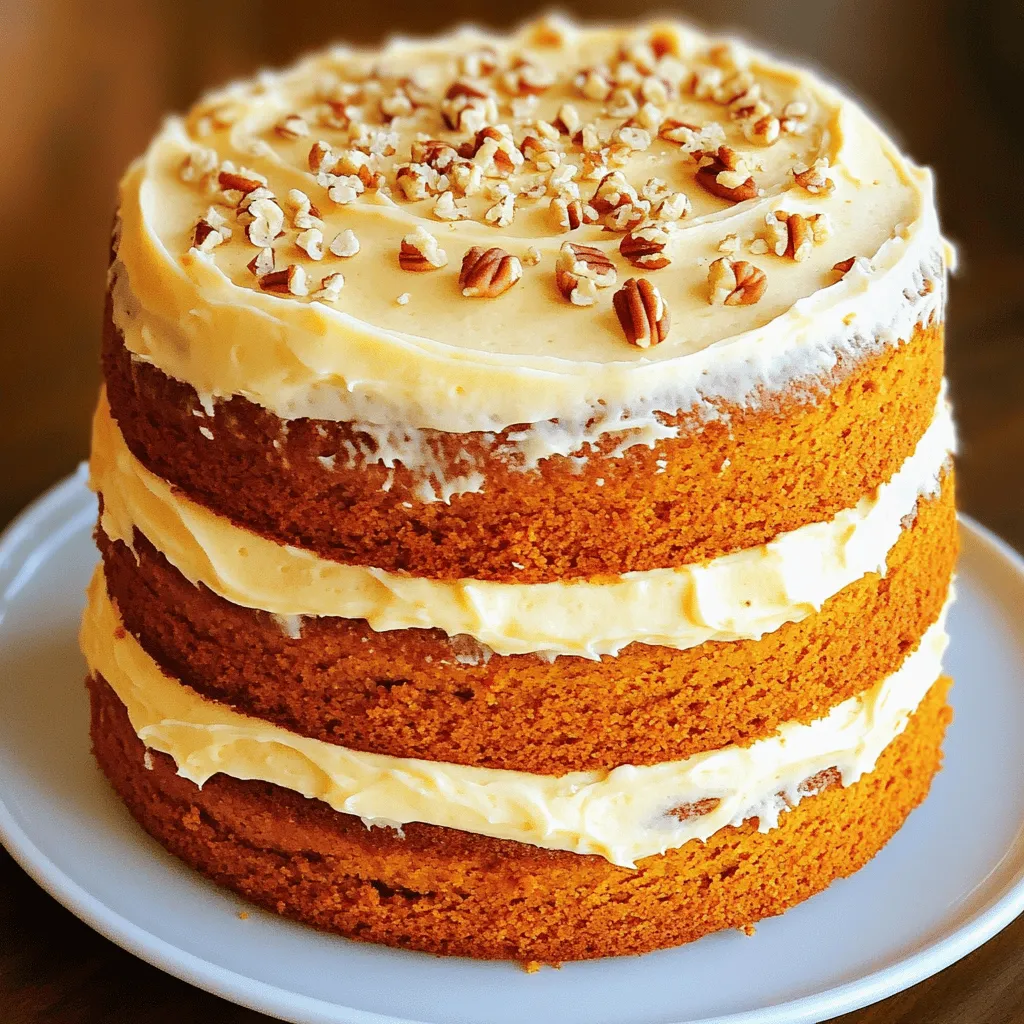
Pumpkin Layer Cake Irresistible Fall Dessert Recipe
Fall is here, and nothing says cozy like a Pumpkin Layer Cake. This rich, spiced dessert is perfect for gatherings or a sweet treat at
Here’s what you need for Maple Glazed Apple Blondies: - 1 cup unsalted butter, melted - 2 cups brown sugar, tightly packed - 2 large eggs - 1 teaspoon vanilla extract - 2 cups all-purpose flour - 1 teaspoon baking powder - 1/2 teaspoon baking soda - 1/2 teaspoon salt - 1 teaspoon ground cinnamon - 1 cup diced apples (about 2 medium-sized apples) - 1/2 cup chopped walnuts (optional) - 1/2 cup pure maple syrup (for glazing) - 1 tablespoon unsalted butter (for the glaze) - Pinch of sea salt (for garnish) Gather these ingredients for a sweet treat. The melted butter brings richness. Brown sugar adds deep flavor. Eggs help bind everything together, while vanilla adds warmth. The flour creates a soft base. Baking powder and baking soda give the blondies lift. Salt enhances the sweetness, and cinnamon adds a cozy spice. Diced apples provide juicy bites. Walnuts add a lovely crunch if you choose to use them. The pure maple syrup in the glaze gives that sweet, sticky finish we all love. A dab of unsalted butter in the glaze makes it shine. Finally, the sea salt on top balances all the flavors. Get ready to mix these ingredients into a delightful dessert! - Preheat the oven to 350°F (175°C). - Grease or line a 9x13 inch baking pan. - In a large bowl, combine melted butter and brown sugar. Mix until smooth. - Add two eggs and one teaspoon of vanilla extract. Stir until fully blended. - In another bowl, whisk together flour, baking powder, baking soda, salt, and cinnamon. Slowly mix this into the wet ingredients. Be gentle. - Fold in one cup of diced apples and half a cup of chopped walnuts if you like. - Pour the batter into the prepared pan. Spread it evenly. - Bake for 25-30 minutes. Check with a toothpick. It should come out clean. - While the blondies bake, make the maple glaze. In a small pot, heat half a cup of maple syrup and one tablespoon of butter. Stir until melted and smooth. - After baking, cool the blondies for ten minutes. Drizzle the warm glaze over them. - Add a pinch of sea salt as a garnish before slicing into squares. To ensure even baking, always preheat your oven. This helps the blondies cook at a steady heat. Use a light-colored baking pan. Dark pans can cause the edges to brown too fast. Rotate the pan halfway through baking for uniform heat. To check for doneness, insert a toothpick in the center. It should come out clean, without wet batter. If it has moist crumbs, bake for a few more minutes. Remember, the edges should look golden brown but not too dark. If you run out of unsalted butter, use coconut oil or margarine. These work well and still keep the blondies moist. You can also try using ghee for a richer taste. For apples, you can use Granny Smith for tartness or Honeycrisp for sweetness. Mix different types of apples for more flavor. Just make sure to chop them into small pieces to blend well in the batter. Serving these blondies warm enhances their flavor. They are soft and gooey right out of the oven. However, they also taste great at room temperature. For garnishing, add a dollop of whipped cream or a scoop of vanilla ice cream on top. You can also place a thin apple slice or a walnut on each blondie for a nice touch. The sea salt sprinkle on top of the glaze boosts the sweet maple flavor too. {{image_4}} You can make these blondies even better by adding spices. Nutmeg and ginger bring warmth and depth. A dash of nutmeg makes them cozy. Ginger adds a zesty kick. You can also try using different nuts. Pecans give a rich flavor, while almonds add a nice crunch. Each choice changes the taste and texture. If you need gluten-free blondies, swap regular flour for almond or coconut flour. You might need to adjust the liquid. For vegan blondies, replace eggs with flax eggs or applesauce. Use vegan butter to keep the taste rich. These changes ensure everyone can enjoy this treat! To keep your maple glazed apple blondies fresh, store them in an airtight container. Place a piece of parchment paper between layers for best results. This helps prevent sticking and keeps them soft. Keep the container in a cool, dry place. If you store them correctly, they will last about five days. You can freeze blondies for later use. First, allow them to cool completely. Then, slice them into squares. Wrap each square in plastic wrap tightly. Place the wrapped squares in a freezer-safe bag or container. They will stay fresh for up to three months in the freezer. When you’re ready to enjoy, remove a blondie from the freezer. Let it thaw in the fridge overnight. For a quick thaw, place it at room temperature for about an hour. If you want a warm treat, you can heat it in the microwave for about 10-15 seconds. Enjoy your delicious blondies anytime! Can I use different fruit instead of apples? Yes, you can use other fruits. Try diced pears or peaches. They add a nice twist. How long do these blondies last? These blondies last about five days. Store them in an airtight container. Can I make the glaze ahead of time? Yes, you can prepare the glaze ahead. Store it in the fridge for up to a week. Reheat it gently before use. Why are my blondies too dry/wet? Dry blondies may result from overbaking. Check them at the 25-minute mark. Wet blondies may need longer baking. Use a toothpick to test doneness. What can I do if I don't have maple syrup? If you lack maple syrup, honey works well. You can also use agave syrup for a similar taste. What pairs well with Maple Glazed Apple Blondies? These blondies pair nicely with whipped cream or vanilla ice cream. A scoop on top makes them extra special. Best drinks or desserts to serve alongside? Serve with warm cider or a cup of coffee. Both drinks complement the sweet and rich flavors well. This blog covered how to make delicious Maple Glazed Apple Blondies. You learned the key ingredients, step-by-step instructions, and useful tips. I also shared ways to customize flavors, adjust for special diets, and store your treats. Now, with all this knowledge, you can create your own tasty blondies. Experiment and enjoy the sweet results! Simple, fun, and perfect for sharing with friends and family. Happy baking!
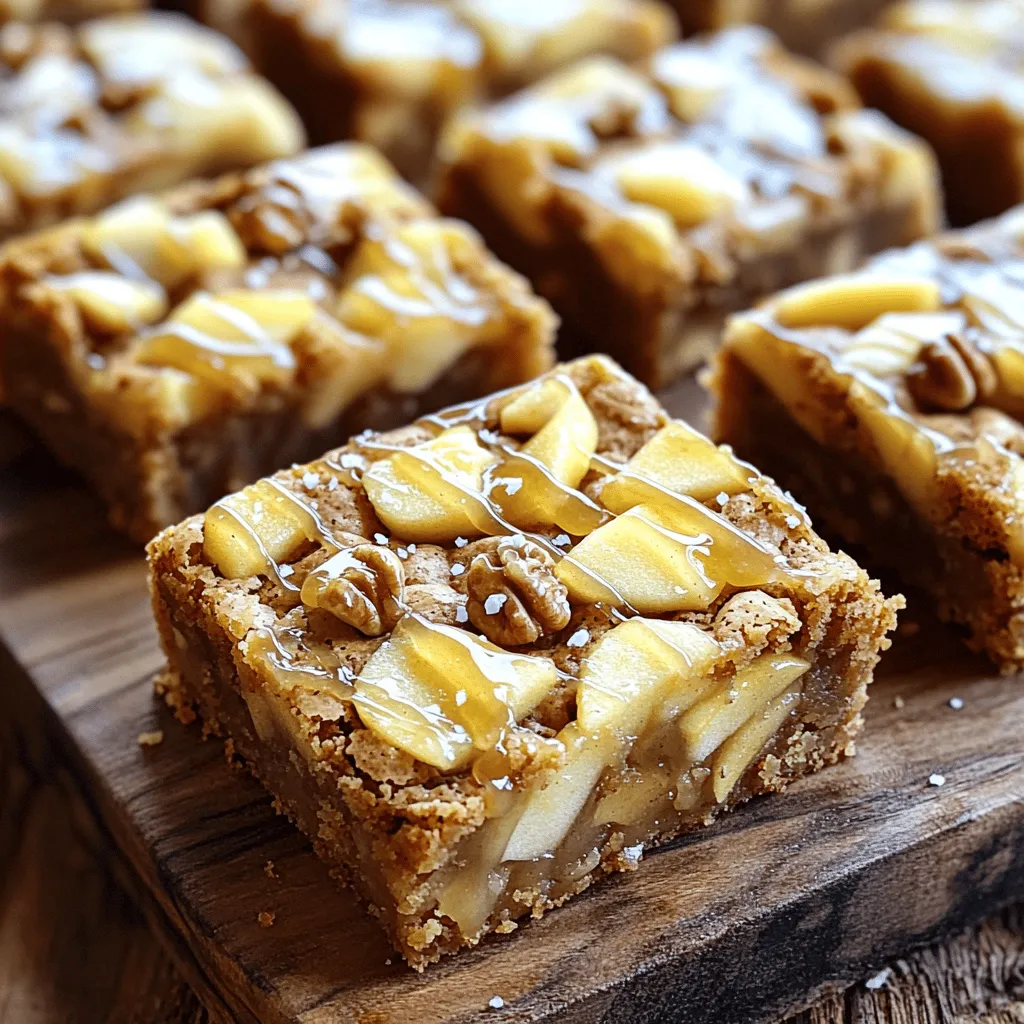
Maple Glazed Apple Blondies Irresistible Dessert Treat
Craving a sweet treat that combines warm apples with a rich maple glaze? You’re in the right place! My Maple Glazed Apple Blondies are simple