Desserts

- Apples: Use 4 large apples like Granny Smith or Honeycrisp. First, peel and core them. Slice them into thin wedges for easy cooking. These apples give a nice balance of tartness and sweetness. - Dry ingredients: You need 1 cup of rolled oats, 1 cup of all-purpose flour, 1/2 cup of packed brown sugar, and 1/2 cup of granulated sugar. Add 1 teaspoon of ground cinnamon and 1/2 teaspoon of ground nutmeg. These ingredients create a delicious, crumbly topping. - Wet ingredients: Melt 1/4 cup of unsalted butter. This will help bind the dry ingredients. Add 1/2 teaspoon of pure vanilla extract for extra flavor. This combination makes the topping rich and tasty. - Ice cream and whipped cream options: Serve your apple crisp warm with a scoop of vanilla ice cream or a dollop of whipped cream. Both add creaminess and enhance the flavors. - Additional spices for garnish: For a nice touch, sprinkle extra cinnamon on top before serving. You can also use nutmeg for a twist. These small touches can elevate your dessert! First, I peel and core the apples. I like using Granny Smith or Honeycrisp apples. They add a nice tartness. After slicing them into thin wedges, I place them in a large bowl. Next, I sprinkle in 1/4 cup of granulated sugar, 1 teaspoon of ground cinnamon, and a pinch of salt. I mix the apples gently with my hands. This step makes sure the flavors blend well. Then, I spread the apple mixture evenly in a greased 9x13-inch baking dish. In a separate bowl, I mix the rolled oats, all-purpose flour, brown sugar, and granulated sugar. I add 1/2 teaspoon of cinnamon and ground nutmeg too. I stir the dry ingredients well to break up any clumps. Once mixed, I drizzle 1/4 cup of melted butter and 1/2 teaspoon of vanilla extract over the top. Using a fork, I toss the mixture until it becomes crumbly. This topping will give the dessert a nice crunch. Now, I preheat my oven to 350°F (175°C). This helps the crisp bake evenly. I sprinkle the oat mixture over the apples, covering them well. I place the baking dish in the oven and set a timer for 35 to 40 minutes. The top should turn golden brown, and the apples need to be tender. I check doneness by piercing the apples with a fork. If they are soft, it’s ready! After baking, I let it cool for about 10 minutes. This cooling time helps the filling set, making it easier to serve. You can make your apple crisp even better with a few tweaks. Here are some simple ideas: - Adding nuts or dried fruits: Chopped walnuts or pecans give a nice crunch. Dried cranberries or raisins add sweetness and chewiness. - Using different spices for a unique flavor: Try adding ginger or cardamom for a warm spice kick. You can also mix in more cinnamon or nutmeg for a classic taste. To make the best apple crisp, steer clear of these common errors: - Overmixing the topping: Mix just until crumbly. If you overmix, the topping can become too dense. You want a light, crunchy texture. - Selecting the right apple varieties: Use tart apples like Granny Smith or Honeycrisp. They hold their shape well and balance the sweetness of the sugars. Avoid soft apples as they may turn mushy. These tips will help you create a delicious apple crisp that everyone will love! {{image_4}} For a gluten-free apple crisp, swap regular flour with gluten-free flour. You can use almond flour or oat flour. These flours give a nice texture and taste. Measure the same amount as the recipe says. This change keeps the crisp tasty for everyone. To make a vegan version, use plant-based butter instead of regular butter. Coconut oil or vegan margarine works well. Instead of granulated sugar, try maple syrup or agave nectar for sweetness. These options keep the flavors rich and yummy without animal products. You can change the fruit based on the season. In fall, add pears or cranberries for a twist. In summer, try peaches or berries. Use spices like ginger or cardamom to match the fruit. This keeps your apple crisp fun and fresh all year long! To keep your apple crisp fresh, place it in an airtight container. This helps avoid moisture loss. You can store it in the fridge for up to five days. If you want to reheat it, simply place the crisp in the oven at 350°F (175°C) for about 10-15 minutes. This warms it gently and keeps it crispy. If you have extra apple crisp, freezing is a great option. First, let it cool completely. Then, cut it into portions. Wrap each piece tightly in plastic wrap. Place the wrapped pieces in a freezer-safe bag or container. They will last for up to three months in the freezer. To reheat, remove it from the freezer and thaw in the fridge overnight. After that, bake it in the oven at 350°F (175°C) for about 20-25 minutes. This will help restore its crunchy topping. Enjoy your delicious apple crisp anytime! To make your apple crisp crunchy, use a mix of oats and flour. The oats add texture. Ensure you melt the butter and mix it well. This helps create clumps in your topping. Spread the topping evenly over the apples. Bake it until golden brown for the best crunch. If you want extra crunch, add chopped nuts like walnuts or pecans. Yes, you can use many fruits! Pears, peaches, or berries work well. You can mix different fruits too. Just keep in mind that softer fruits may need less baking time. Adjust the sugar based on the sweetness of the fruit you choose. This keeps your crisp balanced and tasty. Serve apple crisp warm for the best flavor. Top it with a scoop of vanilla ice cream. This adds creaminess and contrasts with the warm crisp. You can also drizzle caramel sauce on top for added sweetness. A sprinkle of cinnamon just before serving makes it look nice too! You can create a delicious apple crisp with simple steps. Start by prepping your apples and mixing dry and wet ingredients. Customize your recipe with toppings, spices, and fruits to fit your taste. Watch out for common mistakes to ensure the best texture. Remember, you can easily make gluten-free or vegan options too. Store leftovers properly and enjoy them later. With these tips, your apple crisp will impress anyone who tries it. Enjoy baking and serving this warm treat that never fails to please!
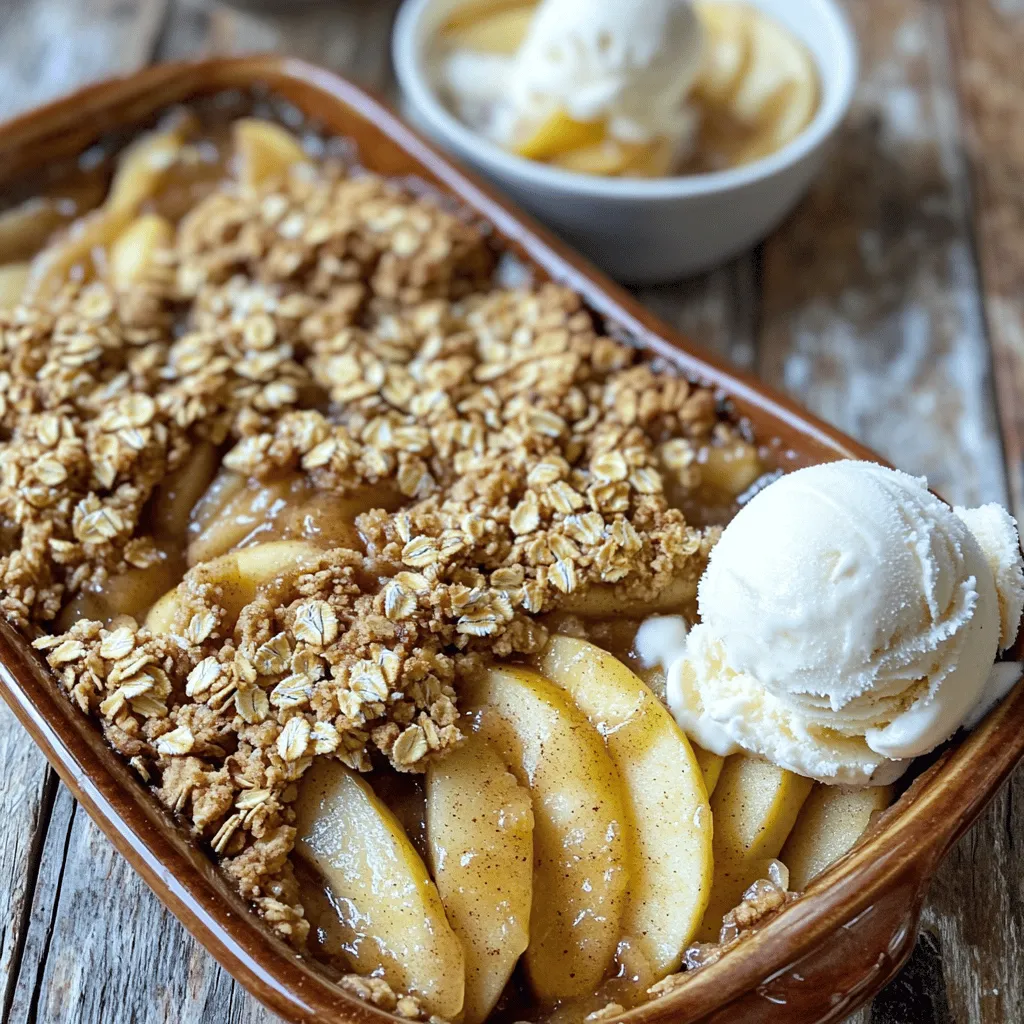
Easy Apple Crisp Simple and Delicious Dessert Recipe
Craving a simple and tasty dessert? Look no further than this Easy Apple Crisp recipe! With just a few ingredients, you can create a warm,
- 4 medium-sized apples (Granny Smith or Honeycrisp) - 2 tablespoons unsalted butter - 1/4 cup packed brown sugar - 1 teaspoon ground cinnamon - 1/2 teaspoon ground nutmeg - 1 teaspoon pure vanilla extract - Pinch of salt - 1/4 cup chopped walnuts or pecans (optional) - Vanilla ice cream for serving (optional) Selecting the best apples for frying Choose Granny Smith for tartness or Honeycrisp for sweetness. Both hold their shape well when cooked. Look for firm apples with no bruises. Alternatives to brown sugar You can use white sugar or coconut sugar. Maple syrup is also a great option for a unique flavor. Substituting nuts If you prefer, skip the nuts or use sliced almonds or hazelnuts. They add a nice crunch and flavor. 1. Heat a large skillet over medium heat. 2. Add 2 tablespoons of unsalted butter. Let it melt completely. Swirl the butter to coat the skillet. 3. Carefully add 4 medium-sized apples, peeled, cored, and sliced. Stir gently to coat the apples in the butter. 4. Sprinkle 1/4 cup of packed brown sugar, 1 teaspoon of ground cinnamon, 1/2 teaspoon of ground nutmeg, and a pinch of salt over the apples. Stir well to coat all slices evenly. 1. Cook the apples for 5-7 minutes. Stir them occasionally. You want them soft, yet firm. 2. Add 1 teaspoon of pure vanilla extract. Stir to combine. Cook for another 1-2 minutes. This step enhances the flavor. 1. If you like nuts, fold in 1/4 cup of chopped walnuts or pecans. This adds a lovely crunch. 2. Remove the skillet from the heat. Let it cool for a few moments before serving. This allows the flavors to settle. Serve the apples warm, topped with ice cream if you wish. Enjoy the delightful mix of flavors and textures! To keep your apples from becoming mushy, cook them on medium heat. Stir them gently and check for softness. You want them tender but not falling apart. Use a heavy skillet. A cast-iron or non-stick pan works best. These types heat evenly, giving you better results. Spices can boost the flavor of your skillet fried apples. Consider adding a pinch of allspice or ginger for warmth. You can also try cardamom for a unique twist. Fresh citrus zest brightens the dish. Just a little lemon or orange zest can add freshness and depth. Skillet fried apples pair well with many dishes. Serve them on top of pancakes or waffles for a sweet start to your day. They also make a great filling for crepes. For dessert, try them with vanilla ice cream. The warm apples and cold ice cream create a delightful contrast. {{image_4}} The best apples for skillet fried apples are Granny Smith and Honeycrisp. These types have a nice balance of tartness and sweetness. They also keep their shape well when cooked. You can try other apples like Fuji or Braeburn for a different taste. Each variety brings its unique flavor to the dish. In terms of seasonal alternatives, consider using local apples during harvest time. This adds freshness to your dish. In fall, you might find Cortland or Jonagold apples, which can also work wonders in this recipe. You can enhance the flavor by adding caramel or maple syrup. A splash of caramel makes it sweet and rich. Maple syrup gives a warm, earthy taste. Both pair well with the spices and apples. Infusing with different spices can also change the dish. Besides cinnamon and nutmeg, you can add ginger or allspice. A pinch of cardamom can give an exotic twist too. Experimenting with spices can bring new life to this classic dessert. For vegan or plant-based options, simply replace butter with coconut oil or vegan butter. This keeps the dish rich and tasty while fitting a vegan diet. If you need a gluten-free option, you're in luck! This recipe is naturally gluten-free, as it uses no flour. Just be mindful of any toppings. Choose gluten-free ice cream or skip it altogether if needed. Enjoy the flavors without worry! To store your skillet fried apples, use an airtight container. This keeps them fresh and tasty. Place the cooled apples in the fridge within two hours of cooking. They will stay good for about three to five days. The longer they sit, the softer they may become. When it’s time to enjoy your apples again, you have options. The stovetop is best for reheating. Just warm them in a pan over low heat. Stir gently to keep them from sticking. If you're short on time, the microwave works too. Heat in short bursts, stirring in between, to keep the texture nice. You can freeze skillet fried apples if you want to save them. First, let them cool completely. Then, place them in a freezer-safe bag or container. Make sure to remove as much air as possible. They can last up to three months in the freezer. When you're ready to eat, thaw them in the fridge overnight. Reheat on the stovetop or in the microwave. This way, you keep the flavor and texture just right. I recommend using Granny Smith or Honeycrisp apples. They have a nice balance of sweet and tart. Granny Smith apples keep their shape well during cooking. Honeycrisp apples add a juicy sweetness that pairs perfectly with spices. Yes, you can! Try using honey or maple syrup instead. These natural sweeteners add flavor without added sugar. Adjust the amount based on your taste. If you want less sweetness, reduce the amount you use. Skillet fried apples shine when served warm. They pair well with vanilla ice cream, creating a creamy contrast. You can also serve them over pancakes or waffles for breakfast. For a cozy dessert, drizzle caramel sauce on top. Absolutely! If you prefer, use pecans or almonds. Chopped walnuts add a nice crunch, but almonds offer a lighter flavor. You can also skip nuts altogether for a nut-free option. Just enjoy the apples and spices! This blog post shows you how to make skillet fried apples. We covered the best ingredients, tips for a perfect texture, and creative ways to serve them. Using different apple types can change the flavor. Remember to store any leftovers properly for later. You can enjoy these apples in many ways, like on pancakes or with ice cream. Now, you are ready to fry some delicious apples and impress everyone with your cooking skills!
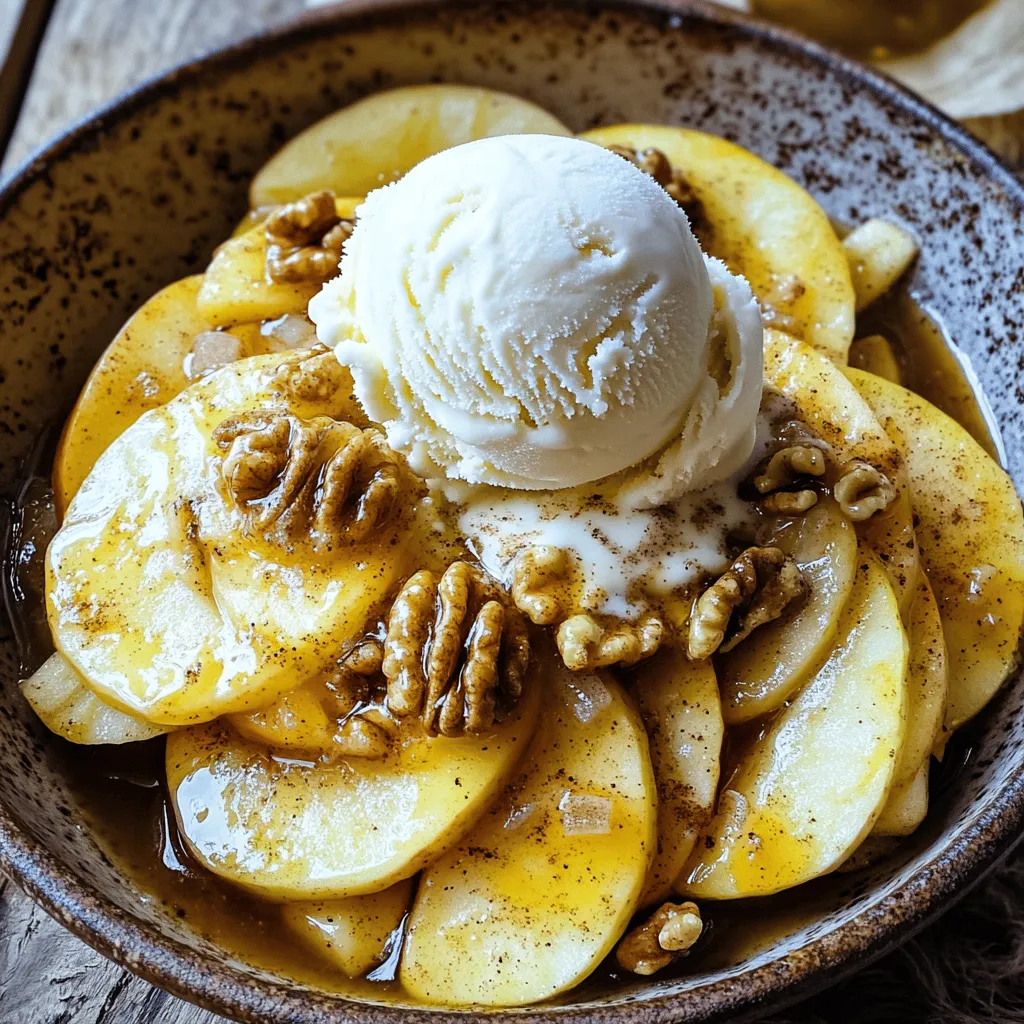
Skillet Fried Apples Delicious Dessert for All Occasions
Looking for a sweet treat that’s quick and delightful? Skillet Fried Apples are the answer! With simple ingredients like fresh apples, brown sugar, and a
- 2 large Granny Smith apples, cored and sliced into 1/4-inch thick rings - 1 cup all-purpose flour - 1/2 cup cornstarch - 1 tablespoon baking powder - 1 teaspoon ground cinnamon - 1/4 teaspoon salt - 3/4 cup cold sparkling water (or regular water) - 1/2 teaspoon vanilla extract - Oil for frying (preferably vegetable or canola) - Powdered sugar for dusting - Optional: Additional ground cinnamon for sprinkling When measuring flour, spoon it into your cup and level it off. This gives you the right amount. For cornstarch, use the same method. If you pack it down, you might use too much. Always measure dry ingredients separately. Use a liquid measuring cup for water and vanilla. Liquid should reach the right line for accurate amounts. If you don’t have Granny Smith apples, try Honeycrisp or Fuji. They add a sweet touch. For the flour, you can use a gluten-free mix if needed. Instead of cornstarch, use arrowroot powder for a similar effect. If you want a sweeter batter, add a bit of sugar. You can also try different spices like nutmeg for a unique twist. Start by taking your Granny Smith apples. They give the best tart flavor. First, core each apple to remove the seeds. Then, slice them into rings that are about 1/4 inch thick. This thickness helps them fry evenly. After cutting, use a paper towel to pat the apple rings dry. This step is key! It removes excess water and makes the rings crispier when fried. Next, grab a large mixing bowl. Combine the following dry ingredients: - 1 cup all-purpose flour - 1/2 cup cornstarch - 1 tablespoon baking powder - 1 teaspoon ground cinnamon - 1/4 teaspoon salt Whisk these ingredients together until they mix well. Then, slowly pour in 3/4 cup of cold sparkling water and 1/2 teaspoon of vanilla extract. Stir continuously until the batter is smooth. If it feels too thick, add more sparkling water, one tablespoon at a time. Your goal is a thick but pourable batter. Now it's time to fry! In a deep frying pan or pot, add about 2 inches of oil. Heat the oil over medium-high heat until it reaches 350°F (175°C). To test if the oil is ready, drop in a small amount of batter. It should sizzle right away! Once the oil is hot, take each apple ring and dip it into your batter. Make sure to coat it well, then let excess batter drip back into the bowl. Carefully place a few battered rings into the hot oil. Avoid overcrowding the pan. Fry them for 2-3 minutes on one side until golden brown. Flip them and fry for another 2-3 minutes. When they are done, use a slotted spoon to remove the rings. Place them on a plate lined with paper towels to soak up any extra oil. Let them cool a bit, then dust with powdered sugar. You can even add a sprinkle of cinnamon for extra flavor! To get crispy apple rings, start with dry apple slices. After slicing, use a paper towel to remove moisture. This step helps the batter stick better. Use a mix of all-purpose flour and cornstarch for the batter. The cornstarch makes it lighter and crispier. Fry the rings in small batches. This keeps the oil hot and helps them cook evenly. Flip them gently to avoid breaking. The golden brown color shows they are ready. Oil temperature is key for the perfect fry. Heat the oil to 350°F (175°C). You can test this by dropping a little batter in the oil. If it sizzles and rises, you are good to go. If the oil is too cool, the rings will soak up oil and become soggy. If it’s too hot, they may burn before cooking through. Keep an eye on the temperature. If it drops, let the oil heat back up before frying more apple rings. Serving your fried apple rings can be fun and creative! Dust them with powdered sugar for sweetness. You can also sprinkle extra cinnamon for flavor. Try serving them with vanilla ice cream. The warm rings and cold ice cream make a lovely contrast. For a nice touch, add a sprig of mint on the plate. This makes the dish look great and adds a fresh flavor. Enjoy your crispy apple rings as a snack or dessert! {{image_4}} You can use different apples to make fried apple rings. Granny Smith apples are tart and crisp. They hold their shape well when fried. Other good choices include Honeycrisp, Fuji, or Gala apples. Honeycrisp adds sweetness, while Fuji offers a juicy bite. Choose apples based on your taste. Try mixing different types for a unique flavor. You can spice up the batter for fried apple rings. Besides cinnamon, try nutmeg or ginger for warmth. Adding a splash of lemon juice brightens the flavor. For a sweet touch, add a bit of brown sugar. You can also mix in some cocoa powder for a chocolate twist. Experiment with flavors to find your favorite. Serving fried apple rings with dips makes them even better. Try vanilla ice cream for a classic combo. A caramel sauce adds a rich sweetness. If you like tangy flavors, serve with yogurt or cream cheese dip. Dust the rings with powdered sugar for a lovely finish. You can also sprinkle extra cinnamon for a warm touch. To store leftover apple rings, first let them cool completely. Place them in an airtight container. You can keep them in the fridge for up to three days. Make sure to layer them with paper towels to prevent sogginess. Reheating is easy. To keep them crispy, use an oven. Preheat your oven to 350°F (175°C). Spread the apple rings on a baking sheet. Heat them for about 5-7 minutes. This method ensures they regain their crunch. Freezing apple rings is a great option for longer storage. First, cool the rings completely. Next, arrange them on a baking sheet in a single layer. Freeze them for about two hours. After that, transfer them to a freezer bag. They can last up to three months. When you’re ready to eat, thaw them in the fridge before reheating. You can make Fried Apple Rings healthier by baking them instead of frying. Use an oven set to 375°F (190°C). Coat the apple rings lightly in a spray oil or brush with a little oil. Bake them for 15-20 minutes, flipping halfway, until golden brown. You can also reduce sugar by skipping the powdered sugar dusting. Try using whole wheat flour instead of all-purpose flour for added fiber. Yes, you can use a different type of batter. For a gluten-free option, mix gluten-free flour with cornstarch. You can also use a pancake mix if you prefer a sweeter taste. For a lighter batter, try using a tempura batter. Just mix ice-cold water and flour until smooth. Adjust the thickness by adding water as needed. Each batter will give your apple rings a unique texture and flavor. The best apples for frying are tart and firm varieties. Granny Smith apples are popular for their crispness and tartness. Other great choices include Honeycrisp, Fuji, and Braeburn. They hold their shape well while frying, and their flavors balance nicely with the sweetness of the batter. Avoid soft apples like McIntosh, as they may turn mushy when cooked. You’ve learned how to make tasty fried apple rings. We covered the right ingredients, how to prep apples, and the best frying methods. Tips for crispiness and serving ideas can elevate your dish. You also explored fun variations and storage tips. Now you can fry delicious apple rings with confidence. Try different apples and flavors for a fresh twist. Enjoy your cooking and impress your friends and family!
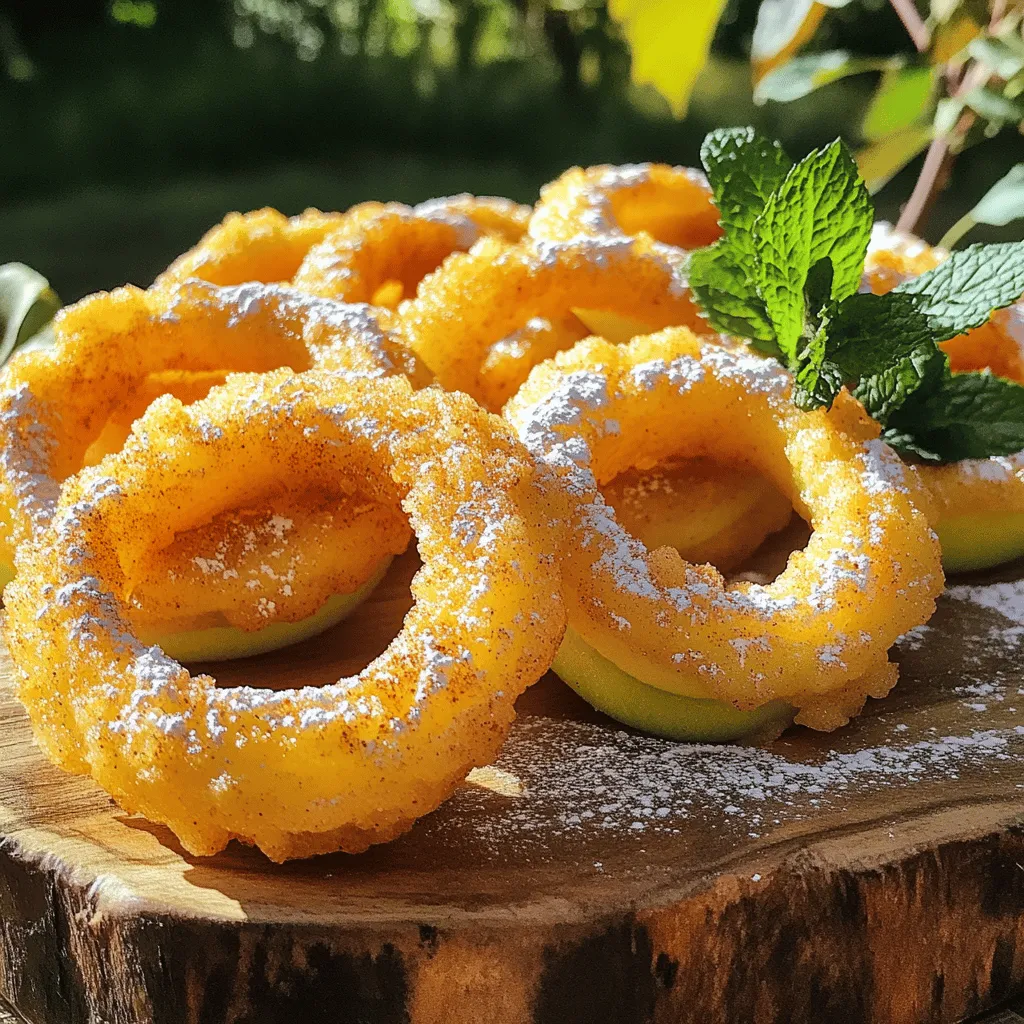
Fried Apple Rings Crispy Delight for Everyone
Get ready to indulge in a crispy treat everyone will love—Fried Apple Rings! This easy recipe transforms sweet apples into golden, crunchy bites that are
- 1 package (16 oz) refrigerated cinnamon roll dough - 1 cup cream cheese, softened to room temperature - 1/2 cup powdered sugar - 1 teaspoon pure vanilla extract - 1 cup fresh strawberries, diced into small pieces - 1/2 teaspoon fresh lemon juice The main ingredients create the heart of the strawberry cheesecake cinnamon rolls. The cinnamon roll dough gives a soft, fluffy base. Cream cheese adds creaminess and sweetness. Powdered sugar mixes well to balance the flavors. Fresh strawberries bring a burst of fruitiness, while lemon juice adds a hint of zest. Together, they form a delicious filling. - 1/4 cup granola (optional, for crunchy topping) - 1 tablespoon milk (for drizzling) - Additional powdered sugar (for a light dusting) The optional ingredients add extra flair. Granola offers a crunchy texture on top of the rolls. Milk creates a lovely drizzle that enhances the sweetness. A light dusting of powdered sugar makes the rolls look even more inviting. You can mix and match these options to suit your taste. 1. Preheat your oven to 350°F (175°C). Grease a 9x13 inch baking dish lightly to stop sticking. 2. In a bowl, mix 1 cup of cream cheese, 1/2 cup of powdered sugar, and 1 teaspoon of pure vanilla extract. Use a hand mixer or whisk until smooth and creamy. 1. Roll out the cinnamon roll dough on a floured surface. Aim for a rectangle size of about 9x12 inches. 2. Spread the cream cheese and strawberry mixture evenly on the dough. Leave a half-inch border around the edges. 3. Start from a long edge and tightly roll the dough into a log shape. Pinch the seams to keep it closed. 4. Slice the log into 12 equal pieces. Arrange them in the greased baking dish, spacing them evenly. 1. Bake the cinnamon rolls in the preheated oven for 25-30 minutes. Look for a puffed and golden brown top. 2. While they bake, mix 1 tablespoon of milk with powdered sugar in a small bowl. Stir until smooth for drizzling. 3. After baking, let the rolls cool for a few minutes. Drizzle the milk mixture over the warm rolls. 4. Optionally, sprinkle granola on top for a nice crunch. Finish by dusting with extra powdered sugar. To get the best rolls, you need to handle the dough with care. Here are some key tips: - Lightly flour your surface: This helps prevent sticking. Too much flour can make the dough tough. - Roll gently: Use even pressure while rolling. This keeps the dough from tearing. - Pinch the seam: After rolling, make sure to pinch the edge to seal it well. This keeps the filling inside during baking. For even baking, follow these practices: - Preheat your oven fully: This ensures the rolls bake evenly from the start. - Use a dark pan: A dark baking dish absorbs more heat, helping the rolls brown nicely. - Space rolls evenly: Place rolls with some space between them. This allows for even heat circulation. To make these rolls extra special, consider adding different flavors: - Try a dash of almond extract: This adds a nice twist to the cream cheese mixture. - Use other fruits: Chopped blueberries or raspberries can add a new layer of taste. Pairing ideas can elevate your rolls too: - Serve with a dollop of whipped cream: This adds creaminess and a touch of sweetness. - Enjoy with a cup of tea or coffee: The warmth of the drink complements the sweet rolls perfectly. These tips ensure that your strawberry cheesecake cinnamon rolls taste amazing and look stunning on your table! {{image_4}} You can change the fruit in these rolls. Blueberries and raspberries work great too. Each fruit adds its own taste. Think about mixing fruits for a fun twist. You can also try different cream cheese flavors. Vanilla cream cheese adds sweetness. Lemon cream cheese gives a bright taste that pairs well with fruit. You can make these rolls dairy-free or vegan. Use dairy-free cream cheese and plant-based milk. There are many brands that work well. For gluten-free options, look for gluten-free cinnamon roll dough. This way, you can enjoy the rolls without worry. Adapt the recipe to fit your needs and enjoy! To keep your strawberry cheesecake cinnamon rolls fresh, store them in the fridge. Place the rolls in an airtight container. This helps keep them moist and tasty for up to three days. You can also wrap them tightly in plastic wrap before putting them in the container for extra protection. When it’s time to enjoy your leftovers, reheating is key. I suggest using the oven for the best texture. Preheat your oven to 350°F (175°C). Place the rolls on a baking sheet and cover with foil. Heat for about 10-15 minutes. This way, they come out warm and soft, just like fresh from the oven. You can freeze these rolls for later. If you plan to freeze them uncooked, prepare the rolls as usual. Instead of baking them, place the sliced rolls in a single layer on a baking sheet. Freeze until firm, then transfer them to a freezer bag. This keeps them from sticking together. If you have already baked the rolls, let them cool completely. Then, wrap them tightly in plastic wrap and place them in a freezer bag. They’ll stay good for about two months. When you’re ready to enjoy frozen rolls, thaw them in the fridge overnight. For uncooked rolls, bake straight from the freezer. Just add a few extra minutes to the baking time. For baked rolls, reheat them in the oven as mentioned earlier. This keeps them soft and delicious! Can I make the dough from scratch? Yes, you can make the dough from scratch. Use a simple recipe with flour, sugar, yeast, and milk. This gives you fresh dough with great taste. It can take more time, but the result is worth it. How do I prevent the rolls from sticking? To prevent sticking, grease your baking dish well. You can use butter or cooking spray. Also, ensure you roll the dough on a floured surface. This keeps it from sticking to your work area. How long do the cinnamon rolls last? The cinnamon rolls last about 2 to 3 days in the fridge. Keep them in an airtight container for best freshness. You can also reheat them in the oven or microwave. Can I freeze the strawberry cheesecake filling? Yes, you can freeze the strawberry cheesecake filling. Place it in a sealed container. It can last for about 1 to 2 months. When ready to use, thaw it in the fridge overnight before filling your rolls. This blog covered how to make delicious strawberry cheesecake rolls. You learned about key ingredients like cinnamon roll dough, cream cheese, and fresh strawberries. I shared steps to prepare, assemble, and bake your rolls. Tips helped improve your technique, while variations allowed for creativity. You also discovered how to store leftovers and answered common questions. Now, it’s time to try this tasty treat yourself! Enjoy the process and share your results.
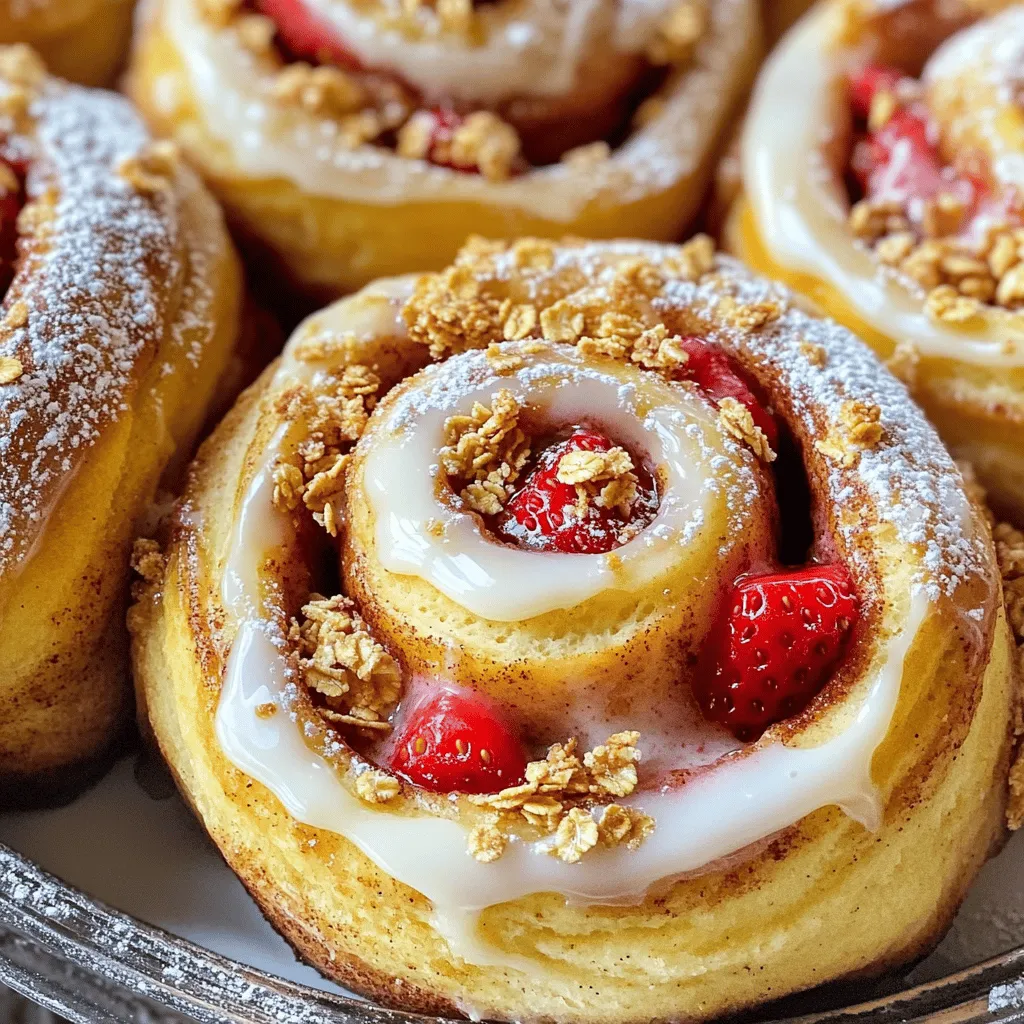
Strawberry Cheesecake Cinnamon Rolls Divine Pastry Treat
Are you ready to treat yourself? My Strawberry Cheesecake Cinnamon Rolls are the perfect blend of sweet and creamy, bringing you a delicious pastry experience.
- 1 sheet of puff pastry (thawed) - 8 oz cream cheese, softened - 1/2 cup powdered sugar - 1/4 cup granulated sugar - 1 teaspoon vanilla extract - 1 egg yolk - 1 tablespoon fresh lemon juice - 1 egg (beaten, for egg wash) - Optional: assorted fresh berries (such as raspberries, blueberries, or strawberries) for garnish When making your cheese Danish, use a standard sheet of puff pastry. If you cannot find puff pastry, try using croissant dough instead. For the cream cheese, you can substitute with mascarpone for a richer flavor. If you want less sweetness, cut down on the powdered sugar. Fresh berries make great toppings. You can use raspberries, blueberries, or strawberries. You can also drizzle honey or chocolate sauce on your Danish. For a twist, add a sprinkle of cinnamon or nutmeg to the cheese filling. This will give it a warm flavor that pairs well with coffee or tea. {{ingredient_image_2}} First, preheat your oven to 400°F (200°C). This helps to get the pastry nice and crisp. Next, take your thawed puff pastry and place it on a clean, lightly floured surface. Roll it out gently to smooth out any creases. Aim for an even thickness. After that, cut the sheet into 4 equal squares. This will be the base for your cheese filling. In a mixing bowl, combine 8 oz of softened cream cheese, 1/2 cup of powdered sugar, and 1/4 cup of granulated sugar. Add 1 teaspoon of vanilla extract, 1 egg yolk, and 1 tablespoon of fresh lemon juice. Use a hand mixer or whisk to beat the mixture until it is smooth and creamy. This filling is what makes your Danish so tasty. Spoon a generous amount of the cheese filling into the center of each pastry square. Be careful not to overfill. Fold the corners of each square toward the center to create a little bundle. Pinch the corners to seal them tightly. Then, brush the tops with a beaten egg for a golden finish. Place the Danish on a parchment-lined baking sheet. Bake for 15-18 minutes until they puff up and turn golden brown. Let them cool for a few minutes before serving. You can add fresh berries on top for extra flavor and color. To get a flaky puff pastry, always keep it cold. Warm pastry won’t puff well. Thaw the pastry in the fridge, not on the counter. When you roll it out, use a light touch. This helps keep the layers intact. If you notice the dough getting warm, pop it back in the fridge for a bit. This small step makes a big difference. The cheese filling needs to be smooth and creamy. Start with softened cream cheese for the best texture. Mixing in powdered sugar helps sweeten it without lumps. Adding an egg yolk gives it richness. Use fresh lemon juice for a nice zing. Mix until it is completely smooth. If it’s too thick, add a bit of milk to thin it out. This will help it spread nicely in the pastry. A golden finish is key to a great cheese Danish. Use a beaten egg wash to brush the tops. This gives them that shiny, golden look. Make sure to cover the whole surface. Be careful not to let the egg wash drip down the sides. This can cause the pastry to stick to the baking sheet. Bake until they puff up and turn a lovely golden brown. Keep an eye on them in the last few minutes. Enjoy that beautiful finish! Pro Tips Keep Your Puff Pastry Cold: Make sure your puff pastry is well-chilled before rolling out. This helps achieve maximum flakiness when baked. Don’t Overfill: When adding the cheese mixture, be careful not to overfill the pastry squares. This prevents them from bursting open during baking. Use a Pastry Brush: Applying the egg wash with a pastry brush ensures an even coating for a beautiful golden-brown finish. Experiment with Flavors: Feel free to add a dash of almond extract or a sprinkle of cinnamon to the cheese mixture for a unique twist on the classic flavor. {{image_4}} You can add fruit to your cheese filling for a tasty twist. Berries like raspberries, blueberries, or strawberries work great. Just mash the fruit slightly before mixing it with the cheese. This gives a burst of flavor and a pretty look. You can also use fruit jams. Spread a thin layer on the puff pastry before adding the cheese mix. Peach or cherry jam adds a sweet touch. For a savory option, skip the sugar in your cheese mix. Add herbs like chives, thyme, or dill instead. You can also mix in some cooked spinach or sautéed mushrooms. This creates a delicious brunch item. Consider adding a sprinkle of cheese on top before baking. Feta or goat cheese can bring extra flavor. You can make these Danish vegan by swapping out a few ingredients. Use a plant-based cream cheese instead of dairy cream cheese. For the egg yolk, try a flaxseed egg. Mix one tablespoon of ground flaxseed with three tablespoons of water. Let it sit until it thickens. Use plant-based milk instead of regular milk in your recipe. Ensure that your puff pastry is dairy-free as well. Store your Cheese Danish in an airtight container. This keeps them fresh. Place them in the fridge if you plan to eat them in a few days. If you want to keep them longer, freezing is the best option. Avoid stacking them to prevent squishing. To freeze Cheese Danish, let them cool completely first. Wrap each Danish tightly in plastic wrap. Then, place them in a freezer bag or container. Label the bag with the date. They can stay in the freezer for up to three months. When ready to enjoy, thaw them in the fridge overnight. To reheat your Cheese Danish, preheat your oven to 350°F (175°C). Place the Danish on a baking sheet. Heat for about 10-15 minutes. This keeps the pastry flaky. You can also microwave them for about 20-30 seconds, but the texture might not be as good. Enjoy your warm, cheesy treat! Yes, you can use store-bought puff pastry. It saves time and effort. Just make sure to thaw it before use. Follow the package instructions for best results. This makes your cheese Danish easy to prepare. You still get that flaky texture and buttery taste. To make the cheese filling less sweet, cut down on the sugar. You can reduce the powdered sugar to 1/4 cup. You can also leave out the granulated sugar entirely. Adding a pinch of salt can balance the flavor. You might also try more lemon juice for a tart kick. Yes, you can prepare the Danish ahead of time. Assemble them, then place them in the fridge. Bake them just before serving for the best taste. If you want to freeze them, wrap each Danish well. You can bake them straight from the freezer; just add a few extra minutes to the baking time. This post covered how to make a cheese Danish. We explored the right ingredients, measurements, and optional toppings. I shared step-by-step instructions for preparing puff pastry, making the filling, and baking your Danish. Remember, simple tips can enhance flakiness, filling consistency, and browning. Try out variations, like fruit-infused or dairy-free options. With the right storage methods, your Danish can stay fresh longer. Enjoy baking!
Homemade Cheese Danish Easy and Flavorful Recipe
Are you ready to indulge in a warm, flaky delight? This Homemade Cheese Danish recipe is simple, flavorful, and perfect for breakfast or a sweet
- 1 cup pumpkin puree - 1/2 cup cream cheese, softened to room temperature - 1/2 cup whipped topping (store-bought or homemade) - 1/3 cup pure maple syrup - 1 teaspoon vanilla extract - 1 teaspoon pumpkin pie spice - 1/2 teaspoon ground cinnamon - 1 cup graham cracker crumbs - 1/4 cup unsalted butter, melted - 1/4 cup crushed pecans You can make some simple swaps to fit your needs: - Alternative sweeteners: Use honey or agave syrup instead of maple syrup. - Non-dairy options for cream cheese: Try a cashew-based cream cheese or silken tofu. - Gluten-free graham cracker alternatives: Look for gluten-free graham crackers or use ground almonds. These swaps help keep the recipe fun and flexible. You can enjoy it your way! To start, grab a medium bowl. Combine 1 cup of pumpkin puree and 1/2 cup of softened cream cheese. Use a whisk to mix them well. Add in 1/3 cup of maple syrup, 1 teaspoon of vanilla extract, 1 teaspoon of pumpkin pie spice, and 1/2 teaspoon of ground cinnamon. Keep whisking until the mixture is smooth and creamy. Make sure there are no lumps from the cream cheese. Gently fold in 1/2 cup of whipped topping with a spatula. This makes the filling light and fluffy. Set this aside. Now, in another bowl, mix 1 cup of graham cracker crumbs with 1/4 cup of melted unsalted butter. Stir until the crumbs are evenly coated. This step helps the base hold together. Next, take small dessert cups or mini mason jars. Place about 2 tablespoons of the graham cracker mixture at the bottom of each cup. Press it down slightly to form a solid base. Time to build your cups! Spoon the pumpkin filling over the graham cracker base. Fill each cup about three-quarters full. If you have larger cups, you can add another layer. Just repeat the graham cracker mixture and then more pumpkin filling. Finally, sprinkle 1/4 cup of crushed pecans on top of each cup. This adds a nice crunch and flavor. Cover the cups with plastic wrap or lids. Refrigerate them for at least 2 hours. This lets the flavors mix and the filling set. Serve these cool and enjoy the creamy, delicious dessert! To make your pumpkin filling smooth, whip the cream cheese well. Start with softened cream cheese at room temperature. Whisk it until you have a creamy base with no lumps. This step is key for a great texture. When you add the whipped topping, do it gently. Use a spatula to fold it in. Be careful not to mix too hard. This keeps the filling light and fluffy. Letting your pie cups chill is important. Aim for at least 2 hours in the fridge. This time allows flavors to blend and the filling to set. For covering, use plastic wrap or lids. This helps keep the cups fresh and tasty. For a pretty finish, consider garnishing each cup. A dollop of whipped topping adds a nice touch. You can also sprinkle a bit of cinnamon on top. Choose clear, small cups or mini mason jars for serving. This way, guests can see the layers. It makes the dessert look inviting and fun! {{image_4}} You can easily change the flavor of your No-Bake Pumpkin Pie Cups. Adding chocolate or caramel gives a sweet twist. Just drizzle melted chocolate or caramel sauce over the top. This adds a rich layer of taste that pairs well with pumpkin. You can also add chocolate chips to the filling for extra indulgence. Spiced variations can also enhance the filling. Try adding a pinch of nutmeg or ginger for a warm kick. You can even mix in some apple pie spice for a fun twist. These small changes create a unique dessert for every occasion. Making your pumpkin cups vegan is simple. Swap cream cheese for a non-dairy version, like cashew cream. Use coconut whipped cream instead of regular whipped topping. Replace maple syrup with agave nectar for a vegan sweetener. These swaps keep the taste while meeting dietary needs. If you're looking for low-sugar options, you can use sugar substitutes. Stevia or monk fruit sweetener works well in this recipe. Just adjust the amount to match your taste. This way, you maintain the sweet flavor without the extra sugar. Pairing drinks with your cups can enhance the dessert experience. A warm chai tea or spiced cider complements the flavors well. If you prefer something colder, a vanilla-flavored soda works too. For plating ideas, consider using clear dessert cups to show off the layers. You can also add a cinnamon stick for decoration. This gives a festive look to your gathering. Using colorful napkins or plates can make your dessert stand out even more. To keep your No-Bake Pumpkin Pie Cups fresh, store them in the refrigerator. Place the cups in an airtight container or cover them with plastic wrap. They stay good for about 3 to 5 days. Make sure to keep them chilled until you are ready to serve. This helps maintain their creamy texture and flavor. If you want to save some for later, you can freeze the pumpkin pie cups. First, cover each cup tightly with plastic wrap or foil. Then, place them in a freezer-safe bag or container. They can last up to 2 months in the freezer. When you’re ready to eat them, move the cups to the fridge to thaw overnight. These cups are best served cold. If you want to enjoy them slightly warmer, let them sit out for about 10 minutes before serving. This way, they soften a bit, but don’t heat them in the microwave. That might change their texture and taste. Enjoy them straight from the fridge for the best flavor! No-Bake Pumpkin Pie Cups last about 3 to 5 days in the fridge. Store them in an airtight container. This keeps them fresh and tasty for when you want a quick treat. Yes, you can make these cups ahead of time. They taste even better after chilling for a few hours. You can prepare them a day before serving. Just cover them well in the fridge. If you don’t have graham crackers, you can use crushed cookies or oats. Some people like to use vanilla wafers or even gluten-free options. Just mix them with melted butter to form a base. Yes, you can use fresh pumpkin. Just cook and puree it until smooth. Be sure to drain any excess water. Canned pumpkin is often easier and saves time, but fresh can add a special taste. To make these cups healthier, use less maple syrup or a sugar substitute. You can also swap cream cheese for a low-fat version. Consider adding yogurt instead of whipped topping for a lighter touch. The blog post covered all you need for delicious No-Bake Pumpkin Pie Cups. We explored essential ingredients and helpful substitutes. Step-by-step instructions made the process easy to follow. Key tips ensured the perfect consistency and tasty results. We looked at fun variations and smart storage options. In conclusion, these Pumpkin Pie Cups are not just simple to make; they are flexible and tasty. Try your own spin, and enjoy this treat throughout the season!
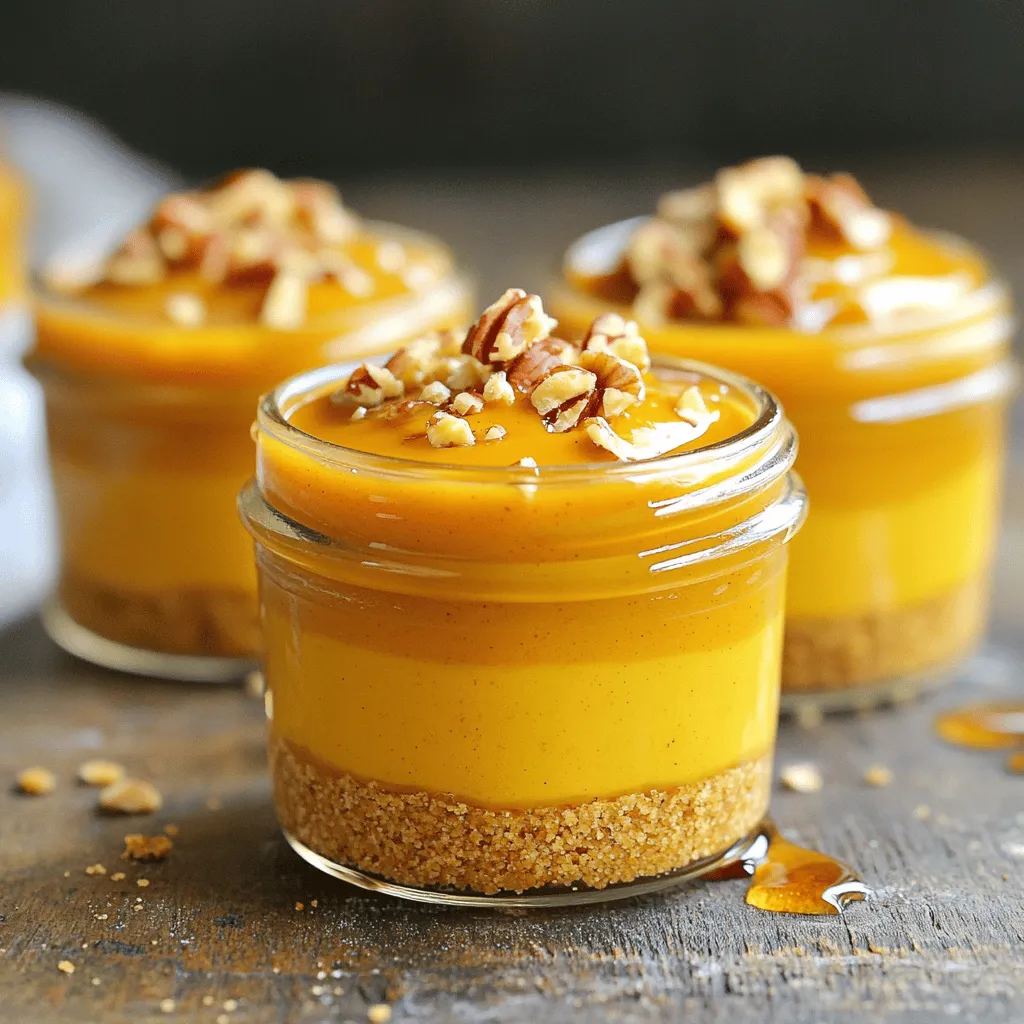
No-Bake Pumpkin Pie Cups Simple and Delicious Treat
Fall flavors are just a bite away with these No-Bake Pumpkin Pie Cups! This simple treat combines creamy pumpkin filling with a crunchy graham cracker
To make delicious Air Fryer Apple Fritter Bites, you will need: - 2 medium-sized apples (like Granny Smith or Honeycrisp), peeled and diced - 1 cup all-purpose flour - 1/2 cup granulated sugar - 1/2 teaspoon baking powder - 1/4 teaspoon baking soda - 1/4 teaspoon salt - 1 teaspoon ground cinnamon, plus extra for garnish - 1/2 teaspoon vanilla extract - 1/4 cup whole milk - 1 large egg - 1/4 cup brown sugar, packed firmly - 1/4 cup powdered sugar (for glaze) - 1-2 tablespoons milk (for glaze) Measuring ingredients accurately is key to great results. Here are some tips: - Use dry measuring cups for flour and sugar. - Scoop flour gently, then level off with a knife. - When measuring brown sugar, pack it firmly into the cup. - Use a liquid measuring cup for milk and other liquids. You can swap some ingredients if needed: - For gluten-free bites, try a gluten-free flour blend. - Use almond milk instead of whole milk for a dairy-free option. - Swap the egg with a flaxseed meal mixture for a vegan version. - Try using different spices, like nutmeg, for a unique flavor twist. Start by peeling and dicing two medium-sized apples. Good choices are Granny Smith or Honeycrisp. Place the diced apples into a medium bowl. Add 1/4 cup of packed brown sugar and 1 teaspoon of ground cinnamon. Mix well. Let this sit for about 10 minutes. The apples will absorb the sweetness and spices. This step makes the apple mixture extra tasty. In a large mixing bowl, combine 1 cup of all-purpose flour, 1/2 cup of granulated sugar, 1/2 teaspoon of baking powder, 1/4 teaspoon of baking soda, and 1/4 teaspoon of salt. Add the remaining 1 teaspoon of cinnamon and whisk until well mixed. In a small bowl, beat one large egg until it is frothy. Then, add 1/4 cup of whole milk and 1/2 teaspoon of vanilla extract. Mix until smooth. Pour this wet mixture into the dry ingredients. Stir gently until just combined. Do not overmix. Now, fold in the spiced apple mixture carefully. This makes the batter rich and flavorful. Preheat your air fryer to 350°F (175°C) for about 5 minutes. Lightly grease the air fryer basket with non-stick spray or a bit of oil. Using a tablespoon, scoop out the batter to form small fritter bites, about 1.5 inches in diameter. Place them in the basket, giving each bite space. This helps them cook evenly. Air fry the bites for 8 to 10 minutes. They should turn golden brown and be fully cooked. If your air fryer is small, you may need to do this in batches. Once done, let them cool slightly. While cooling, make the glaze by mixing 1/4 cup of powdered sugar with 1 to 2 tablespoons of milk. Stir until smooth. Drizzle the glaze over the bites or dip them in for a sweet finish. To get that lovely golden color, watch your cooking time closely. Air fry the bites for 8-10 minutes at 350°F (175°C). Check them halfway through. If they need more time, add a minute or two. The bites should be golden brown and cooked through. The right temperature ensures a crispy outside and soft inside. Always preheat your air fryer. This step helps the fritter bites cook evenly. Lightly grease the basket with non-stick spray. Avoid overcrowding the basket. Give each fritter bite room to expand. If your air fryer is small, cook in batches. This way, each fritter will get that perfect crunch. Serve your fritter bites warm for the best taste. Place them on a decorative plate. Drizzle the glaze over each bite or serve it on the side for dipping. Add a sprinkle of powdered sugar for a sweet touch. You can also garnish with fresh apple slices or mint leaves. This makes the dish look beautiful and appetizing. {{image_4}} You can choose many kinds of apples for your fritter bites. I love using Granny Smith and Honeycrisp. Granny Smith gives a nice tartness, while Honeycrisp adds sweetness. Other good options include Fuji and Gala apples. These apples hold their shape well and add great flavor. Feel free to mix in some fun flavors. You can add nuts like walnuts or pecans for crunch. Dried fruits, like raisins or cranberries, can also add sweetness. If you want a hint of spice, try adding nutmeg or ginger. A bit of lemon zest brightens the taste too. You can make these fritter bites gluten-free easily. Just swap all-purpose flour for a gluten-free blend. For a vegan version, replace the egg with a flaxseed meal or a banana. Use plant-based milk instead of whole milk. These changes let everyone enjoy this tasty treat! To keep your apple fritter bites fresh, store them in an airtight container. This helps lock in moisture and flavor. Place a piece of parchment paper between layers if you stack them. This prevents them from sticking together. Store the bites at room temperature if you plan to eat them within a day or two. If you need them to last longer, refrigerate them. You can freeze apple fritter bites for later enjoyment. Allow them to cool completely. Then, place them in a single layer on a baking sheet. Freeze for about an hour. This helps prevent them from sticking together. Once frozen, transfer the bites to a freezer-safe bag or container. Make sure to remove as much air as possible. They can stay fresh for up to three months in the freezer. Reheating apple fritter bites is easy. You can use an air fryer, oven, or microwave. For the air fryer, preheat it to 350°F (175°C). Place the bites in for about 3-5 minutes until warm. If you use an oven, heat it to 350°F (175°C) and bake for about 8-10 minutes. For a quick option, microwave each bite for about 15-20 seconds. Keep an eye on them to avoid overheating. Enjoy the warm, tasty goodness! Yes, you can make these bites ahead. Prepare the batter and apple mixture earlier in the day. Store them in the fridge. When you are ready to cook, just scoop and air fry. This keeps them fresh and tasty. Check the fritter bites after 8 minutes. They should be golden brown. Insert a toothpick into one; it should come out clean. If it’s still wet, cook for another minute. Every air fryer is a bit different, so keep an eye on them. Yes, you can bake these fritter bites. Preheat your oven to 375°F (190°C). Place them on a baking sheet lined with parchment paper. Bake for about 12-15 minutes until golden. You can also pan-fry them in oil if you prefer that method. Air fryer apple fritter bites are simple and fun to make. We covered the right ingredients, measuring tips, and helpful substitutions. I shared step-by-step guides to prepare tasty fritters and tips for crispy bites. Variations let you explore different flavors, whether using apples or adding other ingredients. Proper storage keeps them fresh for later. In summary, these fritter bites are a tasty treat, easy for anyone. Enjoy making and sharing them with friends and family.
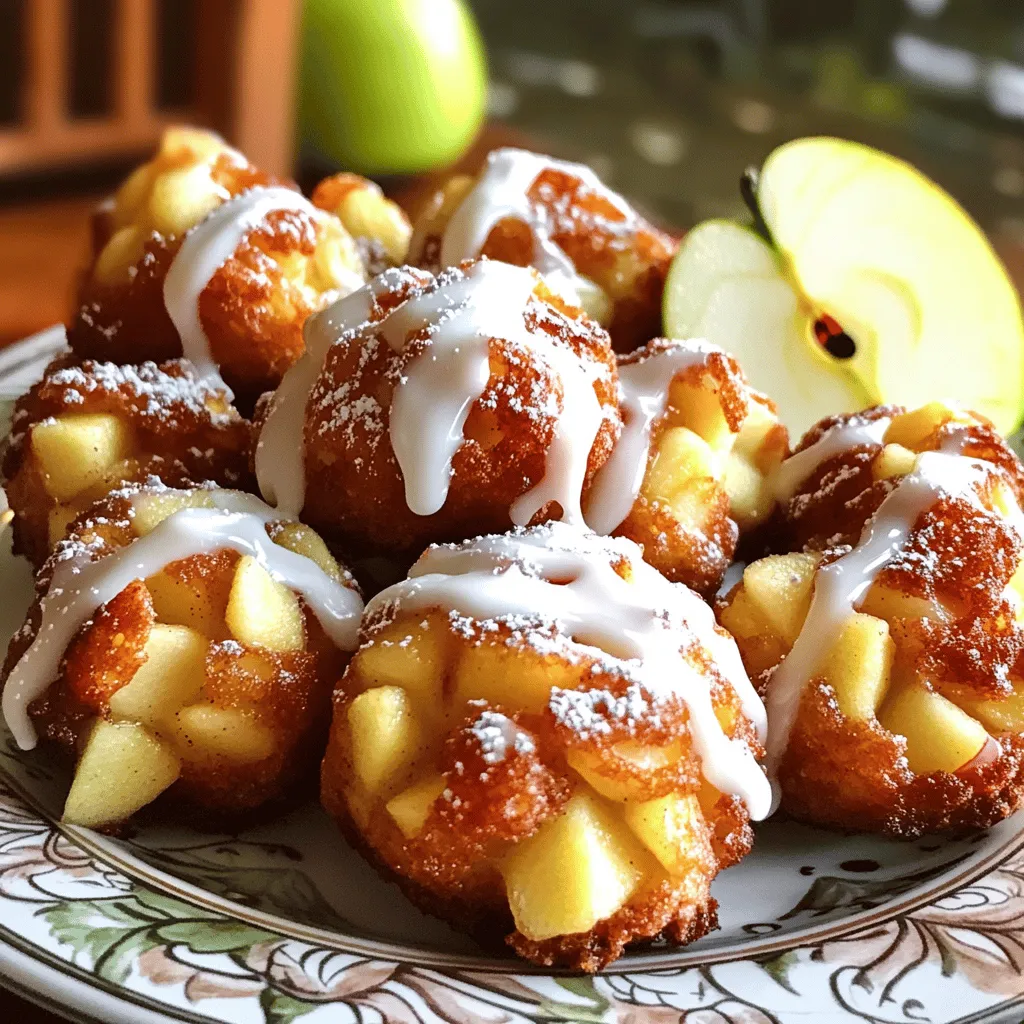
Air Fryer Apple Fritter Bites Tasty and Simple Treat
Craving a sweet treat that’s quick and easy? Let me introduce you to Air Fryer Apple Fritter Bites! These tasty morsels pack all the flavor
- 8 oz cream cheese, softened to room temperature - 1 cup pumpkin puree - 1/2 cup powdered sugar, sifted - 1 teaspoon pure vanilla extract - 1 teaspoon pumpkin pie spice - 1/2 cup salted caramel sauce (store-bought or homemade) - 1/4 teaspoon flaky sea salt - Optional for garnish: Whipped cream, extra drizzles of caramel sauce, and crushed graham crackers To create this delightful dip, you need a few key ingredients. First, cream cheese gives it a rich base. Use 8 oz, and let it soften to room temperature for easy mixing. Next, pumpkin puree adds that warm, fall flavor. One cup works perfectly. Sweetness comes from 1/2 cup of sifted powdered sugar. This helps balance the other flavors. You’ll also add 1 teaspoon of pure vanilla extract for a lovely aroma. Don’t forget the 1 teaspoon of pumpkin pie spice; it brings all the cozy spices together. Now, for the star of the show: 1/2 cup of salted caramel sauce. You can buy this or make your own. Lastly, sprinkle in 1/4 teaspoon of flaky sea salt to enhance the taste. For an extra special touch, consider optional garnishes like whipped cream, more caramel sauce, or crushed graham crackers. They make your dip even more appealing and tasty. Enjoy creating this sweet treat! Start by softening your cream cheese. Leave it out for about 30 minutes. This step makes it easy to mix. Next, grab a large mixing bowl. Use an electric mixer on medium speed. Beat the softened cream cheese for 1-2 minutes. You want it to be smooth and creamy. Now, it’s time to add the pumpkin puree. Also, include the powdered sugar, vanilla extract, and pumpkin pie spice. Mix these together on medium speed. Keep mixing until everything is well combined. The mixture should be velvety and smooth. Next, drizzle in half of the salted caramel sauce. Sprinkle in the flaky sea salt. Use a spatula to fold these in gently. This will create pretty swirls of caramel. Taste the mixture. If you want it sweeter, add more powdered sugar. Mix briefly to blend it in. Carefully transfer the dip to a nice serving bowl. Drizzle the rest of the salted caramel sauce on top. Add a generous dollop of whipped cream. Then, sprinkle crushed graham crackers around the edge. This adds texture and looks great. Serve right away for the best flavor! If you need to wait, cover it and chill. Let it sit at room temperature before serving for the best texture. To get the perfect creaminess in your dip, start with room-temperature cream cheese. Cold cream cheese will not mix well. Use an electric mixer and beat it for about 1-2 minutes. This step makes your dip smooth and fluffy. If you want an even silkier texture, mix it a bit longer. You can adjust the sweetness and spice to fit your taste. If you want it sweeter, add more powdered sugar. Mix it in slowly, tasting as you go. For spice, try adding a pinch of cinnamon or nutmeg. This gives your dip a warm flavor. Remember, balance is key to a great dip! Serve your dip in a colorful bowl. Drizzle extra caramel on top for a nice look. Add a dollop of whipped cream to make it fancy. Surround the dip with fun dippers. Use thin apple slices, crunchy graham crackers, or salty pretzel sticks. Arrange these on a big platter for a beautiful display. This not only looks good but also makes it easy for guests to grab their favorites! {{image_4}} You can switch up the spices in this dip. Try cinnamon or nutmeg for a warm touch. Both of these spices add great depth to the flavor. You can also play with sweeteners. Instead of powdered sugar, use honey or maple syrup for a twist. Each sweetener brings a unique taste that can change the whole dip. If you need gluten-free options, use gluten-free graham crackers. They work well as dippers. For a vegan version, swap cream cheese with a vegan alternative. You can also use coconut cream for a rich texture. Make sure to choose a vegan caramel sauce too. This way, everyone can enjoy the dip! Seasonal ingredients can brighten up this dip. In fall, try adding fresh apples or pears. They add a crisp bite that complements the creamy dip. During winter, consider using roasted chestnuts for a festive touch. You can even mix in some crushed ginger snaps for added spice. These swaps keep your dip fresh and fun for all seasons! To keep your salted caramel pumpkin cheesecake dip fresh, store it in a tightly sealed container. I recommend using glass containers for the best results. If you don’t have one, plastic works too. Make sure to cover it well. This helps to prevent any unwanted odors from mixing in. In the fridge, this dip stays fresh for about 3 to 5 days. If you want to enjoy it longer, you can freeze it. However, freezing might change the texture a bit. To thaw it, place it in the fridge overnight before serving. When you are ready to serve, let the dip sit at room temperature for about 15 minutes. This step helps bring back its creamy texture. If it seems too thick, stir in a little bit of milk or cream to loosen it. This will make it smooth and easy to dip into. Enjoy with your favorite dippers! Yes, you can prepare this dip ahead of time. Make the dip and store it in the fridge. Cover it tightly with plastic wrap. This keeps it fresh for up to two days. When you are ready to serve, let it sit out for a few minutes. This helps bring back the creamy texture. Drizzle extra caramel on top for a fresh look. If your dip is too thin, there are easy ways to thicken it. You can add more cream cheese. Start by mixing in a little at a time. You can also use powdered sugar. This adds sweetness and thickness. Another option is to stir in crushed graham crackers. This adds flavor and helps the dip hold its shape. There are many great dippers to enjoy with this dip. Here are some ideas: - Sliced apples - Crunchy graham crackers - Salty pretzel sticks - Nilla wafers - Celery sticks Each option adds a fun twist to the sweet dip. Yes, you can make your own caramel sauce. For a quick version, melt sugar in a pan. Stir until it turns golden. Then, add butter and cream. Mix until smooth. This homemade sauce can add a personal touch. Use it in place of store-bought caramel. Just make sure it cools before adding it to the dip. This blog post covered how to make a delicious pumpkin dip. We explored main ingredients like cream cheese and pumpkin puree. Next, I shared step-by-step instructions for mixing and serving. I also included tips to enhance flavor and presentation. You can even modify the recipe for different diets! Finally, I provided storage tips to keep your dip fresh. Enjoy making this treat at home, and impress your friends with your tasty skills!
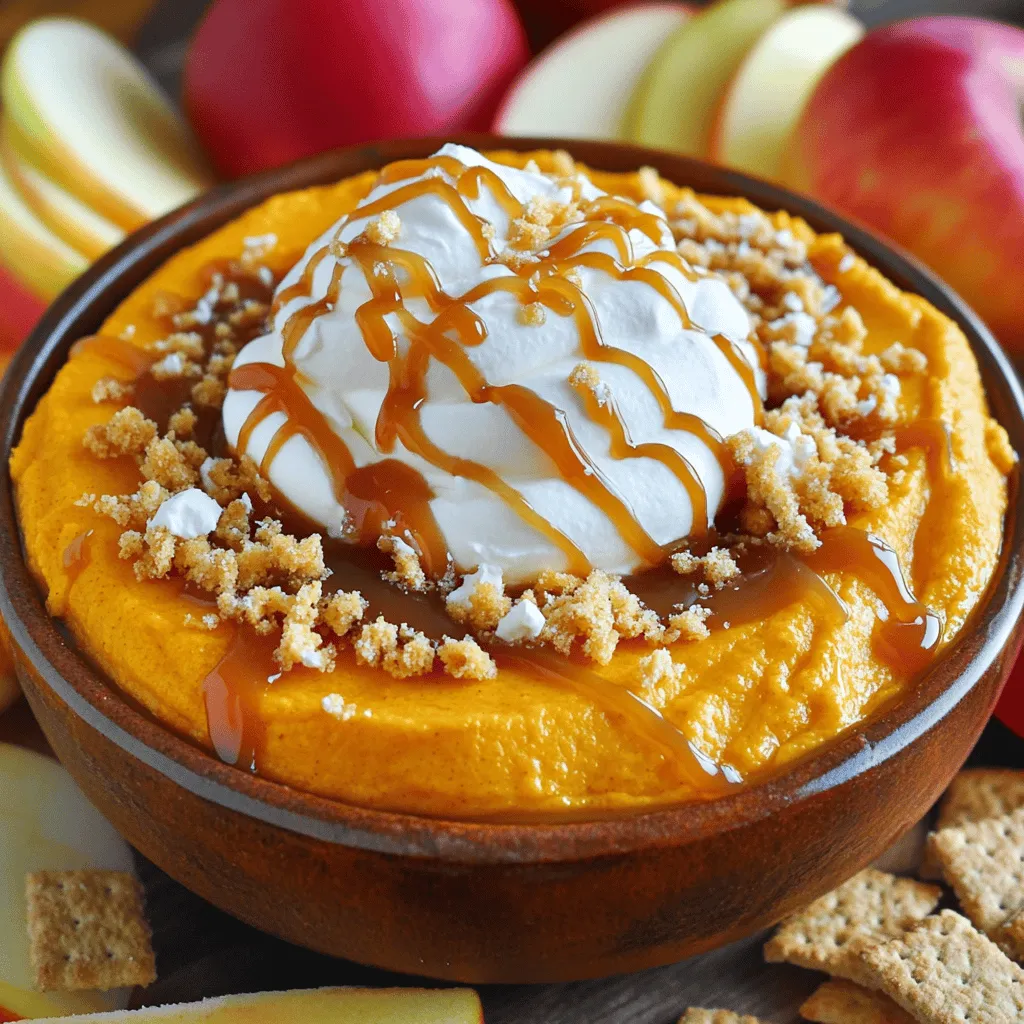
Salted Caramel Pumpkin Cheesecake Dip Delightful Treat
Are you ready for a treat that combines creamy cheesecake with warm pumpkin flavors? This Salted Caramel Pumpkin Cheesecake Dip is your new go-to dessert
- 2 ripe bananas, thoroughly mashed - 1 cup pure pumpkin puree - 1/2 cup vegetable oil - 1/2 cup packed brown sugar - 1/4 cup granulated sugar - 2 large eggs, at room temperature - 1 teaspoon pure vanilla extract - 2 cups all-purpose flour - 1 teaspoon baking soda - 1/2 teaspoon baking powder - 1/2 teaspoon fine salt - 1 teaspoon ground cinnamon - 1/2 teaspoon ground nutmeg - 1/2 cup semi-sweet or dark chocolate chips - 1/2 cup chopped walnuts or pecans (optional) - Bananas: Use ripe bananas for the best flavor. They add moisture and sweetness. - Pumpkin Puree: Canned pumpkin works great. It’s easy and saves time. - Vegetable Oil: You can swap it with melted coconut oil for a richer taste. - Sugar: Brown sugar adds depth, while granulated sugar gives sweetness. - Eggs: They help bind the mix. Room temperature eggs blend better. - Flour: All-purpose flour gives good structure. You can use whole wheat for a healthier option. - Baking Soda and Baking Powder: These help the bread rise and become fluffy. - Salt: A little salt brings out all the flavors. - Spices: Cinnamon and nutmeg add warmth and a cozy aroma. - Chocolate Chips: Semi-sweet or dark chocolate chips add sweetness and a rich flavor. - Nuts: Walnuts or pecans add crunch and extra flavor. They are optional but tasty. - For 5 servings: - Ripe bananas: 1 - Pumpkin puree: 1/2 cup - Vegetable oil: 1/4 cup - Brown sugar: 1/4 cup - Granulated sugar: 2 tablespoons - Eggs: 1 - Flour: 1 cup - Baking soda: 1/2 teaspoon - Baking powder: 1/4 teaspoon - Salt: 1/4 teaspoon - Spices: 1/2 teaspoon cinnamon, 1/4 teaspoon nutmeg - Chocolate chips: 1/4 cup - Nuts: 1/4 cup (optional) - For 20 servings: - Ripe bananas: 4 - Pumpkin puree: 2 cups - Vegetable oil: 1 cup - Brown sugar: 1 cup - Granulated sugar: 1/2 cup - Eggs: 4 - Flour: 4 cups - Baking soda: 2 teaspoons - Baking powder: 1 teaspoon - Salt: 1 teaspoon - Spices: 2 teaspoons cinnamon, 1 teaspoon nutmeg - Chocolate chips: 1 cup - Nuts: 1 cup (optional) First, gather all your ingredients. You will need ripe bananas, pumpkin puree, vegetable oil, sugars, eggs, and vanilla extract. Make sure to have all-purpose flour, baking soda, baking powder, salt, cinnamon, nutmeg, and chocolate chips ready. Don't forget the nuts if you want them! Next, preheat your oven to 350°F (175°C). Grease a 9x5-inch loaf pan with butter, oil, or use parchment paper. This helps the bread come out easily once baked. In a large bowl, mash the bananas well. Then, mix in the pumpkin puree until it looks smooth. Add the vegetable oil, brown sugar, granulated sugar, eggs, and vanilla. Stir these ingredients until they blend nicely. In a second bowl, whisk the flour, baking soda, baking powder, salt, cinnamon, and nutmeg. Mixing these dry items well makes sure the spices spread evenly in the bread. Now, slowly add the dry mix to the wet mix. Use a spatula to combine them gently. It’s okay if there are a few lumps. Overmixing can make the bread tough, and we want it soft! Lastly, fold in the chocolate chips and nuts, if using. Make sure they are evenly spread in the batter. Pour the batter into your prepared loaf pan. Smooth the top with a spatula for a nice finish. Place the pan in the preheated oven and bake for 55 to 65 minutes. Check if the bread is done by inserting a toothpick in the center. If it comes out clean or with a few moist crumbs, it’s ready! Remove the loaf from the oven and let it cool in the pan for about 10 minutes. Then, transfer the loaf to a wire rack to cool completely. Enjoy the delicious smell as it cools! To get the best texture, mix gently. Overmixing can make the bread tough. Stir just until the flour blends in. It’s fine if some lumps stay. This helps keep the bread light and fluffy. If you see bubbles in your batter, stop mixing! Those bubbles help the bread rise. Boost flavor with spices. Cinnamon and nutmeg add warmth. You can also try adding a pinch of ginger for extra spice. Use pure vanilla extract for a rich taste. You might even add a splash of almond extract. These small changes can turn a good loaf into an amazing one. If your bread is too dense, you may have mixed too much. A dense loaf can also happen if you pack the flour tightly. Make sure to spoon flour into the cup and level it off. If the bread sinks in the middle, it might be underbaked. Use a toothpick to check doneness; it should come out clean. If the top browns too fast, cover it with foil. This helps it bake evenly. {{image_4}} You can enhance the flavor of your banana pumpkin chocolate chip bread in several ways. Consider adding spices like ginger or allspice for a warm kick. You can also mix in dried fruits like raisins or cranberries. They add a nice sweetness and chewiness. If you love nuts, try using almonds or hazelnuts instead of walnuts or pecans. Each nut brings a unique crunch and flavor. You can also swap in different chocolate types. For a richer taste, use dark chocolate or milk chocolate. Making this bread gluten-free is easy. Just replace all-purpose flour with a gluten-free blend. Look for a blend that includes xanthan gum. This helps give the bread structure. For vegan options, use flax eggs. Mix one tablespoon of flaxseed meal with three tablespoons of water. Let it sit for five minutes to thicken. Use this instead of eggs. You can also swap vegetable oil with coconut oil for a different flavor. As the seasons change, so can your bread. For fall, add fresh cranberries. This tartness pairs well with the sweet banana and pumpkin. You can also try adding orange zest for a bright citrus note. In winter, consider adding spices like cardamom for a cozy feel. In spring, fresh herbs like mint can add a fresh twist. Each change keeps your banana pumpkin chocolate chip bread exciting all year round. To keep your banana pumpkin chocolate chip bread fresh, store it in an airtight container. This helps maintain moisture and flavor. If you plan to eat it within a few days, place it at room temperature. For longer storage, refrigeration can work, but it may dry out the bread. Use a slice of bread in the container to keep it soft. To freeze your bread, wrap it tightly in plastic wrap. Then, place it in a freezer-safe bag. This helps prevent freezer burn. You can freeze it for up to three months without losing flavor. When you’re ready to eat, place the bread in the fridge overnight to thaw. For a warm treat, slice and warm it in the oven for a few minutes. Enjoy leftover banana pumpkin chocolate chip bread as a snack or breakfast. A slice pairs well with a warm drink like coffee or tea. You can also spread cream cheese on top for added taste. For a fun twist, toast the bread and add a drizzle of honey or maple syrup. This adds sweetness and makes each bite special. Yes, you can use canned pumpkin. It saves time and adds great flavor. Just make sure it is pure pumpkin puree, not pumpkin pie filling. This keeps the taste and texture just right in your banana pumpkin chocolate chip bread. Check the center with a toothpick. If it comes out clean or with a few moist crumbs, the bread is done. You can also look for a golden-brown color on top. The edges should pull slightly away from the pan too. Yes, you can add dried fruits like raisins or cranberries. You can also swap nuts, using pecans or almonds instead of walnuts. Just keep the total amount of mix-ins to about one cup. The bread lasts about three to four days at room temperature in an airtight container. If you want to keep it longer, you can freeze it. It stays good for up to three months in the freezer. In this post, we explored key ingredients for your recipe, including substitutes and conversions. I shared step-by-step instructions to ensure your baking success. You learned tips for perfect texture and flavor boosts while troubleshooting common problems. We discussed variations for taste and dietary needs, plus the best storage methods for freshness. Try these ideas in your next baking session. Small changes can greatly improve your finished dish. Enjoy your adventure in the kitchen! Remember, the joy of baking involves learning from each attempt. Happy baking!
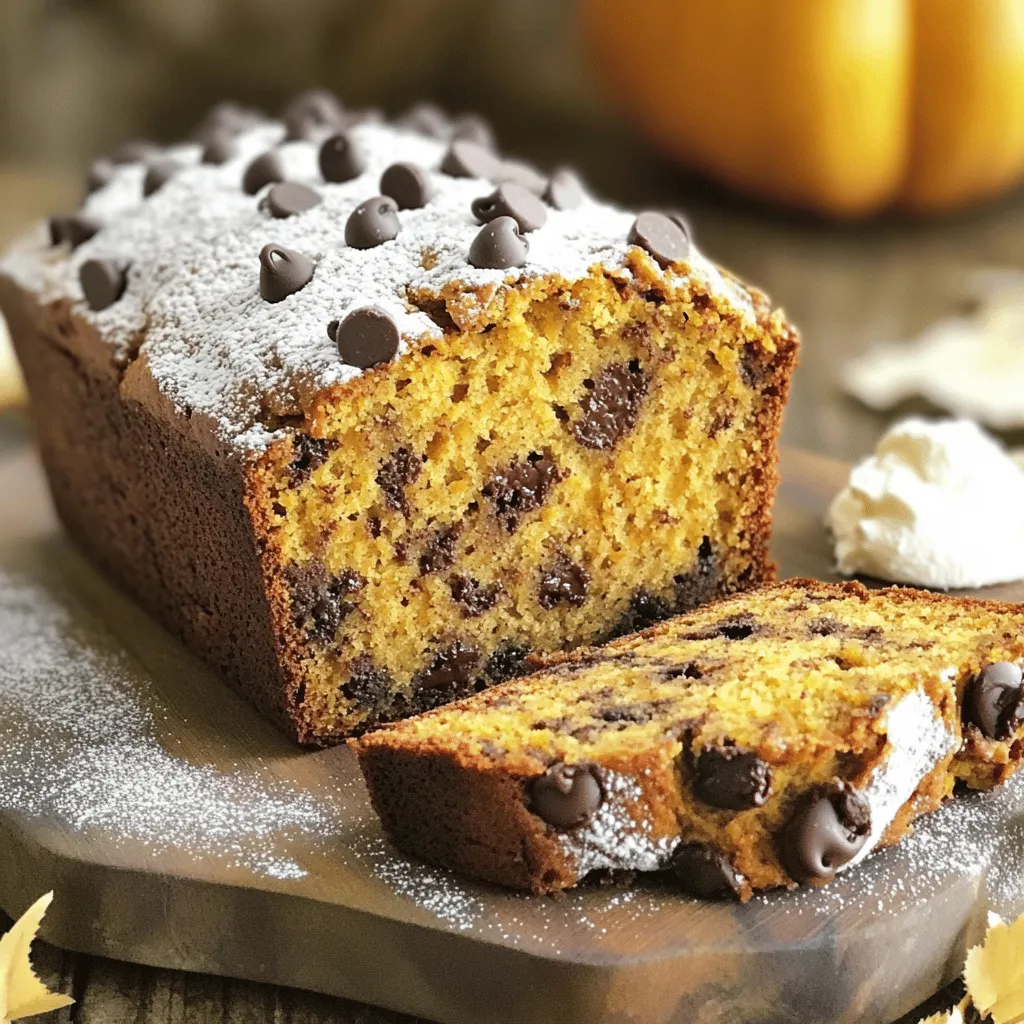
Banana Pumpkin Chocolate Chip Bread Simple Delight
Are you ready to treat yourself to a warm slice of Banana Pumpkin Chocolate Chip Bread? This simple delight combines sweet bananas, creamy pumpkin, and
- 1 ½ cups all-purpose flour - 1 teaspoon baking soda - ½ teaspoon baking powder - ½ teaspoon ground cinnamon - ½ teaspoon ground nutmeg - ¼ teaspoon ground ginger - ½ teaspoon salt - 1 cup canned pumpkin puree - ½ cup granulated sugar - ½ cup brown sugar, packed - 2 large eggs - ½ cup vegetable oil - 1 teaspoon vanilla extract - 4 oz cream cheese, softened - ¼ cup chopped pecans or walnuts (optional) - ¼ cup chocolate chips (optional) Each ingredient plays a key role. The flour gives structure while the baking soda and baking powder help the muffins rise. Cinnamon, nutmeg, and ginger add warmth and spice. Canned pumpkin puree brings moisture and flavor. The sugars sweeten and enhance the pumpkin's taste. Eggs bind everything, and oil keeps the muffins moist. Cream cheese adds a rich, creamy center. Nuts and chocolate chips provide crunch and sweetness. You can swap all-purpose flour for whole wheat flour if you prefer a healthier option. For a gluten-free version, use a gluten-free flour blend. If you want a dairy-free option, try using a plant-based cream cheese. Instead of granulated sugar, you can use coconut sugar for a different flavor. For a nut-free muffin, simply leave out the nuts. Start by preheating your oven to 350°F (175°C). This step helps the muffins bake evenly. While it heats, prepare your muffin pan. Use paper liners or a non-stick spray to prevent sticking. Grab a medium bowl. Add 1 ½ cups of all-purpose flour, 1 teaspoon of baking soda, and ½ teaspoon of baking powder. Next, mix in ½ teaspoon of ground cinnamon, ½ teaspoon of ground nutmeg, ¼ teaspoon of ground ginger, and ½ teaspoon of salt. Whisk these together well so they blend nicely. In a large bowl, combine 1 cup of canned pumpkin puree, ½ cup of granulated sugar, and ½ cup of packed brown sugar. Crack in 2 large eggs. Add ½ cup of vegetable oil and 1 teaspoon of vanilla extract. Beat this mixture until it is smooth and creamy with no lumps. Now, take the dry mix and add it to the wet pumpkin mix. Use a spatula or wooden spoon to stir gently. Mix only until combined. It’s okay if the batter looks a little lumpy; just don’t overmix it. In a small bowl, take 4 oz of softened cream cheese. Add 1 tablespoon of sugar and mix well. This creates a creamy filling that will add richness to your muffins. Carefully fill each muffin cup about two-thirds full with the pumpkin batter. Then add a small dollop of the cream cheese mixture in the center of each muffin. Use a toothpick to gently swirl the cream cheese into the batter for a pretty marbled look. If you want to add some crunch, sprinkle ¼ cup of chopped pecans or walnuts on top. You can also add ¼ cup of chocolate chips for extra sweetness. These toppings make your muffins even more delightful. Place the muffin pan in the oven and bake for 18-20 minutes. Check if they’re done by inserting a toothpick into the center. It should come out clean or with a few moist crumbs. Once they are baked, take the muffins out of the oven. Let them cool in the pan for about 5 minutes. Then, transfer them to a wire rack to cool completely. This step helps improve their texture and flavor. Enjoy your freshly baked loaded pumpkin cream cheese muffins! To make sure your muffins stay moist, use canned pumpkin puree. It adds moisture and flavor. Also, don’t skip the eggs. They act as binders and keep the muffins soft. Use a light touch when mixing. Over-mixing can lead to dry muffins. When you mix the wet and dry ingredients, stir gently. It is okay if the batter is lumpy. Lumps mean you haven’t mixed too much. Use a spatula or a wooden spoon. These tools help you control the mixing better. To get a smooth cream cheese center, soften the cream cheese first. Mix it with a bit of sugar until creamy. Use a spoon to add a dollop into each muffin. Swirl it in gently with a toothpick. This creates a lovely marbled look and a rich taste. {{image_4}} If you want nut-free muffins, skip the pecans or walnuts. These muffins still taste great without them. Instead, you can add extra chocolate chips. They will add sweetness and richness. You can also use seeds, like pumpkin or sunflower seeds, for a nice crunch. For gluten-free muffins, use a gluten-free flour blend. Many blends work well for baking. Look for one that has xanthan gum. This helps bind the ingredients. You can also add a little extra baking powder for lift. This keeps your muffins light and fluffy. Want to get creative? Add chocolate chips for sweetness. They melt and create a rich center. Dried fruits, like cranberries or raisins, make a great addition too. They add a chewy texture and fruity flavor. You can also use spices, like cloves or allspice, for a warm taste. Get playful with flavors to find your favorite mix! To keep your loaded pumpkin cream cheese muffins fresh, store them in an airtight container. Place them at room temperature for up to three days. If you want to keep them longer, refrigeration is a great option. Just remember to wrap them well to avoid drying out. Freezing muffins is simple and effective. Wrap each muffin in plastic wrap or aluminum foil. Then, place them in a freezer bag. They can last up to three months in the freezer. When you're ready to eat them, just pull them out and let them thaw at room temperature. To reheat your muffins, you can use an oven or microwave. If using an oven, preheat it to 350°F (175°C). Place the muffins on a baking sheet and heat for about 10 minutes. For a quicker method, microwave a muffin for about 15-20 seconds. This will warm them up and enhance the flavors. Enjoy your tasty treat! Yes, you can use fresh pumpkin. Just cook and puree it until smooth. Fresh pumpkin gives a bright flavor. However, make sure to remove excess water. Canned pumpkin is easier and consistent, but fresh is great too. Check the muffins at 18 minutes. Insert a toothpick into the center. If it comes out clean or with a few crumbs, they are ready. Overbaking can make them dry, so keep an eye on them. Yes, you can prep the batter a day before. Just store it in the fridge. Bake the muffins when you are ready. You can also bake them ahead and store them. Just cool completely before sealing them in an airtight container. These muffins are great on their own. For a treat, serve with maple syrup. A dollop of whipped cream adds a nice touch. You can also pair them with coffee or tea for a cozy snack. You learned about the key ingredients for tasty muffins, and tips for baking them perfectly. We covered steps from mixing to cooling, plus variations for everyone. Remember, using the right techniques helps ensure a moist muffin every time. Storage tips will keep your treats fresh longer, so you can enjoy them later. Happy baking, and enjoy sharing these muffins with friends and family!
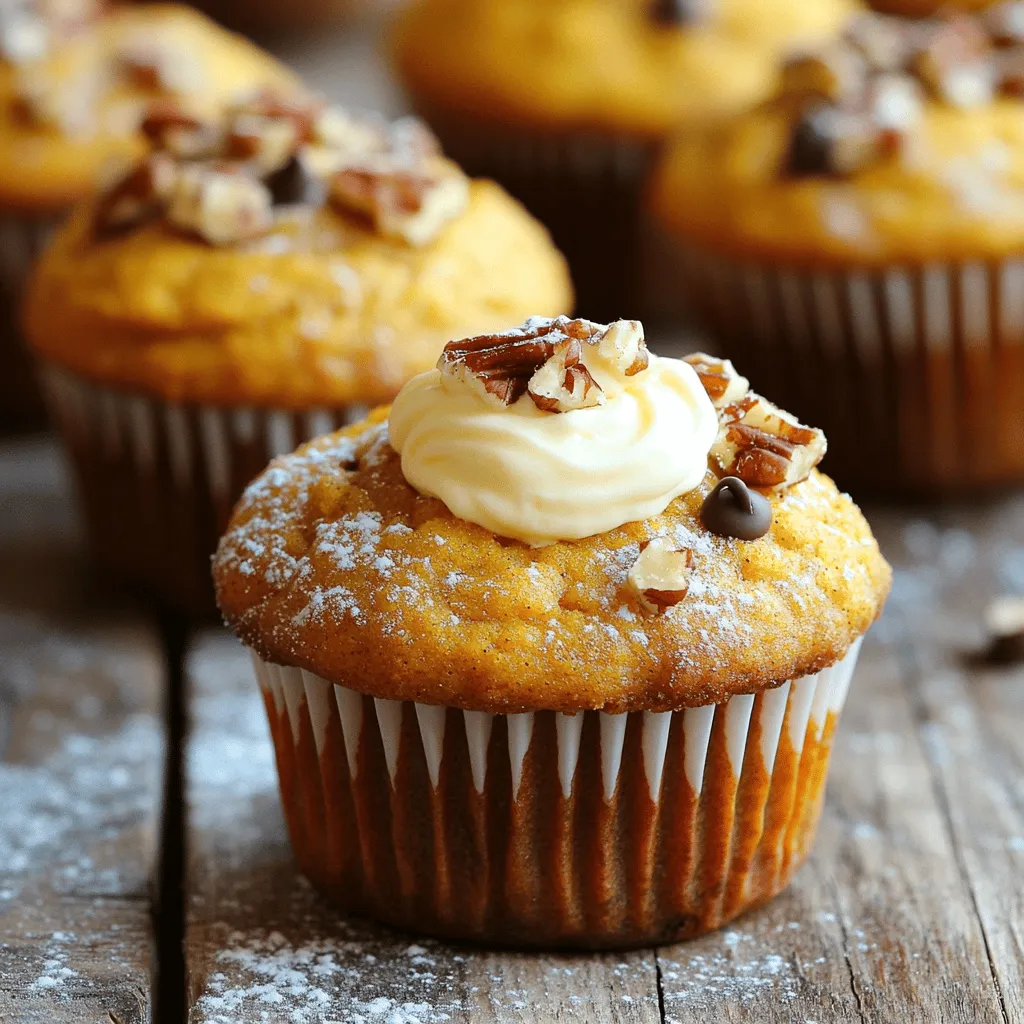
Loaded Pumpkin Cream Cheese Muffins Flavorful Delight
Are you ready to take your fall baking to a new level? Loaded Pumpkin Cream Cheese Muffins are a true treat. They burst with flavor