Breakfast

For a delicious arugula frittata, you need the following main ingredients: - 6 large eggs - 1 cup fresh arugula, roughly chopped - ½ cup cherry tomatoes, halved - ¼ cup feta cheese, crumbled - ¼ cup milk - 2 tablespoons extra virgin olive oil - 1 clove garlic, finely minced - Salt and freshly ground black pepper to taste These ingredients blend well to create a rich and tasty frittata. The eggs form the base, while the arugula adds a peppery touch. Cherry tomatoes bring sweetness, and feta cheese gives a creamy texture. Each bite bursts with flavor. You can make your frittata even more special with these optional garnishes: - Fresh basil leaves Adding fresh basil not only looks great but also adds a fragrant aroma. It complements the frittata's flavors and makes it more inviting. Measuring ingredients correctly is key. Use a liquid measuring cup for milk and a standard cup for arugula and cheese. Fresh arugula should be chopped roughly to ensure even cooking. When mixing the eggs, whisk them until smooth. This ensures a fluffy texture. If you want to elevate your frittata, try using organic eggs or locally-sourced feta. These small choices can make a big difference in taste. For the freshest flavor, buy arugula just before cooking. You can find the full recipe for this arugula frittata above. Enjoy cooking! First, preheat your oven to 375°F (190°C). This heat is key for a proper bake. While the oven warms, grab an oven-safe skillet. I love using cast iron for its even heat. Add 2 tablespoons of extra virgin olive oil to the skillet. Heat it over medium heat. You want the oil to shimmer but not smoke. This step ensures a great base for your frittata. In a large mixing bowl, crack 6 large eggs. Whisk them well until smooth. Then, add ¼ cup of milk, a pinch of salt, and some freshly ground black pepper. Mix until everything blends nicely. Now, fold in 1 cup of roughly chopped arugula and ½ cup of halved cherry tomatoes. Finally, sprinkle in ¼ cup of crumbled feta cheese. This mix brings great flavor and nutrients. Set this aside for a moment to let the flavors meld together. Carefully pour the egg mixture into your hot skillet. Stir gently to combine with the garlic. Cook it undisturbed for about 3-4 minutes. You want the edges to firm up while the center remains a bit runny. This creates a nice texture. After that, move the skillet to your preheated oven. Bake for 15-20 minutes. Check if it’s done by inserting a knife in the center. It should come out clean. Once baked, take it out and let it cool for a few minutes. This makes slicing much easier. After cooling, slice into wedges and serve warm. Enjoy the beautiful colors and flavors of your arugula frittata! For the complete instructions, refer to the Full Recipe. To create a fluffy frittata, use fresh eggs. Farm-fresh eggs make a big difference. Whisk them well with milk until they are light and airy. This air helps the frittata rise. Cook it slowly over medium heat to avoid burning. The edges should be firm, while the center stays soft. Baking it in the oven finishes cooking without drying it out. One mistake is overcooking the frittata. Check it often as it bakes. If you leave it too long, it can become rubbery. Another error is not letting it cool slightly before slicing. This makes it hard to cut cleanly. Avoid using too many heavy ingredients, which can weigh it down. Stick to the recipe for balance. A good quality oven-safe skillet is key. It should handle both stovetop and oven heat. Use a whisk for mixing the eggs, and a spatula to gently fold in the veggies. A sharp knife helps with slicing the frittata. Finally, a wooden cutting board makes for a nice serving display. For the full recipe, check out Arugula Frittata Delight. {{image_4}} You can easily make your arugula frittata more veggie-filled. Try adding bell peppers, onions, or mushrooms. They bring a nice crunch and flavor. You can also toss in some spinach for extra greens. Just remember to sauté these before adding them to the eggs. This helps their flavors shine and keeps the frittata moist. Want a protein kick? Add cooked bacon, sausage, or ham to your frittata. These meats make it heartier and tasty. If you prefer plant-based options, consider adding black beans, chickpeas, or quinoa. They pack a protein punch without meat. Mix them in with the eggs for a filling meal. If you want to skip dairy, you have options. Use almond milk or oat milk instead of regular milk. For cheese, try nutritional yeast for a cheesy flavor without dairy. You can also use vegan cheese if you want something melty. These swaps keep the frittata creamy and delicious while catering to your dietary needs. For more ideas, check the Full Recipe for variations and tips. To store your arugula frittata, let it cool first. Cut it into wedges. Use an airtight container to keep it fresh. Place a piece of parchment paper between layers if stacked. This prevents sticking. Store it in the fridge for up to four days. When ready to eat, take out a wedge. You can reheat it in the microwave or on the stovetop. For the microwave, heat for 30 seconds to one minute. Check if it is warm throughout. On the stovetop, place it in a skillet over low heat. Cover it to trap steam, so it warms evenly. You can freeze arugula frittata, too. Wrap each wedge in plastic wrap. Then place the wrapped wedges in a freezer-safe bag. This keeps them fresh for up to three months. When you want to eat it, thaw in the fridge overnight. Reheat as usual, and enjoy! For the full recipe, check the section above. You can tell a frittata is done when it looks puffed and golden. You should check the center with a knife. If the knife comes out clean, your frittata is ready. If it is still wet or runny, bake it a little longer. Remember, the edges should feel firm, while the middle may still jiggle slightly. Yes, you can use other greens! Spinach is a great choice and adds a nice flavor. Kale works well too, but chop it finely. Swiss chard or collard greens can also be good options. Just make sure to sauté any tough greens first to soften them before adding to the egg mix. This keeps the frittata tender and tasty. Frittatas pair well with many sides. A fresh green salad adds a nice crunch. You could also serve roasted potatoes for a hearty option. Sliced avocados or a fruit salad can bring a fresh touch too. If you want something warm, toast or crusty bread is a great choice. Feel free to mix and match your favorites! For the full recipe, check out the Arugula Frittata Delight. In this blog post, we explored how to make a great arugula frittata. We covered key ingredients, preparation tips, and step-by-step cooking instructions. I shared tips for perfect texture and common mistakes to avoid. You also learned about delicious variations and how to store your frittata properly. With these simple guidelines, you can create a tasty frittata anytime. Trust your skills and enjoy your cooking!
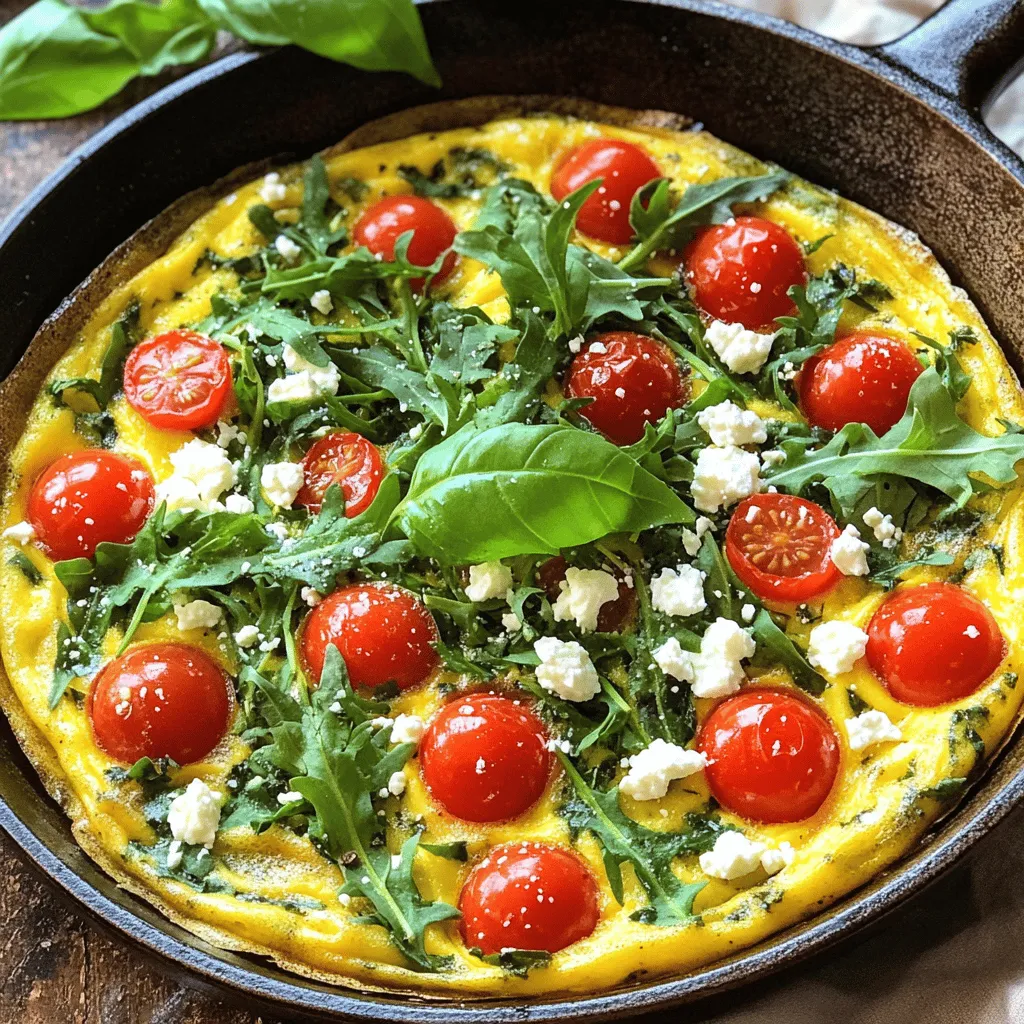
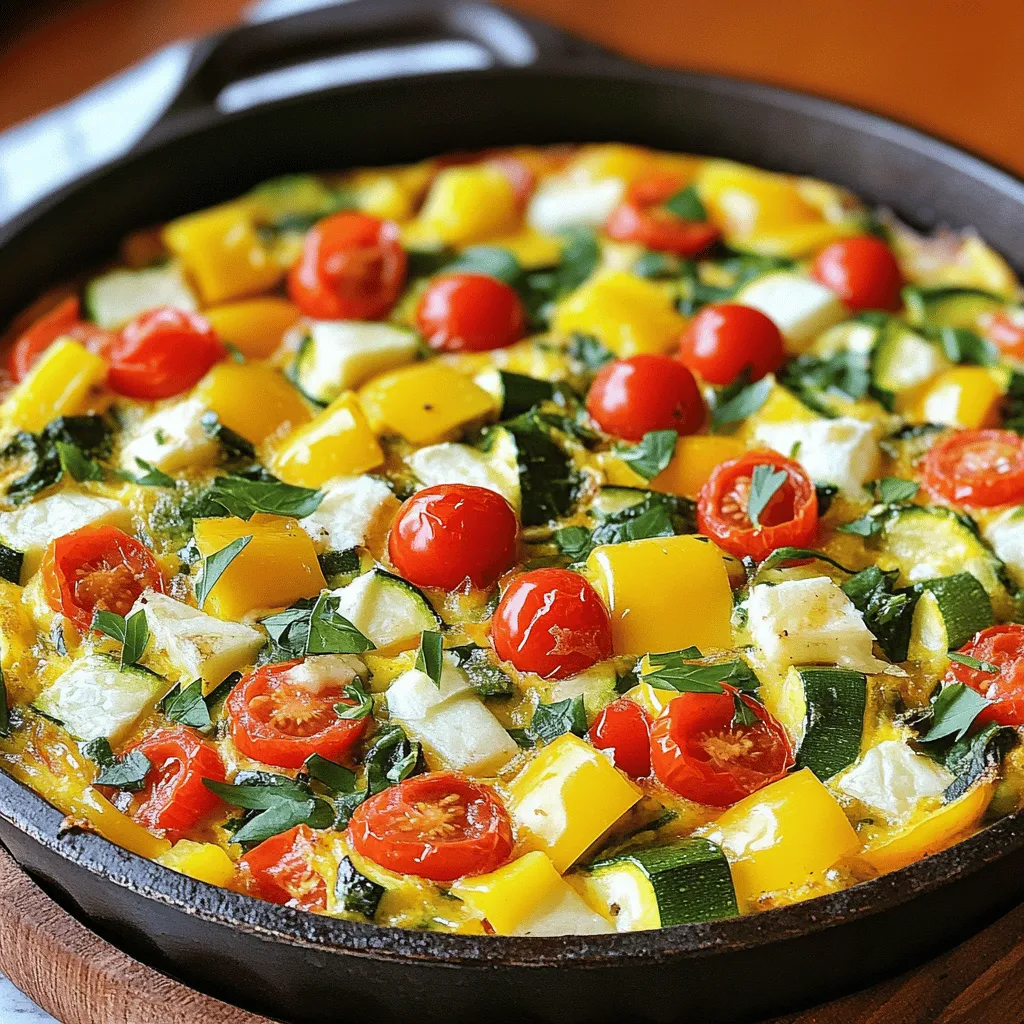
Arugula Frittata Wholesome and Flavorful Meal
Looking for a delicious and easy meal? Try my Arugula Frittata. This dish is not only packed with flavor but also offers great nutrition. I’ll
- 1 cup frozen strawberries - 1 cup frozen mango chunks - 1 ripe banana, sliced - 1/2 cup coconut milk (or any milk you prefer) - 1 tablespoon honey or maple syrup (optional) - 1/4 cup granola (choose your favorite type) - 2 tablespoons chia seeds - Fresh berries and sliced mango for topping - Fresh mint leaves for garnish (optional) To make a Strawberry Mango Smoothie Bowl, you need fresh and frozen fruits. Start with 1 cup of frozen strawberries and 1 cup of frozen mango chunks. These fruits bring a sweet and tangy flavor. Add 1 ripe banana, sliced, for creaminess. For the base, use 1/2 cup of coconut milk or any milk you like. This milk adds richness. If you want it sweeter, add 1 tablespoon of honey or maple syrup. This step is optional, but it can enhance the flavor. Next, you’ll need 1/4 cup of granola. Choose your favorite kind to add crunch. For nutrition, include 2 tablespoons of chia seeds. They are tiny but mighty! Don't forget the toppings. Fresh berries and sliced mango make it pretty. Lastly, add fresh mint leaves for a pop of color and taste, if you want. This mix of ingredients makes a vibrant and tasty smoothie bowl. You will love how easy it is to prepare this fresh and flavorful treat! {{ingredient_image_2}} - Step 1: Combine ingredients in a blender Start by adding the frozen strawberries, frozen mango chunks, sliced banana, and coconut milk to your blender. Make sure you use a high-speed blender for the best results. - Step 2: Blend until smooth and creamy Blend the mixture on high speed. Stop occasionally to scrape down the sides. This ensures everything mixes well. You want a smooth and creamy texture with no chunks left. - Step 3: Adjust sweetness if necessary After blending, taste your smoothie. If it’s not sweet enough, add honey or maple syrup. Blend it again briefly to mix in the sweetener. - Step 4: Pour into a bowl and create decorative swirls Once your smoothie is ready, pour it into a large bowl. To make it look pretty, use the back of a spoon to create swirls on the surface. - Step 5: Add toppings and garnish Now comes the fun part! Top your smoothie bowl with granola for crunch. Sprinkle chia seeds on top for nutrition. Arrange fresh berries and sliced mango to create a colorful display. If you like, finish it off with fresh mint leaves for a pop of color and freshness. For the best taste, use high-quality frozen fruits. Look for brands that flash-freeze their fruits quickly. This keeps the flavor and nutrients intact. My go-to brands are Dole and Cascadian Farm. They offer tasty options that blend well. Bananas should be ripe for the best flavor. A ripe banana has brown spots, which means it is sweet. Avoid green bananas; they are not sweet enough. If your bananas are too ripe, freeze them for later use. To get that perfect creamy texture, use a high-speed blender. Start with the milk, then add the frozen fruit. This helps the blender work smoothly. If you notice lumps, stop the blender. Use a spatula to scrape down the sides. Prevent overflow by not overfilling the blender. Keep the lid on tight, but leave a small gap. This allows steam to escape as it blends. If you want to skip honey or maple syrup, try using dates. They blend well and add natural sweetness. You can also use a bit of vanilla extract. To keep the smoothie naturally sweet, focus on using ripe fruits. The riper the fruit, the sweeter it will be. Always taste before adding any sweeteners. This way, you can adjust to your liking. Pro Tips Use Frozen Fruits: For a thicker and creamier texture, always opt for frozen fruits instead of fresh. They help create a smoothie bowl that holds its shape better. Customize Your Sweetness: Adjust the sweetness of your smoothie bowl to your taste. Start with less honey or maple syrup, then add more as needed after blending. Experiment with Toppings: Don't hesitate to mix and match toppings! Try adding nuts, seeds, or shredded coconut for added flavor and crunch. Chill Your Bowl: For an extra refreshing experience, chill your serving bowl in the freezer for a few minutes before pouring in the smoothie mixture. {{image_4}} When you make a strawberry mango smoothie bowl, the toppings can change everything. Here are some ideas to mix it up: - Different granola options: You can use any granola you like. Try nutty granola for crunch, or go for a fruity variety for extra flavor. - Additional fruit combinations: Add sliced bananas, kiwi, or even blueberries on top. You can make your bowl look as colorful as it tastes! If you want a dairy-free or vegan smoothie bowl, there are simple swaps: - Milk substitutes: Coconut milk is great, but almond or oat milk works well too. Choose what you like best. - Sweetener options for vegan diets: Use maple syrup instead of honey. It gives a nice sweetness and fits vegan diets perfectly. Want to boost the flavor of your smoothie bowl? Here are some fun ideas: - Spices or extracts to try: Cinnamon or vanilla extract adds a lovely touch. Just a little can make a big difference. - Adding protein powders or supplements: If you want more protein, mix in a scoop of your favorite protein powder. It helps keep you full longer and adds nutrition. These variations let you customize your smoothie bowl to your taste. Enjoy trying out new combinations! To keep your strawberry mango smoothie bowl fresh, refrigerate it right away. Use an airtight container and store it in the fridge for up to 24 hours. If you want to save it for longer, freezing is a great option. Pour the leftover smoothie into ice cube trays. Once frozen, pop the cubes into a freezer bag. This way, you can blend them later for a quick treat. The best containers for storing your smoothie bowl are glass or BPA-free plastic. These materials keep your food safe and fresh. Choose containers with tight lids to prevent spills. When ready to serve, simply take out your smoothie bowl and add your toppings. This makes for a quick and easy snack or breakfast. Can I use fresh fruit instead of frozen? Yes, you can use fresh fruit. However, frozen fruit makes the smoothie bowl colder and creamier. If you use fresh fruit, add some ice to achieve that chill and thick texture you want. How can I make it thicker or thinner? To make your smoothie bowl thicker, add more frozen fruit or less liquid. If it’s too thick, add a bit more coconut milk or water. Blend again for a smooth finish. Caloric content of the smoothie bowl This Strawberry Mango Smoothie Bowl has about 300-400 calories per serving. The exact count can change based on the toppings and sweeteners you choose. Health benefits of key ingredients - Strawberries: High in vitamin C and antioxidants, good for skin health. - Mango: Rich in vitamins A and C, supports vision and immune health. - Chia seeds: Packed with omega-3s and fiber, great for digestion. - Coconut milk: Provides healthy fats and a creamy texture. Best pairings with smoothie bowls Smoothie bowls pair well with nuts, seeds, and fresh fruits. You can also add nut butter for extra protein and flavor. Ideal occasions for serving smoothie bowls These bowls are perfect for breakfast, brunch, or a refreshing snack. They are great for hot days and can even be served at parties for a colorful treat. In this blog post, we explored how to make a delicious smoothie bowl. We covered the key ingredients and step-by-step instructions to create a smooth, creamy base. Tips for selection, blending, and storage help ensure success. You can customize your smoothie bowl with different toppings and flavors to fit your taste. Remember, making this healthy treat can be fun and easy. With a little practice, you can enjoy tasty and nutritious creations right at home. Dive in and enjoy your smoothie bowl adventure!
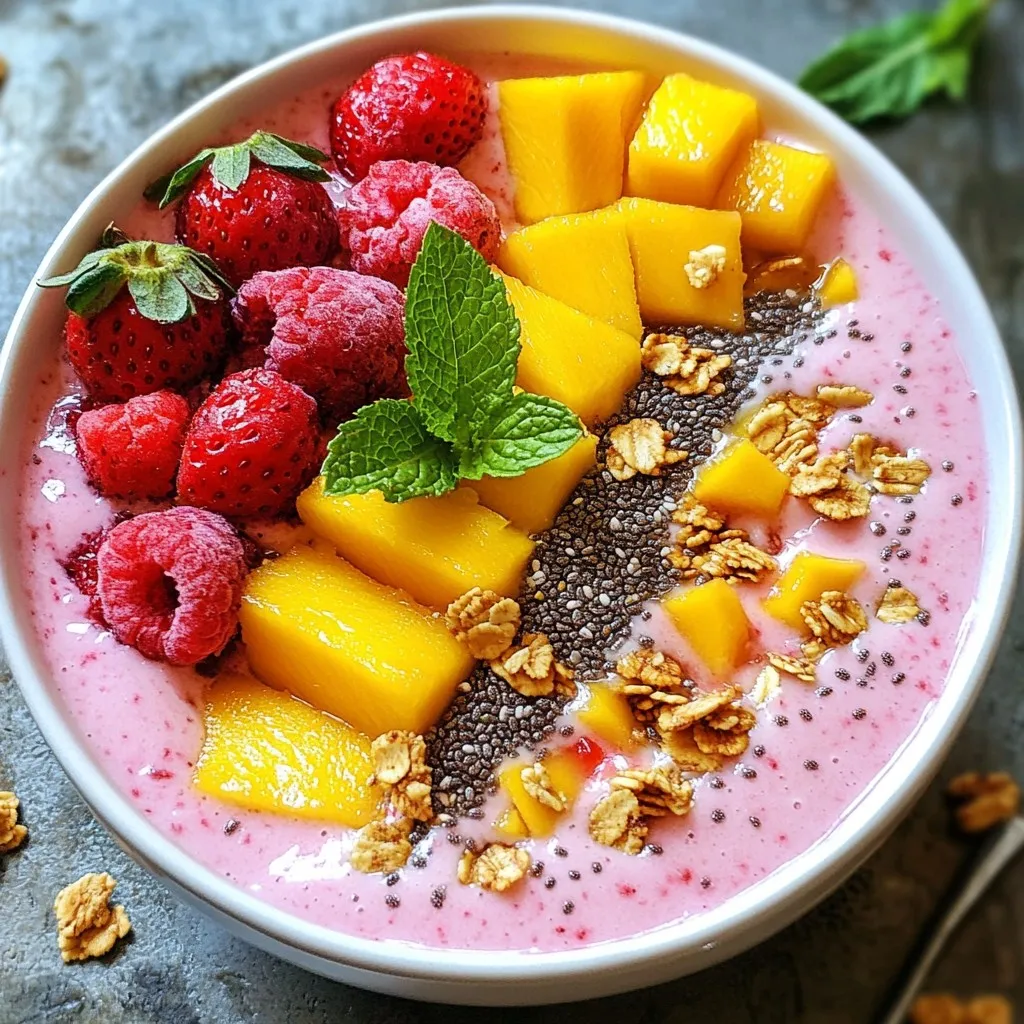
Strawberry Mango Smoothie Bowl Fresh and Flavorful Treat
Looking for a refreshing treat that bursts with flavor? You’ve found it! This Strawberry Mango Smoothie Bowl combines the sweetness of ripe strawberries and mangoes
- 4 large eggs - 1 medium sweet potato, peeled and grated - 1 small zucchini, grated - 1/2 cup red bell pepper, diced - 1/2 onion, finely chopped - 1 clove garlic, minced - 2 tablespoons extra virgin olive oil - Salt and pepper to taste - Fresh parsley, chopped, for garnish These ingredients come together to create a delicious Paleo Potato Breakfast Frittata. Each item adds a unique flavor and texture. - Calories per serving: About 200 - Protein content: 10 grams - Carbohydrates: 15 grams - Fats: 12 grams - Fiber: 3 grams This frittata is not just tasty; it's also packed with nutrients. The sweet potato adds fiber and vitamins, while eggs provide protein. - Alternative vegetables to use: You can swap the zucchini for spinach or kale. Bell peppers can change to green peppers or mushrooms. - Egg substitute options: For a vegan version, try flax eggs or a tofu scramble. - Oil alternatives: Use coconut oil for a different flavor. Avocado oil is another great choice. These substitutions help you customize the frittata to fit your taste and needs. You can still enjoy a great meal while sticking to your diet. For the full recipe, check out the provided link. First, preheat your oven to 375°F (190°C). This step helps the frittata cook evenly. While the oven heats, prepare your ingredients. Peel and grate the sweet potato and zucchini. Chop the onion and dice the red bell pepper. Mince the garlic. This prep work makes cooking faster and easier. In a large, oven-safe skillet, heat 2 tablespoons of extra virgin olive oil over medium heat. Add the finely chopped onion and sauté for 3-4 minutes. You want the onion to turn translucent and fragrant. Next, add in the minced garlic and diced red bell pepper. Stir for another 2-3 minutes until the bell pepper softens. Now, incorporate the grated sweet potato and zucchini into the skillet. Season with salt and pepper. Cook, stirring often, for about 5-7 minutes. You want the vegetables tender but still with a little bite. While this cooks, whisk together 4 large eggs in a separate bowl. Add a pinch of salt and pepper to the eggs. Pour the egg mixture over the vegetable blend in the skillet. Make sure the eggs cover the entire surface. Let the frittata cook on the stovetop for about 4 minutes. The edges will start to set, but the center will still be a bit runny. Carefully transfer the skillet to your preheated oven. Bake for 15-20 minutes. Check for doneness by looking for a fully set center and a light golden top. Once baked, take the skillet out of the oven and let it cool for a few minutes. This makes slicing easier. - Best practices for sautéing vegetables: Start with a hot skillet. Heat your olive oil first. Add onions and cook until soft. Then add garlic and bell peppers. Stir often to keep them from burning. This builds great flavor. - How to prevent sticking in the skillet: Use a good non-stick skillet. Make sure your oil is hot before adding food. Let the veggies cook without stirring too much. This helps form a nice crust that won't stick. - Tips for achieving the perfect frittata texture: Whisk your eggs well. This adds air and makes the frittata fluffy. Pour the eggs over the veggies evenly. Cook on low heat first, then move to the oven. This helps it cook through without drying out. - Adding herbs and spices for extra flavor: Fresh herbs like parsley or basil add a lot. Try adding a pinch of paprika or cayenne for heat. You can also sprinkle in some thyme or oregano for a nice earthy taste. - Suggestions for garnishes and serving ideas: Garnish with fresh parsley for color. Serve slices with avocado on the side. This adds creaminess and balances the dish. You can also offer a light salad for a fresh touch. - Pairing the frittata with items like avocado or salad: Avocado slices bring a rich, creamy taste. A simple green salad with lemon dressing pairs well too. These sides complement the frittata without overpowering it. - Overcooking the frittata: Keep an eye on the cooking time. If you overcook it, the frittata will become dry. Once the edges are set, it’s time to move it to the oven. - Improper egg-to-vegetable ratio: Use the right amount of eggs for your veggies. Too many veggies can lead to a soggy frittata. Aim for about one egg for every cup of veggies. - Skipping preheating the skillet: Always preheat your skillet. This step is key to getting a nice sear on the vegetables. It also helps prevent sticking and ensures even cooking. For the Full Recipe, check out the detailed instructions above. Enjoy your cooking! {{image_4}} You can easily change this frittata by swapping ingredients. Try using other root vegetables like carrots or parsnips. These add nice flavors and textures. You can also mix in proteins like chicken or turkey. These choices boost the protein and make it more filling. For a vegan version, replace the eggs with a chickpea flour mixture. This makes the dish plant-based but still tasty. You don't need an oven for a frittata. You can cook it only on the stovetop. Just keep the heat low and cover the skillet. This method works well for a soft, creamy texture. If you want single servings, use a muffin tin. This makes cute little frittatas. Cooking on a grill gives it a smoky flavor. Just make sure your skillet is grill-safe. Adding global flavors can make this frittata special. Try mixing in spices like cumin or paprika for a vibrant taste. You can also add feta for a Mediterranean touch. A scoop of salsa on top adds a fresh kick. For an Asian twist, include soy sauce and green onions. These flavors will take your frittata to a new level. To store your frittata, let it cool first. Then, place it in an airtight container. This helps keep it fresh and tasty. Your frittata will last in the fridge for about 3 to 4 days. For longer storage, you can freeze it. Just wrap individual slices in plastic wrap and then in foil. This way, it can last up to 2 months in the freezer. When you’re ready to eat, reheating is easy. The best way is to use the oven. Preheat it to 350°F (175°C). Place the frittata on a baking sheet and heat for about 10-15 minutes. This keeps it moist and tasty. If you’re in a hurry, you can use the microwave, but be careful. Heat it in short bursts, about 30 seconds at a time. This helps avoid drying it out. Leftover frittata is great for any meal. For breakfast, serve it with fresh fruit. For lunch, slice it and put it in a wrap with greens. You can also crumble it on top of a salad for dinner. Another fun idea is to dice it and mix it with roasted veggies. This adds a new twist and helps you enjoy every bite. A frittata is an Italian dish. It looks like an omelet but is thicker. You cook it slowly and add more ingredients. Unlike omelets, frittatas mix in the filling. Quiches have a crust, but frittatas do not. This makes frittatas easy and quick. They are perfect for breakfast or brunch. Yes, you can make this frittata ahead. Cook it, then let it cool. Store it in the fridge for up to three days. To reheat, warm it in the oven or microwave. You can slice it into portions for easy meals. Frittatas taste great hot or cold. Serve your frittata with a side salad. A fresh green salad pairs well. Avocado slices are also a great choice. You can add fresh fruit for sweetness. Consider a light salsa for a spicy kick. These sides bring out the flavors in the frittata. Use a non-stick skillet for best results. Add oil before cooking to help. Let the frittata cook on low heat. This helps it release from the pan. You can also use parchment paper to line the skillet. It makes serving and cleaning easier. Yes, this frittata is Paleo-friendly. It has no grains or dairy. It is gluten-free and dairy-free too. You can swap vegetables based on your needs. This recipe fits many diets. Enjoy it no matter your restrictions. You can find the full recipe in the article. This frittata recipe blends healthy ingredients for delicious results. You learned about the essential ingredients, nutritional value, and substitutions. I included tips that can help you cook perfectly every time. Remember to try different veggies or proteins to keep it fresh. With storage and reheating tips, you can enjoy this dish all week. Frittatas are versatile, tasty meals for any time of day. Use these ideas to unleash your creativity in the kitchen. Enjoy your cooking journey and savor every bite!
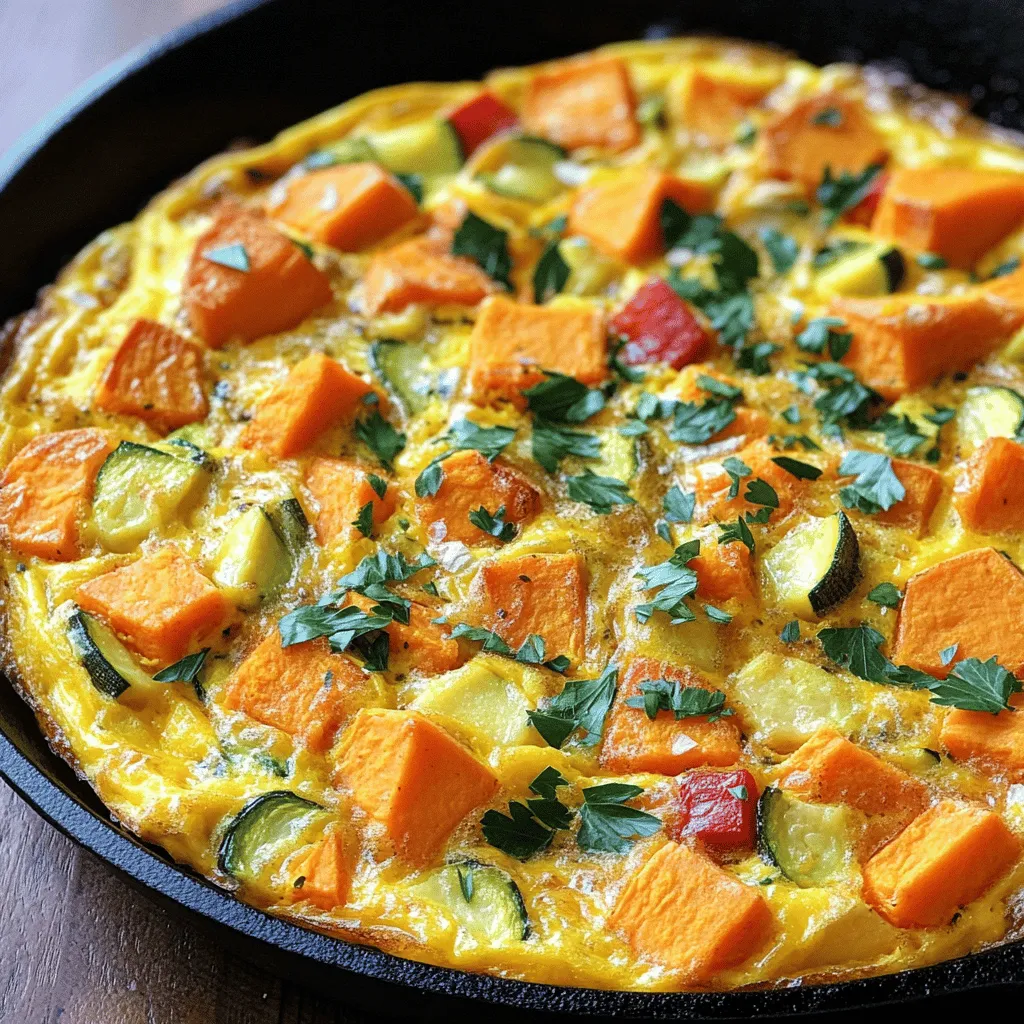
Paleo Potato Breakfast Frittata Delicious and Easy Recipe
Start your day right with a Paleo Potato Breakfast Frittata that’s both delicious and easy to make. This recipe boasts vibrant vegetables, protein-rich eggs, and
- 8 large eggs - 1 cup cooked shrimp, roughly chopped - 1 cup fresh spinach, roughly chopped - 1 medium onion, finely chopped - 1/2 cup bell pepper, diced - 1/2 cup cherry tomatoes, halved - 1/4 cup freshly grated Parmesan cheese - 2 tablespoons extra virgin olive oil - Salt and freshly ground black pepper - Fresh parsley, chopped (for garnish) To make a great shrimp frittata, you need fresh and quality ingredients. The eggs serve as the base and provide protein. The cooked shrimp adds a nice seafood flavor, making the dish hearty. Fresh spinach not only adds color but also increases the nutritional value. Onions and bell peppers bring sweetness and crunch. Cherry tomatoes give a pop of flavor and a juicy bite. Parmesan cheese adds saltiness and richness, while olive oil keeps everything moist. - For alternative proteins, use crab or smoked salmon instead of shrimp. - You can swap spinach for other veggies like zucchini or mushrooms. - If you want to change the cheese, try feta or goat cheese. These substitutions keep the dish exciting. They allow you to play with different flavors and textures. You can use what you have on hand or what’s in season. This flexibility makes cooking more fun and less stressful. Feel free to explore and make it your own. For the Full Recipe, check out the details above. - Preheat the oven to 375°F (190°C). - Chop the bell pepper, onion, and shrimp. Start by preheating your oven. This step ensures the frittata cooks evenly. Then, chop your bell pepper and onion. Aim for small pieces so they cook fast. Roughly chop the shrimp too, making sure they are bite-sized. - Heat olive oil and cook onion and bell pepper. - Add spinach and cherry tomatoes. Next, grab a large skillet and heat the olive oil over medium heat. Once it shimmers, add the chopped onion and bell pepper. Cook them for about 4-5 minutes. You want the onion to be clear and soft. Then, toss in the spinach and halved cherry tomatoes. Stir them for 2 more minutes. The spinach should wilt, and the tomatoes will soften. - Whisk eggs and combine with shrimp and cheese. - Pour egg mixture into the skillet and stovetop cook. - Transfer to the oven and bake. Now, crack the eggs into a mixing bowl. Whisk them well, adding salt and pepper to taste. Fold in your chopped shrimp and cheese. Mix until everything is combined. Carefully pour this egg mixture into the skillet over the sautéed veggies. Let it cook on the stovetop for 3-4 minutes. You’ll see the edges starting to set. Finally, transfer the skillet to your preheated oven. Bake for 10-12 minutes. The frittata should puff up and feel firm in the center. For the full recipe, check out Shrimp & Spinach Frittata Delight. To get the best frittata texture, focus on the eggs. Whisk them well to add air. This makes the frittata light and fluffy. When cooking on the stovetop, keep the heat medium. Too high a heat can burn the edges before the center sets. For even cooking in the skillet, use a non-stick pan. This helps prevent sticking and allows for easy flipping. Pour the egg mixture slowly over the veggies. This helps distribute the ingredients evenly. Cook until the edges firm up, then bake. This two-step method gives a great texture. For plating, consider a rustic wooden board. This adds a nice touch. You can also use a bright platter to make the colors pop. Serve with a side of mixed greens. Drizzle them with olive oil and lemon juice for freshness. For drinks, pair your frittata with a light white wine or even iced tea. Both complement the flavors well. To boost flavor, add fresh herbs like basil or cilantro. These can make a big difference. You can also try spices like paprika or chili flakes for a kick. For cheese, explore different types. Feta adds a salty tang, while goat cheese offers creaminess. Mixing cheeses can create a unique taste profile. You can try adding a sprinkle of cheddar for a sharp bite. For the full recipe, check out the Shrimp & Spinach Frittata Delight 🥚. {{image_4}} You can swap shrimp for other meats. Crab and lobster add a nice touch. Smoked salmon gives a rich flavor too. For a vegetarian twist, mushrooms and tofu work well. Mushrooms bring an earthy taste, while tofu adds protein. These options keep your frittata fresh and exciting. Using seasonal ingredients can boost flavor. Fresh vegetables like tomatoes and zucchini shine in their peak months. You can also use leftover veggies for a fridge-cleaning frittata. Toss in whatever you have on hand. This not only reduces waste but also creates unique flavor combos. A shrimp frittata fits any meal. For breakfast, serve it with toast or fruit. Pair it with a light salad for lunch. At dinner, it makes a great main dish. You can even add a side of roasted veggies to round it out. Enjoy it warm or at room temperature for a tasty option. To keep your frittata fresh, follow these steps: - Refrigeration guidelines: Place any leftover frittata in an airtight container. Store it in the fridge for up to three days. Ensure it cools to room temperature before sealing. - Freezing tips: If you want to keep it longer, you can freeze it. Cut the frittata into slices. Wrap each slice in plastic wrap and place them in a freezer bag. It can last up to three months in the freezer. To enjoy your frittata later, here’s how to reheat it: - Techniques for reheating: Use an oven or skillet for the best results. Preheat the oven to 350°F (180°C). Place your frittata on a baking sheet for about 10-15 minutes. If using a skillet, add a splash of water, cover it, and heat on low for 5-7 minutes. - Best practices for leftover storage: Always ensure your frittata is in a sealed container. This keeps it from drying out and preserves its taste. Enjoy your meal just as delightful as the first time! A frittata is thicker than an omelet. It cooks slowly and often includes more ingredients. You mix everything in and cook it gently. An omelet is folded and usually has fewer fillings. Frittatas are great for feeding a crowd. You can slice and serve them easily. Yes, you can make a shrimp frittata ahead of time. Just cook it, let it cool, and store it in the fridge. It keeps well for up to three days. Reheat it in the oven or microwave when you're ready to serve. This makes it a perfect dish for busy mornings. Check the center of the frittata. It should feel firm to the touch. If you insert a knife, it should come out clean. The edges will be slightly puffed and golden. Keep an eye on it to avoid overcooking. Yes, you can use frozen shrimp. Just thaw them before chopping. Make sure to pat them dry to remove excess moisture. This helps keep the frittata from becoming soggy. Frozen shrimp can be just as tasty as fresh. A shrimp frittata pairs well with a fresh salad or sautéed veggies. You can also serve it with toast or crispy potatoes. For a light meal, add some fruit on the side. Drinks like juice or iced tea complement it nicely. For the complete recipe, check out the [Shrimp & Spinach Frittata Delight 🥚](#). This blog post shared a simple, tasty shrimp frittata recipe. You learned about the necessary ingredients, how to cook it step by step, and ways to add flavor. We also explored variations and how to store leftovers. Frittatas are great for any meal of the day. You can mix it up based on what you have. I hope you feel inspired to try this dish and enjoy it with your loved ones.
Savory Shrimp Frittata Quick and Easy Recipe
Ready to elevate your brunch game? This savory shrimp frittata is quick, easy, and delicious! Packed with fresh ingredients, it makes a perfect dish for
- 8 large eggs - 1/2 cup almond milk - 1 red bell pepper, diced - 1 green bell pepper, diced - 1 small onion, finely chopped - 1 cup fresh spinach, roughly chopped - 1 cup cherry tomatoes, halved - 1 jalapeño, seeded and minced - 1 teaspoon ground cumin - 1 teaspoon smoked paprika - Salt and pepper, to taste - 2 tablespoons extra virgin olive oil - Fresh cilantro, chopped for garnish Choosing the right ingredients makes your frittata shine. I love using fresh veggies. They add color and crunch. Look for ripe tomatoes and bright peppers. Their flavors stand out in every bite. Special Considerations Using fresh ingredients is key for this recipe. Fresh veggies have more flavor and nutrients. You can use frozen spinach if fresh isn't available. If you have nut allergies, swap almond milk for coconut milk or regular milk. These options still keep your frittata creamy. Remember, the goal is to enjoy a tasty meal that fits your needs. For more details, check the Full Recipe. You’ll see how simple it is to create a delicious frittata! 1. First, preheat your oven to 375°F (190°C). This step ensures the frittata cooks evenly. 2. Next, grab a large mixing bowl. Whisk together 8 large eggs, 1/2 cup almond milk, 1 teaspoon of ground cumin, 1 teaspoon of smoked paprika, salt, and pepper. Mix until the mixture is smooth and a bit frothy. 3. Heat 2 tablespoons of extra virgin olive oil in a large, oven-safe skillet over medium heat. When hot, add 1 small, finely chopped onion. Sauté for about 4 minutes, until it turns translucent and fragrant. 4. Now, add 1 diced red bell pepper, 1 diced green bell pepper, and 1 minced jalapeño to the skillet. Keep sautéing for 3-4 minutes, stirring frequently. The peppers should soften during this time. 5. Gently fold in 1 cup of roughly chopped spinach and 1 cup of halved cherry tomatoes into the skillet. Cook for another 2 minutes, stirring until the spinach wilts and the tomatoes warm through. 6. Pour the egg mixture evenly over the sautéed vegetables in the skillet. Use a spatula to mix gently, making sure the vegetables blend well with the eggs. 7. Let the frittata cook on the stovetop for about 2-3 minutes. You will see the edges start to set. 8. Carefully transfer the skillet to your preheated oven. Bake for 15-20 minutes, or until the center is firm and the top turns golden. 9. After baking, remove the skillet from the oven. Allow the frittata to cool for a few minutes. Then, gently lift it out onto a cutting board. 10. Garnish with freshly chopped cilantro for a burst of flavor. Slice the frittata into wedges, and it’s ready to serve. Enjoy your wholesome Paleo Southwest Frittata! To make sure your frittata doesn’t stick to the skillet, use a good non-stick skillet. Heat the skillet and add olive oil before adding the veggies. This helps create a barrier. Use a spatula to gently lift the edges while cooking. Cooking times can change based on skillet size. A larger skillet will cook faster than a small one. Keep an eye on your frittata as it cooks. The edges should set while the center remains a bit soft. This usually takes about 2-3 minutes on the stovetop, followed by 15-20 minutes in the oven. The best way to serve the frittata is warm and cut into wedges. A colorful platter makes it look nice. You can also top it with fresh cilantro for color. Accompaniments like salsa or sliced avocado add great flavor. The cool creaminess of avocado pairs well with the spicy frittata. You can even serve it with a side salad for extra crunch. The main ingredients in this frittata bring a lot of health benefits. Eggs are packed with protein, while bell peppers offer vitamins A and C. Spinach adds iron and fiber. This meal fits well into the Paleo diet. It uses whole foods and avoids grains or processed items. Eating this way can help with energy levels and overall health. The colorful veggies make it a nutritious choice, too! {{image_4}} You can change up the vegetables in your frittata. Try adding zucchini or mushrooms for a new twist. Both options give a nice texture and flavor. You can also add proteins like crispy bacon or grilled chicken. These swaps will make your frittata even more filling and delicious. To spice things up, adjust the seasonings. Add more cumin or a pinch of cayenne for extra heat. If you miss cheese, you can sprinkle some on top for a non-Paleo option. Just remember, cheese can change the dish's texture, so use it sparingly. This frittata is naturally gluten-free and dairy-free. If you want a vegetarian version, simply skip the meats. You can also add more veggies like sweet potatoes or broccoli for extra nutrition. These changes keep the meal healthy while still being tasty. After you enjoy your Paleo Southwest Frittata, store leftovers in the fridge. Use an airtight container to keep it fresh. I recommend glass containers because they don’t hold smells. If you have a lot left, slice the frittata into wedges before storing. This makes it easy to grab a piece later. To reheat, the oven is best. Preheat your oven to 350°F (175°C) and place the frittata on a baking sheet. Heat for about 10 minutes or until warm. If you’re short on time, use a microwave. Place a slice on a plate and cover it with a damp paper towel. Heat for 1-2 minutes, checking often to avoid overcooking. This keeps the texture nice and soft. The frittata lasts about 3-4 days in the fridge. Always check for signs that it’s no longer good. If it smells off or has a strange texture, throw it out. Keeping an eye on your food helps prevent waste and keeps your meals safe. What is a frittata and how does it differ from an omelette? A frittata is an Italian dish made with eggs and other ingredients. It cooks slowly and is often baked in the oven. An omelette cooks quickly and is usually folded. Frittatas are thicker and can hold more fillings than omelettes. Can I make the frittata ahead of time? Yes, you can make the frittata ahead. Cook it, cool it, and store it in the fridge. Just reheat when ready to serve. This makes meal prep easy and saves time. What else can I add to a frittata? You can add many things! Try mushrooms, zucchini, or different herbs. Cooked meats like bacon or sausage also work well. Get creative with flavors that you love! Can I freeze the Paleo Southwest Frittata? Yes, you can freeze the frittata. After it cools, cut it into portions. Wrap each piece tightly in plastic wrap and place it in a freezer bag. It keeps well for up to three months. How can I adjust the recipe for more servings? To adjust the recipe, multiply the ingredients by the number of servings you need. Make sure your skillet is large enough to fit the extra mixture. You may need to bake it longer if it’s thicker. What are some good sides to serve with a frittata? You can serve fresh salad, avocado slices, or salsa on the side. These add flavor and balance to the meal. You can also pair it with sweet potatoes or fruit for a nice touch. Do I need a specific type of skillet for making a frittata? An oven-safe skillet is best for a frittata. Cast iron or non-stick pans work great. This helps ensure even cooking and makes it easy to transfer to the oven. How can I tell when my frittata is done cooking? Check the center of the frittata. It should feel firm and not jiggly. The top will also be golden brown. Use a toothpick to test if it comes out clean; then it’s ready! This blog post gives you a clear guide to making a delicious frittata. We covered a list of fresh ingredients and tips for preparing and cooking. You learned about storage, variations, and common questions. Remember, using fresh ingredients makes your meal tastier. Feel free to experiment with your favorite veggies and flavors. Enjoy making this dish and share it with family and friends. Your kitchen will be filled with joy as you serve this tasty frittata!
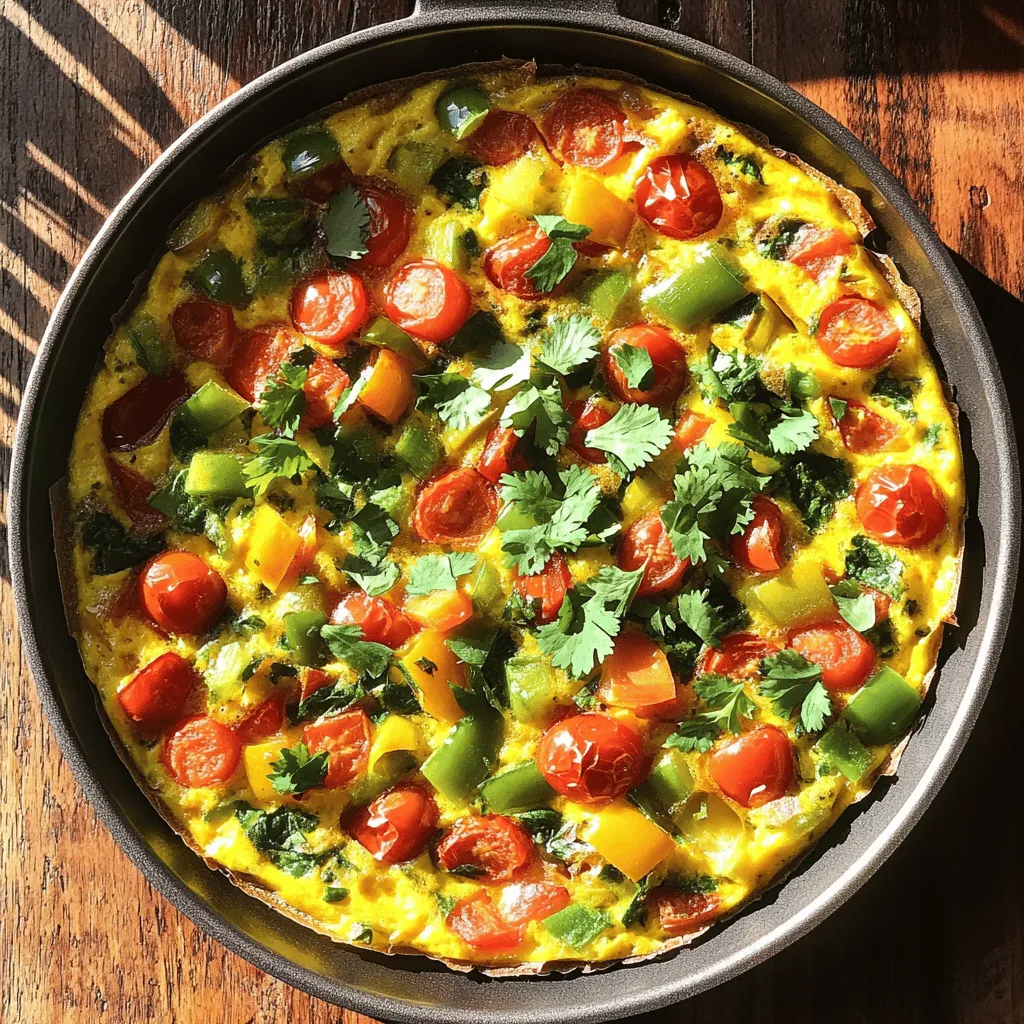
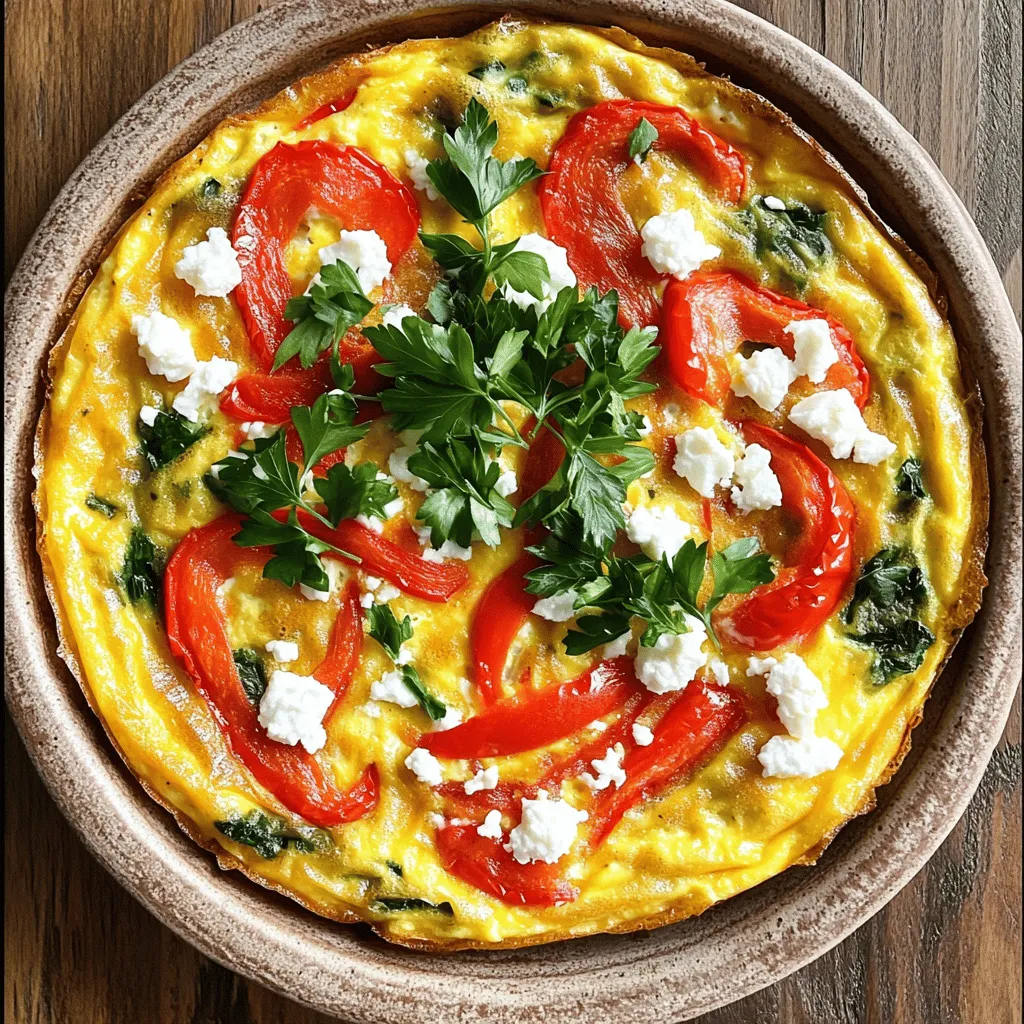
Paleo Southwest Frittata Wholesome and Flavorful Meal
Looking for a delicious meal that’s packed with flavor and fits the Paleo diet? Meet the Paleo Southwest Frittata! This easy recipe combines fresh veggies,
- 6 large eggs - 1/2 cup milk (or dairy-free alternative) - 1 cup assorted bell peppers, diced - 1 small zucchini, diced - 1/2 cup cherry tomatoes, halved - 1/4 cup red onion, finely chopped - 1 cup fresh spinach, chopped - 1 cup shredded cheese - 2 tablespoons olive oil - Salt and pepper to taste - Fresh herbs for garnish The main ingredients for the easy frittata are simple and colorful. You need large eggs as the base. Milk adds creaminess, and you can use a dairy-free option if you prefer. The diced bell peppers, zucchini, and halved cherry tomatoes bring great flavor and texture. The red onion adds a nice bite, while fresh spinach gives it a healthy boost. Cheese is key for that gooey, delicious top. I love using a mix of cheddar and mozzarella, but you can choose what you like best. Olive oil helps cook the veggies and adds richness. Don’t forget salt and pepper to season your dish just right. Fresh herbs, like basil or parsley, will make your frittata pop in flavor and color. - Additional vegetables - Cooked meat like bacon or sausage - Different cheese varieties If you want to customize your frittata, there are many optional add-ins. You can add more vegetables, like mushrooms or kale, to enhance the taste. If you like meat, cooked bacon or sausage will add a hearty touch. Feel free to experiment with different cheeses, too, like feta or goat cheese. Each choice adds a unique flavor to your frittata. - Non-dairy milk options - Egg alternatives for vegan frittata - Low-fat cheese options For those who want to make swaps, there are great substitutions. Use almond, soy, or oat milk instead of regular milk. If you need a vegan option, replace eggs with tofu or chickpea flour. You can also pick low-fat cheese to lighten up the dish without losing flavor. - Preheat the oven to 375°F (190°C). - In a bowl, whisk the eggs and milk together until smooth. - Heat olive oil in a large skillet over medium heat. - Add finely chopped red onion. Sauté until it turns translucent. - Next, add diced bell peppers, zucchini, and halved cherry tomatoes. - Cook for 3-4 minutes, stirring now and then. - Stir in chopped spinach. Cook for 1-2 minutes until it wilts. - Carefully pour the egg mixture over the sautéed vegetables. - Gently stir to mix all the ingredients. - Sprinkle shredded cheese on top and let it cook on the stove. - Transfer the skillet to the preheated oven. - Bake for 15-20 minutes, until it sets and the top is golden. - Once baked, let it cool for a few minutes. - Slice the frittata into wedges and serve. For the complete recipe, check out the Full Recipe. Enjoy your easy frittata! To make your frittata fluffy, start with fresh eggs. Whisk them well with milk until smooth. This adds air and lightness. When cooking, keep the heat moderate. High heat can overcook the eggs. Always remove the frittata from the heat as soon as it is set. The residual heat will finish cooking it. To boost taste, use fresh herbs like basil or parsley. They add brightness and aroma. Spices like paprika or garlic powder also work well. For a zesty kick, try adding a splash of hot sauce or lemon juice. These ingredients bring out the best in your frittata. A frittata pairs wonderfully with a simple salad. Mixed greens with a light vinaigrette complement its richness. For garnish, sprinkle fresh herbs on top for color. Serve slices on a colorful plate for an eye-catching look. This makes for a fun brunch or a light dinner option. {{image_4}} You can change up the frittata to fit your taste. A Mediterranean-style frittata is a great option. Use ingredients like spinach, olives, and feta cheese. This gives a fresh and tangy flavor. You might also try adding Italian herbs, like oregano or basil. They add a warm and fragrant touch to the dish. Using seasonal veggies makes your frittata special. In spring, use fresh asparagus and peas. These bright greens add color and taste. For fall, consider squash or pumpkin. They add a nice sweetness and warmth. Mixing seasonal ingredients keeps the dish exciting year-round. If you need gluten-free options, frittatas are a good choice. Eggs are naturally gluten-free. Just make sure to avoid any added gluten in your mix. For low-carb meals, use cauliflower instead of potatoes. This adds a nice texture without the carbs. You can enjoy a tasty meal that fits your dietary needs. For more ideas, check out the Full Recipe for a vibrant vegetable frittata! To keep your frittata fresh, store leftovers in the fridge. First, let it cool completely. Then, cover it tightly with plastic wrap or aluminum foil. You can also use an airtight container. This helps keep moisture in and prevents odors from other foods. Your frittata will last up to four days in the fridge. Always check for signs of spoilage before eating. If you want to save some frittata for later, freezing is a great option. Start by cutting the frittata into slices. Wrap each slice in plastic wrap. Then, place them in a freezer-safe bag or container. Make sure to label the bag with the date. Your frittata can stay fresh for up to three months in the freezer. Thaw it in the fridge overnight before reheating. You can reheat frittata in two easy ways: the oven or the microwave. For the oven, preheat it to 350°F (175°C). Place the frittata on a baking sheet and cover it with foil. Heat for about 10-15 minutes. This keeps the texture nice. For the microwave, place a slice on a microwave-safe plate. Heat it for 30-60 seconds. The microwave is faster but may make it slightly less fluffy. Always check the temperature before serving. A frittata lasts about 3 to 4 days in the fridge. Store it in an airtight container. This keeps it fresh and safe to eat. If you see any signs of spoilage, like a strange smell or color, throw it away. Yes, you can make a frittata ahead of time. It’s a great meal prep option! Cook it, allow it to cool, and then store it in the fridge. You can also freeze it for longer storage. Just make sure to wrap it tightly. Frittatas pair well with fresh salads or crusty bread. You can also serve it with fruit for a lighter meal. Consider adding some roasted potatoes or a simple green salad. These sides can make your frittata a full meal. The frittata is done when it is set in the middle. You should see a light golden color on top. Insert a knife into the center; if it comes out clean, it is ready. The edges should also pull away from the sides of the pan. You learned how to make an easy frittata with various ingredients. I covered main items, optional add-ins, and substitutions to suit your needs. Following clear steps, you can cook, bake, and store the frittata easily. I also shared tips for better flavor and texture. Now you have the tools to create a tasty dish every time. Enjoy experimenting with flavors and ingredients. Happy cooking!
Easy Frittata Recipe Perfect for Quick Meals
Are you looking for a quick and tasty meal that is easy to make? This Easy Frittata Recipe is perfect for busy days and will
To make an Insanely Easy Italian Sausage Frittata with Peppers, you need a few key ingredients. Here’s what you'll gather: - 6 large eggs - 1 cup Italian sausage, casings removed - 1 bell pepper (red, yellow, or green), diced - 1 small onion, finely diced - ½ cup fresh spinach, chopped - ½ cup shredded mozzarella cheese - ¼ cup grated Parmesan cheese - 2 tablespoons olive oil - Salt and black pepper to taste - Fresh basil leaves, for garnishing Each ingredient plays a role in making this dish delicious. The eggs form the base, while the Italian sausage adds rich flavor. Peppers and onions bring color and sweetness. Spinach adds freshness, and the cheeses give a creamy texture. Olive oil helps with cooking and adds richness to the dish. Fresh basil at the end adds a nice touch. For the full recipe, check out the complete list and instructions. 1. Preheat your oven to 375°F (190°C). This helps the frittata cook evenly. 2. Grab a large oven-safe skillet and pour in 2 tablespoons of olive oil. Heat it over medium heat. 3. Add 1 cup of Italian sausage to the skillet. Break it into small pieces with a wooden spoon. 4. Cook until the sausage is browned and cooked through, about 5-7 minutes. 5. Once the sausage is ready, add 1 small diced onion and 1 diced bell pepper. 6. Sauté the veggies for 3-4 minutes until soft and fragrant. 7. Stir in ½ cup of chopped fresh spinach and cook for another 1-2 minutes until it wilts. 1. In a mixing bowl, whisk together 6 large eggs until they are well blended. 2. Add ½ cup of shredded mozzarella cheese and ¼ cup of grated Parmesan cheese. 3. Season the mixture with salt and pepper to taste. Stir until all ingredients are combined. 1. Pour the egg and cheese mixture over the sausage and veggies in the skillet. 2. Let the frittata cook on the stovetop for 2-3 minutes without stirring. 3. Use a spatula to gently lift the edges so uncooked egg can flow underneath. 4. When the edges start to set, transfer the skillet to your preheated oven. 5. Bake the frittata for 15-20 minutes until set in the center and golden on top. 6. Remove the skillet and let it cool for a few minutes. Slice into wedges. 7. Garnish with fresh basil leaves for a lovely touch. For the full recipe, check out the detailed instructions above. Enjoy your delicious Italian sausage frittata! - Use fresh ingredients for better flavor. Fresh veggies and herbs make a big difference. - Ensure even cooking on the stovetop. Let the edges set before moving to the oven. This keeps the frittata fluffy and not rubbery. - Stove-top only method can save time. You can cook it fully on the stove and skip the oven. Just cover the skillet with a lid to help it cook through. - Oven variations give different textures. Baking makes the top golden and fluffy. If you want a crispy top, broil it for a minute after baking. These tips will help you master the art of making an Italian sausage frittata. For more details, check the Full Recipe. Enjoy your cooking! {{image_4}} You can easily change the meat in this frittata. Try turkey sausage or chicken sausage instead of Italian sausage. For a vegetarian option, use mushrooms or zucchini. These options still give great flavor. You can also switch up the cheese. Instead of mozzarella, try feta or goat cheese. These cheeses add a tangy taste. If you want a sharp flavor, use aged cheddar. Each choice will change the taste and texture of the dish. To make your frittata unique, think about adding herbs or spices. Fresh basil or oregano work well with the Italian theme. For a spicy kick, add red pepper flakes or a touch of cayenne. Incorporating seasonal vegetables can also enhance flavor. Try asparagus in spring or squash in summer. These fresh veggies not only add taste but also color to your dish. This frittata is adaptable and fun to experiment with. For more details, check the Full Recipe. To keep your frittata fresh, let it cool down first. Once it’s cool, cover it tightly using plastic wrap or place it in an airtight container. Store it in the fridge for up to three days. If you want it to last longer, you can freeze it. To freeze, cut the frittata into slices. Wrap each slice tightly in plastic wrap, then place them in a freezer-safe bag. This helps keep out air and prevents freezer burn. The frittata can stay good in the freezer for up to three months. When you want to eat your frittata again, there are quick ways to reheat it. The microwave is easy and fast. Simply place a slice on a microwave-safe plate. Heat it for about 30 seconds, then check if it's warm. If not, heat for another 15 seconds. For the oven, preheat it to 350°F (175°C). Place the frittata slice on a baking sheet. Heat it for about 10-15 minutes until warmed through. This method helps keep the frittata’s texture. Try to avoid overheating, as it can make the frittata dry. Enjoy your delicious Italian sausage frittata again! For the full recipe, check out the earlier section. How to know when the frittata is done? You can tell the frittata is done when the center is firm and not jiggly. The edges should be lightly golden. A knife inserted into the center should come out clean. If the top is slightly puffed and set, it’s ready to serve! Can I make the frittata ahead of time? Yes, you can make this frittata ahead of time. It stores well in the fridge for up to three days. Just cover it tightly with plastic wrap or foil. You can reheat it in the oven or microwave when you're ready to eat. Breakdown of calories and macros This frittata serves 4-6 people. Each serving has about 250 calories. It includes roughly 20 grams of protein and 15 grams of fat. The carbs are around 5 grams, making it a great low-carb option. Health benefits of the ingredients used The eggs are rich in protein and good fats. Italian sausage adds flavor and protein. Bell peppers are high in vitamins A and C. Spinach provides iron and calcium. Together, these ingredients make a nutritious meal. What to serve with this frittata? You can serve this frittata with a simple side salad. A fresh tomato salad drizzled with olive oil works well. You might also enjoy it with crusty bread. Ideal breakfast or brunch pairings This frittata is perfect for breakfast or brunch. Pair it with fresh fruit or yogurt for a balanced meal. A glass of orange juice or coffee complements it nicely too. This blog post outlined how to make a tasty frittata. You learned about the best ingredients, steps for prep, and cooking tips. I shared ways to mix it up with flavors and substitutions. Storing and reheating your frittata is easy when you follow my best practices. Now, you can enjoy a delicious meal any day. With fresh ingredients and a little care, your frittata will shine at breakfast or brunch. Happy cooking!
Insanely Easy Italian Sausage Frittata with Peppers Recipe
Are you ready to whip up something delicious? This Insanely Easy Italian Sausage Frittata with Peppers is just what you need. You’ll love how simple
- 6 large eggs - 1 cup milk - 1 cup roasted red peppers, chopped - 1/2 cup onion, finely chopped - 1 cup fresh spinach, chopped - 1 cup feta cheese, crumbled - 1/2 teaspoon garlic powder - 1/2 teaspoon paprika - Salt and black pepper to taste - 2 tablespoons olive oil - Fresh parsley, chopped, for garnish When I make a baked frittata, I love the blend of flavors. First, I gather my main ingredients. I use six large eggs, one cup of milk, and one cup of roasted red peppers. The roasted peppers bring a sweet, smoky taste that makes the frittata shine. I also chop half a cup of onion, which adds a nice crunch and flavor. Next, I add a few more goodies to the mix. I chop one cup of fresh spinach. It adds a pop of color and a healthy boost. I also crumble one cup of feta cheese, which gives a creamy texture and salty kick. For seasoning, I use half a teaspoon each of garlic powder and paprika. They enhance the dish without overpowering it. Don’t forget to add salt and black pepper to taste. To finish off, I pour in two tablespoons of olive oil. This helps the frittata cook evenly and adds richness. Lastly, I keep fresh parsley on hand for garnish. It adds a vibrant touch and fresh flavor. These simple ingredients come together to create a savory delight. For the full recipe, check out the instructions that follow. Error: Error code: 429 - {'error': {'message': 'Rate limit reached for gpt-4o-mini in organization org-zFeAnX8gJvsCtEtJubNX3NN3 on tokens per min (TPM): Limit 200000, Used 198989, Requested 2327. Please try again in 394ms. Visit https://platform.openai.com/account/rate-limits to learn more.', 'type': 'tokens', 'param': None, 'code': 'rate_limit_exceeded'}} To check if your frittata is done, insert a knife in the center. If it comes out clean, it is ready. If not, bake it a few more minutes. Each oven works differently, so you may need to adjust the time. Keep an eye on it after 25 minutes. Add spices like oregano or thyme for extra taste. Fresh herbs can also boost the flavor. When selecting roasted peppers, look for ones that are bright and firm. They should smell sweet and have a nice char. You can use store-bought or roast them yourself for a fresh touch. For a great presentation, slice the frittata into wedges and serve it on a colorful plate. Drizzle with olive oil or sprinkle with red pepper flakes for flair. A side of mixed greens adds freshness and color. Pair the frittata with a light salad or some crusty bread for a complete meal. Enjoy this savory delight! Check out the Full Recipe for more details on making this dish. {{image_4}} You can change the cheese in your frittata. Try mozzarella or cheddar for a new taste. Goat cheese adds a creamy twist. Feel free to swap out the roasted peppers. Zucchini, mushrooms, or even broccoli work great. You can also add proteins like cooked sausage or diced ham for extra flavor. To make the frittata gluten-free, check your seasonings. Most are safe, but always read labels. For a dairy-free option, use almond or soy milk. You can replace regular cheese with a dairy-free version too. If you want low-carb choices, skip the milk and use more eggs. Adding more veggies helps keep it filling without extra carbs. Combining flavors makes cooking exciting! You can add zucchini or mushrooms for a fresh taste. These vegetables bring great texture. For some heat, sprinkle crushed red pepper on top. It adds a nice kick to each bite. Fresh herbs like basil or chives also enhance flavor. You can mix and match to find your favorite combination. You can find the full recipe to explore even more ideas! To store your baked frittata, let it cool first. Once cool, place it in an airtight container. This helps keep it fresh for up to four days. When you want to eat it again, simply slice a piece and reheat it. Use a microwave for quick warming or an oven for a crisp finish. If using the oven, heat it at 350°F (175°C) until warm. You can freeze leftovers for later meals. Cut the frittata into portions and wrap each piece in plastic wrap. Then, place the wrapped pieces in a freezer bag. This way, they stay fresh for up to three months. When ready to eat, take out a portion and let it thaw in the fridge overnight. For best texture, reheat in the oven instead of the microwave. This keeps the frittata from getting too soggy. Enjoy your baked frittata anytime! For the full recipe, check out the details above. A baked frittata stays fresh for about 3 to 5 days in the fridge. Store it in an airtight container. Look for signs of spoilage like a sour smell or mold. If you see any, toss it out. Yes, you can make the frittata ahead of time. Cook it, let it cool, and store it in the fridge. When you're ready to eat, heat it in the oven or microwave until warm. This saves time on busy mornings. Here are some great side dishes and drinks to pair with your frittata: - Mixed greens salad - Fresh fruit salad - Toasted whole-grain bread - A light vinaigrette dressing - Coffee or herbal tea Yes, you can use fresh peppers, but roasted peppers add more flavor. Roasting brings out their sweetness and gives them a smoky taste. If you choose fresh, sauté them first to soften and enhance their taste. This frittata recipe is simple and full of flavor. You can mix fresh veggies, eggs, and cheese for a tasty dish. Remember to adjust cooking times and spices to fit your taste. Try different ingredients for fun variations. Store any leftovers well to enjoy later. With these tips, you can make a great frittata any time. Enjoy the cooking process and share this dish with family or friends!
Baked Frittata with Roasted Peppers Savory Delight
Are you ready to elevate your breakfast game? This Baked Frittata with Roasted Peppers is a savory delight that’s easy to make and packed with
- 1 cup all-purpose flour - 2 tablespoons granulated sugar - 1 tablespoon baking powder - 1 teaspoon ground cinnamon - 1/4 teaspoon salt - 1 cup milk - 2 large eggs - 1/4 cup unsalted butter, melted and slightly cooled - 1 teaspoon pure vanilla extract - 1/4 cup confectioners' sugar (for dusting) - Additional ground cinnamon for sprinkling You can swap all-purpose flour with whole wheat flour for a healthier twist. Use almond milk or oat milk instead of regular milk for a dairy-free option. If you need a vegan version, replace eggs with flax eggs. Mix one tablespoon of ground flaxseed with three tablespoons of water, then let it sit for five minutes to thicken. For butter, use coconut oil or a vegan spread. You can also choose maple syrup instead of granulated sugar for a natural sweetness. When selecting flour, check the packaging for freshness dates. A good flour should be free from lumps and have a fine texture. For milk, opt for fresh, cold cartons, and look for a long shelf life. Eggs should be firm and uncracked; you can check their freshness by placing them in water—fresh eggs sink, while older ones float. Choose unsalted butter that is firm and smooth. Lastly, pick ground cinnamon that is fragrant, as this shows it’s fresh and flavorful. {{ingredient_image_2}} Start by taking a large mixing bowl. Add 1 cup of all-purpose flour. Next, put in 2 tablespoons of granulated sugar. Then, add 1 tablespoon of baking powder, 1 teaspoon of ground cinnamon, and 1/4 teaspoon of salt. Use a whisk to mix well. Make sure there are no lumps in the dry mix. In a separate bowl, pour in 1 cup of milk. Crack in 2 large eggs. Then, add 1/4 cup of melted unsalted butter. Don’t forget to include 1 teaspoon of pure vanilla extract. Whisk these wet ingredients until smooth and well mixed. Slowly pour the wet mixture into the dry bowl. Use a spatula or wooden spoon to gently fold them together. Mix until just combined. It’s okay to have a few small lumps; avoid overmixing. Preheat a non-stick skillet or griddle over medium heat. Once hot, grease the surface lightly with oil or butter. For each pancake, pour about 1/4 cup of batter onto the skillet. Cook until bubbles form on the surface, about 2-3 minutes. Carefully flip and cook the other side until golden brown, another 2-3 minutes. After cooking, transfer the pancakes to a plate. Cover them with a kitchen towel to keep warm. On a shallow plate, mix 1/4 cup of confectioners' sugar with additional ground cinnamon. Dust the warm pancakes generously with this mixture. For a fun touch, serve with chocolate or caramel sauce and fresh fruit. To make your pancakes fluffy, start with fresh ingredients. Use baking powder that is not expired. Mix dry and wet ingredients separately first. When you combine them, do not overmix. A few lumps in the batter help keep them light. Let the batter rest for a few minutes before cooking. This allows the baking powder to activate. One common mistake is overmixing the batter. This can lead to tough pancakes. Another mistake is not preheating the skillet enough. If the pan is not hot, pancakes can cook unevenly. Also, avoid using too much oil. A light greasing is enough to prevent sticking. Lastly, don’t rush the flipping. Wait for bubbles to form before you turn them. Cook your pancakes on medium heat. This helps them cook evenly without burning. Each side should take about 2-3 minutes. Look for bubbles on the surface as a sign to flip. If the pancakes brown too fast, lower the heat. Keep the cooked pancakes warm under a towel while you finish the batch. This ensures all pancakes are ready to serve at the same time. Pro Tips Use Fresh Ingredients: Always use fresh eggs and milk for a richer flavor and fluffier texture in your pancakes. Don't Overmix: Mix the wet and dry ingredients until just combined to keep your pancakes light and airy. A few lumps are okay! Adjust Heat as Needed: If pancakes are browning too quickly, lower the heat. You want them cooked through without burning. Serve Immediately: For the best experience, serve the pancakes warm and fresh from the skillet, topped with the cinnamon sugar mixture. {{image_4}} You can easily switch up the flavors in your churro pancakes. Here are some fun ideas: - Chocolate Chips: Add 1/2 cup of semi-sweet chocolate chips to the batter for a sweet touch. - Nutmeg: Swap half the cinnamon with nutmeg for a warm, spicy flavor. - Orange Zest: Mix in a teaspoon of orange zest for a bright, citrusy twist. These simple changes can make your pancakes unique every time you cook them. Want to make these pancakes gluten-free? It’s easy! Just follow these steps: - Flour Swap: Use a gluten-free all-purpose flour blend instead of regular flour. Check for one that has xanthan gum included. - Baking Powder: Ensure your baking powder is gluten-free. Most brands are, but it’s good to check. These swaps keep the texture light and fluffy while avoiding gluten. You can serve Spanish churro pancakes in many ways for any occasion. Here are some ideas: - Breakfast Treat: Stack them high and drizzle with rich chocolate sauce and whipped cream. - Brunch Delight: Serve with fresh fruit like strawberries or blueberries. They add color and freshness. - Party Fun: Create a pancake bar! Offer toppings like sprinkles, nuts, and flavored syrups for guests to customize their pancakes. These serving ideas can make your churro pancakes a hit at any meal! To store leftover pancakes, stack them on a plate. Place a piece of parchment paper between each pancake. Cover the stack with plastic wrap or foil. This keeps them fresh and prevents sticking. To reheat, use a microwave or stove. For the microwave, place a pancake on a plate. Heat for about 20-30 seconds until warm. If using a stove, warm a skillet over low heat. Heat each pancake for 1-2 minutes on each side. To freeze pancakes, let them cool fully first. Stack them with parchment paper in between. Place the stack in a freezer-safe bag. Remove excess air and seal it tight. They can last up to three months in the freezer. When you're ready, thaw them in the fridge overnight before reheating. Yes, you can make these pancakes ahead. Cook them and let them cool. Place them in an airtight container. You can store them in the fridge for up to three days. To reheat, use a microwave or a skillet on low heat. These pancakes are tasty with many toppings. Here are some ideas: - Warm chocolate sauce - Creamy caramel sauce - Fresh fruit like strawberries or bananas - A dollop of whipped cream - Extra cinnamon sugar for a sweet kick Yes, you can make vegan churro pancakes. Replace eggs with flax eggs or applesauce. Use non-dairy milk like almond or oat milk. Substitute melted butter with coconut oil or vegan butter. It will still taste great! Watch for bubbles forming on the surface. This means they are ready to flip. Cook until both sides are golden brown. You can also check with a toothpick. If it comes out clean, the pancakes are done. You can use different flours for these pancakes. Whole wheat flour adds a nutty flavor. Almond flour makes them gluten-free but changes the texture. Just make sure to adjust the liquid if needed. We explored the key ingredients for perfect pancakes and shared smart substitutions. You learned step-by-step instructions for making pancakes, plus tips for getting them fluffy. We also discussed serving ideas and storage options for leftovers. Pancakes can be fun and easy to make at home. Experiment with flavors and adapt recipes based on your needs. Enjoy every bite of your delicious creation!
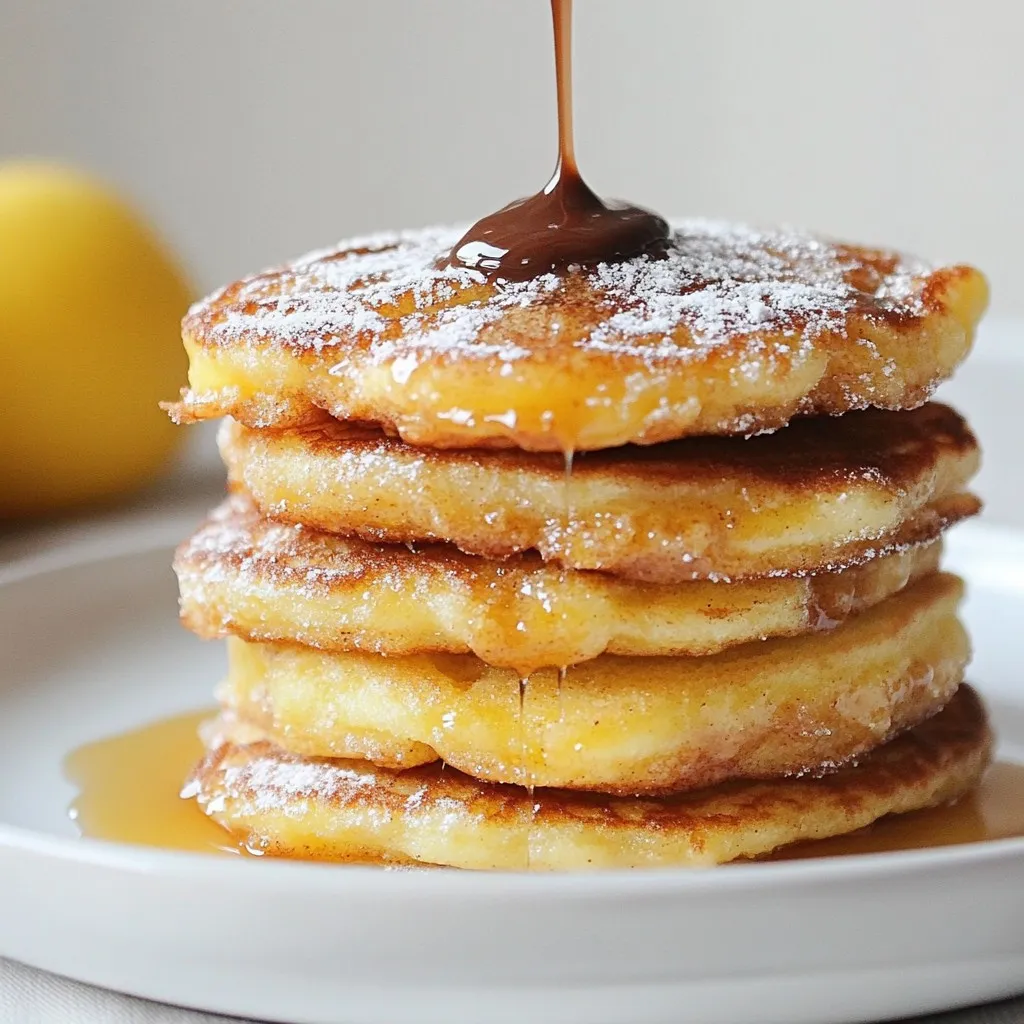
Spanish Churro Pancakes Delightful and Simple Recipe
Are you ready to indulge in a sweet twist on classic breakfast? Spanish churro pancakes combine fluffy pancake goodness with the delightful flavors of churros.
- 1 loaf of challah bread, cut into 1-inch cubes - 6 large eggs - 2 cups whole milk - 1/2 cup heavy cream - 1 tablespoon ground cinnamon - 1/4 cup granulated sugar - 1/2 cup packed brown sugar - 1 tablespoon pure vanilla extract - 1/4 cup unsalted butter, melted - 1/4 teaspoon salt - Optional garnishes: powdered sugar, maple syrup Gather these ingredients for a cozy breakfast treat. I love using challah bread because it soaks up the egg mixture well. The eggs and dairy make the casserole creamy. The brown and granulated sugars give it a sweet crunch on top. Ground cinnamon adds warmth and spice, while vanilla gives it a lovely aroma. Melted butter helps combine the brown sugar for a perfect topping. Don't forget the salt; it enhances all the flavors. You can top your finished dish with powdered sugar and drizzle maple syrup for extra sweetness. {{ingredient_image_2}} Preheating your oven is key for a great bake. Set it to 350°F (175°C). This helps the casserole cook evenly. Next, lightly grease a 9x13 inch baking dish with cooking spray or butter. This step prevents sticking and makes serving easy. Now, let’s mix the wet ingredients. In a large bowl, crack six large eggs. Whisk them well. Add two cups of whole milk, half a cup of heavy cream, one tablespoon of pure vanilla extract, one tablespoon of ground cinnamon, a quarter cup of granulated sugar, and a pinch of salt. Mix until smooth and creamy. This blend creates a rich base for your casserole. It’s time to combine! Gently fold in the cubed challah bread. Ensure all cubes get coated with the egg mixture. This step is important for flavor. Let the mixture sit for about 15 minutes. This allows the bread to soak up all those yummy flavors. In a small bowl, mix half a cup of packed brown sugar with a quarter cup of melted unsalted butter. Stir until it’s well blended and crumbly. The goal is a thick, sandy texture. This mixture adds sweetness and a nice crunch on top. Start layering your casserole. Pour half of the soaked bread mixture into the greased dish. Drizzle half of the brown sugar mixture over it. Then, add the rest of the bread mixture. Finally, drizzle the remaining brown sugar mixture on top. This layered approach gives the casserole great texture. Cover the baking dish with aluminum foil. This helps to keep moisture in while baking. Place it in the preheated oven and bake for 30 minutes. After that, remove the foil and bake for another 15-20 minutes. It’s done when the top is golden brown and the center is set. When it’s out of the oven, let the casserole cool for a few minutes. This makes it easier to cut. Lightly dust the top with powdered sugar for a sweet touch. Serve warm slices drizzled with maple syrup. Enjoy this delightful dish at breakfast or brunch! Using challah bread gives a soft and rich flavor to the casserole. Its eggy texture absorbs the custard well. This bread makes every bite delightful. If you do not have challah, try brioche or French bread. Both options work well and add nice sweetness. To avoid sogginess, let the bread soak only for 15 minutes. This allows it to absorb the liquid without getting too wet. If you prefer a firmer texture, reduce the soaking time. Adjust baking time for your taste. If you want a crispier top, bake it longer without the foil for a few extra minutes. Cut the casserole into even squares. Stack them neatly on a plate for a great look. Dust the top lightly with powdered sugar for elegance. Fresh berries like strawberries or blueberries add color too. This makes the dish even more appealing and tasty. Pro Tips Use Stale Bread: For the best texture, use day-old challah or bread. This will absorb the custard mixture better without becoming too soggy. Customize the Spices: Feel free to experiment with spices like nutmeg or cardamom for a unique flavor twist in your casserole. Overnight Option: Prepare the casserole the night before and refrigerate. This allows the bread to soak up the custard overnight for enhanced flavor. Serving Suggestions: Pair with fresh fruits like berries or banana slices and a dollop of whipped cream for a delightful brunch presentation. {{image_4}} You can add fun fruits to your casserole. Berries like strawberries and blueberries work great. Bananas also add a nice sweetness. They give a fresh taste too! You can switch up spices for more flavor. Try nutmeg for warmth or cardamom for a hint of spice. Each choice gives a new twist to the dish. If you need gluten-free options, use gluten-free bread. Many stores sell good options now. For dairy-free, swap whole milk and cream with almond or oat milk. You can also use coconut milk for a richer taste. These changes keep the dish tasty while meeting your needs. Think about what to serve with your casserole. Crispy bacon or sausage can make it heartier. You can also add fresh fruit on the side for brightness. This dish works well as breakfast or dessert. Drizzle it with maple syrup for breakfast or add whipped cream for dessert. Each way makes it special. To keep your baked cinnamon sugar French toast casserole fresh, refrigerate it. Place it in an airtight container. You can also freeze it. Cut the casserole into slices. Wrap each slice in plastic wrap, then place it in a freezer bag to avoid freezer burn. In the fridge, the casserole lasts about 3 to 4 days. If you freeze it, aim to use it within 2 to 3 months for the best taste. For reheating, the oven works best. Preheat it to 350°F (175°C). Place the casserole slices in a baking dish. Cover them with foil to keep the moisture. Heat for about 15 to 20 minutes. You can also microwave individual slices for quick servings. Just make sure to watch the time. After reheating, serve with a drizzle of maple syrup. This adds a sweet touch to each slice. Enjoy your flavorful breakfast or brunch! Yes, you can prep this casserole in advance. To do this, follow these tips: - Prepare the casserole up to the baking step. - Cover it well and store it in the fridge overnight. - When ready to bake, remove it from the fridge. Let it sit for about 30 minutes at room temperature. - Bake as directed, adding a few extra minutes if needed. This way, you save time on busy mornings. You can enjoy a warm, tasty meal without stress. If you want to replace eggs, here are some great options: - Use 1/4 cup of unsweetened applesauce for each egg. - Try 1/4 cup of mashed banana. - Use a commercial egg replacer according to the package. These changes may alter the texture and flavor a bit, but they work well. Applesauce adds moisture and sweetness, while banana gives a fruity taste. Look for these signs to check if the casserole is ready: - The top should be a golden brown color. - The center should feel firm, not jiggly. To test doneness, insert a toothpick into the center. If it comes out clean, the casserole is done. If it has wet batter on it, bake a little longer. This way, you ensure every piece is fully cooked and delicious. You learned how to make a tasty challah French toast casserole. We covered key ingredients, like eggs and milk, plus essential steps for mixing and baking. Remember to layer well for great flavor and texture. You can customize with fruits or spices, and adjust for diets too. Follow my tips to store and reheat leftovers correctly. Enjoy this dish for breakfast or dessert. Get creative with garnishes, and make it your own!
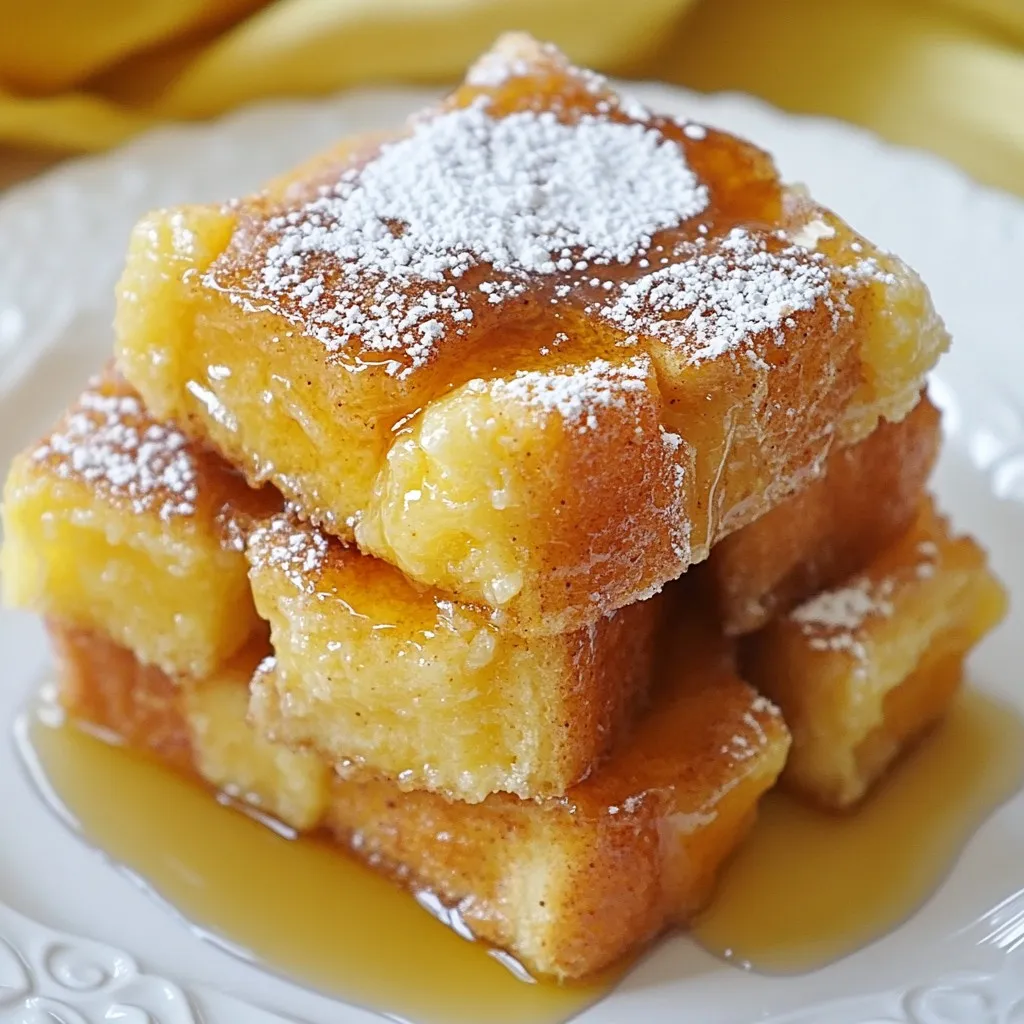
Baked Cinnamon Sugar French Toast Casserole Delight
Are you ready to indulge in the warm, sweet flavors of Baked Cinnamon Sugar French Toast Casserole? This dish combines soft challah bread with rich