Breakfast

- 2 cups rolled oats - 2 cups plant-based milk (such as almond or oat milk) - 1 cup fresh or frozen raspberries - 1 ripe banana, mashed - 1/4 cup maple syrup or agave nectar - 1 teaspoon vanilla extract - 1 teaspoon baking powder - 1/2 teaspoon ground cinnamon - A pinch of sea salt - Optional toppings: sliced almonds, coconut flakes, or additional raspberries To make these vegan raspberry baked oats, start with the main ingredients. The rolled oats give the dish its hearty base. I love using plant-based milk because it keeps everything creamy. Raspberries add a burst of flavor and sweetness, whether fresh or frozen. Next, mash a ripe banana. This adds natural sweetness and moisture. Maple syrup or agave nectar complements the banana and enhances the dish. The vanilla extract brings warmth to the mix. For our baking essentials, baking powder helps the oats rise, while ground cinnamon adds a cozy spice. A pinch of sea salt balances the flavors. If you want to add a little extra crunch, try toppings like sliced almonds or coconut flakes. You can also sprinkle some extra raspberries on top for a pop of color. {{ingredient_image_2}} - Preheat the oven to 350°F (175°C). - Grease an 8x8 inch baking dish or line with parchment paper. To start, you need to get the oven ready. Preheating ensures that your baked oats cook evenly. Greasing the dish helps the oats come out easily after baking. If you use parchment paper, you can lift them out without any mess. - Combine rolled oats, baking powder, ground cinnamon, and sea salt in a bowl. - Stir dry ingredients thoroughly. In a large bowl, mix your dry items. The rolled oats form the base. Baking powder makes them rise. Ground cinnamon adds warmth, while a pinch of sea salt enhances all the flavors. Stir well to ensure everything is evenly mixed. - Whisk together plant-based milk, mashed banana, maple syrup, and vanilla extract until smooth. - Gradually combine with dry mixture. In a separate bowl, whisk your wet ingredients. Use plant-based milk for creaminess. The mashed banana replaces eggs and adds sweetness. Maple syrup gives it a rich flavor, while vanilla adds a nice touch. Once smooth, pour this mix into the dry ingredients. Stir gently until just combined. - Fold in raspberries and place mixture in baking dish. - Bake for 30-35 minutes until golden. Now, it's time to add the raspberries. Gently fold them in to keep them whole. Pour the mixture into your greased baking dish. Spread it out evenly. Bake for 30 to 35 minutes. You want the top to be golden and firm to the touch. This creates a delicious, satisfying treat you'll love! When you mix ingredients, avoid overmixing. This helps keep your baked oats fluffy. Use ripe bananas for better sweetness and flavor. They give a nice, natural taste to your dish. To check for doneness, press the top of the dish. If it feels firm, it’s ready. Rotate the dish halfway through baking. This ensures even cooking and a perfect texture. Serve your baked oats warm. Drizzle some maple syrup on top for added sweetness. You can also add fresh raspberries and nuts for garnish. This makes your dish look beautiful and taste even better. Pro Tips Use Fresh Raspberries: For the best flavor and texture, try to use fresh raspberries when in season. They will elevate the dish with their vibrant taste and juicy burst. Customize Sweetness: Adjust the sweetness of your baked oats by reducing or increasing the maple syrup according to your preference. Taste the batter before baking to find your ideal sweetness level. Store Leftovers Properly: If you have leftovers, store them in an airtight container in the fridge for up to 3 days. Reheat in the microwave for a quick and satisfying breakfast. Add Nut Butter: For an extra boost of flavor and creaminess, drizzle your baked oats with almond or peanut butter before serving. It adds a deliciously rich dimension. {{image_4}} You can switch raspberries for blueberries or strawberries. Each fruit brings a new taste. Blueberries add sweetness, while strawberries offer a fresh twist. You can also mix different fruits for a fun blend. Adding nut butter boosts creaminess and flavor. Almond or peanut butter works great. Just stir in a couple of tablespoons before baking. Want it less sweet? Use less maple syrup. You can cut it in half. This still keeps the dish tasty. Another option is to use mashed dates instead of banana. Dates add natural sweetness and a unique flavor. Just mash them well before mixing with other wet ingredients. To make this dish gluten-free, choose certified gluten-free rolled oats. This ensures no cross-contamination with gluten. You can also try gluten-free flour. This can change the texture a bit. Start with a small amount and see how it feels. Enjoy experimenting until you find your favorite version! You can refrigerate leftovers in an airtight container. They stay fresh for about 3-5 days. Always check for any signs of spoilage before eating. For longer storage, freeze portions in individual containers. This makes it easy to grab a quick snack. The baked oats can be kept frozen for up to 3 months. Just label the containers with the date for easy tracking. When you're ready to enjoy your baked oats again, reheat them in the microwave or oven until warm. If they seem dry, add a splash of plant-based milk to restore moisture. This little tip ensures you get the same great taste every time! Yes, blueberries and strawberries work well as substitutes. You can mix and match fruits based on what you like. Apples or peaches also add a nice touch. Just remember, different fruits may change the taste and texture a bit. To make this recipe gluten-free, use gluten-free rolled oats. Always check the ingredient labels on your products. Some oats may have cross-contamination with gluten. You can reduce the maple syrup in the recipe. Using less will keep the flavor while cutting sugar. Another option is to use a sugar substitute like monk fruit. It keeps the sweetness without the extra sugar. Yes, you can double the recipe easily. Just use a larger baking dish to hold all the oats. You may need to adjust the baking time a bit. Keep an eye on it as it cooks. Enjoy the larger batch! This recipe, featuring oats, raspberries, and plant-based milk, offers a nutritious and delicious treat. We covered how to prepare and bake it step-by-step. Remember, you can mix and match ingredients for your taste. Use different fruits or adjust the sweetness as needed. Store leftovers properly and enjoy them later. This simple dish is perfect for any meal. I hope you try making it and enjoy the process as much as the outcome!
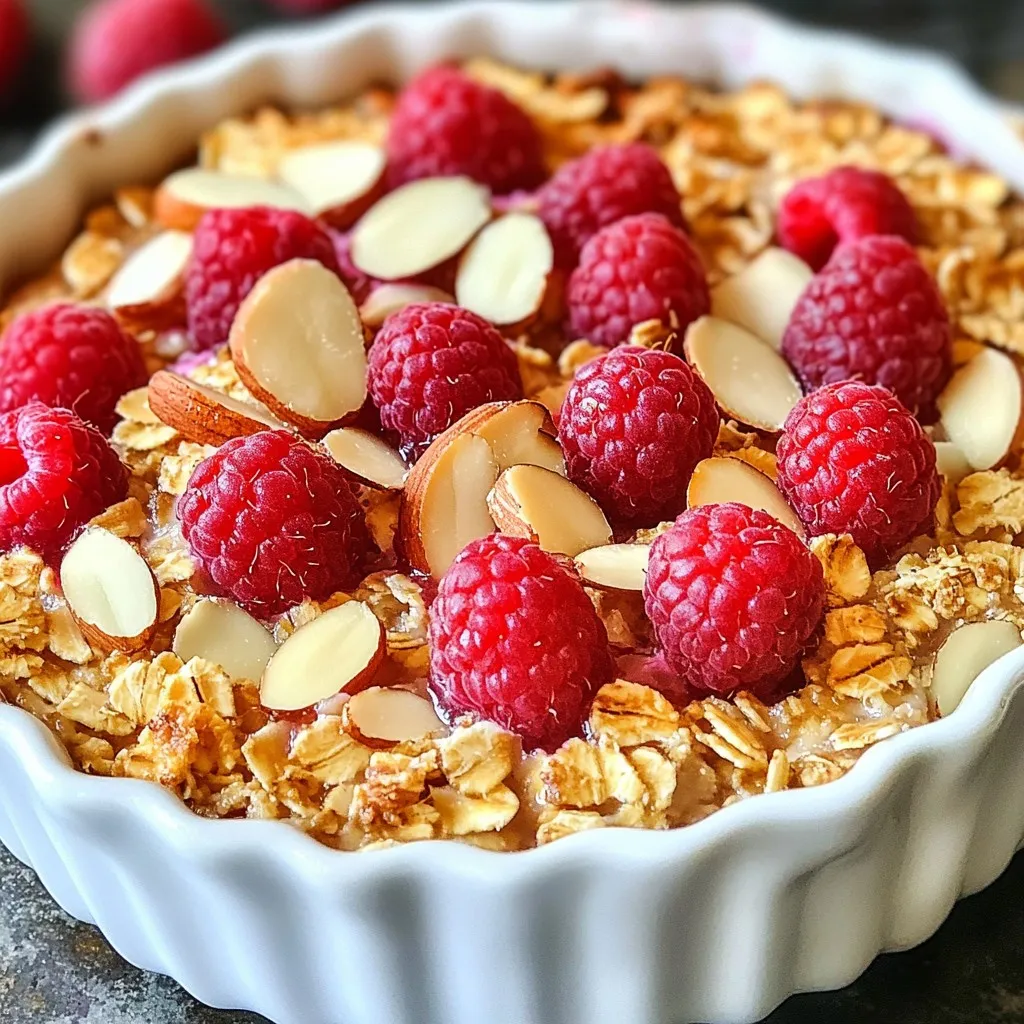
Vegan Raspberry Baked Oats Simple and Tasty Treat
Looking for a delicious and easy way to enjoy breakfast? These Vegan Raspberry Baked Oats are just what you need! Packed with wholesome ingredients like
To make protein waffles, you need: - 1 cup rolled oats - 1 scoop protein powder (vanilla or unflavored) - 1 ripe banana, mashed until smooth - 2 large eggs - 1/2 cup almond milk (or any milk of your choice) - 1 tablespoon baking powder - 1 teaspoon vanilla extract - 1/2 teaspoon ground cinnamon - Pinch of salt These ingredients blend together to create a tasty, fluffy waffle. The oats serve as a great base. They add fiber and texture. The protein powder boosts your protein intake, making the meal more filling. You can make your waffles even better with fun toppings. Consider adding: - Fresh berries (strawberries, blueberries, or raspberries) - Greek yogurt for creaminess - A drizzle of honey or maple syrup for sweetness These toppings not only enhance the flavor but also add color and nutrition. You can mix and match toppings based on your mood or what you have at home. Choosing the right protein powder matters. Here are some great options: - Whey protein for a creamy texture - Plant-based protein for a dairy-free choice - Pea protein if you're looking for a vegan option Each type has its benefits. Whey protein blends well, while plant-based options often have more fiber. Pick the one that fits your needs best. {{ingredient_image_2}} To start, preheat your waffle iron. This step is key. A hot iron helps cook the waffles evenly. Follow the guide for your specific device. Usually, a light will indicate when it’s ready. Next, we need to make oat flour. Take 1 cup of rolled oats and put them in a blender. Blend until they turn into a fine powder. This oat flour will give your waffles a nice texture. Now it's time to make the batter. In the same blender, add the oat flour, 1 scoop of protein powder, and 1 mashed banana. Crack in 2 large eggs. Pour in 1/2 cup of almond milk, add 1 tablespoon of baking powder, 1 teaspoon of vanilla extract, 1/2 teaspoon of ground cinnamon, and a pinch of salt. Blend until the mix is smooth and creamy. The batter should be thick but still pourable. Lightly grease the waffle iron with cooking spray or a brush of oil. Pour enough batter into the center of the iron, but don’t overfill it. Close the lid and cook for about 3 to 5 minutes. Check the waffles to avoid burning. They should be golden brown and crisp. Once cooked, carefully take the waffles out. To keep them warm, place them on a baking sheet in a low oven. Serve the waffles warm with fresh berries, Greek yogurt, and a drizzle of honey or maple syrup. For a nice touch, stack two waffles and add a sprig of mint on top for color. To make great protein waffles, you want a fluffy texture. Here are some tips: - Blend your rolled oats until they are fine. This helps create a light batter. - Use ripe bananas. They add natural sweetness and keep your waffles moist. - Don’t skip the baking powder. It helps the waffles rise and stay fluffy. - Let the batter sit for a few minutes. This allows it to thicken a bit more. You can easily change this recipe to fit your needs: - For a gluten-free option, use certified gluten-free oats. - If you are dairy-free, almond milk works well. You can also try oat or coconut milk. - For a vegan version, swap the eggs for flax eggs. Mix 1 tablespoon of ground flaxseed with 2.5 tablespoons of water. Wait 5 minutes until it thickens. - Use plant-based protein powder if you prefer vegan protein. No one likes waffles that stick! Here’s how to prevent that: - Always grease the waffle iron. Use cooking spray or a light brush of oil. - Let the iron preheat fully before pouring in the batter. This helps create a crisp surface. - Don’t overfill the waffle iron. This can cause the batter to spill out and stick. - Let the waffles cook until golden brown. This means they are more likely to release without sticking. Pro Tips Blending Oats Perfectly: Ensure your oats are blended into a fine flour for the best waffle texture. A good blender or food processor will do the trick! Egg Substitute Option: If you're looking for a vegan alternative, consider using flax eggs (1 tablespoon flaxseed meal mixed with 2.5 tablespoons water per egg) for a similar binding effect. Customize Your Waffles: Add in extras like chocolate chips, nuts, or seeds to the batter for an added flavor and texture boost! Keep Waffles Warm: Use the oven to keep your cooked waffles warm while you finish the batch. Set it to a low temperature (around 200°F or 93°C) to avoid drying them out. {{image_4}} You can make your protein waffles extra fun by adding flavors. Here are some ideas: - Chocolate: Add 2 tablespoons of cocoa powder. This gives a rich taste. - Berry: Mix in 1/2 cup of fresh or frozen berries. Blueberries or raspberries work well. - Pumpkin: Stir in 1/2 cup of pumpkin puree and a dash of nutmeg for a fall flavor. These flavors change the taste and make breakfast exciting. You can try different combinations too! To make gluten-free protein waffles, you can use gluten-free oats. Just blend as before. Replace regular protein powder with a gluten-free brand. The other steps stay the same. You still get delicious waffles that fit your diet. If you love protein shakes, you can turn that into waffles. Use the same base and add: - 1 scoop of your favorite protein shake mix - 1 tablespoon of peanut butter or almond butter for a nutty flavor - A splash of your favorite milk This mix gives you a taste similar to your protein shake. The waffles will be filling and tasty. Enjoy them with your favorite toppings! After making protein waffles, let them cool down first. Place the cooled waffles in an airtight container. You can keep them in the fridge for up to three days. This will help maintain their freshness and taste. If you want to enjoy them later, freezing is a great option. When you’re ready to eat your leftover waffles, you have a few choices. The best way is to use a toaster. Toasting them gives you a nice, crispy texture again. You can also use an oven. Preheat it to 350°F (175°C) and warm the waffles for about 5-10 minutes. This makes them taste fresh, just like when you first made them. To freeze protein waffles, stack them with parchment paper between each one. This stops them from sticking together. Place the stacked waffles in a zip-top bag. Squeeze out the air before sealing. They can last up to three months in the freezer. When you want to eat them, just reheat as mentioned above. Enjoy your delicious protein-packed meal anytime! These waffles have about 15-20 grams of protein per serving. The protein comes mainly from the protein powder and eggs. If you use a higher protein powder, you can boost this even more. This makes them great for a post-workout snack or a filling breakfast. Yes, you can use any type of milk you like. Almond milk works well, but you can also try oat milk, soy milk, or even regular cow's milk. Just remember, the flavor might change slightly based on your choice. Each milk adds a unique taste to the waffles. To make these waffles vegan, swap the eggs for flax eggs or applesauce. Use a plant-based protein powder, and choose almond milk or any non-dairy milk. This way, you keep the texture and flavor while making them plant-based. Yes, protein waffles are great for meal prep. You can make a big batch and store them in the fridge or freezer. They reheat well, making them easy to grab on busy mornings. Just pop them in the toaster or microwave, and they are ready to eat! Protein waffles provide many health benefits. They are high in protein, which helps build muscles and keep you full. The oats offer fiber, which aids digestion. Plus, you can add fresh fruit for vitamins and minerals. These waffles are a tasty way to fuel your day! You now know how to make tasty protein waffles. We covered key ingredients, step-by-step cooking, and handy tips. You learned about flavor variations and storage options. Protein waffles are not only fun to make but also great for your diet. They can help you stay full and energized. Remember, you can mix and match ingredients to fit your taste. Enjoy your waffle-making journey!
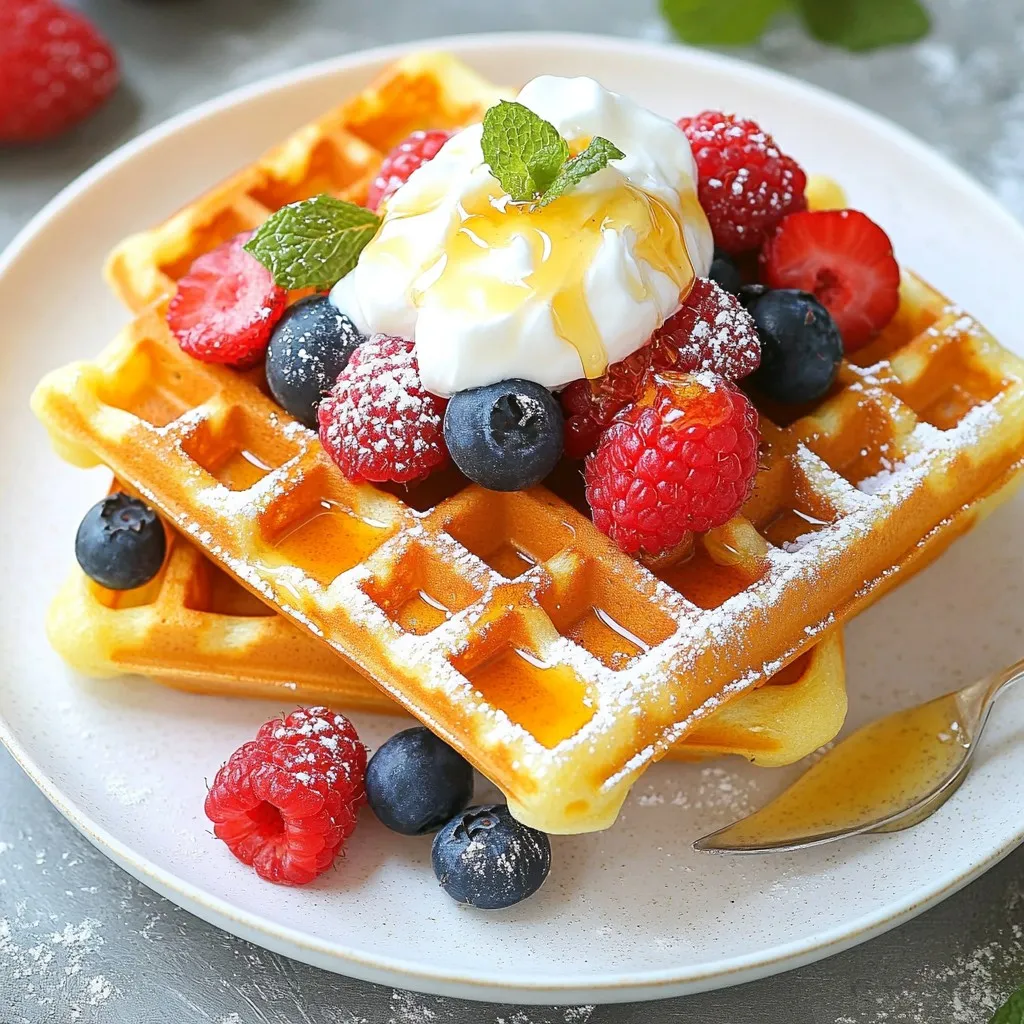
Protein Waffles Easy and Nutritious Recipe Ideas
Looking for a tasty way to boost your protein intake? You’re in the right place! These protein waffles are not only easy to make but
- 1 cup quark cheese - 1 cup whole wheat flour - 1 tablespoon baking powder - 2 large eggs - 1 cup milk or plant-based alternative These main ingredients give the pancakes their soft and fluffy texture. Quark cheese adds protein and creaminess. Whole wheat flour gives a nutty taste and boosts fiber. The baking powder helps pancakes rise. Eggs add richness, while milk makes the batter smooth. - 1 tablespoon honey or maple syrup - 1 teaspoon vanilla extract - 1/2 teaspoon ground cinnamon These enhancers bring warmth and sweetness. Honey or maple syrup adds natural sweetness. Vanilla extract gives a lovely aroma. Ground cinnamon adds spice and flavor depth. Use these to elevate your pancake experience. - 1 cup mixed berries (fresh or frozen) - 1/4 cup chopped nuts (e.g., walnuts, almonds) - Alternative fillings (e.g., chocolate chips, shredded coconut) Optional fillings make these pancakes special. Mixed berries add freshness and juiciness. Chopped nuts provide crunch and healthy fats. You can also use chocolate chips for sweetness or shredded coconut for a tropical twist. These options allow you to customize your pancakes to your taste. {{ingredient_image_2}} In a large bowl, combine these dry ingredients: - 1 cup quark cheese - 1 cup whole wheat flour - 1 tablespoon baking powder - 1/2 teaspoon ground cinnamon Use a whisk or fork to mix them well. You want to break up any lumps in the quark. This step helps to create a smooth batter. In another bowl, whisk together: - 2 large eggs - 1 cup milk (or a plant-based milk) - 1 tablespoon honey or maple syrup - 1 teaspoon vanilla extract Make sure this mixture is smooth and well mixed. This blend adds flavor and moisture to your pancakes. Now, pour the wet mixture into the dry ingredients. Stir gently until they just combine. Do not overmix, or your pancakes will be tough. If the batter seems too thick, add a splash of milk for a better pour. Next, fold in: - 1 cup mixed berries (fresh or frozen) - 1/4 cup chopped nuts (like walnuts or almonds) This will add flavor and texture to your pancakes. Preheat a non-stick skillet over medium heat. Lightly grease the skillet with cooking spray or coconut oil. For each pancake, pour about 1/4 cup of batter onto the skillet. Cook for 2-3 minutes until bubbles form on the surface. Gently flip the pancakes with a spatula. Cook for another 2-3 minutes until golden brown. Once done, place the pancakes on a plate and keep warm. Repeat with the rest of the batter, adding more oil if needed. To make the best stuffed protein quark pancakes, it's key to get the batter right. If your batter is too thick, add a splash of milk. This makes it easier to pour. When mixing, use a gentle hand. Stir just until the wet and dry ingredients blend. Overmixing can make your pancakes tough. Aim for a smooth batter with small lumps. The right skillet temperature is crucial. You want it set to medium heat. If it’s too hot, your pancakes will burn. Too low, and they won’t cook properly. A non-stick skillet is your best friend here. It helps prevent sticking and makes flipping pancakes easier. Always grease it with cooking spray or coconut oil before pouring in the batter. When serving, stack pancakes high on a plate. This makes a great visual appeal. Drizzle some honey or syrup on top for extra sweetness. For a fresh touch, garnish with more berries. You can also add a dollop of quark on the side. This contrast in flavor and texture makes your pancakes even more delightful. Pro Tips Use Fresh Ingredients: Opt for fresh berries whenever possible for the best flavor and texture in your pancakes. Adjust Consistency: If your batter seems too thick, add a little more milk to achieve the desired pourable consistency for fluffier pancakes. Cook on Medium Heat: Maintain a medium heat for even cooking; too high can burn the pancakes before they're cooked through. Keep Them Warm: Place cooked pancakes in a warm oven while you finish cooking the rest to keep them hot and delicious for serving. {{image_4}} You can switch up the flavor of your stuffed protein quark pancakes easily. Try using different fruits like bananas or apples. Each fruit adds its unique taste and sweetness. You can also change the sweeteners. Instead of honey, use agave syrup or coconut sugar. These alternatives can change the flavor and make the pancakes your own. If you want gluten-free pancakes, use almond flour or oat flour instead of whole wheat flour. These options work well and still taste great. If you follow a vegan diet, you can make simple changes. Use flax eggs instead of regular eggs and choose plant-based milk. These swaps keep the pancakes delicious while meeting dietary needs. Adding extra nutrition is easy with stuffing. You can mix in protein powder or Greek yogurt for a boost. This makes your pancakes more filling and nutritious. If you prefer savory options, think about adding cheese and spinach. These ingredients create a tasty twist, making your breakfast unique and exciting. To keep your pancakes fresh, store them in the fridge. Place them in an airtight container. You can also use parchment paper between layers to avoid sticking. This will help keep them soft. To freeze pancakes, stack them with parchment paper in between. Wrap the stack tightly in plastic wrap, then place it in a freezer bag. This will help keep the pancakes fresh for a long time. You can reheat pancakes in two ways: the microwave or the oven. For the microwave, place a pancake on a plate. Heat for about 20-30 seconds. This is quick and easy. For the oven, preheat it to 350°F (175°C). Place pancakes on a baking sheet. Cover them with foil to keep them moist. Heat for 10-15 minutes. This keeps the texture nice and fluffy. In the fridge, pancakes stay fresh for about 3-4 days. If you freeze them, they can last for up to two months. Enjoy them within this time for the best taste and quality. To make these pancakes dairy-free, swap quark and milk for plant-based options. Use almond, soy, or oat milk as a milk substitute. For quark, try using silken tofu or a dairy-free yogurt. These options provide a similar creamy texture. Keep in mind, the flavor may change slightly. Experiment with different brands to find what you like best. Yes, you can use regular flour instead of whole wheat. However, this change may impact the texture and nutrition of your pancakes. Regular flour makes the pancakes lighter and fluffier. Whole wheat offers more fiber and nutrients, making them healthier. If you want a balance, try using half whole wheat and half regular flour. Quark is a soft cheese popular in many countries. It has a creamy texture and mild flavor. Nutritionally, quark is high in protein and low in fat. It also contains calcium, which is great for bones. Using quark in recipes boosts protein content without adding too many calories. This makes it a smart choice for a healthy breakfast. You can tell pancakes are done by looking for visual cues. Bubbles should form on the surface as they cook. When most bubbles have popped, it's time to flip them. After flipping, look for a golden-brown color on both sides. You can also test texture; they should feel firm and springy. If they are soft or gooey, they need more time. In this article, we explored how to make stuffed protein quark pancakes. We covered essential ingredients like quark cheese and whole wheat flour. You learned step-by-step instructions, tips for perfect pancakes, and variations to try. These pancakes are nutritious and versatile. Feel free to adjust the ingredients to suit your taste or dietary needs. Enjoy experimenting with flavors and fillings. You’ll find that these pancakes can fit into any meal or occasion. Happy cooking!
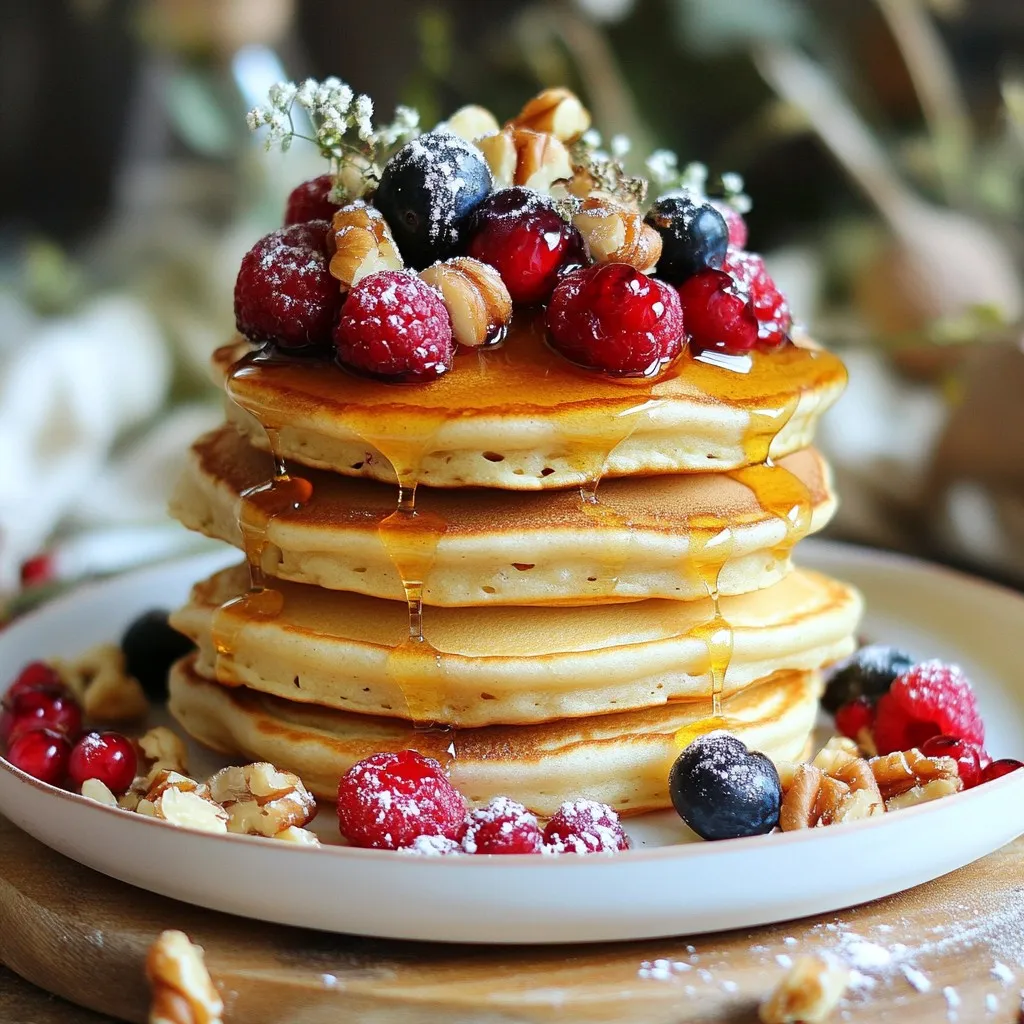
Stuffed Protein Quark Pancakes Wholesome Breakfast Delight
Looking for a breakfast that’s both tasty and nutritious? Let me introduce you to stuffed protein quark pancakes! These pancakes are packed with flavor and
- 1 cup rolled oats - 1 cup milk (can be dairy or plant-based) - 2 tablespoons honey - 1/4 cup unsalted butter, melted - 1 large egg - 1 teaspoon vanilla extract - 1 1/2 cups all-purpose flour - 1 teaspoon baking soda - 1/2 teaspoon salt - 2 teaspoons ground cinnamon - 1/2 cup brown sugar, packed - Optional: 1/4 cup chopped nuts (such as walnuts or pecans) You can swap the milk for almond or oat milk. This works great for vegans. Instead of honey, maple syrup adds sweetness. If you want a lighter loaf, you can use whole wheat flour. For a nut-free option, skip the nuts entirely or replace them with seeds. Each serving of this bread has about 200 calories. It includes 3 grams of protein and 5 grams of fiber. The bread also gives you healthy fats from the butter and nuts. If you're looking for a boost, the oats add good nutrients, too! {{ingredient_image_2}} Start by preheating your oven to 350°F (175°C). This step is key for even baking. Next, take a 9x5 inch loaf pan and grease it lightly. You can also use parchment paper to line the pan. This helps in removing the bread easily after it’s baked. In a medium bowl, mix 1 cup of rolled oats with 1 cup of milk. Stir them together well. Let this sit for about 10 minutes. Soaking the oats makes them softer and better for the bread's texture. Grab a large mixing bowl. In it, whisk together 1/4 cup of melted unsalted butter, 2 tablespoons of honey, 1 large egg, and 1 teaspoon of vanilla extract. Whisk until the mixture is smooth. This blend adds moisture and flavor to your bread. In another bowl, combine 1 1/2 cups of all-purpose flour, 1 teaspoon of baking soda, 1/2 teaspoon of salt, 2 teaspoons of ground cinnamon, and 1/2 cup of packed brown sugar. Whisk these dry ingredients well. This ensures that the flavors mix evenly throughout the loaf. Now, gently fold the soaked oat mixture into the wet ingredients. Stir just until combined. Then add the dry mixture to the wet mixture gradually. Mix until just combined, but do not over-mix. If you want, fold in 1/4 cup of chopped nuts at this stage. Pour the batter into your prepared pan, smoothing the top. Bake in your preheated oven for 50-60 minutes. To check if it’s done, insert a toothpick in the center. It should come out clean. Let the bread cool in the pan for about 10 minutes. After that, transfer it to a wire rack to cool completely. Enjoy your warm, delicious bread! To get that soft and fluffy bread, soaking the oats is key. When you mix the rolled oats with milk, let them sit for 10 minutes. This step helps the oats soften and blend into the bread. Use the right flour too; all-purpose flour works best. It gives your bread the perfect lift and texture. If you want a denser loaf, you can add whole wheat flour, but start with a smaller amount. The sweetness of this bread can change based on your taste. The honey and brown sugar add great flavor. If you want it sweeter, feel free to add more honey or sugar. You can also try maple syrup instead of honey for a different flavor. Taste the batter before baking to find the right balance for you. After baking, let the bread cool completely. This keeps it from getting soggy. Wrap it in plastic wrap or store it in an airtight container. It stays fresh for about three days at room temperature. For serving, slice it warm and drizzle a little extra honey on top. You can also add butter or a sprinkle of cinnamon for a nice touch. Enjoy it as a snack or for breakfast! Pro Tips Use Fresh Ingredients: Ensure your baking powder and spices are fresh for the best flavor and rise in your bread. Don’t Overmix: Mixing the batter just until combined helps keep the bread light and fluffy. Overmixing can make it dense. Cool Properly: Allow the bread to cool completely on a wire rack to maintain its texture and prevent sogginess. Add Variations: Feel free to experiment with mix-ins like dried fruits or seeds for added flavor and texture. {{image_4}} You can make this bread even tastier with simple add-ins. Nuts add crunch and flavor. I recommend using walnuts or pecans. You can also add chocolate chips for a sweet twist. Dried fruits like raisins or cranberries work well too. For a spicier kick, mix in some nutmeg or ginger. Don't be afraid to experiment! Each add-in can change the bread's taste and texture. To make a gluten-free version, swap the all-purpose flour. Use a gluten-free flour blend instead. This blend usually contains rice flour, tapioca flour, and xanthan gum. The oats must be labeled gluten-free too. They are often processed in facilities with gluten. With these swaps, you still get a soft, yummy loaf without gluten. If you're vegan, you can easily change the recipe. Replace the egg with a flax egg. To make a flax egg, mix one tablespoon of flaxseed meal with three tablespoons of water. Let it sit for about five minutes. For the milk, use almond, soy, or coconut milk. Substitute the honey with maple syrup or agave nectar. These changes keep all the flavors and make the bread plant-based. To store your honey cinnamon oatmeal bread, first let it cool completely. Wrap the loaf in plastic wrap or aluminum foil. This keeps the bread fresh and soft. You can also place it in an airtight container. Store it in a cool, dry place. This bread can last up to 3 days on the counter. If you want to keep the bread longer, freezing is a great option. Slice the bread first for easy access later. Wrap each slice tightly in plastic wrap. Then place the wrapped slices in a freezer bag. Squeeze out the air before sealing. This way, the bread stays fresh for up to 3 months. When you're ready to enjoy it, just thaw it at room temperature or toast it directly from the freezer. Reheating your honey cinnamon oatmeal bread is easy. For the best taste, use the oven. Preheat it to 350°F (175°C). Place the slices on a baking sheet and warm for about 10 minutes. You can also use a toaster or microwave. If using the microwave, heat for about 15-20 seconds. Enjoy your warm bread with a drizzle of honey or a pat of butter! You can replace the egg with flaxseed meal. Use one tablespoon of flaxseed meal and three tablespoons of water. Mix them and let it sit for about five minutes. This will create a gel-like texture that works well as a binder in your bread. Yes, you can use quick oats. However, the texture will be softer. Quick oats absorb liquid faster than rolled oats, so keep an eye on the bread while baking. It may bake a bit quicker than with rolled oats. Check for a golden-brown crust. Insert a toothpick into the center. If it comes out clean, your bread is baked. Another sign is a hollow sound when you tap the bottom of the loaf. The bread lasts about three days at room temperature. Store it in an airtight container to keep it fresh. For longer storage, consider freezing it. This way, you can enjoy it later without losing flavor or texture. You learned how to make a delicious Honey Cinnamon Oatmeal Bread. We covered key ingredients, baking steps, and handy tips. You found out how to adjust flavors and store leftovers. Remember to try variations like gluten-free or vegan options to suit your needs. With these steps, you can bake great bread at home. Enjoy your baking journey and try new flavors. The joy of homemade bread awaits you!
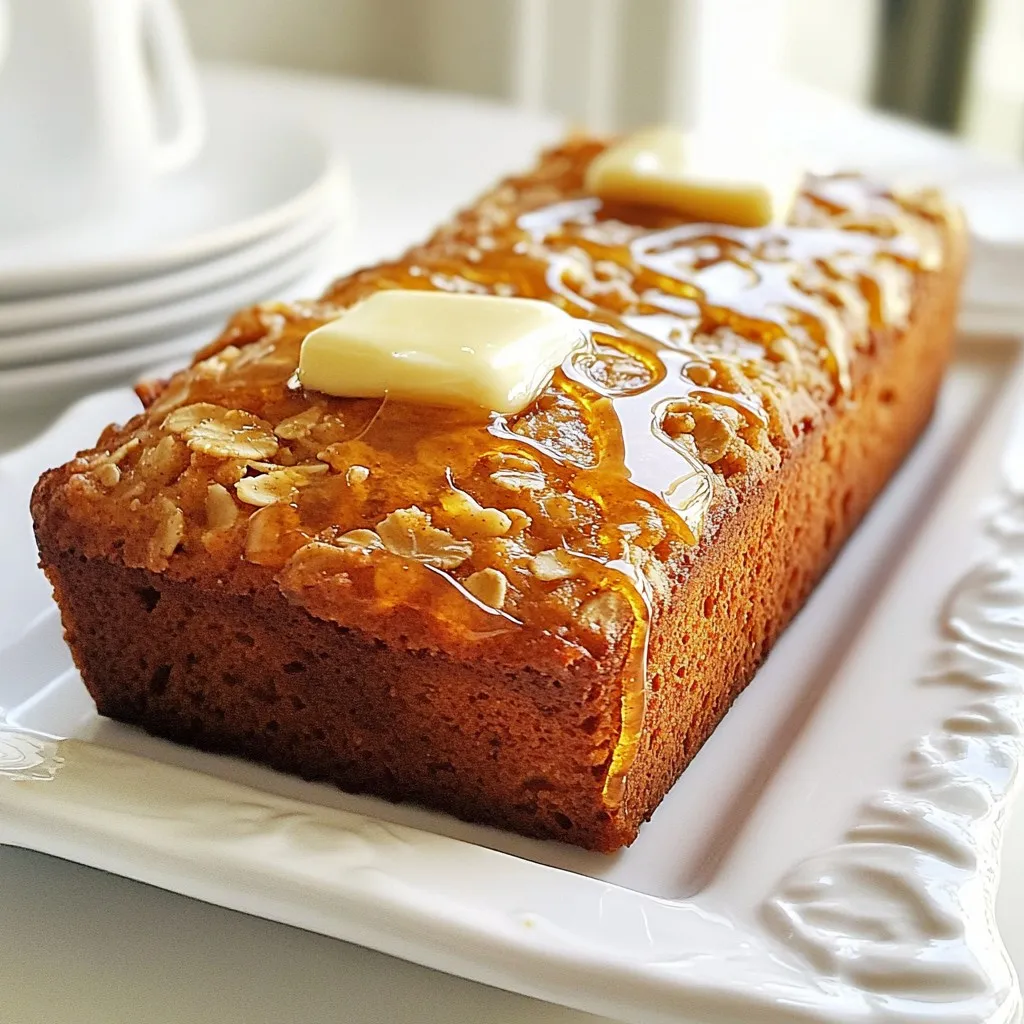
Honey Cinnamon Oatmeal Bread Loaf Tasty and Easy Recipe
Are you ready to bake something that warms the heart and soul? Honey Cinnamon Oatmeal Bread Loaf is easy to make and packed with flavor.
- 2 medium sweet potatoes - 4 large eggs - 1/2 cup black beans, rinsed and drained - 1/2 avocado, diced - 1/4 cup cherry tomatoes, halved - 1/4 cup shredded cheddar cheese - 2 tablespoons Greek yogurt - 1 tablespoon olive oil - 1 teaspoon ground cumin - 1/2 teaspoon smoked paprika - Salt and freshly ground black pepper to taste - Fresh cilantro leaves for garnish The sweet potatoes are the star of this dish. They add a creamy texture and natural sweetness. Eggs provide protein, making this breakfast filling. Black beans add fiber and a nice earthy flavor. Toppings like avocado and tomatoes bring freshness, while cheese offers a rich finish. You can personalize your loaded sweet potatoes with these extras: - Sliced jalapeños for heat - Salsa for a zesty kick - A sprinkle of green onions for added crunch - Hot sauce for those who love spice Feel free to mix and match these toppings to suit your taste! To make this recipe, you'll need: - Baking sheet or parchment paper - Fork for pricking sweet potatoes - Non-stick skillet for cooking eggs - Mixing bowl for black beans - Knife and cutting board for chopping toppings Having the right tools makes cooking easier and more enjoyable. With these items, you can whip up this tasty breakfast with ease! {{ingredient_image_2}} First, preheat your oven to 400°F (200°C). This step warms the oven, helping the sweet potatoes cook evenly. Next, wash and dry the sweet potatoes well. Use a fork to poke holes in the skins. This helps steam escape while baking. Lightly coat the skins with olive oil and sprinkle a bit of salt on top. This adds flavor and helps the skin become crispy. Place the sweet potatoes directly on the oven rack or on a baking sheet lined with parchment paper. This makes cleanup easier. Bake them for 45-50 minutes. They are ready when they feel soft and a fork goes in easily. Once done, take them out and let them cool for a few minutes. While the sweet potatoes bake, mix the black bean topping. In a small bowl, combine the rinsed black beans with ground cumin, smoked paprika, salt, and black pepper. Stir well to blend all the flavors. Let this mixture sit for a moment. This allows the spices to enhance the beans’ taste. In a non-stick skillet, heat over medium heat. Cook the eggs as you like them. You can make them sunny-side up, scrambled, or poached. Add a small pinch of salt and black pepper while cooking. Keep an eye on them to ensure they are cooked to your preference. When picking sweet potatoes, look for firm ones with smooth skin. Avoid any with cuts or soft spots. Size matters too; medium sweet potatoes work best for this recipe. They cook evenly and fit well on your plate. If possible, choose organic sweet potatoes. They often taste better and are better for you. Eggs can be cooked in many ways. For sunny-side up, cook them gently on medium heat. This way, the yolks stay runny. If you prefer scrambled eggs, whisk them in a bowl first. Add a pinch of salt before cooking. For poached eggs, simmer water with a splash of vinegar. Crack eggs into the water and cook for three to four minutes. Each method adds a unique texture to your dish. Seasonings can take your sweet potatoes to the next level. Use ground cumin and smoked paprika for a warm flavor. They work well with the sweetness of the potatoes. Be sure to season the black beans too. A little salt and fresh black pepper make a big difference. Don't forget to add fresh cilantro as a garnish. It adds a burst of color and fresh taste. Pro Tips Choose the Right Sweet Potatoes: Look for firm, unblemished sweet potatoes for the best texture and flavor. Organic sweet potatoes often have a richer taste. Perfectly Cooked Eggs: For perfectly cooked eggs, use medium heat and keep an eye on them. If you prefer runny yolks, remove them from the heat just before they look done. Customize the Toppings: Feel free to add your favorite toppings like sautéed spinach, diced bell peppers, or even a drizzle of hot sauce for an extra kick! Meal Prep Friendly: You can bake extra sweet potatoes ahead of time. Just reheat them in the microwave and top with your desired ingredients for a quick breakfast option! {{image_4}} For a vegetarian twist, skip the eggs and add more beans or veggies. You can use tofu scramble as an egg substitute. For a vegan option, replace Greek yogurt with dairy-free yogurt. This keeps the dish creamy and tasty without dairy. You can also add nutritional yeast for a cheesy flavor. Get creative with your toppings! Try adding sautéed spinach or kale for greens. Feta cheese works great if you want a salty kick. For some crunch, sprinkle on toasted nuts or seeds. Hot sauce can add a spicy touch. Think about what flavors you love and mix them in! Seasonal ingredients can make this dish even better. In spring, add fresh herbs like chives or parsley. In summer, toss in sweet corn or bell peppers for brightness. Fall brings great choices like roasted pumpkin or squash. In winter, consider hearty greens like collards or Swiss chard. Use what’s fresh and in season for the best taste! To store leftover loaded sweet potatoes, let them cool first. Place each half in an airtight container. Make sure to cover them well to keep them fresh. You can store them in the fridge for up to three days. If you want, you can keep the toppings separate to maintain texture. When you’re ready to eat, take the sweet potatoes out of the fridge. Preheat your oven to 350°F (175°C). Place the sweet potato halves on a baking sheet. Heat them for about 15-20 minutes, or until warm. You can also use a microwave. Just heat them for 1-2 minutes, but the oven keeps them crisp. If you want to freeze your loaded sweet potatoes, here’s how. First, let them cool completely. Wrap each half tightly in plastic wrap. Then, place the wrapped potatoes in a freezer-safe bag. They can last in the freezer for up to three months. When you want to eat them, thaw them overnight in the fridge before reheating. Yes, you can use other potatoes. Regular russet or red potatoes work well. They will change the flavor and texture a bit. Sweet potatoes add a natural sweetness and nutrition. However, feel free to explore with different types! You can get creative with your toppings! Some great options include: - Sautéed spinach or kale - Crumbled feta cheese - Diced bell peppers - Salsa or pico de gallo - Hot sauce for a kick These toppings add fresh flavors and colors to your dish! Cooked sweet potatoes last about 3 to 5 days in the fridge. Make sure to store them in an airtight container. This keeps them fresh and tasty. Always check for any signs of spoilage before eating. You can prepare elements ahead of time! Bake the sweet potatoes and store them in the fridge. You can also cook the black beans and eggs in advance. Just reheat them before serving. This will save you time in the morning! To add spice, try these ideas: - Mix in diced jalapeños with black beans - Use spicy cheese instead of cheddar - Drizzle hot sauce over the top - Sprinkle cayenne pepper on the eggs These tips will give your breakfast a flavorful kick! This blog post gives you all you need for loaded breakfast sweet potatoes. We covered ingredients, steps, and cooking tips. You learned how to choose the best sweet potatoes and prepare tasty toppings. Explore variations to fit your taste and needs. Lastly, I shared storage tips for leftovers to keep your meals fresh. Remember, breakfast can be fun and healthy with this easy dish! Enjoy making your loaded sweet potatoes and experimenting with flavors!
Loaded Breakfast Sweet Potatoes Simple and Flavorful
Are you ready to shake up your breakfast routine? Loaded Breakfast Sweet Potatoes are packed with flavor and nutrition. This dish combines sweet potatoes, black